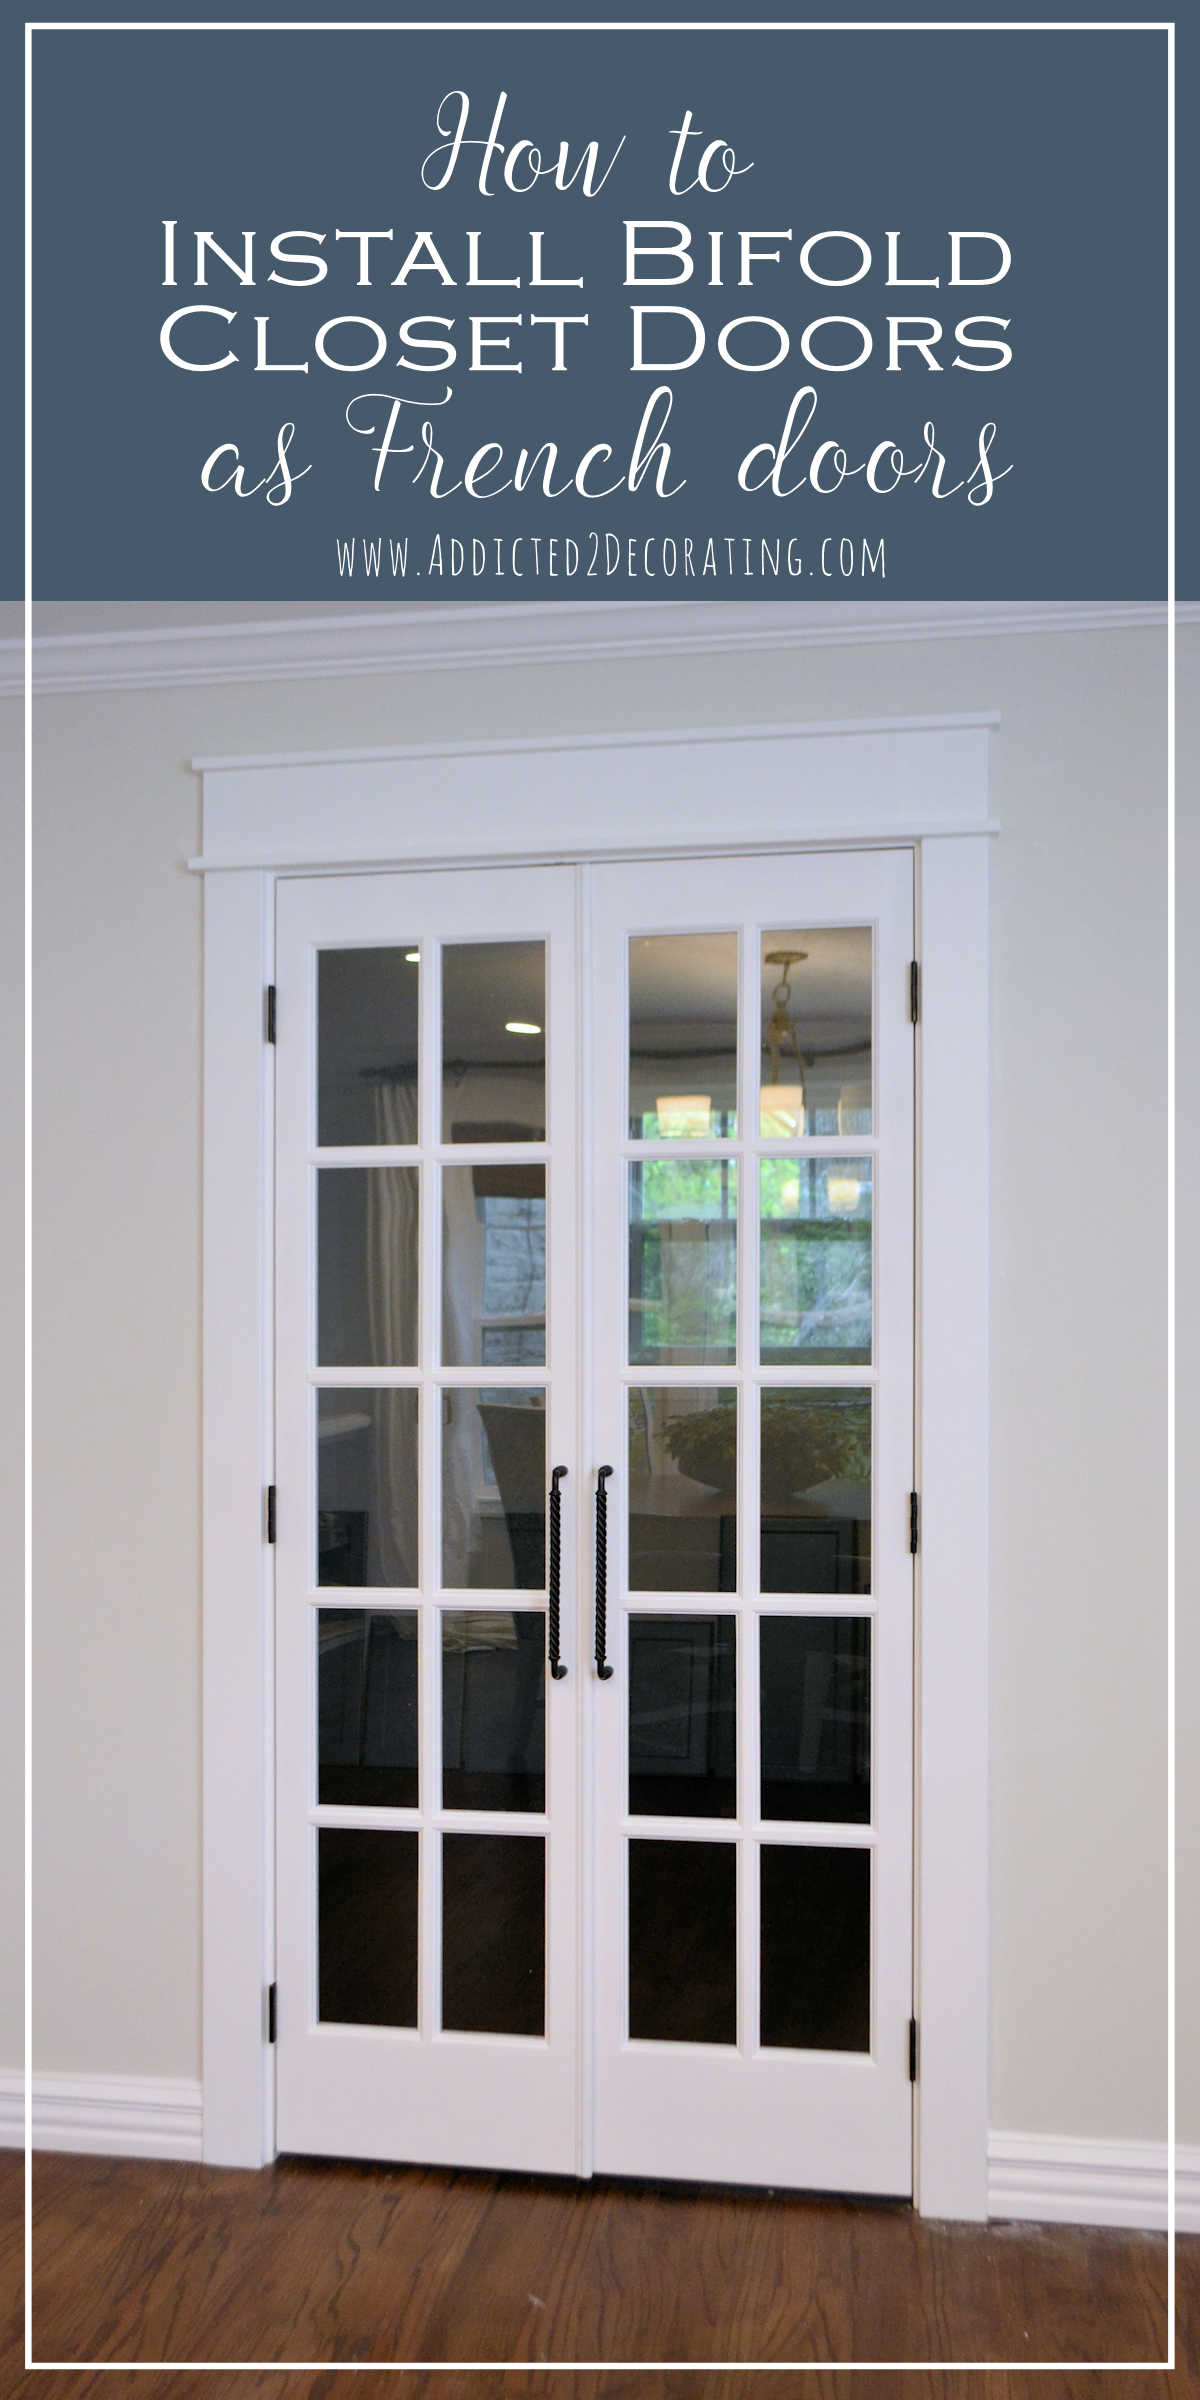
Pantry Doors Finished – Bifold Closet Doors Installed As French Doors
Well, it’s the 22nd day of the month, and I’m finally crossing the first completed project off of my “to do” list for the month. 😀 I got my pantry doors finished! These doors are actually bifold closet doors that I bought from Home Depot, and then I proceeded to remove all of the bilfold door hardware and install the doors as French doors on my pantry.
If you missed the first part of this project, you can see it here:
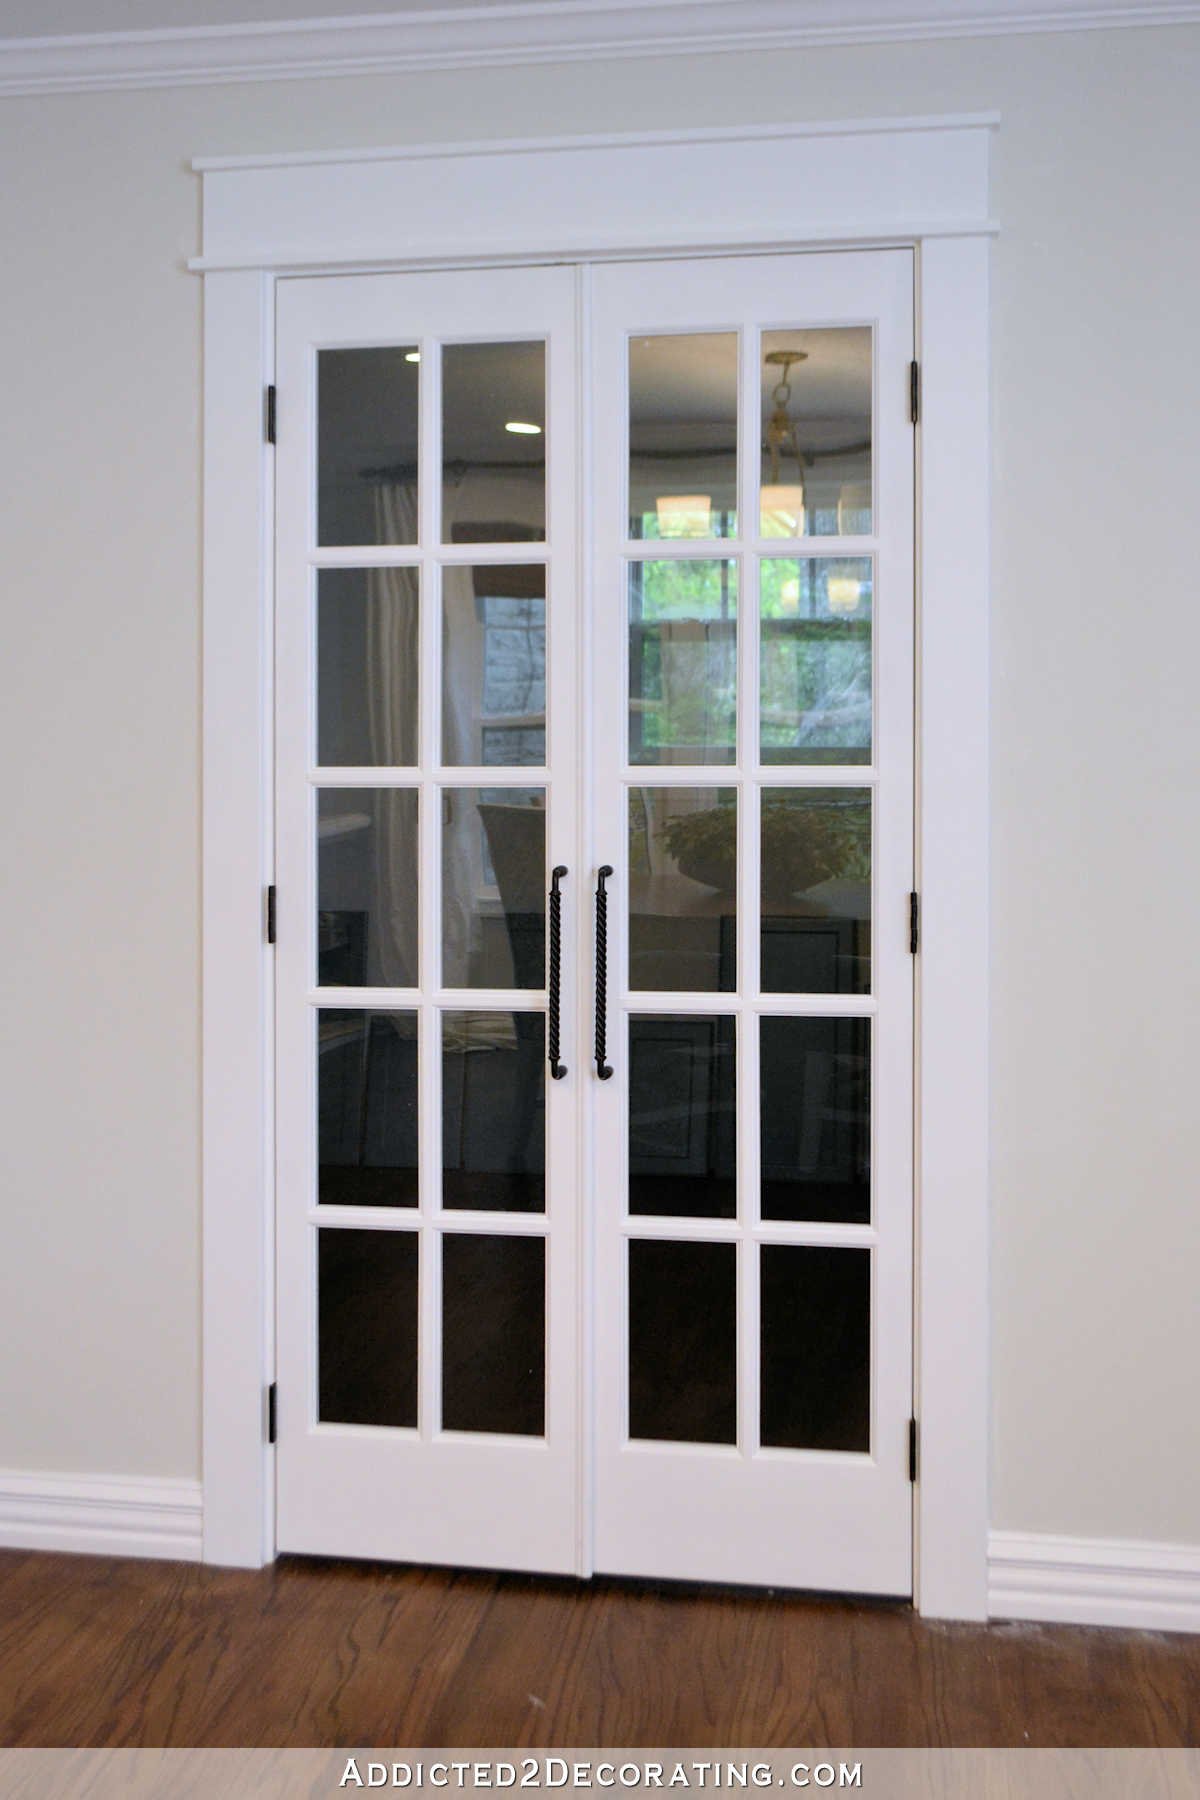
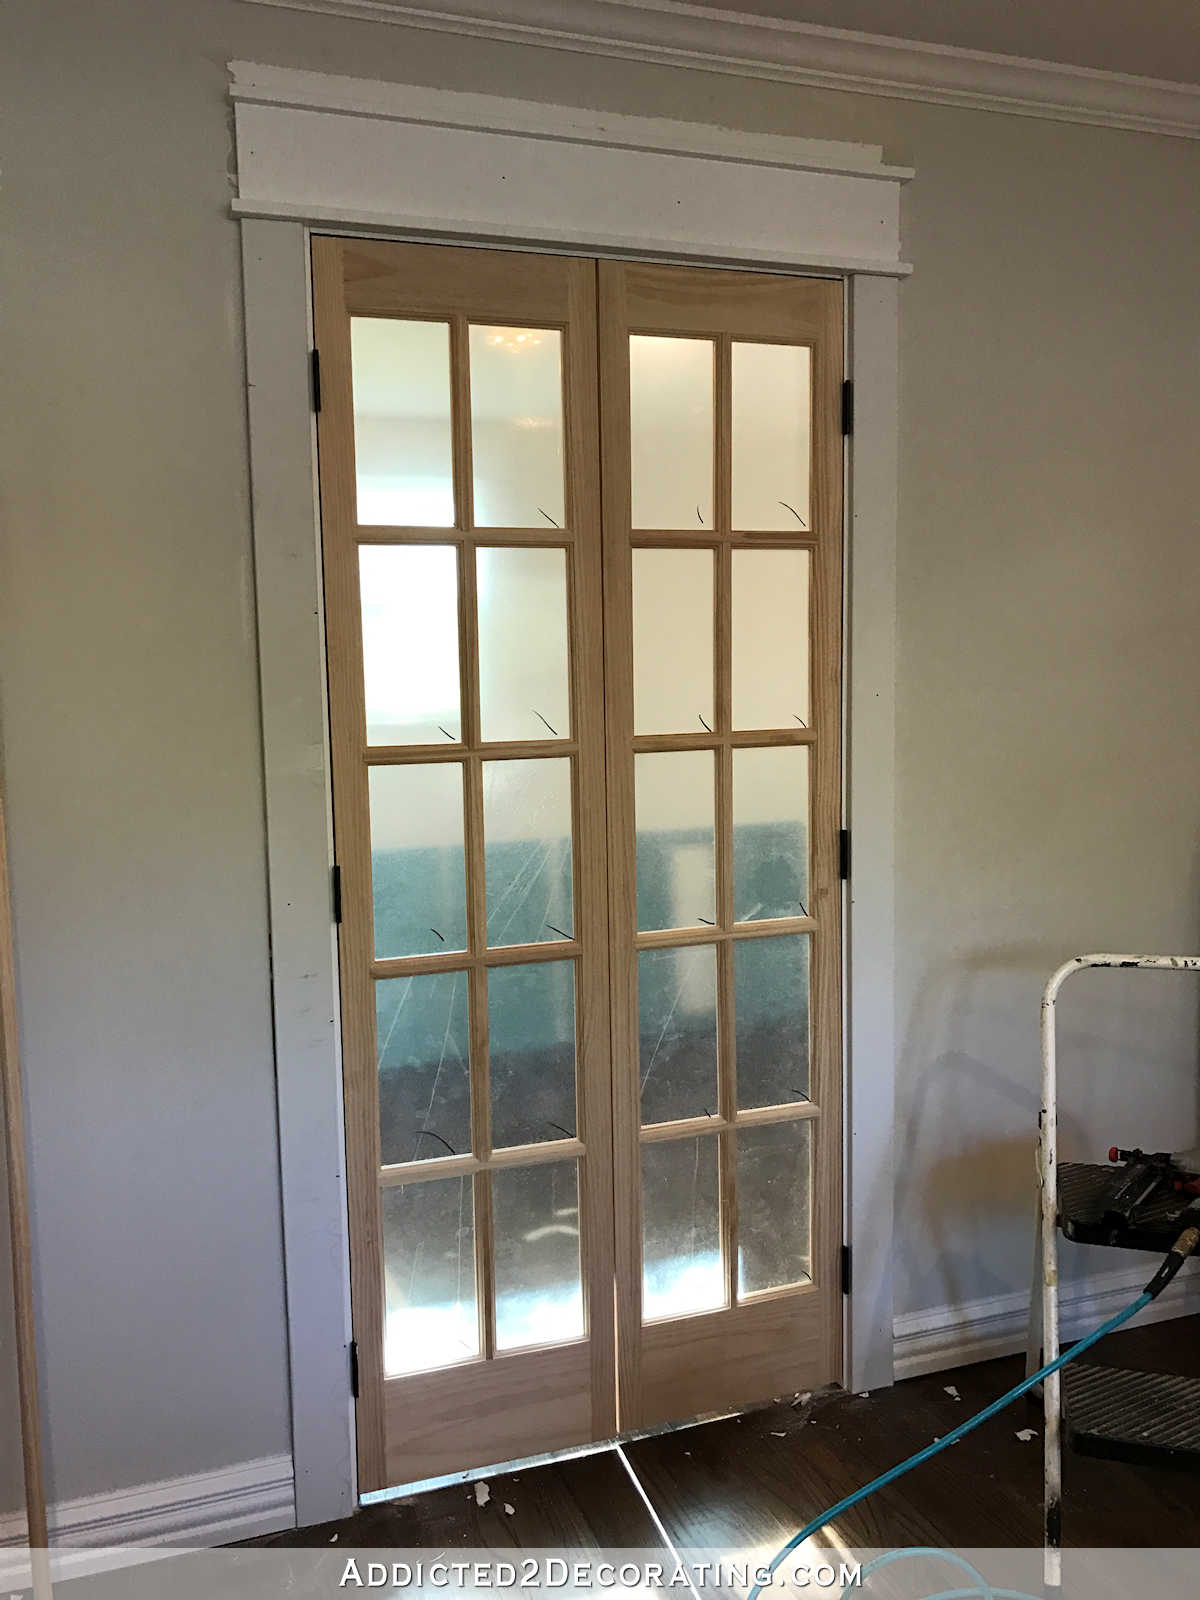
And now, here’s how the finished doors look…
So let me show you how I finished these doors…
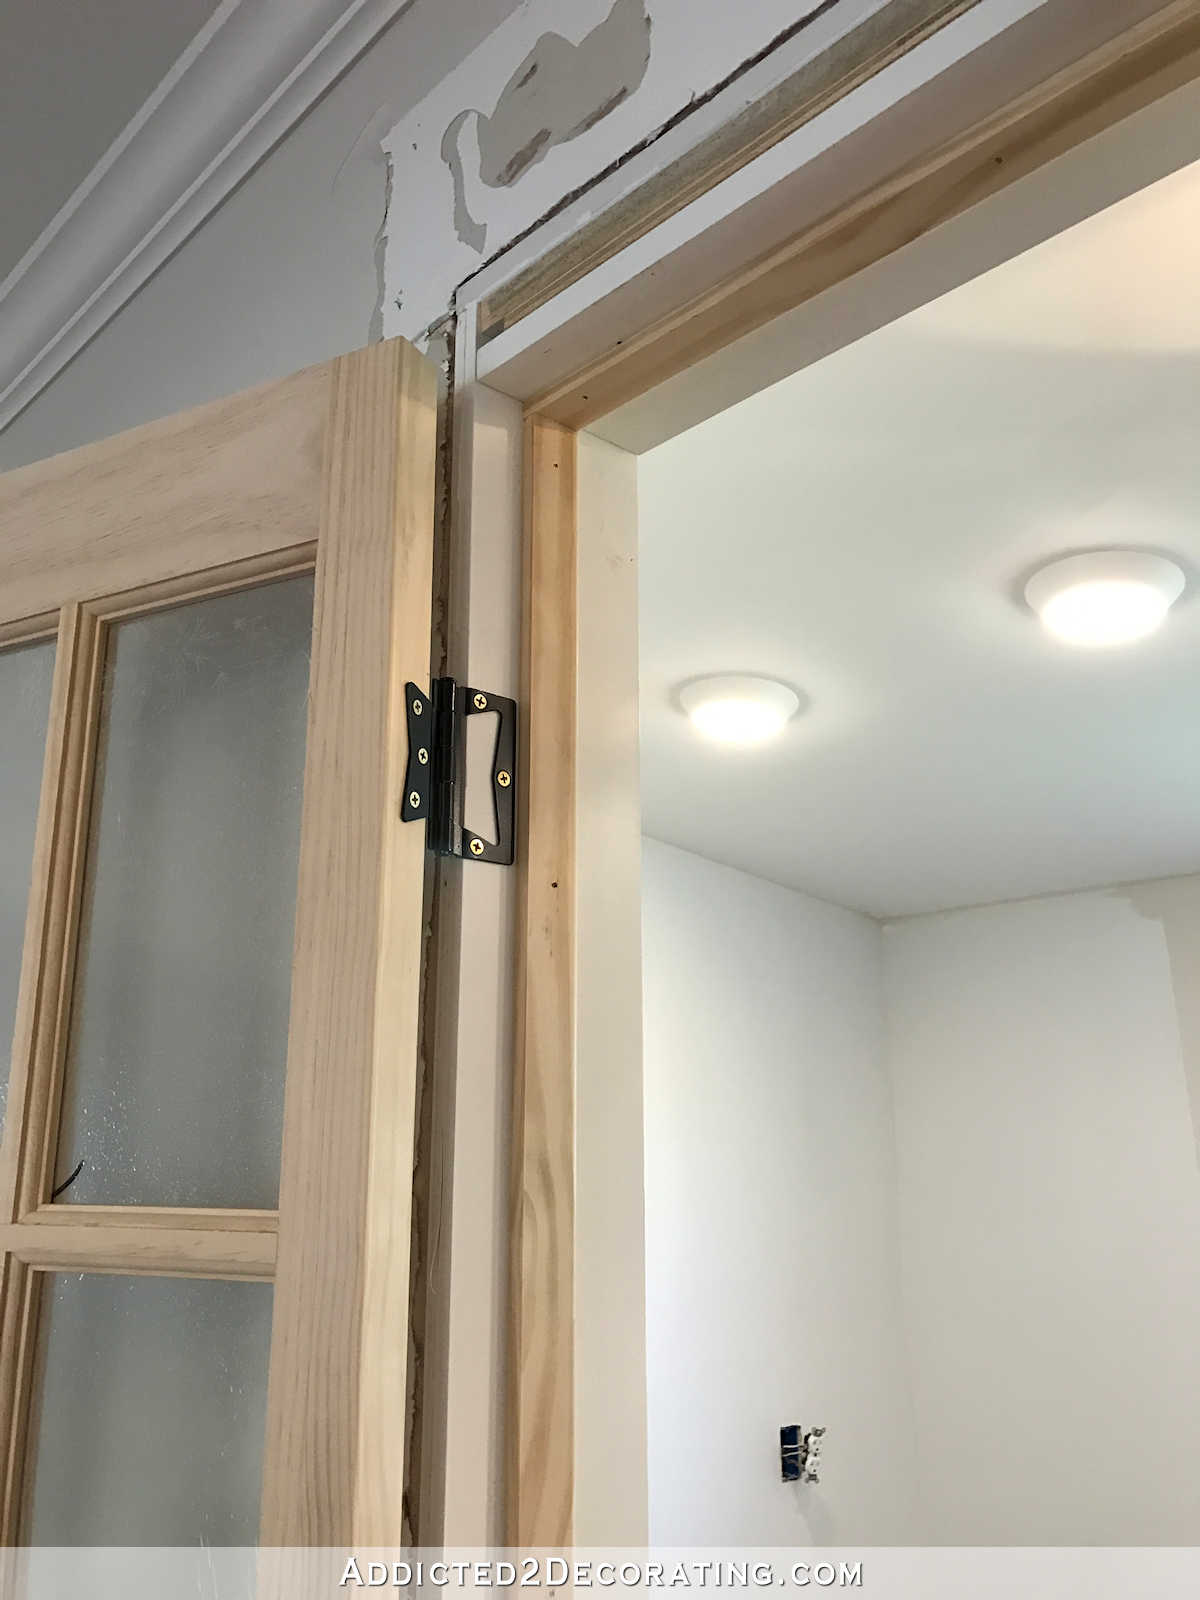
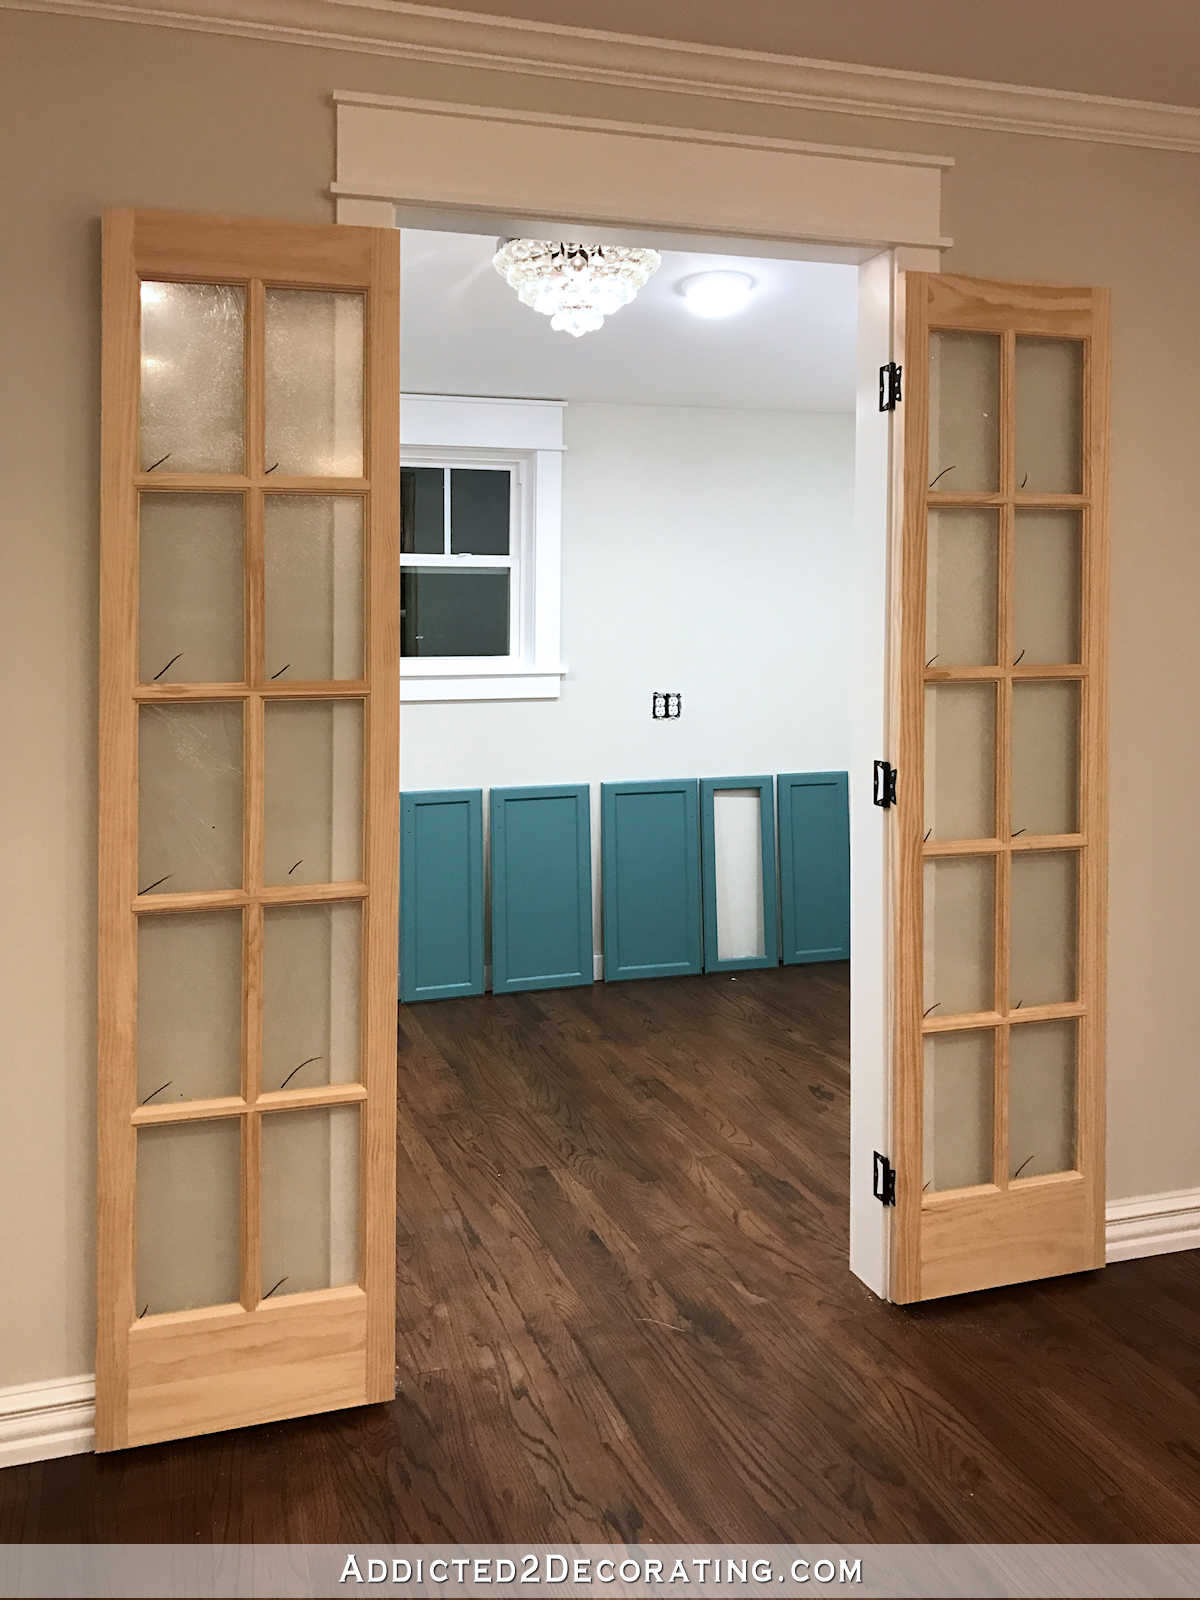
On the last post about my pantry doors, I left off with them looking like this, with a big gap between the top of the doors and the top door jamb…
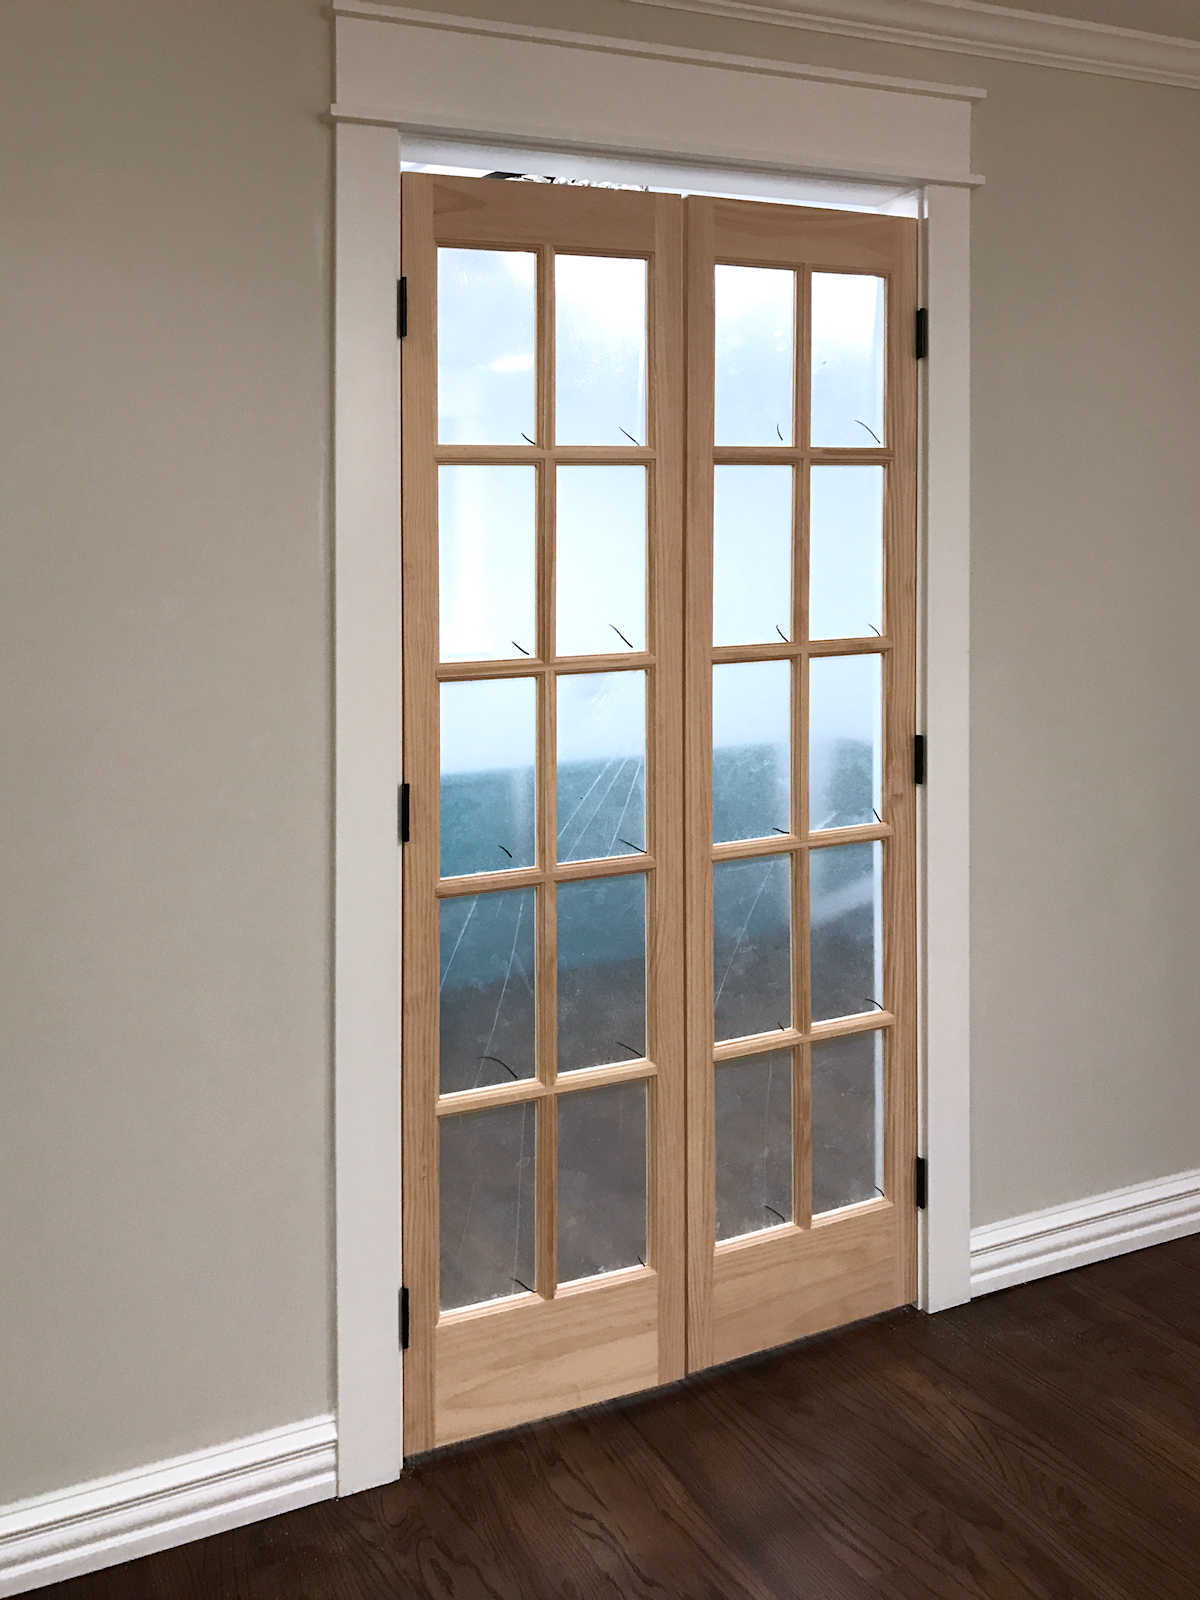
To make the necessary adjustments, I started by removing all of the door facings. It looks terrible because I have a thing for construction adhesive. 😀

In order for the new top jamb to be where it needed to be, I needed to add a 1.25-inch spacer. I used a scrap piece of 1 x 6 lumber, ripped down to fit the width of the door jamb. (1″ lumber is actually only 3/4″ thick.) And I also added a layer of 1/2-inch plywood. Those two pieces together made up the 1.25-inch spacer that I needed. Then I nailed the new top jamb to the plywood/lumber spacer.
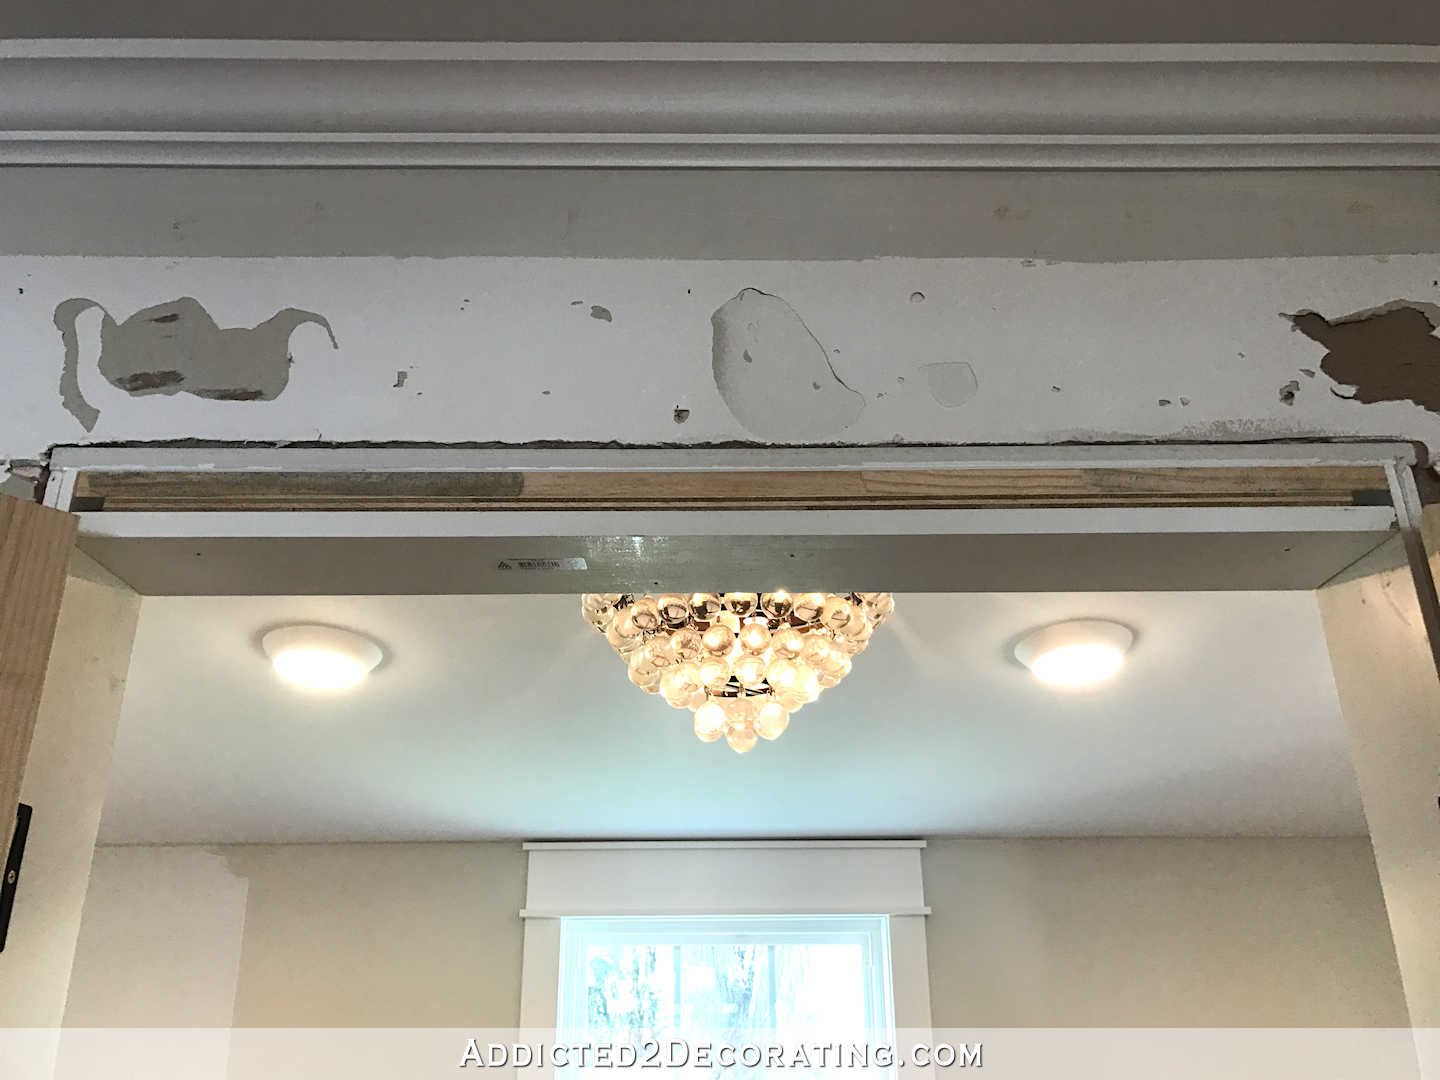
It wasn’t pretty, but it did the job. That placed the top jamb just above the door, right where it should be.
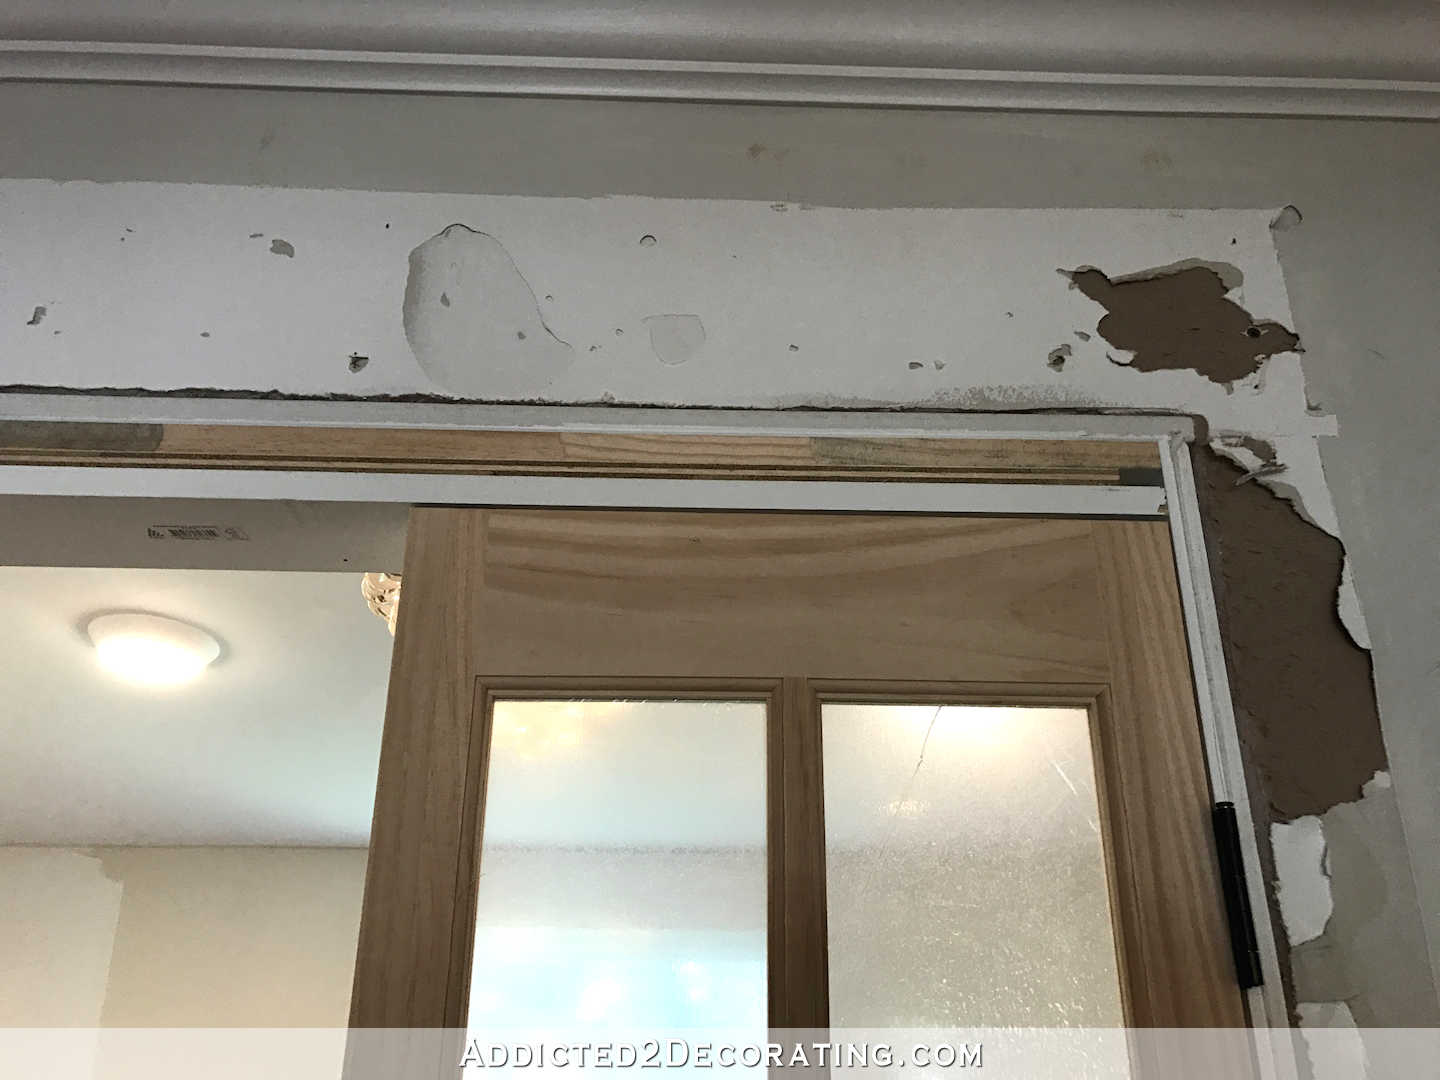
I then attached the stops to the top and side jambs.
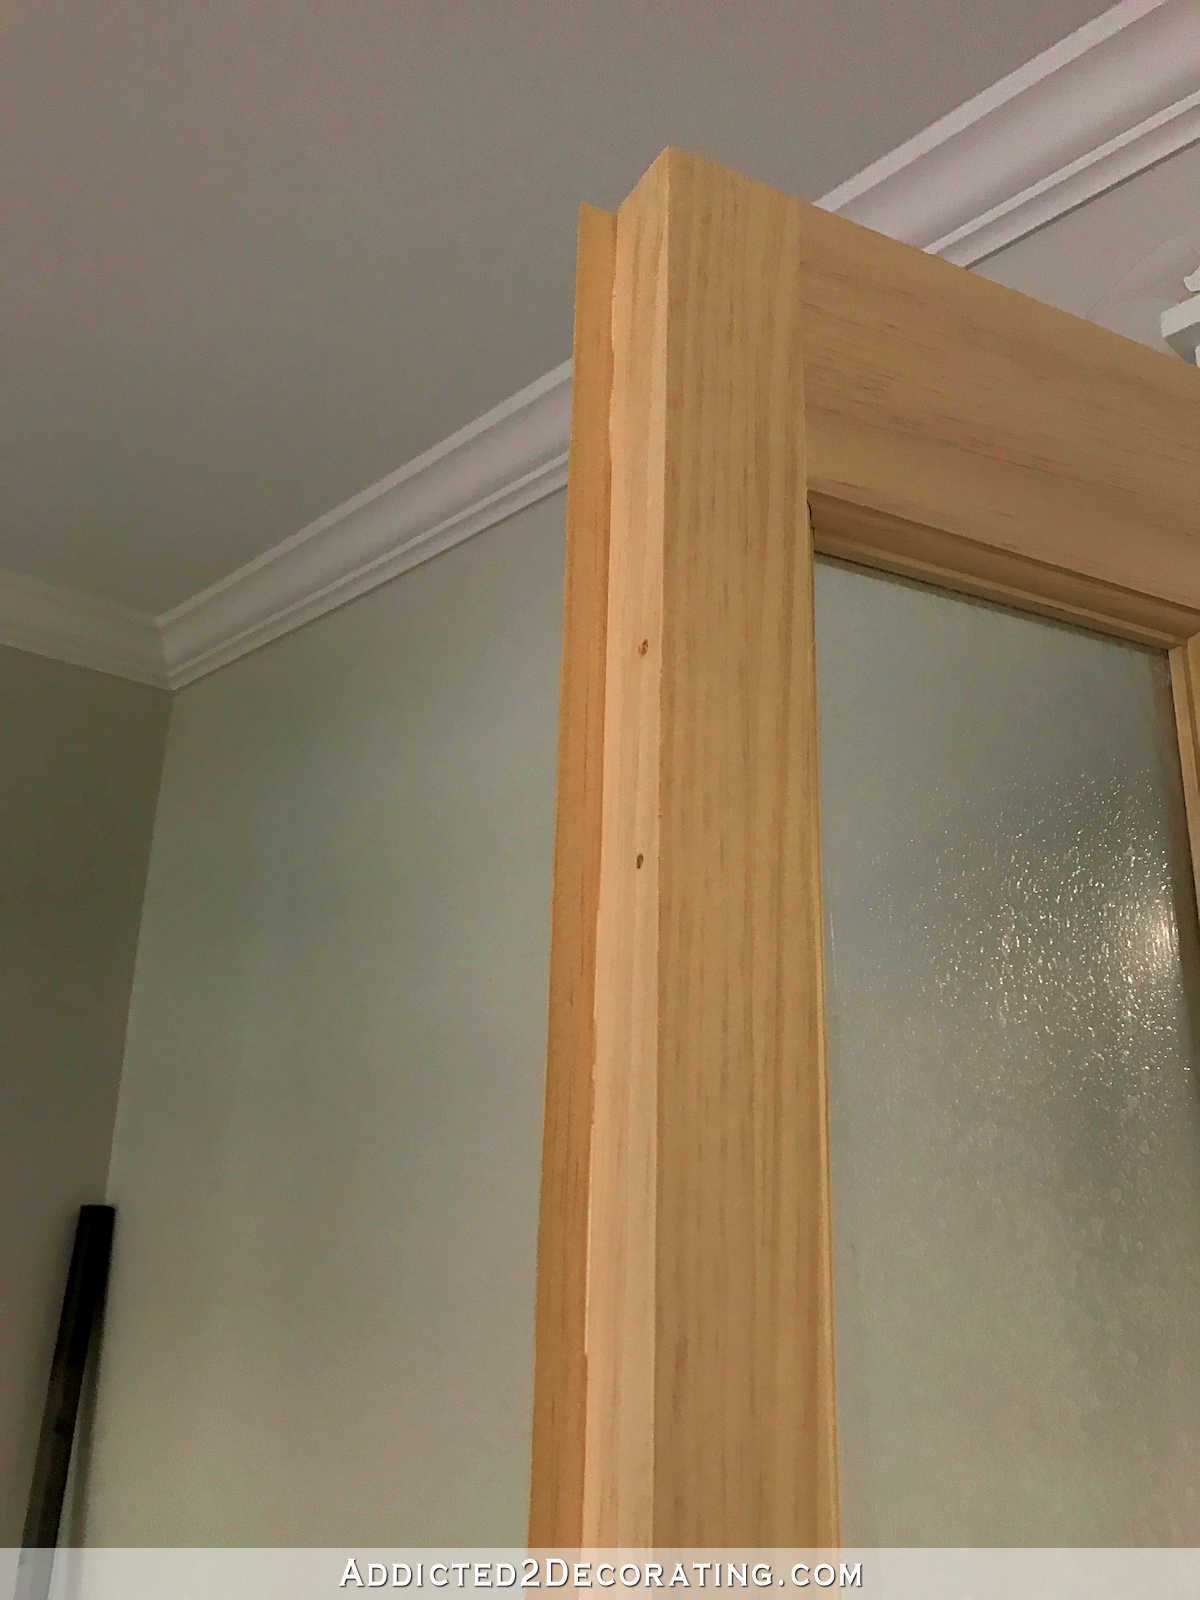
And then I reinstalled all of the door facings.
I also decided to add the same decorative trim to these doors that I added to the bifold-doors-turned-double-doors that I used on my bathroom for completely privacy. (Click here to see that project.) It’s virtually impossible to completely close the gap between the doors, and while privacy isn’t an issue on a pantry, I didn’t like the light coming through the window and shining through that small space between the doors.
So I attached a 1-inch piece of trim on the front of the left door, covering the small space.
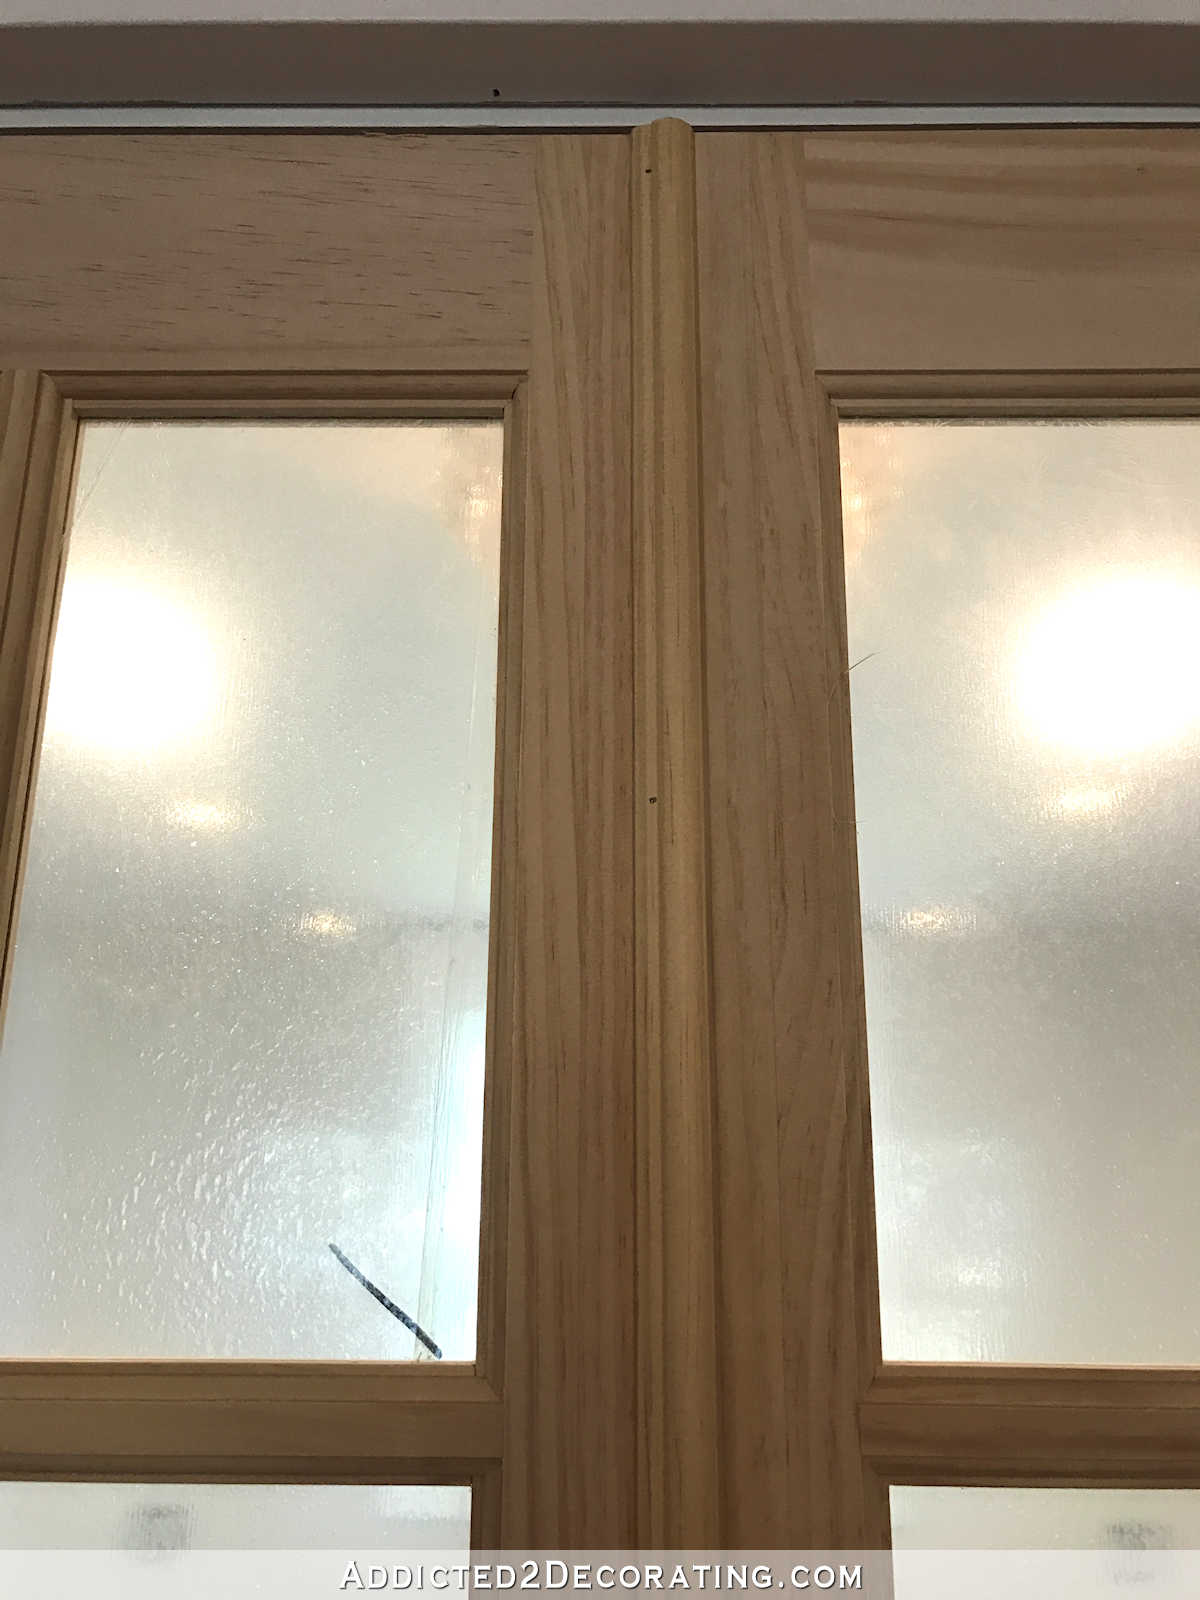
You can see here how it sticks out past the front edge of the door…
And then I attached the same trim to the back side of the right door.

Another benefit of adding this trim is that I’ll now be able to open both doors at the same time with one hand. I’m right handed, so I made sure to add the back trim to the right door. That way, when I reach for the right handle and pull, the back trim on the right side door will pull against the left door and open it as well.
And then it was just a matter of priming, sanding, and painting the doors, and recaulking and touching up the door facings.
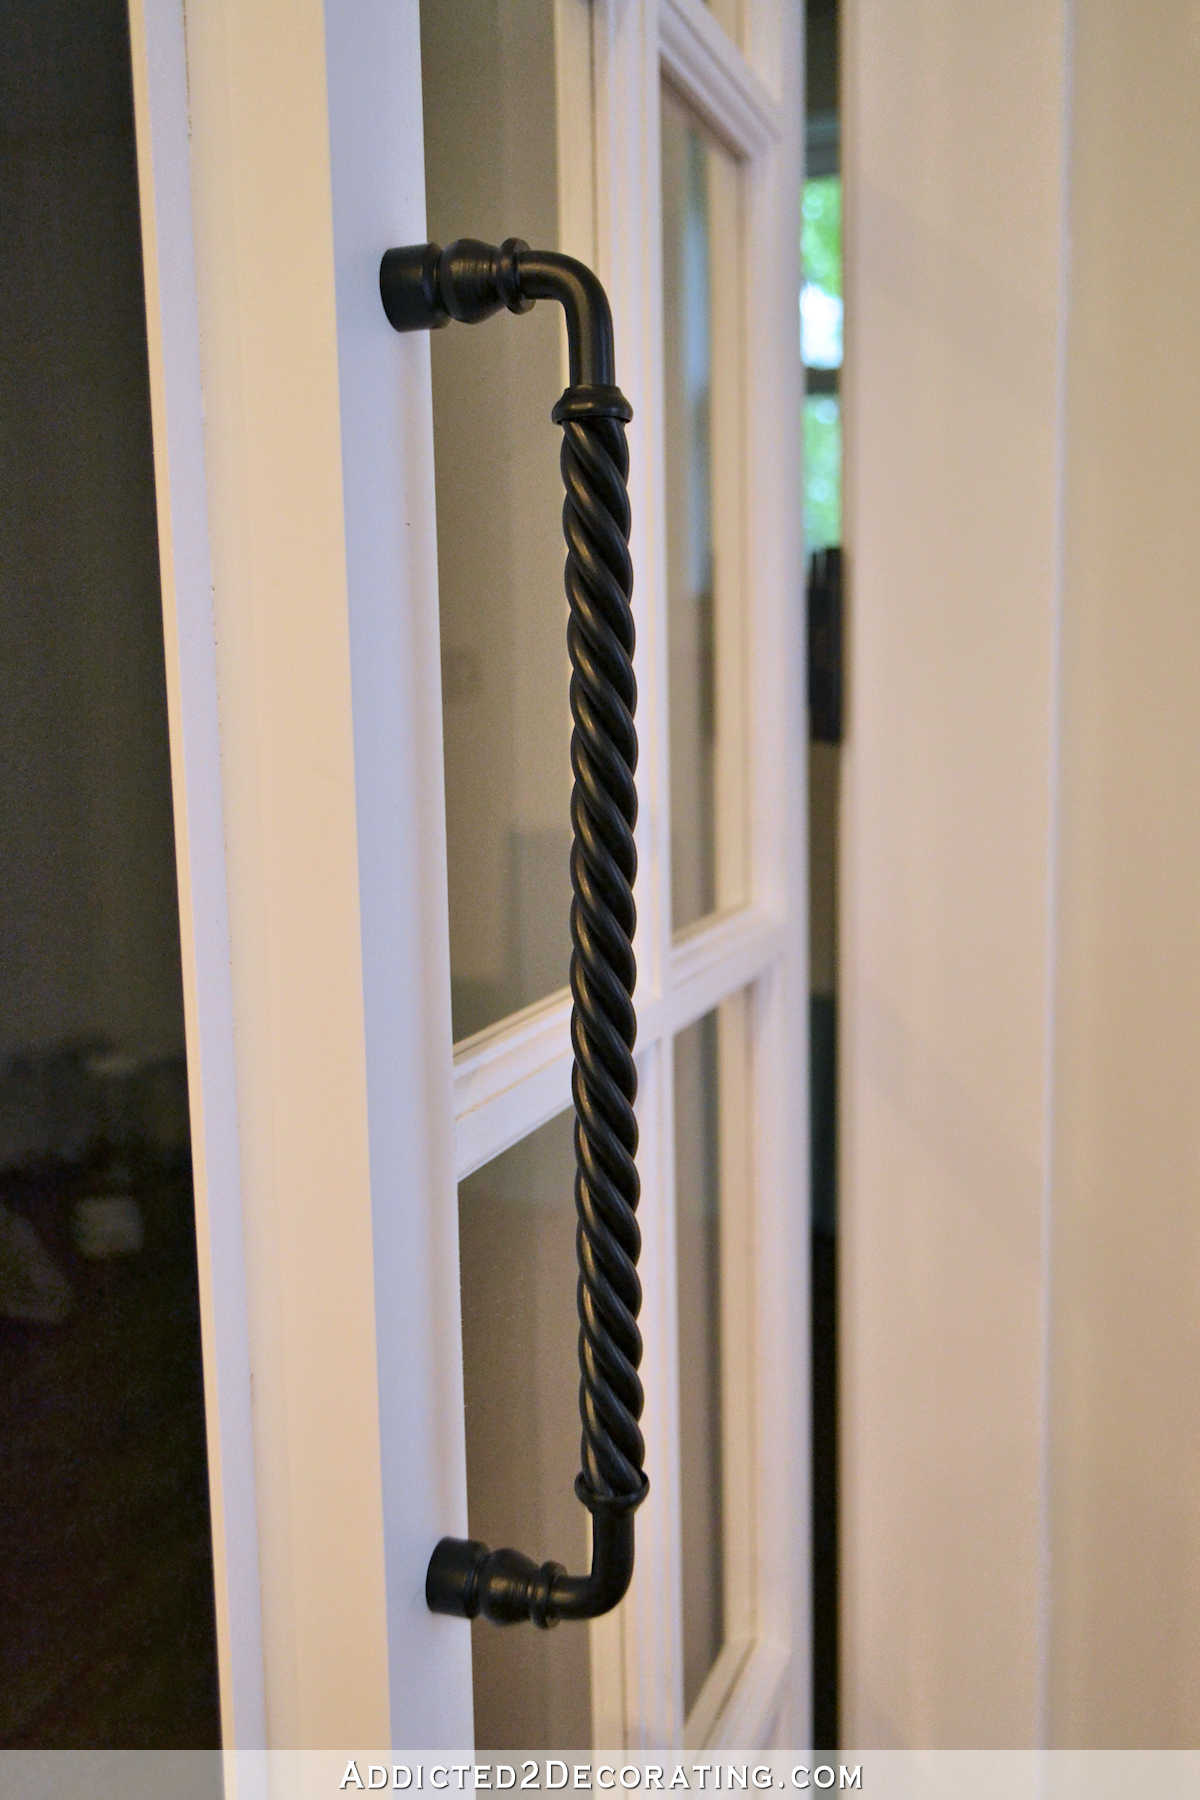
In order to keep the doors closed, I installed a ball catch (click here to see what that looks like) on the top of the left door. I also added these pretty 12-inch handles that I found. (You can find them here.)
So project #1 for the month is finished. Hmmmm…I’m starting to think maybe I won’t be meeting my goals for the month. 😀 That’s okay. At least I’m making progress!
UPDATE:
My pantry is finished! Want to see the entire project from start to finish? You can find every single post about the pantry build right here…
Or you can skip to the end and see how it turned out. Here’s a peek of the finished pantry…
You can see more pictures on the before and after post right here…

Addicted 2 Decorating is where I share my DIY and decorating journey as I remodel and decorate the 1948 fixer upper that my husband, Matt, and I bought in 2013. Matt has M.S. and is unable to do physical work, so I do the majority of the work on the house by myself. You can learn more about me here.
Exactly…. it’s all about making progress 😀
That looks so good Kristi! I love the 12″ black pulls too. Was this the biggest project for the month? And, where has this month gone?!
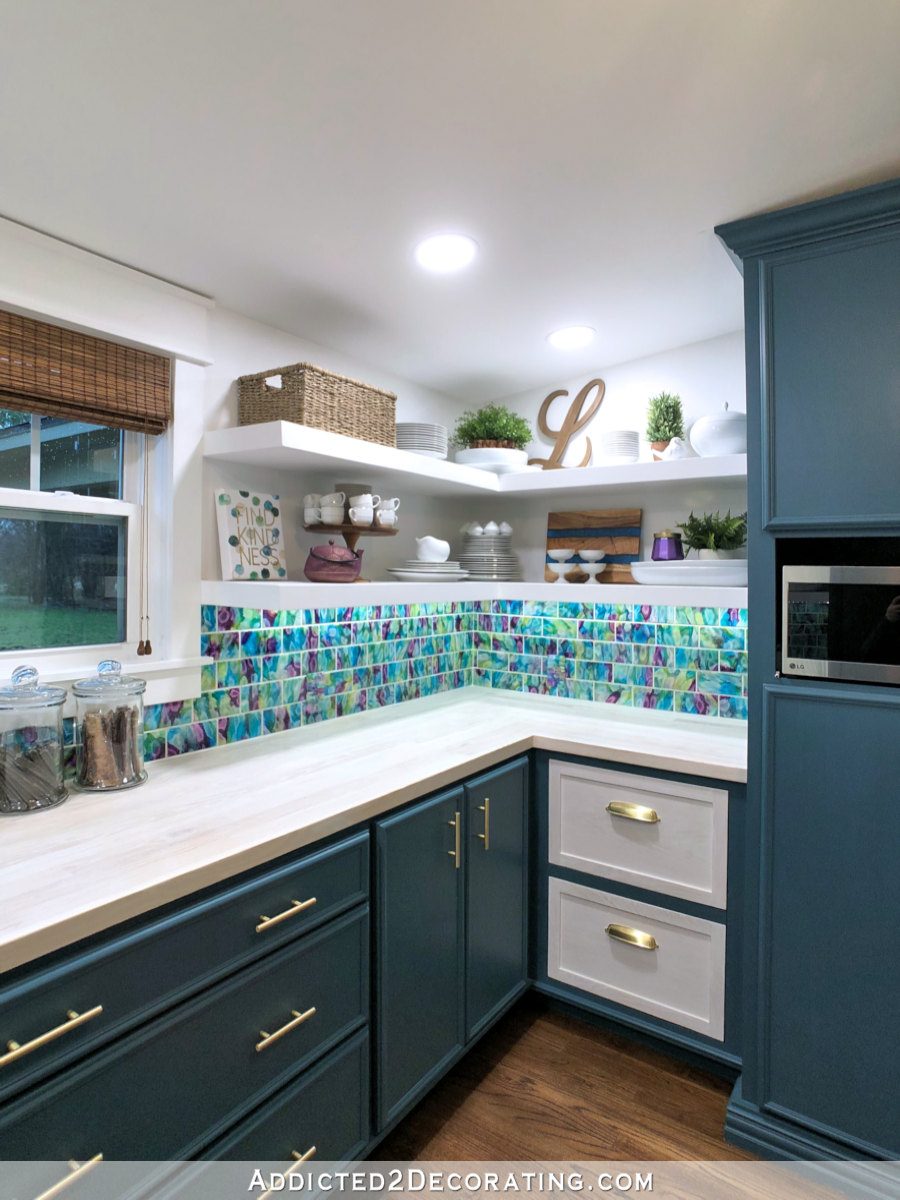
My biggest project for the month is painting my cabinets. I finally finished painting all of the doors yesterday. It has been a real pain trying to work around the weather. I’ll start painting the cabinets inside today, and I’m hoping to get them finished by the end of the weekend. But the countertop guy is coming tomorrow, so I’ll be taking Thursday and Friday to concentrate on the countertops. At least that’ll be one more project I can cross off by the end of the weekend! 😀
well done!! I love the idea that you can open both doors in one go with this simple solution! I would never have thought of it, so it’s not really that simple, but you always make it sonud that way 😉 I love the doors and think that it’s great that they corespond to your french doors in the music room esp. as you said that there is a point from which you cam see both at once!
You are so clever
What size bi-fold doors did you use and what size is the opening?
The opening was just a smidge under 32 inches wide, and I ordered 32″ bifold doors.
They turned out so beautiful and functional too. You never cease to amaze me of your talent.
The pantry doors turned out beautifully. I love the 12″ door pulls, such a nice touch. You are making great progress. I’m always amazed at how much you do get done with almost no help. Doing things solo is a lot of extra work, I know. This is a completely different house than the one you bought three years ago! I have to tell you, I love home decor and learning about remodeling. I started reading those type of blogs about five or six years ago. And your blog is now the only one that I read every single post! You keep things real and tell us the good and the bad of your experiences. I feel I can trust your opinion and I love your style. I do appreciate that you show your real personality and I feel the way you design/remodel/decorate is for real day to day life, not something staged for a magazine shoot. Your work is beautiful, practical and comfortable. Those are qualities I find lacking in a lot of other home design sites. Thank you for allowing us to see your talents firsthand. I’m always excited to see your next post!
The only blog I still read too.
I can honestly “second” this post. Pretty much everything Casey says… 🙂
Amen! Kristi I’ve been following you since before you bought this house. You show and tell it straight up. I love your blog and I feel like I’ve known you for a long time . Thanks Casey I couldn’t have said it better.
Looks really nice! Do you think you’ll leave the glass on your doors clear or do you think obscure glass would look nice?
I want to get my pantry done, green cabinets and all, before I decide. If it turns out like I envision in my head, I’ll leave it clear. If it doesn’t quite work out, I’ll frost the glass. 😀
How would you frost glass? Film? Spray? I am asking because I am going to hang glass paneled door between the living and the dining room and might need frosted glass.
Your pantry doors are beautiful and I am going to steal that idea too 🙂 Only that my pantry is small and wouldn’t look pretty as yours, so the doors will have no glass.
I don’t like the spray at all. It’s almost impossible to spray it on completely evenly, and it looks splotchy. I always have great success with the film. You just have to take your time and be sure you get all of the bubbles out. Once it’s on and dry, it’s very easy to clean and looks great (in my humble opinion).
Progress is the most important part. The room is coming along beautifully! Has Matt Sat at the table yet?😊
He has! 🙂 He loves how the room is coming together. He’s amazed at how it looks now considering how it started out.
Looks great! Thanks for the tip on the trim at the front of the left door, covering the small space. I have a set of french doors which are not “finished” to my bedroom and can use this trick!
Your pantry doors are lovely, Kristi; your workmanship is outstanding. Cheers, Ardith
To quote Billy Crystal, “they look mahvelous!”
You are a genius! Love the handles!
Looks great! Love the doors and handles. Perfection!
Question about how you attached the trim piece. I have the same trim pieces on my french doors and they were attached using small nails. The pieces are constantly coming loose when the kids push the doors open simultaneously as the front door applies pressure to the trim from behind. Did you use nails? Did you use construction adhesive?
I used wood glue and small nails on mine. The wood glue (I use Gorilla brand) is super strong.
So Beautiful. You do amazing work! Just Love it!
Pretty clever….pretty doors….pretty handles.
These doors are stunning! I think you did a great job. Now I can’t wait to see your cabinets finished. It’s all coming together. I LOVE your blog and check my email every day for your posts. I’ve been following you for about a year now and I’m so amazed at how talented you are and impressed at all that you can accomplish. By the way, I used to have the same color scheme that you’re using in your dining room (the blue and green combo) in my den. I love this combination! Keep up the good work!
The doors are gorgeous! Will you be changing out your cabinet hardware in the kitchen from the gold? Will the pantry hardware match the doors? Can’t wait to see!
The pantry doors look amazing and I really love the door handles!!!
Love, love, love!! Makes me want to take some time off work and just go crazy with all my half finished project. I have neither your patience or skill, but you make me feel motivated. Thank you for that!
love those pulls and how your doors came out. congrats on crossing it off the list.
Kristi, I am just so impressed with your attention to detail and the willingness to deconstruct in order to make it right. I love reading your blogs.
They look fantastic!!!
I’m a bit confused. The walls were put on first and then you bought the doors? Is that why there was a gap?
Yes. I explain in more detail in the first post: https://www.addicted2decorating.com/new-pantry-doors-part-1.html
Those look beautiful! I really like the door pulls you installed – decorative AND very functional.
Perfection! And progress is progress! No matter how big or small.
Love the pantry doors. BTW…are you taking applications for apprentices? 🙂
LOL, I see a whole new business for Kristi, we pay her to spend a week or two as an apprentice or student! 😀
Yes! Then comes the reality tv show, “The Real Apprentices of Kristi.” Lol
What a transformation of this whole room…it’s looking mighty beautiful and it’s all coming together so nicely! I love your door pulls too, they finish those doors so well. What type/brand of caulk do you use and do you sand it prior to painting?
Lovely. You should teach a class at the local college.
That extra wood piece to cover the space between the doors actually gives the doors a nice finished and custom look and the pulls are GORGEOUS! You’ve taken on a lot of tasks this month and hopefully, you’ll feel like your accomplishments were significant. I’m impressed!
OK, I think I did the math right – $290 for the doors, $47.50 times 4 for the pulls, plus hinge hardware plus tax equals pretty close to $500, right? I really liked these, and was contemplating them for my master bath doorway (which is currently empty – the old, solid door just took up too much floor space in that tiny bathroom), but I think I will have to try to find an old louver set at the Habilitat Re-Store. I can see why you were hoping to use your old house doors! But at least now I know how to install it! Maybe I could even replace the top louver section with glass?! Hmmmmm. Plus glass film, of course. Thanks again for all your helpful ideas!
Only two handles. 🙂 I don’t need handles inside my pantry.
I had wondered about that, but then I thought the picture was taken from the pantry side (showing handles) looking through to the breakfast room side. Now I see it’s the reflection, and actually looking into the pantry – sorry about that! They are gorgeous handles for sure! I also seem to remember when you did the music room doors you used a towel bar that was very reasonable – I need to go look that up. So many great ideas! Aloha!
I can’t imagine getting done all the projects you do in a month. Laundry and dishes are my biggest accomplishments, lol! Well done as always!
Genius and gorgeous one again!
I have an awkward and not so tidy space that is supposed to be my walk in closet. At this point I can’t fit proper closet shelves and cabinets and it makes my bedroom untidy. A door like yours could tidy things up a bit.
Nice job!
What kind of film have you used on the glass panels of the door ?
Were you able to put door pulls on both sides of the doors so that you have the ability to open and close from either room? I have narrow French doors like this going into my master bedroom and am struggling with finding the right door pulls (I can’t get myself to like the front-mount pulls) that I can use on both sides of the doors. Thanks!