How To Paint A Brick Fireplace
Today I’ve decided to tackle one of the questions that lands in my inbox quite frequently. How do you paint a brick fireplace?
The truth is, I’ve been remiss in posting this because, when I last painted a brick fireplace, I took pictures of the process. But now, those fireplace pictures are lost. And you know me… I love a tutorial filled with an abundance of pictures detailing each and every step. It pains me to have not even one picture of any of the steps. BUT… seeing that I’m continually asked this question, and seeing that I’ve painted two brick fireplaces now, and seeing that I know the process, and seeing that people want this information, I suppose it’s stingy for me to keep it to myself any longer. (How’s that for a run on sentence?!)
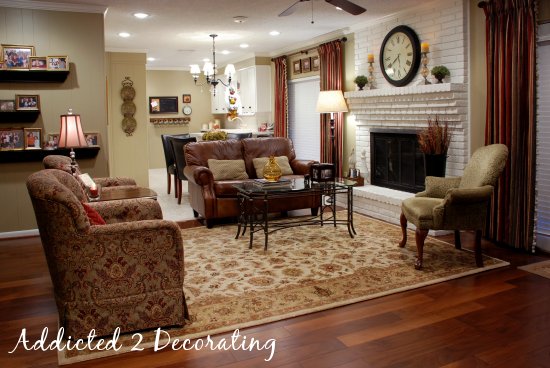
Yep, I’ve painted two brick fireplaces. The first one I painted was in my mom’s family room. Its original color was an interesting reddish orange color…
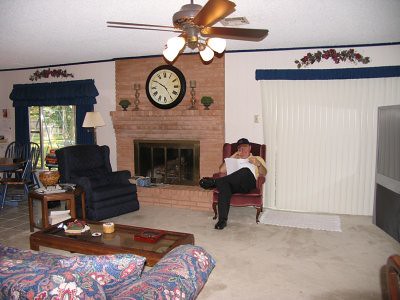
She was reluctant to let me paint it, but I know she would now agree that painting that fireplace went a long way towards updating the room (along with replacing…well…everything else)…
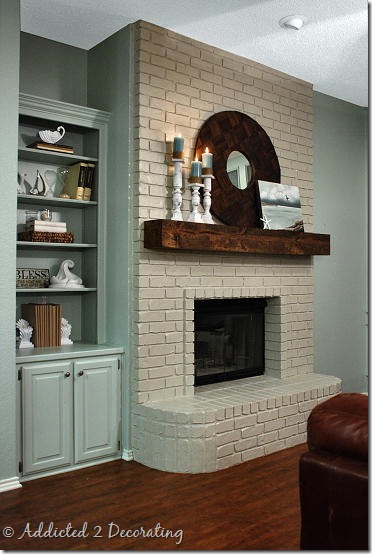
And the second brick fireplace I painted was the one in John & Alice’s family room. The original brick on that fireplace was a busy combination of red, white and gray…
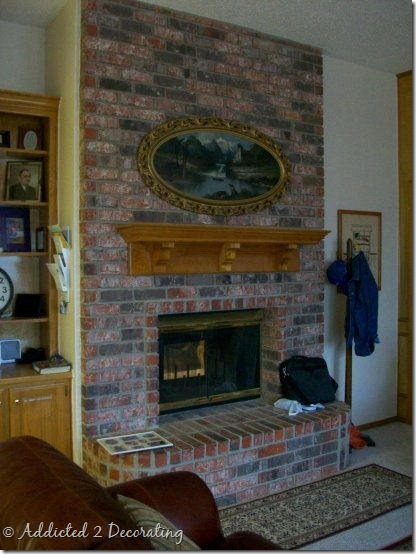
So I toned it down with a very soft, subtle gray color…
Now if you’re a man, and your reading this post because your wife strategically left this open in the browser on your computer in hopes that you might see the pictures and suddenly be stricken with an urge to allow her to paint the fireplace that she’s hated since the day you moved into your house, but that you insisted should never be painted because IT’S BRICK, and brick should never be painted, because IT’S BRICK…well, let me assure you that your home really will survive a bit of painted brick. Contrary to what most men think, painting brick really doesn’t upset the balance of the universe. Calamity won’t befall your family because you’ve upset the gods of home and (brick) hearth. No, none of that. I promise. It’ll be okay.
(Seriously, what is it with men and their brick and wood?) 😀
Okay, enough of that. Let’s get to the pictureless instructions, shall we?
Tools & Materials:
- Broom,
- Vacuum cleaner with an upholstery attachment
- One gallon of quality latex primer
- Quality oil-based primer (optional)
- One gallon of latex paint in your choice of color (note: you don’t need a special fireplace paint here!)
- Paint roller (you’ll probably need one with an extension handle)
- 2 Paint roller covers with a very thick nap (I think the one I used had a 1.25-inch nap and was labeled for use on stucco)
- One or two paint brushes (I used a 2.5-inch Purdy brush because that’s what I always have on hand, but this is probably the only time I would advise not using a high quality brush because it will probably get ruined in the process. But don’t use the cheapest brush either.)
- 2 Paint pans (or one pan and two paint pan liners)
- Painters tape
- Drop cloth
- Ladder
Painted Brick Fireplace Instructions
- Using your broom and vacuum, brush off/vacuum the entire surface of the bricks. You’d be surprised how much dust brick fireplaces hold onto! Be really sure to get the mortar areas between the bricks, and also really concentrate on the areas just around the firebox and on the hearth.
- If your fireplace has any soot buildup around the firebox, you will need to use a diluted household cleaner and a bristle brush to remove as much soot as possible. If this is required on your fireplace, it is imperative that you wait until those areas are completely dry before moving on to the next step.
- Use painters tape to tape the areas around the fireplace, e.g., where the brick meets the wall, and where the brick meets the floor.
- Using the paint roller and the thick nap roller cover, roll primer onto the entire surface of the bricks. These thick nap roller cover hold a LOT of paint, so it might take some practice to get used to how much pressure to apply, but the brick will also soak up the primer pretty fast. The thick nap of the roller should allow you to get primer into most of the mortar areas.
- When you’ve covered all of the brick you can cover with the roller, use your paintbrush to go back over any areas that the roller couldn’t reach, e.g., the mortar areas, and any pits and crevices in the bricks, and the areas around the floor, walls, and ceiling. This is the time-consuming part! The key to using a brush to paint brick is to use a pouncing/dabbing/jabbing motion (to get the primer or paint down into the cracks and crevices) in combination with a smooth back and forth brushing motion (to catch any drips and runs).
- Optional: If your fireplace has a
hearth that people sit on, I recommend using an oil-based primer on these areas for more durability. Again, that’s optional, and if you don’t want the extra expense of an oil-based primer, or the additional hassle (and smell) of using an oil-based product, it’s fine to use the latex primer. But you will get more durability out of oil-based primer on those areas that get regular wear. - Allow the primer to dry completely. Note that this may take longer than usual, as the primer can puddle just a bit in the pits and crevices. I recommend letting it dry overnight.
- Paint
the fireplace using the very same process–rolling with a thick nap roller cover, and follow up by using a brush on the areas that the roller didn’t reach. One coat should do the trick!
Helpful Hints:
- Don’t be gentle, especially with the brush work. You might really have to put some force behind the jabbing to get the paint into the deepest pits and crevices.
- Allow the paint to dry for a few days before placing any fireplace tools or decor back on the hearth.
- Have your primer mixed to match the paint color you’ve chosen for the fireplace.
And that’s it! Everything you ever wanted to know about how to paint a brick fireplace all wrapped up in one neat little post.
The process is pretty easy and straightforward. I think the idea of painting brick is just intimidating for lots of people, but there’s really nothing difficult about it. And yes, it is true that once brick is painted, it really can’t be undone without hours and hours (possibly days and days) of tedious and frustrating work (and even then, the likelihood of you getting all of the paint off is probably somewhere around 0.0025%, and that’s if you’re having a really great day where everything is going your way).
But like I told my mom when I was trying to convince her to let me paint her fireplace…there is just some brick that doesn’t ever need to see the light of day again…ever.
By the way, you’ll notice that on both of the fireplaces above, I also painted the brass screens. You can see that process here. And if you want to build wood mantel that looks like a big chunk of rough hewn wood, you can find those instructions here.

Addicted 2 Decorating is where I share my DIY and decorating journey as I remodel and decorate the 1948 fixer upper that my husband, Matt, and I bought in 2013. Matt has M.S. and is unable to do physical work, so I do the majority of the work on the house by myself. You can learn more about me here.

Thanks so much for posting this- dramatic before and afters! We keep grappling with the idea of painting our brick fireplace (http://wrighthouseaffairs.com/2011/10/14/hello-world/), but I am so afraid that when we go to sell our home (hopefully within the next couple of years) prospective buyers will not like it. I think this post may be giving me the final “push” I need to finally stop thinking about it and actually do it!! I also really like the way you used a soft gray tone- rather than stark white- in the second transformation! Thanks for sharing!
I think your poll results are pretty indicative of what any future prospective buyers would think of a painted fireplace. 😉 I think you should definitely go for it.
(Seriously, what is it with men and their brick and wood?)
Seriously!
That’s all. 🙂
Seriously!!! lol
Kristy, you’re sooo right! I don’t know why the idea of painting brick is so intimidating – and that included my husband. But I had a cure for that (ha,ha,ha..).
I used specialty masonry paint – affordable price, Home Depot – and he couldn’t say anything about the brick. You can see my post here http://blog.art-for-your-walls.com/2011/11/my-fireplace-makeover.html
I don’t even know what to say. Today, I was looking at my hideously ugly brick fireplace and wishing I knew how to paint it. And then I see this on my Facebook feed. And then I see the part about your husband not wanting you to paint the fireplace because it’s brick.
If I could find you, I’d give you a hug. Strategically leaving this open this evening.
I wish I had read this before I painted my fireplace last spring! Here’s the post: http://www.lifeonmarsblog.net/2011/05/helpful-hand.html
I would add that having 2 or 3 really small cheap brushes on hand helped me. I used them for really getting into the crevices. The process destroyed the brushes but I think I paid 30cents each for them. It was better than destroying my nice brushes though!
This is a fab tutorial Kristi, and I love that new rustic mantel too! Bravo girl!
xo
Kate
Thanks so much, Kate! 🙂
Wow, what a difference a little paint makes! Love all the new furniture too but if you just did the paint it would still look so much more updated. Very nice!
Oh my Kristie…thank you for this tutorial! I told my husband right before the holidays that WE are painting our ugly brick fireplace. I am so leaving this up on his computer tonight so he can see how beautiful the brick looks painted! Thank you Thank you Thank you!!!
Gorgeous! The new color looks fantastic with the tone of the mantle! I may just be able to persuade my husband into painting 😉
nice idea. i like your blog so much. i think this type of blog inspired me so much…thank you
I agree that no one is ever going to walk into a lovely room of a house for sale and say, “Too bad the owners painted the fireplace. I guess we won’t buy this house.” Face it, anti-painted-brick people: these fireplaces always look better. Brick belongs outside, and even then I love it painted.
Worse case is that someone can do a convincing faux finish to restore the brick look.
I had to talk my husband into letting me paint ours, and he came over to the right team once he saw how fresh and clean it looked.
Your pictures tell the story. Nice job.
Painted ours 3 years ago using same process as you have. Never have regretted it and have had nothing but compliments about how much better the room looks. Oh, and I painted the paneling that was on the lower half of the wall. Nothing but compliments on that also. Dark and dingy is out.
Do you want to come remodel my house?? Oh wait, we are renting, never mind. Great great job!! Love it!!
Nice suggestions that will help in keeping the original look. Thanks
I found this post almost a year after you wrote it while searching Pinterest for how to paint my brick fireplace. Now I gotta tell you I liked the brick fireplace when we moved in 25 years ago but it’s just gotta go now and I was dreading the “argument” with my husband about how it should be painted. I love that you addressed this crazy logic in your post. My hubby saw me smiling to myself while reading it and I was able to break the ice about my plans by reading your post to him.
Thank you!!
Oh good, DeeAnna! So glad I could help you break the ice. 🙂 Hope you get your beautiful painted fireplace!
What a great blog! I have been searching the internet to figure out how to make a wood mantle (as ours is painted and would look much better stained agains a white painted fireplace). Thanks for the details, ideas, pictures, and humor. I posted a discussion on Houzz.com, and someone posted a picture from your site – great link!! You are talented! What is the gray paint color? Ours is stark white, and I’m wondering if something a bit gray would be better.
Thank you!!
after painting the fireplace, has the fire ever been lite? My hub is reluctant to paint as well and insist that IT HAS to be done with a “special” paint that will cost us an arm and a let. Please advise, thank you
The fireplace in the first two pictures is at my parents’ house. There have been MANY fires lit in the fireplace since it was painted several years ago. No special paint needed. 🙂
Any chance you can tell me the paint colors from the finished fireplace and walls/built ins?
I have brick (very UGLY brick) behind my wood burning stove. I would LOVE to paint it, but do I need to use a heat-resistant paint there? Unlike a fireplace, where the heat goes up the chimney, my woodstove really puts off the heat. (we don’t use it THAT much, maybe 3-4 times a month.) Thanks for your good advice.
Any chance you can give the name of the color of paint you used on the subtle gray fireplace?
I love everything about your blog! And I love that on my first visit, the first thing i find is fireplace painting! Funny fact: Recently, while I tried to envision the benefits of my husband possibly having to travel for work for three months, the first thing that came to mind was, “Well, at least I can paint that dang brick fireplace and he won’t be home to worry about it!”. So I’m still laughing. “What is it about men and wood and brick?” Question: Should I bother with masonry paint? Apparently it’s more breathable, but it sounds like latex worked fine and is still holding up, correct?
So glad you get to paint your fireplace, Kay! 😀 Latex paint is perfectly fine. It’s what I used on both fireplaces shown in this post. While I haven’t seen the second fireplace since about a month after I painted it, I do see my mom’s fireplace very often, and even after several years, it still looks just like it did right after I painted it.
Just wondering what finish paint did you use? Flat? THANKS! Yours look great!!
I think I used a satin finish.
That paint color on the built in is the ultimate shade of perfection! What is it?!
Hi, can you tell me the colors of your brick and the shelves next to the brick? LOVE them!