Breakfast Room Progress – Plywood Subfloor Installed Over Concrete Slab For Nail-Down Solid Hardwood Flooring
I mean, if that’s not an exciting title, I don’t know what is! 😀 But seriously, this was a major project in the breakfast room, and I’m so excited to have it finished.
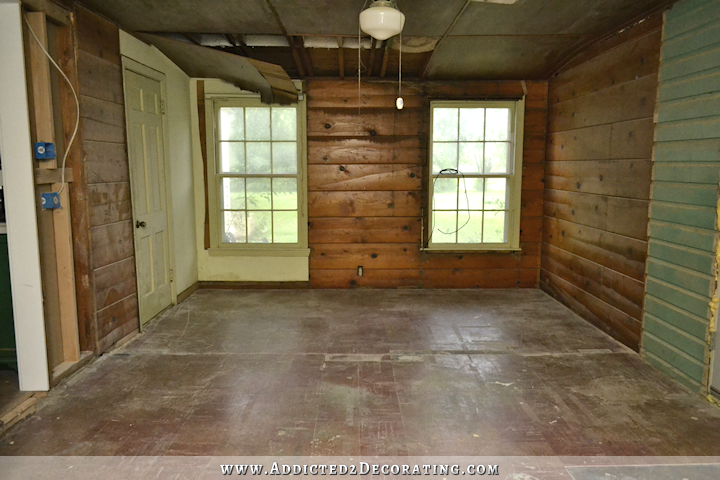
First, let’s have a quick recap. After I removed the green carpet from this room, this is the floor I was left with — asbestos tiles on top of a cracked and unlevel concrete slab…
So to get the concrete slab level, and also to cover over the cracks, I had some concrete guys add a layer of new concrete over the top of the slab.

You can read more about that, and even watch a video of the process, here.
So for the last couple of weeks, I’ve been walking on a new level concrete floor in the breakfast room.
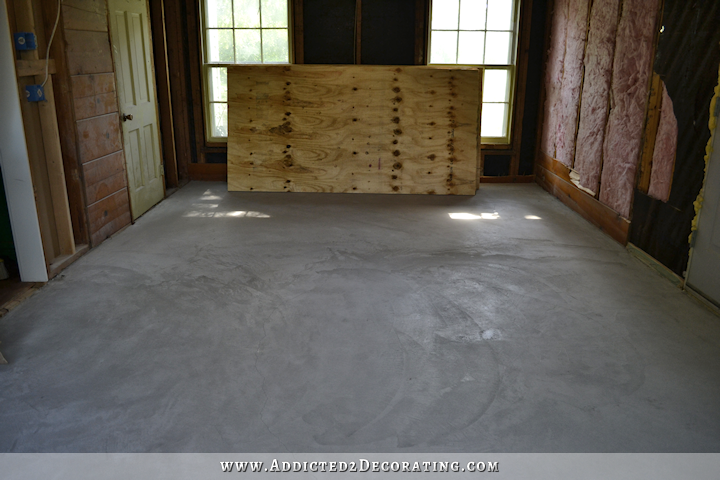
And while that progress was thrilling to me, it was far from finished. So this past weekend I got busy on the next step, and yesterday my brother came over and helped me with the hardest part.
So let me back up and explain my thought process here, and tell you how I decided to do things the way I did them.
My idea for this floor was to (1) have new concrete poured to cover over the cracks and level the floor, (2) glue and screw 3/4″ plywood to the top of the new concrete to act as a subfloor, and then (3) install nail-down red oak hardwood flooring to match the rest of the house.
And then somewhere along the way, some of you started asking, “But what about a moisture barrier? Won’t you need that over the concrete before you put your flooring down?”
So I did some research and asked around, and indeed, I did need a moisture barrier.
I considered the moisture barriers that come in sheets and roll out onto the subfloor. That wouldn’t work for me because then I’d lose the ability to glue my plywood to the concrete.
I considered using a moisture barrier between the plywood and the hardwood floor, since the rest of the house has tar paper between the subfloor and the hardwood floor. But the difference is that the rest of the house is on a pier and beam foundation, so the subfloor can “breathe” from underneath. If I put plywood on top of concrete, and then put a moisture barrier on top of that, I was afraid I’d be creating a mold breeding ground if moisture ever did find its way between the concrete and the moisture barrier.
Then I remembered that I had seen a similar process (i.e., plywood subfloor over concrete slab for nail down hardwood flooring) over on Little Green Notebook a while back, so I searched and found the method they used.
As it turns out, they used a troweled-on adhesive that also acted as a moisture barrier. So I headed to Home Depot to find that adhesive. The only one I found was around $150 for a 3-gallon container, and according to the spread rate, I would need one whole container plus just a little bit of a second container. And unfortunately, it didn’t come in single gallon containers. That meant that I’d be spending $300 on adhesive, and I’d have a huge amount left over.
But price wasn’t the only issue. I was also concerned that the product was actually made for gluing down hardwood flooring on top of concrete, and it said it could be used for flooring up to five inches wide. Well, my pieces of plywood were considerably wider than that, so I didn’t really want to use a product that wasn’t made specifically for huge pieces of plywood subfloor.
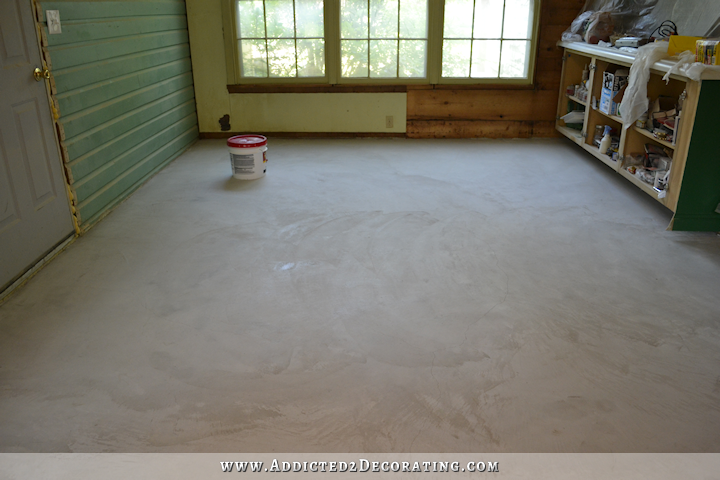
So I searched for other options, and that’s when I came across RedGard. I’ve used RedGard before on the bathtub surround in my hallway bathroom remodel.
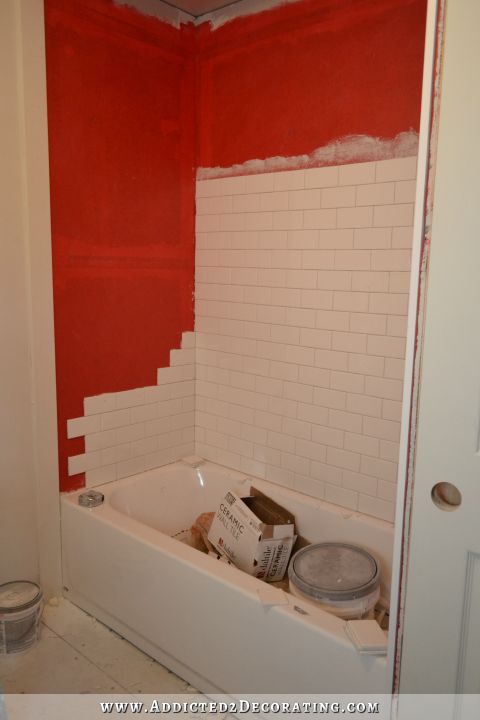
RedGard is a moisture barrier that you paint on with a brush and a roller, and yes, it’s red. Actually, it goes on pink, and it turns red when it’s dry. It’s not cheap either — about $130 for a 3-gallon container. But according to the spread rate, one container would be sufficient for my room. And then I could use regular subfloor adhesive, which is MUCH cheaper, for the plywood.
But what really sold me on the RedGard for this room is that it’s not only a moisture barrier, but it’s also a crack prevention membrane. I had already been told that the new layer of concrete would surely crack, and in fact, it was already developing some hairline cracks. But the hope is that even if it cracks, it will remain level. But a crack prevention membrane would certainly help! So it sounded like the perfect solution for me. I’d have a moisture barrier, plus a crack prevention membrane, and once it was really good and dry, I could use a much cheaper adhesive that’s actually meant for plywood subfloors to glue the plywood down.
So I grabbed one 3-gallon container and got to work. First, I used a paint brush to apply the RedGard around the edges of the room.
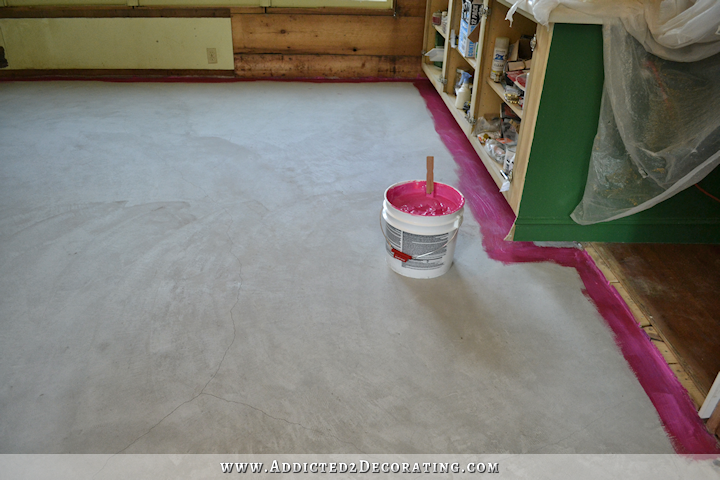
And I also used my brush to put a little extra on the hairline cracks that had formed in the new concrete.

And then I rolled it onto the rest of the floor using a 3/8″ nap roller.
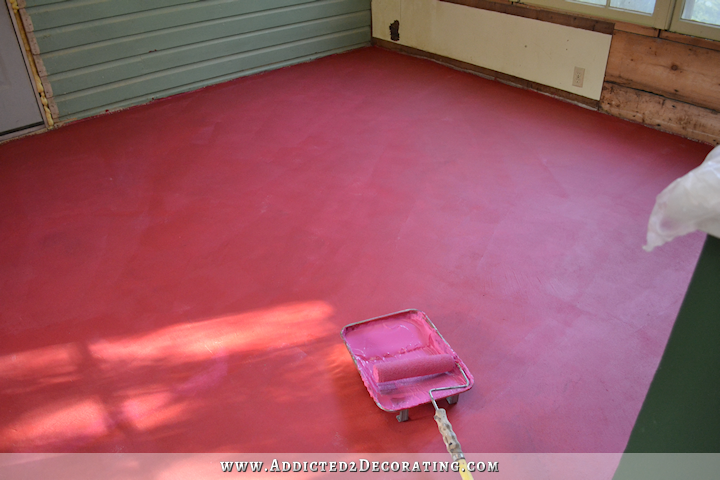
The first coat dried incredibly fast, literally within minutes. The second coat took longer — about two hours. When it’s pink, it’s still wet. When it’s all red, it’s dry.

I bought the plywood before I made the decision to use RedGard, so it was already all stacked at the back of the room, and there was no way I could move 12 sheets of 3/4″ plywood by myself, so I just had to paint around it.
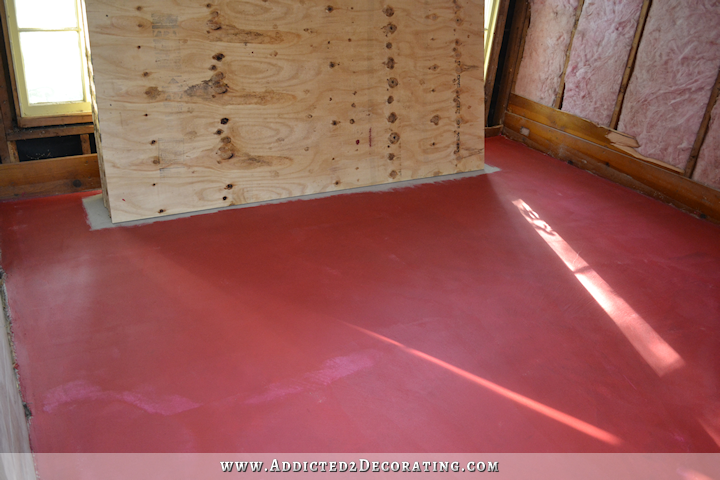
It all worked out fine, though. As we uncovered that area while we were installing the plywood, I was able to get two coats on that area as well.
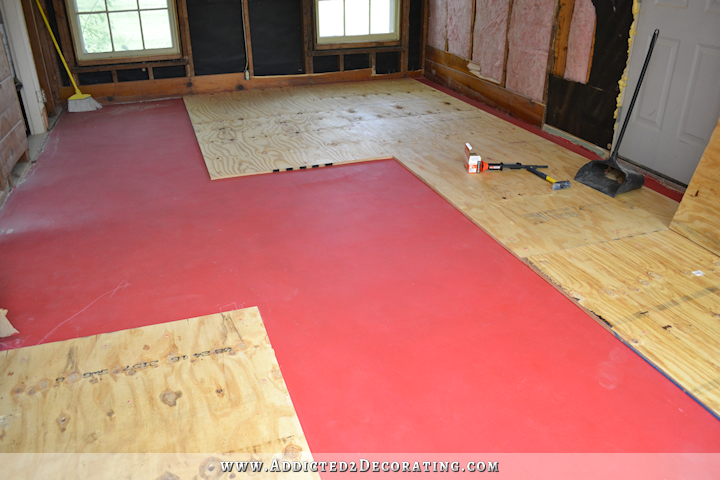
So yesterday, my brother Rod came over and helped me install the plywood. It was hard work, but went really smoothly.
I used this adhesive from Home Depot…
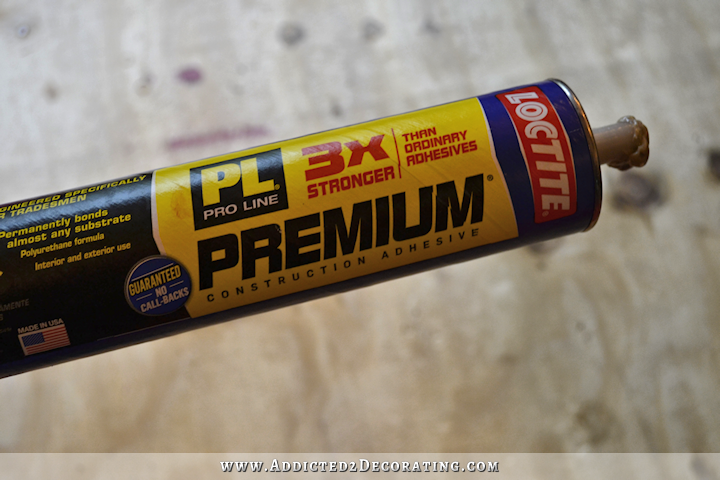
And I bought the large 28-ounce tubes. I used one tube per full sheet of plywood.
And then as each sheet was put into place, I used a Ramset powder-actuated tool to drive nails through the plywood and into the concrete.

I’m not gonna lie. That tool scared me at first. I mean, it actually uses gun powder in a .22 gauge shell to drive the nail with such force that it goes into concrete. The first few were scary, but I got used to it pretty quickly. If you use this tool, just be sure that you read the directions, and yes, take the online “licensing” exam. I thought it was really pretty silly, and mostly common sense stuff, but its still a good reminder that you’re using a very dangerous tool. And definitely use eye and ear protection during use.
Home Depot sells various models of this tool, starting at the low end $27 model, and going up to something like $300. The one I bought (pictured above) is the cheapest one they had, and it worked perfectly. It’s the kind that you have to hit with a hammer (the more expensive ones have a trigger), and I found that if I used my 2.5-pound blacksmith hammer that I bought during the bathroom remodel to break up the tile floor…
…the hammer did all of the work and saved my arm from having to swing a hammer so hard. And since the hammer head on a 2.5-pound blacksmith hammer is about three or four times the diameter of a regular hammer, I had fewer misses than I would have trying to hit the button on top with a much smaller hammer head.
Anyway, it took us from 8:00am to 3:30pm, with about an hour for lunch, but we got it done! This room is far from square, so all of the pieces around the edges requires special cuts with the circular saw to get them to go in, but we got it done.
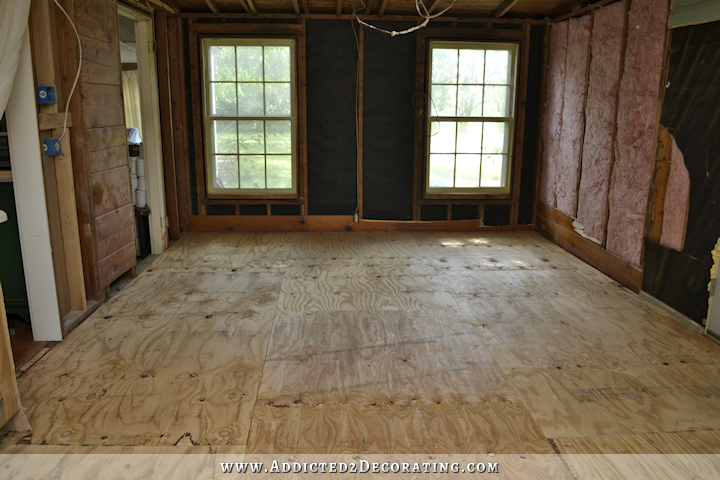
I know it doesn’t look like much now, but the exciting part is that this room is now ready for hardwood floor!!

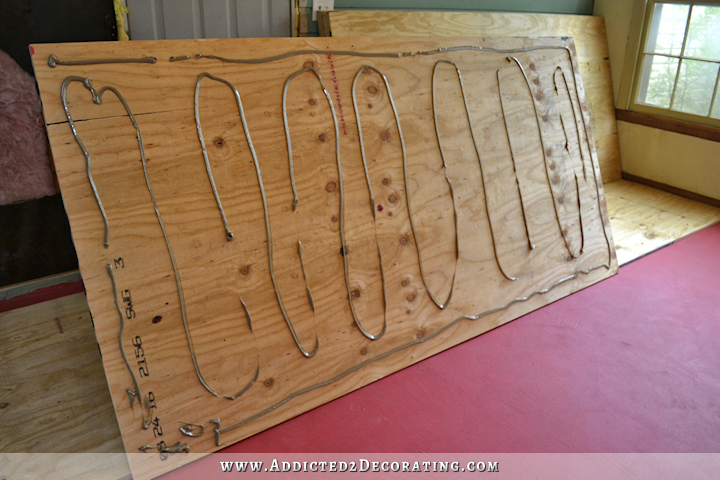
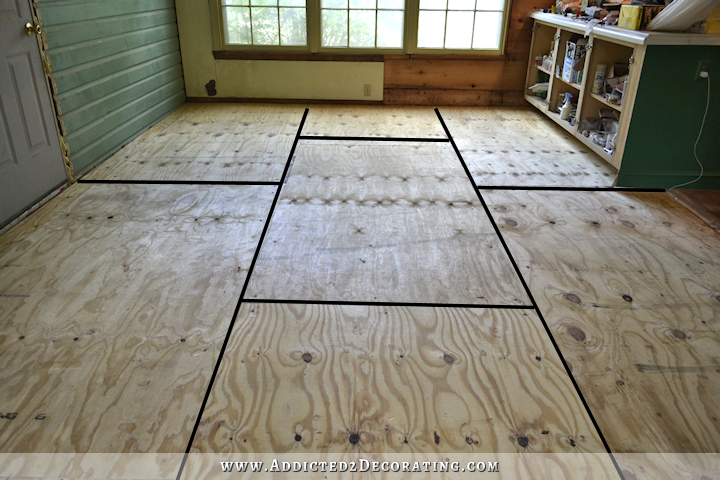
We staggered the plywood pieces. I’ve highlighted the seams in this photo to show you the pattern we used.
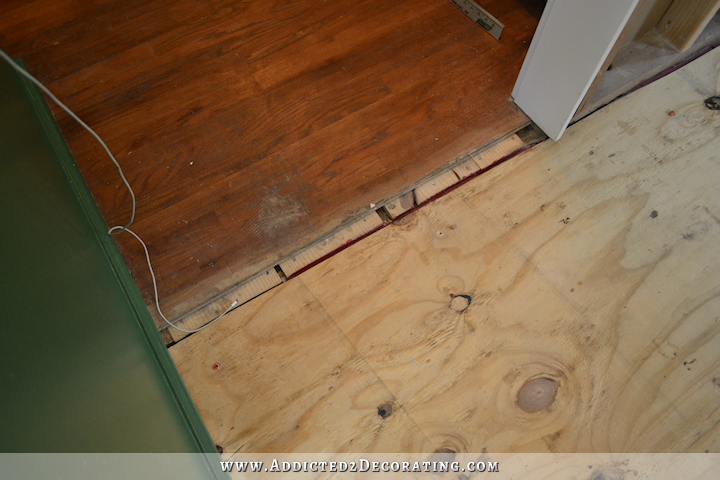
And now, this plywood subfloor is level with the 1 x 10 plywood subfloor under the hardwood flooring in the kitchen. I just need to seal those cracks with something, and then I’ll be ready to continue the hardwood flooring right into the breakfast room and pantry!
This was a huge project, and it feels so good to have it DONE! Now I’m one step closer to the pretty stuff. 🙂

Addicted 2 Decorating is where I share my DIY and decorating journey as I remodel and decorate the 1948 fixer upper that my husband, Matt, and I bought in 2013. Matt has M.S. and is unable to do physical work, so I do the majority of the work on the house by myself. You can learn more about me here.


That is super exciting! I’m sure it’s such a relief to see that room start to take shape! And Matt will be able to just roll right through! Yay!
Ballpark, Kristi, How many nails did you drive per full 4 x 8 sheet into the concrete?
This looks good, kiddo. I know you were stuck for a while so I’m glad you’ve gotten over some humps.
I used 15 nails per sheet.
Fascinating tutorial! Thanks for taking the time to explain everything so clearly. I absolutely smile with joy to read about your progress,…even if it’s precluded with a few setbacks. That’s reality!
Wow, Kristi! Just Wow!
Who knew plywood could look so beautiful? Congratulations, you are on your way.
Well now, aren’t you just the cat’s meow! (Yeah… My age is showing 😀) congrats to you! Now you can exhale….
So exciting and it looks great!! You are such a hard worker and wow do you do your research!!
Wow, Kristi, you are really making progress!! On to the fun of laying those hardwood floors and the awesome results there. You just amaze me. And give me something to aspire to, lol.
You GO, girl!!
Exciting! Going through our own remodel, I know how hard it is to be patient with the necessary expenditures of time and money before you get to the good stuff. Thank you for sharing the not so pretty and the not so fun. Its a reality of any project. Keep up the good work! You have got to pleased with the new pace of things 🙂
It must feel good to have the knowledge that even the parts that will become unseen are done RIGHT. I imagine that Ramset tool and hammering process must have been super loud.
Now THIS is progress!! I’m so glad to see you work towards the really important finishing of the basics. As you complete each of these projects, I’m sure the part you love, the decorating, will be simmering away in the back of your mind. And it will all fall into place. You will have the beautiful home that you and Matt so deserve. You are an inspiration to us all.
PS. I’m a long time follower, but rarely post comments. I just wanted to let you know that I am delighted to see you move back to the truly vital renovation of your home, making it safe and secure for you
both!
Just wondering…are you going to lay the hardwood floors before putting in the framing for the pantry or hanging the drywall? I am trying to figure out your process. Since I clean from ceiling to floor, I would have thought that that would have been the order in which you work when putting it all together too.
I’m still debating about the hardwood floor installation. I’m leaning towards doing it before the drywall, and even before I build the wall for the pantry.
But I couldn’t put up drywall until I run the new wiring for the room. I can’t run (all of) the wiring until I get the wall built for the pantry. And I couldn’t build the wall for the pantry until at least the subfloor was installed.
My order is (1) subfloor, (2) build the wall, (3) run the wiring, (4) install new windows, and then (5) install drywall. The only thing in question is at what point I’ll install the flooring. That’s usually done last so that it doesn’t get scratched and dinged. But it would be easier to do while the room is wide open so that I don’t have to cut around another wall and doorway. Plus, since I’m trying to match almost 70-year-old hardwood floor in the rest of the house, I actually think dings and scratches would be fine and help it blend in more.
I’m not sure if you’ve done this because I got a little behind on your post but I think you have to let the floor sit in the room for a while before you lay it. That way you can do the other things while it (breathes).
I didn’t know it had to be in the same room. It’s been sitting in the middle of the music room since Friday. I think that’s probably close enough. And it’ll probably still be there another two days before I’m ready to install.
I’m not sure if it does either. I think you are probably right though.
Wow, that was a pretty interesting blog! I have never heard of a ramset. You didn’t talk about the nails. Is that a picture of the nails that go with the ramset? The ones with little plastic red things on them? And are those the cartridges with gunpowder in the picture too? Don’t the nails bend whe you try to force them into the concrete? Are there concerns with the nails pulling back out of the concrete? I always thought when affixing something to concrete that you had to use special concrete screws!
Yes, those are the nails. The little plastic things are what keep the nails inside the barrel of the tool. If the nail goes in like it’s supposed to, the plastic thing flattens under the nail head, and sometimes it even comes completely off. The little things that look like small bullets are the gun powder shells that go inside the tool. You use one shell per nail, and on the cheapest tool that I have, you have to reload after each nail. The nails don’t bend at all. With that amount of force pushing them into the concrete, they go in just fine and perfectly straight. And I have no worries about them pulling out. This tool is made specifically for installing wood (e.g., 2 x 4’s for building walls) over concrete. Screws would have taken several hours more because you have to pre-drill for each screw, and since I’d be drilling into asbestos flooring, it would have produced airborne asbestos fibers, which I didn’t want to take a chance on. So this was faster and safer, and every bit as secure as screws.
Thanks Kristi! You learn something new every day, right?
Hey! Dealing with a similar situation, so I’m hoping you can provide a little insight. Did the ramset nails lay flat enough that you were able to put the floor down without having to cut nailheads off? I’ve dealt with the tapcons and know how challenging it can be to get them in flush and am hoping this is a solid alternative.
The nails did go in flush, but keep in mind that we were setting them in pretty new concrete. I’ve also tried using the Ramset to put nails into 70-year-old concrete (to do a wood porch over my front concrete porch), and those didn’t go in all the way no matter what I tried. I ended up having to secure the sleepers/risers to the concrete porch using concrete screws. It was such a pain, but there was just no way the nails were going to penetrate that old concrete enough to get the job done.
Another tough job completed. Now that the subfloor is on top of the leveled concrete floor it should all hold together well for a very long time.
I am in my 50’s. Never used tools – power or otherwise. But have always dreamed of being able to create some nice things for my home. Its because of you, a female and doing it yourself… that I have been slowly buying your top 10 tools. I am putting up new all new trim (baseboards, and all windows and doors) in the basement, perfecting my technique. If it looks good I will continue with the upstairs, too! I really hang on every word because I don’t know how to do it and I trust you. I bought oil based primer and wood filler. I use a rotary sander. I use Flotrol and Pentrol paint additives. I cut with the sliding miter saw you like. I have the compressor and nail guns but have been too scared to try them yet. And I have the critter sprayer that I plan to use to repaint my vanity soon (also had to get the cone strainers you recommended so the sprayer won’t clog!).
To me, you are not just another Blogger, you are making a real difference in my life! I think part of it is the very slow methodical way you lay it out and show us pictures. It helps when you show the mess-ups because if it can be messed up I’ll surely do it. This post is exactly why I read every single one of your entries. Its far from a before and after. It’s a how to get there from here with an explanation of the basics. Very different and very much needed in the age of HGTV where it’s all scripted, easy, fast, and totally useless except to see what I can’t have unless I pay for a professional to do it for me.
Trina…you should be applauded…let me be the first to say BRAVA! Well said and well done.
Trina, I wish there was a great big like button for your post! In your way you are as much an inspiration as Kristi is. You are facing challenges that you know nothing about, and it sounds like are nervous about, and DOING it! In the words of the youth today “You go, girl!”.
Trina, now YOU are an inspiration! Thank you so much for sharing your journey, and I’m sure many others will be inspired by your words. And congratulations on putting fear and doubt aside, and just DOING it! It’s empowering, isn’t it? Even in the mess ups, I still find it empowering and liberating that I can learn from my mistakes, undo, and try again until I get it right. I’m so happy for you, and thank you for leaving this comment that I know will inspire others to just go for it!
YAY! It’s looking great. I love being able to see your step by step process and to read your thought process too. Thanks.
How many days do you have to let the raw hardwood “acclimate” before installing?
Well, it’s kind of hard to say for sure since I don’t have one of those humidity readers that you’re supposed to use to determine the moisture content of the wood. The goal is to get the temperature and moisture level of the wood to be the same as the room it’s going in before installation, and I know it takes a minimum of three days, but can take as many as ten days. Since I don’t have a moisture reader, I generally try to wait a minimum of seven days, but longer is always better.
Way to go, Kristi! I love reading these posts with “non pretty” information, yet so important in the process. You’re getting there.
Cheering you on even though I rarely comment.
Keep it up!
It looks great!!! It may sound silly but it’s amazing how much one’s spirit lifts as each step is done and seeing it move more and more towards the final beautiful space :)!! BTW, may I ask what color your kitchen floor is stained – I love that color.
I actually custom mixed that color for the floor. I think I made a note of it in the blog post when I wrote about it, but I’d have to search for it. That would have been sometime around May or June 2014.
I think the kitchen floor stain mix was discussed when you finished up with the kitchen floor saga at the end of August 2014… https://www.addicted2decorating.com/stained-red-oak-floor.html
I love the color as well!
It looks great Kristi! Didn’t the police pay you a visit to check what this gunfire is about? 🙂 Or the tool is not that loud?
It’s definitely that loud. Sounds just like a gunshot from a hand gun! I was fully prepared to see the police drive up and knock on my door, but it didn’t happen. I guess my neighbors are used to my noise. 🙂
Thanks for the tutorial; I love all the details. The breakfast room is coming along nicely and I look forward to more updates.
The floor looks amazing!! But I have one question – will you be erecting the wall for the pantry before you install the hardwood flooring?
I’m considering doing the floor before the wall. That way I don’t have to do extra cuts around a new wall and doorway. Installing in a wide open room would be much easier.
One of the best blogs around – fascinating, lots of detail – and such a sense conveyed of ‘being there’ and going along with the process. Im becoming addicted too – its just so encouraging to others to have a go. Kind regards from New Zealand
Doesn’t look like much? ! Kristi, it looks amazing! The ramset is one of the tools I was taught to use when building my house with Habitat and, yes they are loud! Definitely use ear and eye protection!
HI Kristi- Thought you might like this link to Pantry door ideas. Enjoy!
http://knockoffdecor.com/9-ideas-for-the-perfect-pantry-door
Whew, you’re not stalled anymore. Can’t wait to see the progress shots as this room comes together.
What a colossal bit of progress!!!! I bet those plywood floors just feel better already! So what was your total cost breakdown? We just moved some cabinets and dryer last week and are feeling PHENOMENAL about it – although like you it still isn’t done. Progress progress!
https://wanderlustingbydesign.com/2016/09/08/w-d-together-at-last/
The room looks amazing! I’ve never heard of this RedGard before, but will definitely consider it for my kitchen remodel that’s starting next month. Thank you so much for sharing!
This is one of the best written DIY articles I have come across. I am doing something very similar to you. I am guessing you are using a .22 actuated powder round? Also was the plywood 3/4″ and what size nails did you use?
I did use a .22 actuated powder round, and I also used 3/4″ plywood. The flooring nails I used were 1 3/4″.