My Experience Staining Wood With Tea, Steel Wool And Vinegar
Yesterday I finished up my dumpster coffee table makeover. If you’ll remember, just a few days ago, I found this coffee table leaning against the dumpster at my condo.
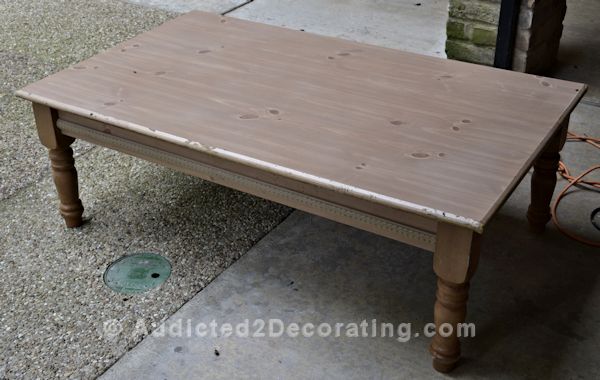
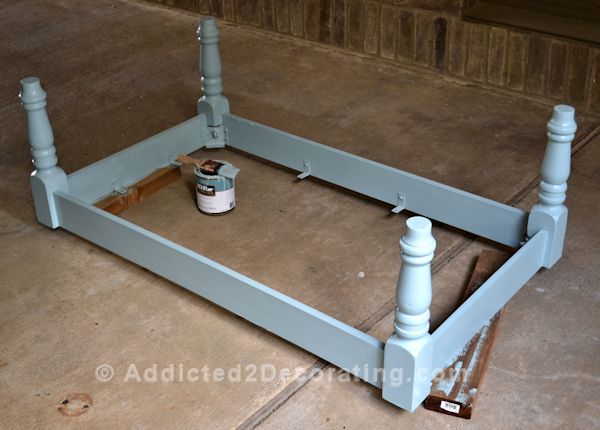
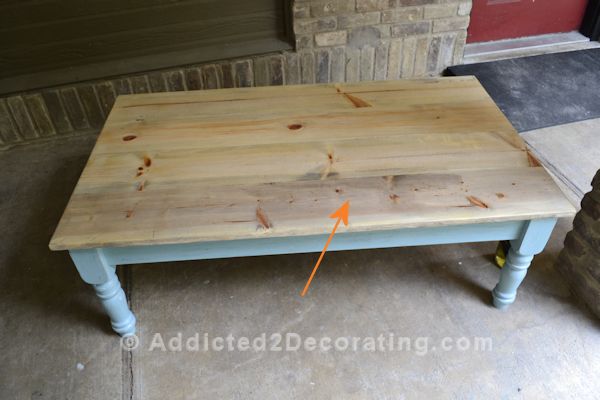
Initially, I planned to paint the entire thing, including the cheap particle board top with the plastic paper-thin veneer with wood print. But then I decided that those pretty little turned legs were worthy of a real wood top, so I removed the cheap top and painted the base.
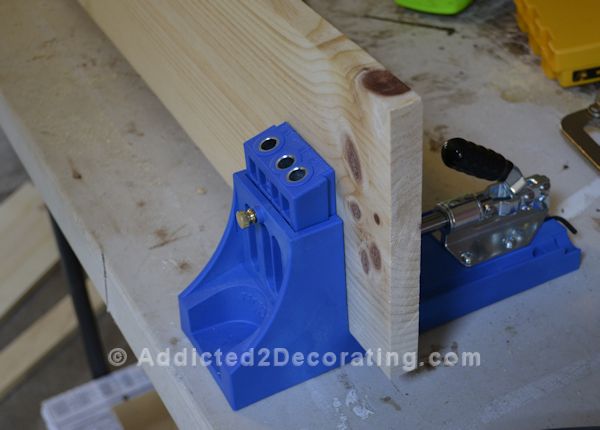
Then I used my new Kreg Jig to make a new table top out of 1″ x 6″ pine lumber. I’ll do a whole post on the Kreg Jig soon, because it’s AMAZING. If you like to build things with wood, then you definitely need one of these. I could kick myself for waiting so long to buy one!!
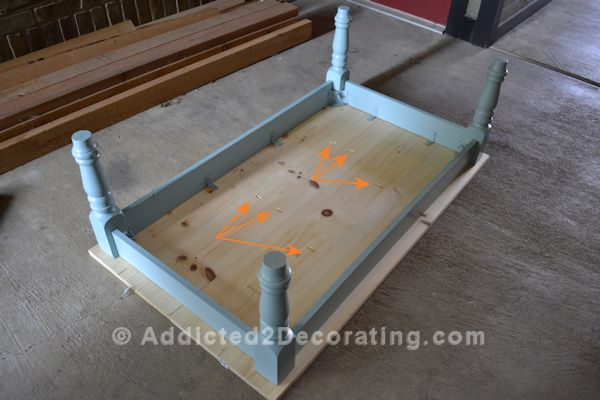
With the table top put together, I attached it to the base with L-brackets. You can see the pocket holes that I drilled with the Kreg Jig that hold the table top together (orange arrows). There are more than six, but the others aren’t really visible.
Then I moved on to staining the top. Now in my experience, pine doesn’t stain very well. It starts out so orangish-yellow, and stain just highlights all of the yellow parts and turns the grain almost black. Not a good look. In fact, let’s revisit this horror from from last year that I made for John & Alice’s breakfast room.
So this time, I decided to try staining/antiquing the top with the tea, steel wool, and vinegar method. After researching the topic, I finally decided to follow the directions found at Craftaholics Anonymous. However, I confess that I was very impatient, so rather than letting my steel wool/vinegar solution sit for 24 hours, mine sat for about 10 hours.
This first board shows what the wood looked like immediately after applying one coat of the vinegar to the wood. You can see a slightly gray color.
And here’s what the entire table top looked like after waiting about an hour. You can see the dark splotchy areas on the last board. Those were areas that just hadn’t completely dried yet. And on the first board, you can see what the wood looks like with a coat of wax on it.

And here are the three in comparison: raw pine wood, pine treated with the tea/steel wool/vinegar treatment, and pine wood treated and then waxed.
Let me also point out that I used my electric sander to give the edges of the top a slightly rounded look. I think this looks so much better than the squared edges.
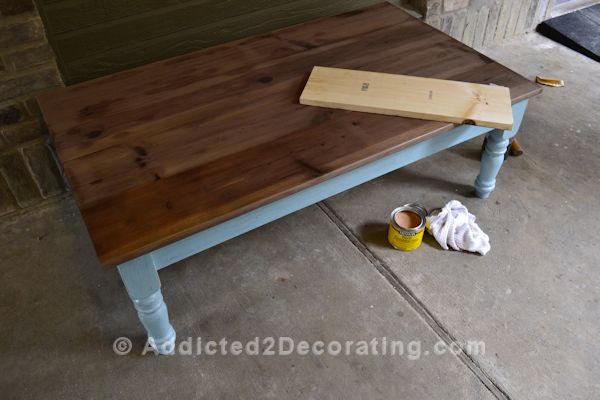
So after I got the entire surface waxed, I decided that the wood wasn’t quite dark enough to give enough contrast with the light aqua base. So I decided to give it a coat of stain. Yes, I stained right over the wax. I figured since both were oil-based products, it would be just fine. And it did work just fine.
Here you can see the difference between the table top and a piece of pine that has one coat of Minwax Special Walnut stain on it. See how the grain is so dark on the separate piece of wood? And that makes all of the yellow areas look really vibrant. Definitely not a good look.

I still need to give the table top another coat of wax, but here’s how the table looks now after staining the top and antiquing the base.
Sorry that I don’t have pictures that are all styled and pretty, but the top was still wet, and I was losing daylight quickly, so I wanted to go ahead and get some pictures to show you. 🙂
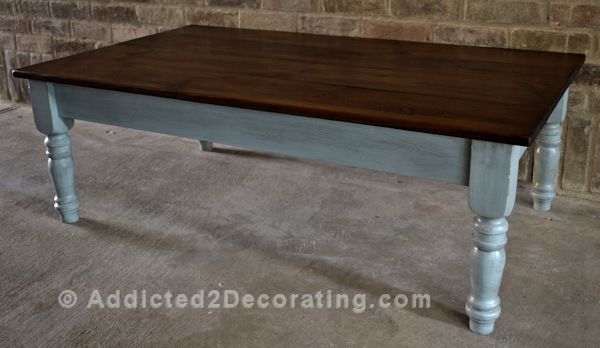
I really love how the top turned out. Definitely a different experience than I’ve ever had in the past when I tried to stain pine.
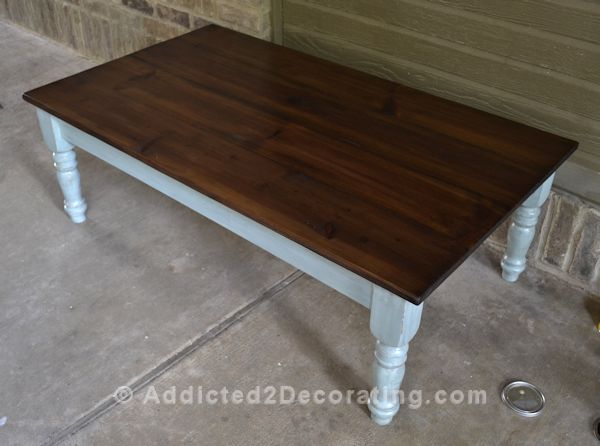
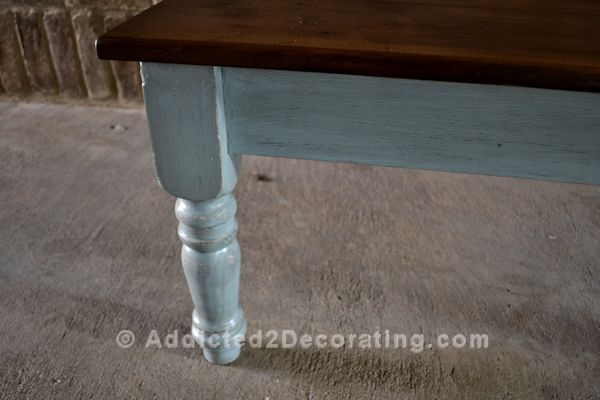
And the dark wood in combination with the antiqued aqua base just makes me smile.

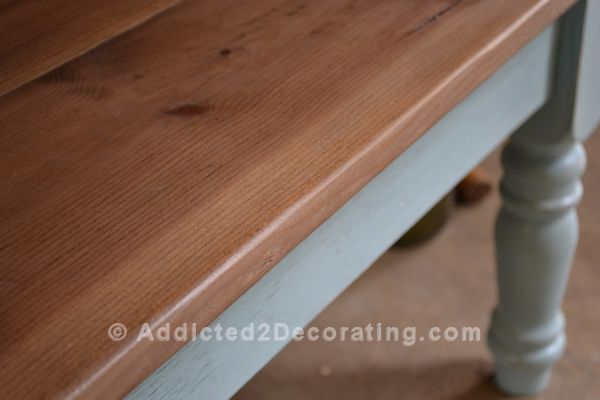
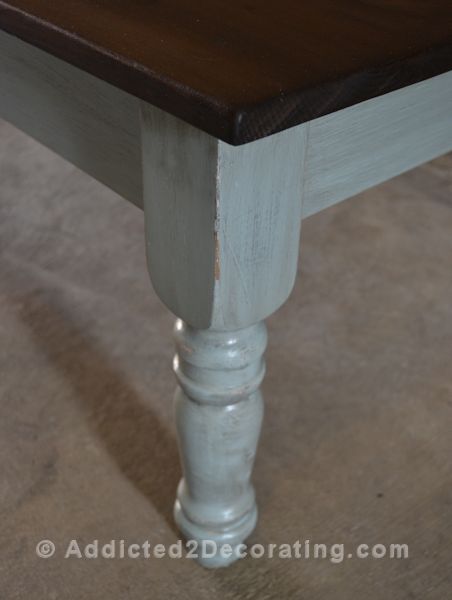
To antique the base, I simply let the paint dry and then sanded it (manually, not with an electric sander). Then I rubbed Minwax Special Walnut stain on it, let it sit for about a minute or two, and then wiped off the excess. I do this in sections, because if the stain sits on there too long, it’ll start drying and won’t leave a subtle antiqued finish. I really like antiquing furniture like this because the stain acts as a sealer and leaves a very nice satin finish, almost like furniture wax.
So that’s my experience with using the tea/steel wool/vinegar method. I’d definitely like to try it out again after letting the mixture set for 24 hours or more. Then I’d like to compare it to other methods, such as using wood conditioner on pine before stain (which I’ve never tried). I’d also like to try the steel wool/vinegar method, and then follow up with stain BEFORE waxing the wood. 🙂 That’s actually how it should have been done, but I was too anxious to get wax on the top.
And as you can see, my steel wool/vinegar treatment didn’t really result in “antiqued” wood. I’m not really sure why. Perhaps there are many factors, such as weather conditions. (It was pouring down rain while I was working on this coffee table outside.) So there’s definitely lots of testing and comparing that I want to do to find the absolute best way to stain cheap pine lumber and get the best results.
Have you ever tried this antiquing/staining method? Did yours result in an actual antiqued wood look? Have you had success staining pine wood with other methods? I’d love to hear about it! And if you have a post showing your project and describing your method, please feel free to leave a link in the comments. I’d love to learn from your methods!
Update:
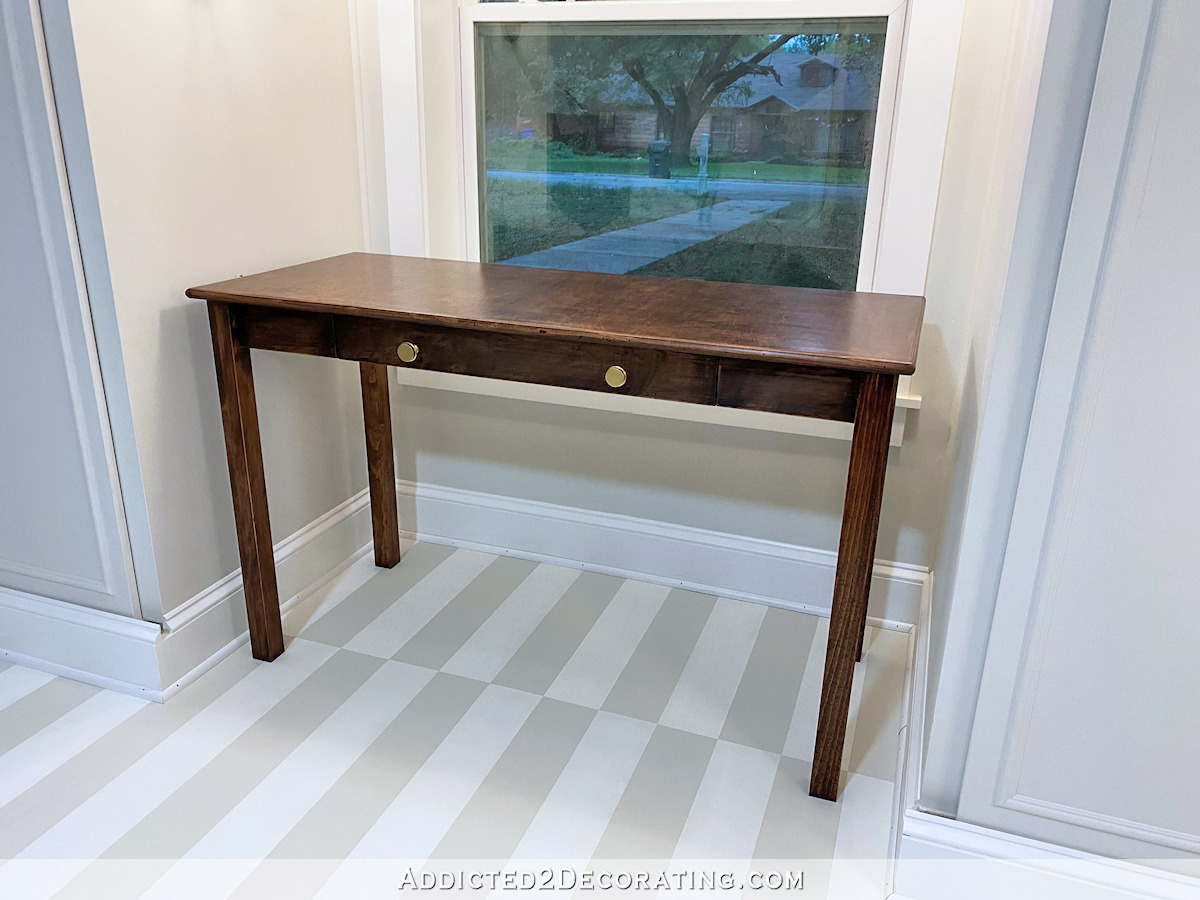
It took me seven more years, but I finally figured out a way to stain pine without the horrible orange and yellow grain, while getting consistent results each time. (The vinegar/steel wool solution is very unpredictable and inconsistent.)
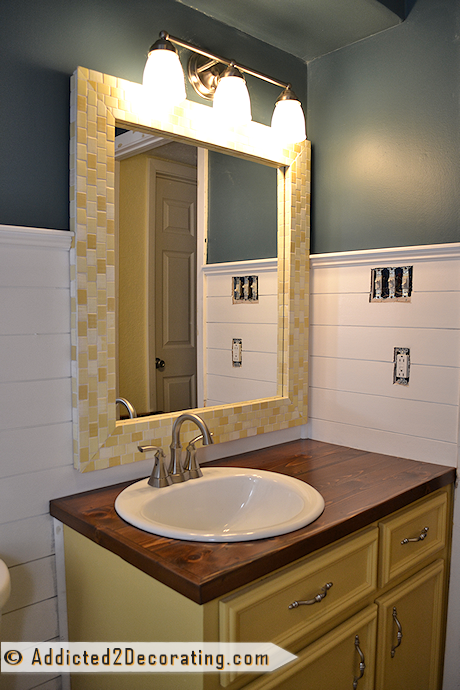
I figured out this new technique while refinishing my wood bathroom countertop during a makeover in 2019. Here’s a peek at the finished pine countertop…

You can see the details of this staining process here…

Addicted 2 Decorating is where I share my DIY and decorating journey as I remodel and decorate the 1948 fixer upper that my husband, Matt, and I bought in 2013. Matt has M.S. and is unable to do physical work, so I do the majority of the work on the house by myself. You can learn more about me here.
The top does look much nicer in the darker stain. Good on ya! I used to stain all of my painted wood furniture the way you described and never poly-ed or waxed over it. It does seal it nicely. Now, I like more of a “clean” distressed look. The table came out beautifully!
Thanks, Jean! Do you have an example of a “clean” distressed look? I’d love to see what you mean.
I’ve been out of town doing a vintage market, but as soon as I get settled back in, I will send you some pictures of what I mean.
no clean distressed photos ever showed 🙂
I am lusting after that table, it turned out gorgeous! I have to stop reading your posts…..I will never finish any projects with new inspiration that I get from your posts! Shame on you! lol….I haven’t ever heard of the vinegar and steel wool treatment, definitely something I want to try. Geez, I must live in a cave, so many new finishes I haven’t ever heard of before! 🙂
hmm I do have a question now. In the cabin the upper section of the cabin was an add on and they used plywood for paneling, quaint for a mountainy type of look but I don’t like it AT ALL. It looks gross to me like it isn’t finished. Do you think this type of finish would work on plywood? A big job but if you get that kind of look (as in your coffee table) I am thinking it might make that nasty plywood look better too…..What do you think?
I’d certainly be tempted to try it, Wendy! Is there an inconspicuous place where you could test it out?
Yep I could try it on a wall in the loft. This might be just the thing to make the walls on the upper part of the cabin look great. It wouldn’t be so bad if the walls matched the lower half especially in the loft area but as it is now it sticks out like a sore thumb. I will let you know how it turns out….this may be another Monday project to finish in the future! 😀
That’s a hit for sure! I love it. And I like how you used the jig for connecting the boards for the table top. What size screws did you use? I’d be afraid they’d go through.
You actually have to use the Kreg screws. 🙂 I think the ones I used were 1 1/4″ long…maybe 1 1/2″. It worked perfectly! But yeah…the Kreg screwdriver bit that comes with the kit isn’t a standard Phillips or flat head screwdriver bit, although it does look like a Phillips screwdriver would fit into the screw head.
My hubby has a Kreg jig and LOVES it. It was especially useful when he made the fort for our kids, so no screws or nails are exposed, just a smooth wood floor for them. We were thinking of doing a kreg jig post, but I may just mention yours and link up. Let me know when it goes live :). This is my first fort post, but we will be a doing a whole series next week:
http://westernwarmth.blogspot.com/2012/07/building-fortand-love.html
That turned out lovely. Maybe I need to add a Kreg jig to my shopping list 🙂
wow! so cool… I didn’t know about this type of treatment. I totally agree with how lousy the stained pine looks, it reminds me of those cheap waterbeds with huge bookcase headboards from the 70’s… oops, I guess I’m dating myself. 🙂 thanks for the great tute! Little Bit
I am blown away by your patience and diligence with this project and many of your others. You are so focused and the results are inspiring. Thanks for the detailed explanations, even when you make a faux pas, it helps me understand the process. Beautiful table looks like something at expensive furniture store for $500!
Nicely timed! I just saw this technique earlier in the week but it was simply one of those “handy tips” that have no comments or demonstrations showing how said tip works – now I know that it works beautifully – that first photo of the entirely stained table is *exactly* the sort of color I want for my new bedroom when I move next month – yay!
Awesome table! I just stained a table top using the same method and will definitely be using it again. You can see it here. http://thestyledsoul.wordpress.com/2012/07/12/table-update-and-a-little-reminder/
Love the color of your table top!!! The whole thing looks great.
Awesome table! I just stained a table top using the same method and will definitely be using it again. You can see it here.
http://thestyledsoul.wordpress.com/2012/07/12/table-update-and-a-little-reminder/
Hi Kristi!
The table turned out beautifully!
I have never heard of putting the stain over the paint…but, it makes sense. Looks great too.
Regarding the wood conditioner. I stained a whole house before I learned about it…the difference is amazing. Get some and try it. It really makes pine look very even in coloration.
Take care!
I used wood conditioner on my butcherblock countertops in my kitchen. I was very pleased with the difference it made! I’ve never tried it on pine, though. I’ll have to do that!
Loving the finished product, especially the dark rich wood top. Will have to try that! Also looking forward to the post on the Kreg Jig. I had to do a web search just to see what it does and it already went on my Amazon wish list!
If you go onto YouTube and watch the videos about the Kreg Jig that are actually by the company, I think you’d probably want to go TOMORROW and get yourself one!! 😀 I love mine, and I’ve only used it once. I can’t wait to start building actual furniture with it. I can now imagine that building a coffee table from scratch like the one above would be a pretty simple task now that I have my Kreg Jig. Buy it! You won’t regret it!
Not sure I can justify it right now (sigh!), but it’s high on my want list! I did check youtube and am doubly sold on it – there are lots of projects I can imagine trying with that that I think would be out of my league without it. My birthday and Christmas are the same month, so it’s going to be a long wait if I have to wait for it as a gift! LOL
The table looks beautiful. I never would have thought of taking off the crappy top and replacing it, brilliant!
Hi! I just found your site by Pinterest and I love it! We have used the steel wool/vinegar/tea method on pallet projects and it turned the wood really dark which was gorgeous, but since we wanted a lighter weathered gray look you can just sand off some of the color and it’s gorgeous underneath! Love your table like it is!
I had no idea I could revamp my coffee table with just a few things that I already have around the house! I’ve been meaning to give that table a facelift for a while now! Between keeping up with my job at Dish and the rest of the household, I never have time to shop for staining supplies. This project idea is the perfect solution! How do you find out about this stuff? The only place I know to turn to for DIY help is DIY Network, and now your blog! My DVR is filled with DIY shows; it’s addicting! Luckily, I have the Hopper DVR that has plenty of recording space to accommodate my little DIY obsession. They never show ideas as simple as this one though, so thanks for sharing! I look forward to seeing how it turns out for me!
Hey! I’m about to build a farmhouse dining room table for my dining room and REALLY didn’t want to have to buy expensive wood for the top, but I knew pine wouldn’t stain well so I didn’t want to use it. NOW I can rethink buying that pine top! I also have a kreg jig and can’t wait to put it to good use! I do have a question though…..is there a reason you didn’t use the kreg jig on the apron of the table to connect it to the table top instead of using the L-brackets? I just wondered because I had planned on putting mine together that way and now wonder if there’s a reason it won’t work. 🙂
Thanks for being the staining guinea pig!
Hugs!
MIssy 🙂
Hey Missy! If I were making the coffee table from scratch, I certainly would have used the Kreg Jig to put the whole thing together. But since I found this at the dumpster at my condo 🙂 it was already put together with the L brackets, so I just left them attached to the apron and reused them. Your Kreg Jig would certainly work, and probably make everything sturdier in the end. Can’t wait to see your table!
Well that makes perfect sense! lol I went back and looked at your first picture…..if I had been paying closer attention I would have noticed those L-brackets in the first picture! 🙂 I’ll send you a link when I get my table done. I’ll also send you a link to the window seat I just built in my dining room when I get the post done….it turned out doggone cute! :0)
Thanks for letting me know I can attach my table top with the jig…I thought I was missing something! lol
Missy
your table is so pretty! i love what the whole vinegar thing did, very cool!
This table really looked really great after the makeover. Im going to stain a piece of Cherry wood ( making a “wand” for my 8 year old brother ;o) and I want it to get that lovely dark reddish colour Cherry wood can get. Is this the right way to get it, or would you recomend another method?
Hi there,
Just stumbled on this post and wondered if I could offer a suggestion. I agree that pine (and other paint-grade woods like poplar) can be tricky to colour without covering the grain pattern, but it’s possible. A simpler solution to the one you posted here would be to apply one or two thin coats of half pound cut shellac. You just want light coats because all this is intended to do is seal the pores of the wood so it will take whatever stwin you are using evenly. I just use a regular amber shellac that I make myself, but you could also use Zinnser or similar. The amber colour won’t have much effect on the stain unless it’s really light. In which case you could use dewaxed (white) shellac.
The mixture of vinegar and steel wool creates a chemical stain that is used by woodworkers to ebonize wood. This blackens the wood without obscuring the grain. Typically, woods with higher tannin content will react more dramatically with this treatment.
Another way to colour wood without obscuring grain is to use aniline dyes dissolved in distilled water – places like leevalley.com sell these. You just needto pre-raise the grain as with any water-based finish on wood.
Hope this might be useful.
So sorry for the multiple posts — I was typing from my phone and kept getting an error message.
Any idea on how this would look on oak. My mom gave me an old table and she said its oak. It’s yellowish and I want it to be dark.
Tiffany, my experience with this has been that each time I’ve done it, I get a different result.
What color paint did you use on the legs? My fiancé just made me a vanity and we stained the top dark and I wanted either a soft white or a color similar to this for the x-legs (:
Hi! Love the coffee table. I’m wondering what paint color you used for the legs. It looks like Behr brand and you said it was an aqua base…wondering what the color is?
Thank you for taking the time!!!
Julia
Hello – I love how the table top turned out. Great color. I looking to do a dining room table in yellow pine (2x lumber) and want to tone down some of the gold/yellow in the wood and bring out a more muted brown overtone like you’ve done here. May I ask what stain (brand and color) and final finish you used after the vinegar/steel wood solution bring out the rich deep brown (walnut-like) tones?
This is TRULY what I have wanted to do to my pine pieces that I have collected for our new home….Thank you so much…..
Awesome project Kristi! I was just wondering what kind of wax you used on the table top? It looks great!
I can’t remember if I used Minwax or Annie Sloan wax. I have both, and have used both. I want to say that on this table, I used the MInwax. It’s a lot cheaper, and you can get it at Home Depot.
I was wondering. When you were distressing the table legs and then applied the stain, which you said you let sit for a few minutes before wiping off, did the stain completely wipe off or did it turn the blue around it a purply color and if so how did you fix that or did you just blend it into more or the paint?
I think it wiped off completely. I don’t remember it turning the paint a purply color. But if it’s leaving too much, you can use a little bit of mineral spirits to remove the excess. If you’ve used latex paint, the mineral spirits shouldn’t affect the paint at all, and it’ll just remove the excess stain.
You are amazing. Every time I google something to find an example of something I want something I am working on to look like, I click on the picture that I like and its YOUR stuff. I am expanding my business and putting in a classy and rustic bar area. I am learning a lot just by your website. Thanks so much. I wish you could come help me finish this job so I can open. LOL.
I am so excited!!
I bought a pinewood kitchen table yesterday at a second hand store for $25 that I was planning on making something VERY similar with. I think my legs will be white and the top stained. I am SO HAPPY I found out staining pine isn’t to recommend. I will do what you did with the home made stain. It looks amazing. And exactly what I was looking for!
Thank you 🙂
Don’t use the vinegar and steelwool on your pins table!!!
I did the vinegar and steelwool treatment on pine a so definitely don’t recommend it. My table looks dark grey kinda greenish and just isn’t right. I saw some others that turned out brown and that’s what I was going for but I guess those were different types of wood. Oh well… I’m going to try staining a store bought stain over this mess and see what it gives me.
I built a small end table and decided to try the steel wool vinegar and tea treatment to antique it. the wood I was using was maple. after 3 coats it looked absolutely gorgeous. it looked grey with a hint of purple/blue…….but then I put on varnish…and it absolutely wrecked it, what was gorgeous turned into dark patches and spotty unbalanced surfaces. I then sanded off what I could and applied a stain varnish that was a grey color to mask the disaster. it was a learning experience… great without varnish.
Did you use a spray paint on the legs or a paint brush? It seems like you used the antique Aqua from Benjamin Moore, is that correct? Thank you!
I have looked at several different sites on aging pine to make it look like reclaimed pine and by far your table has the best look I’ve seen yet. Thanks for posting the tabletop that you did last year (well, I guess it’s been years now 🙂 ) in comparison as that is what I’m trying to avoid and many other posts of aged pine have that look and people seem pleased with it. I guess it is all in what you like. My reason for researching different methods is because I’d actually like to to do this to new pine flooring. (A huge undertaking….I know this confirms my insanity.) I am renovating a house and thinking of going with inexpensive new wide plank pine flooring. I love the look of the reclaimed pine, but it is far far out of my budget range! From all that I can see, it is much safer to go “natural” with the pine and not try to stain it dark but that is what my heart is set on! At least a medium shade. Although I must say that some of the dark stained pine floor “disasters” I’ve seen really make the natural pine floors look quite sweet in comparison and so I haven’t ruled out the natural finish as I’m certain it would be safer! I do believe I’ll try your method on some extra pine boards before going full scale though. Since this is for flooring, do you or anyone else have any suggestions as to what I should use as my final top coat to protect the finish? I really think the look that I’m after (that “reclaimed” pine floor look…..and I’m not crazy about those that overly distress and probably the reason I like this tabletop so much) would in the end have a matte finish…possibly satin, but not gloss. I love the wax finish, but for a floor I don’t think that would be an acceptable top coat. I do have some questions for you. Have you ever gotten to try doing this with pine again using a wood conditioner and if so, what differences did you notice if any? Also, I just want to confirm that the stain you used on the tabletop was MinWax Special Walnut, right? Also, did you use white vinegar and black tea I am assuming? Any additional advice would be appreciated! Thanks.
I have a red oak table that I want to distress using the vinegar/steel wool mixture, but have heard that the oak turns out black. Do you have any suggestions to lighten it up. Do you think if I use 0 grade steel wool instead of 0000 grade, and not let the mixture sit so long that it wouldn’t be so dark? Thank you, Jackie
Hello, I’m trying to do the vinegar and steel wool stain, but it’s not working for me. I put white malt vinegar in a glass jar, dropped steel wool inside and sealed it with a metal lid. It’s been two days and not the slightest change of color! Any idea what’s happening? I’m wanting the old gray wood look. Looking forward to hearing from you. Thanks!
Juiwanna
I want to try this on my pressure treated pine fence. Can you recommend a dealer to make it weatherproof?
I just did the vinegar/wool/tea thing and it initially looked amazing but gradually turned orange ish. It’s horrible how. The weird thing is I’ve come across other people who did it and it came out amazing!
I have been trying different ways to use the tea/vinegar/wool to age wood over the last couple weeks. First I ised cheap Walmart brand white vinegar, Walmart brand black tea, and 0000 steel wool. I also use Mason jars with metal top for the mix. That is what I used incase ppl want to know. First when use mix the steel wool and vinegar the mixture will not always change colors in the jar. Almost always it was clear. Wait 24sband that is good. Now I am not chemist but it seems that if you want darker aging brew the tea let it sit for 45-60 mins hot then use it right away. Also the amount of tea bags you brew make a difference also. I used 12 bags for 5 1/2 cups and it was dark. I like it at 9. Also you can lay multiple coats of the tea to make darker or wipe it off after you put it on to make a light grayish color. Note that the TEA will not change the color of the wood until you add the vinegar mix. If it not dark enough then use another coat of vinegar after 30 mins. Will add about 25% darker tent. On pine I use two coats. The first one looks a lil Greta while the next one looks like a slightly dark red oak wood. Very nice and a lot cheaper than red oak wood. But the best way is to try different tea amounts and vinegar coats to find that color you like. Don’t forget to beat up the wood with rocks nails and screwdriver to make it look older or you just have a perfect piece a wood that looks stained not old.
Hi, Could you please tell me what color blue and type of paint you used for the legs? I love the color!
My husband built a bookcase for our daughters room. It’s made of untreated new pine. I want to do it an antique white with the distressed look. Should I stain the wood and then use a chalk paint over that, or chalk paint it the color I want and then use the homemade stain?
Well I just tried the vinegar and steel wool combo and I used pine wood. Well it looked good wet, but when it tried it was a milky chalky light reddish rust color. Not at all what I was going for! I put on another coat and it dried the same way. Now I am thinking of using the black tea mixture. I will see if that lightens it at all. I suppose I could stain it, but I was hoping to let the natural grain of the wood show through. There are some nice knots that I would love to show. I am making a headboard for a twin bed. I do like the grayish color you got with yours. Your table is beautiful. I love the rounded edges too. I may try that.
Quick question — what kind of tea did you use? I tried this and mine turned out a lot grayer than yours did. I’m wondering if that has to do with the tea? I like the warm tone in yours (before you added the dark walnut stain).
Thanks!
I used Lipton tea bags.
There is a difference in the vinegar you use though. The apple cider will give it the grey look and the regular white vinegar will give it a darker look. That may be the issue 😉
I aged some pine and pallet wood which I believe was fir. The first step to get best results is heavily steep some black tea… I used orange peko. Apply liberally to the wood and let dry. There needs to be tannin in the wood to get the best results which you get from the tea. I actually usually leave the tea bag in my mason jar until I brew the next batch. The next step is to apply the vinegar steel wool mixture, I used a small handled sponge from the dollar stop… work fast to avoid blotches. If you desire a darker colour reapply the tea let dry then coat again with the other solution. If you find your. Inevar solution is staying too reddy brown add a bit more white vinegar to the mix and mix well. Different types of wood react differently to this process and so you will obtain varying numbers shades of colour. Pine turns grey but only if you use the tea mixture first to provide the tannins.
Love! What is the paint you used for the base? Brand, color, and sheen?
Hi, I have been looking for someone who’s used gel stain over white primed wood/cabinets (i only found 1 who said they tried one coat, hated it, and gave up but would’ve needed 3 coats to look good, so still don’t know) AND.. someone who took pine to a nice dark color, which was how I found you, which you’ve done beautifully! Only problem was that I noticed the color didn’t get to what I thought was that gorgeous rich dark shade until AFTER you applied an oils based stain on top, but don’t see any details as to what kind of stain (gel perhaps?) Or color was used? A several posts said they try the tea because they love the rich dark color, so I’m thinking I’m missing that you added that info somewhere? Love to know! 🙂 I’d already added some conditioner and stain w a top coat, before gel stain was a thing, and really want a dark rich color to a very thick rustic pine table (sadly that means the chairs too) so hoping that your work means I have a good chance of gel staining right over whatever the hell I used as a top coat? (BTW I added the fact that i was looking for info on the gel stain over primer on case you’d tried, I think,i know what would make it not turn out good and just needs a little extra prep but if you have any thought… 😉
This is actually my new go-to method for finishing pine. I get consistently good results (unlike with the vinegar/steel wool thing, which is very unpredictable), and I’m able to get a nice brown finish without the typical orange and yellow pine grain (which I can’t stand). https://www.addicted2decorating.com/how-to-refinish-pine-wood-countertops.html
BTW,,i do a lot of searching & looking, but not commenting & questions, and thought I had to come back & tell you that one of my favorite things about your blog, that made me think to look for a “like” and/or follow” button (I NEVER think to follow anyone afraid it may mean I’ll could get even more things in my inbox) but the fact that you included not only details of a previous stain job that came out bad,,but then ADDED A PICTURE OF IT! I just immediately addored you for it!