Desk Chair Upgrade — Swapping Legs For An Antique Wood Swivel Caster Base
A week or so ago, my mom and I reupholstered my desk chair in a beautiful dark red velvet fabric. The chair started off looking like this after I bought it and added the casters to turn it from a dining chair to a rolling desk chair…
If you missed that post about adding the casters, you can see it here: Dining Chair To Office Desk Chair Mini Makeover
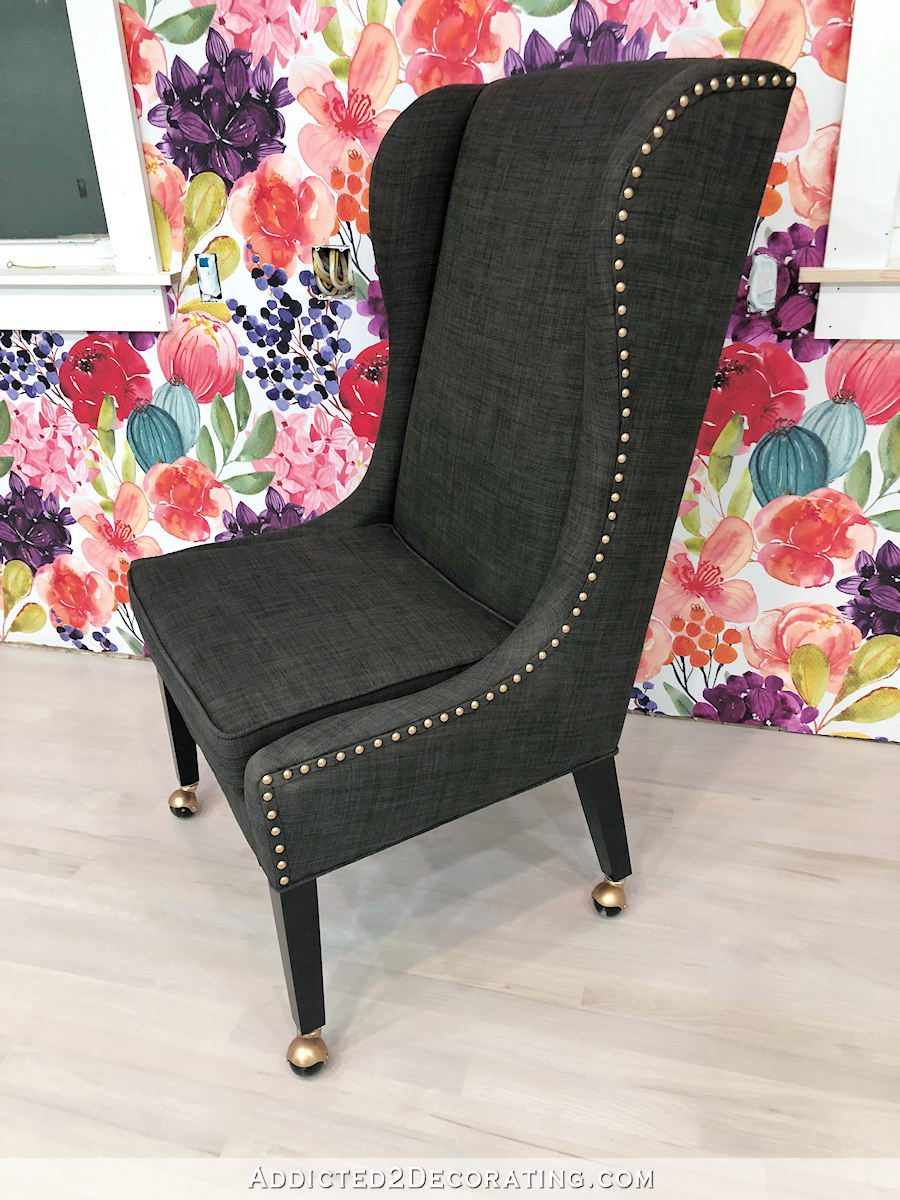
After we reupholstered it, it looked like this. The fabric was so gorgeous, but those legs just weren’t working for me.
If you missed the posts about reupholstering the chair, you can find Part 1 here: How To Reupholster A Chair – Part 1 (Removing The Fabric & Making Patterns)
You can find Part 2 here: How To Reupholster A Chair – Part 2 (Attaching The New Fabric To The Chair)
And you can find Part 3 here: How To Reupholster A Chair – Part 3 (Adding The Finishing Trim & Nailheads) – It’s Finished!
After going to all that trouble to reupholster the chair, and after ending up with such a beautiful result, I just couldn’t stand those legs. I didn’t really like them in the first place, but they were tolerable with the black fabric. With the dark red velvet, they seemed so out of place. So I searched online for a replacement wood swivel base for a desk chair.
Well, those things are very hard to find, and the couple of sources I did find were EXPENSIVE! One source sold the parts separately, and if I added everything up, it would have come to several hundred dollars. Of course, you can buy the plastic ones cheap on Amazon, but I had my heart set on a dark wood for my dark red velvet chair.
So I started keeping an eye on Facebook Marketplace for a desk chair with a wood swivel base with casters. After several days with no luck, I almost settled for one that was kind of mid-century (straight lines) in style. It wasn’t what I wanted, but at least it was wood. But then…JACKPOT! A woman in a neighboring town posted several desk chairs with wood bases, and about three of them looked exactly like what I was looking for.
My mom and I had planned to go yesterday afternoon to look at them, but then Matt ended up having a horrible day, and I couldn’t leave him alone. So my mom asked a friend to go with her, and they headed to that neighboring town to pick up a chair with a swivel base. My mom said it was a very interesting place. The woman selling them has basically filled her back yard and her three-car garage with stuff. Stuff piled upon stuff, filled with more stuff, and buried under even more stuff. On the phone, the woman described it as “a hoarder’s place” where she has to dig and climb for stuff. I thought she was probably exaggerating, but according to my mom, the woman is evidently very self-aware and precise in her description.
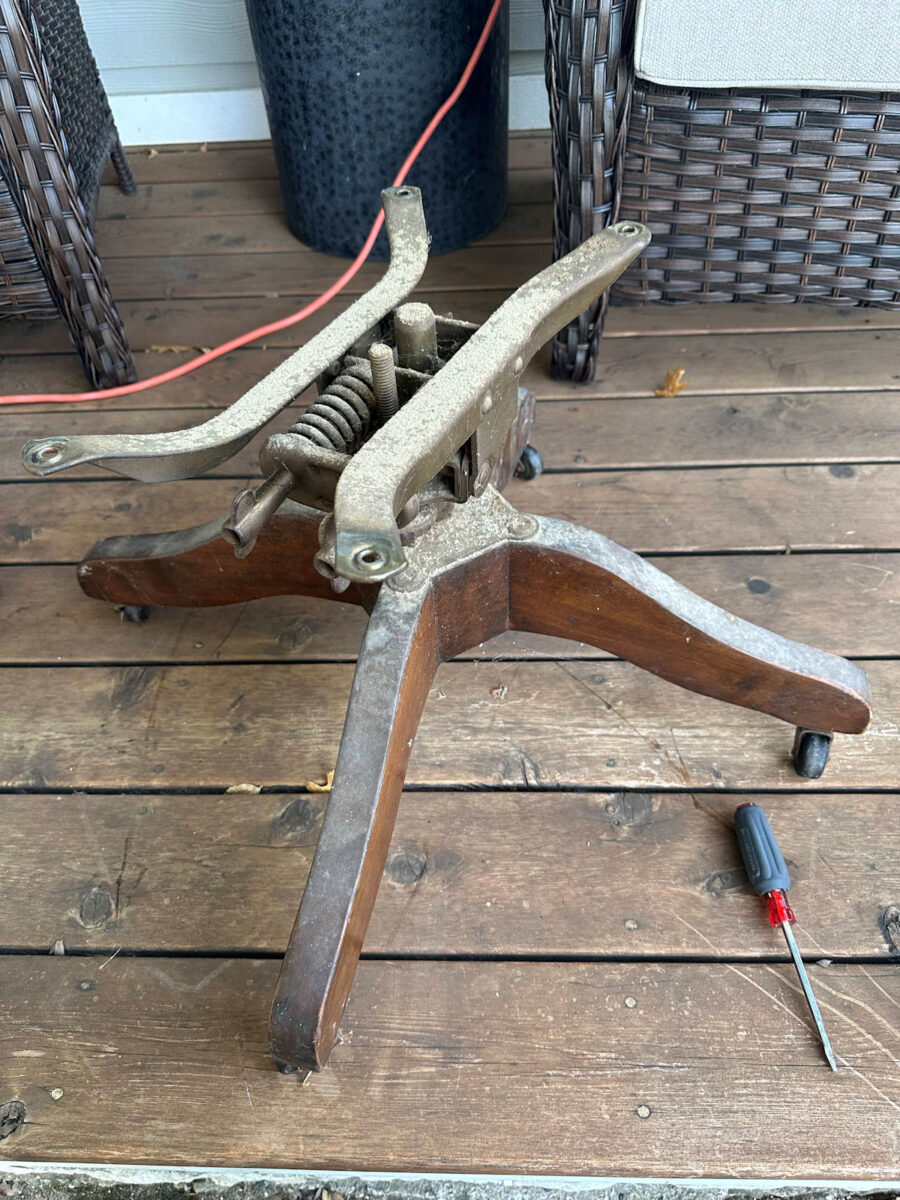
It was quite the adventure, but she came away with this beauty for $65.
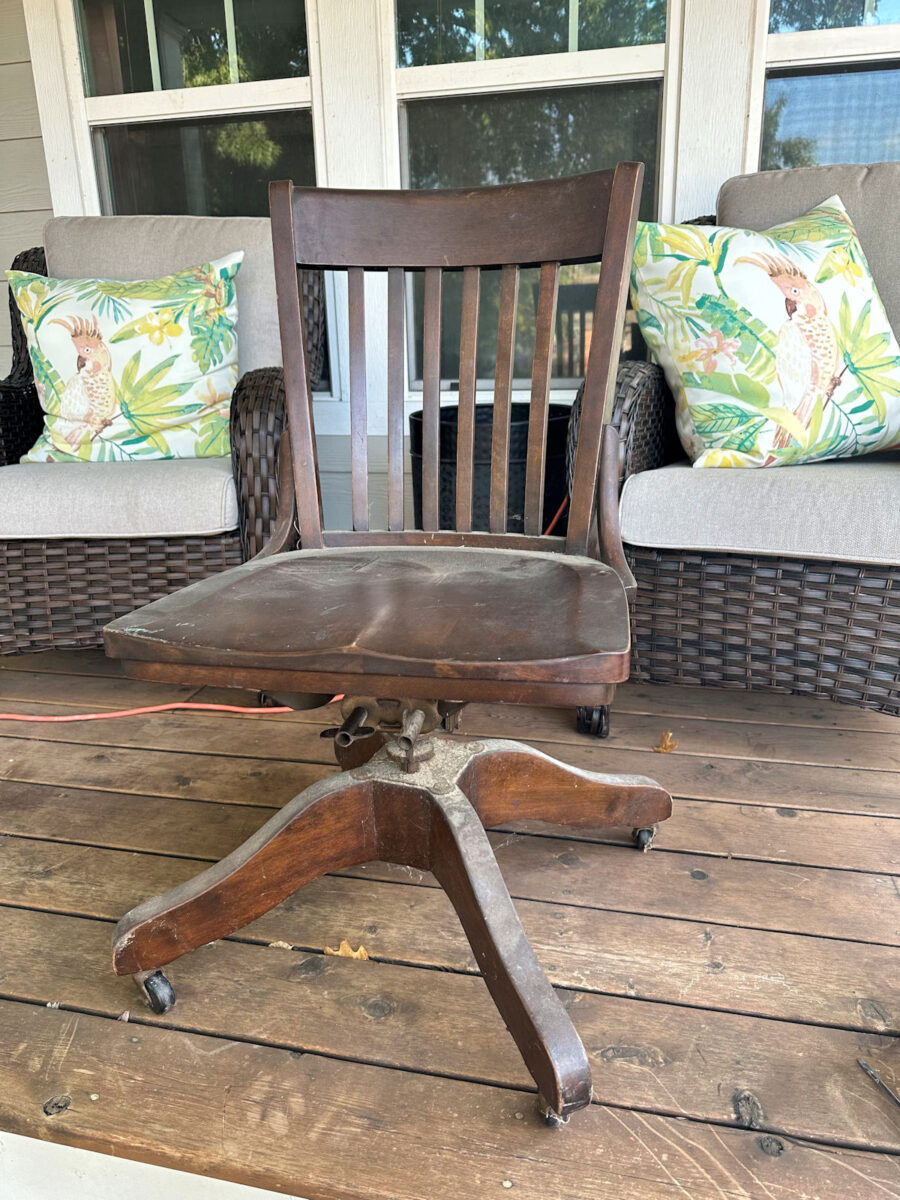
The chair was in great condition, but covered in a few layers of dust. The base swivels, can adjust up and down, and also tilts.
The base was attached to the chair with just four large screws.

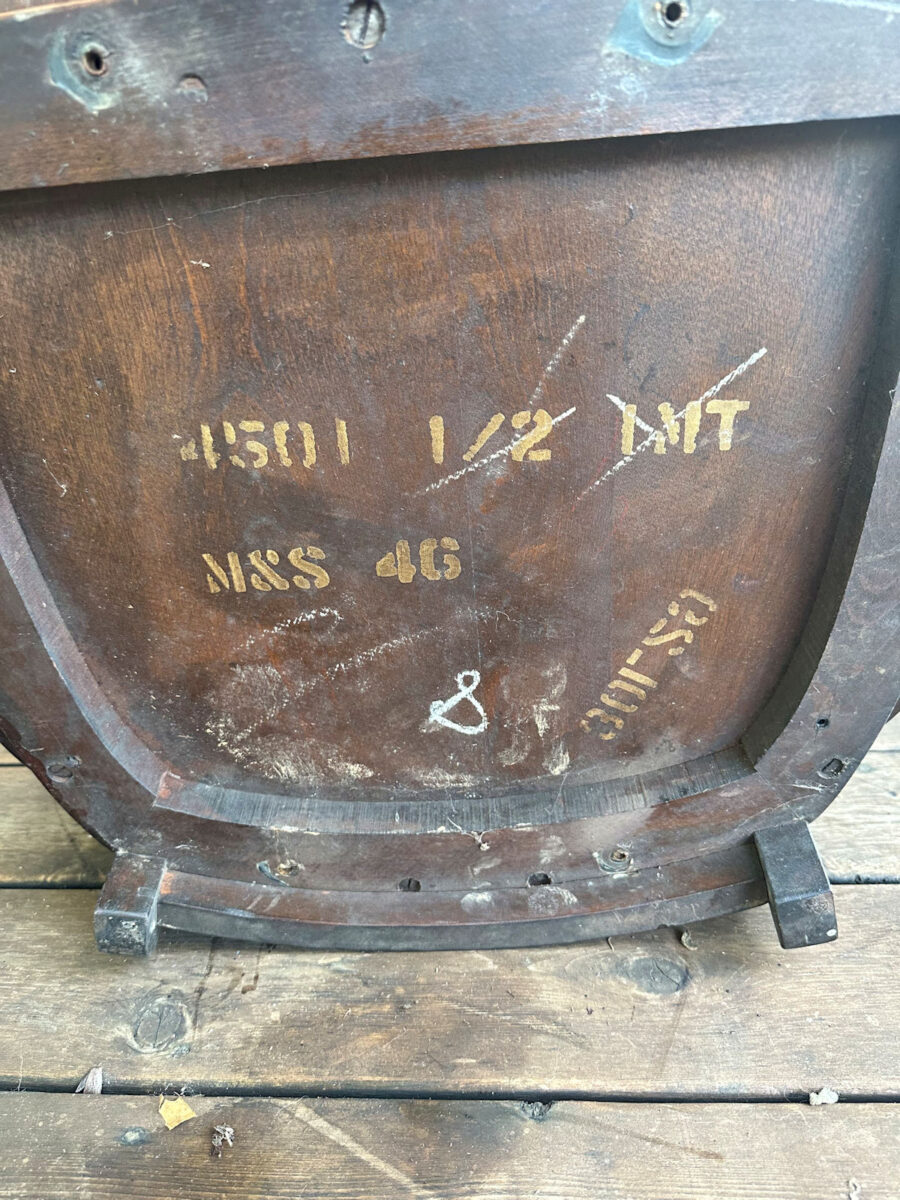
I found this interesting little metal stamp on the chair showing that it’s by The Marble & Shattuck Chair Company in Cleveland.
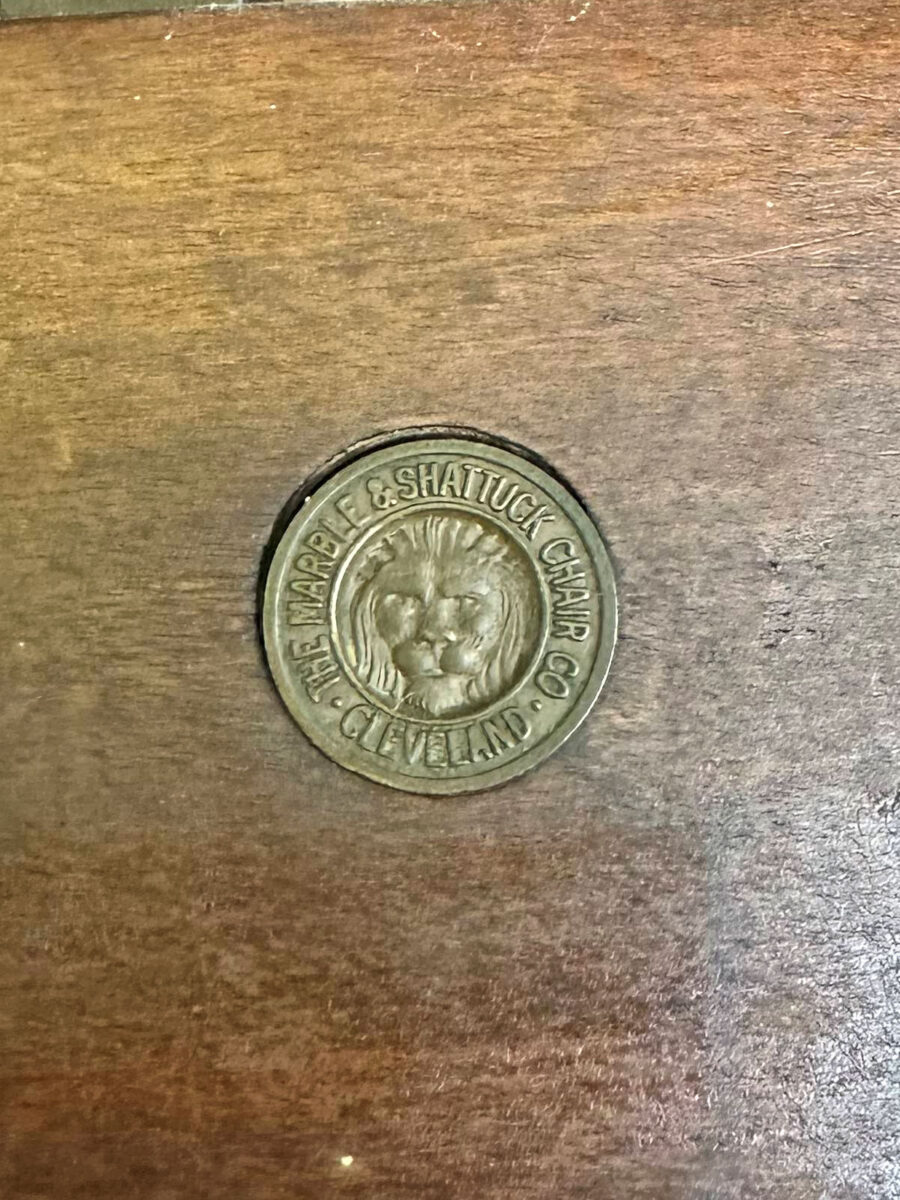
I googled that out of curiosity, and something tells me that I got this chair at quite a steal. I don’t know anything about antiques at all, but I think if this chair were cleaned up and polished, it could actually be sold for a whole lot more than the $65 that I paid for it.
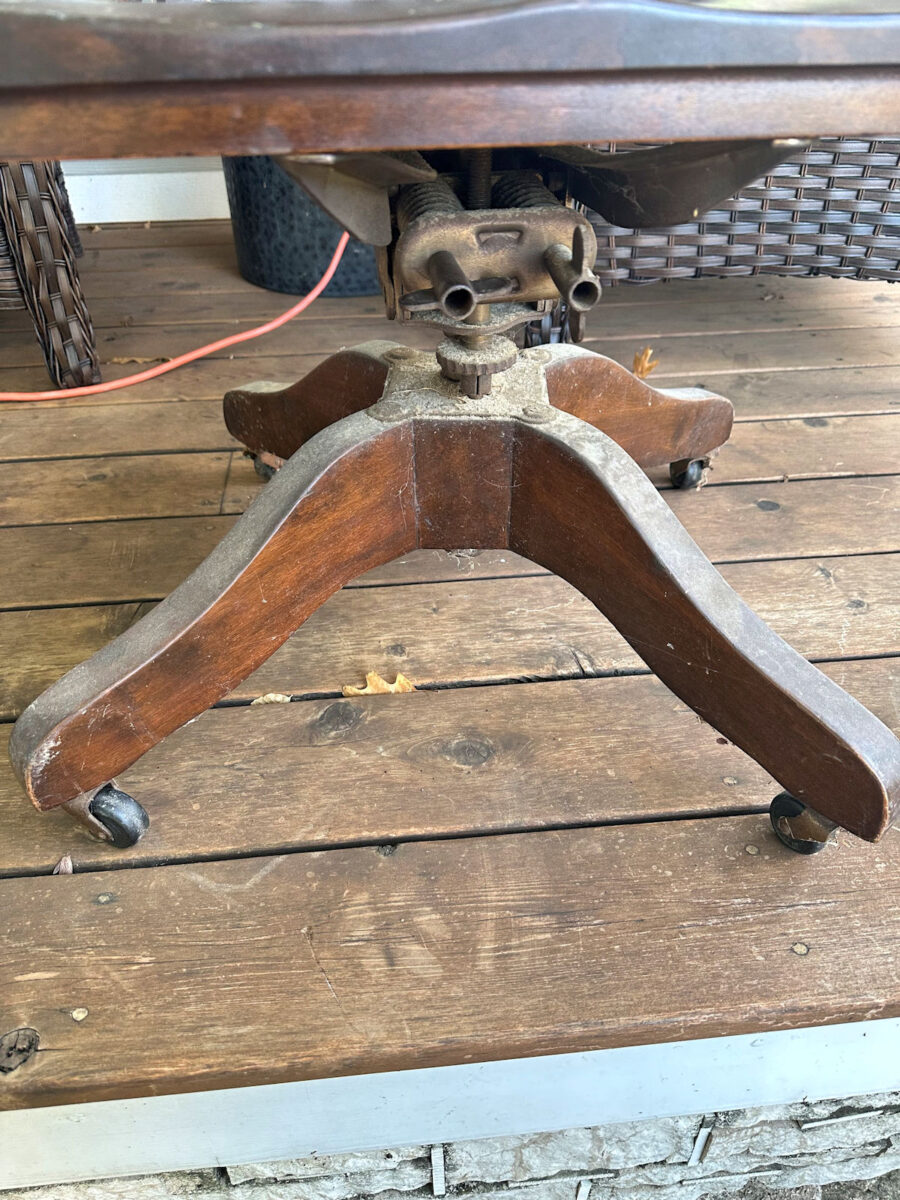
I won’t be throwing any part of this chair away. But for now, I only needed the base. I removed those four large screws holding it to the chair seat, and then started cleaning.
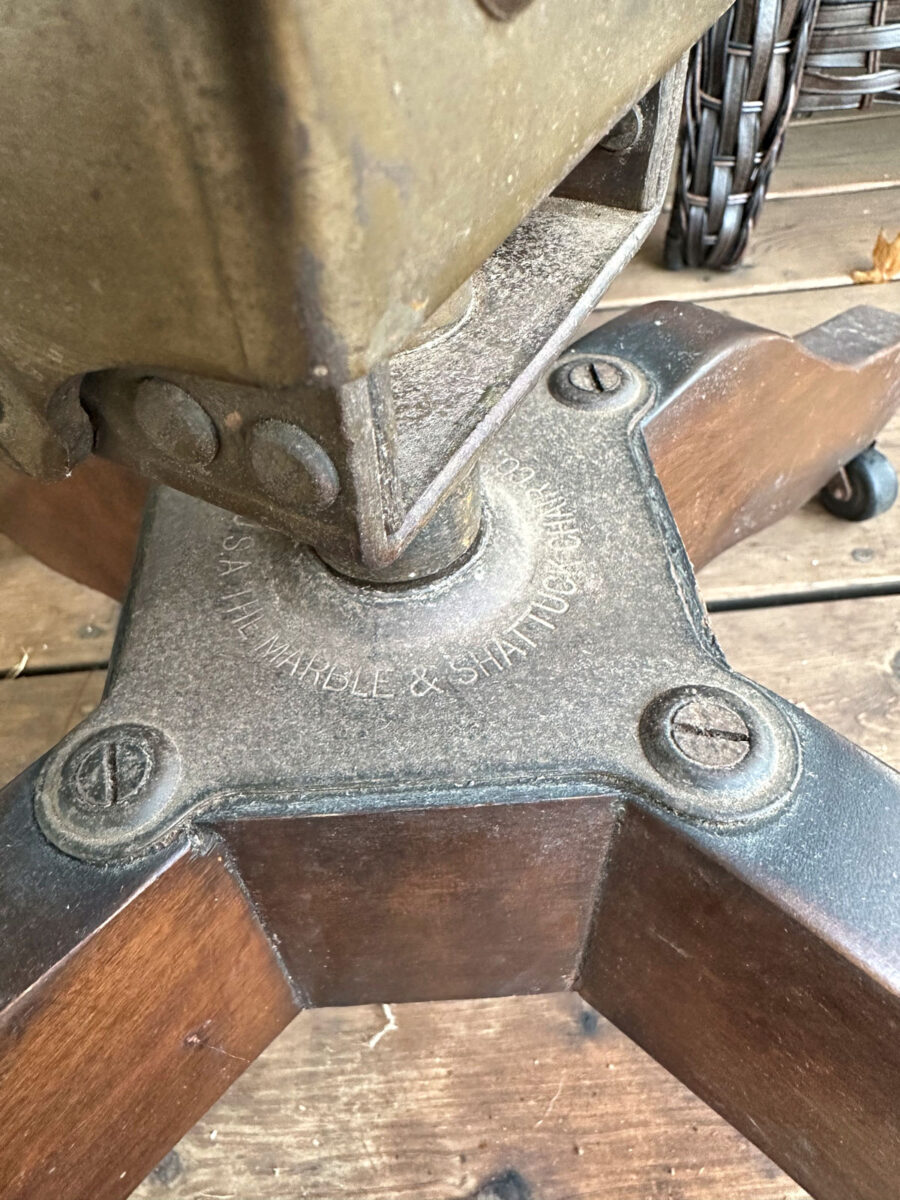
The metal on the base is also stamped with the company name and location.
It looked really nice after I got it all cleaned up! I think it could use a good oiling or waxing. The wood was gorgeous when it was damp, but it had a hazy look when it dried. But I didn’t have any good oil or wax on hand that I could use on it, so I left it like this for now.

I don’t know what any of these markings mean, but I took pictures of them in case some of you antiques experts may know.
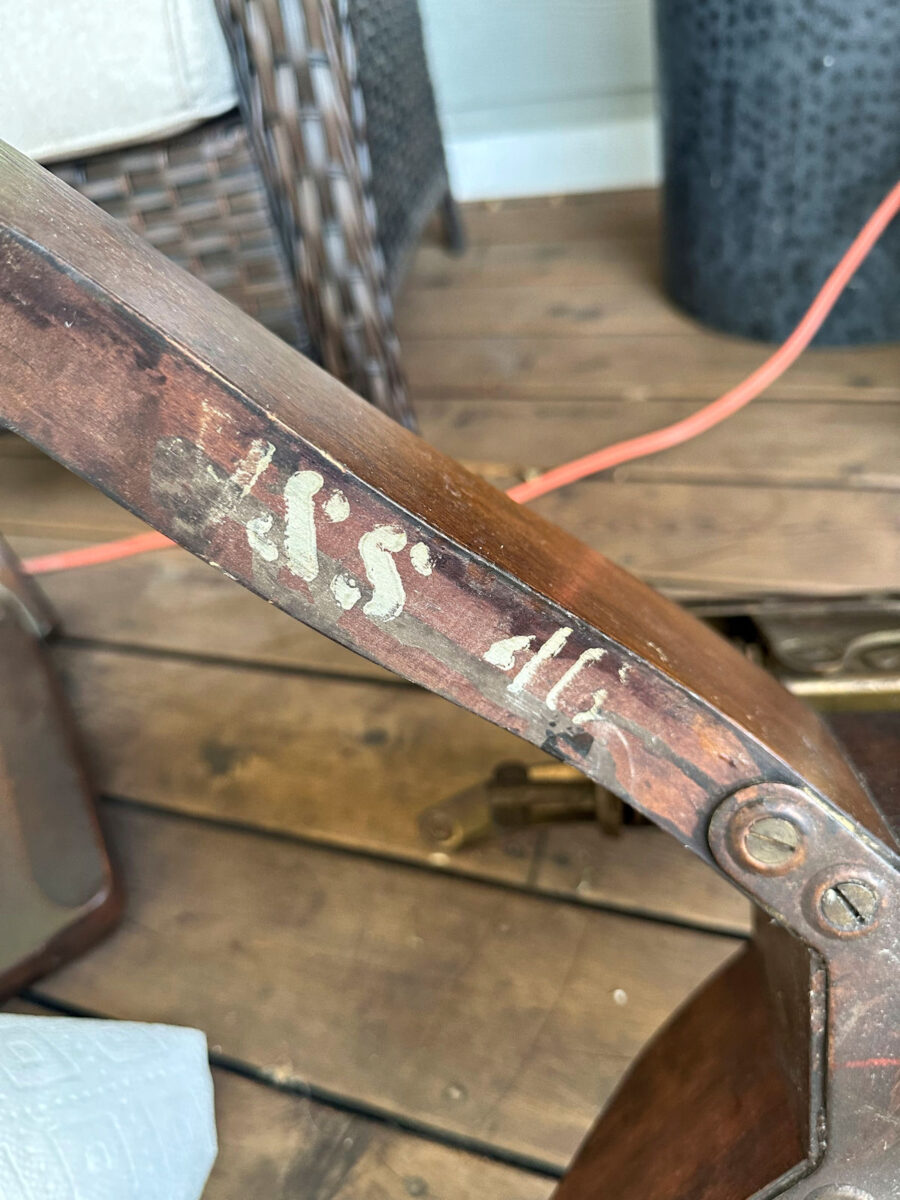
This is what was stamped on the bottom of the seat.
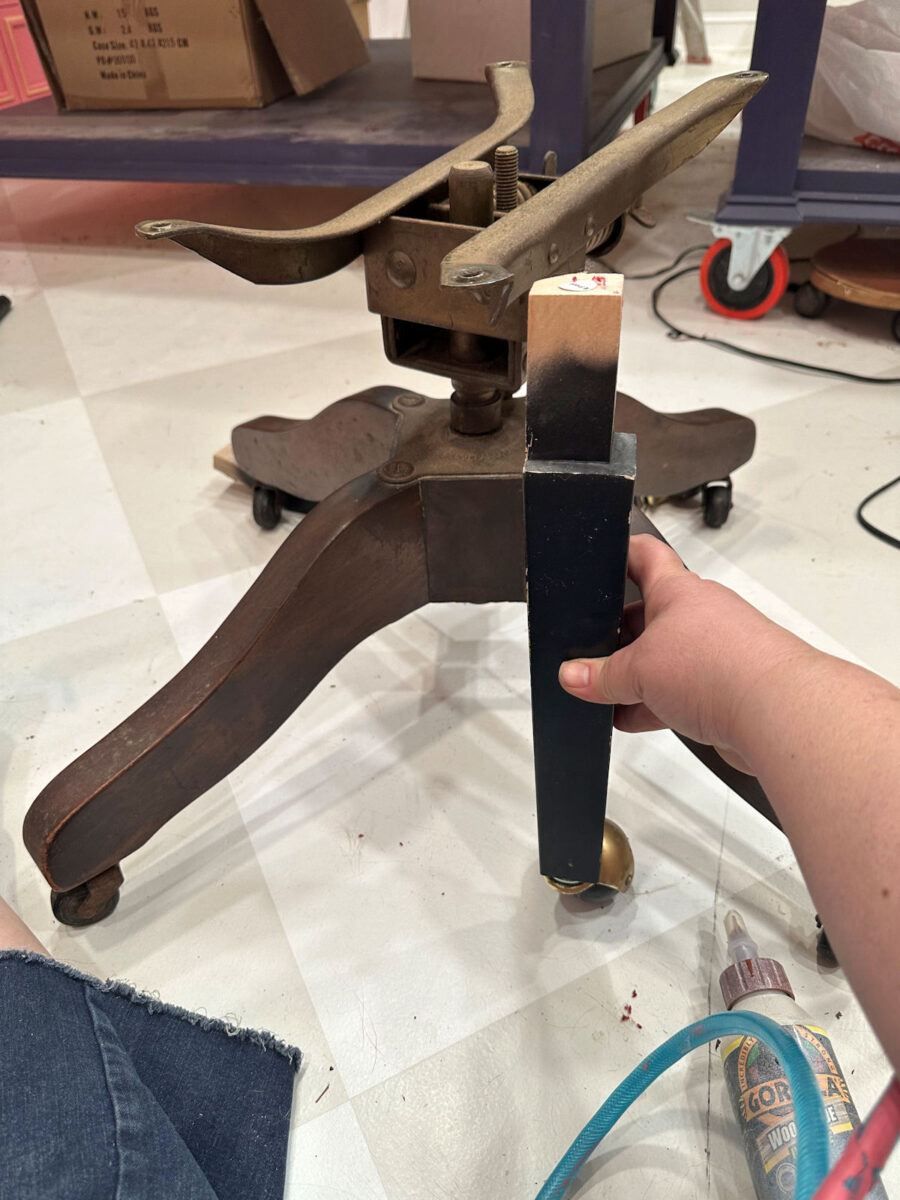
Anyway, I needed to figure out how to attach this to my chair. As you can see, this base is quite a bit taller than the original legs that were on the chair.
So I needed this base to be recessed in the frame of the chair seat as much as possible. I flipped the chair onto its back so that the seat frame was exposed, and then I cut and attached some scrap lumber, cut to about 1 inch square on my table saw. I placed these pieces as far to the top of the frame as possible, attaching them with wood glue and 16-gauge nails.
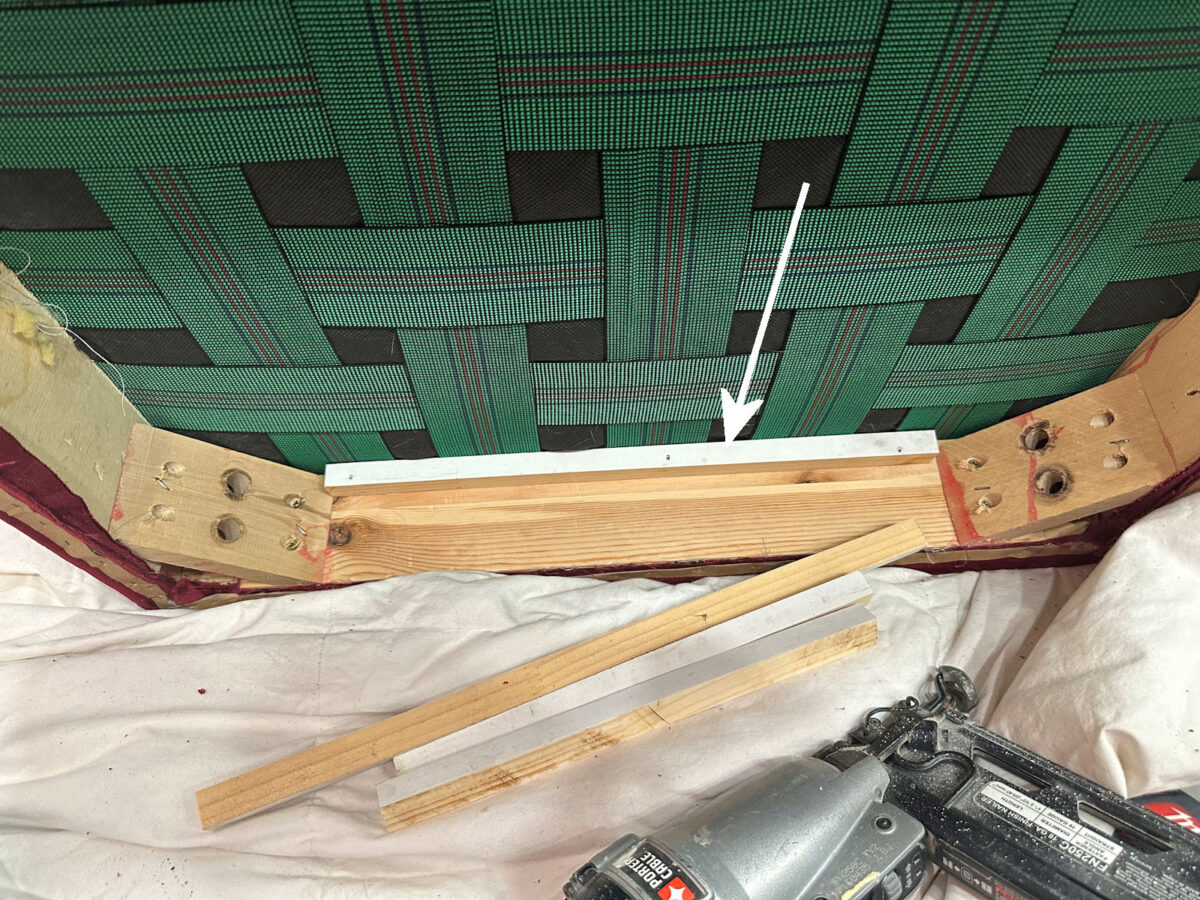
Here’s what it looked like with all four of them attached.

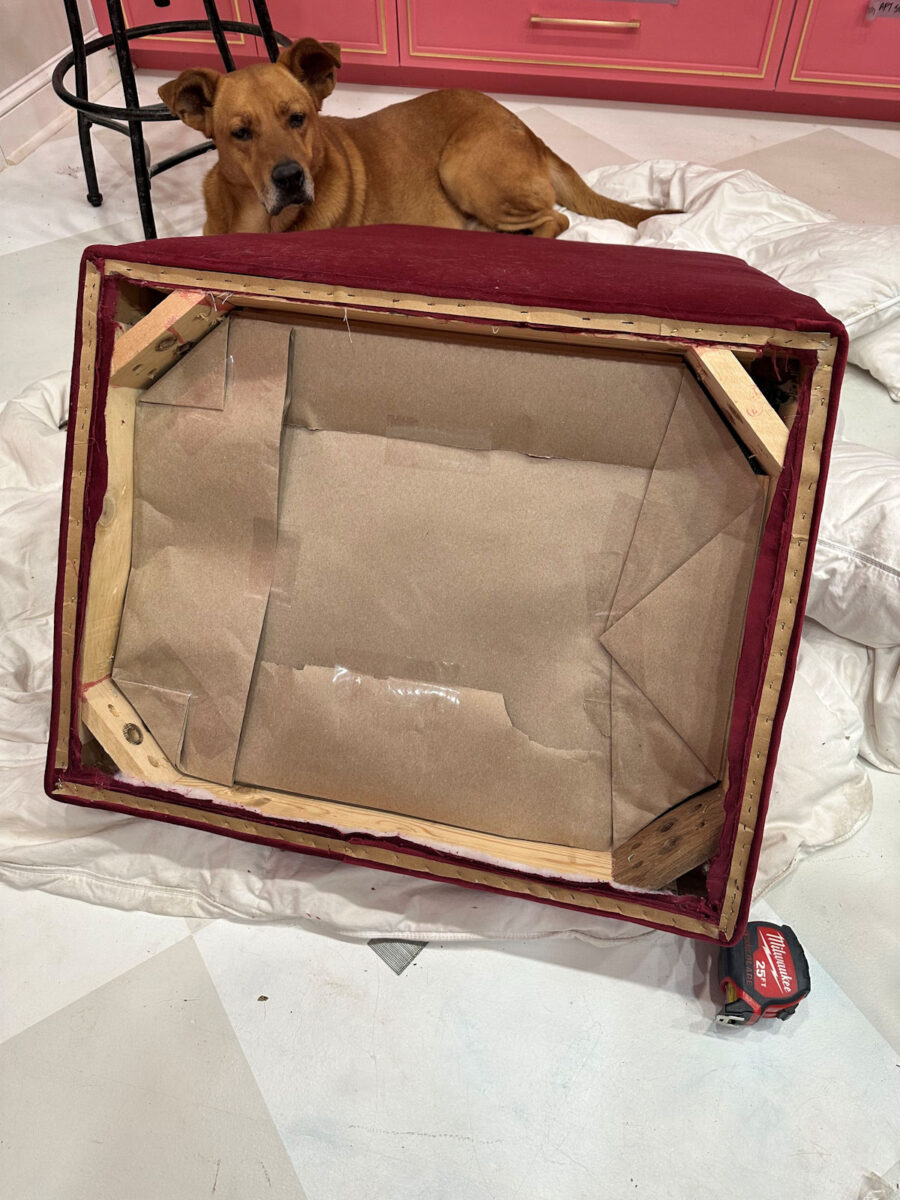
Next, I used brown craft paper to make a template that I could use to cut out plywood. I just folded and taped it with packing tape until it fit. My sweet Cooper was the perfect supervisor.
And then using that template, I traced the pattern onto a scrap piece of plywood, cut it out with my jigsaw, and then nailed it to those pieces I had previously attached to the frame.
I had to allow for these metal pieces that protrude past the top of the base…

So after taking lots of measurements and marking where the base would attach, where the screwholes would go, and where those two metal pieces would land, I used a 1 3/8-inch spade bit to drill out holes for those protruding metal pieces.

Then I drilled four pilot holes and attached the base with the four original screws.

And then I turned the chair right side up for the moment of truth. I was so excited to see how it looked!!!

It’s everything I had hoped for!! Here are a few different views without commentary.
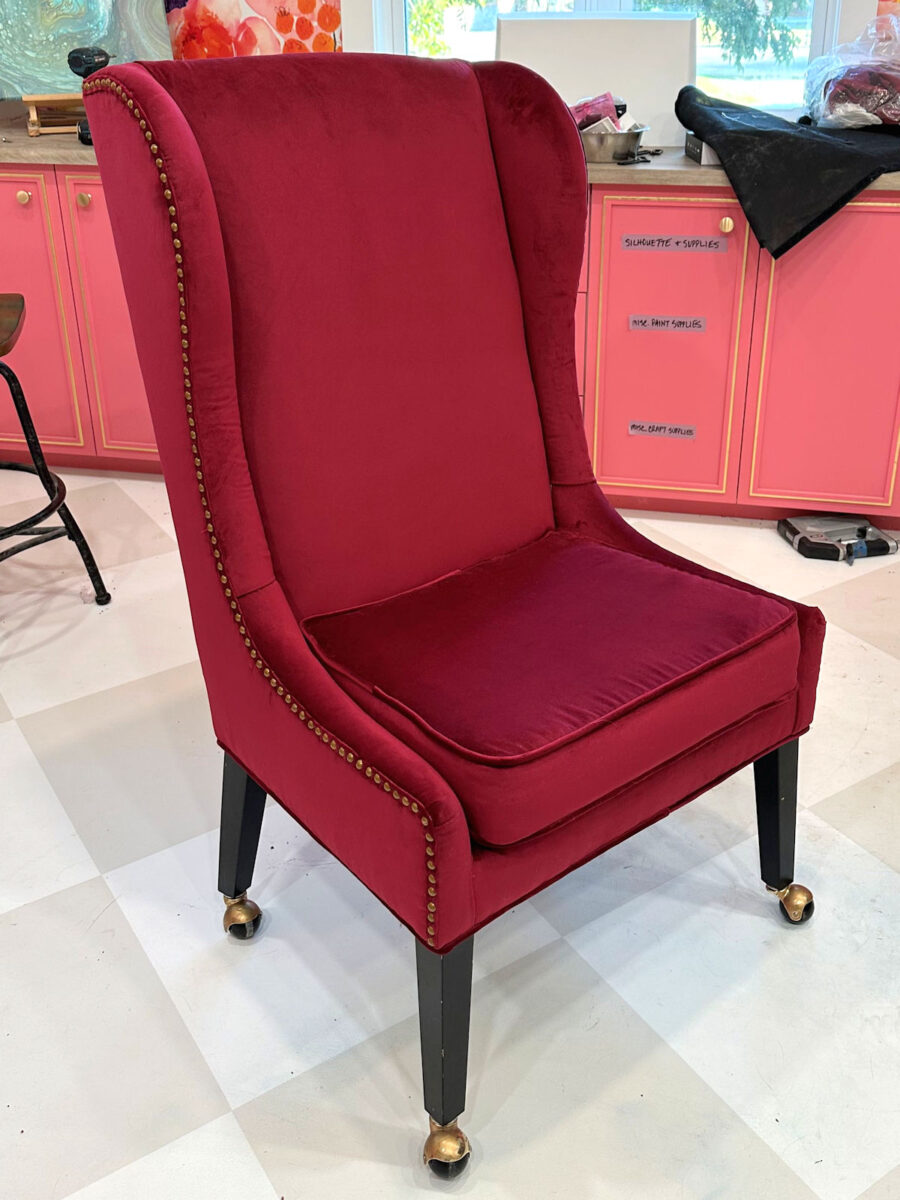
Isn’t that PERFECT?! I just love how it turned out! So here’s one more view of the chair before…
And here it is now with its new fabric and new base.

Addicted 2 Decorating is where I share my DIY and decorating journey as I remodel and decorate the 1948 fixer upper that my husband, Matt, and I bought in 2013. Matt has M.S. and is unable to do physical work, so I do the majority of the work on the house by myself. You can learn more about me here.

Ooph…where were you last year when I tried to turn my wing backed chair into my office chair. Now I am back on the hunt once again! Thanks for the directions!
GORGEOUS!
It looks fantastic! So glad this worked out for you. Your mom is a superstar!
I am gobsmacked.
Brand. New. Chair.
You rock!
Reply to Shiela Felix; I agree, love the color and fabric, but feel the base looks too small. It looks off balance to me, especially with the very high back of the chair. I do love the shape of the base. How does it feel when you sit in it?
I agree that the antique base looks too small for the chair but I’m glad Kristi is happy with it.
I didn’t want to be critical but I thought the base looked too small for the chair. However I haven’t sat in it and if it feels comfortable to Kristi then that’s all that
I believe Kristi is petite. I’m sure it’s adjusted for her.
I think if you saw it in real time, you wouldn’t think that. There’s not much more room for the legs to stick out where they wouldn’t go beyond the base of the chair. But thats just my opinion as well. 😁
I think the high back is just throwing you off. Enlarge the picture, it gives it a better feel.
I agree with Linda. At first, I thought it seemed smaller and too short, but the last photo changed my mind. The legs would stick out beyond the chair if bigger, and thinking of Kristi’s height, it is perfect for her. Also, the back is high, and that makes it seem out of proportion – but it’s a QUEENS chair, after all! 🙂
I love the look. My concern is how small the wheeled base looks for the size of the chair. Do you feel like it may tip when you are sitting in it? Overall it is gorgeous!
Sheila F.
That was my main concern, but it’s very sturdy. I’ve even tilted back in the chair, and there’s no danger of tipping. I made sure to attach the base so that it’s more towards the back of the chair than the front.
What a great find! You have a gift for adapting your furnishings to your needs. Nice job.
AWESOME!!! You clever thing you. It’s gorgeous. The markings under the seat on the chair are usually a model number, and/or size and stain color. We have a lot of turn of the century furniture and my dad’s dad was an upholsterer by trade and my dad explained the crayon and chalk marks of that time gone by. This was a period of time when hand crafted and machine made were intertwined. The pieces could come down the line and the maker knew which parts would fit it. I have really learned to appreciate furniture from this period, 1880-1920’s, the Army movers, bless their hearts, if it wasn’t sturdy, they destroyed it. Try some Murphy’s Oil Soap on it and then a light sanding, and your favorite finish, and you will have the best made up custom piece in all of Texas.
Cheers!
I have the exact same vintage chair and don’t even remember where I picked it up years ago . I did replace the small rollers for larger/newer ones to roll more smoothly on my tile floor . I’m curious about the manufacturing stamp but will have to wait until it’s out of storage where all my stuff is while building our home.
The base is perfect on your chair! What a wonderful upgrade…. Good job:)
Wow, that is PERFECT!
It’s been elevated from non descript to gorgeous! How is Felicia taking to the velvet?
Felicity, sorry!
Felicity hasn’t been allowed to get on the velvet fabric yet. 🙂 She still sleeps in the chair every day, but for now, I keep it covered with blanket.
Do you have any of the red velvet fabric left over? Maybe you can make Felicity a bed of her own. I had to bring a chair in my craft room for my cat so he could nap while I worked.
Love that it’s covered! We just got new living room furniture delivered today, and the 1st thing I did was get an old quilt from a closet to cover the sofa! Our dog was the only one who used the old leather sofa, as it hurt our backs, so she is used to getting on the sofa!
That is sweet and a perfect fit!
Perfectamont!
Amazing insight, craftsmanship and ingenuity! You need your own tv show!
YESS!! …… How great would that be??
It’s beautiful. I love those old desk chairs too but this is a comfy upgrade.
Beautiful !!! That base just made that chair amazing!!!
They make replacement wheels for those old chairs that practically glide. I found some on Amazon a few years back, here’s a link for you:
https://www.amazon.com/gp/product/B01GO2UKL6
I love it! I know nothing, but those markings on the chair made me immediately think it was an office chair on a military base in the past. I hope you find out…
You didn’t comment on the comfort of sitting in it now. It’s not too high for you or the desk?
It’s higher than it used to be, but not too high. It’s very comfortable! That base is really heavy, and the chair feels sturdier now than it did before.
Fantastic!
That base is GOLD and perfect with the new fabric. I love it so much! I also really liked the wooden chair you bought. I was so glad to hear you’re keeping everything!
Great work!
Bravo Kristi, Bravo !
FANTASTIC!!! You do good work on things you’ve never done before! I think men would have struggled with this – their minds just don’t work like ours, and they are unable to break things down in their mind like we can do. Great job!
Oh my! That is one GORGEOUS chair!!
Kristi, that is absolutely fabulous. I love antiques. We have a cute little small drop leaf desk with a small chair just like you bought that was called a salesman sample. It looks like something for a child but it was a sample of larger furniture. Belonged to my husband’s grandmother. I am so glad you modified that beautiful chair with that vintage base. A one of a kind. I just love it.
Awesome!
OH wow…what a transformation…I had no idea what this was going to be…I love it, and it looks SO comfortable! AND, Beautiful! My goodness!!! Great job.
That old chair is when they made things to last, took pride in their work and they were sturdy. Looks fabulous, great job!
The chair reminds me of a chair my father has that came from his uncle’s office, working for Los Angeles County.
It looks amazing!! Well done as always lovely lady!
Amazing!
It’s GORGEOUS!!!
This is amazing!