Dining Room & Entryway Progress
When I started on the picture frame molding and chair rail on the walls of my entryway and dining room, I had absolutely no idea how time-consuming that project would be to finish. This room has so much molding in it that it’s starting to feel like a never-ending job.
I was certain that I could get it finished this weekend. I worked all day Friday (which is usually the day I take off), all day Saturday, and all day yesterday, and STILL it’s not finished! I feel like I’ll be wood filling nail holes, sanding, and caulking until the end of time. So, while I had hoped to have a room with finished walls and ceiling to show you today, unfortunately I don’t. I can assure you it’s not for lack of trying! But I did promise an update no later than today, so here goes…
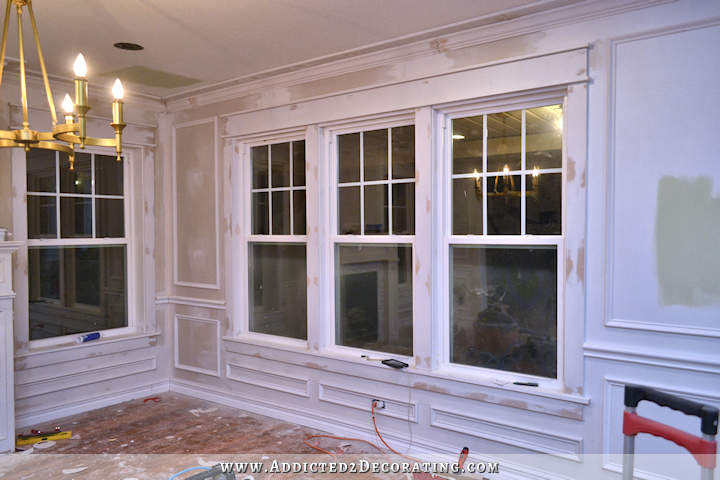
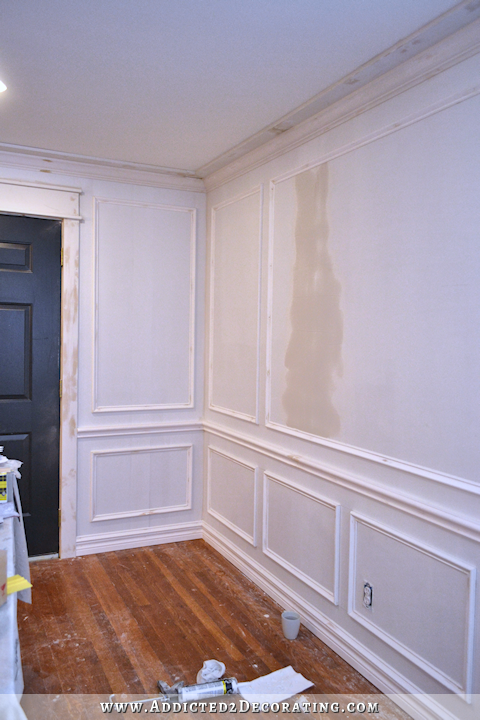
On Friday, I finished installing the rest of the picture frame molding, baseboards, base cap, and chair rail molding on the fireplace wall.
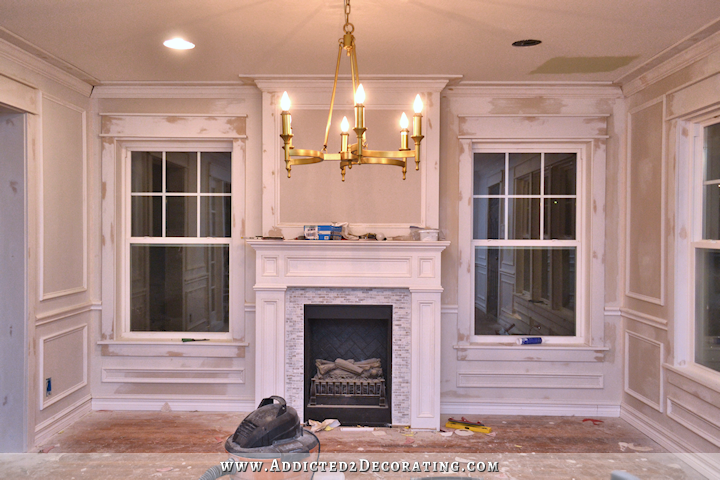
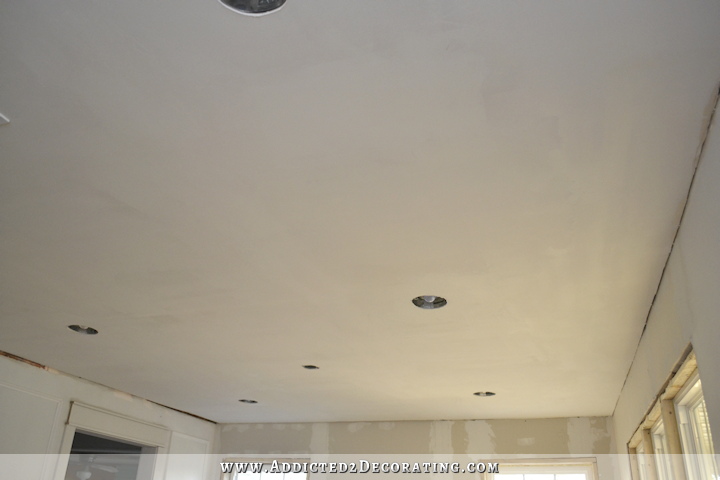
It looks like a complete mess right now, because so much is still unprimed. So you kind of have to use your imagination. The rest of my weekend was spent wood filling and sanding. Soooo much wood filling and sanding!
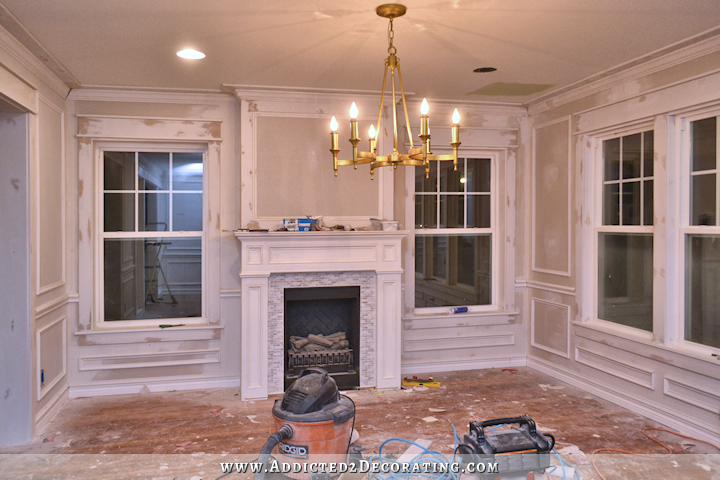
I ran into a couple of problems. First, the electrical outlet beneath the middle front window is right in the center (vertically, not horizontally) of one of the frames.
But there’s not enough room left to use a whole outlet cover. So I’m going to have to cut one to fit, and I really don’t know how I’m going to do that. I would image that a miter saw blade would just crack and split a plastic outlet cover, and the wood outlet covers have metal plates on the back, although it might be thin enough for my miter saw to cut through. I’ve cut metal several times with my saw successfully, but cutting something so small with my fingers so close to the blade without knowing how my saw will handle it makes me a bit apprehensive. So we’ll see. I’ll figure something out.
The second problem was the light switch plate by the door…
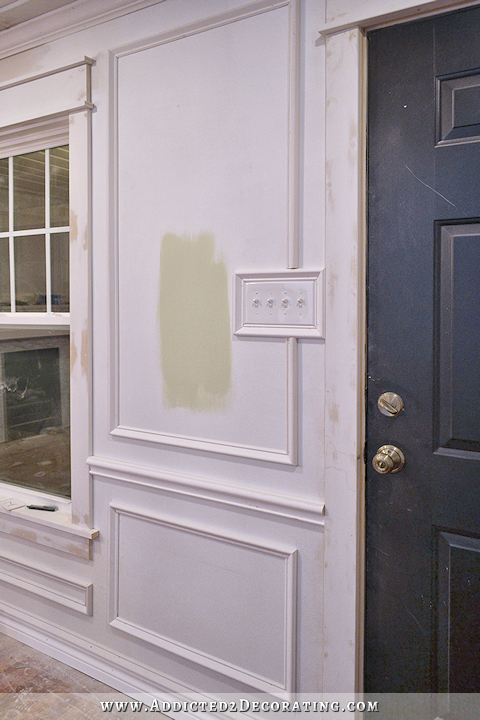
I tried just butting the picture frame molding right into the edge of the switch plate, and that looked really silly and unfinished. So then I decided to frame out the plate, and then butt the pieces into that frame. It’s not ideal, but it’s fine. If only I had known I was going to do the top picture frame molding when we were installing those switches, I could have moved them over to leave
And you can see that I tested the green paint in a couple of places. I’m still deciding on that.
So by the end of the day yesterday, even with my non-stop working throughout the week, I still only had one wall that is finished and ready for paint today, and that’s the entryway wall. I did have to re-mud one of the drywall seams, so today I’ll have to quickly sand and prime that first before I can paint, but at least I have all of the wood filling, sanding, and caulking finished on this entire wall.
I really had no idea how time-consuming and tedious all of this would be. I’ve installed and finished tons of molding and trim before, but no other job seemed to go on and on and on
Once these walls are finished, I’ll breathe such a huge sigh of relief…and then be able to get on with the fun stuff! 🙂

Addicted 2 Decorating is where I share my DIY and decorating journey as I remodel and decorate the 1948 fixer upper that my husband, Matt, and I bought in 2013. Matt has M.S. and is unable to do physical work, so I do the majority of the work on the house by myself. You can learn more about me here.


WOW! and BEAUTIFUL!
Kristi, I love your Blog. Your molding is spectacular. I am dying to start adding more molding to my 1960s house. I’m going back to some of your earlier posts to get input on what tools I will need. Moldings make a huge, huge difference.
Ditto x2!
Yes!amazing
Wow! It looks amazing so far! With paint and a decorated room, it’s going to look spectacular. I can understand much better now why you were so adamant to change out your windows. I love the picture molding, especially the short boxes below the windows. Well done & worth ALL your effort 🙂 P.S. I have cut the cheap plastic outlet covers on a miter saw to fit within/around wood trim. It worked fine.
I bet you could use your Dremel cutting tool to cut the outlet cover no problem!
Yep. I was thinking Dremel also. I used a grinder to cut a space in an outdoor outlet cover to allow access for a cord. So a grinder or Dremel cut/grind should work.
What a lot of work, but looking awesome.
We had the same problem in our old house with outlet covers that did not fit. My husband marked the covers to the correct size and used a hand held belt sander ever so carefully to take them down to the correct size.
That’s what I’ve done, just sanded it back.
A bit too much molding going on there. I hold off for the reveal.
It’s gonna look amazing when you’re done!
They do make special, narrow versions of receptacle covers. I’m not sure how much room you have to work with, but that could work just fine. Good luck!
Why didn’t you make the trim line up top to bottom on the right hand wall?
I don’t understand what you’re asking me.
I think he means where you mudded – everywhere else the width of the panels is the same above and below the chair rail, and there the top portion is wider.
Isn’t that the area Kristi plans to have artwork and sconces?
Way back when when discussions were going on about the entry way wall, I think it was decided this way would be better for hanging art, mirror……decorating purposes…..if memory serves me correctly.
About cutting the plate close to your fingers…
Try screwing or lightly nailing it to a larger piece of scrap wood and cut right through both boards. Then, back the screws out and you’re good. You can either use the normal screw hole and then tuck a screw up against the edge of one of the plug holes (to keep it from turning) or you can screw right through it if it’s wood and then wood-fill the screw hole.
Another thought… If you buy the slightly harder plastic ones (I think Home Depot usually sells two grades), you might be able to score them several times with a straight-edge and a knife or even a small piece of hacksaw blade and then snap them. Probably not, but for a dollar or two, it might be worth a try.
Also, about the metal… You might be able to pop the metal off with a putty knife, cut it with tin snips or an old pair of scissors, and then just glue it back on later.
The room is looking awesome!!!
You always have the answers!! 😀 I never would have thought to nail or screw the plate to a piece of scrap wood to cut it. That’s brilliant!
I won’t take credit for it. That’s another one from my watching too much This Old House. Tommy does it every time he cuts-out small pieces, like for dutchman patches. 😉
You know, I ran across a neat solution for the switchplate problem too, but darned if I can remember exactly where I saw it. I think the person ended-up cutting a block of pine the size of the switch plate (or a frame of 1x pine around the electrical box that is exactly the size of the switch plate), effectively bumping the switch plate out to the dept of the molding (you’d have to buy a box extender, also). Then, they just did the interrupted molding as a butt-joint against the pine block/frame. Because the molding met the spacer pine evenly instead of looking chopped-off, it looked better.
Your solution accomplishes more or less the same thing (giving the picture frame molding something to attach to), except the switch plate ends-up looking recessed instead of popped-out to match the dept of the molding.
I have also placed painters tape where I am cutting to prevent splintering of the plastic.
Great tips, Justin! And Kristi, this room is looking so wonderful! Keep up the great work- 🙂
We have a similar situation in our master bedroom, so I am thankful for these suggestions!
I think it’s absolutely stunning, even in its unfinished state. Somehow you have successfully changed the whole feel of the room (and I didn’t dislike it in its first form as the living room); it’s just lovely. Imagine how pretty once it’s freshly painted! I can’t wait to see!
I love millwork, so I know this will look divine when it is finished! Hang in there!
It really looks like a formal dining room!
I love it! Even in it’s unfinished state!
Wow, it’s going to be beautiful!! You inspire me.
Wow, this room is going to be a showpiece. I am loving it. But then again, I am a huge fan of molding and trim work. I love how that light looks too.
Maybe instead of plastic for that narrow outlet cover, you can cut a wood one and paint it to match. Might be easier to cut than the plastic.
Girl, your tenacity is amazing! I know it will be awesome when it’s finished. But I think you deserve a break, just an hour or two, sitting outside reflecting on your hard work. Breathe some fresh air, will you?
Wow, wow, wow! It already looks unbelievably beautiful! Framing out the light switches was a great idea! It will be fun to see the finished project!
You certainly put a lot of work into the room, some of it necessary, so maybe no so necessary. In looking at the room you could have easily eliminated the molding under the windows. You are an excellent craftsman, but sometimes you taste gets a tad too heavy. I have seen and also have moldings installed by professionals, and I don’t think they would agree with the under window treatments. Sometimes less is more. Also, I know you are a stickler for everything matching and being the same size, but I think you would draw less attention to the large light switch if you had just placed it with the molding or outside the molding. Yes I know it would cause the moldings on either end not to match, but believe me, you are the only one who would notice. If what you care about is how it appears to you, well then that is you. Case in point, we were in our home for over ten years, when one day my husband called me into the living room where he was reading by the fire. He asked me to sit next to him on the love seat, which I happily did. Next he asked me to look toward the double door entry of the living room, specifically at the chair rail and tell him what I saw. I thought it was going to be about dirt or some such household thing. I kept looking back and forth at either side of the opening, I looked at artwork, furniture etc and could find nothing. He then stood up and walked to the doorway. He stood on one side, and asked me to take note of where the chair rail hit on his body. I did what he asked. Next he moved to the opposite side and did the same. I was flabbergasted. The chair rail on the sofa side (which ran from the doorway to a window was three inches higher than on the other side. Since it did not join another piece, and was interupted by a doorway and also a window, no one had ever noticed the difference. We laughed like crazy. Then we wondered if the master carpenter who did all the woodwork in our home did something like this in all his homes, as his signature. Needless to say, my husband has shown it to tons of people, none of whom would have ever noticed it. So I guess you can have a carpenters secret in your room, or be convinced that everything must match. As far as the caulking and patching, you have always said that you would rather do those things then worry about getting your measurements perfect. After such a big project as this, you may consider you opionion on the later. Blessings
I love this story re the misaligned chair rail – and agree that the framing need not be beneath the windows – particularly the center one. I do love the other moldings!
I LOVE IT! You have totally changed the character of your house. It’s going to look amazing when you’re finished. Hang in there! If it were me, I’d leave it all white, because I love white millwork. But, I know you like more color. It will look beautiful either way!
For needing a narrow switch plate cover, try kyleswitchplates.com. They have one that is 1.7″ wide. Not sure if that is thin enough.
You have completely changed the feel of this room, Kristi. It now looks so much more elegant than before. I look forward to seeing the finished result. As for the outets and switches, I really like the way you boxed them in. I’m not one for hiding or disguising switches and outlets; I like to be able to find them! All your hard work certainly will pay off once the painting is complete.
Onward and Upward!
The big box stores have nylon outlet and switchplate covers that are flexible unlike the rigid plastic ones and would be much less likely to crack. In fact, I find the rigid ones will crack if I don’t pay attention and fasten them down tightly….nylon ones won’t do that at all, they will bend.
Forgot to mention if you go to kylesswitchplates Facebook page and scroll down, there is a post similar to what you are doing and they talked about notching out a piece of the molding to get the switch plate to fit.
Your room looks looks lovely and very traditional. You have put a great deal of time and work into this room. However, everytime I look at this room something is off and that something is the tile around your fireplace. It no longer works with all of the moulding and the traditional, stately feel of this room. I also agree with Mary Anne, simple is sometimes better. I think if you remove the moulding under the windows (and change out the tile) your room would go from lovely to spectacular. Your blog continues to be one of my favorite and I look forward to reading it each time it pops up in my email.
I agree! I was looking at the photos with my usual Kristi-amazement-face, and thought the same thing. I think they detract from all this incredible work. Still, it’s not my home, so a question of personal taste. I think it’s the shape of the individual tiles. Something more squarish???
I’ve learned to use my imagination by looking at your pictures for several years now 🙂 and can honestly say that this is going to look fabulous!!! I particularly love the little boxes underneath the windows, find your solution for the switches whimsical and fun (and very human whne considering the process :)) and am very taken with the green colour! So I cannot wait to see what it’ll all look like when it’s done. I don’t envy you all that tedious work! But just keep telling yourself that it’s not only one room (and nothing in comparison to the size of, say, your bathroom) but you will have a suite of rooms done and looking great when you’ve finished these walls!! Congrats and lots of cheering to you from Germany!
Gorgeous! I bought an old fixer-upper that has several molding panels in the living room over the top of smooth wood paneling and I’ve struggled with what to do – take it down and hang drywall or paint – seeing this makes me know that painting will be a great option!
One question, will you leave the edge of your chair railing as is where it sticks out farther than the door and window trim as seen in the picture with your switchplate? I’ve always been concerned with adding chair rail like this because I wasn’t sure how to finish these kind of edges?
Thanks so much for sharing your progress and any details you can share on finishing the chair rail ends.
Yes, I just leave it sticking out. I’ve found that things like that (like the chair rail sticking out beyond the window and door casing) tend to disappear once everything is all caulked and painted, and the room is filled with draperies, furniture, accessories, etc.
Good point, thanks so much Kristi! Keep up the great work, your posts are so encouraging!
I think everything is looking great so far. The only change I would have made would have been to add a return where the chair rail is proud of the horizontal trim.
I usually see that where the chair rail sticks out where it meets the door or window frames, the end of the chair rail is cut at an angle so it has less of a transition between the two moldings.
As to the recep cover…could you maybe sand it down to the desired size?
I think it will look amazing! Please tell me where you got your light fixture, it’s beautiful! It’s going to look great when it’s all done.
I’ve had a lot of luck trimming the nylon switch plates with a thin blade in a band saw. The room is lovely! You’re making tremendous progress.
It looks great! As always, it will be beautiful when you are finished!
Looking good! I think glamming up the fireplace molding last year was foreshadowing of what was to come! Good move. 🙂 the simpler craftsman style would not have fit in.
The light switch dilemma – how about taking the receptacle and adding it between the door frame and the moulding, so the lights turn on and off sideways instead of up and down, then the moulding will be like the other others, a single box. I am sure it’ll feel weird at first but you can get used to it.
We’ve used a dremal with blade to cut the plastic receptical covers before.
Absolutely amazing. So much work, but it will all be worth it!
Love your blog!
It’s going to be worth the effort!
Love it a lot! Thinkiing of doing dining room. but not sure!
Even though you didnt finish, you amaze me.
The trim underneath the windows kind of draws your eye to an area that doesn’t really need any attention. Just saying, if you got rid of it, it would not take anything away from the room and it would solve your outlet problem.
This is the fine detail work that, sadly, builders don’t seem to do anymore unless it’s an expensive custom home. It’s looking great, even unfinished. I have seen electrical switch plates at Lowe’s in odd widths. Don’t know if they also have them for outlets.
Already looks gorgeous- we enjoy updates and progresss reports, as well as “final reveals”, so don’t beat yourself up for not being done yet.😉 Thank you for sharing- it has been so fun to learn and watch your house come together. Keep up the great work!! Loving it!!
I love it! I know some people may think that it’s too much….buts absolutely perfect. I can’t wait to install my own molding.
As for the outlet cover….have you look at this site: http://www.justswitchplates.com/page/list?N=switchplate_type+1_Outlet+color+Brass&No=30
Not I’m trying to blow your budget, but they have some incredible looking slim outlet covers….including brass cover outlets…..
Loving it! Even in it’s unfinished state, the vision is coming through loud and clear! I know that this is not a style that would not work for me, but I am loving it in your house! And I like that the frames are below the windows, it gives it a symmetry – the visual space between the baseboard and the frame is consistent around the room, just as it is between the top of the frames and windows with the ceiling. Great solution to frame the switch plate by the door! And trimming an outlet cover for below the front window is not hard; I have had to trim 2 and my Dremel worked just fine. Loved the idea suggested to attach it to a piece of wood to keep fingers safe. Cut it just a tad wide so that a final sanding will smooth the edge. Absolutely can’t wait to see the reveal….. 🙂
Try scoring your cover plate with an exactly a few times. I think you’ll be surprised… (You can also use a dremel attachment, or really rough grit sandpaper). They are quite cheap. I’d buy more than one so that you don’t have to go back to the store if you crack it)
Hi Kristi,
What a treat getting your post today. I’m a horticulturalist, so was getting tired of garden ideas! 🙂 ha ha. Very happy to see the amazing work you’re doing on this room.
Last year we had our floors replaced and also the skirting (baseboards). The flooring blokes did the skirting as well as the floor. He told me a tip, which you may/may not know. Instead of going back after you’ve attached the moulding, and filling the seam, you simply run a bead of caulk on the back of the moulding before you nail it on, then clean up as you go. The caulk is positioned near the edges of the moulding, so it oozes out, just a tad, thus filling the gap. Have you ever tried this? If you have, and you prefer not to use this method, could you please let me know why? I’m trimming out a room this week, and was intending using it. Would love to know what you think.
Thanks Kristi. Keep up the great work. I’m really looking forward to the end result, and the journey is all very exciting! (Well, at least for the onlookers!).
Cheers, Liz (Australia).
Elisabeth,
That is a brillant moulding trick. I have upcoming moulding work and will give this tip a try.
Charlsie
Amazing! Love all the detail, including the trim under the window. This room is fabulous already. I can’t imagine how gorgeous it’s going to be when you are finished! Bravo!
Kristi,
Why don’t you ever cover your floors when working on a room? Seems more work for you later.
Wow Kristi, you are simply amazing. All the work you’re doing is so worth it, as this is looking absolutely stunning and will look even more stunning and elegant once you’ve finished and decorated it…..can’t wait to see more progress pics! Well done, you’re such an inspiration to us all.
Kristi, I love all the picture frame molding! So exciting to watch it all happen and I’m so HAPPY FOR YOU! Great job laying it all out, very professional looking. CAn’t wait to see it painted 🙂
Just beautiful…
I saw these outlets a while ago and always loved them. They may solve the problem of your outlet smack in the middle of your picture frame molding. They do not need an outlet cover and are very cool too.
http://bocci.ca/22-series/
Looks gorgeous! And I am definitely for the narrow molding below — I always think when people don’t put molding below windows or small areas like that, it looks unfinished — like they forgot that spot. Can’t wait to see the finished room!
Great work on the molding and trim!
Paint color tip: Take a look at Dynasty Celdaon from Behr. It may be too neutral for your tastes, but I think it’s an exquisite color. It’s one of those colors that manages to be colorful while still being neutral. It changes with the light – it’s green, but sometimes looks gray or blue. Not sure if it fits your style, but it’s stunning! 🙂
Beautiful as always. Can’t wait to see the finished room. I just saw this yesterday and thought I would post the link since it sounds like your aren’t thrilled with your switch plate cover solution http://www.lowes.com/pd_325968-77652-WW018TT-WT_0__?productId=3880967 . It kinda mimics your window framing but without the awkward bulkiness. 🙂
Absolutely love it when you post meaty real progress. Exceptionally well done. I realize you feel you must post often for your advertisers but the fluff stuff takes your valuable time and distracts you. Matters of scale. The two large windows dwarf the fireplace. You now have heat and air!!!!! You don’t need that space heater fireplace anymore!!!!!! Get rid of it like the pony wall. It’s too tiny. Scale is everything! Or, move it to the back of the house with all the other furniture from that room. Once the dining room table and chairs are in there the fireplace is just a walk around do dad. SCALE
I think it is looking very, very nice. Regarding all the time and effort to install the molding– why do you think most people don’t have all of that trim in their house? If it was easy, we’d all have it! Looks great.
It looks SO good!!! It’s going to be a gorgeous room.
Hi Kristi,
First of all, I’m a daily reader of your blog. Love it and all that you do on it!
Here’s a suggestion for your wall color crunch-time decision. How about green above the chair rail with white underneath in addition to a lighter green ceiling? For the ceiling you could mix the green and white at say a 1:1 ratio or whatever you wanted. This route could get you even more color in the room to make you happy without being too much and will take away some of the harshness of a bright white ceiling. I think it would help your eyes focus in on your overmantel/fireplace and your trim detail at the bottom of the walls. Can’t wait to see what you decide!!
Amanda
Kristi, love the moldings! Not many comments about your painting dilemma. Really like that one of your ideas is keeping the walls white and then putting the color on the ceiling. Only question I have is I wonder if it would cause your room to constantly have a green cast to it? Like maybe making your white walls look greenish instead of white. But I don’t know… Just something I was wondering.
Have you done any tutorials on the caulking, wood filling and sanding you do? I’m must curious about when you decide to use wood filler and when you decide to use caulk. (My inexperience is showing lol)
Hi Kristi! I stumbled upon your blog from Pinterest. I LOVE the DIY wall paneling & chair rail you did. It’s so beautiful! Would you mind sharing the specific styles of moulding you used?
I’m brainstorming to do the same thing in my townhouse (with the help of a girlfriend) but having a hard time finding styles that would match/flow with the beautiful baseboards & crown moulding I already have.
Thanks!! And keep up the great work 🙂
The chair rail is just chair rail molding. The molding that I used for the picture frame molding is called base cap. It’s generally used on top of plain baseboards to dress them up a bit (hence the name “base cap”), and it’s pre-primed and sold by the linear foot at Home Depot. Lowe’s will also have it, of course, but it might be slightly different from the one I used.