DIY Hand Drawn Floral Line Drawing Wall Mural (Part 1 – Progress)
It took me a few starts and stops and changes of plans, but I finally landed on a wall design for the guest bedroom that I love! I ended up doing a DIY floral line drawing wall mural. It’s hand drawn, but here’s the secret. It’s incredibly easy because I used an overhead projector to project the design on the wall, and then just traced it onto the wall.
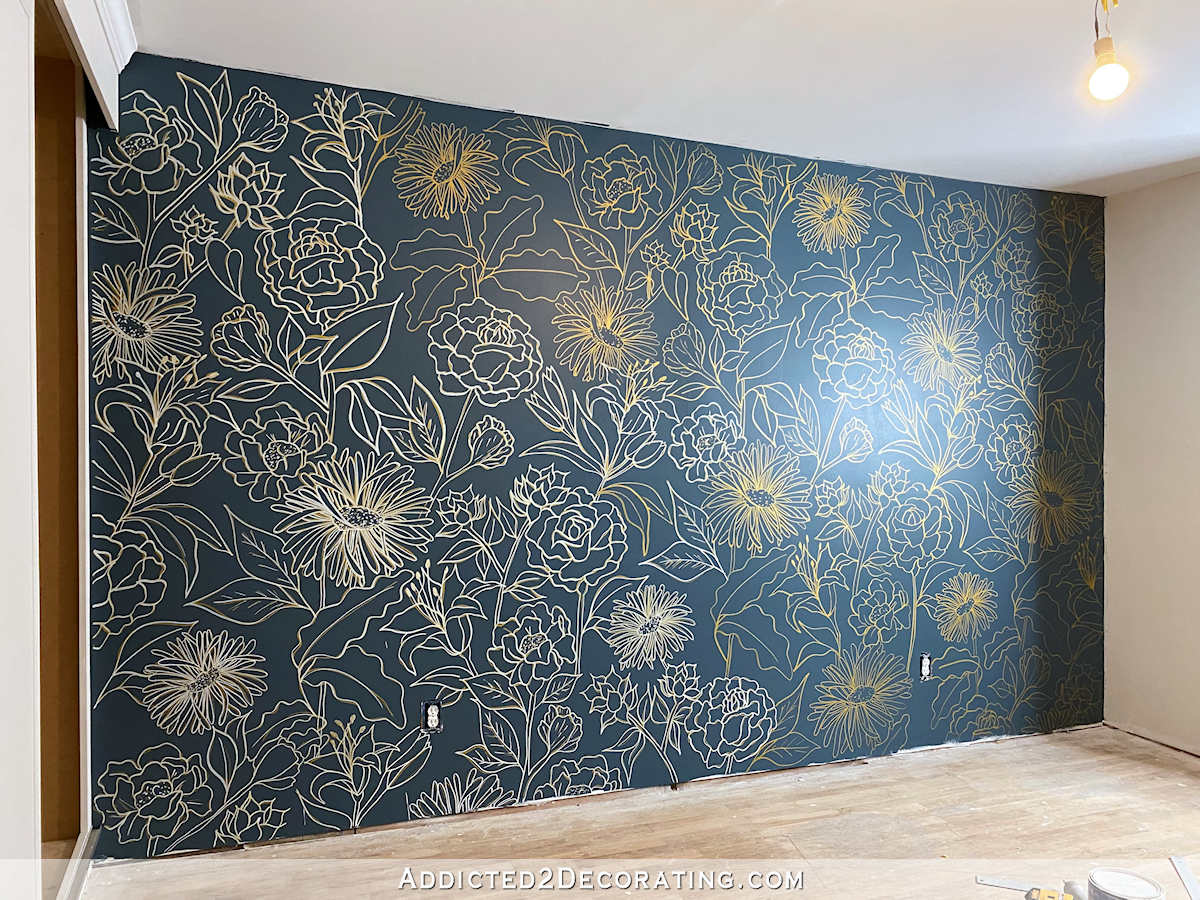
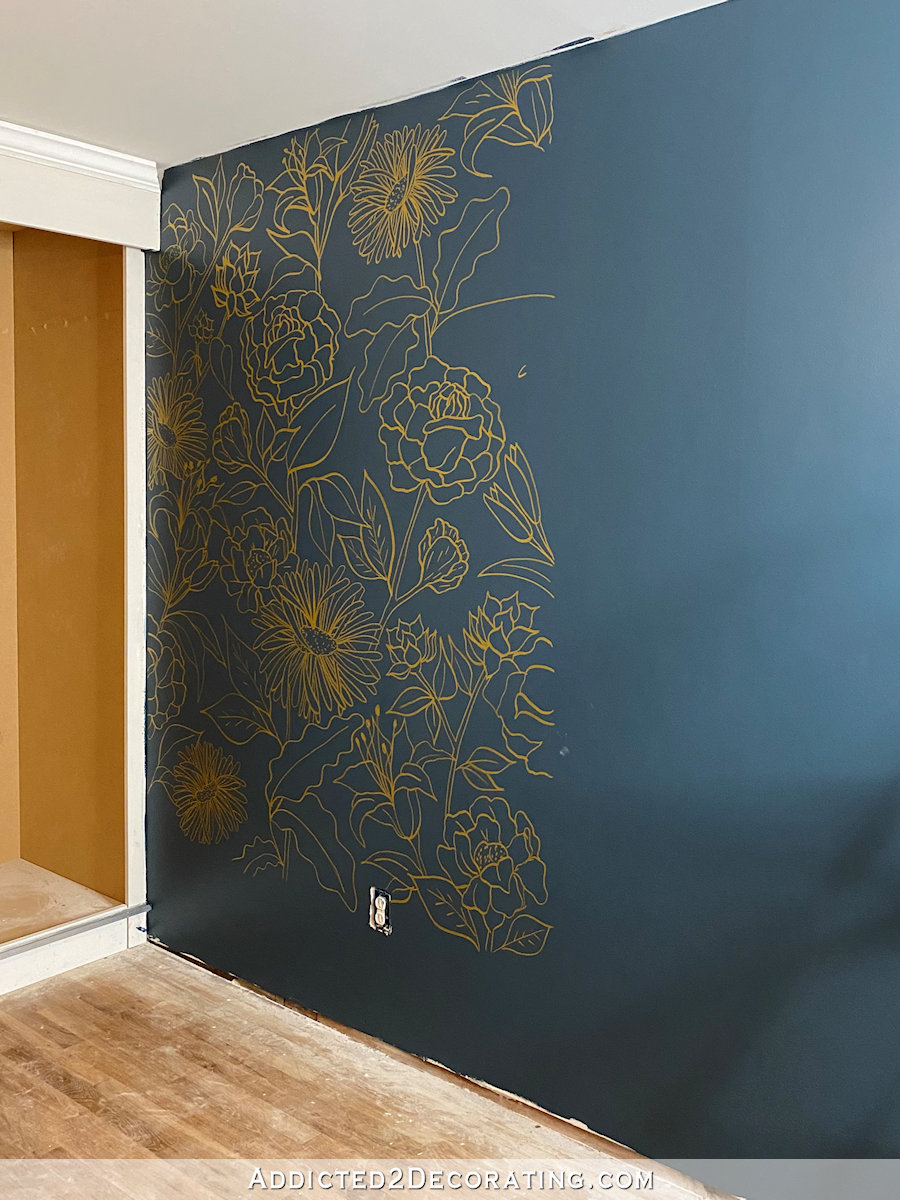
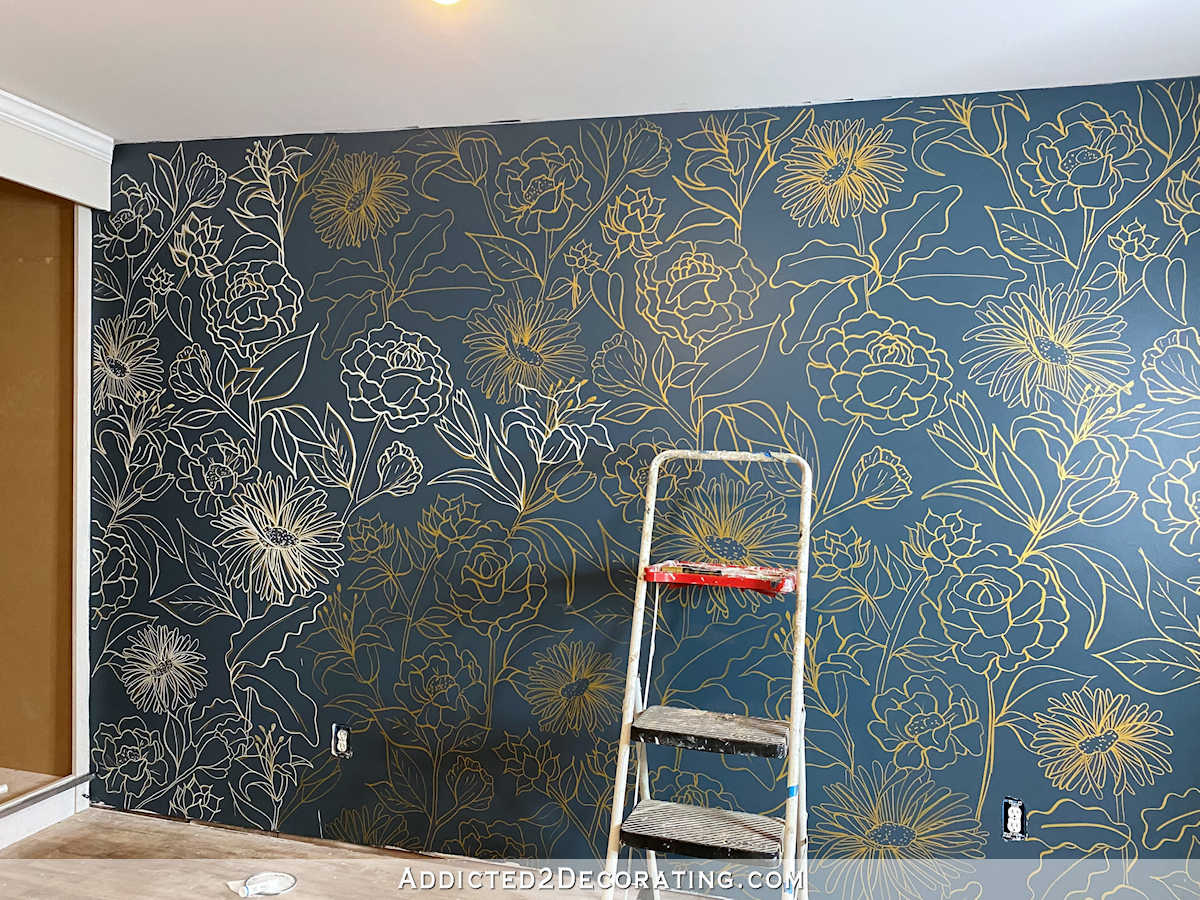
First, let me show you the progress I’ve made so far, and then I’ll go back to the beginning and show you the steps. So far, here’s how the wall looks…
I’m pretty sure I can finish it today, so hopefully I’ll have a finished wall to show you tomorrow.
As I said, I used an overhead projector for this project. I bought a very inexpensive one a few years ago when I did the butterfly and branch design on the entryway wall. I think it was around $50 on Ebay. So once I had my designed printed on a transparency (which I had done at FedEx Office), I was ready to go.
I set up my projector and the transparency with the design on one side of the room…
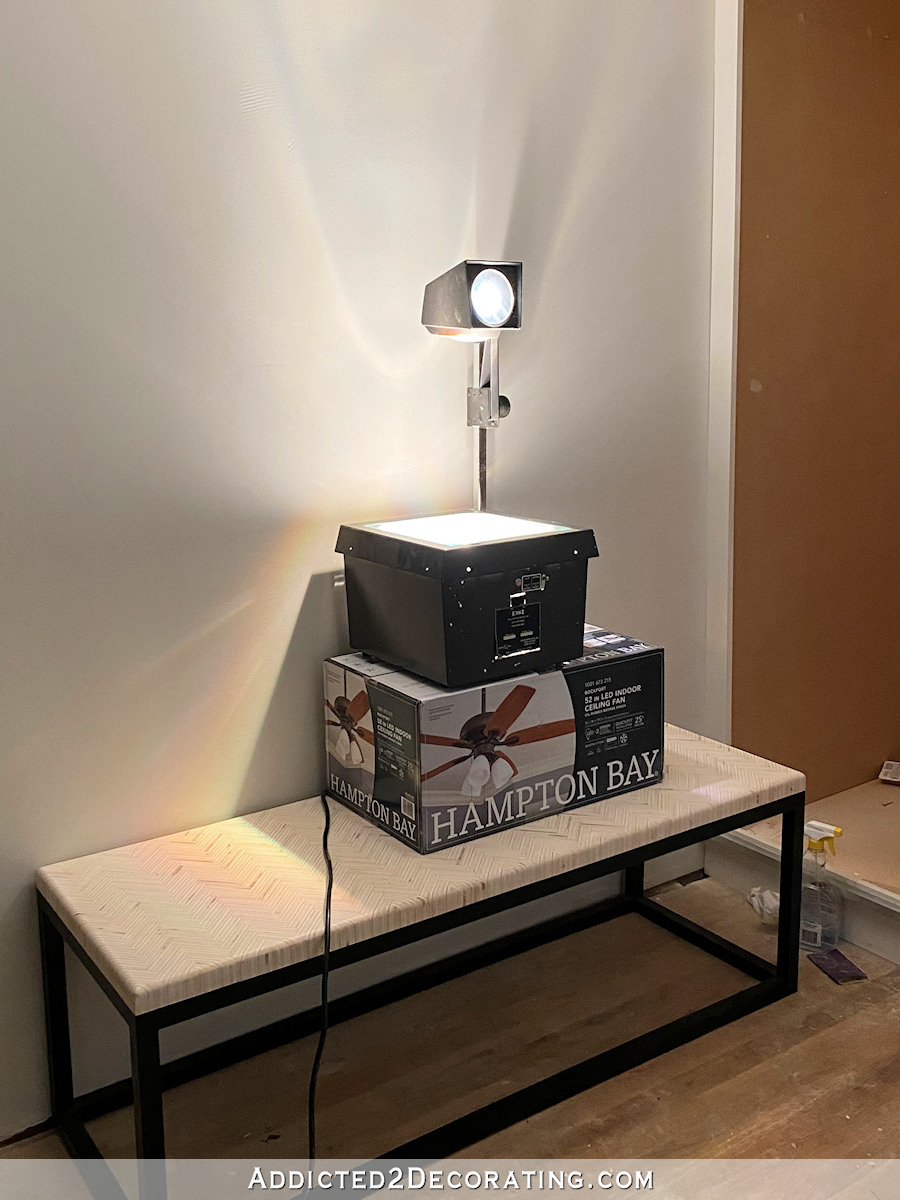
…and started on the top left corner of the wall…
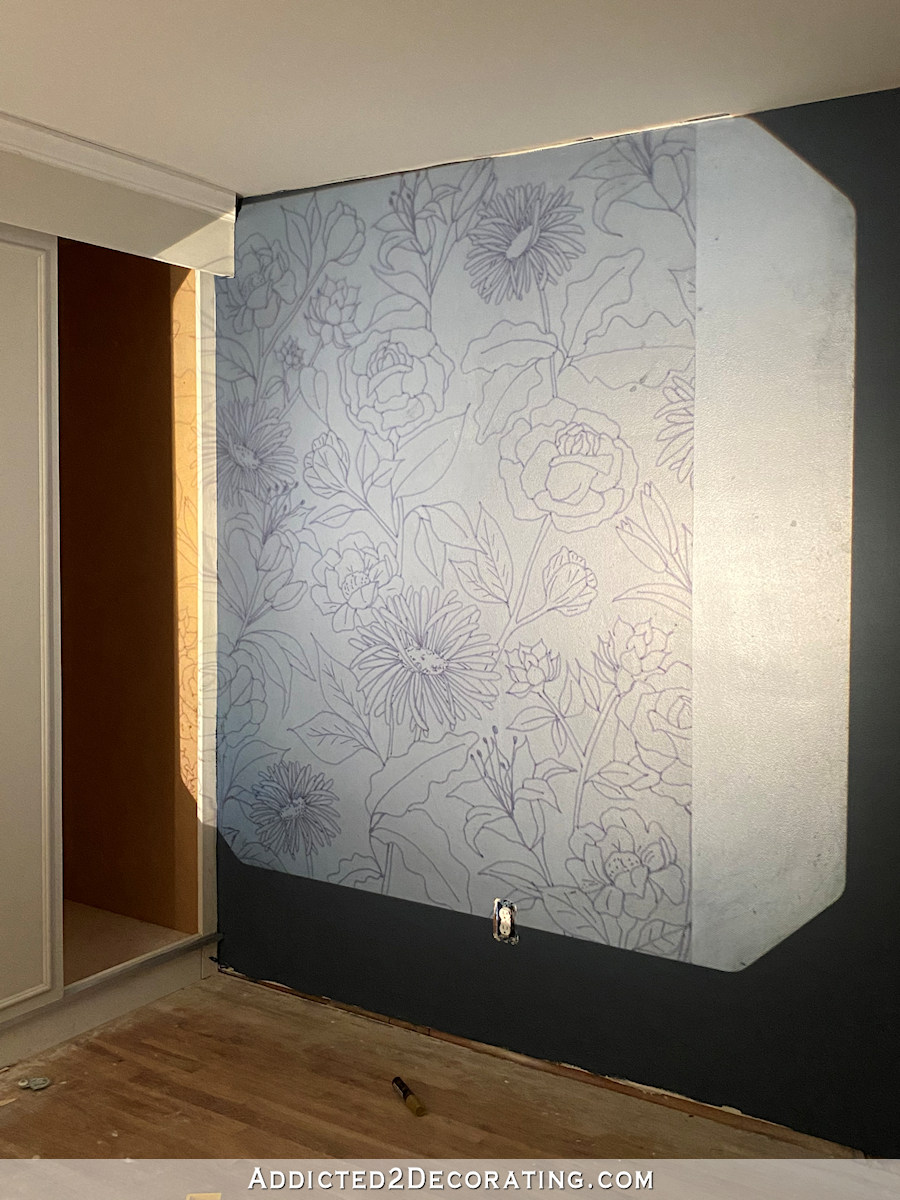
And then I began tracing, and tracing, and tracing.
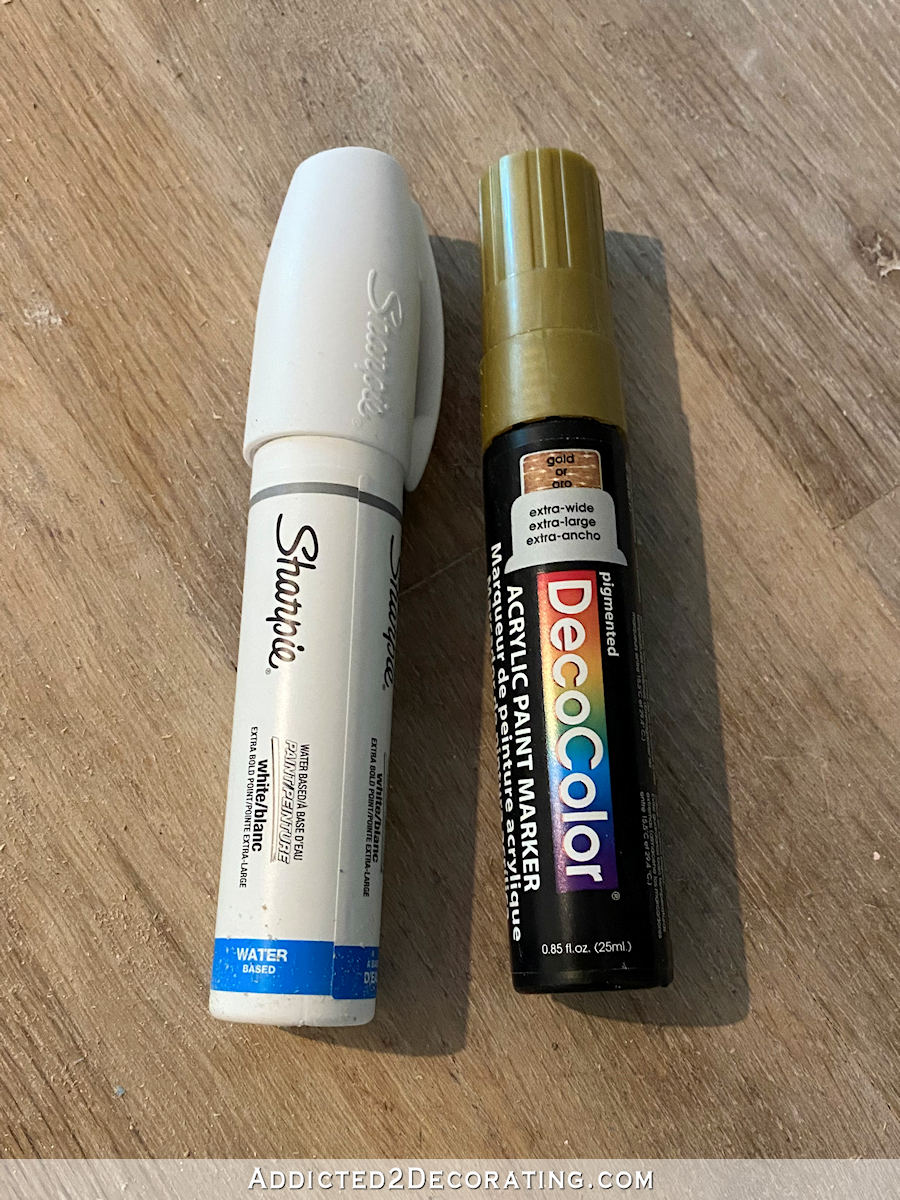
These are the pens I used for the design — DecoColor extra wide acrylic paint marker in gold (affiliate link) and a Sharpie extra wide water-based paint marker in white.
My original idea was to do the entire design in gold only. When I got the first section done, I loved it.
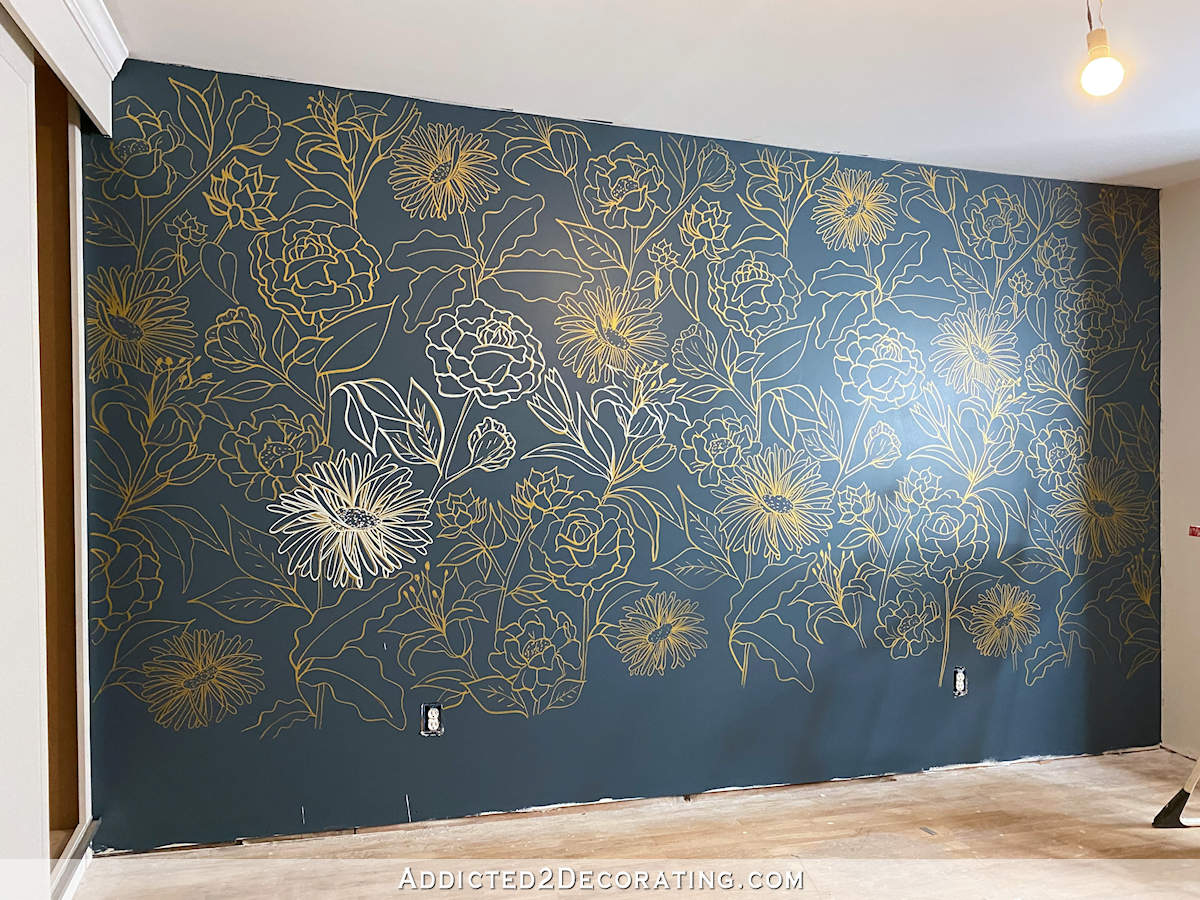
When I got the second section done, I still liked it, but the whole design was looking a little dark and blah to me. That particular gold pen was darker and more yellow than I had hoped, but there just aren’t many options when it comes to thick gold pens that will work on a wall. It was pretty, and if you’re a person who doesn’t like a lot of high contrast, this would probably be perfect for you. But I tend to be drawn to higher contrast, so I began to wish that I had done the design in white instead of gold.

So after showing it to my mom and telling her that I wish I had gone with white instead of gold, she suggested that I go over the gold in white. But instead of doing it carefully and trying to cover over all of the gold, she suggested that I do the white in such a way (quickly, imperfectly) that quite a bit of the gold still shows. So I tried that out, and I loved it! And the big white water-based Sharpie worked perfectly on the wall.
Here’s a close-up peek at the design. See how there’s still quite a bit of gold showing?
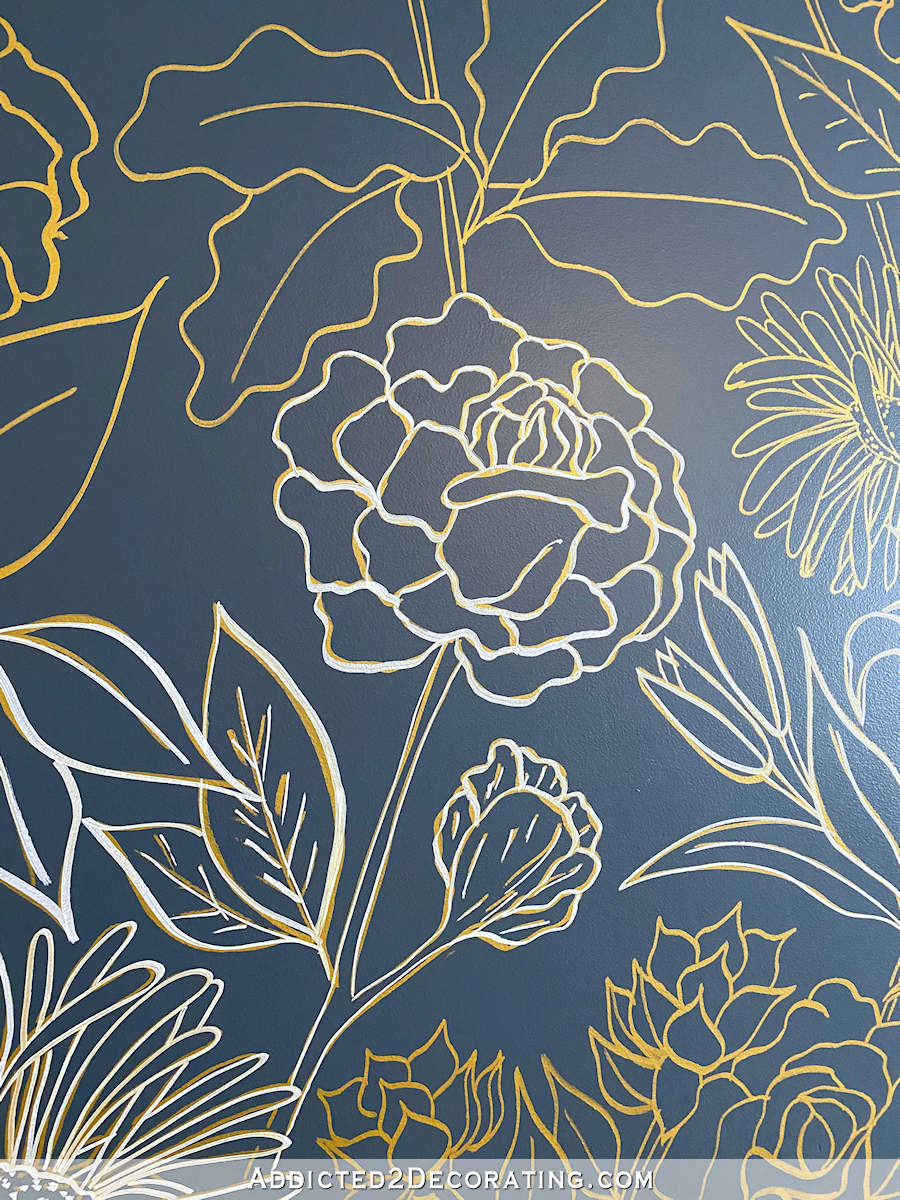
And let me tell you, I wasn’t striving for perfection at all with this design. I think the fact that it looks like messy doodles adds to the charm of the design.
So after getting all of the gold finished, I started on the white.
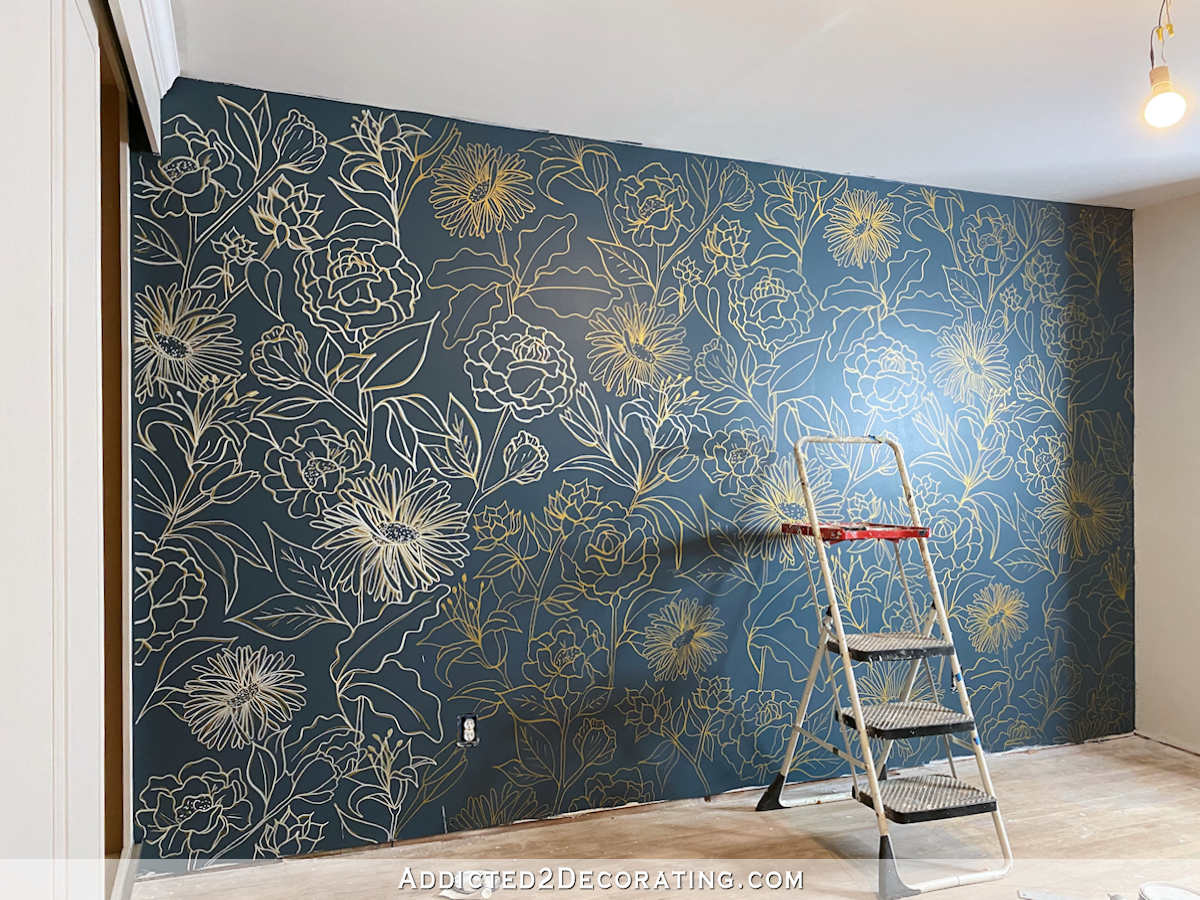
I’m loving how the wall is turning out. This was my progress when I stopped working last night.
The gold was the hardest part, especially because the design I had made wasn’t a seamless repeatable pattern vertically. I had intended for the design to cover the entire height of the wall, but I couldn’t get my projector back far enough to make that happen. So I ended up having to piece together the design and freehand some of the elements at the bottom of the wall, but I think I made it work.
The white part goes fairly quickly, so I think I’ll be able to finish up the whole wall in about an hour and a half. Since I used water-based pens, I think I might have to put a clear coat over the whole wall when it’s finished. And since brushing or rolling might mess up the paint pen design, I’ll probably have to spray it. I’ll use my favorite General Finishes High Performance Topcoat in a flat finish (affiliate link). Then hopefully I can get the trim up and have a finished feature wall.
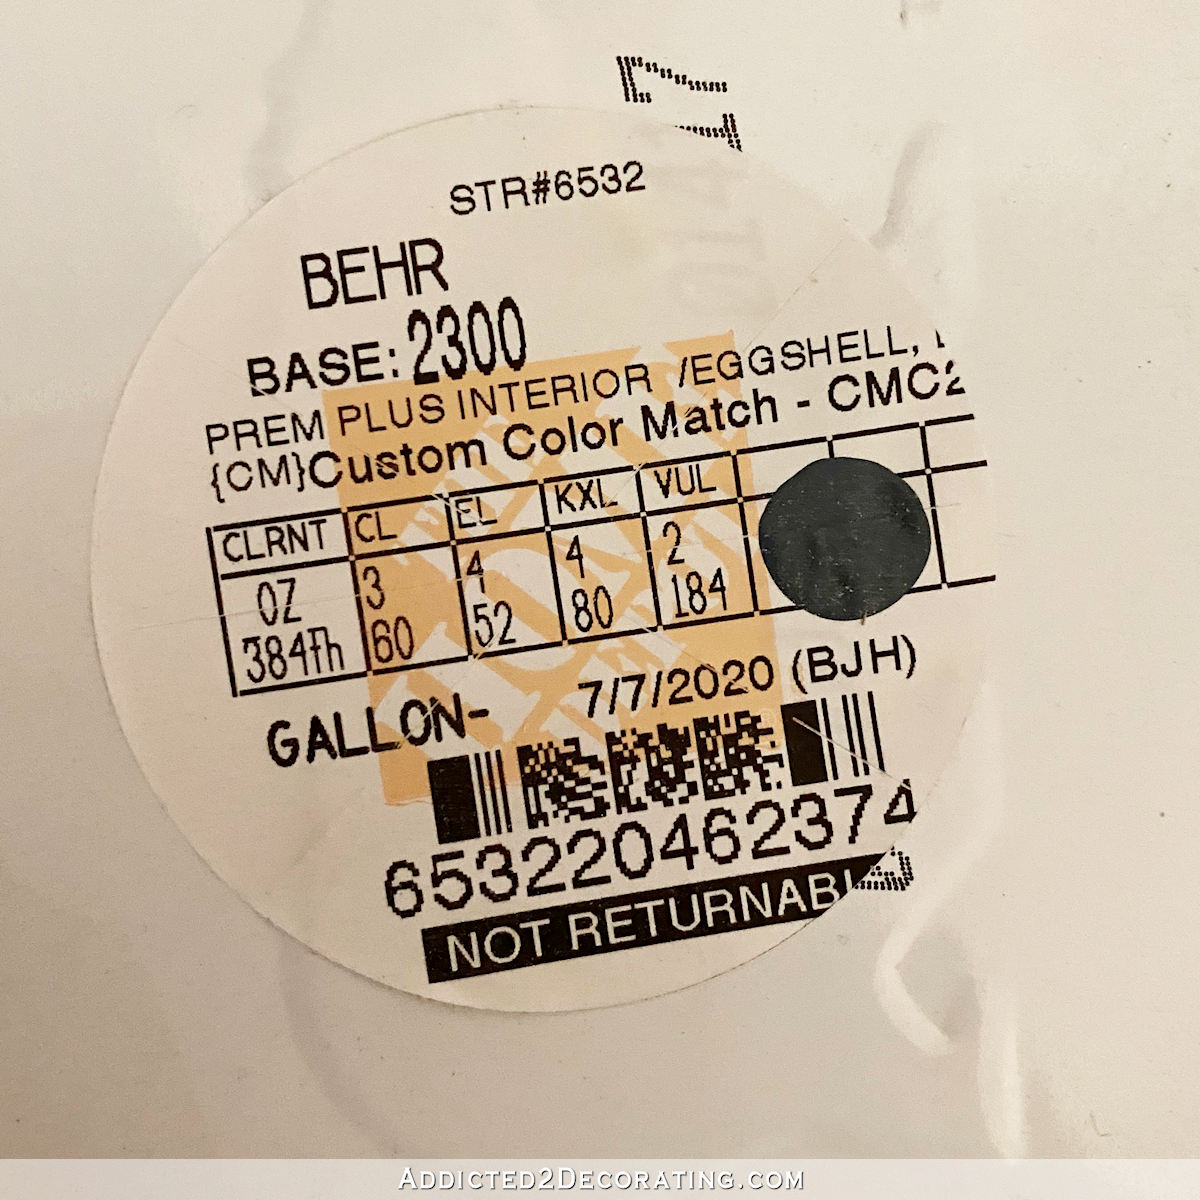
By the way, a few of you asked for wall color details. It’s a custom color match, and here’s the formula…
See Part 2 of this project here (the finished wall): Guest Bedroom Wall Mural – Finished!
Want to see how the room turned out? You can see the whole before and after here: Guest Bedroom – Finished! (Before & After)

Addicted 2 Decorating is where I share my DIY and decorating journey as I remodel and decorate the 1948 fixer upper that my husband, Matt, and I bought in 2013. Matt has M.S. and is unable to do physical work, so I do the majority of the work on the house by myself. You can learn more about me here.
I love how it’s turning out!
Wow, this is looking amazing. I loved the gold, but with the white it’s taking it up a whole new level of amazing!
Wow! Your designs always inspire me… you have outdone yourself this time ❤️
Wow, you’ve completely transformed the room, the wall treatment is amazing !
Your Mom is a genius. I did like the gold though.
When I saw that you had started with the gold last week I also thought it was too yellow. LOVE the addition of the white and it stands out so much more now.
It’s spectacular.
Glad to see you found your creative spark again!
Hi,
Somehow I am not getting emails notifying me of your blog posts. I went on Instagram and found this post that way. Last post I received in my inbox was your decision on chairs for your living room.
Great idea of your mom’s and beautiful design choice and work by you! It’s just lovely!
Comment not to Kristi
Very pretty! I like the idea your Mom had on not being perfect with the white. She’s a smart cookie! Now, I don’t understand why you think you need a topcoat? It’s not like you will be setting anything on it or in other ways messing with it. And regular wall paints are water based, so why bother?
Wow! You are incredibly creative. Just love this!
Why would you need a topcoat? Most wall paint is latex paint… aka water based… so why would a water based paint pen need a top coat on a wall?
The gold looked GORGEOUS! I want to try that some day. The white seems a bit more “you”, though. Looking good!
Kristi–I think that your tutorials are one of the best on the internet. You give all the steps and explain your process so well. Thank you for that!
Super gorgeous!
I would leave the left diagonal half in gold only, like a progression. It’s beautiful, no matter how you do it, I love each step. <3
I love the gold by itself, but I also love the gold and white! Can’t wait to see the finished wall!
This is breathtaking. I *might* like it even more than I like the studio wallpaper (though it’s a close contest either way).
Can you tell me a bit more about “finding a design that I liked on-line”? What did you search for? What kind of file did you send to FedEx? Were their some graphic design/IT skills involved? I love this idea, but I am faaaar from tech-savvy.
(This is not a copyright question.)
Thank you!
I had an idea of what I wanted. I didn’t want something with lots of color or shading or depth. I wanted a very simple line drawing of flowers. So I googled “floral line drawing wallpaper for walls” and similar terms, and then viewed the images for each search term. I found several that I liked, but I chose the one with the largest and clearest image available. I also looked for one that had visible repeats in the design so that I could match repeats easily.
(Side note: If you don’t put “wallpaper for walls” and you just search “wallpaper”, you’ll get a bunch of images of wallpaper for desktop computer backgrounds. Those never have what I’m looking for, so I always specify “wallpaper for walls”.)
Then I did a screenshot of the image (my laptop has a Snipping Tool for screenshots) and pasted the image into a new document in my photo editing program. However, you can paste into Microsoft Word document or any type of program that will allow you to paste images. No graphic design skills were involved. I just sized the image so that it filled an entire 8.5″ x 11″ page, and then set it to “print to PDF.” That created a PDF file of the image saved to my computer.
I then called the FedEx Office store and got their unique email address where I could send the file and requested one transparency. By the time I got there, they had it ready for me! And it was about 80 cents. 🙂
Kristi,
Thank you SO MUCH for that very thorough explanation! That was just what I needed.
Warm regards from Annapolis!
I’m having a heck of a time hunting down the image you used for the wall, but I LOVE it and want to use it! How can I hunt that down? I think I’ve been looking for over an hour for it!
You can find it here: https://www.addicted2decorating.com/two-wall-design-patterns-free-downloads-guest-bedroom-flowers-and-original-entryway-vines-and-birds.html
Holy cow! I thought it was wall paper!!!! Yes! Please tell us your inspirations for your design. I imagine FedEx just copied your drawing onto overhead-projector-clear-whatever-it’s-called.
That looks AMAZING!!! And I actually love the half-gold half-white look too, though I don’t know how a proper design of that would look (and I’m sure that in person, the white over gold everywhere is better).
I actually thought the first picture was photoshopped, looks that good!
Holy Moly, you hit it out of the park again! The white-over-gold technique really gives you the best of both, with the added uniqueness of being offset. What a fabulous idea! Don’t you LOVE it when a plan comes together?
Yes, not sure a top coat is needed. I did a wall design with a gold acrylic sharpee and it was fine as is.
I have to say I was a bit perplexed too. Thank you Kristin for the question and Kristi for very thorough explanation in laymen’s words.
Wow! I really love how this is turning out. Can’t wait to see the finished project.
OOOO!! I somehow stopped getting your emails. Going to have to sign up again. Totally missed this
This is tremendous! I thought that lead image was a Pinterest inspiration until I noticed the mid-projects debris along the bottom of the wall. Amazing idea and execution, Kristi!
Amazing! It’s beautiful! I want to do something along these lines outside on a metal barn. I wonder if there are weatherproof markers? I had a thought regarding finding images, too. A search for B&W floral fabric might work. Fabrics always have pattern repeats.
This is very you! Such a cool design! I can see this done with a turquoise/aqua first, and white or silver over it, too. The possibilities are endless where creativity rules! Mom had a great idea!
Love this – it is amazing!
Really inspiring. You are very talented. The design is fantastic.
AMAZING…again!
Really, really like your floral wall. Came out amazing! AND your mom. You know about the “apple not falling far from the tree.” So fortunate you have her. I love your work.
How could this be made into a stencil? I would love to have something like this for a wall in a small bath. There is no way to get a projector to work there.
I was just wondering how many pens you used (sorry if you already answered this). I love and am in awe of all design choices and this is one I think I can do.
I think I used three white and three gold pens for the one wall.
Please is your plane design available for others. I love this bedroom so much! How thick is the golden marker?
This a bedroom to dream of….
Greetings Evi from Belgium.
You can find the design here: https://www.addicted2decorating.com/two-wall-design-patterns-free-downloads-guest-bedroom-flowers-and-original-entryway-vines-and-birds.html
The golden marker has a nib on it that’s probably 1/4″ wide, so it’s pretty thick.