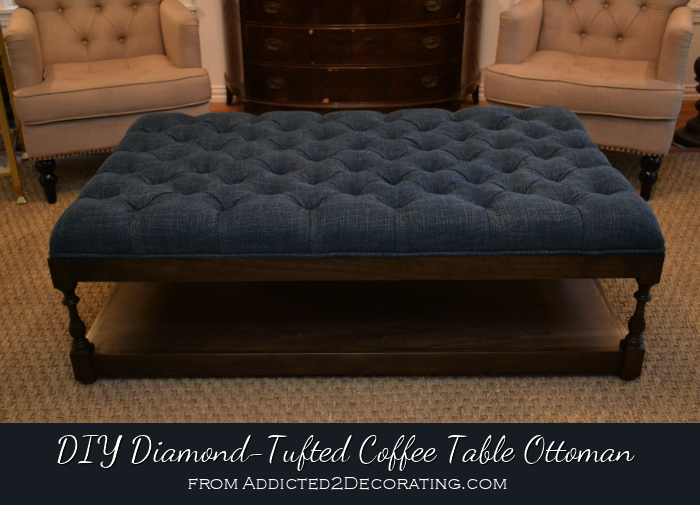
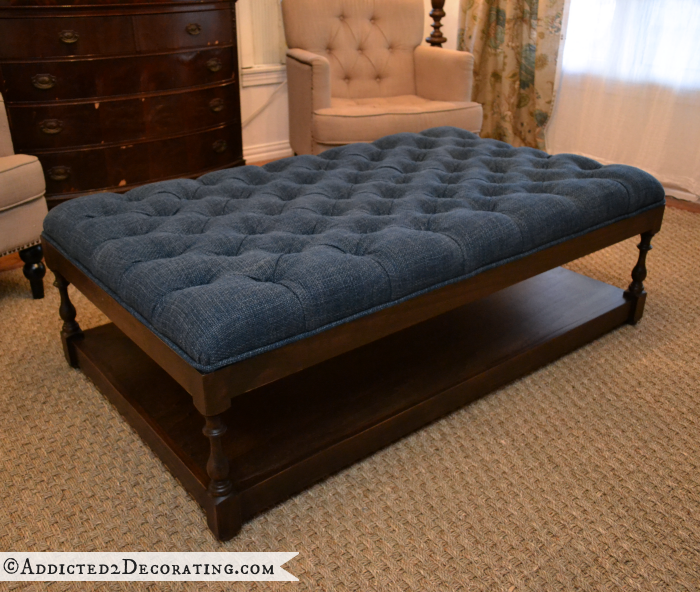
DIY Ottoman Coffee Table – FINISHED!!
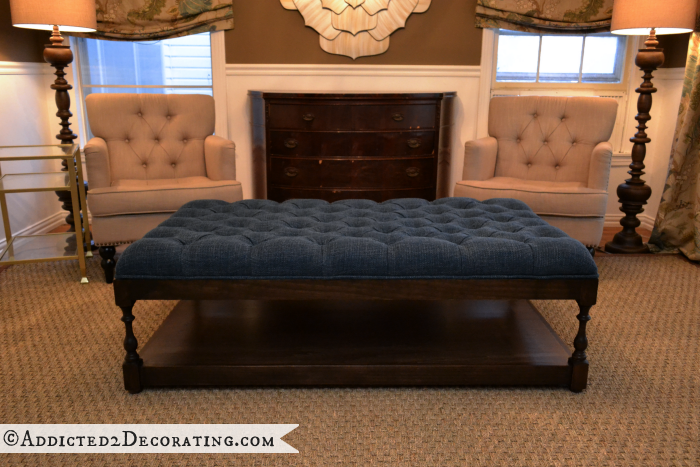
It is finished, y’all! And oh my gosh, I love it. I mean, seriously, I love it. This diamond tufted DIY ottoman coffee table is by far my favorite project I’ve ever done, and definitely the nicest piece of furniture I’ve ever made.
Does that make me sound prideful and boastful? 🙂 I hope not. Really. But if it does, then please indulge me just for a bit and allow me just this one day to be prideful and boastful. 😀 Because I’m so stinkin’ excited about how this tufted ottoman with shelf project turned out!!!
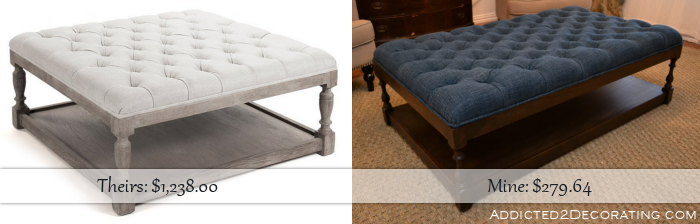
As I’ve shown you several times, this tufted ottoman with shelf from Layla Grayce was my inspiration.
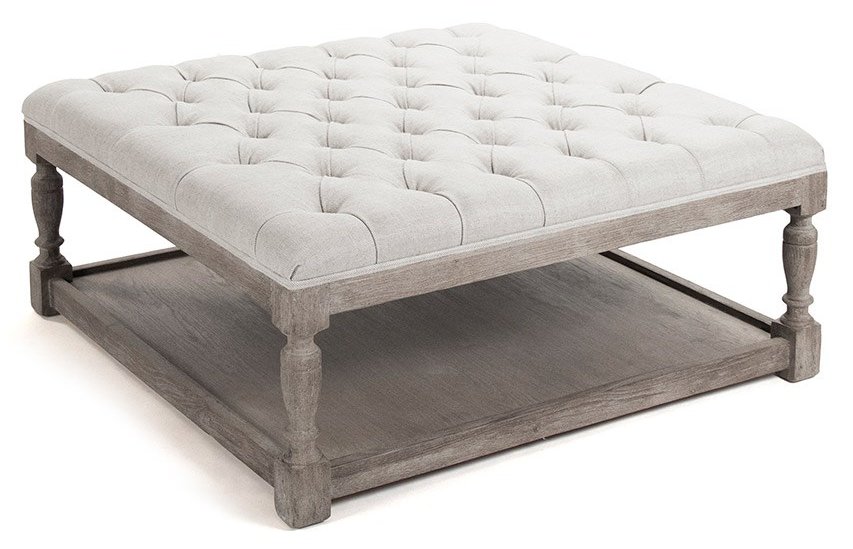
The things I loved about that ottoman were:
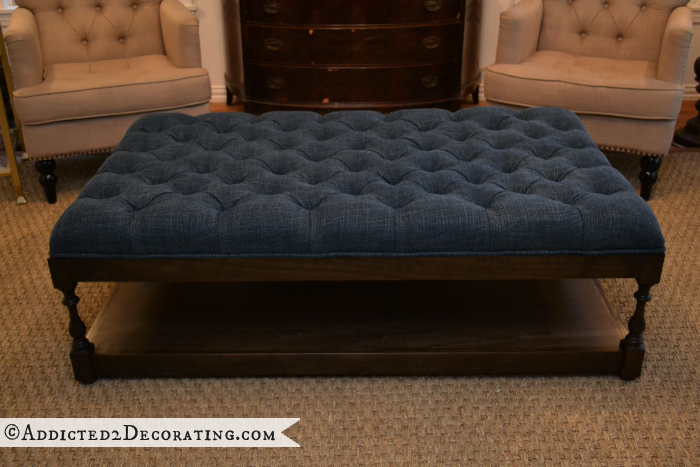
- the diamond tufted top,
- the legs,
- the shelf on the bottom.
The things I didn’t love about that ottoman were:
- the cream colored fabric on the top,
- the finish on the wood,
- the size (I wanted a rectangle instead of a square),
- the way the shelf was dropped down about 1/2-inch from the side rails (which in my mind would only make dusting quite difficult),
- the $1,238.00 price tag.
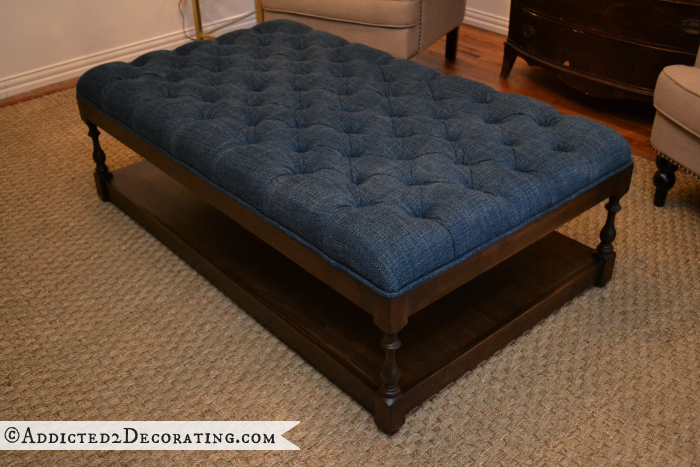
So I made my own DIY ottoman coffee table, including the things I loved, and changing the things I didn’t love about the inspiration ottoman.
If you missed any of the tutorial posts, you can see them here:
- Part 1 – How to do diamond tufting (a modified method)
- Part 2 – Finishing details on the tufted top
- Part 3 – How to build a coffee table base with a shelf

And here are a few more details not covered in those tutorial posts:
- The stain I used is Rust-Oleum wood stain in Dark Walnut. I used two coats to get the dark color you see on this ottoman.
- I gave the whole base two coats (three coats on the shelf) of Rust-Oleum water-based polyurethane in a satin finish. I sanded very lightly with 180-grit sandpaper after the first coat.
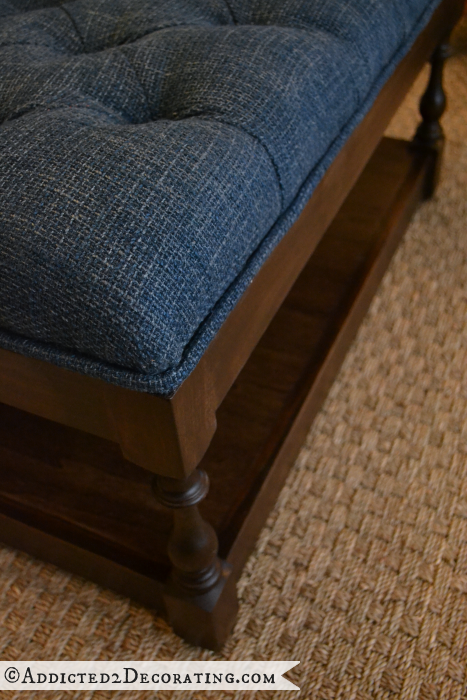
- Before attaching the tufted top to the wood base, I added a welt cord that I covered in the ottoman fabric. I simply glued it around the bottom of the ottoman top using hot glue.
- After trying other methods unsuccessfully, I ended up attaching the top to the base with my high melt hot glue gun. (The kind you use for woodworking with the really big glue sticks…not the cheap kind you get at a craft store with the tiny little glue sticks made for tiny little crafts.)
And my favorite thing about my DIY ottoman coffee table? The price!
Here’s how the cost breaks down:
- Four coffee table legs – $79.75
- 3-inch high density foam – $57.75 (with 50% off coupon)
- Twin size hi-loft batting – $7.50 (with 50% off coupon)
- Buttons – $2.50 (a total bargain because I learned a secret to saving big)
- 8-ounce can of Rust-Oleum Dark Walnut stain – $5.50
- Four 8-foot 1″ x 3″ lumber – $30.68
- 1 package of piping cord – $4.99 (with 50% off coupon)
- 1 piece of plywood – $25.00
- 3 yards of 54-inch fabric (Robert Allen Tex Weave in the color Baltic) – $65.97
- TOTAL: $279.64
I also used some things that I always have on hand, like wood glue, staples, finishing nails, etc. But if you had to purchase those things, you could still easily make this ottoman for under $350. That’s not too bad for a completely custom ottoman, made the exact size and color you want, with the exact fabric you choose!
Of course, keep in mind that the fabric is a huge factor in how much this ottoman will cost since fabric varies so widely in price. The fabric I used was a woven upholstery weight fabric that cost $21.99 per yard from Decorator’s Best.
Yep, this is definitely my favorite project so far. 🙂
So what do you think? Would you ever tackle this project? The tufting really is the hardest part, but you just have to go into it knowing that it will take lots of patience and that you’ll end up with very sore fingers for a couple of days. The base? That was the easy part with the help of my Kreg Jig. Those things can make anyone look like a pro.
And with this DIY ottoman coffee table project finished, I’m going to say goodbye to y’all for a few days, and I’ll see you in the new year! I’ve been working so furiously on projects that my house looks like a tornado went through. For the sake of my sanity and my marriage, I need to step away from the computer and get things under control here. And hopefully, I’ll have time to work on some new projects that I can dazzle y’all with in the new year. 😀
I’ll be gone all next week, and I’ll return on Monday, January 6th. In the meantime, I’m sure I’ll be hanging out some on my Facebook page, so come join me if you haven’t already!
Have a very happy New Year, y’all!

Addicted 2 Decorating is where I share my DIY and decorating journey as I remodel and decorate the 1948 fixer upper that my husband, Matt, and I bought in 2013. Matt has M.S. and is unable to do physical work, so I do the majority of the work on the house by myself. You can learn more about me here.
Great job! It looks wonderful!
Oh my goodness Kristi this is absolutely beautiful. As I’ve sad so many times before and obviously will continue to do so, you are so talented! You got mad skilz, lol! Love, love, love this. Enjoy your time away from the blog and have yourself a very Happy and Safe New Year! God bless!
Incredible job. I would be proud to have that piece of furniture in my house. Enjoy your well-deserved break.
I knew you could do it! It looks great! Enjoy your time off and have a wonderful new year!
Btw. I sent you an email regarding blog design service. Thanks
i love it. there is no way i could make that so you should be very proud. can not wait for what you will do next year.
You have so much talent. The ottoman looks wonderful!
You did an excellent job on this one, Kristi. I am sure it will become a family heirloom. Enjoy your break and we’ll look forward to seeing what next you have up your sleeve in the new year!
Gorgeous!!! You do such amazing work!!
Wow, I love it and what a savings from your inspiration pick. Things are certainly coming together in that gorgeous living room of yours now.
Beautiful!!! Now, get so R&R will you? 🙂
Can hardly believe how your living room is turning from a sow’s purse into an elegant room that is so inviting. You are so good that we all have to brag. Enjoy your time off, you have more than earned it. Looking forward to a new year full of really great things for you and Matt.
Oh Kristi –
You deserve to boost girl. It is even better than the inspiration piece! What a beauty you have created and you should be very proud!
Have a great New Year and see you again on January 6th with more great projects❤️
WOW!!That was a lot of hard work but worth it!I’m not surprised because you are quite talented.
Oooh! It’s so gorgeous;) I love how the legs mimic (in a general way) the shape of the lamp bases….it’s not an exact match (how could it be?) but it resembles the general idea of curving base.
The tufting is just amazing and the cording finished the edge beautifully.
Great job!
Wow! This looks absolutely stunning! You should be prideful!
Oh! It turned out beautifully! I do love yours a lot more than the inspiration piece, mostly because of the colours. Your piece looks more inviting and less of a show piece–you know, the kind where you can look but can’t touch lol. Your whole room makes me feel good about sitting back, putting up my feet and relaxing. Well done!
WOW! Looks fantastic! Merry Christmas and Happy New Year!
ABSOLUTELY BEAUTIFUL!! And love that you made it for a fraction of the cost of buying one!!!
No I would never attempt this project but I love it you did a fantastic job it looks awesome!!!
It looks Amazing!!!! Way to go, you’re 10 times the woman I am, I can’t even imagine the struggle and inevitably, defeat I would face trying to make this. Congrats, yours is a total success.
It looks great!!
A job well done and looks very professional. And yes, be proud of yourself, you deserve it. Great accomplishment. (tip: use a small crevice tool on your vacuum to clean down in the tufts when they collect stuff, and they will.)
OK Kristi….it is so absolutely beautiful and I have a hard time believing you made it but of course I know you did!!!! Be proud and happy because you are amazingly talented!
Wonderful outcome! Take care of yourself and your husband first … the house will still be there. ~:)
Absolutely beautiful! I don’t think I would ever take on such a task but you make it look so easy. Can’t wait to see what fun new projects you’ll take on in the new year!
Kristi,
The ottoman/table is lovely….it’s a classic piece that could be used in so many decors, yet polishes your living room so well. You make me believe my husband and I could build something like this one day…and we have no tools or skills! Is it strong enough for a person or people to sit on?
Absolutely gorgeous!
Kristi, its beautiful. All I can say is that you are phenomenal!
Can you tell us how you covered the washers that were used for buttons?
See Part 2 above, she covers the whole process.
You should be proud…it’s gorgeous! And it looks like it cost a fortune. Great job!
Beautiful job. Hope you enjoy your respite from all the hard work. Can’t wait to see what you bring us in 2014!
Stunning! Around my house, I would want to cover it up to protect its beauty from pets and children.
Outstanding! Your ottoman looks way better than the one by Layla Grayce. Side by side…yours looks like the expensive one. Simply elegant. Looking forward to seeing how you tackle the sofa!
Be prideful, be boastful! You have earned the privilege with your faithful readership! What a terrific and professional project you have achieved. I am so very happy and honored to be able to witness your skills. You inspire me Kristi, I look forward to your posts and when I spot them in my mailbox I make myself a cup of coffee and I savour them word by word, picture by picture.
Please accept my warmest wishes for the new year, may you continue to find joy and fulfillment in your work! All the very best to you and your loved ones. Hugs
BTW, I finally got my family to eat enough pistachios to start the succulent garden you shared! Can’t wait to get on that, I love it!
Boast away, be proud, hey pat yourself on the back. Feel it! That piece of furniture is beautiful and your talent is amazing. Happy New Year.
The ottoman is beautiful — your talents are endless!!!
LOVE LOVE LOVE. Even more than the inspiration piece! Enjoy your week off. You will be missed.
GORGEOUS!!! Some day…when I get more brave…and when I have a Kreg Jig, I’m going to tackle one of these! In the mean time, I’m pinning…so I don’t forget! Well done! Happy New Year! xo
It looks fabulous! You have inspired me to do the tufted diamond pattern on an ottoman that I need to recover…with you holding my hand via your pictures…I know I can do it!
Fantastic!! Just gorgeous!
Wowzers! That is beautiful and I want one in my family room. I love the tufted top and the bottom shelf just begs for a couple of stacks of books and maybe a basket. Love it!
As expected….. just FAB-U-LOUS…!
Unbelievable!!! What a job you did. You must be so proud of yourself. I’m so impressed. Love it.
Beauteous!!!!!!!
Kristi, I LOVE it!! It looks perfect in your living room. Can you move closer to me so we can DIY together? 😉 Again, you are a wonderful inspiration to the rest of us. Enjoy your blogging break!
go ahead and be proud, that looks fantastic, i am going to give it a try without the shelf(don’t want another surface to dust)thanks for another great tutorial.
It’s gorgeous. Be proud!
Happy to learn you are taking a break. I was beginning to wonder if you ever rested.
Well Done!! I’m glad to be on this list!
You get an A+ – again! Nice job, Kristi. We’ll miss you next week! Happy New Year to you and Matt. 2014 is going to be a fun time.
OMGoodness!!! FANTASTIC, STUNNING, GORGEOUS!!!
When you finished, besides that feeling of complete satisfaction, and staring at your beautiful work of art, did you lay on your ottoman and hug it while kicking your feet in a little happy dance? Cuz I would have 😀
You are AMAZING!
Enjoy your well deserved break.
Co 😀
Oh yeah, just to let you know, I pinned your ottoman on my “V. Inspiring P.” (Very Inspiring People) Pinterest board 😀
The right tools and your AMAZING talent make a big difference. You did a wonderful job and it looks SOOOOO professional.
I just purchased a similar jig last week. It’s not the K— Jig, but the Harbor Freight Pocket Hole Jig. I had looked at Big Blue for a couple of years hoping the price tag would get smaller but it never did. I am happy with the results so far on my HF Jig. Note: I did have to head over to the HD to purchase the Kreg screws for my project. Looking forward to more inspiring projects. All the Best!
Lovely, enjoy your time away and Happy New Year!
Hi Kristi, Beautiful work on the ottoman! I’m impressed by not only your talent but work ethic, such an example to me, to finish what you start and keep going through the challenges that can come up in a DIY project (I struggle with that at times). I feel like I am looking at a piece featured in an article in Architect’s Digest or House Beautiful! Such a pretty piece! All the Best to you in the New Year!
Awesome job! Looks fantastic!
Kristi, your coffee table is beautiful! You did an amazing job! I wish I lived closer, I’d come watch so you could teach me how to build pieces. I would love to learn! Maybe you could make some video tutorials sometime…bet they would be huge hits on YouTube!
Susan
P.S. I sent you an e-mail for a small job for DDO. I know you’re probably super busy with the holidays so just let me know when you can work it in.
Happy New Year to you and Matt!
It’s simply beautiful!! You are a talented craftsman!! Happy new year!! I can’t wait to see what’s next!!
Before attaching the tufted top to the wood base, I added a welt cord that I covered in the ottoman fabric.
*****
You done good! Just that step alone seriously impresses me. How the heck do you cover a cord in fabric?
I just so happen to have a tutorial on that. 🙂
https://www.addicted2decorating.com/sewing-basics-how-to-make-continuous-bias-for-welt-cord.html
Just read the tutorial. Holy-smokes, that is a heck of a lot of work! If I tried it, I think I’d wind up with a lumpy mess. I salute your precision.
That is amazing!! I love it! You did a great job!! You definitely deserve to be proud of your work! =]
I am dying to do this but my coffee table is 36″ square. My 54″ fabric is nowhere near wide enough. What do you think about piecing 3 pieces of fabric together? Not sure how it would look on an ottoman. How wide was your piece? Thanks for the fantastic tutorial. It’s the best I’ve found!
I luuuuuuurve it!
I just love this and to buy one in Australian stores in over the $500 mark so you have 100 % inspired me
Your tufted ottoman is BEAUTIFUL!! What a great job you did. I made one myself using different techniques it turned out nice, not nearly as nice as yours. Great Job!!! BTW, love your site:)
I have a question…
I recently found your blog and I’m wanting to DIY an oval coffee table ottoman. I’ve found some French provincial tables on my nearby Craigslist for $30 and basically want to add the tufted plywood top to the existing table. What do you suggest using to attach the the completed plywood tufted top to the coffee table top? I’m fairly new to DIY furniture transformations so I don’t even know where to start with attaching.
LOVE YOUR BLOG and Thanks!
Claire
This is gorgeous Kristi! I’ve wanted to do this kind of project for a long time, and now I’ll be bookmarking this page and trying it out this spring. Thank you for such wonderful inspiration.
What size is this ottoman?
Love all of your projects! I have a question about the size of fabric needed though for diamond tufting. I want to do a huge king size headboard, about 80″ x 48″ – I’m using an Ikea foam mattress that is about 3.5″ deep. Do you have some idea what size fabric I am going to need? Is the rule 15″ overlap on each side? I am going to buy an extra-wide window panel but not sure how long it needs to be. Someone at Interior Fabrics here in Austin said you can tuck a seam in a diamond headboard zig zag style – but that sounds like a lot of work for a novice. I guess if I use a 54″ wide fabric what is the maximum width of an ottoman/headboard that will support? 30″? Any advice is appreciated!!! Best regards, Melanie
Absolutely faultless piece of furniture. You deserve to feel really proud. I’m going to attempt to make a bench for the end of my bed. Hence, can you suggest how much fabric overhang I need (as a minimum) so I don’t run out of fabric please? Someone earlier suggested 15 inches. Does that sound about right to you? Thanks in advance for your advice. I appreciate you are very busy with resonating your own house and running the blog.
I always add 15-18 inches to the length and width of the item I’m tufting to get the size of the fabric I need.
this is what I was going to ask 🙂 thank you SO much for being so thorough and detailed with this project Kristi – you are amazing! Definitely going to try this soon – you’re the best!
Thank you for a great tutorial! I am very tempted to try it….how do you estimate how much fabric you’re going to need?
This was so inspirational. Thank you. I’m just trying to do a little old chair about 80 plus years old and want to do the back with tufting. It didn’t have it originally, so I’m trying to figure out how to do it when there is a frame all around the edge, not separate like your auttoman. Great work!
Thank you so much for posting this diy ottoman coffee table! I have been searching way too long for the right size ottoman coffee table and now I can make it custom. Beautiful work!
This is exactly what I was looking for! Do you think faux leather will hold the same way as the fabric? I have never worked with faux leather and I would love to do this with a camel faux leather.
If you can tuft it, it will hold up beautifully. But tufting faux leather (vinyl?) is a tough job. Very tough. I have plenty of upholstery experience, and I’m not even sure if I would attempt it.
Hi Kristi. I just stumbled across your blog and am amazed at how talented you are! I’m quite the DIY girl myself, but I have to bow down to you! Those kitchen cabinets in your condo…..wow…the green w/the gold leaf is just too much for words. Seriously. This ottoman is just what I’m looking for. The wood part would be no problem to build, but I’m completely lost by the tufting. No way I think I could accomplish that. Yours is so professional, you could be professional! I work with a lot of wood and was just wondering why you don’t spend the extra 20-40 bucks and get some nice quality wood that would stain beautifully?? (Maybe use General Finishes or Varathane Gel stain). Pine and Doug fir are fine, but are no match in the stain department for cherry, oak or walnut. Our lumberyard has “shorts” which are pretty darn cheap if you are doing smaller projects (maybe 4-5 feet in length). Please, I’m not knocking your work. It’s absolutely A-1. But I can’t help but wonder how superb it would look if you used a better quality wood. That’s all. Please, no criticism here. Just a little advice from a wood finisher.
OMG this is gorgeous!!! U r so talented. I saw the same ottoman at HomeGoods for $800 and fell in love but I still thought it was too much. I thought to myself, I wish I could make this. I guess I will need to buy the tools and all first. U have a lot of patience looks like LOL. Keep up the good work!
So lovely! I’m curious how big your ottoman is? I can’t seem to find the dimensions written anywhere
I can’t find any directions where you added the piping. Did you just glue it onto the tufted top? Thanks!
I either stapled it or glued it. I can’t remember. But either way will work.
I just finished my table using Kristi’s directions. I wrapped the rope/piping with a five inch wide piece of fabric the length of the perimeter of the table plus extra to ease around the corners. I placed the piping along the edge of the board and had the two inches of extra fabric to staple to the back of the board. This was very easy and looks great.