DIY Ottoman Coffee Table Part 2 – Tufted Top Details
Well, it appears that my plans to completely finish my ottoman were a bit too ambitious. I just barely finished the upholstered top. Literally, I just finished the top at 8:30 this morning, snapped some pictures, and here I am showing you. *Sigh* I thought I’d have so much more done. Oh well.
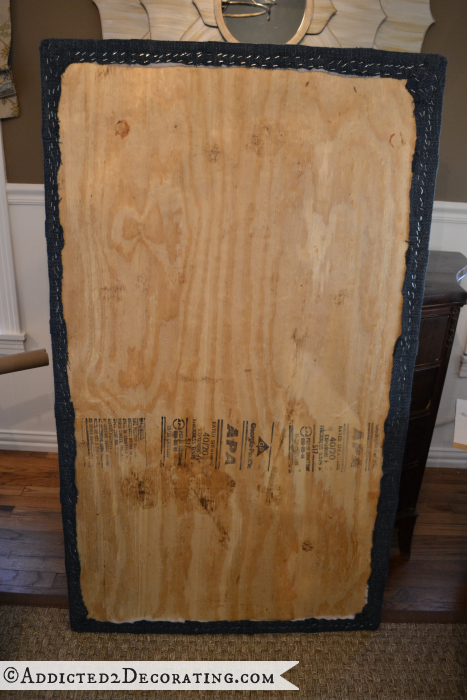
When I left y’all on Friday, my ottoman top looked like this because I couldn’t get my electric staple gun to shoot staples through the plywood, which meant that I couldn’t finish the edges.

So on Saturday, I headed to Home Depot and picked up a few new toys (which those of you on my Facebook page may have already seen).
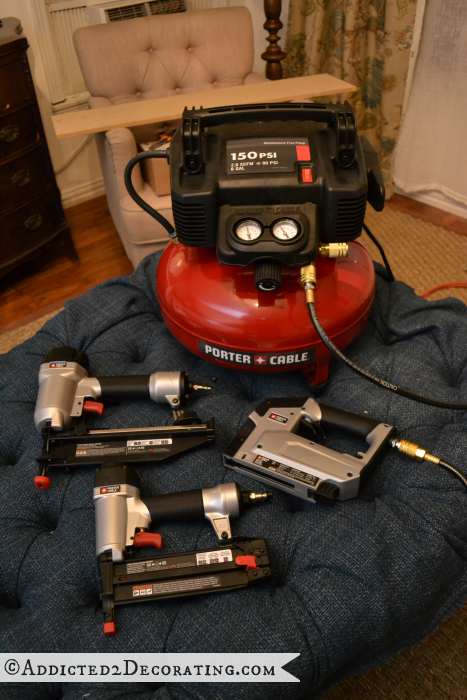
I’m so excited to have this!!! I’ve been using a very cheap Campbell Hausfeld air compressor and nail gun for a very long time now. And as far as staple guns go, all I had was an electric stapler. This pneumatic staple gun is so much better, and far easier to use!! It uses the exact same staples that my electric staple gun uses, but it shoots them into plywood with ease.
And the best part? This whole set (the 6-gallon 150 PSI compressor, one finishing nail gun that shoots up to 2.5-inch 16-gauge nails, one finishing nail gun that shoots up to 2-inch 18-gauge nails, and a staple gun) was only $199!!! That’s an amazing price for this set!!
After finishing up the edges of the ottoman top, I ran into another problem. I needed 58 buttons to complete the top. When I was purchasing supplies before I started this project, I didn’t yet know how many buttons I’d need, so I picked up two packages of 18 buttons. I assumed that 36 buttons would be plenty for an ottoman. I was wrong. 🙂
So yesterday I headed back to JoAnn Fabrics to get two more packages, but they were completely out. (FYI, if you’re doing a project like this, it’s best to plan ahead and order your buttons so you’ll have enough. Local places like JoAnn Fabrics will seldom…okay never…have enough buttons in stock.)
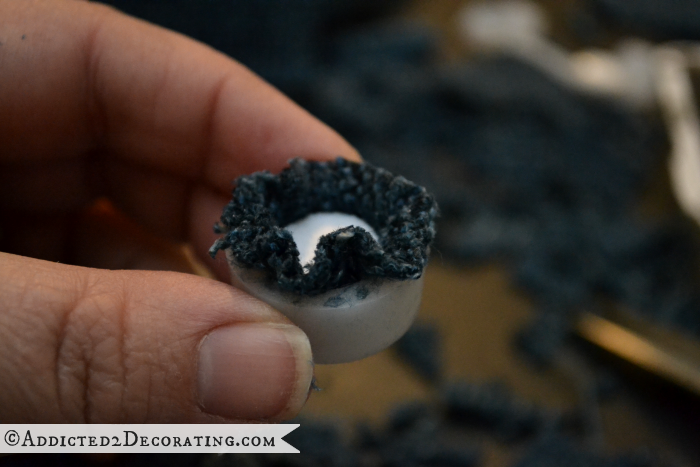
But I also had another problem. The upholstery fabric I used for my ottoman was way too thick to use on the standard cover buttons. So I would have had to purchase different fabric for the buttons. I generally don’t have a problem with that as long as I can find the exact same color in a thinner fabric. But I couldn’t find a fabric that was even close in color.
So I looked for different options. Since I made the ottoman using a modified tufting method (i.e., with screws and washers), I didn’t necessarily need actual buttons. Just anything button-shaped that I could wrap fabric around would work. And what did I find?

Yep. I used googly eyes. One package of 96 eyes cost $4.99, and I used a 50% off coupon. That’s quite a bargain for 58 “buttons” considering that the actual cover buttons I was originally going to use were $9.99 for a package of 18 buttons, and I was going to need four packages.
I had already opened one of the packages of cover buttons (which I’m sure I’ll use on a future project), so I went ahead and used the bottom part of the 2-part tool that comes with it for covering the buttons. I placed the fabric in it, and then a googly eye on top and pressed it down into the tool.
Then I used my hot glue gun on the low melt setting (this is important because, as you can see, I got glue all over my fingers) to glue the fabric to the back of the “button.” It looked like a complete mess on the back.
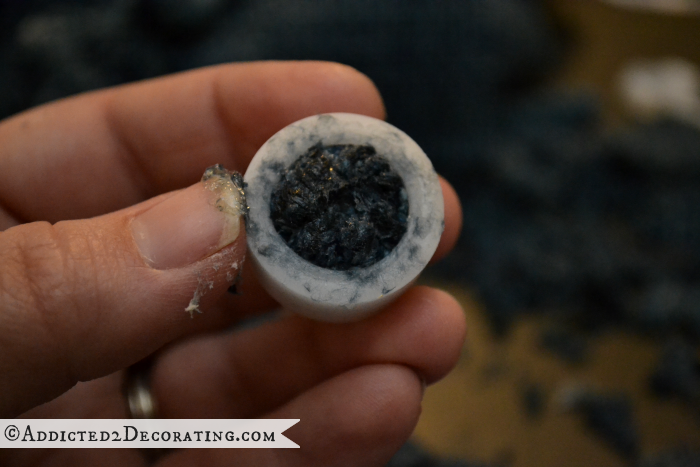
But once it was dry and I popped it out of the tool, the front looked like a perfectly covered, pretty little button.

Then I used my hot glue gun on the high heat setting to glue the buttons onto the screws.
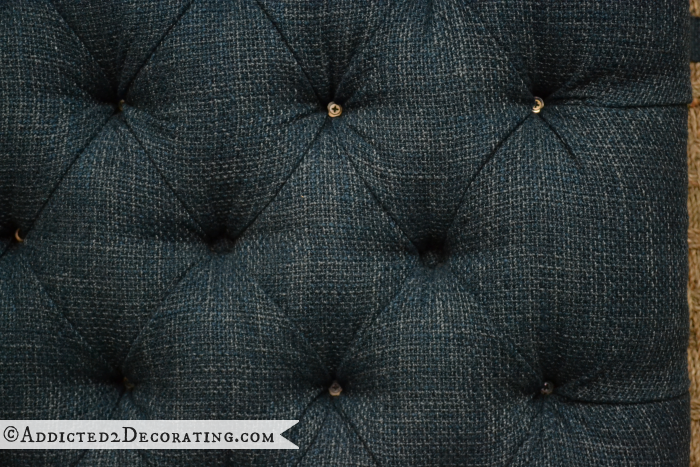
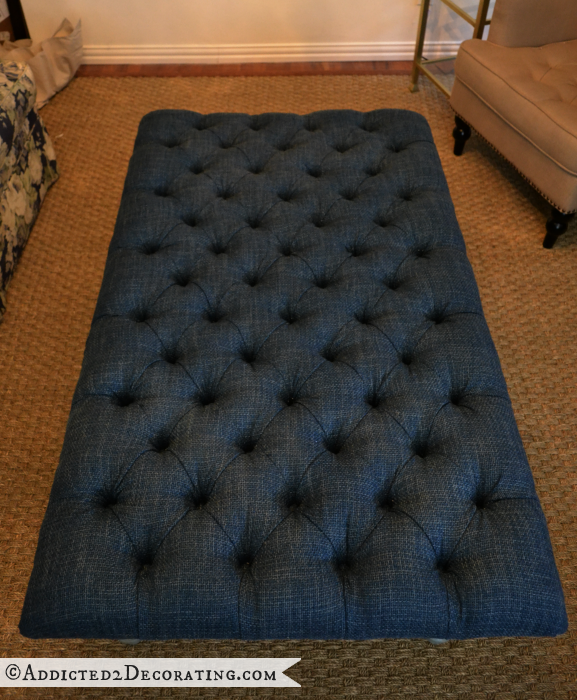
And with the buttons done, my upholstered top was finished…finally!!
So with this modified method of diamond tufting, here’s what the back of the ottoman top looked like.
And here’s what the back of the headboard using the “correct” diamond tufting method looked like…
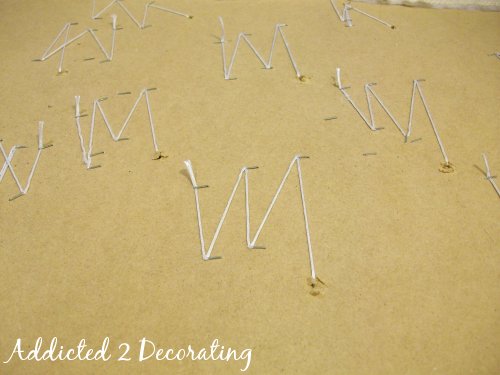
So there’s quite a difference. Remember that with this modified method, all of the tufting work is done from the front. There’s nothing to pull through and staple to the back. So other than the handful of screws that managed to peek through the back side of the plywood…

…the back should be just one solid piece of plywood.
Around the edges, I trimmed off all of the excess fabric and batting, added one more row of staples to secure the edge of the fabric, and then used a hammer to be sure that all of the staples were in the plywood all the way.

And it’s finished! Well, at least the top is. 🙂 I still have to build the base. For now, the top is just sitting on the coffee table that’s temporarily in the living room. So not only is the base not pretty at this point, but the ottoman top is also sitting about four inches too high. But I’m pretty excited about how it turned out! Diamond tufting is definitely one of those things that takes practice, and I feel like my tufting gets a little better with each piece I make.
So again, ignore the base. 🙂 But here’s how everything is looking together so far.
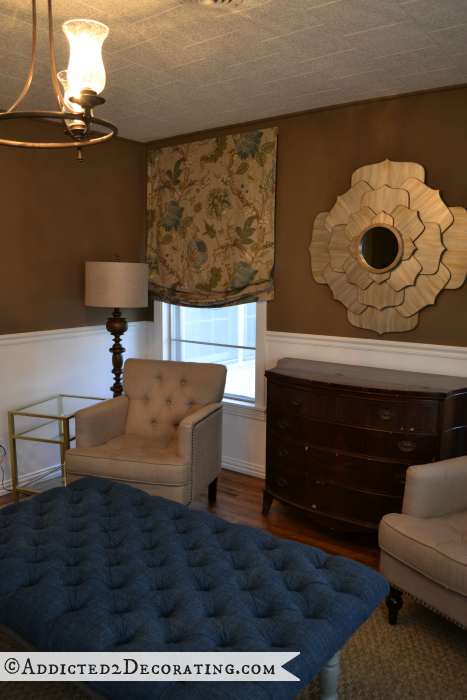
Do you notice my new floor lamps? I got those from Target. I knew exactly what I wanted for this room, and looked all over at Pottery Barn, Restoration Hardware, Ballard’s, etc. I was fully expecting to have to pay about $200 for each floor lamp, but then I found exactly what I wanted at Target, and they were under $80 each!! I love it when that happens!
I’m not sure if I’ll keep the shades like they are, or recover them in a different color. I’m really wanting to bring some greens into this room somehow, so those lamp shades might be the perfect way to do that. But we’ll see.

Addicted 2 Decorating is where I share my DIY and decorating journey as I remodel and decorate the 1948 fixer upper that my husband, Matt, and I bought in 2013. Matt has M.S. and is unable to do physical work, so I do the majority of the work on the house by myself. You can learn more about me here.


Looks beautiful…great job!
Your tufting looks as beautiful as that on the chairs. I love the size also. Just BEAUTIFUL.
Brilliant idea with the googly eyes! But just for future reference, coverbuttons.com is AMAZING! I use it for all of my buttons. You can get every size and every quantity for pretty cheap. They ship REALLY fast too! You can also get zippers and stuff like that, but they are THE BEST place for buttons. No question.
Thanks for that resource, Caroline! Those are amazing prices!!
I do generally order my cover buttons online when I know I’m going to do a project where lots of buttons are needed. I usually order from http://www.createforless.com, which is cheaper than JoAnn’s, but still way more expensive than the link you gave!
Those cover buttons are SO expensive at JoAnn Fabrics! Generally a package of 5 buttons is around $4. Ridiculous! That adds up so fast!!
Kristi that looks awesome! I love the buttons – really a stunning and amazing piece!!! 🙂
Ok, now here’s my thought..GREAT idea for buttons but..for those with smaller children who LOVE to push their fingers in the holes of tufted furniture those little googly eyes will push in and dent. If you do not have smaller children then the googly eyes is such an awesome idea! The fabric and color you chose are just stunning! You did a beautiful job.
I was actually afraid that the googly eyes might be too fragile, and I almost didn’t use them. But then I put one down into a button hole, and pushed and pushed and pushed on it many times. I could feel it pushing the plastic in, but it would just pop right back out each time. No matter how hard I pushed or how much I tried, I couldn’t get it to stay dented in. So I decided to go for it.
But if someone is worried about that, I think that round wood pieces could also be used. In fact, that was my first idea, but JoAnn’s doesn’t have a very good selection of those unfinished, packaged wood pieces, and I was feeling too lazy to go to another store. 😀 I think Michael’s has a bigger selection, so they might have bags of wood circles or even wood buttons or something like that.
In fact, at JoAnn’s I did see those wood “plugs” that you use when you countersink screws into wood. They look like buttons since they have the rounded top, but they weren’t big enough for what I needed. Perhaps a store with a wider selection would have them in bigger sizes, though.
This is fantastic. You’re tufting looks amazing! I had the same button issue with my made from scratch tufted ottoman but powered through (literally – I beat those buttons into submission!) And now just glue them back in as they pop off. Googly eyes is a genius modification! And on the topic of modifications; I’m really looking forward to trying out your modified tufting. I think it will yield less of a headache than the typical drill a hole in the plywood and pray your upholstery needle hits the right spot on your first (or tenth) try!
Thanks Kristi!
Beautiful! well done!
I love the fabric you chose for your ottoman, and the space is looking totally devine!
Looks awesome truly. I do have a question and it is the back of the base. Are you planning on covering the staples? That detail would bother me. I know it won’t show but somehow I feel it is not finished until some sort of trim or braiding is used to make a finished edge.
I probably will…although I have a bad habit of leaving things unfinished that can’t be seen. 😀 But any time I’d make a headboard for a client, I would take some plain white fabric (either leftover drapery lining, muslin, quilting cotton, or anything similar), and I would cover the entire back with it, turning it under and stapling about 1/4-inch from the edge. That way no plywood shows, and no raw fabric edges show.
Whether or not I’ll take the time to do that on this ottoman remains to be seen. 🙂 I probably should, but like I said, when working on projects for myself, I very often leave the unseen things unfinished. It’s a bad habit. I have a short attention span, and once I get things to where the parts that will show are finished, I’m ready to move on to the next project. 😀
The tufts look GREAT!
I LOVE your ottoman, the color, everything, it’s truly gorgeous…the googly eye thing, GENIUS (said in my opera singing voice). My next buttons will definitely be googly eyes, plus, they have entertainment value…have a couple of your guests pick up and shake your ottoman around and listen for that googly eye sound. Cookie Monster would be so proud, hehehe!
All the best to you….Co 😀
P.S. I’m drooling over the lamps you got and I can see green shades being stunning on those lamps, yep yep yep 🙂
THANK YOOOUUUUUU!!! (Had to sing back to you in my best opera voice.) 😀
That really made me laugh. 🙂
Wow. I. Am. Impressed. You are truly amazing, Kristi! “Creative” doesn’t begin to describe how you tackle a problem and come up with a solution. The ottoman top looks absolutely beautiful! I’m looking forward to seeing it on the base once you get that done.
Looks really nice – might have to show this to the hubs and see what he thinks about making one for our living room – yours is MUCH bigger than what I want for our living room but I do want something that is upholstered on the top and has a shelf that can be used (or a wooden top that you can put ottomans under which can be used for extra seating if needed). Can’t decide – but nothing will be done until after the first of the year. But I love the way yours turned out! 🙂
You’re so smart, and so hard-working. What a room you are designing! I do hope you’re spending your “thinking” time setting in this lovely work in progress.
Gorgeous work!
Wow, beautiful job. Your professionalism shines! I’ve been wanting to do a tufted ottoman and now I’m more confident I could do it. Thanks.
Merry Christmas, Kristi, your first in your beautiful new home. You deserve it.
I can only dream that my first tufting project will look even remotely like your ottoman top. I think it’s probably going to be more like a nightmare, but I am determined to try it. After the holidays, maybe. Looks really good, Kristi.
You have to be one of the most resourceful human beings on this planet! Googly eyes? In a million years I wouldn’t have seen that coming. LOL Great job and the room is looking awesome! Merry Christmas!
It looks great and I have tool envy big time.
That ottoman is drop-dead gorgeous and you did an awesome job on the tufting. I love following your blog.
Oh, gOOgly eyes! I so love it that you can do anything with anything. Looking great!
Its looking really great Kristi
I want to tell you I am super excited to see how you have done this project.Absolutely elated is probably a better way to put it.I have a reproduction set of Victorian tufted furniture,complete with two setties,two high back chairs and the coffee table and side tables with Italian marble.My decor is pink,green tuquise and white.They are rust orange lol.I have wanted to reupholster them so badly but I have been afraid to attempt it although I have done several other projects successfully.I did not know how to attempt the tufting without completely tearing them apart.You have made me very happy because with your method I think I will have the courage to attempt it.Thank you so much.:D
Everything is gorgeous! I feel silly even offering a change, but every time I look at your beautiful lotus mirror, I want to center it vertically on the brown portion of the wall. Equal parts brown above and below. Completely my hang-up, but I thought I’d throw it out there.
Be blessed during the celebration of our Lord’s birth!
Not to worry…I’ll move it. 🙂 But first, I want to figure out what decorative accessories I want on the credenza since they’ll also determine the height of the mirror. If I move it now, I’d probably just have to move it again later, and I’d rather just move it once. That thing is heavy!! 🙂
Beautiful job! I’ve done tufting before, using a needle and thread and it’s time consuming, even for a small project. I really like your modification! I’m very much looking forward to the finished project.
What about spray painting the lamp shades? I’ve used floral spray paint and they’ve come out fine. (tape off the inside)
Interesting. I’ve never used floral spray paint before. Will it keep the shade looking like fabric? Right now, it’s a really pretty linen/burlap look. I love the fabric look, but just wish it was green instead. But I don’t necessarily want it looking like it’s covered in paint.
What a wonderful job! I’m constantly amazed by your creativity! I love the thought you used googly eyes, what a great ability to think flexibly!
I saw that same lamp at Target tonight and LOVE it. I have lamps with bases in a similar wood look (different shape) and was thinking how I might get that one some day, but already have a brass vintage one, so probably not for a long time.
One thought on the shades, maybe a wide green ribbon top and bottom glue gunned on? You could pull the color from the shades…love how this elegant room is coming together…
I love the idea of green ribbon! Now to the challenge of finding some that I like that’s just the right color, width, and style.
Kristi, you are an absolute machine. I can’t get over how much you get done in such a short time. The room is going to look great!
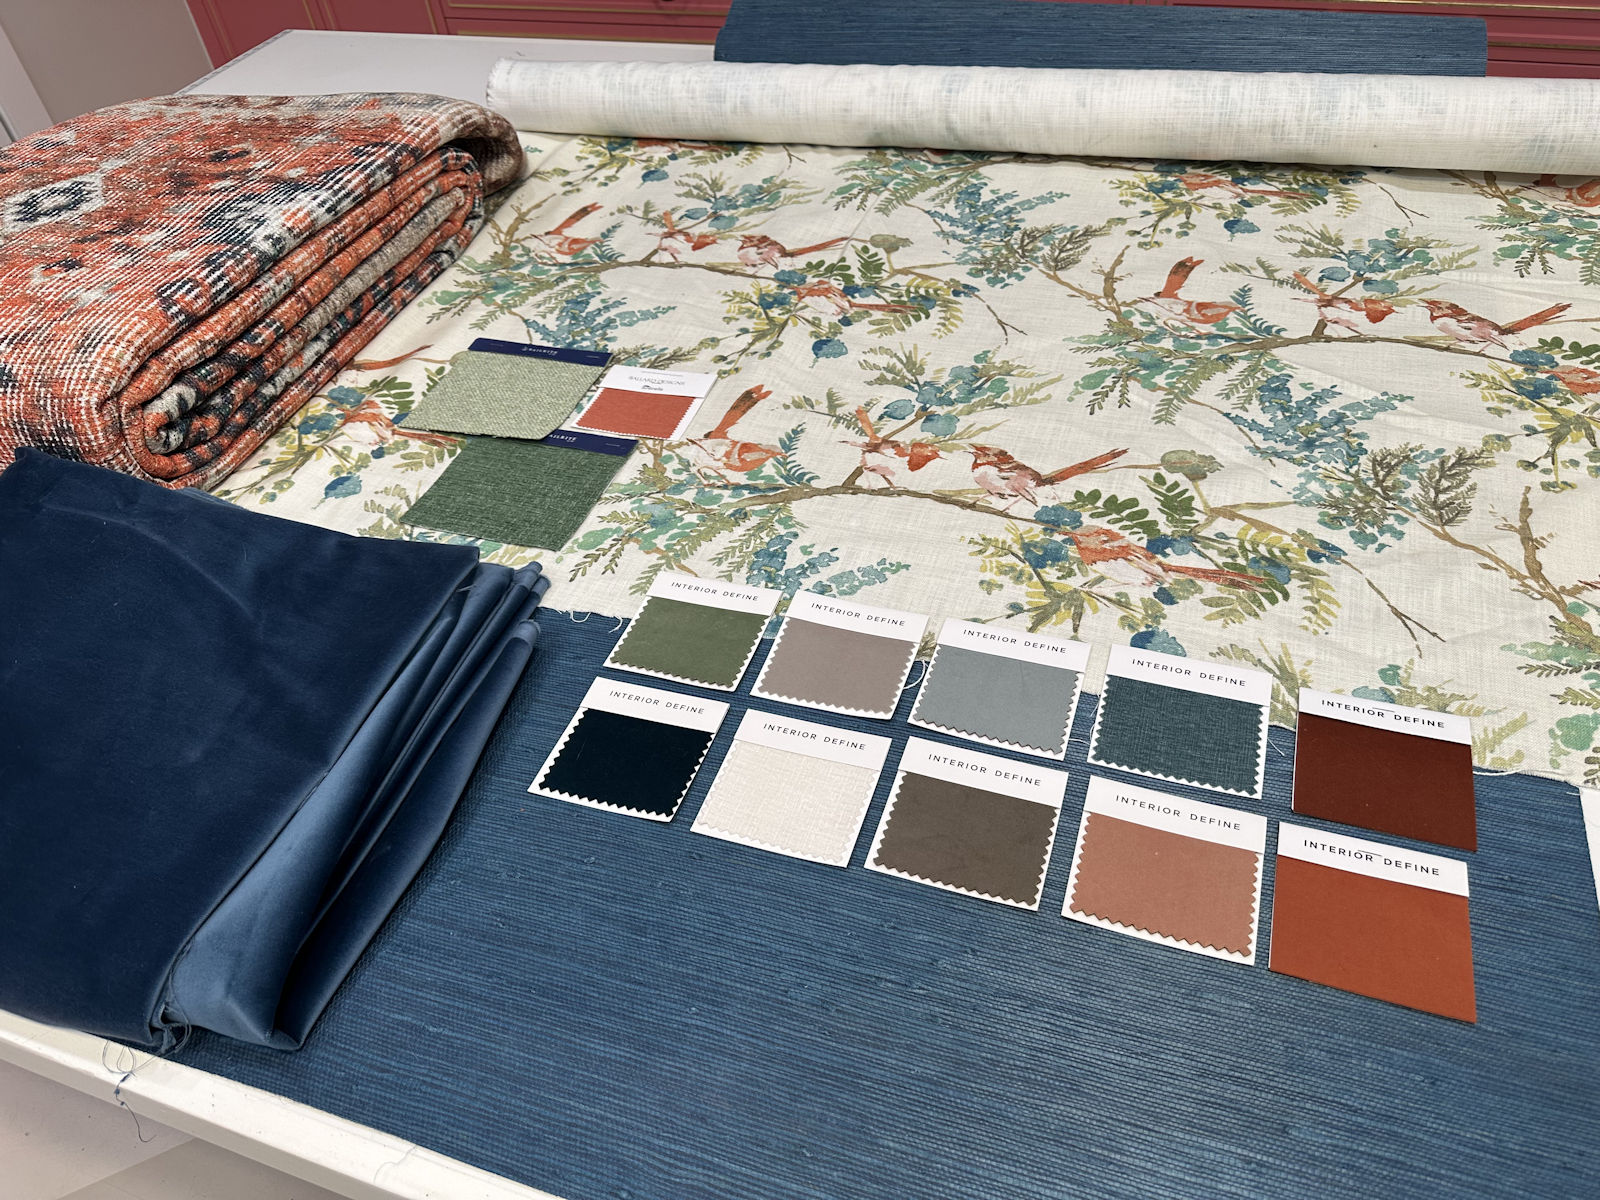
Hi!! What kind of fabric is this? It’s beautiful!! Also, where did you get it?
Thank you and have a Merry Christmas!!!
I got it here:
http://www.decoratorsbest.com/prod-Tex_Weave_Baltic-157530.aspx
Thank uuuuuu!!!!! Which color? You are wonderful!!!!
The color is called Baltic.
Yes I thought so!!!! It looks like a dark denim? I know it’s not denim but I’m looking for a dark blue so this would work right? It’s gorgeous!!!
It’s gorgeous Kristi!
Your upholstered bench is just beautiful. I need to upholster a bench myself but mine will NEVER look the way yours does. Great job!
Genius, as always!
Ok, I admit that the second I saw the package of googly eyes, I was hoping you were going to go all avant-garde and just use them as-is in all their Cookie Monster glory on your ottoman! LOL! Maybe in a kid’s room? Anyhow, I am duly impressed with your solution for the buttons, I think you own the rights to thinking outside the box! I cannot believe the size of that ottoman, all that tufting you had to do, and the fact that it turned out flawlessly. Just gorgeous, such a professional looking job! That fabric is stunning, I love the color and texture, good choice you made on that. That ottoman coffee table is going to be an epic piece of furniture, and I predict it will be one of your signature pieces once you’ve got it completed.
Ditto what Betty said. Just gorgeous!!
I LOVE this ottoman! You make it look so easy. I’ve been wanting a Kreg Jig set for awhile so maybe sooner than later after seeing this. Also, by any chance did you make the lotus flower mirror hanging in the room? It is FABULOUS! I keep thinking about how to recreate it.
I found the post of the lotus mirror 🙂
Wow, it turned out beautifully. You are super talented. I took upholstery classes and still shy away from tufting. With your great “how to” info maybe I might give it a try.
This is exactly what I was looking for! Thank you for such exact instructions and pictures! I just salvaged an upholstered ottoman that has tons of potential so this process is perfect. And the buttons- brilliant!
Kristi, It’s now May and I am wondering how the buttons( aka googly eyes) have held up? I would love to do your method for an ottoman coffee table and I will be selling it so I want to make sure they truly stay on over time. I know each household will be different based on kid traffic etc. Thanks for the feedback!
Mine have held up perfectly. I haven’t had even one of them come off. I really can’t see them ever coming out. Even if a kid tried to dig them out, I think they’d have a very hard time because the fit is very snug. Even when I was just testing out the idea, and I put one of the buttons down in there without using glue, I had a very hard time getting it out.
This is the best tutorial on faux-diamond tufting out there. I can’t wait to try it. I just wanted to confirm the size of the buttons you used. Were they 3/4″?