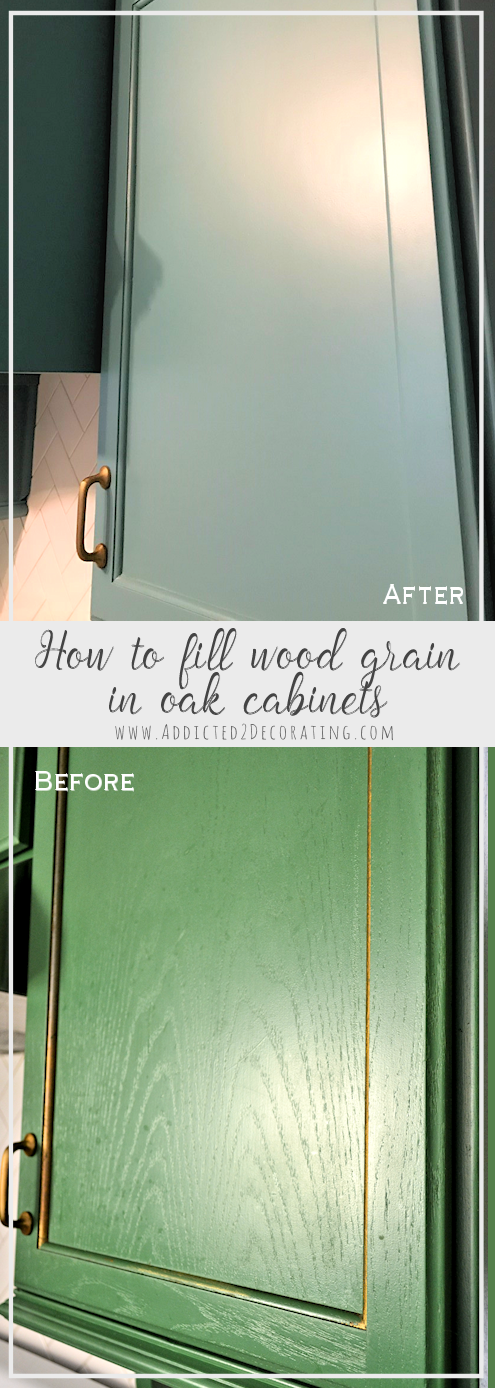
DIY Wood Range Hood Cover – Some Adjustments For Safety + More Progress
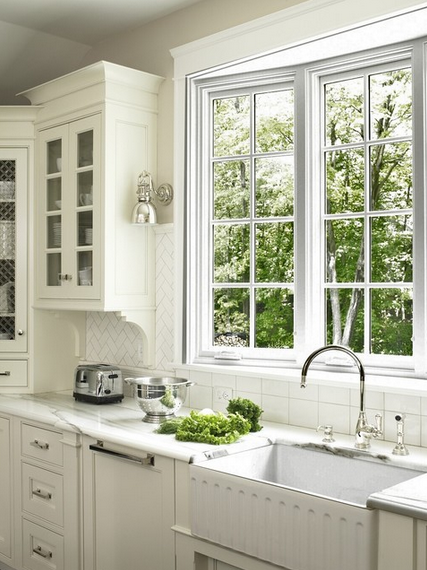
So guess what I did yesterday! I pretty much took apart my wood range hood cover and remade it. 😀 I used the exact same process that I used the first time around to build the first version of the range hood covert (click here for those details if you missed that post), but on the first go ’round, it didn’t even dawn on me that the wood needed to be a certain distance from the stove top. Duh, right? I was just thinking that it needed to clear the top of my head, which is pretty easy to do since I’m only five feet tall. 😀
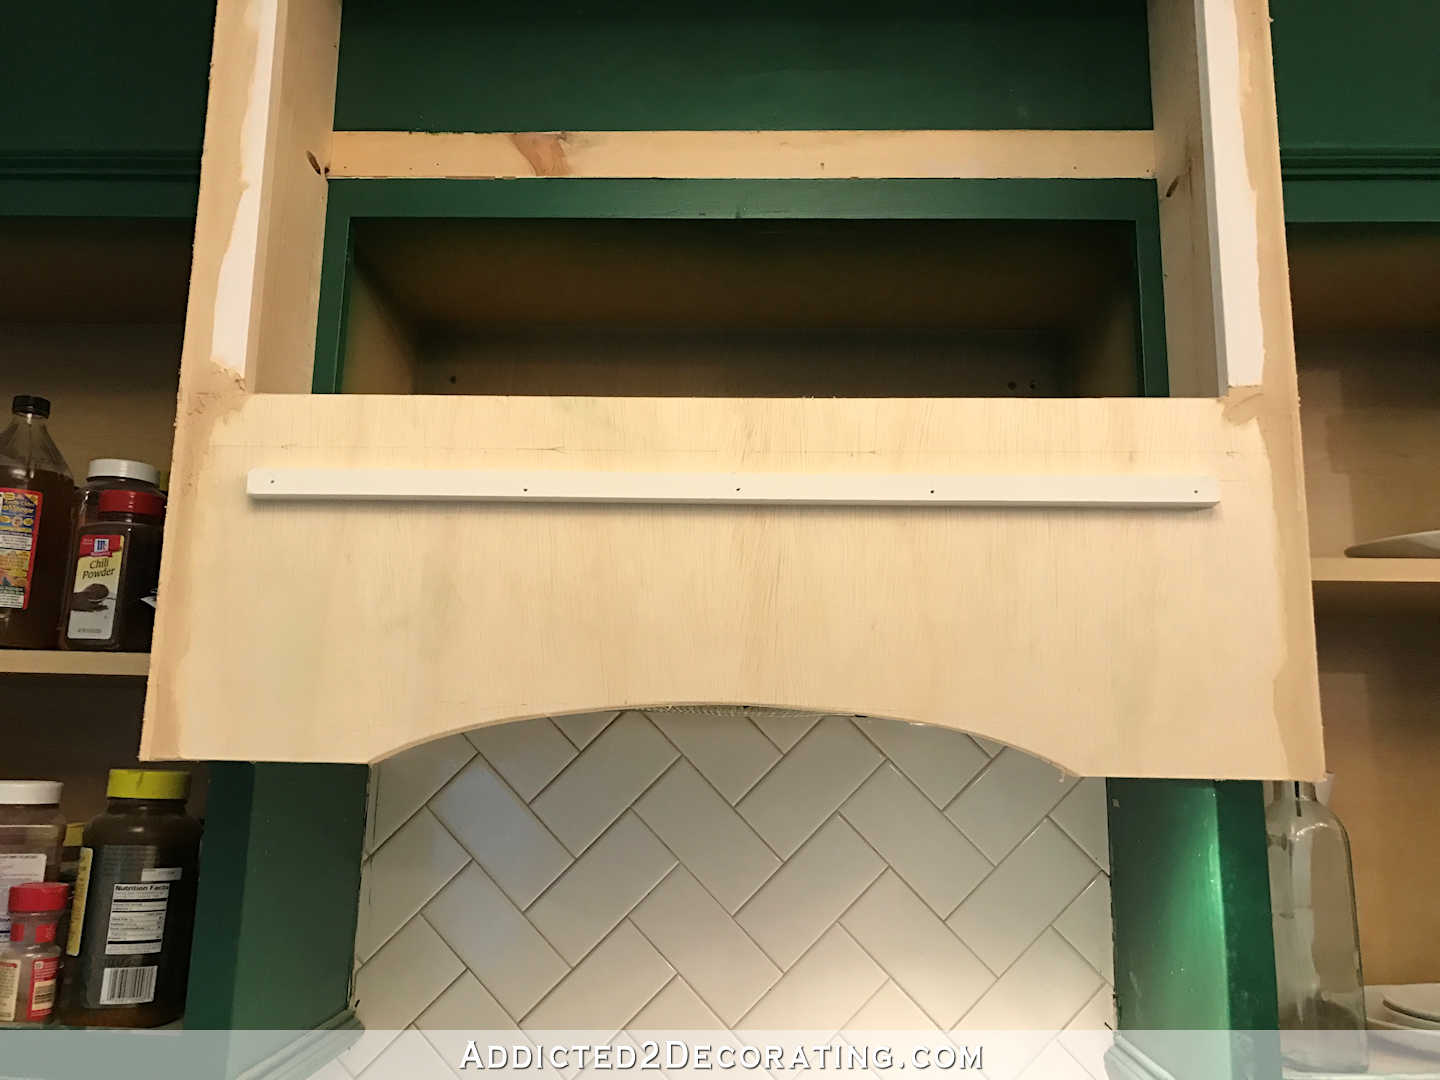
But actually, combustible material needs to be at least 30 inches from the stove top. Mine was about 25 inches on the sides…
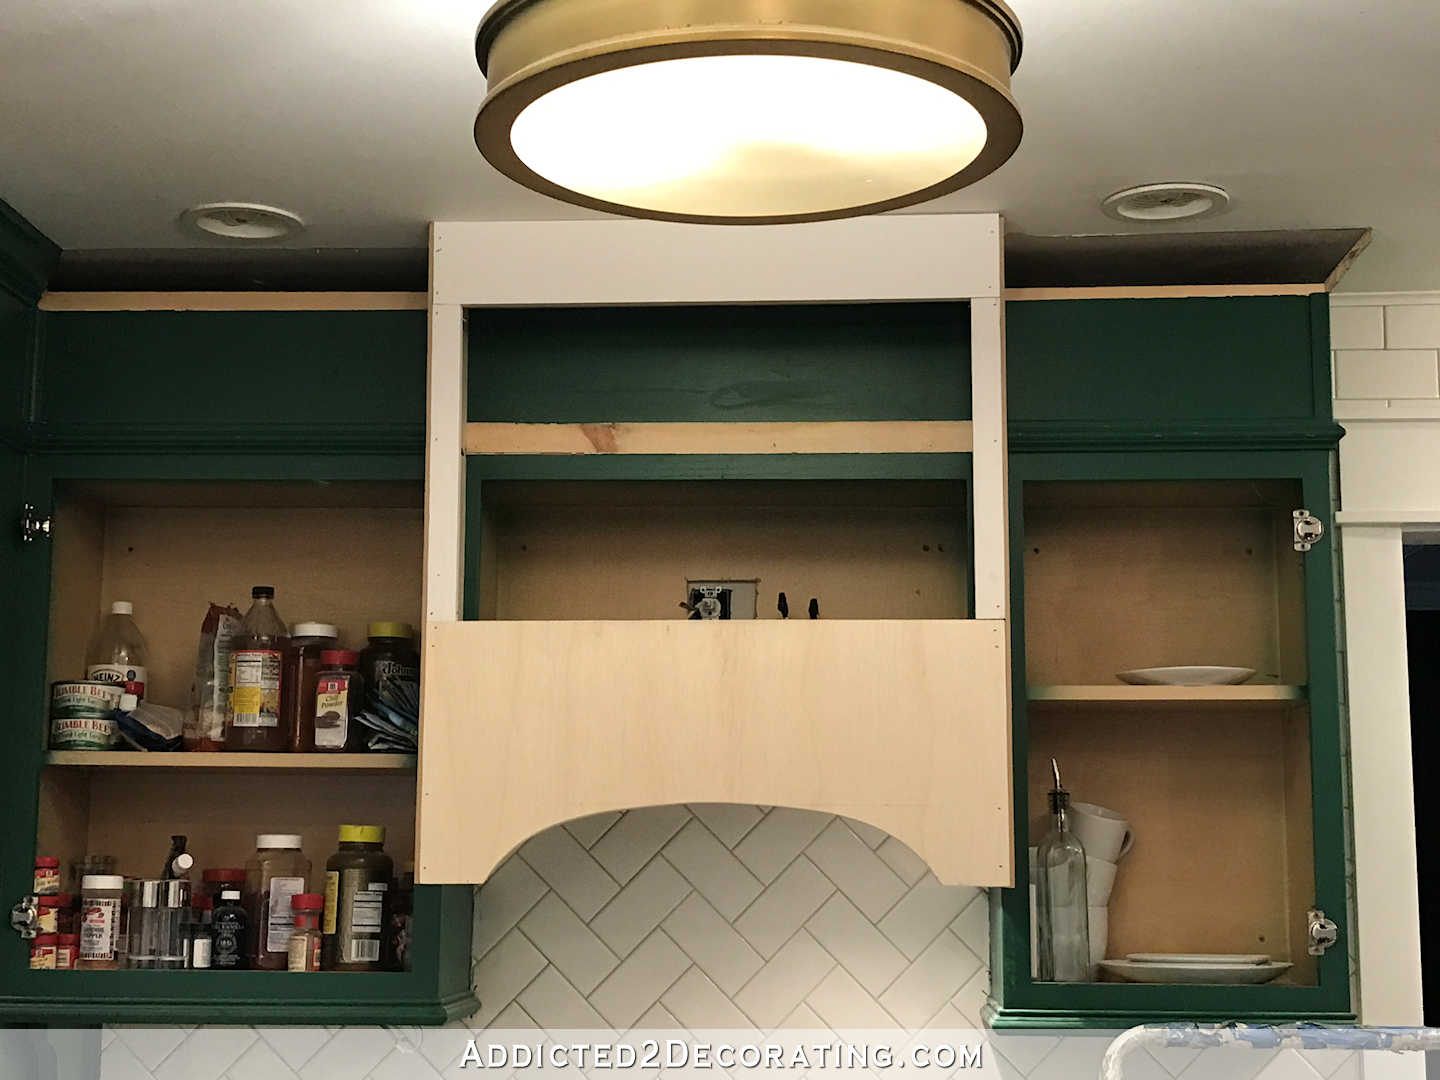
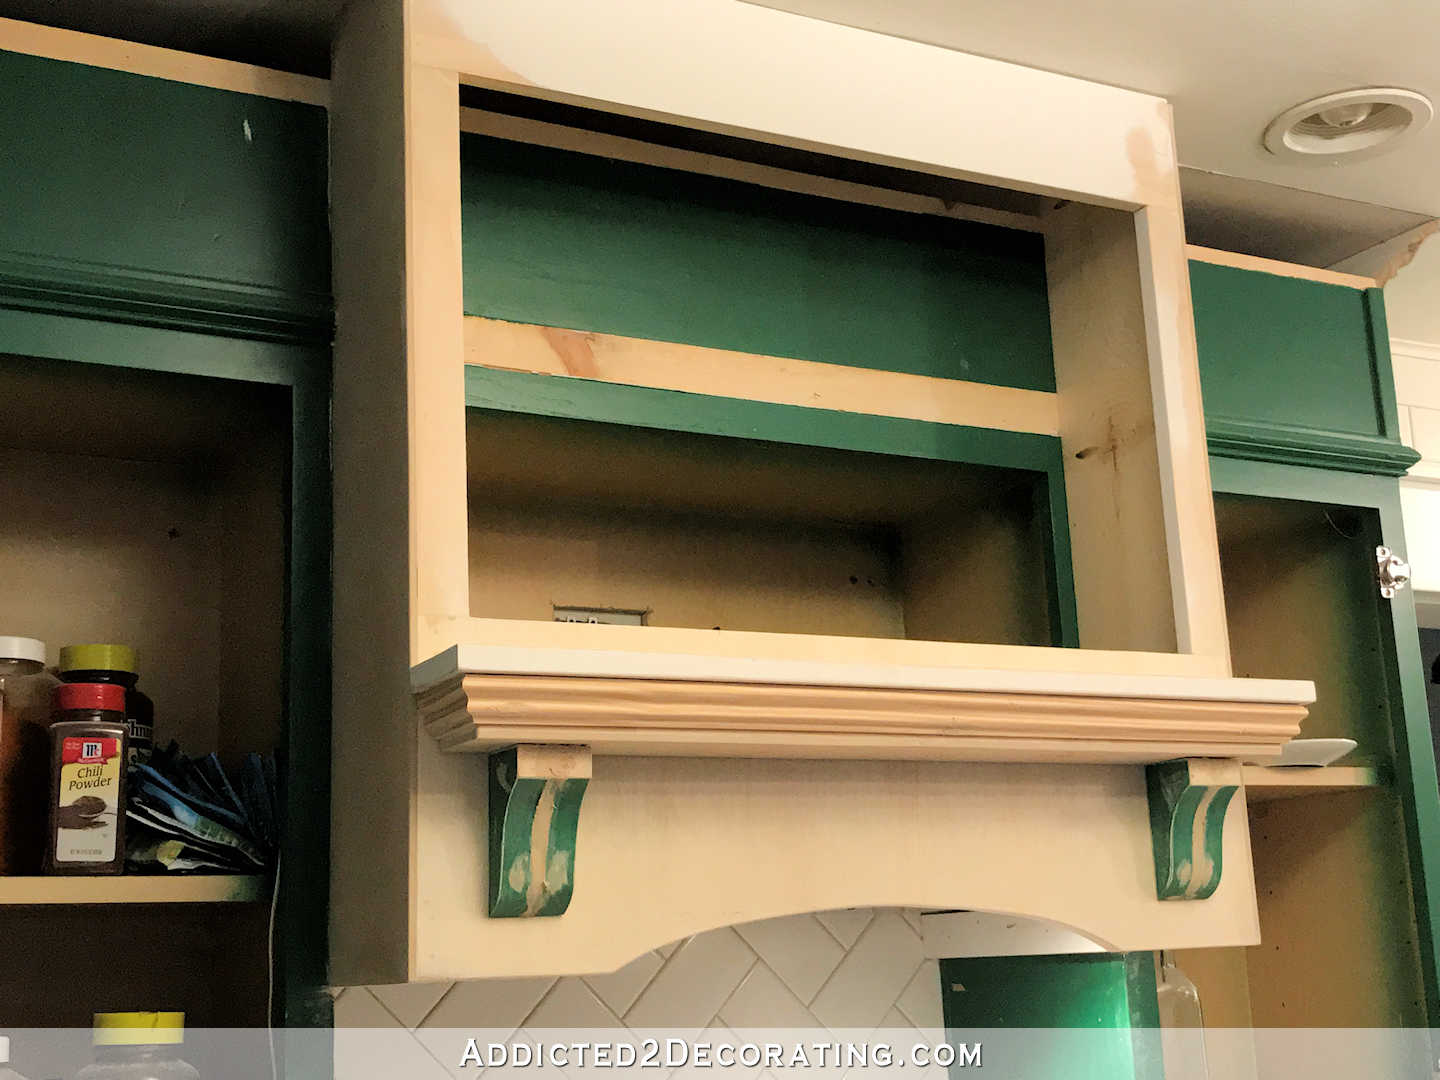
So I removed the side MDF panels, the bottom arched piece on the front, and the two lower support pieces attached to the side cabinets, cut all of those down considerably, and replaced them. Believe me, that process sounds a whole heck of a lot easier than it actually was. But at least now it’s the right height for the sake of safety, and it looks a lot better and less imposing as well.
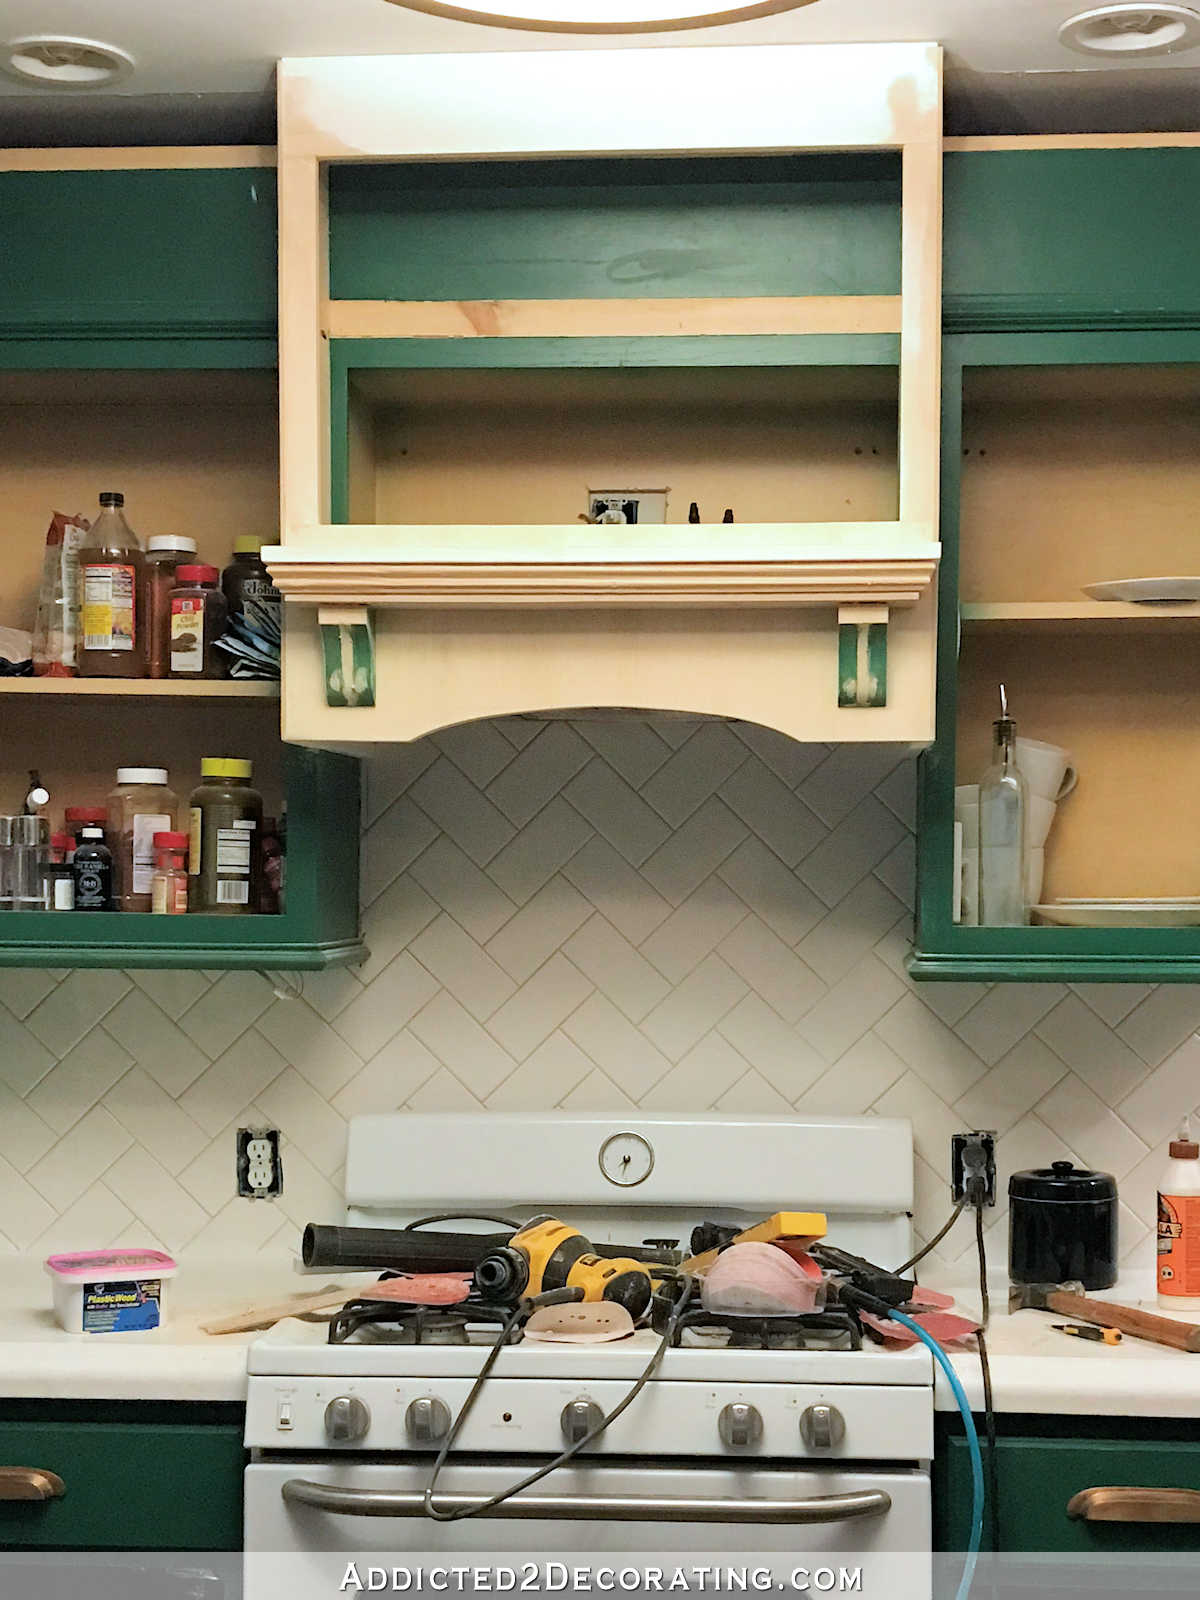
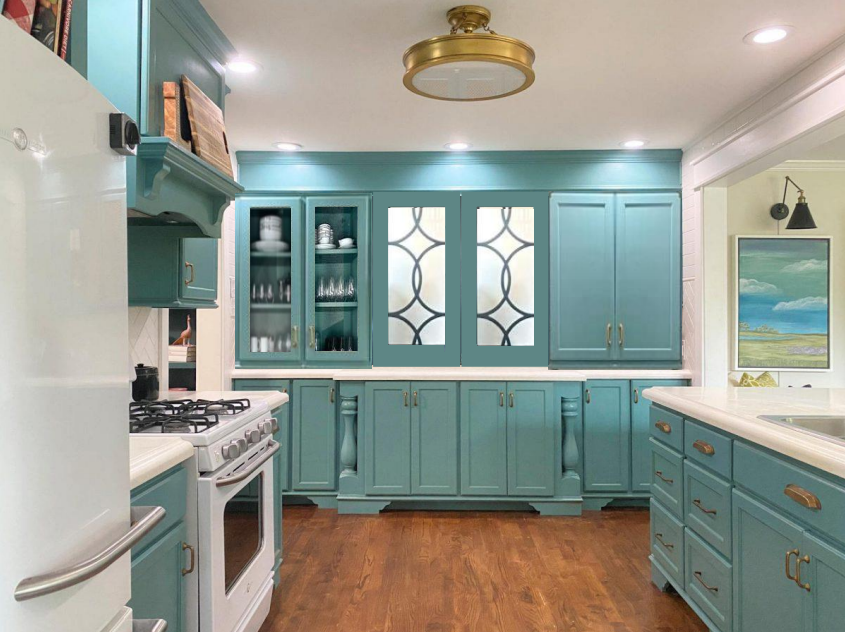
And you can see that I also added the corbels and shelf. Here’s how I made those…
I started by cutting a piece of primed 1-inch lumber to the size I wanted the top of the shelf to be. Mine was 30.5 inches wide by 3.5 inches deep.
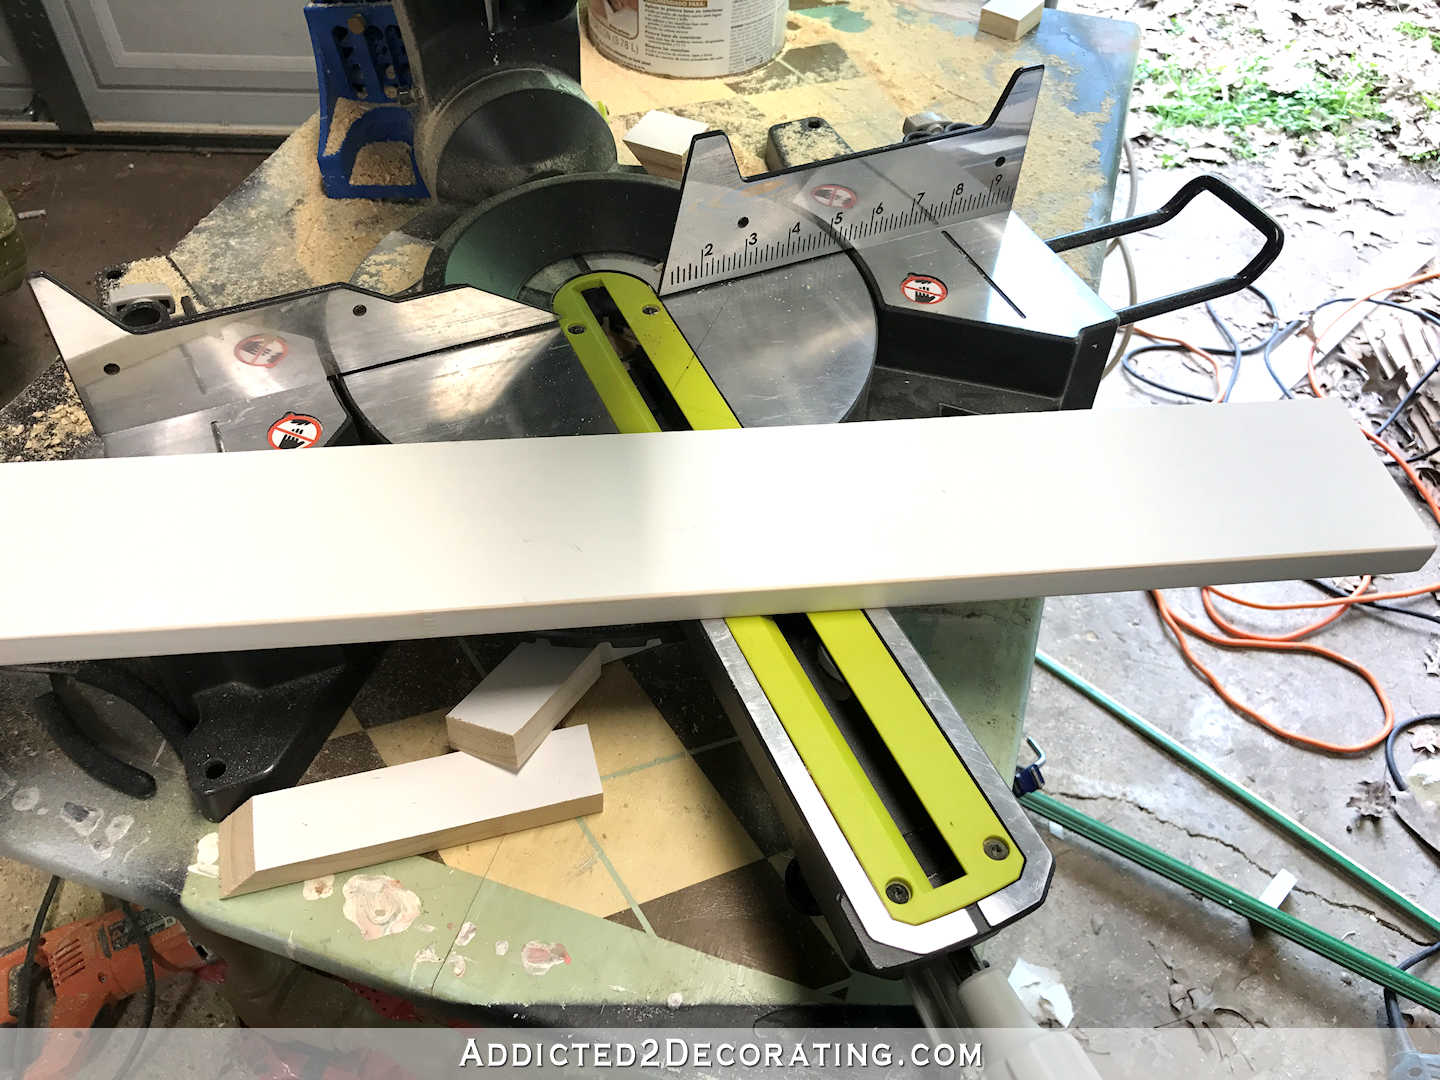
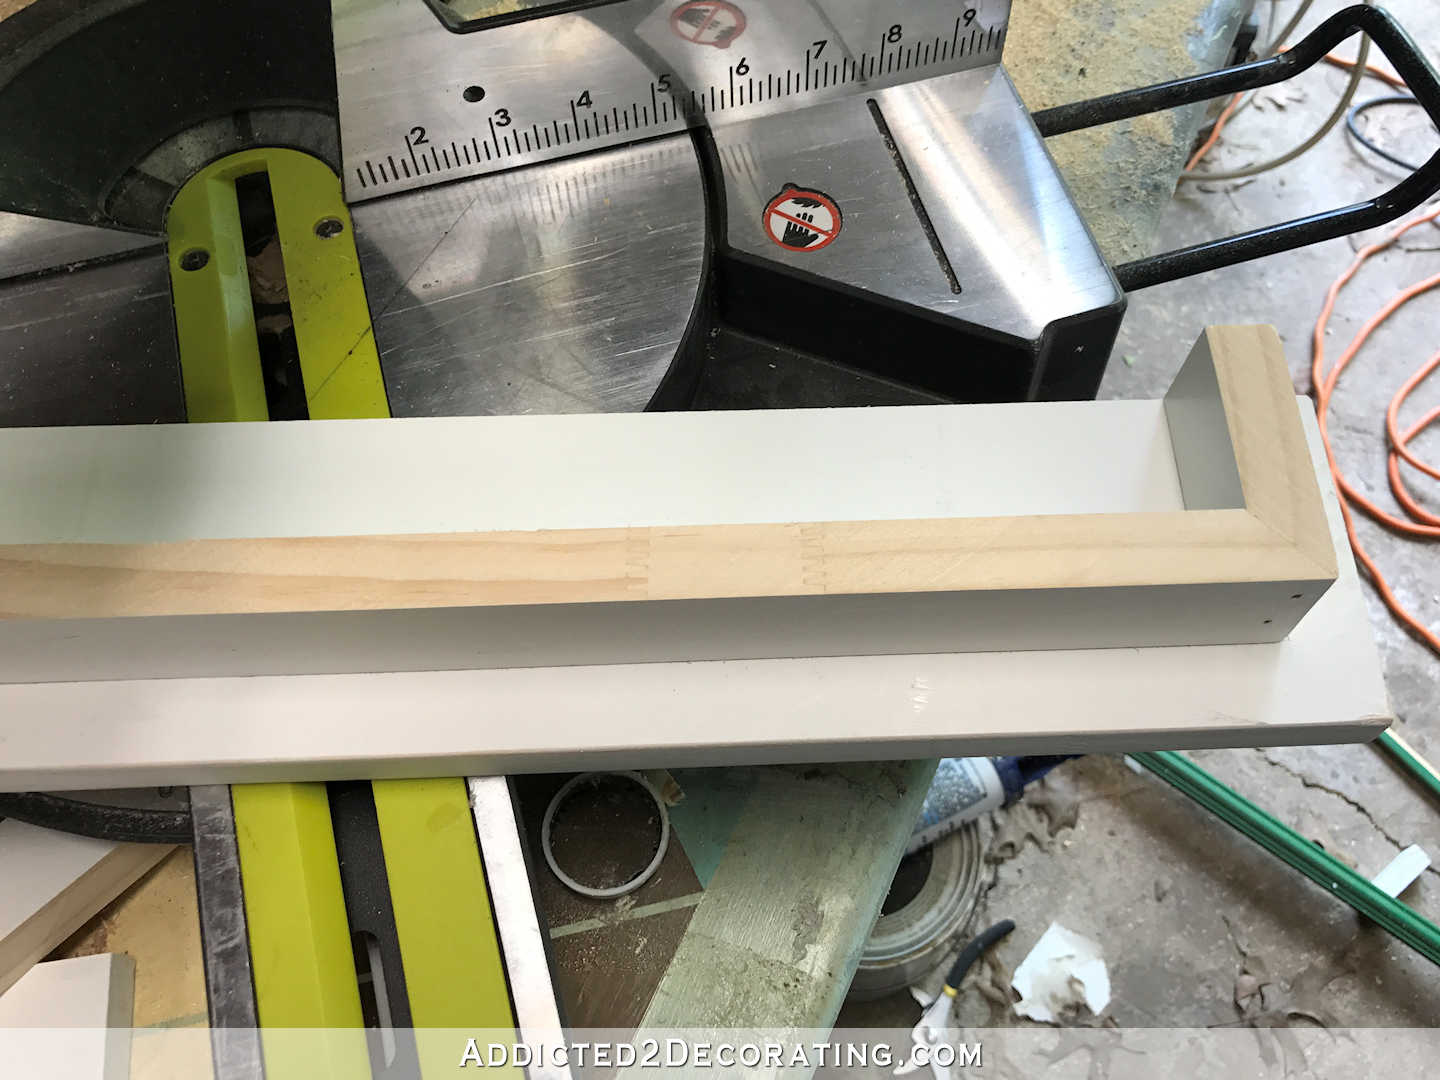
Next I cut some pieces of 1 x 2 lumber, mitered on the ends, so that it would sit in one inch on the sides and front of the shelf. I assembled those pieces with wood glue and little finishing nails, and then attached it to the top shelf piece with wood glue and finishing nails.
Here’s a close up of the other side…
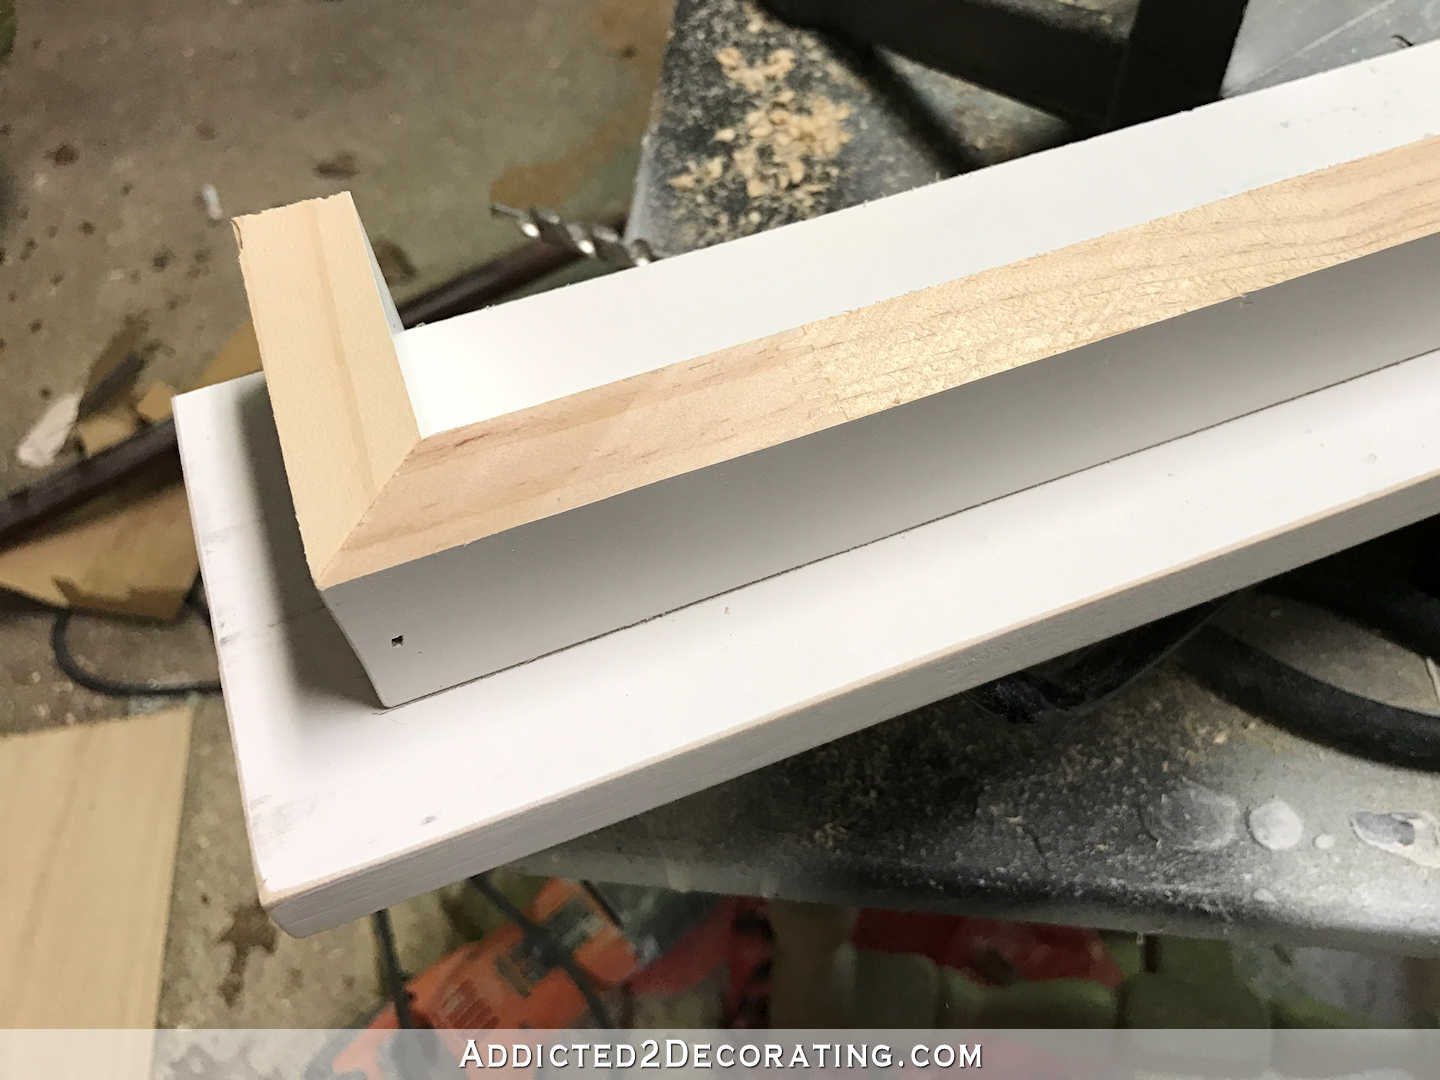
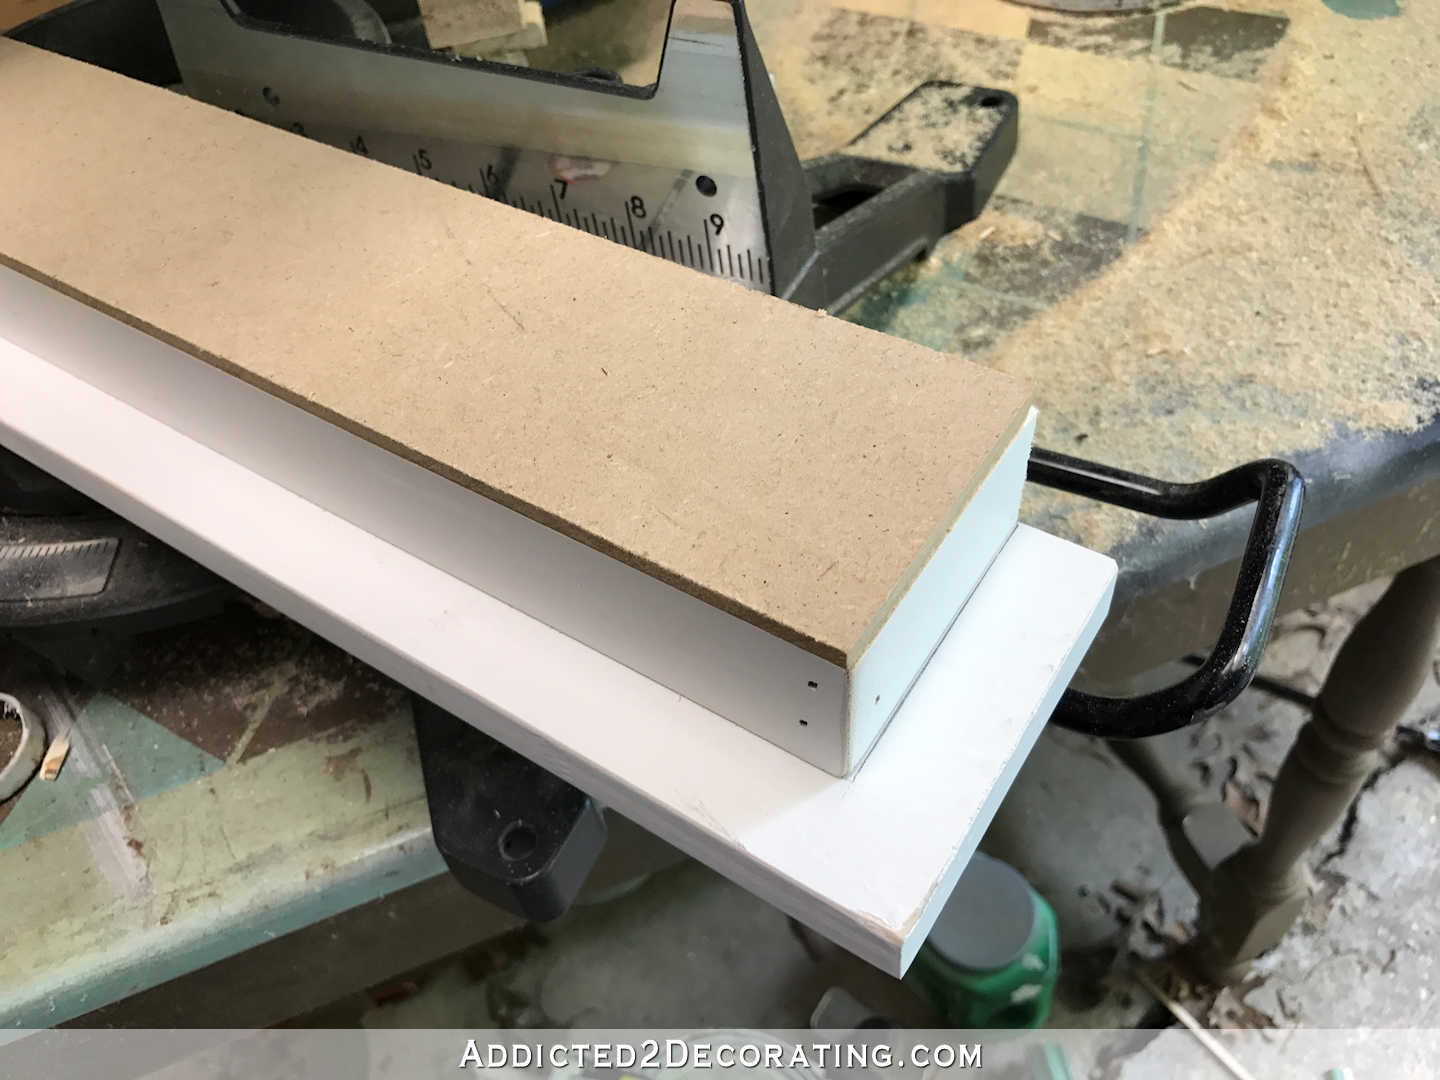
And then I cut a piece of 1/4-inch MDF to cover the bottom of the shelf. (The shelf is upside down at this point.)
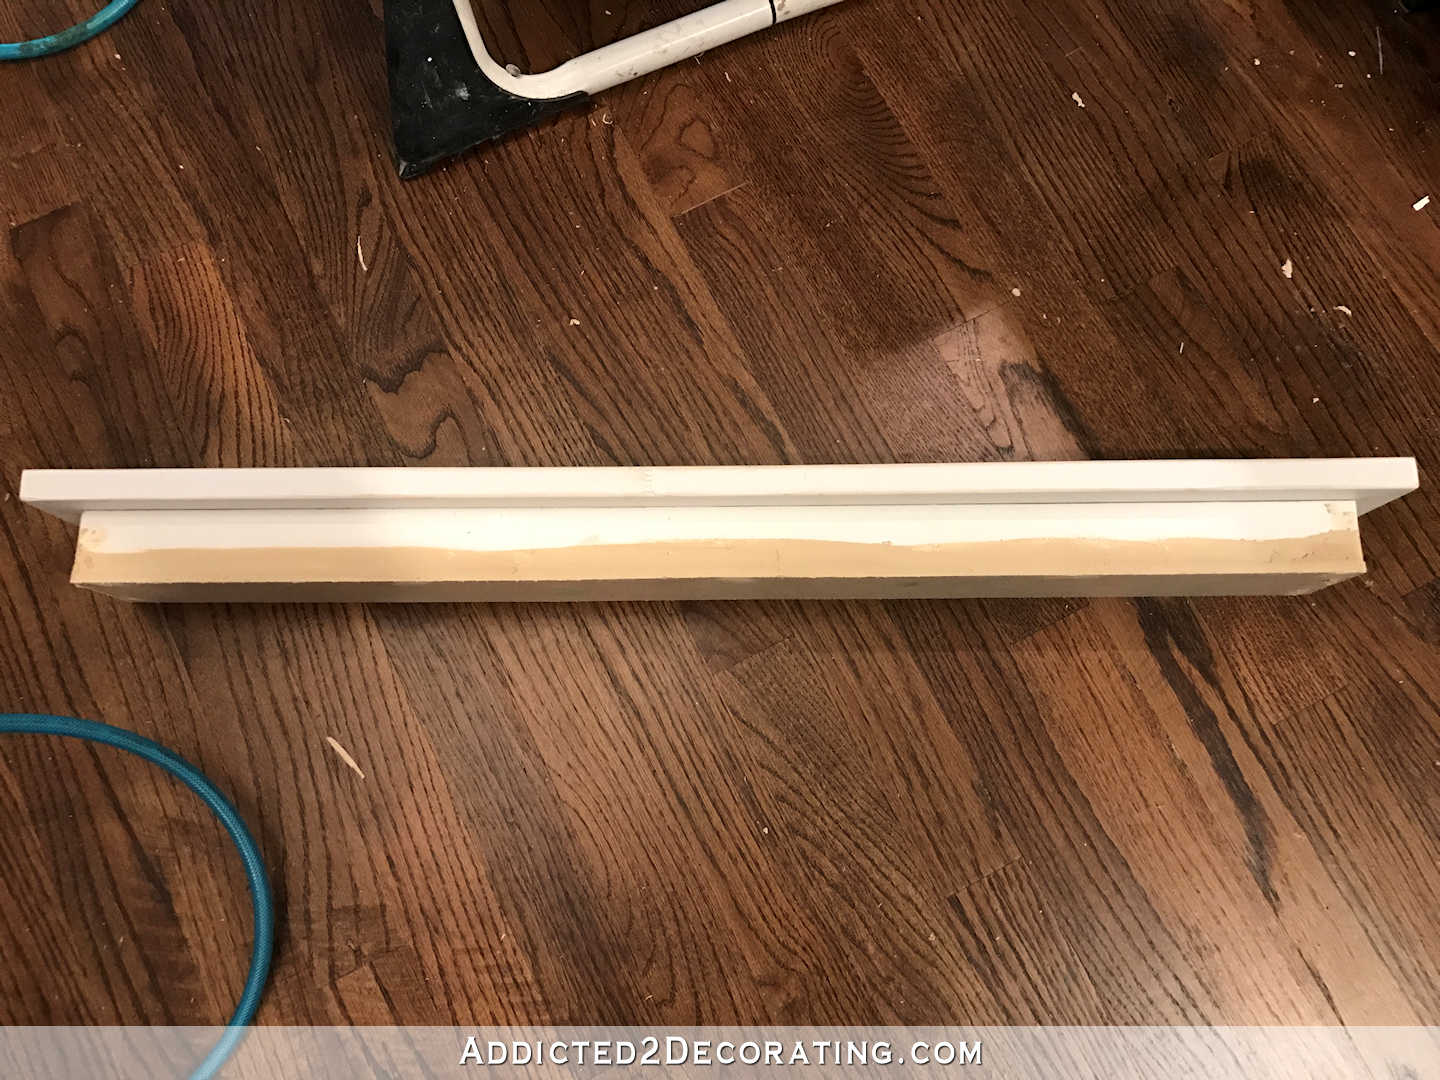
So here’s how the basic shelf structure looked from the front (with lots of wood filler and before sanding).
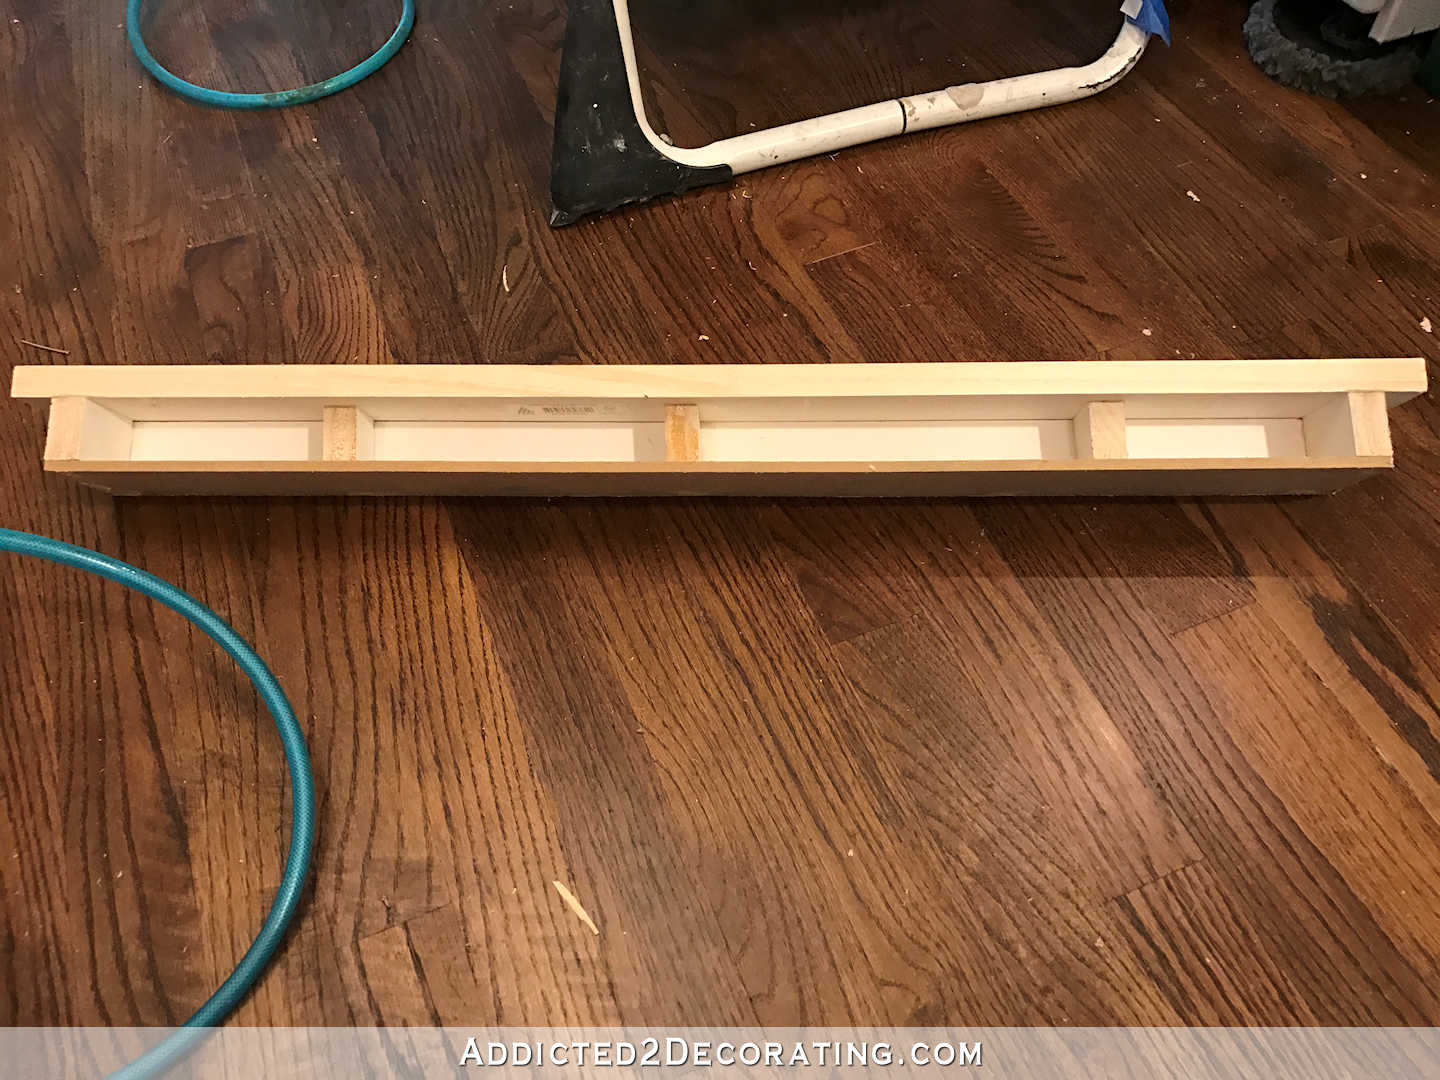
And here’s how the back looked. I cut three additional short support pieces and slid them in between the top shelf piece and the bottom MDF piece. These three pieces sat towards the front of the shelf and sat about one inch from the back edge of the shelf.
On the range hood cover, I measured where I wanted the shelf placed, and then attached a piece of wood that I cut to about 25″ wide and ripped to 1″ deep (i.e., the size needed to fit inside the back of the shelf), and attached it with finishing nails, using my level to make sure it sat level.
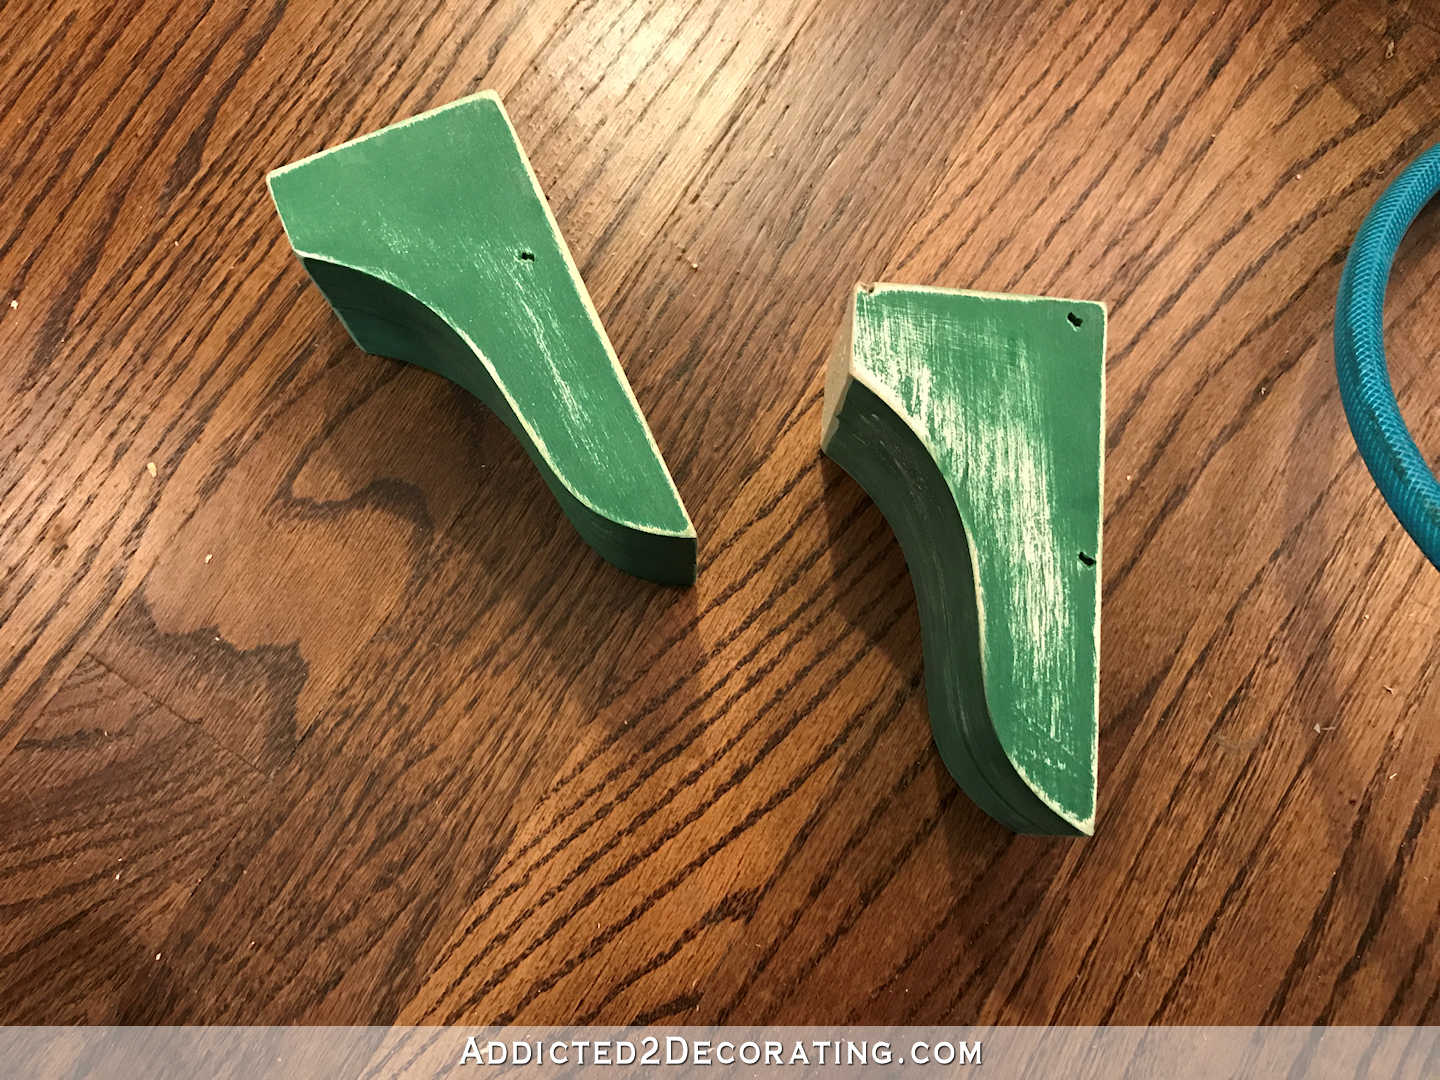
Before installing the shelf, I made some little corbels. To make these, I recycled four of the corbels that used to be in my kitchen, and just cut them down on my table saw until they were small enough to be used for this shelf. Then I attached two of them together for each corbel to make them wide enough.
Before I installed the shelf, I used my sander to sand everything smooth (i.e., the areas where I had used wood filler to fill the cracks between the wood and MDF). I also did all of the wood filling and sanding on the actual range hood cover. (You can see the wood filler on the edges of the range hood cover two pictures up, and in the photo below it has been sanded.)
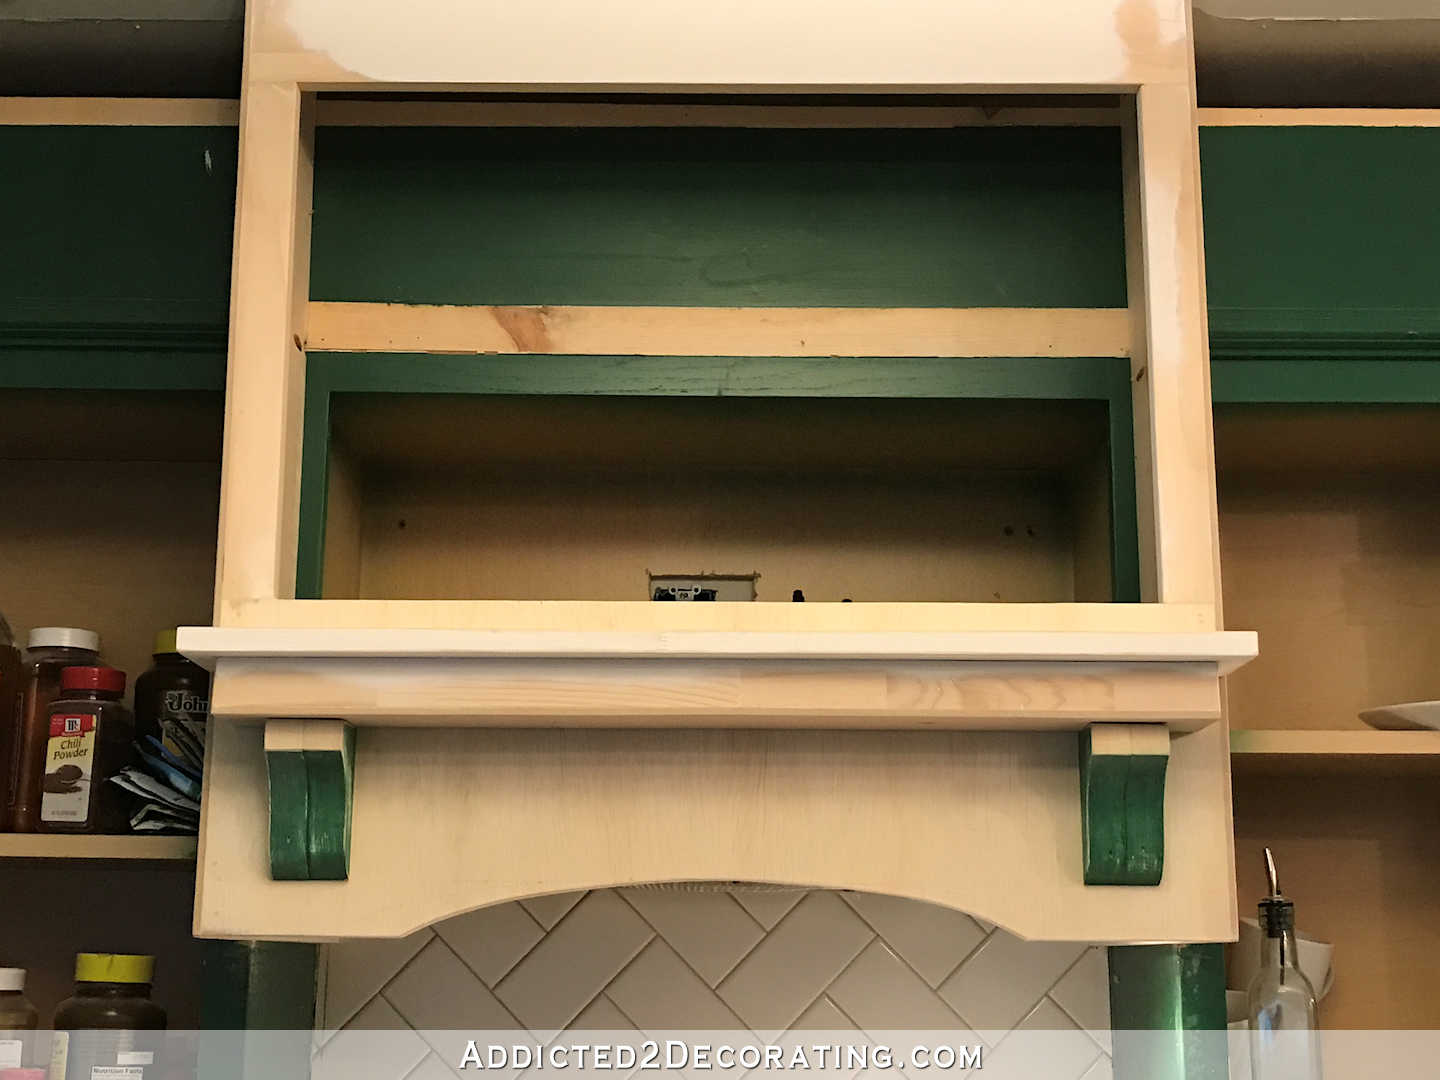
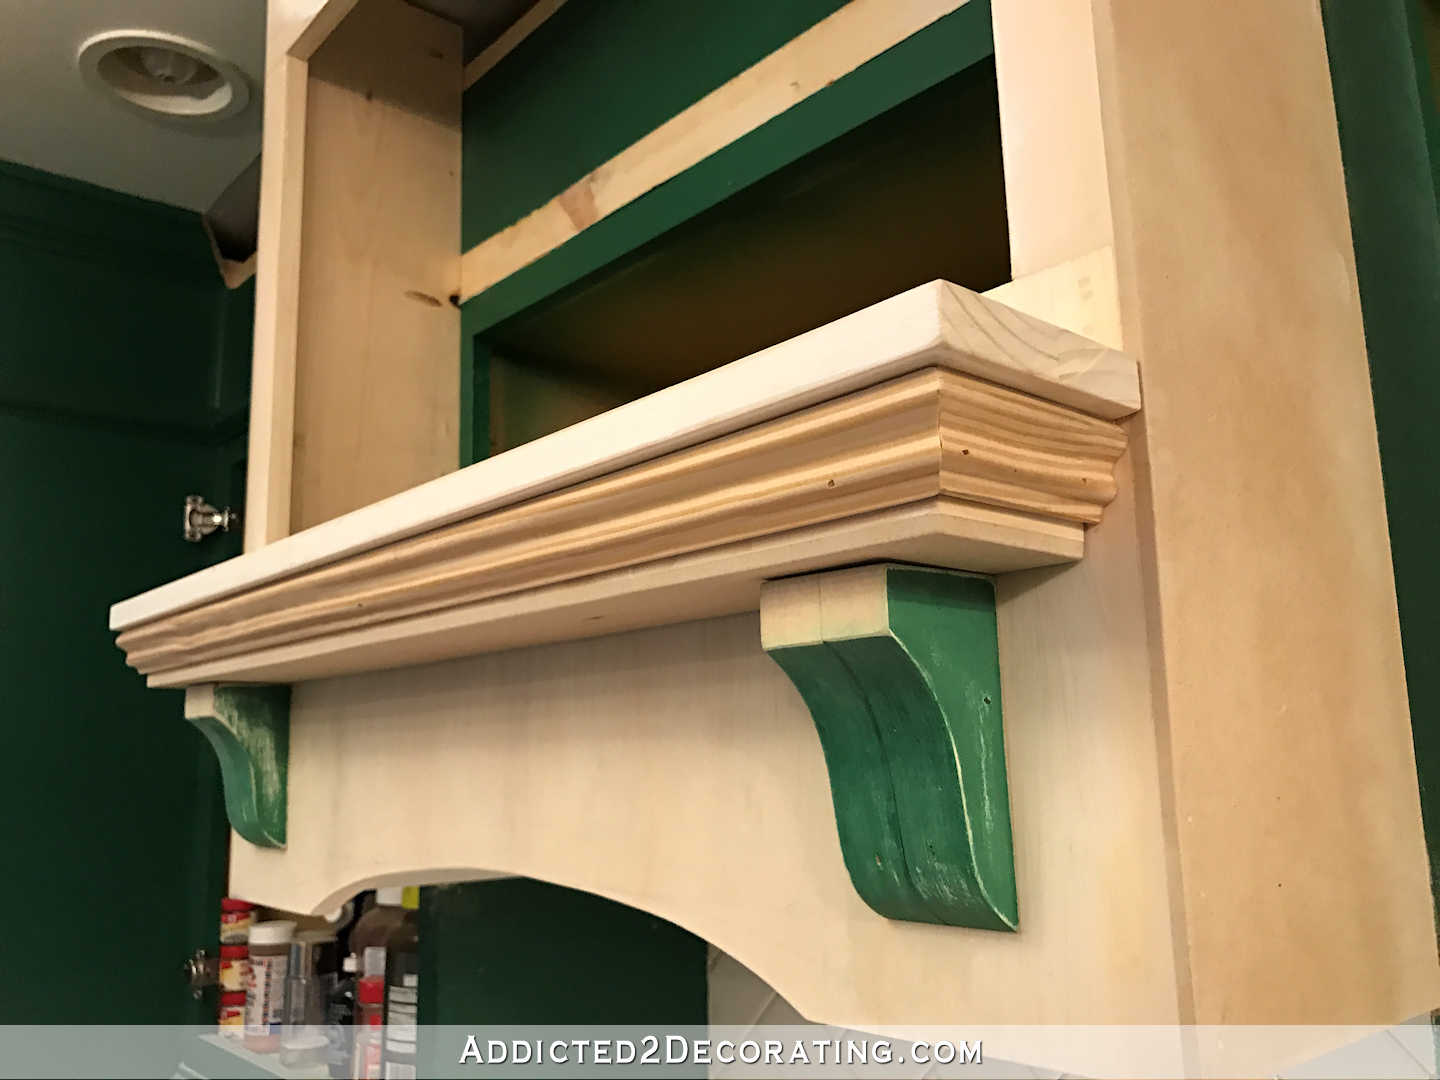
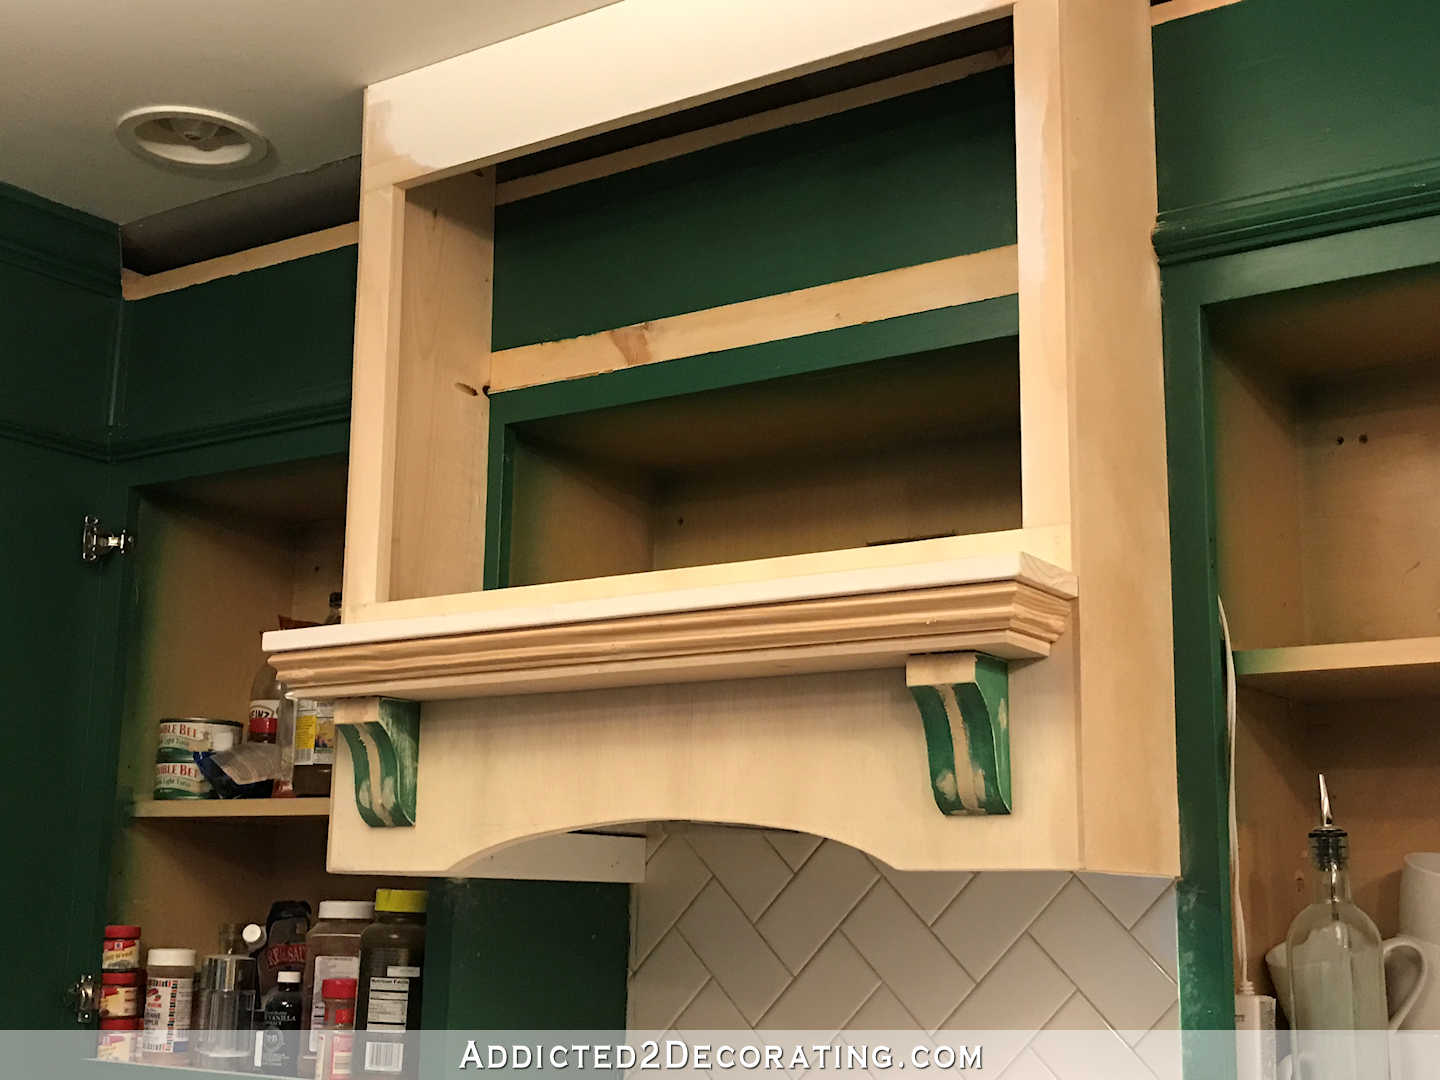
To install the shelf, I slid the back of the shelf over the support piece on the range hood cover, and then nailed the top shelf piece to the support piece by shooting nails down through the back edge of the top shelf piece and into the support piece to basically create a floating shelf. Then I attached the corbels by nailing them to the range hood cover.
And finally, I added three pieces of decorative moulding, mitered on the corners, right below the top shelf.

And here’s the shelf all trimmed out but looking a bit rough because of the unsanded wood filler.
The range hood cover still needs a bit more wood filler, lots of sanding, and caulking before it can be primed and painted. But it’s getting there!
And finally, I installed the crown moulding around the top. I was dreading this step. Just the mention of installing crown moulding fills me with dread. But in reality, it really wasn’t difficult at all with my Kreg Crown Pro.

I had to cut five pieces of crown, and on four of them, I got it right on the first try. I would have gotten the fifth one on the first try had I written down the right measurement. But I re-measured, and got it on the second try. Not too bad considering that when I did this crown moulding the first time, before I bought the Kreg Crown Pro, I had a pile of scrapped crown that I had cut wrong because I just couldn’t figure it out. 😀
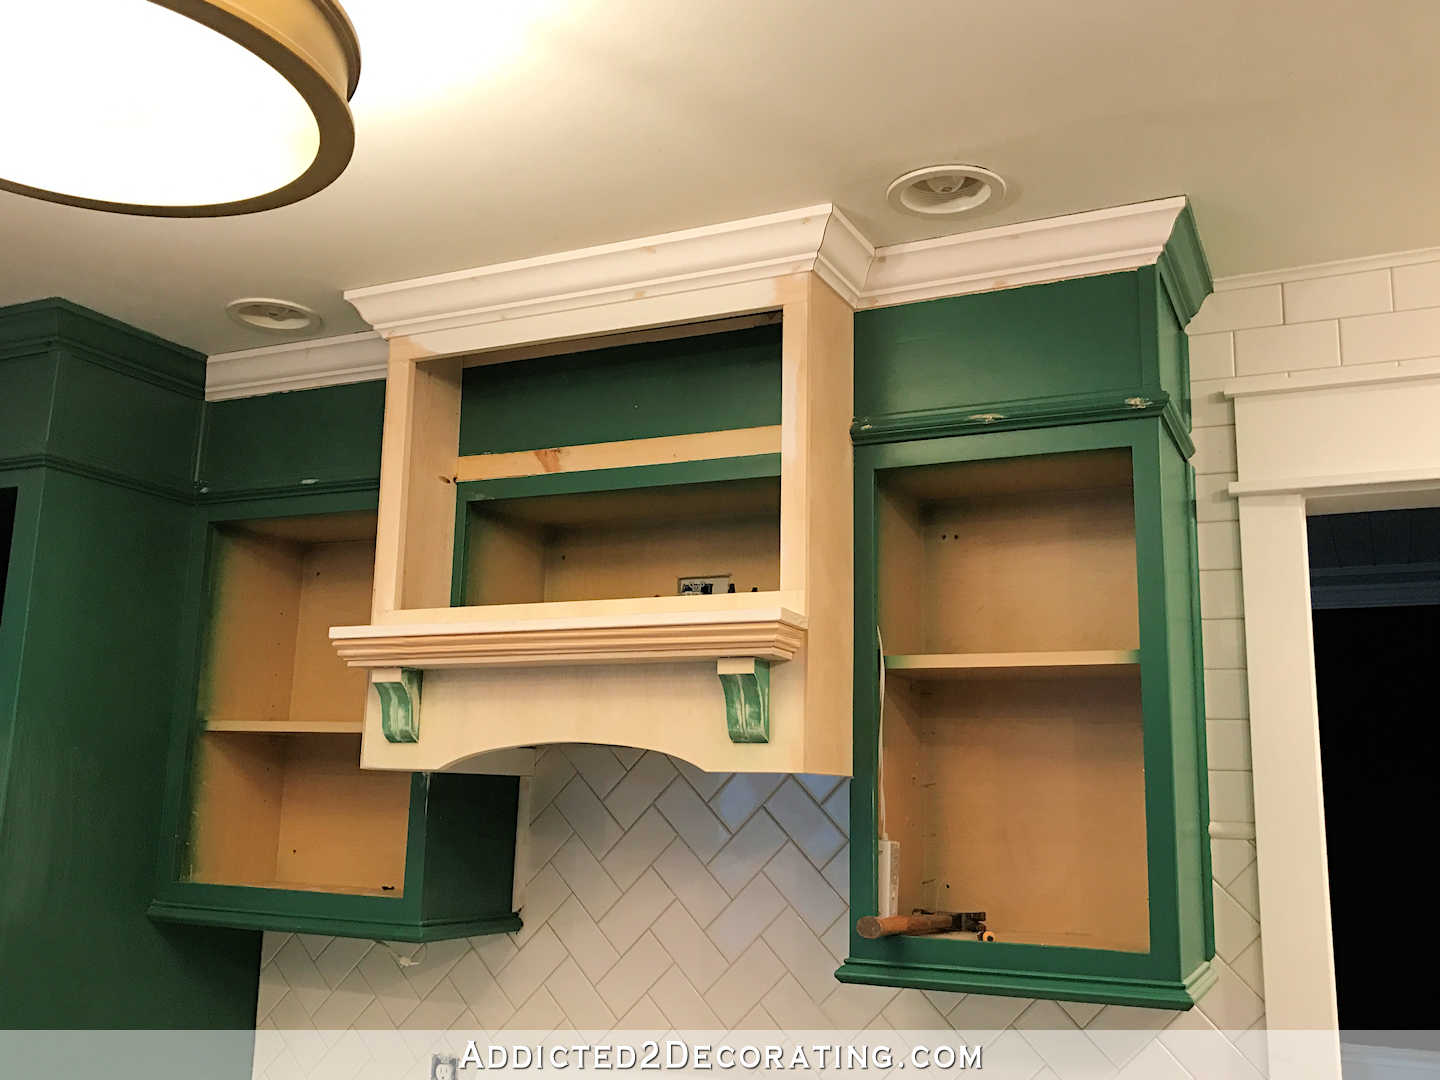
So the last piece I need for this range hood cover is a panel to cover the opening. I decided to go with a matching cabinet door, and it’s already on order. I had considered making one, or making something to match my fireplace overmantel in the living room, but I think a matching cabinet door is the best option.
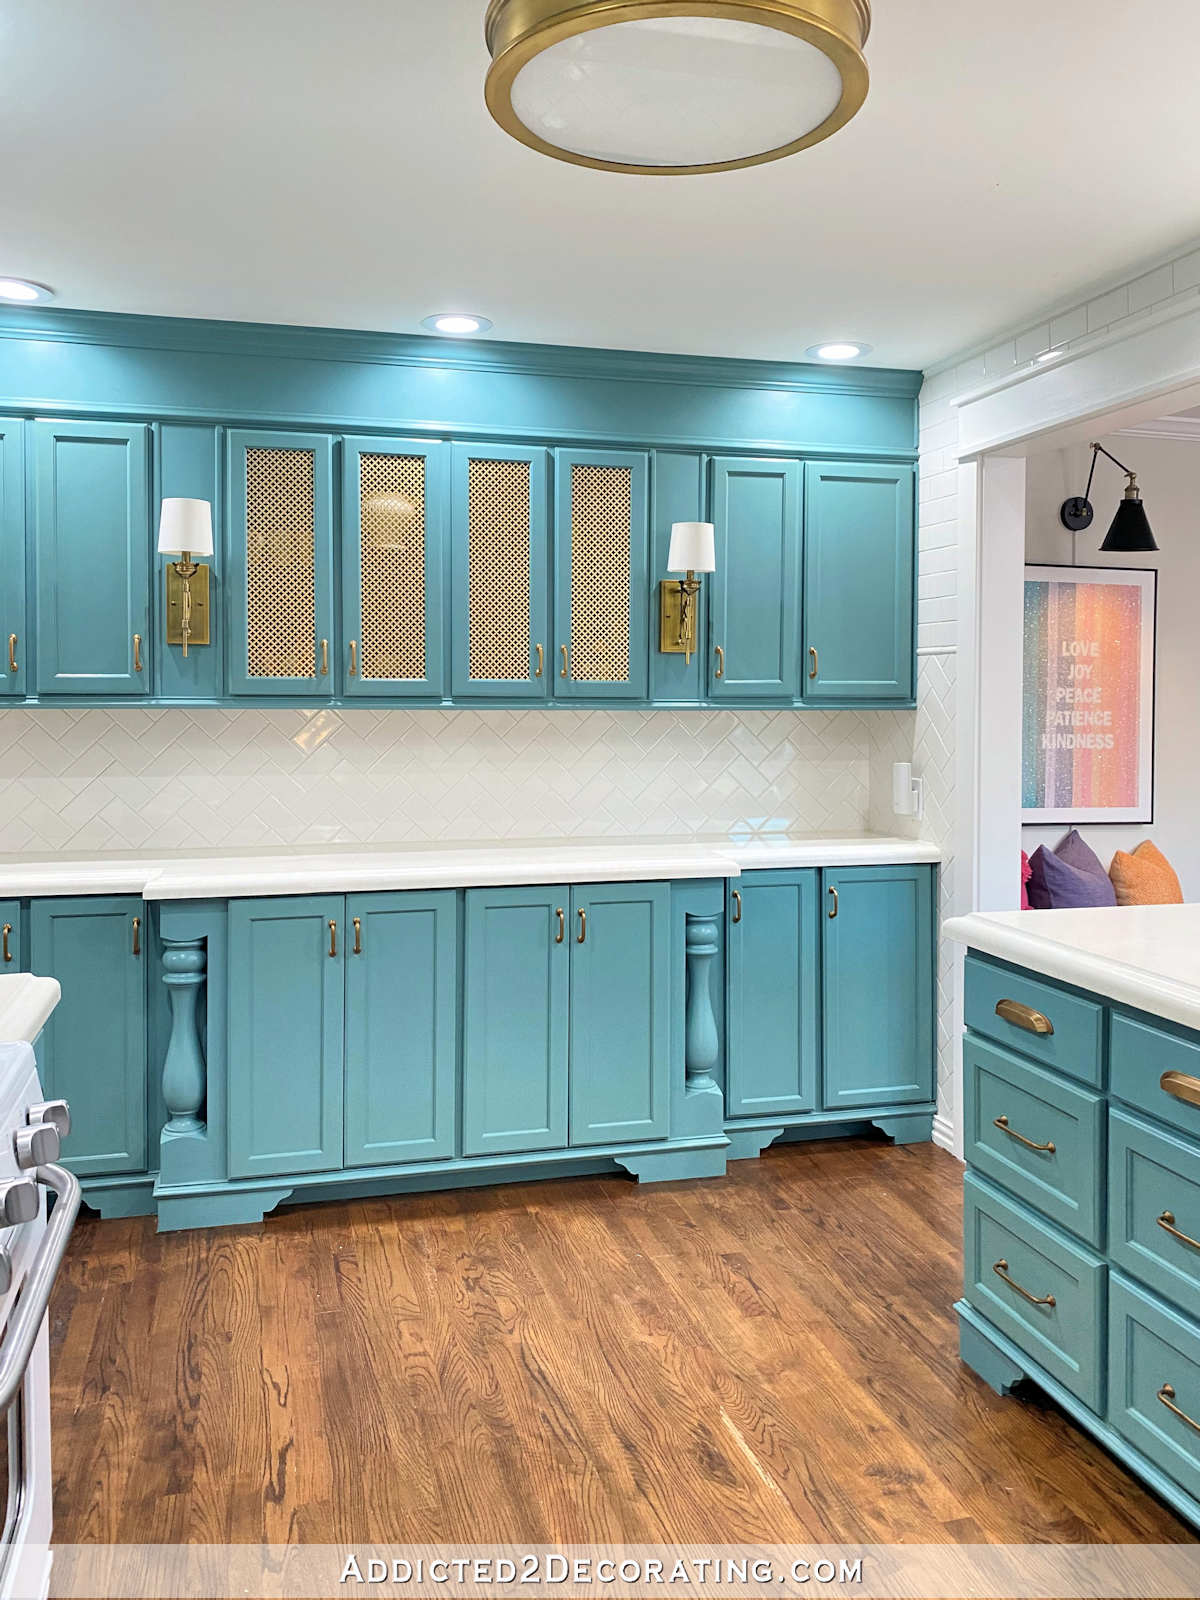
I’m soooo close to being able to paint these cabinets! Just a little more wood filling, sanding, and caulking left to do. I’m getting anxious to see my finished teal cabinets!
UPDATE!
The range hood is finished! Click here to see it…

Addicted 2 Decorating is where I share my DIY and decorating journey as I remodel and decorate the 1948 fixer upper that my husband, Matt, and I bought in 2013. Matt has M.S. and is unable to do physical work, so I do the majority of the work on the house by myself. You can learn more about me here.

I love how this came out. It’s going to look great when all painted. BTW, I have to so crown molding on my kitchen cabinets soon. Never have done them before so this will be a learning curve. I noticed that Lowe’s carries something called Flip Face Crown which has the same profile on both sides so you make a mitered cut and then flip it and have the matching edge cut to cut down on all the mitered cutting. I may give it a try.
https://www.lowes.com/pd/Flip-Face-8-Pack-3-625-in-x-12-ft-Pine-PFJ-Crown-Moulding/3583834
I’ve said it before and I’ll say it again; you never cease to amaze me! It’s looking great Kristi!
Looks great and is now closer to the look of your inspiration piece. A great lesson for us all on making something that looks good and is up to code!!
thanks for explaining the process of how to build a lfoating shelf (just in passing :)), as I meant to do that for a while! I like the look of the new cover much better than yesetrday’s vsion, so I think it’s time well spent!
It is going to look fantastic! I love the way the hood is shaping up.
Simply fabulous! Just an FYI, Kreg Jig has something called Kreg Crown Pro that is supposed to make easier work of crown molding. Young House Love wrote a post on it a while back: http://www.younghouselove.com/2013/03/crowning-achievement/
I have one. 🙂 It certainly makes it easier, but I still somehow find a way to screw it up and make the job harder than it should be. 😀
I love all things Kreg, but we got this particular crown molding jib and love it! https://www.cutncrown.com/
Looks great! Definitely agree on matching cabinet doors!
So, I’ve been following your blog for probably a year or more. You do some incredibly detailed trim work. I have two questions:
1. Do you sketch this stuff out or just design as you go?
2. Weird question, but do you listen to any tunes while you build? I just feel like I would need to listen to “We are the Champions” on repeat to keep my mojo going to do all the stuff you do. 🙂
I don’t generally do any sketches. My process is probably a bit different than most, but I actually do a lot of what could be described as visualization, for lack of a better word. I envision how I want the project to look, and then in my mind, I walk through every single step of building that project from beginning to end. During that process, I always find errors in my initial plans during the first and sometimes the second mental walkthrough of the process, so I can do some trouble shooting. For example, on this project, the big obstacle was figuring out a way to build a range hood cover that would cover the sides of the range hood while not encroaching too much onto the side cabinets and hindering the opening and closing of those side cabinet doors.
So I continue to do these metal walkthroughs of the entire process until I have it down, and I’ve solved all of the issues. Then I start building. So by the time I actually cut the first piece of lumber to build the real thing, I’ve actually “built” the thing at least three or four times all the way through in my mind.
That probably sounds very strange, but I find it to be a good mental exercise. 🙂
As far as listening to things while I build, that’s a huge YES. If I’m working on house projects, I have my earbuds in and my phone in my back pocket, and I’m listening to something.
Music is generally my last choice, though. Lately, I’m all about podcasts, and my favorites are true crime, unsolved crime, wrongful conviction stores, etc. Some of my absolute favorites are Serial (especially season 1), Up & Vanished, Truth & Justice with Bob Ruff, and Undisclosed. As of last night, I got all caught up on Crimetown (so good!), and now I’m listening to the four-part series by Gimlet Reply All called On The Inside about a man named Paul Modrowski who is in prison for a murder he says he didn’t commit. I listened to all of S-Town on the day it came out (March 28) and was less than impressed with it. And Missing Richard Simmons was entertaining and sad, but I felt completely let down with how it ended.
Anyway, I love, love, LOVE podcasts! 😀 Interestingly, the only home-related podcast I listen to is Young House Love. It’s a nice change of pace once a week, and I really enjoy it, but not nearly as much as my true crime, unsolved crime, wrongful conviction podcasts. 😀 And my absolute favorite ones are the ones that focus on one case over the course of one season, and get into all of the details, all of the forensic evidence, all of the court transcripts, details of investigations and interrogations by detectives, interviews with friends and family, etc. I find it harder to get into the podcasts that tell a new story every episode. I much prefer the in-depth analysis.
So there you have it…a little glimpse into part of my personality that I don’t really talk about on my blog because it’s totally off topic. But I’m completely addicted to podcasts. 😀
So if someone reading this has any suggestions for podcasts in the genre I like, I’m all ears!
I will have to try those. I watch all the TV shows about true crime and forensics and love them.
I think you would love the podcast In the Dark, about an unsolved crime. I loved it.
Awesome! I’ll look it up right now. I just finished the podcast I’ve been listening to (Accused) so I’m looking for a new one. Perfect timing!
Is the door over the range hood going to open from the side or top? Have you thought about it lifting up from hinges from the top?
If you want to get at interior wiring, etc., wouldn’t you rather have side hinged doors?
If she wants hinges on top, you can install a locking arm hinge ( I think that’s what they are called ) and it will lock in place when you open the door.
I was thinking that same thing. Kristi you could also use the space as a hidey hole for small valuables.
Looks great, as usual. Thanks for the continuing inspiration that you are to me and other DIY wanna-be’s!
looking really good.
Yay for safety! I’m glad you adjusted for safety. And, personally, I think it looks better. Even though you (personally) didn’t need the height, visually there is more space between the range and the range hood cover, which I think makes the space look more open. 🙂
The hood looks better Kristi!!!
When you build, you shine. This is what sets you apart from other bloggers.
You just ‘get it’….and you make it seem easy!!!!! What a gift.
Love the range hood! Love all the work you do! (But for love of Mary put a drop cloth on your newly refinished counters and your stove — you will save yourself a lot of grief down the road. Sorry to be so obnoxious/preachy – I really do admire your creativity and work.)
I must admit this crossed my mind as well. What’s that saying about an ounce of prevention?
Yeah, I would have them covered in cardboard!
Crikey, this is quite the modification, Kristi. Your hood cover is going to look like such a seamless part of your cabinetry. Well done you. Cheers, Ardith
The hood is looking fantastic! Can’t wait to see your kitchen all come together again with the new hood and the new teal color cabinetry!
Wow! You make it looks so easy–and do-able!!! I had a question about the actual venting. Were there specs about how much clearance you needed in front of the exhaust? Any other considerations? Such an inspiration!!!
I really like this new range hood cover much better. I will be excited to see how the kitchen looks after all cabinet doors are re painted, and trim is finished between breakfast room and kitchen.
I’m so glad you had to retrofit this for safety – it looks way more in scale and fits everything so much better! Good job (as usual!).
I agree. Yesterday I couldn’t put my finger on what it was that seemed off, so I decided to wait until it was finished. But this restyled version is much more in proportion. That’s what it was – the size was off to my eye!
Great carpentry and I bet you still have all your fingers.
That safety oooops was a happy accident. The hood looks a lot less bossy now than it did a couple of days ago! It looks like it grew there. Brilliant re-use of the corbels! Great job all around, Kristi.
I enjoy reading your posts. It has helped me to understand that it is okay to have “do overs”. Your work is amazing and so inspiring. Small question about the exhaust unit. You noted that it is not vented anywhere. When you are doing your other work, is it possible to have it vented to the outside? I can’t remember your floor plan at present but surely it is possible to have a “hose or ductwork” (I’m not very technical) that could travel from the kitchen through the beams etc to take the steam and heat outside?
I’m happy you’re keeping the kitchen cabinets all looking the same. I was afraid the fireplace design would make your kitchen look too chaotic with a bunch of different things in there. JMHO
So much better! Are you able to find and link to your stove and fridge? I seriously want them!
They are the GE Artistry set I think. She did a post on them.
Love the hood!
I liked it before but this looks SO much better. I love that it sits higher, and the shelf looks amazing. I can’t wait to see it once it’s all painted!
Looks great and thanks for the instructions,as I would love something similar for my kitchen.
Do you have to use a heat resistant paint on this hood? I was just wondering if the paint would crack or peel over the range?
No. Regular paint is fine. When I have the burners on while I’m cooking, I can stir food with my hand/arm just inches from the burner and barely feel the heat. If my bare skin is fine doing that, then paint 30 inches up probably doesn’t get any heat at all.
You are amazing!!
I like the slightly smaller version of the hood and that shelf is really nice. As always, I can’t wait for the painting to get done. I’m sure it’ll look fabulous.
It looks much better! Plus, as a tall person who is helpful in the kitchen when visiting others, version one would have been a head-banger. Can’t wait to see it all painted. 🙂
Did you build the original corals? If so, did you blog about it and can you send the link. I am painting the cabinets at our Lake home and would love to make this vent hood. I think I have the same cabinets. Thank you!!!!
I didn’t build them. I bought them at Home Depot. But they were about $10 each, and if I didn’t happen to have them on hand, I wouldn’t buy them for this project. Instead. I’d just use 1 x 2 lumber and a jigsaw to make my own. Cut the design first with the jigsaw, then glue two pieces together for the proper width. Then wood fill and sand, sand, sand until smooth on the front so that it looks like one piece. Of course, if you have a band saw, you can glue two pieces of 1 x 2 lumber together first, and then cut the design. That would definitely be much easier, but I don’t happen to have a band saw or any saw that will cut designs into wood that thickness, so I’d have to do the pieces separately.
I have been searching for MONTHS for a relatable DIY for this very kitchen hood! I’m so excited to have found you!