Hallway Closet…It’s Outta There!
My goal this week is to get the floors finished. Cleaned. Sanded. Cleaned. Sealed. Done.
It sounds easy enough, but I actually have no idea if that’s an attainable goal since I’ve never refinished floors before. I’m going to try my hardest, though!
So since I wanted the hallway closet outta there, it needed to be done before I refinish the floors.
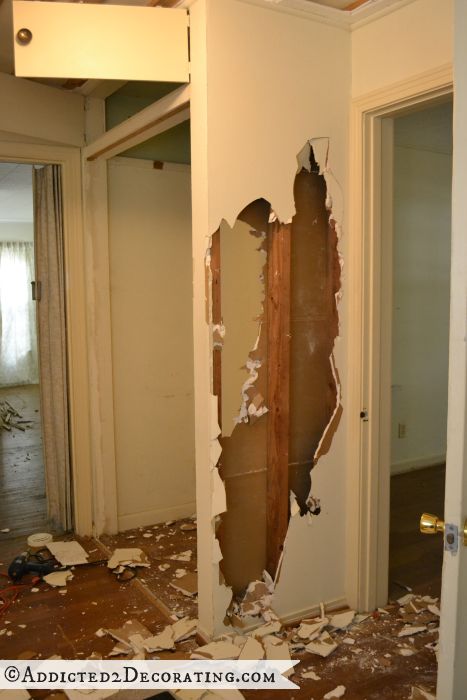
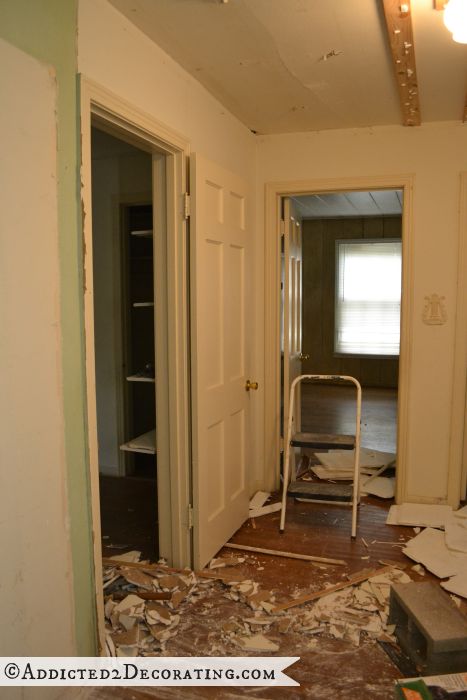
Here’s the closet I’m talking about on the right. Through the doorway in the middle is the living room. The closet on the left is original to the house.
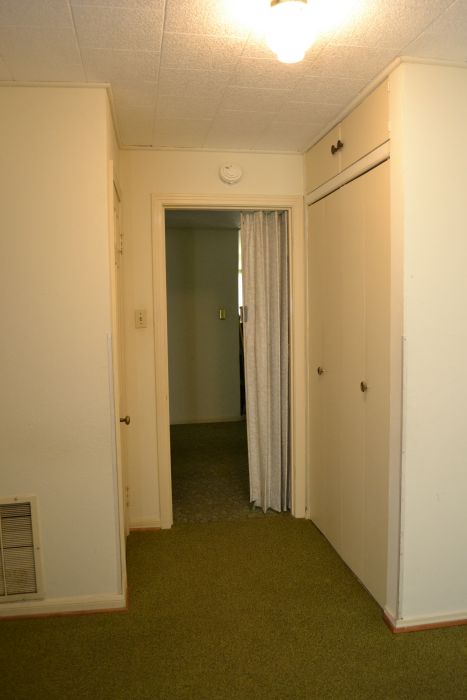
When I arrived at the house yesterday, here’s what the closet looked like. If you’ll remember, I had already ripped off some of the polystyrene ceiling tiles, and of course, the carpet was gone.
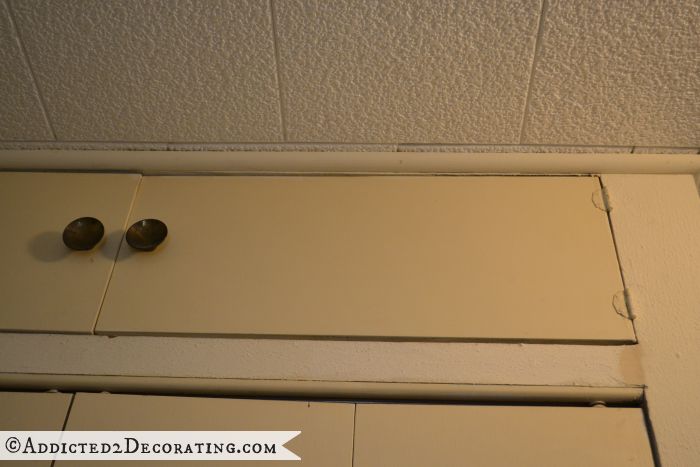
I know at least a few of you will think I’m crazy for getting rid of storage, but this closet wasn’t original to the house, and it was obvious that it wasn’t original. Plus, it wasn’t really built properly, and even with lots of trim, it still wouldn’t have really looked good. You can see what I’m talking about here…
Not to mention the fact that this closet made the hallway feel really closed in.
When I told my mom of my plans to remove this closet, I was sure she would think I was crazy.
Let me explain that my mom is my voice of reason at times. When I commented about how sad I thought it was that the pretty original windows were covered by not-so-pretty storm windows, she said:
“Kristi, before you go removing stuff like that, you really need to consider your electricity bill. Those may not be pretty, but they’ll save you money.”
I listened. The storm windows are still there.
When I was sharing all of my plans for the house one day, she said:
“Kristi, you need to be sure that you don’t get in here and just start ripping everything out. You really need to think through your projects, and take them one at a time, one room at a time.”
I listened. Well…for the most part. Because believe me, if I didn’t constantly hear her voice in my head repeating that to me, I probably would have ripped out half the kitchen by now, as well as a good portion of the hallway bathroom. But I’m trying to exercise some self-control.
So a few days ago, I said, “Mom, I’ve made a decision, and you’re gonna think I’m crazy.”
She said (genuinely concerned), “Oh no! What crazy thing have you decided to do this time?”
I said, “I’m gonna tear out the closet in the hallway.”
I was fully expecting her to be surprised…and concerned…and to tell me that I was, in fact, being crazy. And to list all of the reasons that I should keep the closet. And to stress how I’d regret it if I got rid of the extra storage. After all, I was sure that a reasonable and rational person would naturally say to keep the extra storage!
Instead, she said, “Oh, you mean the big closet in the hallway with the bi-fold doors? Oh yeah. I definitely think that needs to go. I don’t think you’re crazy at all.”
So it was decided. The closet would be gone, and I’m not crazy (at least when it comes to the closet). 🙂
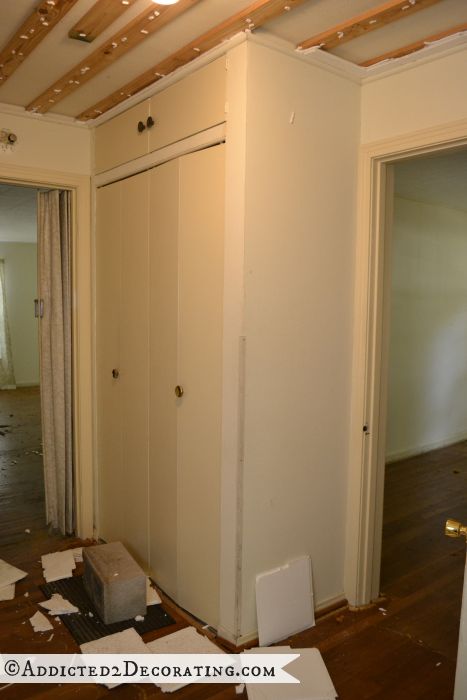
I started by removing the bi-fold doors.
And then (my favorite part), I just started whacking at the drywall with a hammer. Talk about a great stress reliever!
With the drywall all off, I could then remove the studs. That was easier said than done, especially since I didn’t have any kind of sledge hammer or a circular saw with me. I whacked the center 2 x 4 about 50 times as hard as I could with a hammer, and it only budged about one-and-a-half inches.

But I wasn’t about to give up! A few more whacks with all of my might, and it finally gave way. The other two were just as difficult, but I just thought about the great exercise I was getting, and hit them as many times as needed to remove them.
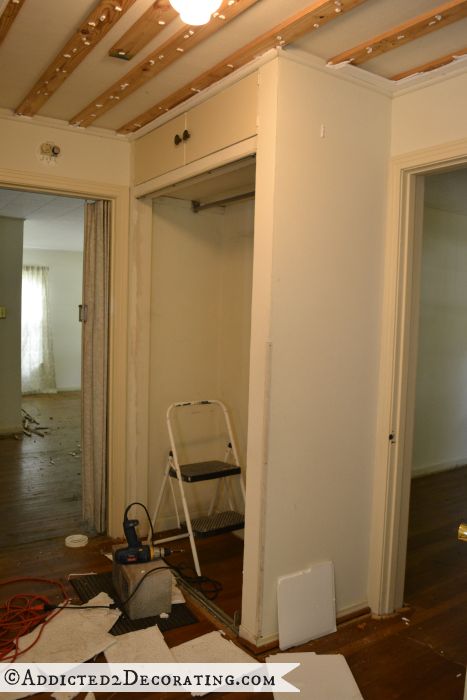
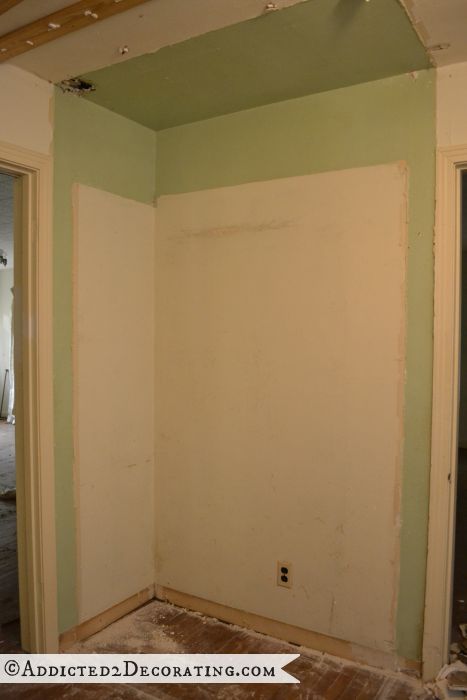
Then I just had the ones on the ceiling, and the one on the far wall to remove.
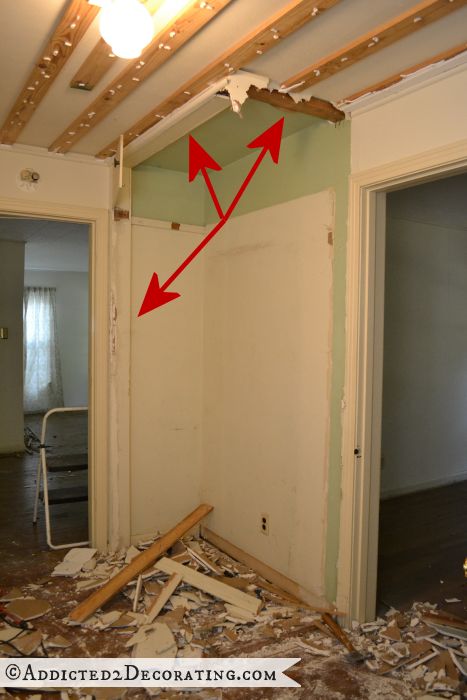
And of course, I forgot to take my Shop Vac, so I couldn’t get everything really clean. But once I got most of the big pieces of debris cleared away, I was able to step back and admire my work. It wasn’t pretty, but it felt like a huge accomplishment!
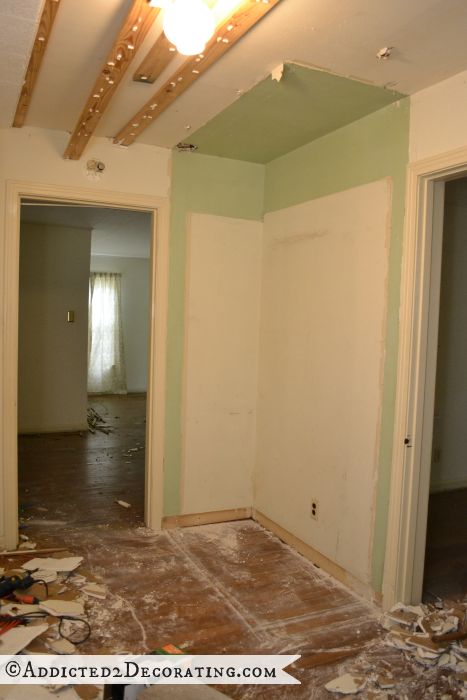
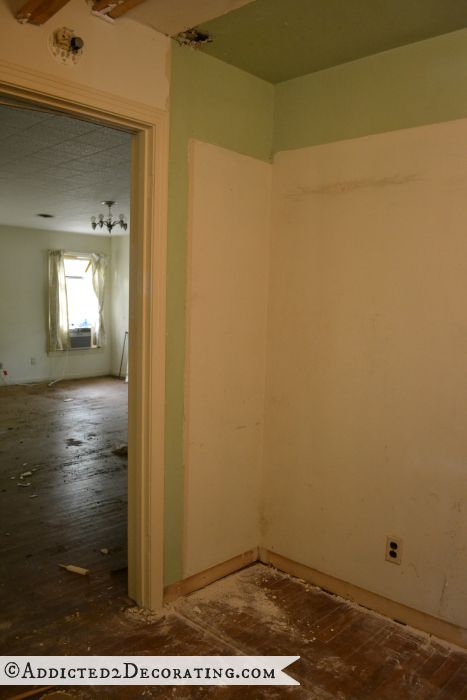
And wow! Did it ever open up that hallway! It feels so spacious now! (And how do you like that seafoam green paint I uncovered?) 🙂
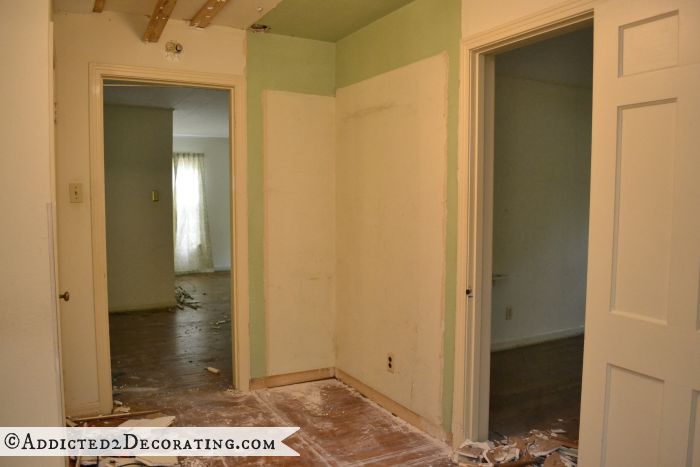
And here’s the view looking back the other way (standing in the doorway that leads from the living room area to the hallway). The bedroom door on the left used to be completely obscured by the closet. Now you can actually see it as you enter the hallway. (And is it weird that that one bedroom door opens out into the hallway? I can’t figure out why it’s like that, while the other three doors open into the rooms.)
I have quite a bit more drywall and other stuff to clean up, and I obviously have some patching that I’ll eventually need to do on the walls and ceiling. But for now my goal has been accomplished. The closet has been removed, and everything has been removed from the floor (closet framing, bi-fold door tracks, carpet tack strips, quarter round, and baseboards) so that I can sand and refinish the floor in the hallway.
Nope, I don’t think I’ll be missing that closet at all. 🙂
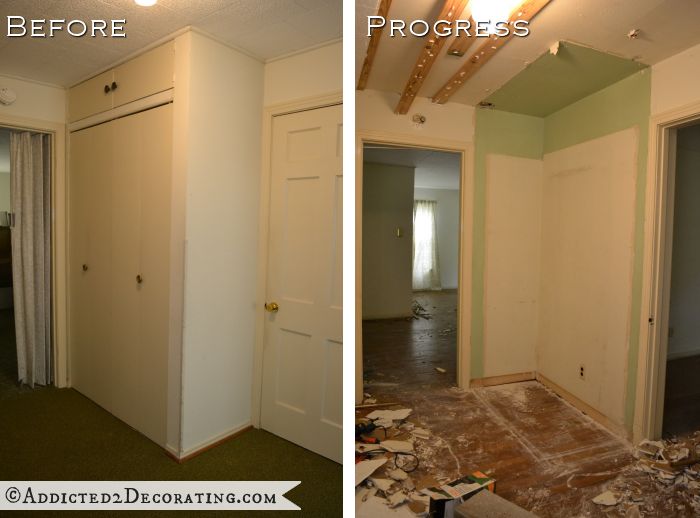
And here’s a quick side-by-side of what it looked like before and what it looks like now…
Now it’s time to get busy cleaning all of the floors (and removing the rest of the carpet tack strips, quarter round, and baseboards) so that I can rent that sander and get started on the refinishing. This should be fun!

Addicted 2 Decorating is where I share my DIY and decorating journey as I remodel and decorate the 1948 fixer upper that my husband, Matt, and I bought in 2013. Matt has M.S. and is unable to do physical work, so I do the majority of the work on the house by myself. You can learn more about me here.


Good job! ~:)
Are you going to finish removing all the ceiling styro tiles *before* refinishing the floors?
(Your mom is a smart gal — good that you listen to her!)
In a perfect world, I would remove all of the ceiling tiles, repair any damage to the ceiling, paint the walls, and THEN refinish the floor.
My world is way less than perfect. 🙂 My main goal is to get the floors refinished and let them cure for a few days so that we can get moved in. I think it would be really frustrating living there (especially for Matt) while I’m trying to refinish the floors later on, so that’s my one and only goal right now. I’ll just have to make myself be disciplined enough to use drop cloths when I tackle the ceiling and walls after the floors are done. 🙂
I agree, in a perfect world the ceilings & walls should be done before the wood floors get polyurethane but I totally understand your dilemma. I would recommend using Red Rosin Paper, typically found in the roofing section @ Lowes. I’m an interior designer & I work for a general contractor and that’s what we use. You just tape it down, covering the whole floor area. It’s an inexpensive way to cover your floors while you work on the walls/ceiling. Oh, BTW – love your blog! And I understand the concept of hiring another designer to help you out; I’ve done it myself!
That’s what my floor guy recommended. I had to have the floors done and then have new Windows installed and paint. The rosin paper was a life saver.
Do you plan on moving into the house before all the work is done?
You’re not crazy, it looks a lot better even with a mess!
Yep, we want to move in ASAP, but my goal is to get all of the floors refinished and allow them a few days to cure before we move in. Our original goal was to move in on September 3rd, but I think that might be rushing the floors a bit (I’d like them to have a bit longer to cure), plus we found out yesterday that we’ll need some pretty extensive plumbing done, and until it’s done, we won’t have hot water. The plumber couldn’t get us on the schedule until sometime next week.
So for now, our exact move-in date is kind of up in the air, but hopefully it’ll be within the next two weeks.
Wow – lucky you there was a floor under that wall! This nonsense is what I went through with my bathroom remodel – they used I don’t know how many spiral nails to hold the wall at the end of the bathtub in place. That sucker was not meant to move. EVER. LOL
It does look much more open and spacious. Great job Kristi!
Oh, I was confident that there would be hardwood flooring underneath the closet wall. I knew the hardwood floors were original to the house (built in 1948), and it was obvious that the closet was added much later (my guess is sometime in the 1970’s), so it just made sense that they would have added the wall on top of the existing floor. I just have a few nail holes to fill, but thankfully no huge, noticeable holes are in the floor!
Great job!! I so admire your tenacity. I have the same question as Krikit – are you going to finish removing the ceiling tiles and supports before you refinish the floors? Just a suggestion – I know you are SO EAGER to get those floors refinished, but maybe (don’t hit me) you might want to wait until you’re done with the tiles, and maybe even finished painting, before you do the floors. JUST a suggestion – really 🙂
If I waited to do all of that, it might be a couple of months before we move in. Which means it would be that long before we could get the condo on the market. 🙁 Believe me, I know it makes SO much more sense to do it that way, but we really want to get out of the condo ASAP so we can get it on the market and hopefully sell it soon. So right now, the floors are my one and only priority so that they can have a few days to cure before we move in.
I totally get it – didn’t realize you were moving in that soon – that makes sense. LOVE your blog – OH, and I have a cool DIY for you – a clock – I’ll send you photos when I’m done.
Great decision to remove the closet … actually makes it look like a foyer now! A beautiful bench or chest of some kind will look beautiful in that spot with a great piece of artwork over it!
Loving reading the progress posts on this house … you have a diamond in the rough there!
Get yourself a sledge hammer. They’ll kill those stubborn frames. Looks soooo much better. I like how the other lady put it – you are letting your cute house breathe! I’m having so much fun with this!
Kristi, I’m curious to know if you are going to leave your condo ‘staged’ or are you moving everything with to the house when you move in. My husband and I bought a house that was built in 1970 and it hadn’t been update at all. I have been working on it steadily ever since we moved in and have used so many of your ideas. You are a great inspiration and teacher.
I won’t be taking anything from the condo to the house (as far as furniture and decor). As far as I see it, I made just about everything specifically for the condo, and it all just makes sense here. I don’t think any of it would look right in the house.
So I’m basically starting over…completely. Which is a little bit scary and intimidating, but also fun.
Each house has it’s own personality and with the larger space, you can do different things, have a ball:)
Kristi, you can remove any wall stud with just a hammer if you think in terms of how a carpenter whacks a stud into place to get it perpendicular…he whacks right at the bottom of it so it slides over the floor plate. Take it out in the same direction…sliding on the plate and not into the room. You’re doing good, Gal! Looking forward to watching the progress on the house and very excited for you and Matt.
I concur – you are not crazy. Good decision! It looks so much roomier now!
Good decision, Kristi! I have voices in my head that sound like your mother – sometimes I listen and sometimes I don’t. 😉 This will give you the perfect spot for a great piece of furniture (that will also give you storage). Love this. You are such an inspiration!
Hey Kristi, so glad you removed that closet. But, I think you need a better step stool…lol…I learned from experience…on my last room to do over I finally broke down and got the 3 step one at Lowe’s. I’m sure Home Depot has them also. I can’t tell you how much easier it made everything. The steps are bigger, so you feel more secure. It has a shelf on the top to hold things. And I didn’t have to get the ladder out to reach the ceiling. Sure wish I had had it to do the rest of the house. This is just a friendly suggestion….Please don’t stand on a concrete block anymore! Love your blog!
Haha! Rest assured, Martha, I didn’t use the concrete cinder block to remove the closet. 😉 I actually took a small step ladder with me for the project. The cinder block was just in there because I took it in there the other day (after removing the storm door from the front door) to get a closer look at how the closet was built so that I’d know what tools to bring. 🙂
I second Martha’s ladder suggestion. That tool/paint can shelf comes in very handy. I’ll go further and suggest you go ahead and get one and leave it at the house. That way you won’t have to remember to take one back and forth. You will appreciate having two different sized ladders as you move through all your house projects. [Ask me how I know. ;)]
Charlotte also says “buy a large-stepped stepstool/ladder . . . the third (highest) step was actually slightly larger than the first two and was a little platform to stand on . . . with the shelf for holding tools and screws and such. All three of mine have also had a hand rail at the top also that helps you with balance when needed. I have also purchased one of these for my sisters to use at their own houses. They cost about $50 or so and worth EVERY penny ! Both of my sisters have thanked me many times ! You won’t regret it . . . I promise !
AWESOME! I love that now you have the perfect nook for a table and lamp (I see the electrical outlet!)! Soooooooooo much better!
Seriously, a huge improvement! I’m so jealous that you get to have all that fun!!! LOL. Oh man I need a big project. Great job Kristi. Can’t wait to see more.
I wish I had an ounce of your energy. Going to have to start calling you the Energizer Bunny! Looking good!
Incredibly smart decision. It opens it up SO MUCH more!
I repeat… You and your abundant energy amaze me.
Looking great!! I wish I could accomplish as much as you do in such a short time! Love reading the progress and seeing all of the photos!
This blog is getting like an adiction for me. I can’t wait to see what’s next. Love the way it looks. I am seeing a chest with good storage, pretty lamp, large mirror or artwork on wall. I can’t wait. I know whatever you do will be beautiful.
I have always enjoyed your blog and I am really enjoying watching you with your new house. I think I would miss the storage from the closet. Most importantly for you though I think that the closet gone will make things easier for Matt in his wheelchair, so on that note I don’t think the missing storage is as important!!! Keep letting us see your great progress and projects!!!
Kim
Excellent choice! Best of luck on the sanding.
MUCH better! I completely agree with you – get it out of there. You sound like me, but I don’t have the voice of reason from a Momma so I plunge ahead. But let me tell you, its always been the beginning of something wonderful and transformative. You have my full support! lol.
G
Taking down that closet made a huge difference! I don’t know what you plan on doing with the space but you could totally still use as some kind of storage! A shelf up top for baskets and bins, hooks on the wall to hang coats/purses, etc.
I always loved your decorating projects with the condo, but now I’m absolutely mesmerized by your plans, projects and aspirations for your new house. It brightens my afternoon when I see your automated email pop up on my screen and I know I’ll get to peer into your latest project. Thank you for writing such a down-to-earth, girl power blog. I also do most of my home projects on my own. What a great feeling of accomplishment and pride I’m sure you must feel.
SO much better already! My whole kitchen is in the state your hallway is in, lol. It’s been fun looking at the empty space after I demo’ed (by myself of course) — but now I guess I have to start working on it! Love, love, love your blog!!
Oh, that is so much better! Electrical outlet, Score! Can’t wait to see how you style it, and looking forward to seeing the finished floors!
Must admit that I am overjoyed that you actually listened to me and somewhat heeded my advice. 🙂 I still get a little nervous though every time I see another blog about destruction. When I went through the house that first time I got this panicky feeling that you were going to go in with a sledge hammer, take ALL the walls down to the studs, tear out all the kitchen cabinets, gut the bathrooms, have all the storm windows gone, and then have to live in it that way for years as you worked on it. This way I can still sleep most nights. Let me know when you need more advice. 😉 Love you!
LOVE you, Kristi’s mom ! WHAT an amazing woman you have raised . . . I know you are VERY proud of her . . . and you’re cool, too !
I feel like I get a workout just reading your blog 🙂 That hall looks MUCH better without the closet – definitely NOT a crazy idea (and I’m a mom too, so maybe my voice counts an eentsy bit, lol). I love that you are taking on an older home – it’s inspirational to watch something that others overlooked become beautiful. We have become such a throw away society in some ways, but I find myself drawn to the old ways of fixing up stuff and making it usable again. By the way – a reciprocating saw ($20 ish at Harbor Freight, plus blades – I bought good blades at HD for about $10) will cut right through those 2x4s and help remove them. You can still salvage a lot of the lumber, because the saw can cut very close to the edges. Plus, the saw makes light work of cutting through nails, bolts, etc if the need arises. Thanks so much for taking us along on this ride of yours – I need to get a nap now 🙂
I think it was a good decision to take out that closet. If you need more storage later on, I’m sure there are other places in the house or garage you could add it, right? I am sure the floors will be spectacular when they are completed and cured. Can’t wait to see them. Happy Sanding!
Absolutely so much better without that closet — great choice! Kim
I am totally in awe of your skills, energy and determination. You go Girl!
Kristi, you both amaze and humor me. I loved your description of “whacking” the studs outa there. (How did you know the ceiling wouldn’t come down on your head?) You make projects seems so DOable. I love it. Hey, the hall looks spacious without that closet. Glad you listened to your gut instinct.
I know why that one bedroom door opens into the hallway! They put it in backwards! So fun to watch this whole process through your eyes. You are so encouraging and motivating for me to get my projects done!
Kristi, A side benefit of all the work you will be doing is you will tone and lose weight. I lost 12 pounds when I started working on my fixer upper and I am so much stronger!
Is the bedroom where the door opens out small? I really considered turning the door around in my last house because our 1920’s bungalow had such tiny bedrooms. I couldn’t place the bed where I wanted it because of the door needing clearance. Never did it, but I wish I would have.
You inspire me!
Kristi,
It would never have occurred to me that you could remove a closet. Your hallway looks so much bigger. Totally agree with you that getting the floors done first is key if you want to move in…they just need undisturbed time. Now THAT will be a challenge for you! Keep inspiring us…you are amazing.
I agree with everyone else, the closet is gone…good move. But it just occurred to me that while the floors are curing you can’t be in the house. If you aren’t in the house you can’t be working, if you are not working there is nothing to bog about, without a blog I will go into withdrawal. Withdrawal is bad. Ahhhh…but i just remembered…coral front door, pressure washing and shutters. Nevermind, there will be plenty to blog about. Have fun tomorrow!
😀 Your comment ACTUALLY made me laugh out loud — not only the withdrawal part, but the fact that you seem to have my days planned for me. I have a feeling my productivity could double if you were here organizing my time! 😀
I am so excited to see all the changes you will be making to make your home YOURS. I love your style & decorating. You’ve done an amazing job with your condo so I could only imagine the magic you will do with your house. You’re an inspiration to so many of us!
Oh my heavens, can you imagine that green paint with the green carpet?! Yikes!
Haha! I have a feeling that the green paint and the green carpet(s) never coexisted in the house. I think the carpet was added in the mid-1980s, and by that time (or maybe at the same time) the walls were all painted that antique white color. But the interesting thing is that at onetime, ALL of the walls AND the baseboards were painted that seafoam green. :-/
Looks great! I bet it was fun to do that demo, I love demo!!!
Absolutely everything you’ve torn out has been a perfect choice. Those boxwoods really overpowered the house. That closet overpowered the hallway. You are making some really sound choices. Love watching the progress. Do not crowd that hallway back with much stuff. The seafoam green walls was a color that was very popular for the day your house was built. Hope you will find some well chosen antiques or vintage to match the date of your house. You may have to start completing one room at a time once you’ve finished the floors and moved in, so your husband can stay in a completed room while you work on another. I admire you so much. I worked for 32 years for a rural electric cooperative, and can tell you that those storm windows can cut your heating (or in the case of Texas, cooling) way down. Also, since you have removed the foam ceiling tiles (which were horrid) you’d better check out the insulation in the attic and bring it up to par pretty soon. Will be so happy for you when the condo sells.
You are amazing, and such an inspiration. I look forward to each and every leg of your journey. You have been such an inspiration to me. keep on posting.
Maryann
I am now tired from reading your post. 😉 Your energy level is incredible!
Removing that closet did open up that area. However, it almost looks like there was never a closet there. Why? Because there is an electrical outlet. Why was there an outlet in the closet? Was the closet an addition to the house? Did I miss something?
Yes, the closet was an addition. The house was built in 1948, and I would guess that the closet was added sometime in the 1970s. That’s why I knew I could remove it without any issues. Had the closet been original, it’s very likely that there wouldn’t have been any hardwood flooring under the wall(s) of the closet. Of course, had the closet been original, the style would have been completely different and would have matched the style of the rest of the house (and the rest of the doors), and I probably wouldn’t have wanted to remove it in the first place. It really was the fact that it was an obvious 1970s addition (rather than the space that it took up) that made me want to remove it. 🙂
Love. Love. Love you! Such will. What a work horse! You go girl. I’m feeling your pain with the reno, and that door opening out into the hall is odd. Do you think it could have been an exterior door at one time? Maybe that bedroom was a porch back in the day? Otherwise, I would guess whoever hung it just had a major brain fart and hung it wrong. Been there. Good news? That’s a really easy fix if it bugs you that very much.
Now, onto renting a floor sander. Been there, done that. Here are my hints. Bring LOTS of water, because that’s some thirsty work. Keep in mind the sander works with pressure from your hands. Lean one way, the sander goes the other. (At least the one we rented did this.) So pick a room to start, maybe a bedroom, and start in the MIDDLE of the room. I thought I would start in a corner and go from there. After banging HARD into the baseboard and shoe molding several times, I finally got the hang of it. Starting in the middle will give you a bit of room to practice. Wear a mask. Bring a tee shirt, or two, and another pair of pants/shorts to change into so you don’t get dust in your car. I changed shirts before eating lunch just because I felt to dirty to eat.
Those are my most important tips. I’m sure that your fab-boo self already knew them though.
Best of luck, I can’t wait to see the finished floors!
No, I don’t think that room was a porch, simply because that room is on a pier and beam foundation, AND it has the original hardwood floors. The front porch and the original dogrun between the kitchen and the garage (which is now a den) are both solid concrete. So I have a feeling that if that room used to be a porch, it would also have a solid concrete foundation, and it would have a different floor other than the hardwood.
I think it’s more likely, as others have stated, that it was either an oversight by the original installer OR (and probably more likely), it was turned around to make it easier for someone in a wheelchair to get out of the room. And since the house has a wheelchair ramp in the front, and the door to the master bathroom has been widened for wheelchair access, I’m guessing that the door was turned around for the same reason. Which is actually pretty great! Since this will be Matt’s video game room, and my office is next door, I can shut his door if I need some quiet, and be confident that he’ll be able to get out easily if he needs to. So I think it’ll actually work out for the best! 🙂
Hi Kristi – I love, love, love your blog!! I can’t believe how much you’ve accomplished in your new house in a mere 2 weeks. It’s inspiring to me since I just bought my first new house exactly 1 week after you did. I can’t wait to get in there and start with all my DIY ideas (and some of yours). 🙂 Congrats on your new adventure….I’ll definitely be following along!
Love love love this! It opens the space up so much! I’m really excited to see how everything turns out. You’ve got so many great ideas!
Great job! Now the hallway is big enough to breathe in! You’ve got wonderful ideas for this home and look forward to tagging along!
I am so loving your blog….You are an inspiration to me….it gives me so many things to put on my list that will be where everything else is…on the list and not done….but if I were young as you ….and I used to be and I did lots of this kind of thing…it has been interesting also to read all the comments….so many ideas…I was looking for someone to say how eerie it was to have the door opening into the hall rather than the room….I could picture some person being locked in and not being able to get out…because someone else had locked them in~~~~~but I guess everyone else who comes here is not as looney in the head as me…I can’t wait to see the finished floors…and also the work on the outside while they are setting…you go girl….
When you first described what you were planning, I had my doubts, but it looks so much better!
Are you guys living in the house now? Or are you still at the condo, and working on the house? (Sorry if you’ve mentioned this & I missed it)
We’re still in the condo. *Sigh* It seems like we’ll never get out of here! 🙂 But my goal is to get the hardwood floors refinished, give them a few days to cure, and then we’ll move in. Of course, now that we’re having to have more extensive plumbing done, that may delay us a bit more. But hopefully it’ll be no more than three weeks before we can get moved in.
What did you do with the soace now that there is no closet?
This area has undergone many changes in the years since I removed this closet, but you can see what it looks like now in this post: https://www.addicted2decorating.com/photo-tour-of-our-whole-master-bedroom-suite-foyer-walk-in-closet-bedroom-and-bathroom.html