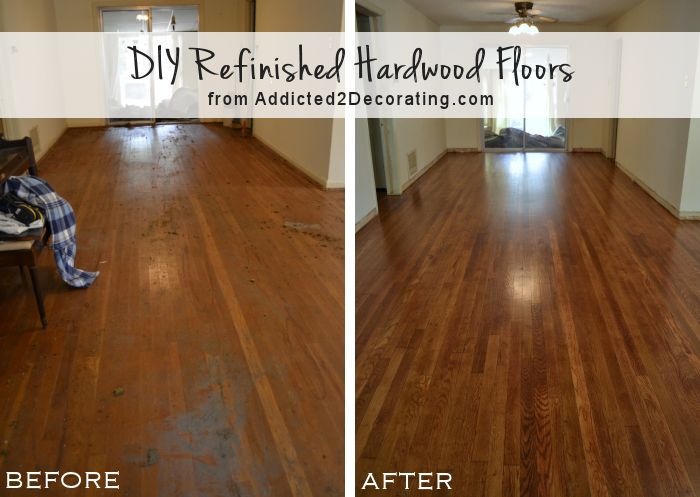
My DIY Refinished Hardwood Floors Are Finished!
Oh my gosh, y’all!! I was beginning to think that this hardwood floor refinishing project would never be complete, like I was caught in some Groundhog Day-type loop of never ending sanding. But my floors are finally finished, and I couldn’t be happier with the results! They’re not perfect by any means, but I’m okay with that. 🙂
Of course, the “before” picture above was taken immediately after I had removed the 30-year-old green carpet, so while the “before and after” for the hardwood floors looks like the picture above, the “before and after” for the room looks like this:
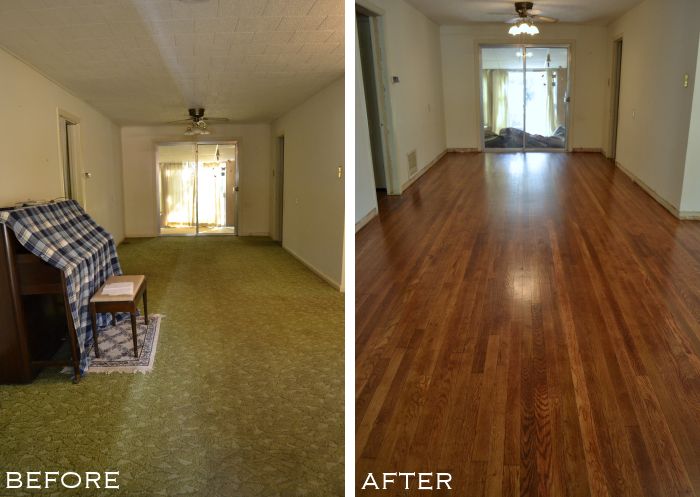
Quite a transformation, right? 😀 I’m pretty ecstatic about it! And just to think that those gorgeous floors were hidden under there the whole time, for about 30 years, beneath green carpet, carpet padding, and a very thick layer of almost-opaque mystery finish that hid the beautiful grain of the oak floors.
This was definitely one of the hardest and most time-consuming DIY projects I’ve ever done, but I’m so glad that I stuck with it and didn’t throw in the towel after my initial attempt was a complete bust.
Because now I have beautiful floors, and I can say that it was the result of my own hard work and my own two hands. There’s so much satisfaction in that! (And of course, my mom also helped me for two days by removing baseboards from three of the rooms, clearing out all of the remaining debris from the hallway closet tear out, and doing lots of edge sanding.)
So let’s take a little tour of the rest of the rooms, shall we?
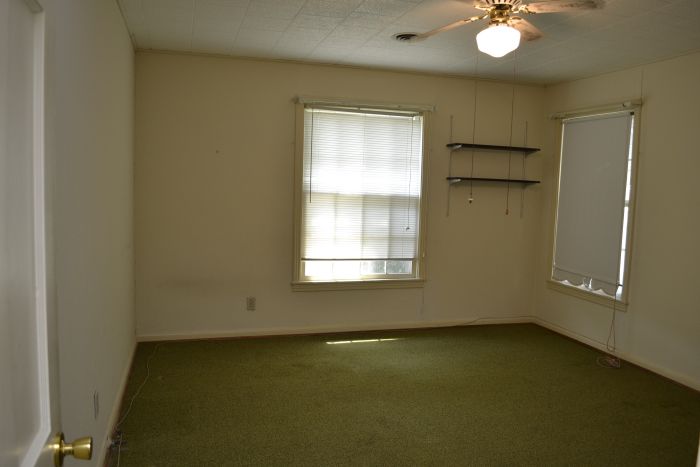
The Master Bedroom
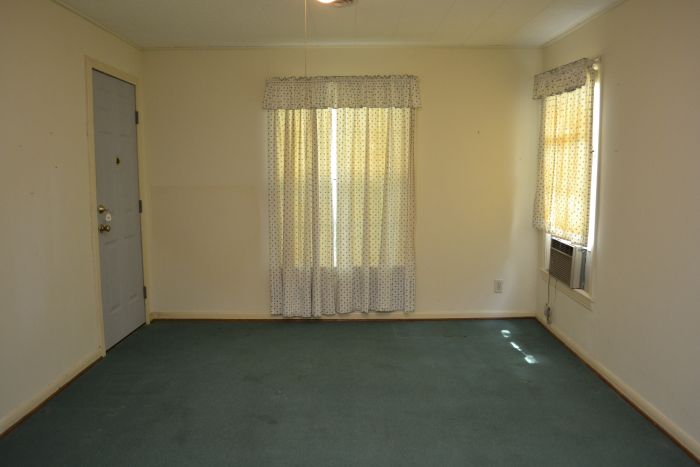
Here’s how this room started out (with green carpet, of course).
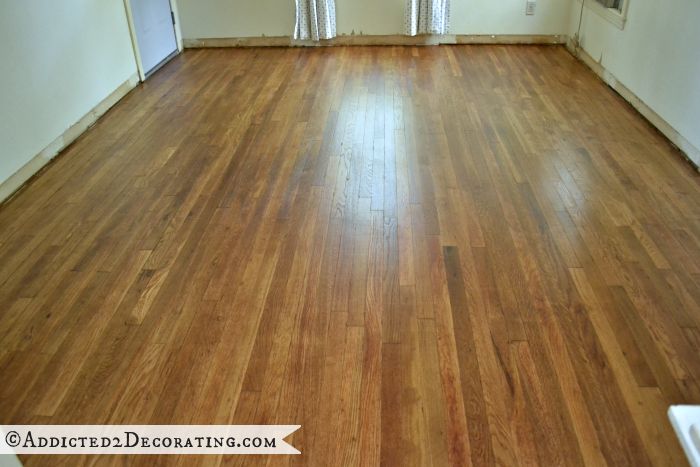
And here’s how the floor looked right after I removed the carpet.

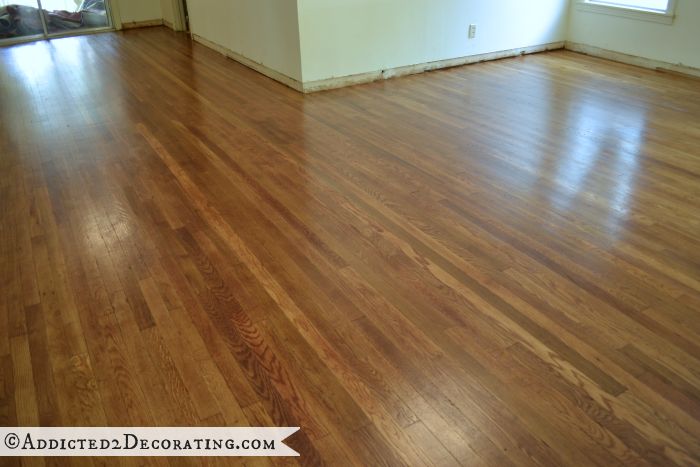
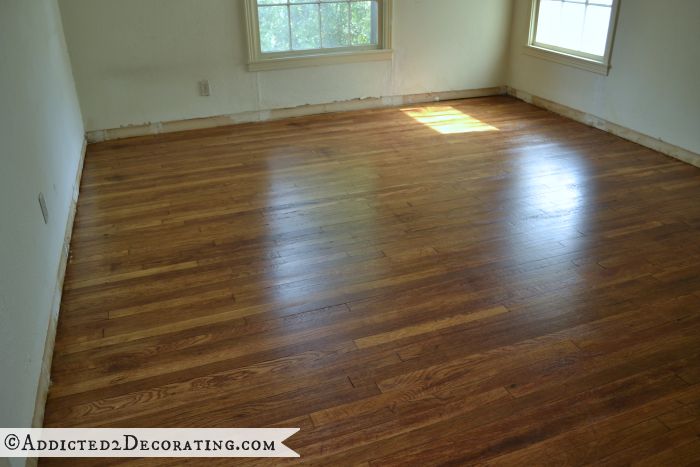
And here’s the floor now, with its shiny new finish.
Matt’s Game Room
This room started out with carpet that was more teal than green.
And here’s what the floor looked like right after I removed the carpet and padding:

And now, with a beautiful refinished hardwood floor:
The Hallway
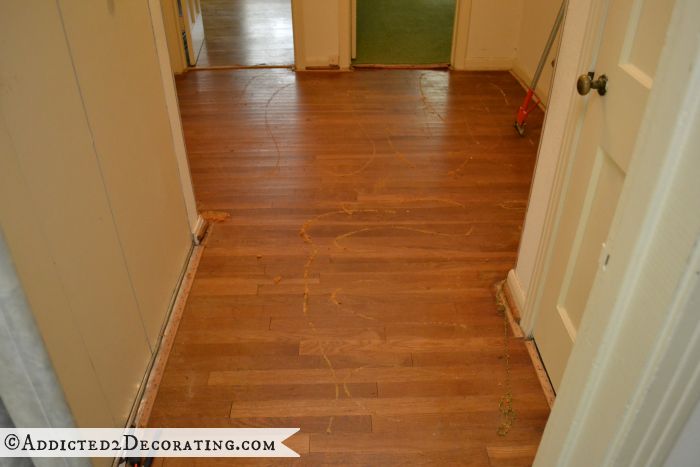
Of course, the hallway also had green carpet:
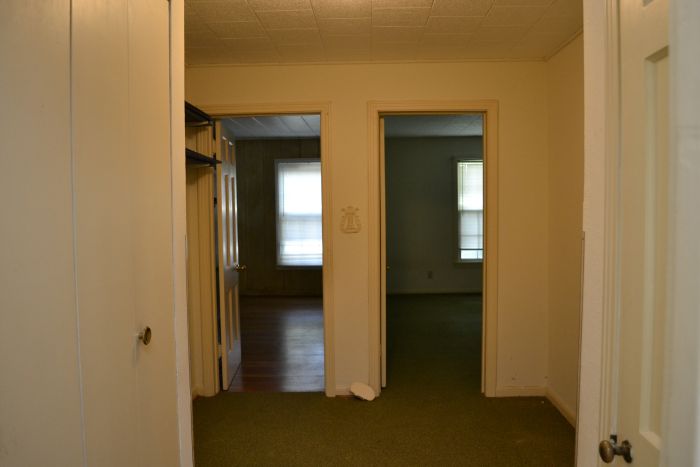
(Obviously I wasn’t really focused on the floor in that photo, but you get the picture, right?)
And right after I removed the carpet:
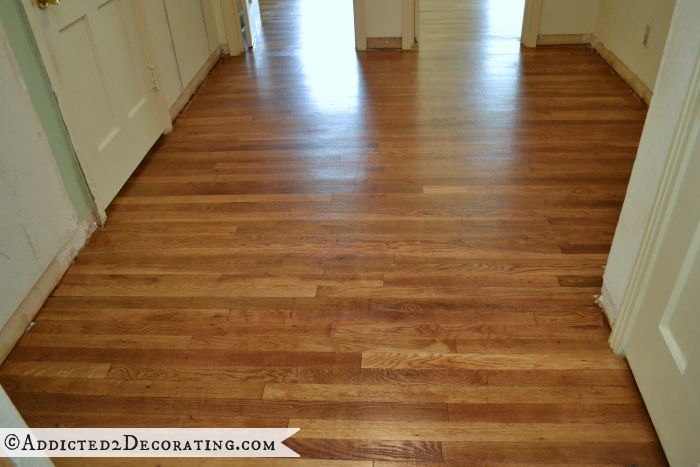
And here’s how the floor looks now (with the closet gone also):
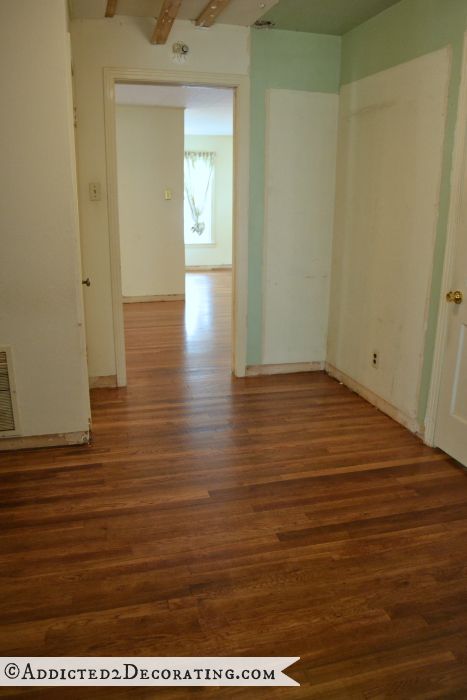
Of course, when it comes to the hallway, this is my favorite before and after view. Here’s how it looked with the carpet:

And now:
My Office
I also didn’t get a good “before” picture of the original hardwood floor in my office. It’s the only room that actually had the original hardwood floors exposed (no carpet), so when I pulled up all of the carpet in the other rooms, I didn’t even think to get a picture of the floor in my office. But it looks just as beautiful as the rest now. (Well, except for that one board that has termite damage. *Sigh* I still need to deal with that.)

Of course, the color of the paneled walls is very distracting and detracts from the beautiful floors, so I want to paint those ASAP. I did learn that the paneled walls and ceiling are actually original to the house (and very thick solid wood!). For some reason, I thought that they had been added later, but they are in fact original, so I’ll be keeping them. But a coat or three of primer and paint will do wonders for that room.
And now, let me answer some of your questions regarding my floor refinishing project:
1. How much did this cost?
The equipment rental and sandpaper came to $450 (about half of that cost was for sandpaper!!), and the Waterlox cost me $700. Throw in the extras, like a new natural bristle brush, a gallon of mineral spirits, etc., and the cost came to right at $1200.
(FYI: I could have saved $300 if I had been satisfied with a semi-gloss finish but I had my heart set on a satin finish. After seeing the cost difference, I almost decided to forgo the satin finish to save money, but Matt insisted that I do it like I want it the first time, rather than settling for something I didn’t want and regretting it later. So that satin finish cost an extra $300 in product, and took an extra day of labor. The satin finish is really gorgeous, and actually looks much more satin in person than it does in the pictures above. For some reason, in pictures it reflects quite a bit more light than it does in person.)
2. How much did you save refinishing your own floors?
I refinished about 1500 square feet of hardwood flooring. In my area, the cost for professional refinishing is around $3 per square foot. So that would have put the cost at around $4,500. My cost was 80 cents per square foot. I saved around $3,300 by refinishing my own floors. Had I skipped the satin finish, my cost would have been 60 cents per square foot, which would have been a $3,600 savings. But I really like a satin finish. 🙂
3. What kind of wood floors do you have?
I wouldn’t bet anything important on my answer, but I’m almost 100% sure that they’re oak. Now I couldn’t tell you if they’re white oak or red oak, but if you can guess based on the color they turn when you put oil-based finish on them, I’d say they’re red oak. But again, I wouldn’t bet anything important on that answer. I do know that they’re a very hard wood. That I do know for sure.
4. How did you stain your floors?
I actually didn’t use stain at all. The color you see is the natural color that the wood turns when you apply an oil-based finish. The Waterlox does have a slight amber color, but not much. Here you can see the difference between the raw wood and the wood with Waterlox.
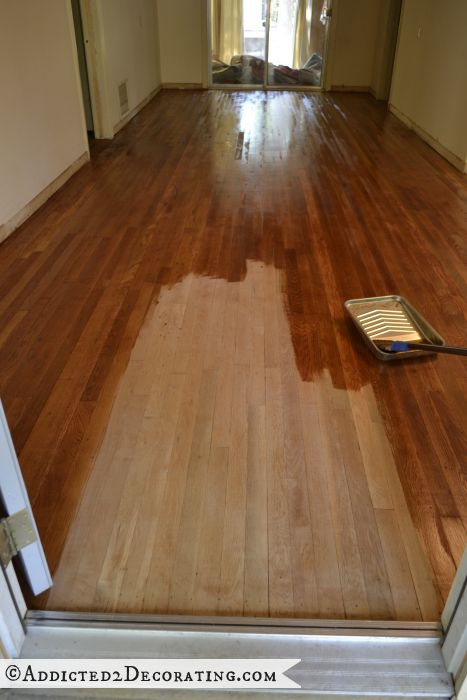
But again, most of that is just the natural color that it turns when an oil-based finish is applied. In fact, the day before I applied the first coat of Waterlox, I actually wiped down then entire floor with mineral spirits, and they turned almost exactly that color with just mineral spirits. So wiping mineral spirits onto wood is actually a very good way to see what color it’ll turn once an oil-based finish is applied, so you can determine of you want or need to use stain or not.
On the other hand, if you want really light-colored floors, you’ll almost certainly have to use a water-based finish.
5. Why did you decide not to stain your floors?
Whether or not to stain really just comes down to how dark you want your floors. It’s completely a personal preference.
I personally wanted a really warm medium brown. I love really dark floors, but I think they show dirt and dust much easier. Plus, I think that a natural finish (the medium brown) is more in keeping with the age of my house (built in 1948). The really dark finishes seem to be a more modern thing (at least from what I’ve seen), and I can’t help but wonder if they have an expiration date. But a natural oak, on the other hand, seems timeless to me, so that’s what I decided to go with.
6. How is Waterlox different from stain?
A stain is used to alter the natural color of wood. More often than not, stain is used to make wood darker than it is naturally. Waterlox doesn’t actually alter the color of the wood. As I mentioned, it does have a very slight amber color to it, but not enough to really “stain” the wood.
Waterlox would be more comparable to a polyurethane, in that both Waterlox and polyurethane are used as a clear finish to protect wood. The difference is that polyurethane is literally a plastic coating that sits on top of the wood. Waterlox is a tung oil-based finish that actually penetrates into the wood, much like the oil finishes (tung oil, linseed oil, etc.) that have been used to protect wood for over 200 years.
7. How do you clean this type of floor?
Waterlox actually makes a cleaner that you can use to mop the floor, but just plain vinegar and water will work also. You can’t use any cleaners that contain ammonia or bleach, or anything that will create a waxy build-up on the floor.
I think those were all of the questions I received, but if I missed one, or you think of something else that I didn’t cover, just let me know in the comments below, and I’ll add it to the list.
And don’t forget to check out my other post where I shared a few specific details and tips regarding sanding the floors.
Oh yeah! One other question I got from a few of you. Was it worth the blood, sweat, and tears (and two weeks of work)?
And of course, my answer is, “Absolutely!!” But I don’t think I’d ever want to do it again. 😀
*This post is not sponsored by Waterlox. I really did just do my own research, comparing the benefits and drawbacks of polyurethane, oiled finishes (specifically tung oil), and Waterlox, and came to the conclusion all on my own that I wanted to use this product on my floors.
UPDATE: Want to see how these Waterlox floors compare to polyurethaned floors? I reviewed all five hardwood floor finishes I’ve used in our house here: Comparison Of The Five Hardwood Floor Finishes I’ve Used In Our House (Waterlox, Oil-Based Polyurethane, Whitewashed, And Two Different Painted Floor Finishes)

Addicted 2 Decorating is where I share my DIY and decorating journey as I remodel and decorate the 1948 fixer upper that my husband, Matt, and I bought in 2013. Matt has M.S. and is unable to do physical work, so I do the majority of the work on the house by myself. You can learn more about me here.
Amazing! I would want to sleep on those floors after doing all the hard work you did!
So very gorgeous! Is there a method for tinting waterlox if you wanted to darken up a finish? Or is there a way to waterlox in white? I’m still eyeing those cupboards in my laundry room as a place to test refinishing.
You can use stain with Waterlox. You can stain the wood first, and then use Waterlox on top of the stain. Or you can add stain to the first coat of Waterlox. I’ve used both methods, and they both work well. You can find specific instructions on the Waterlox website.
There’s not really a way to make it lighter, though. Being an oil-based product, it’ll definitely add an amber tint to anything you apply it to.
I love the floors! It makes the house look so much bigger than it originally looked with the carpet in it…..I wish I had floors to refinish! You truly inspire me!
Wow great job! The flooring looks so beautiful! Such a difference from the old green carpets 🙂 It makes the rooms much lighter and removing the built in closet from the hallway has really opened up the space. I’m following your progress to see what you do next.
Wow Kristi!! Those floors look Amazing. You have done an incredible job. Can’t wait to see what you do next.
Absolutely beautiful! Can’t wait to see what you do next!
They are GORGEOUS, Kristi! Great job! Can’t wait to see how they start to look as your paint walls, decorate, move in…
They turned out GORGEOUS!! Just an aside…I know for a fact that my floors are red oak, and after refinishing, they are much redder that what yours shows on the computer. But it doesn’t matter what they are, does it? I can see why you are thrilled with your results!
Nope, it doesn’t matter to me one single bit what kind of wood my floors are. I love them regardless! 😀 But people keep asking me, and I’d like to sound at least a tiny bit knowledgeable. 😉
ABSOLUTELY FANTASTIC!!!!! You did a GREAT job! Cannot wait to see what you tackle next. 🙂
Gorgeous!!
Absolutely gorgeous – congrats!!!!! Oh and just a hint – you can always tell the color your wood will be if you just spit on your finger and rub it in – I know GROSS, but I was once married to a wood-worker and that’s what he did. 🙂
YOU ARE TRULY AMAZING………….LOVE, LOVE, LOVE YOUR FLOORS.
GREAT JOB AND YOU WERE WRONG……. YOUR FLOORS ARE PERFECT AND BEAUTIFULLY DONE!
J
I have nothing to say besides “Beautiful”!
I love the way your floors turned out. They’re absolutely gorgeous! And…there’s nothing quite like the satisfaction of having done them yourself (not to mention all the $$$ you saved).
I applaud you for doing it yourself, with such amazing results!
I am refinishing the floors in my 1925 house. I have just pulled up the carpet and padding. You are my inspiration to DIY. Did you fill the carpet nail holes with wood filler?
Did you sand between applications of Waterlox?
No, and no. 🙂
I didn’t fill any nail holes because one person who comments on a previous post said she liked the look of the nail holes on her floor, and regretted having her hubby fill most of the nail holes. Kind of gave it a reclaimed wood look. So I didn’t bother filling mine. As it turns out, you can’t really even see them at all. Even in the hallway, where I removed the closet that had 2 x 4’s nailed into the floor, I can’t see the nail holes. I think if my floors were a “clear” wood (i.e., a wood with little or no grain), they might be more noticeable. But since mine are oak, with quite a bit of grain, the nailholes just blend right in.
As far as sanding between coats, that’s not needed with Waterlox. They say that you CAN sand between coats if you want to for aesthetic purposes, but as far as adhesion, it’s not needed. After my first coat, my floors felt quite rough. But quite honestly, I was so tired of sanding by that point that I just ignored it. 🙂 After the second coat, it got a little smoother. By the fourth and final coat, the finish was very smooth. So I really believe that if you sand your floors right to begin with (I started with 20-grit, then 36-grit, then 80-grit, and ended with 100-grit), and then you clean your floors thoroughly before starting the first coat of Waterlox, then there’s no need for sanding between coats.
So, so awesome, Kristi! The floors look amazing. (Good choice on the color.) I’ve been enjoying following along on your new home transformation.
Fantastic!
Your floors look amazing! Very nice job!!
Absolutely beautiful! I love the satin finish! I did that on my butcher block countertops and just love the look. I think you can tell in the pictures that it is a satin finish because the light coming in from the windows looks diffused. Can’t wait to see what you do with the rest of your house! 🙂
BEAUTIFUL! I think you are absolutely correct that your floors are red oak. They look just like the ones at my mother’s house.
The floors are gorgeous, Kristi! Your new home is really beginning to reveal itself, thanks to your hard work. I suspect you are right about the floors being red oak. I have an Amish China cabinet that is the same color, and it is red oak.
As I said last night, your house just wants to wrap it’s arms around you and hug you! What you have done is beyond terrific. Rest on your laurels while you plan, plan, plan and let your floors cure properly. Watching with baited breath.
Oh my goodness, they came out beautiful. Great job! So much hard work and I give you a lot of credit! I don’t know if I would have had the inclination, patience or if my back would have been able to handle that as a DIY job, no matter the savings. You go girl!
The “Power of Women” you did an amazing job, congrats, they look awesome.
You rock! It makes the house look so much bigger – esp the rooms that come together w/the closet taken out!
Absolutely beautiful and what I am MOST impressed with is your spirit, your enthusiasm and the energy level you pack into that little body of yours!
Beth 🙂
If you happen to be walking around with your chest swelled with pride looking very smug, it’s okay! You should be VERY proud of yourself. Wow! What an amazing transformation and YOU did it! I am so impressed!
Marci
Oh my goodness, what an awesome accomplishment!!
I totally agree with Marci…you should be feeling very proud of yourself right now! The floors are absolutely perfect and the color is timeless! Great job, Kristi!
Looks amazing Kristi!
You and your little house are on your way to Rock Star status! Amazing how such a small detail can transform the space… and I’m sure the best is yet to come! (Of course I mean small in relation to accomplishing all the other things on your list!)
Congrats on your “stick-to-it-ness – they look gorgeous!
Gorgeous floors! Definitely worth the effort!
Fabulous! What a great finish to be proud of Kristi. Good for you
You did a fantastic job, and your perseverance and dedication to the job is outstanding. For years to come, you will smile whenever you look at the floors.
Because of the part of the country you and I are in (I am in Austin), the floors in houses of that vintage are almost certainly either heart pine or red oak, and judging from the photos, I am sure yours are red oak. BTW, and FWIW, I think you chose wisely on the satin finish. The general rule of thumb is “the higher the gloss of the finish, the more you see imperfections—and dust”!
Beautiful floors! I’ve refinished wood floors in 2 houses, such a hard & dirty job but I just can’t see paying someone for something that I can do!
I have an idea for the panel walls. I had a contractor that mudded the grooves, then textured and painted the paneling. You really couldn’t tell unless you were looking for it. Looked like regular walls!
Now that’s an interesting idea! If it were that thin, flat 1960s paneling, I could definitely see trying that method of filling the grooves and texturing the wall. When I see that paneling in people’s homes, I always wonder if that would work.
The problem with mine is that each board is slightly bowed with a slight curve going down the middle of the each board. So if I filled in the cracks and then textured and painted, the wall would look wavy. I think I’m just going to have to embrace the paneled walls and ceiling. 🙂 I’ll probably actually like it after it’s painted white. After all, I do seem to have a thing for adding wood slats to every surface possible (condo kitchen ceiling, hallway bathroom walls, small bathroom walls). I’d probably look a bit insane if, now that I have the real thing, I tried to cover it up and disguise it. 😀 Here’s hoping that white paint works wonders.
Pretty. VERY pretty. Great job, Kristi. The floors are DONE!!! Perfect foundation to get started on all the rooms.
Great job, great justifications/reasoning for each element, and great end result. I’m definitely going to stay tuned over time for future posts about how the Waterlox holds up over time. Primarily because I like this approach over the typical stain/poly. I know that people who are interested in a darker finish but still want to use Waterlox can also use an aniline dye first (to actually change the pigment of the wood, unlike stain), and the Waterlox over that. But that’s a much more difficult approach to get it even and consistent, and once it’s a different color, you better like it. There’s really no sanding that color out.
Oh my gosh they are beautiful! I love the satin finish. Awesome work, Christi!
looks stinking awesome!
Only thing I can think of to say is: A.M.A.Z.I.N.G. !!!!!!!!!!!!!
OH MY GOSH KRISTI!!!! The floors looks AMAZING!!!!!!!!!!!!!!! I’m totally jealous.
Wow! You’re my hero! There are not enough words to describe how impressed I am. They are beautiful!
I can’t believe how many rooms you did and all the square footage you finished. You are a goddess. I hope you drink because you deserve a bottle of champagne.
Yay! They are gorgeous. You did a terrific job. 🙂
The floors look amazing! You did such a good job! All of your hard work really payed off.. xx Liz Marie
Just lovely!
I really think you should send pictures and a letter to Waterlox detailing your choice for their product and your journey — they are getting a lot of free advertising through you, and just might be willing to show some form of tangible appreciation. ~:)
Floors are gorgeous, that is a given but I find myself excited to see your house come together like a home. I am totally high-fiving you 🙂
GORGEOUS!!!!!!!
I agree with everyone else – these floors look amazing! SOOOOOOOOOOOOO Beautiful! They add character and depth to each room and as you finishe the walls room by room you will love how they look different for each room. As for the ‘bad board’ in your office, I would leave it (unless it is a tripping or home hazard) because it adds character to the room. Congrats Kristi on a job well done!
P.S. You should make this post one of your ‘featured posts’ with these gorgeous floors!
Done! 🙂 I always forget to update those Featured Posts. Thank you for the reminder!
I’m happy to see those amazing floors as soon as I open your site!
I actually have considered filling that board with epoxy and just leaving it. 🙂
Your floors look amazing! Would you ever consider using Waterlox on wood furniture as an alternative to stain? Wasn’t sure if it was only to be used on floors or how it would hold up on wood furniture.
Oh, sure! You can use Waterlox on anything made of wood. And once it cures for 30 days, it’s even FDA-approved as “food safe”, so you can use it on wood bowls, butcherblock countertops in kitchens, etc. And you can actually use it with stain. You can stain the piece first, and then use Waterlox over top just like you would polyurethane, or you can add stain to the first coat of Waterlox. You can find detailed info about that on their website, including the ratio of stain/Waterlox if you prefer the mixing method.
Enhorabuena. Satisfacción, cansancio, alegría, ilusión, nuevas fuerzas para seguir adelante… Bien hecho.
looks so beautiful! I can’t believe you were able to restore them to that! It looked very intimidating after the carpet was out!
Laura
House Envy
Wowser! Those are gorgeous!!!!!!
So glad you are finished with that enormous job! Your floors look b-e-a-u-t-i-f-u-l; you are an inspiration to other women do-it-yourselfers.
Awesome Kristi!
This is amazing!!! They look beautiful, just beautiful. This makes me want to go out and find old hardwoods to refinish! lol….just awesome kristi!
Gorgeous job! I’m so happy they turned out so well, though that is completely due to your hard work, sweat and tears. No doubt that you should be proud as punch!
OMG it was SO worth it! Just by redoing the floors I can totally see a different look with the house. Seriously, you did a great job and it looks fabulous!
Jennifer @ Decorated Chaos
http://decoratedchaos.blogspot.com
WOW. just…. Wow.
A MA ZING! So awesome. You give me inspiration everyday!
The floors are beautiful, well worth the trouble. You did great!
Wow! Wow! Wow! You did a very fine job. Enjoy them!
Beautiful. The floors are gorgeous. I don’t remember them ever being THAT pretty. Love the finish. Waterlox should be paying for ALL of it and use your photos for ads–i doubt that they can find other photos more convincing of the benefits of using their product! And wow, you were persistent–what determination it took to get through this project . Well done!
Beautiful! I am so happy that they are so wonderfully intact. You are amazing and I think Matt is so smart to want them done in satin at the outset in spite of the additional trouble and expense. You both will be glad for that decision every time you look at them.
Girrrrrrl, you did a fantastic job. I love watching the progress you are making – it makes me braver in my own undertakings. LOL. Keep up the great work!!!
Kristi, I am absolutely blown away at how good your floors look! They totally look like a professional went in and did the job, you should be very proud. I agree with previous posters who said Waterlox should pay you for endorsing their product. Your befores and afters are simply amazing and you better believe if I owned a home with wood floors, I’d be running to Waterlox to buy their product after seeing what a good job you did with it on your floors. It was absolutely worth the blood, sweat, and tears you invested in this project because you spent time on doing such a good job, and you will never have to do that job again! I remain in awe of your energy level and dedication to this project. Congratulations!
Best,
Kimberly
WOW !! I mean wow, wow, wow!! This is an amazing transformation. Incredible! Your hard work really paid off. Great job!
Looks fantastic!! I will never ever ever understand why people would cover hardwood up. I guess it came with the times. Cant wait to see what is next!
BEAUTIFUL! You are one hard working girl. They look amazing. Great job.
I really wanna say, I love your grit girl! I love how you kept going because you knew what the outcome would be! So stunning, I love how they look, love that you made them look that way more! Excellent job! I would like to know about repairs, when the first scratch shows up, how do you fix that?
I’ll definitely keep y’all posted. From what I understand, I’ll just be able to sand it out, and then reapply Waterlox to that area, and it’ll blend right in. I hope it’s that easy!
I think they are gorgeous! I’ve been looking for a medium wood floor stain. Something with no yellow or red undertones.
Beautiful job! One thought on filling holes in flooring is to mix some of your sanding residue (if you have any left) with some clear wood glue and it will look more natural. I’m guessing that’s how the holes that were left from pulling up the carpet got filled when you were sanding and then sealed with your finish.
Congratulations, the floors look great!
So, so gorgeous. I think you made a great choice with the satin finish. In a couple months, you won’t even think about that extra money you spent for the finish, while if they were semi-gloss you might feel a little bit sad every time you noticed it for years to come.
Just incredible! They are beautiful and I am in awe of all your hard work and endurance! Can’t wait to see which project you tackle next 🙂
The floors look really nice. Are you pleased?
Oh, well done! Very well done!!!
The hardwood floor looks amazing! I will show this to my friend, as she wants to do this in her home she has just bought! – her first house 🙂
Can I just say I really didn’t see how HUGE the impact of getting rid of that hall closet was until you refinished the floors? Everything looks absolutely amazing!!!
absolutely gorgeous!!!!
Bravo on all your hard work.
Three pats on your back!
Your floors look fabulous! What a gigantic labor of love! They make me what to slide around on the barefoot! I bet they feel like silk. What a huge accomplishment – so proud of you! Thank you so much for sharing and keep upo the fantastic work! Hugs, Leena
LOVE!! What an amazing job! Even with the sanding issues you had starting off, they still came out totally gorg!
Kristi, I do not even know where to begin. Everyone has said everything. Queen Lady of sanding and staining floors, I will just bow to thee. 😉
Bam! Job fantastically done! 😀
The floors look amazing, can’t believe the change.
Nice job- sanding and finish. Did you do everything with a brush? Any problems with satin coat? I just did first coat and ended up doing everything with a brush. Was easy. But sounds like satin is finicky if not just right- too thin or overbrushed. Also, did you use original or the low VOC? I got the impression that the original is more forgiving. Thanks.
Yep, I did everything with a brush. I used either a 3-inch or 4-inch brush, and taped it to the end of a paint roller extension. I used the original, not the low-VOC, and I didn’t have any trouble at all with the satin finish. It went on smoothly, just like the original finish did.
Wow that looks awesome! You will certainly be able to enjoy your floors for many years, and have the satisfaction that comes with doing it yourself!! 🙂
Hi! I love your information. I desperately need to refinish my reclaimed wood floor. I have two dogs and a small house. I’m thinking we would have to move out to do this project, and also, how do I keep pretty hair out of the polyethylene?
VWRY NICE!!!
Wow, I am the one of many readers have asked about the intimidating task of refinishing wood floors. Thank you for share it!
Beautiful job! We have the original floors in our 1910 home. Everything I’ve read says Waterlox is the best. How was the odor? There’s no way we can move out. I was thinking of doing a room at a time. I’m just not sure we have the time to wait for the waterlox to dry. Other things I’ve read said to wait 24 hours in between coats and then 7 days before moving furniture back in. How fast did yours dry and what was the temp outside?
You are my hero! I love how brave you are! Do you do this for a living as.well?
I’m in the middle of refinishing heart pine floors in a 1949 house. Why did you choose to use Waterlox, which is a tung oil, over using a stain, since the Waterlox does act almost like a stain. What is the advantage over a stain. I’m wanting a very light stain and am leaning towards “Natural” stain from Minwax, but would like to know if there would be any pros vs cons of choosing Waterlox instead. Thank you!
Waterlox doesn’t take the place of stain. It takes the place of polyurethane. The color I got from the Waterlox on my old red oak floors is the same color I would have gotten had I used an oil-based polyurethane. A water-based polyurethane would have resulted in a much different color. But you can use stain first, and then Waterlox. (Stain alone is not going to seal your floors adequately. You’ll still need a sealer of some sort, whether it’s Waterlox, oil-based poly, water-based poly, tung oil, or something else.) In fact, in my kitchen, where I used brand new red oak flooring, I tried just using Waterlox alone, thinking it would match the old floors. It was drastically different, so I ended up using a stain, and then finishing up with three coats of Waterlox.
I wrote about the reason I chose Waterlox over polyurethane here: https://www.addicted2decorating.com/why-i-chose-to-seal-my-hardwood-floors-with-waterlox-instead-of-polyurethane.html
Wow! Wonderful job! I have been refinishing hardwood floors for years and you do a great job. For future food for thought for you, the way we apply stain is with a buffer and a carpet circle.
You literally take a piece of carpet, pour stain directly onto the carpet, place it underneath the buffer and buff in the stain. WAYY quicker, you use much less stain, and it applies a much more even stain. You do have to “cut in” the edges and corners by hand but the rest, you can fly through.
Well done! You can check out our pics as well. http://www.thefloordoc.com/projects-1/
I am in the process of refinishing my floors, this years winter did a number of water damage on my house. You have me convinced to use Waterlox but what I can not find is the “mineral spirits” the ones I am finding are supposedly not compatible with waterlox according to their website. Do you have a picture of the label or where you bought “mineral spirits”
You can buy mineral spirits at Home Depot or Lowe’s.
Looks great – we are about to embark on the exact same mission! Old hardwood floors that look just like yours, and we believe they are oak. We would like to use Waterlox as well, but are having a hard time finding it anywhere. Can you tell me where you ordered it from, and how much you paid? Thanks so much!
Jackie, somehow I missed your comment! I’m sure you’re done with your floors by now, but just in case you’re still wondering, I order the Waterlox online directly from the company, waterlox.com.
Looks very professional . No scratches , no gauges , no bumps .
You saved a lot of money .Good job !
These look amazing, what a giant project to take on yourself! You must feel so good every time you look at them. I actually am using Waterlox as well, but paid flooring guys to do it because I am just not that dedicated to DIY! How long did you wait before putting furniture on them? I want to move back in but don’t want to mess up the finish! I saw on the Waterlox site to wait 7 days… 7 days?!?!
Kristi, thanks for the helpful post. I have just purchased a house from 1915 with about the same square feet of wood, and the floors are in rough shape. Because of all the other work required (new roof, new windows, new plumbing, etc) I am going to take on the floors myself. Can you recall how many hours/days of sanding this job required?
Thanks!
If I remember correctly, the whole thing took me about a week. But that was ripping up carpet, removing carpet tack strips, sanding, and sealing with Waterlox. And I worked for several hours a day.
I know this is an older post but…
Did you use the satin finish or the semi-gloss on these floors?
They look great!
I used the original finish (semi-gloss) on the first two coats, and then finished with a third coat of satin finish.
BEAUTIFULLY DONE!!!!!!
Looks fantastic! Thanks for posting the before/after shots. Really great job on the floors.