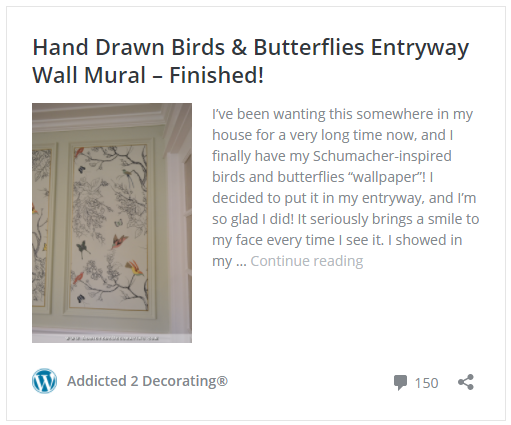
Hand Drawn Bird & Branch Entryway Wall Mural – Part 1
For a very long time now, I’ve been wanting to to a hand drawn “wallpaper” inspired by Schumacher’s Birds & Butterflies wallpaper. I had planned to use it on my music room walls, but that plan changed. Then I thought I might be able to use it on my breakfast room walls. But when I came up with my new decorating plan for my dining room and entryway, I decided to work it into the design by using it on the entryway wall.
I didn’t want to to copy the Schumacher design exactly. I wanted something inspired by it, but also different. So several months ago, I asked my mom to come up with a similar repeatable design, and here’s what she gave me.
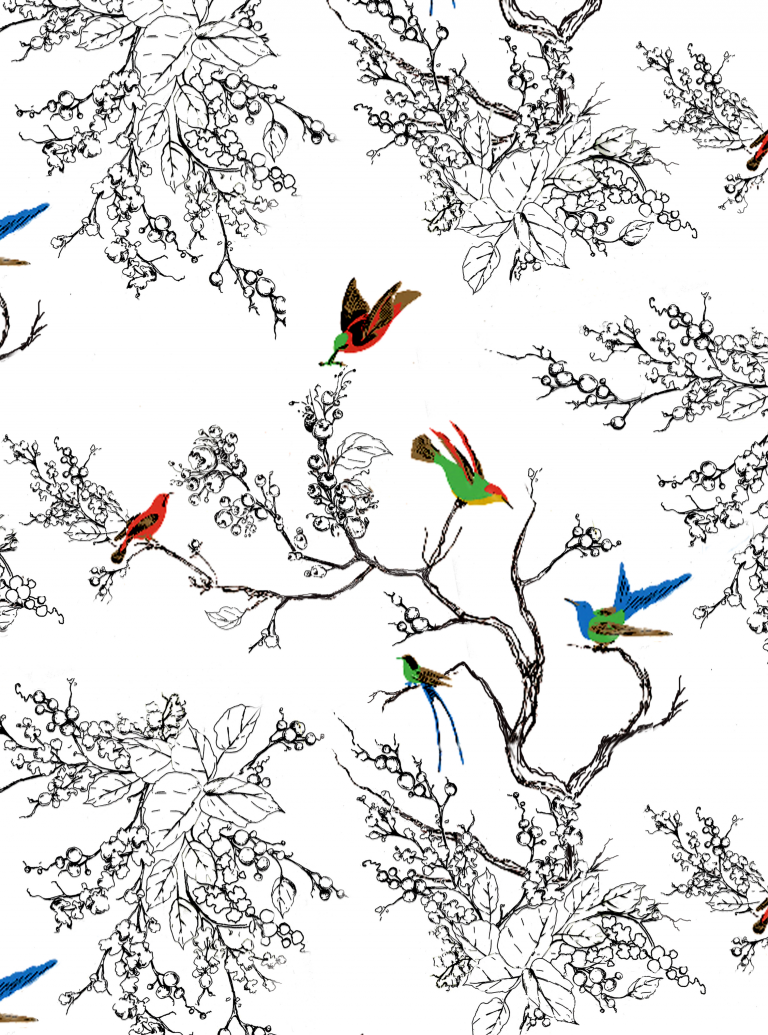
If you want to use this design, you can click here for a larger version.
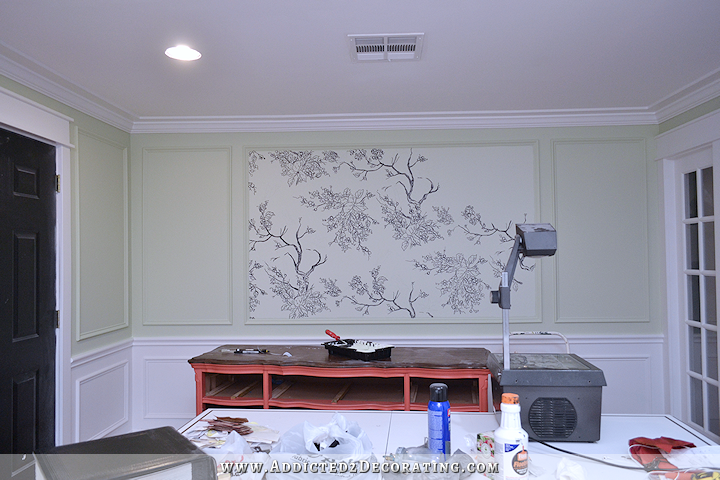
I had it printed on a transparency at Office Depot, and then used an overhead projector that I purchased on Ebay for about $60 to project the image onto the wall. Then I used a permanent black marker to draw the design.
A while back, someone commented that I should use Marks-A-Lot brand markers and avoid Sharpies for this project because Sharpies tend to fade over time. (At least, I think that’s the reason she gave.) I tried to find a Marks-A-Lot, but checked at two places (including Office Depot) and couldn’t find one. So instead, I purchased a big Sharpie and a package of the Office Depot brand permanent markers. The Sharpie was difficult to work with, but the Office Depot brand markers with the chisel tips worked perfectly!
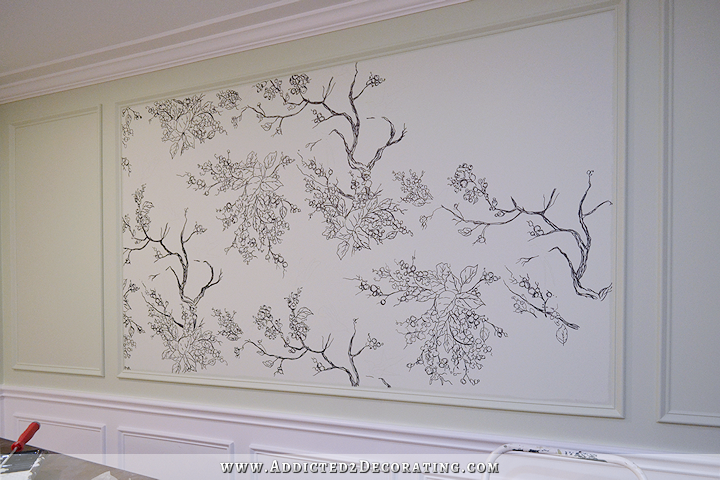
This actually went much faster than I thought it would. I had planned to start much earlier in the day, but then I waffled back and forth between using the green background or repainting the background white. My mom did two mock-ups for me, one with a white background and one with the green, and I decided that I didn’t like either one. The white was too jarring, and the green was too dull. So I mixed one part Feng Shui (the green) and one part Polar Bear (my white trim color) and made a lighter green for the background. I guess it was really humid yesterday, becasue it took all afternoon and part of the evening to paint two coats of the background color and wait for them to dry enough so that I could start drawing the design.

I didn’t actually get started until 7:30pm, and I worked until around 11:00pm. But during that time, I also took a break and cooked dinner, and then sat and relaxed with Matt for about an hour while we ate dinner. So I would estimate that this took me just under two hours.
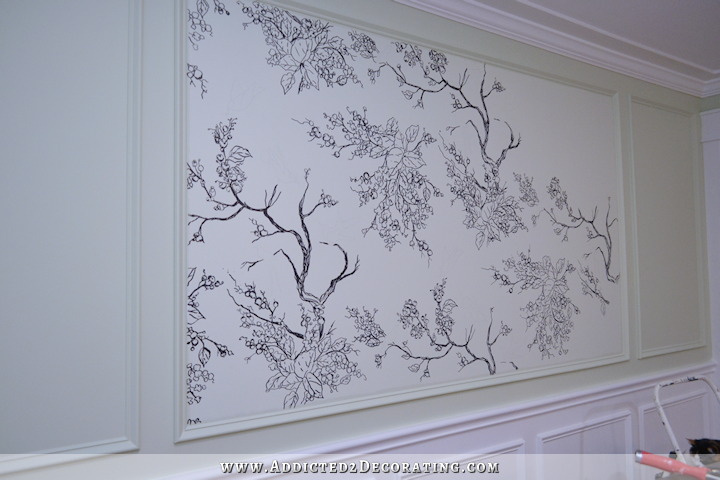
As you can see, I didn’t quite get finished on the right side. I need to finish that up, and then add my birds. And butterflies. 🙂
Yes, I’ve decided to go with butterflies, too. As much as I’d like to leave them off and just stick with birds, I really think they add some balance and interest to the Schumacher wallpaper. Something just seems a little off when I leave them out. Anyway, I’m hoping to have a finished mural to show you tomorrow! And this mural, just like wallpaper, will be used as a backdrop for something that I’ll hang on the wall. More on that later.
UPDATE:
The mural is finished! Click here to see how it turned out…

Addicted 2 Decorating is where I share my DIY and decorating journey as I remodel and decorate the 1948 fixer upper that my husband, Matt, and I bought in 2013. Matt has M.S. and is unable to do physical work, so I do the majority of the work on the house by myself. You can learn more about me here.


That is beautiful. I love that
I love this!
This is going to be stunning! I can’t wait to see the finished product. I really love the direction this space is taking.
YES !!!
Yay!
I love you. I just feel like I need to re-iterate this every once in awhile. I am the type that likes to finish something and leave it, never changing it again, but you are so fluid and if you don’t like it, you just fix it! No holds barred, no living with it, no settling. I just.. admire you. 🙂
^^^ What she said. 😀
Yes. I agree. I look forward to your posts everyday. They inspire me to have no fear and keep creating!
This will really spice up your entry! Lovely!
This is very pretty. I think it will look great 🙂
This is going to be lovely!
this is utterly beautiful!!!!
I knew the birds and branches were coming back! I love it just done in that little area!
I knew it too! I figured this is what yesterday’s post was about! I look for your updates everyday!!
I’m happy you decided to add the butterfly’s! What would the design be, without them?? They actually make “it”, to me anyway! Kudos!!
I agree! Actually butterflies mean something special to me so I’m happy to see a few!!
That is absolutely stunning! I’m seriously amazed — it is so beautiful!
For anyone else that wants to try something like this, I had a couple of suggestions:
You can get an Art-o-graph art tracer and skip the part of having a transparency printed. You just set the Art-o-graph on top of what you want to trace and it projects it onto the wall.
POSCA paint markers are the bomb. You might even want to try the POSCAs for the birds and butterflies. They are expensive, but they are glossy and beautiful and it’s paint instead of ink.
This is such a cool project and I absolutely love what you have done so far.
LOVE!
Wow this my be my favorite Kristi project yet! Are you going to paint the moulding surrounding the area a different color to frame it out, or leave it green?
Cool! This room is going to be so light and bright. Do you need to add some kind of sealant over the marker so it doesn’t fade or smudge over time? Or do you paint over the marker with black paint and an artist brush? Curious how this is done.
I was wondering about this too. I’m guessing you’re going to cover the magic marker with something. My son does projects with paint markers from office max.
It’s exciting to see the birds n butterflies design finally come alive.
I think I’ve figured out what your “problem” is: you have way too many great ideas and not enough house to use them all! But, if that’s a problem, it’s good for us who read your blog. Carry on, Fearless One!
That is beautiful, I’ll be watching for the final reveal! I’m glad you are adding the butterflies.
I might do this on my kitchen wall!!!!!!
It is gorgeous Kristi!!!
Absolutely beautiful and such a personal touch!
Please pst directions and tools used for transfer of mural.
By the way I love the direction you are going now. Love, Love, the table.
You are amazing!
I love it! I think it will be beautiful!
Wow – between you and your mom, the level of talent – WOW. I think someone else or lol, many others have said it: It is inspiring – VERY – the way you are kind of like the energizer bunny… Nothing stops you and if Plan A doesn’t work, you keep chugging right on into Plan B. THIS inspires the heck out of me… Just keeping this inspiration in MY head makes it easier when my own Plan A’s don’t work… So keep on keeping on and THANK YOU!!!
This is beautiful!!!!!
Wow! I have to admit that I’ve always been worried your plan to do it with markers would look a little too DIY-ish (like someone literally just scribbled on the wall), but it looks like it’s coming out great! I’m sure your artistic hand has something to do with it. If I tried to do it, it’d probably look like a scratch pad. 🙂
Can’t wait to see how the butterflies and birds turn out.
Are you planning to put a clear coat over it? I remember reading somewhere that someone did a sharpie project like that in a bathroom and the moisture made the ink run. If you’ve ever looked closely at permanent marker on a shiny surface, it more or less sits on top like paint. Even in a dry living room, I think I’d want the added surety of a clear coat.
This will be a stunner! Even without the birds and butterflies, it grabs your attention.
This is just fabulous – LOVE IT!!!
Me too!!!
Oooooo! Can’t wait to see what colors you use for birds and butterflies!
Happy dance!!!
Love this…and love the upper comment ….you are “fluid”. I too make mistakes and keep reworking til I get what I love. Lots of twists and turns. You use way more color than I do but l love seeing what you do each day. Can’t wait to see your finished room. It will be lovely.
Swoon! This looks amazing. Its even better then what I imagined from your earlier plans!
So unique and beautiful! Can’t wait to see the finished project. What a VERY cool idea.
I am so happy for you! I see you in this and that is exactly what it should be!
Love it! So glad you found a way to incorporate your custom birds & butterflies “wallpaper”. It really works there 🙂
I love this Kristi and echo all of the above sentiments! I am inspired by your ability to change direction and not beat yourself up about something that didn’t work out quite the way you might have hoped! Instead you fearlessly charge ahead! I would love to see another printable with the butterflies included if you are able and have the time sometime – or else just the butterfly that
we could superimpose on it.
Thanks so much Kristi – you inspire me every day and everything that you finally decide upon just seems so right for the space.
Ditto on what was said earlier about just not doing it but doing it until you are content and loving the final result. You give others great courage! Thanks Kristi for truly being yourself and sharing so broadly.
In order to protect it I would tape it off and spray it with a can of artist quality “fixative”. Then I would brush on polymer matte medium (professional modge podge). If you use the matte medium without the fixative I wouldn’t be surprised if even permanent markers would bleed. The polymer will go on opaque but will dry clear.
You are hugely gifted and talented and a big inspiration!!!!
Just beautiful. You’re so very generous for sharing and allowing use of the image.
I think it looks beautiful!! I used sharpies and folk art craft paint for a mural in my son’s bedroom when he was born. We repainted about eight years later. At that time, I had some crackling in the paint on just the wall that shared the exterior of the house, and no fading or problems at all with the sharpie lines!
Wish I had your talent. I always loved what you did on the kitchen wall in the condo, so I’m
happy to see this in your new house. Just lovely !
Very pretty. I can’t wait to see the birds added.
We use Marks-a-Lot at work and they are impossible to find. We buy online. But, right now The 99 cent store in Waco has them in a 3 pack for 99 cents.
I buy Marks-A-Lot online at Quill.com. Hope this helps some of you. Fab job, Kristi!!!
Please don’t take offense when I say that I’ve always had misgivings about this project when it’s come up before. But, to the surprise of no one, your creative vision far surpassed my imagination. This looks fabulous! I can’t wait to see the finished product.
Love it! Yesterday, I suggested maybe painting the overmantel, behind Mom’s picture, the green of the room, but your blended green for the mural is really nice, so now, I would suggest that.
Ditto all of the preceding comments. I most admire you for your perseverance. I LOVE that wall. You have inspired me, again, because I saw a desk on Etsy that had this type of design on top. I wanted it so much but really couldn’t rationalize the cost. It was worth every penny but . . . Also, none of my artistic friends could figure out how to replicate it. Now I know and will try this on one of my thrift-store desks! Big thanks.
I knew you would implement your custom Schumacher inspired wallpaper somewhere, and here it is. I thought too, it would be in your breakfast room, but it’s looking so amazing in your entryway and what a way to make a statement when someone enters your home. You’re totally brilliant with what you create as always Kristi. I cannot wait to see the entryway and dining room completed and styled. You have us on tender hooks in anticipation of your blog reveal each day!!!!
The mural looks very cool!
Just a thought, if you’re not into butterflies, how about dragonflies?
I have a PB duvet in my guest room called “Fauna” with birds, butterflies and dragonflies. I like that the dragonflies look a little “buggier”.
OH MY GORGEOUS! Don’t know if you received the photos of the bird mural in our state’s Governor’s Mansion dining room that I took when I attended a tea, but yours is even better! Absolutely stunning!
The best use of your design EVER!!!
This is truly stunning. I hope your birds and butterflies will be sort of mutted. Why aren’t you doing it on the side walls? It is such a statement for the entrance of your home, I think it would be beautiful. You keep talking about the humidity and the paint not drying. Aren’t you using your central air? I thought that was the whole purpose of having it? You mentioned that you were going to put something over your mural. Unless it is some sort of artistic finish, please don’t do it. Don’t hang something on that wall. It is too beautiful to be covered.
LOVE! That is seriously all I can say. It’s Perfect!
I LOVE this! I am so happy you are now showing the results of your decisions and not getting so much influence from others. You need to follow your heart here! And look what results from that!! So beautiful and unique!
Simply beautiful!
Hey, your dining room drapes got a positive mention on http://laurelberninteriors.com/ even though they are only photoshopped into the photo. Not sure Laurel realized that but it is nice to see your idea in the “what to do” category.
This link might get you closer. It’s kind of buried in her blog: http://laurelberninteriors.com/2016/03/30/window-treatments-difficult-windows/
Thank you for the link Linda! I did realize that they were photo-shopped. Great job with that too! I use pic monkey for stuff like that. And thank you Kristi for the use of your image to help demonstrate my point. BTW, LOVE what you’re doing here. LOVE! This is GENIUS+++
Holy Crap! You are so creative! This is gonna be gorgeous! I’m Lovin it!!!
THAT is going to be awesome! I can’t believe how fast you got it done. Wait, yes I can, because it’s you doing it! You are incredible!
Do I see the paint pan sitting on top of the coral dresser? Does this mean maybe the top is going to get redone? Or is this a different dresser? Or maybe you are just not a messy painter, and can afford to not cover the entire room to avoid paint mishaps?
Can’t wait to check your posts every day, to see what’s new!
Absolutely love! Its going to be beautiful!
I will have to remember this post! You did a really good job!
Oh, I can’t believe how you’ve turned this project around! It’s looking absolutely “you”! Love this turn of events, and kudos to you for figuring it out!
Perfect, perfect, perfect! =D This room is going to be beautiful. It’s true, you’re so flexible and hard working, it’s amazingly inspirational.
Lovely!