How To Stain And Seal Butcher Block Countertops
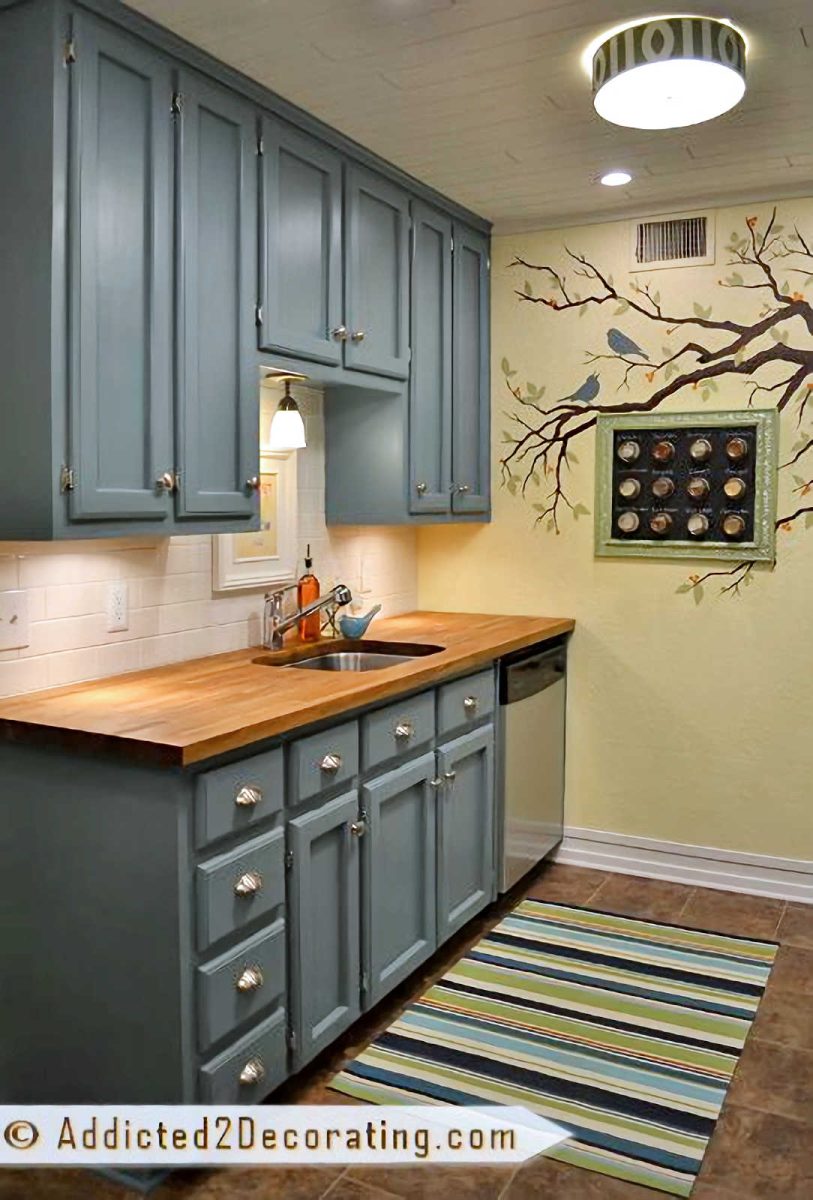
They say that the third time’s the charm, and I’m hoping that’s true with my Ikea NUMERAR butcher block countertops. Yep, this is my third time to stain and seal these things. Let’s take a look at how the turned out this time, and then I’ll share with you how to stain and seal butcher block countertops to achieve this look.
*This post contains affiliate links.

Interestingly, even with the headache of having to sand them down, stain them, and reseal them, I’d still choose butcher block again. I just love the way they look, the way they warm up the space, and the fact that they CAN be sanded and re-stained. In one weekend, I can change the color of my countertops…and the look of my kitchen…and spend relatively little money. What other countertop material can you do that with?
The last two times I did my countertops, I used Minwax stain and sealed them with Waterlox. Both times, my countertops turned out yellowish orange, and seemed to get even more yellowish orange over time. Not pretty.
So this time, I decided to try completely different products. Here’s how I refinished my butcher block countertops…
I started by sanding the current finish off of the countertops with my orbital sander. I started with 80-grit sandpaper just to make the job a bit faster, and then ended with 150-grit sandpaper to leave a smooth finish.

DIY Tip:
When using an orbital sander inside, remove the dust bag attachment, and place the hose of your Shop Vac over the spout thingamajig that the dust bag attachment usually attaches to. Turn on the Shop Vac, then turn on the sander and sand away. The Shop Vac will catch most of the dust.
After everything was sanded down, and the dust was wiped away, I put a coat of Wood Conditioner on the butcher block according to the instructions on the can. I used Minwax, and found it at Home Depot.

This was my first time to use wood conditioner, and I really did notice a difference. The stain seemed to go on much more evenly, and the grain blended in more with the rest of the wood when the stain was applied, which was definitely a welcome sight.
Next it was time for the stain. I used Rust-Oleum stain in Early American. It took five coats to get the rich, dark color that I wanted. I just made sure that each coat was completely dry before adding another one.

When the stain was completely dry, I was ready to seal the wood.
This is the decision that I really struggled with the most…how to seal the butcher block countertops. The first time I finished the countertops, I was very concerned about using a product that is food safe. That’s why I went with Waterlox…it’s food safe after it fully cures.
But after two tries with Waterlox, and after living with my countertops for 2.5 years, I realized that food safety really isn’t a concern for me. I simply do not ever put food on my countertops. I use cutting boards, or plates, but I don’t ever place food directly on the surface of my countertops.
So this time around, food safety wasn’t an issue for me. I decided that I wanted durability first and foremost, and a close second was that I wanted something that would not turn yellow.
I narrowed down my options to Rust-Oleum spar varnish and Rust-Oleum polyurethane in a matte finish.

Both of these products are water-based. Water-based products definitely have their advantages, lack of noxious smell and quick drying times being two of the big ones. Another advantage…they don’t yellow over time. SOLD!
I was leaning towards spar varnish. I figured if it was tough enough to be used on things that sit outside in the weather, then it was tough enough for my kitchen countertops. But after a quick call to the Rust-Oleum customer service number, I realized that I was about to make the wrong decision. I honestly can’t remember all of the details, but the man explained to me why the spar varnish shouldn’t be used indoors. I wish I could remember, but suffice it to say that he made a very convincing argument.
I went with the Rust-Oleum polyurethane in the matte finish.
Water-based polyurethane is really quite different from oil-based polyurethane. It looks streakier when it’s applied, and also appears milky white. It always makes me a bit nervous in the beginning.

But somehow, it always dries without streaks, and completely clear. And let me tell you, that matte finish is simply gorgeous. I don’t think I can capture it completely with a picture, but in person, I just want to stare at it. It’s just beautiful.
The directions on the can said that sanding in between coats wasn’t necessary. However, I did notice that after the first two coats, it seemed a bit rough in places. So instead of taking a chance in messing up my newly stained and sealed countertops with sandpaper, I decided to use brown paper (like the brown shipping paper or a brown paper bag) to sand the surface.

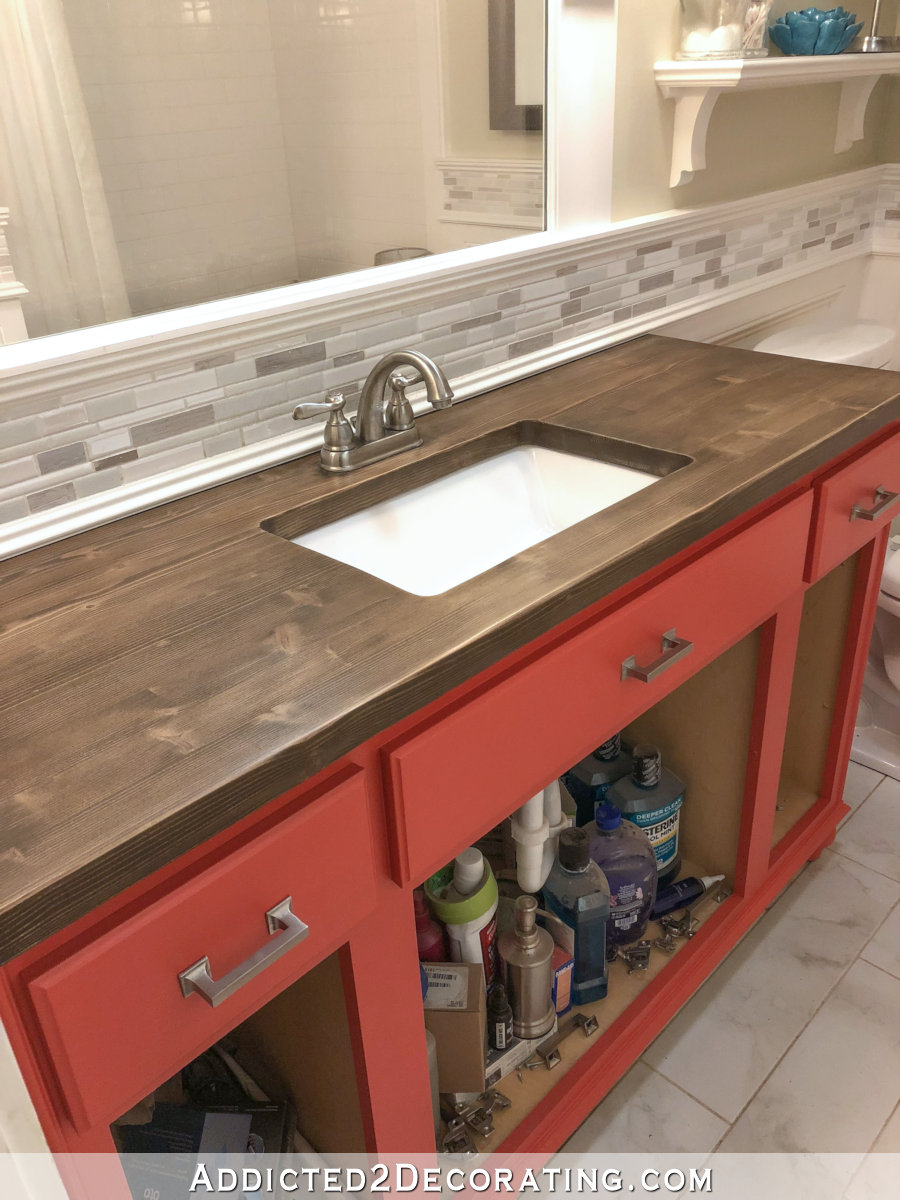
It worked amazingly well, and gave the countertop a very smooth finish. After “sanding”, I wiped away all of the dust, and then gave them two more coats of polyurethane. The finished countertops look just like I hoped they would look…dark, rich, not glossy at all, and not yellow.
And this time, I’m going to do my best to be sure they stay looking beautiful!
Now I know that making a decision on how to stain and seal butcher block countertops can be quite stressful. I remember before I purchased mine, I spent hours and hours doing research online, trying to figure out what products were the best, which ones were food safe, which stains could be used, etc. With all that research, plus refinishing my own butcher block countertops three times now, I’ve definitely learned a few things over the years. All that to say this…if you have any questions about it, please feel free to ask. If I know the answer, I’ll gladly share it!
UPDATE:
This finish was pretty, but I found it very high maintenance. Plus, I do NOT recommend using water-based polyurethane on butcher block countertops, especially if your butcher block is on your main countertops where your sink is located. When water sits on water-based polyurethane, even for just a minute or two, it turns back to that milky white color. It does turn clear again when it’s dry, but it’s just a very frustrating thing to deal with on kitchen countertops.
And quite honestly, after three attempts, I also don’t recommend staining butcher block countertops that will be used in a kitchen. I suggest purchasing countertops made out of a wood that has a natural color you like, and then use my fourth (absolute best and easiest) method for sealing the countertops.
Click here to see how I sealed my Ikea Numerar butcherblock countertops for the fourth and final time. I wish I had used this method from the very beginning!!
Want to see other posts about this kitchen?

Addicted 2 Decorating is where I share my DIY and decorating journey as I remodel and decorate the 1948 fixer upper that my husband, Matt, and I bought in 2013. Matt has M.S. and is unable to do physical work, so I do the majority of the work on the house by myself. You can learn more about me here.

Your countertop looks gorgeous Kristi! Thanks for the great tip about using brown paper for delicate sanding.
How exactly does the brown paper sand the counter?
The roughness of brown paper is about the equivalent of a very super fine sandpaper (think: 400 grit)
The countertop looks amazing! So weird … I just scheduled a post for tomorrow featuring you, your blog and your chrysanthemum mirror. I then checked my email and there was your post. Crazy timing. I love your blog – you are crazy talented. Thanks for all the inspiration!
Missi, you just made my day! Thanks so much for such a sweet compliment. 🙂 So glad you find inspiration on my blog! That’s always nice to hear.
Kristi! This post is awesome! I have to refinish my butcher block countertops this summer and I was so dreading having to “tent” everything from the dust. That trick of attaching the sander to the shop vac. GENIUS!!! I love the way yours turned out. I am pinning this post, and I think I might actually do the exact same thing. I use the Wood Conditioner every time I stain, and I love the way the stain takes to the wood. Your countertops look perfect. Thanks for all the tips and the steps! -K
Karen, I’d love to see yours when they’re done! And I can’t take all the credit (or any credit…LOL) for that Shop Vac trick. My smart hubby taught me that one. Before he showed me that, I always made the BIGGEST messes inside with my sander!! 😀
You can tell your husband there is a girl in Northern California who is SOOOO grateful for that tip about the sander! I have sanding mess everywhere. I have come up with all kinds of barriers to keep it to a minimum, but sanding inside my home is just the biggest headache. Two years ago I tried to refinish my butcher block countertops, and the dust covered every surface in the first floor of my home, for months! I am so excited about this tip, I might just do this next week! Thanks again. -K
They look BEAUTIFUL!! While I’m still convinced I wanted recycled glass counter tops eventually (should probably buy a house first!) I have to say your butcher block would be a strong contender for a backup plan!! 🙂
Ooohhhh, recycled glass countertops! One of my favorites as well. If you ever get those, you MUST send me a picture!! 🙂
Kristi!
Again….gorgeous countertops!
I too love wood conditioner….it really makes for an even fine furniture look. Between coats I use the black sandpaper and after dusting, I dust with a tack cloth. I’ll have to try the brown paper. We suggest that if a customer’s handle feels a bit rough to use the paper bag as sandpaper. Never thought beyond that.
Congrats on finishing project number 1!!!!! Those countertops look amazing. Way to go!
Thanks for sharing the process of how you stained & finished your countertops. The steps you followed and tips you gave can be applied to sanding, staining, and sealing pretty much anything wood. I never would have thought to use brown paper as sandpaper – I’m definitely going to try it out next time I have a stain & seal project 🙂
I’ve been told that polyurethane can get milky again when it gets wet (though it goes back to normal when it dries). Is this something you’ve experienced?
I have noticed that, Krista. Only the water-based does that, and I thought it was because the polyurethane hasn’t cured completely. According to the specifications on the can, it takes a full seven days to completely cure. Now I’m anxious to see if that’s the reason, or if it’s always going to be that way. If it’s always that way, I’m going to have to coat it with an oil-based poly, because the milky white spots will drive me crazy!
I got curious, so I actually called Rust-Oleum and asked about that. The man I spoke with said that after it’s fully cured, it won’t turn the milky color when it gets wet. He said that if you use multiple coats (like my five coats) it could take even longer than seven days to cure, but when it’s fully cured, there won’t be any color change when water is dripped on it. 🙂 Phew!
Thank you so much! I’ll def be referring to this when I stain my kitchen cart. What are your thoughts on using mineral oil? As in what the heck do i do with it? my dad always used it on our butcher blocks at home growing up.
This is soooooooo helpful!!
I’m about to start a complete kitchen remodel and wonder, since my counters are still in the box, how much of the work, if any, should I do before the countertops are installed? Should they be cut and installed before beginning the staining and sealing process?
You should have your cuts made before staining so that the final color will be uniform. If you stain first then cut, the fresh cuts will require stain causing a possible line where the new stain covers the previous stain. So dry fit first, then take it back off to stain/sand/stain if you like, though not necessary especially if you don’t have the room. Then do your final finish once it’s fastened down.
This is awesome. I am looking online for ideas for counter tops on a budget and was looking at the Ikea tops. I really like tile but don’t have the time nor the patience to do it in the 3 weeks window I have open to work on this. After closing Home Depot’s website in horror and shock over the non-laminate counter prices, I thought “Ikea has counters…” then went on a search to find people who’ve made Ikea wood tops work. I was just looking for ideas to piece together in my feeble design brain, but you gave me the paint-by-numbers with background experience for what to avoid. Thanks, Kristi! I sure do appreciate when people keep web logs of their home projects and really do appreciate this one. I’m excellent with tools and following directions, but the original ideas take me too long to put together–I can do it, but MAN it takes me forever. Thanks for helping this stranger in a time-crunch out. 🙂
By the way, I’m not a food-on-the-counter person either (nor a bare produce on the grocery store conveyor belt person neither, but that’s another topic for another blog). I’m glad you pointed that out because so many websites are talking about “food safe finishes” and I was naturally thinking I had to do that. But duh, of course I don’t… I don’t prep bare food on the counter! Heh. Anyway, thanks!
So glad you found it helpful! One thing…I wouldn’t recommend the water-based polyurethane. I’m probably going to go back over mine with oil-based (i.e., REAL) poly in the near future. Even after almost six weeks, the water-based poly still turns milky white when water gets on it and sits there for a few minutes. It always clears up when it dries, but I still don’t like it. 🙂
Ah! Thanks! Duly noted. This is good to read because I tend to favor oil based finishes. I find they are more durable. 🙂
Yah I was scrolling through to see if this came up… especially around the sink…. water based sealers are re-activated by water! so it seemed like a problem waiting to happen, I’d love to hear how the rust-oleum oil based turns out.
thanks for documenting all this, I’m about to walk through it myself
Hi Kristi, I have a IKEA countertop that I really like, but read somewhere that you can’t use an under mound sink with it. However it looks like you do have an under mound sink. I am also concerned about durability, how is your countertop holding up?
We sold that condo several years ago, so I don’t know how it’s holding up. But you can definitely use an undermount sink with a wood countertop. In my hallway bathroom in this house, I have a DIY wood countertop with an undermount sink, and it has help up beautifully for years. As long as you keep it sealed, there’s no reason undermounts won’t work with wood countertops.
Wow I am so glad to have found your blog!! We are venturing our second home remodel and I am going to install these countertops from Ikea once again. This time I am desperate to stain and coat them – and will be following your example 🙂 Another question that I had was this – how did you cut the sink opening into the top. I am being told special kinds of saws are needed and have no clue where to find the solution!! Any help??
Hi Danielle~
Please don’t use these instructions. I have refinished my countertops once again since I wrote this post, and I just posted about it this morning: https://www.addicted2decorating.com/my-ikea-numerar-butcherblock-countertop-saga-continues.html
This was my FOURTH time to refinish my countertops, and I have finally found the perfect finish for them. I honestly wouldn’t recommend anything else. Do NOT use the water-based polyurethane that I wrote about in this post. It will frustrate the heck out of you. Even four months after I sealed my countertops, the finish was still turning milky white when it would get wet. It would dry clear each time, but I just couldn’t stand that it was turning white when water would sit on it for more than a minute.
I was just about to edit this post with an update when I got your comment in my inbox. Seriously…head over here for the only finish you’ll need for your countertops: https://www.addicted2decorating.com/my-ikea-numerar-butcherblock-countertop-saga-continues.html
Now regarding the sink hole, you’ll need a circular saw to cut the straight edges, and a jigsaw to cut the rounded corners. Be sure that each tool has a brand new blade so that you can get the smoothest cut. Then follow up with an electric sander. You’ll also nee to do quite a bit of sanding by hand, especially on the rounded corners.
Your kitchen is so amazing. I can’t even believe it’s the same kitchen! I’m just wondering if you have a post on how you installed the counters? I’m looking at installing the same counters and want to do it myself.
Kristi – I have found your blog to be so helpful but yet I am still so torn. We installed IKEA butcher block countertops and I’ve been living with cardboard over them for the past 2 weeks while I decide how to seal them. My biggest concern is stains. We drink alot of kool aid at our house and I don’t want an accidental purple ring to take over my counters. With that said, I bought to tung oil from IKEA to put on them. How have your countertops stood up to stains since using only oil and not a poly? We are not staining them, just keeping them natural. THANKS!!
Hi Kelly~
Yes, I’ve gotten a few stains on my countertops, but honestly, I’d never, ever, ever go back to any other finish other than just plain oiled countertops. While I have gotten a few stains, the ease with which those stains can be removed gives me such freedom to actually USE my countertops (whereas before, I was trying to baby them…and that’s not pleasant in a kitchen). When a stain appears, it takes just a few minutes to grab some sandpaper, sand out the stain, and put some oil on it. Then they look as good as new. It was seriously the best decision I could have made for my own kitchen!
Good job – the key is conditioning the wood first. The stain you use isn’t really the issue at all – minwax, rustoleum..it doesn’t really matter. I think it’s the conditioning that made the difference for you this time. I’m sealing my wood counters with Minwax wipe-on poly. It has out-performed waterlox in every test I’ve been able to read about.
Kate,
I’m also considering using Minwax Wipe on Poly for our butcher block counter tops (highly recommend by various sources). I’m curious as to how your counter tops are holding up now? If you’re happy with how they turned out, would you mind sharing how you prepped your counter tops before applying Minwax (sanding, conditioning, etc.) and if you have any tips for the application process and/or maintenance afterwards? Although I don’t plan to cut on the surface, I can’t seem to find any information on the food safety of Minwax…
Any input would be greatly appreciated!
Thanks,
Sara
Thank you so much for the info on Waterlox. I was planning on buying some tomorrow, but definitely going to reconsider now. I just finished staining the top and long sides of my kitchen island butcher block. When I started to stain the 2 shorter ends, the stain grabbed so quickly I couldn’t wipe it off, and it looks about 4 shades darker than the top and long sides. I used conditioner and sanded. Did this happen to you? how did you get the stain on the super porous ends to match the top?
Thanks!
Kate
After doing some thorough research, I found Kristi’s experience to be in the minority. Her fourth and final attempt sounded like my first and only attempt minus the use of Rust-Oleum products. I believe the preparation process including proper sanding (removal of the factory finish requires 200 or 220 grit sandpaper), removal of dust grains and WOOD conditioner (VERY IMPORTANT) to be key in staining and sealing the countertops. I used minwax to stain my Ikea butcherblocks and waterlox to seal them with no apparent issues. It’s worth doing things right the first time around.
Below are just a few people who used Waterlox and Minwax with great success.
http://kleypas.blogspot.com/2009/06/countertops.html
http://homebodychic.com/2012/07/11/butcher-block-countertops/
http://www.ikeafans.com/forums/modifications/10382-how-i-stained-my-butcherblock-countertop.html#post73087
Kristi, why did you have to keep refinishing your countertops? Whenever I tell a tradesperson that I want to install a butcher block they give me the wide-eyed “are you crazy” look! Are they that hard to maintain? I read your post about mineral oil…did you have to do anything to the wood before applying the first coat?
What would you suggest to do before installing the countertops wrt finishing them (sealing, etc.)?
Love your blog! Thanks so much for taking the time to post your ideas and please keep it up!
For those of you considering these counter tops, be very careful in how you finish them and take your time with the sanding. I have found the Numerar oak tops to be loaded with oil from the factory, so much so that the conventional path of hand sanding with low to high grit sandpaper (ending at 220) will NOT remove all of these oils. This will wreak havoc with your stain and sealing process. I used oil-based products as I was aiming to use the top for a work desk and I had one small section of my 1st coat of polyurethane lift off of the surface after the 2nd coat had dried. This was a good 72 hours after my stain application and it felt dry, but some stain was still rubbing off onto a cloth.
The underside of the top that got less attention was an even larger headache. I used a very light coat of stain on that surface and let it dry for 7 days. It took the first coat of poly over 24 hours to dry completely and looked horrible, with some sections practically drinking the poly up and others having a “shiny” post poly finish. This was a “fast-drying” poly too. For comparison, the top side with the same product and same climate conditions dried to the touch in about 7 hours and looked much better in 24 hours.
Bottom line: sand the hell out of these before you finish.
Thank you so much for this information. I just purchased the same countertops and cabinets from IKEA and I was not happy with repeated “refinishing” using the accepted and IKEA approved butcher block oil. They were too light and everything left marks. We had sanded them twice in the last 4 months. Finding your blog post was awesome. One thing though. I went to Home Depot looking for these items and explained you showed them. They didn’t want to help me, said they didn’t carry them and pretty much dismissed me. I ended up at Menards and though I couldn’t find the Rust Oleum brand, found minwax brands of everything you mentioned in the same colors. I LOVE THE RESULTS. They are awesome. I learned a little about staining tricks that I can use next time.
Kristi,
Thanks for you post. Your kitchen looks great. We recently purchased unfinished butcherblock counters from Lumber Liquidators and have been going through the sand, staining and sealing process. We are about to choose a sealer and we are leaning towards the Rustoleum Polyurethane, but I wanted to get another update from you to see how your counters have held up this time.
Leslie,
How did your Lumber Liquidators butcher block counter come out? I am starting the sanding, staining and sealing process on mine tomorrow. Maple Williamsburg. I would appreciate if you would comment on your process and if you are pleased with it.
Hi.
This post may have just saved my installation deadline for a lake house client. I originally ordered a Black walnut butcher block for his kitchen three weeks ago,only to be told today that it is on back order til July. Installation was suppose to take place next week. The vendor has a maple butcher block that he says I could stain to get the same results. The design was built on the brown/gray tones of the Black walnut. I was freaking out about the stain and finish issue due to food safety, but you brought up a good point. I always use a cutting board or food slips for my counters.
Did you only apply mineral oil to the newly sanded, wood conditioner applied, butcher block after sanding to achieve the last most recent finish?
-v
Hello, I just had a few questions. I just recently bought butcher block countertops and I am having a hard time finding the information I am looking for online. I am having a hard time picking what to finish my countertops with. I know that I will not be using my countertops for cutting or putting food directly on. I am think of getting a semi-gloss clear poly and I will not be staining the countertops at all. I know you touched a little about the difference between the oil-based and water-based poly but I was wanting to know if there are any other long term differences besides the application process which you have talked about. Also, my countertops are about half way through the installation process and have not been sealed at all. With the countertops being installed already, how do we seal the bottom side? Does the bottom side even need to be sealed?
Just curious if you have every tried to re-seal a small part of butcher block? I recently installed a butcher block island and every time i seal it I end up with some crazy imperfection…so I have one side that has some horrible streaks but the rest finally looks great! Do you think I can gently sand the bad area, re-seal and that it will blend with what is already finished? Thanks!
I honestly have no idea. I finally gave up on trying to stain and seal mine, and sanded the whole thing down and just used mineral oil on it. Best decision ever. It has to be re-oiled about once a month, but it’s very quick and easy, and just using mineral oil only makes it so much easier to sand out scratches and other imperfections regularly.
I didn’t use the conditioning can I still use it before my second coat?
I’ve never tried that, so I honestly have no idea. You might call the stain or conditioner company on their customer service line and ask them.
I used minwax wipe on poly on my numear countertop. (It has an undermount sink) I wouldn’t recommend. It lasted about 2 years before it needed refinishing. Then I let it go a year more and it looks awful. Get home depot varathane with nano defence (it’s a floor finish) it’s rock hard after 4 coats, scratch resistant (just DO NOT put food on it, bc you never know)
I’m way to busy to oil this stupid thing every month and need to worry about what or whom is on the countertop
One thing I noticed is that after you sand the wood lightens a lot over factory finish (probably no oil) so a stain would look nice. I didn’t bc I liked the color.
Good post. The suggestion about the shop vac & sander is excellent…. the brown paper also. I refinish a lot of wood products which get rough treatment, such as rifle & shotgun stocks…and refinish and build various cabinetry. Min Wax is an excellent product which I like & use a lot, but it doesn’t sink into wood: it just sits on the surface, like paint, then chips off with use. I use 50% Minwax & 50% Tung oil mixed, to get the penetration and finish I like… Mineral oil is another excellent, cost-effective finish which I like to use on cutting boards, wooden kitchen utensils, and anything wood, painted or not….
I have had wood countertops on my kitchen island and two bathrooms for years now. I love them! They wear beautifully and are completely repairable, if necessary. I installed them all myself. The bathrooms are beech butcher block from Menards and the island is strips of oak flooring nailed to an MDF substrate. I stained (Minwax) and polyurethaned (Minwax water base) two of the surfaces. The third one I stained but just used mineral oil, no poly. I think I recommend the mineral oil b/c it is easier to repair the surface in the future – less sanding required. It is more matte with just mineral oil but holds up just as well.
what about the edge of the butcher block directly around an under mounted kitchen sink? any ideas for giving direct exposure to water? Spar varnish? And also if you do use mineral oil to seal the stain, can polyurathan be used over it at a later time?
I used mineral oil on the whole thing, even the edges exposed to water around the sink. I seriously doubt that you can polyurethane over oiled wood, but I’m not sure.
hi Kristi! Can you elaborate on why you do not recommend the water based polyurethane? I love the color of natural wood and heard that water polyurethane maintains that color. I would hate to spend a lot of money on something that doesn’t last. Thanks!
My experience with water-based polyurethane (Rust-Oleum brand) was that when water dropped on it, it clouded over. It would always clear up, but just couldn’t imagine having that in a kitchen. Now the one exception might be a General Finishes brand clear coat. It’s a brand that I started using just recently, so several years after we sold this condo with the butcherblock in the kitchen. But my experience with General Finishes has been excellent. It’s really amazing and durable, so if I were going to use a water-based poly, I’d see if they have something specifically for counteretops and start there.
I would recommend a minimum of “3” coats of poly when using on butcher block kitchen countertops, especially when near sink. I did 4 coats myself.