My Finished Music Room Ceiling (Painted Wood Plank Ceiling)
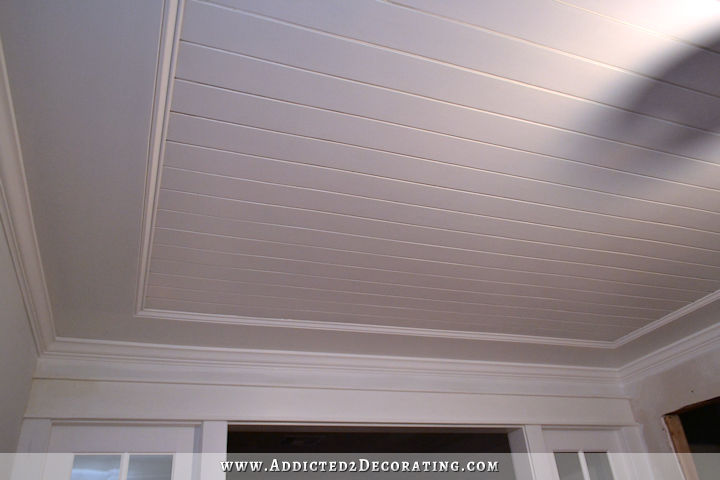
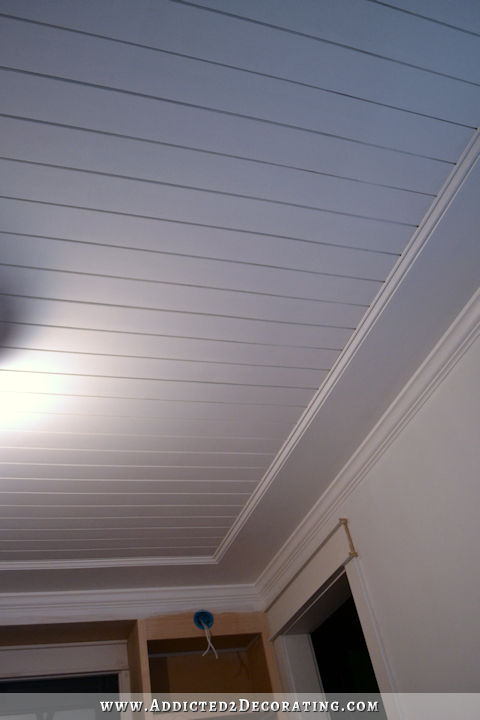
I’ve finally finished the ceiling in the music room! This ceiling took way longer than I had expected it to, but I’m very pleased with how it turned out.
Since this project took me so long, let me recap how to install a wood plank ceiling like this.
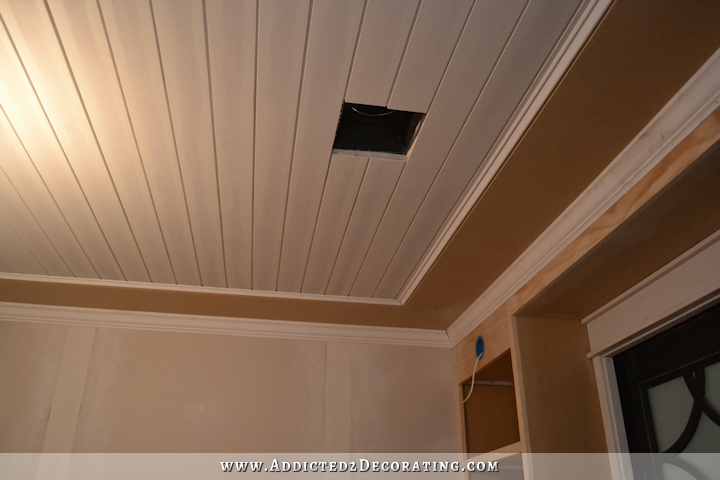
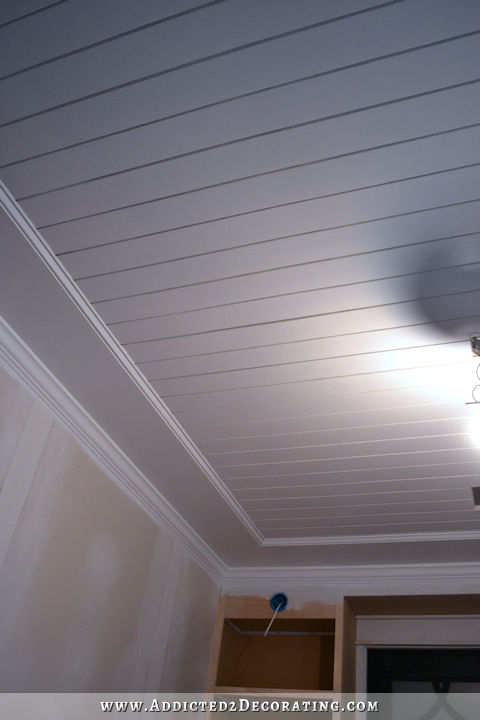
I started with 4′ x 8′ sheets of 1/4-inch plywood, and cut them into strips that were just under 4 inches wide and 8 feet long. Then I attached those to my ceiling using Loctite construction adhesive and 18-gauge finishing nails. To see how I installed these by myself, click here.
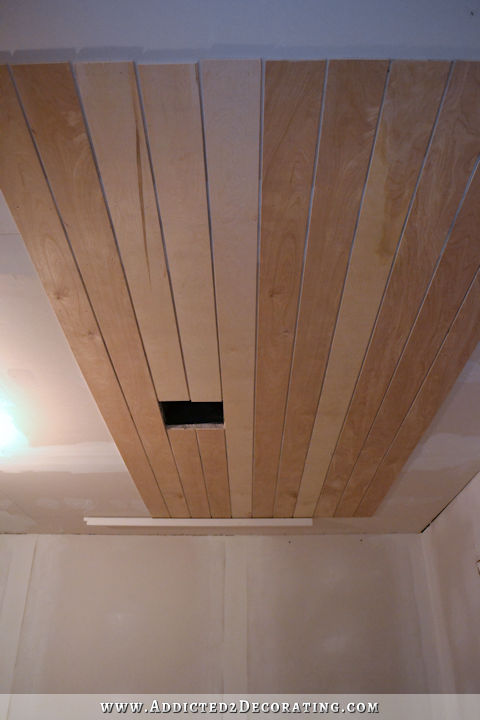
Because the plywood strips were only 8 feet long, and my room is just over 10 feet wide, I left a 13.5-inch perimeter around the wood planks.
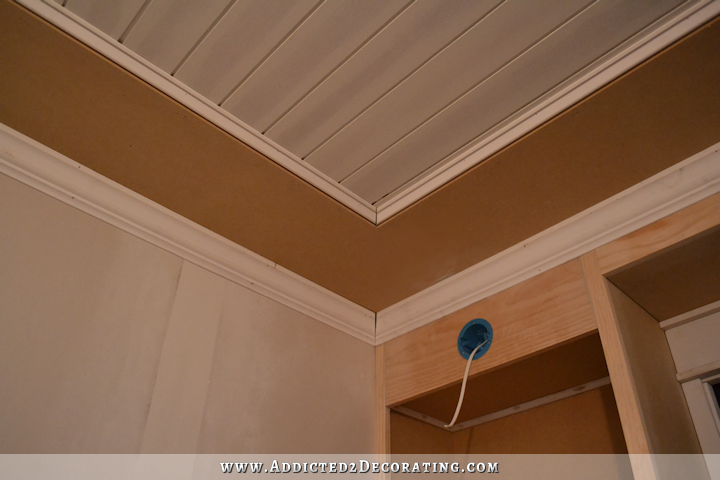
Next, I attached some strips of 1/2-inch MDF around the perimeter of the room and around the plywood strips.
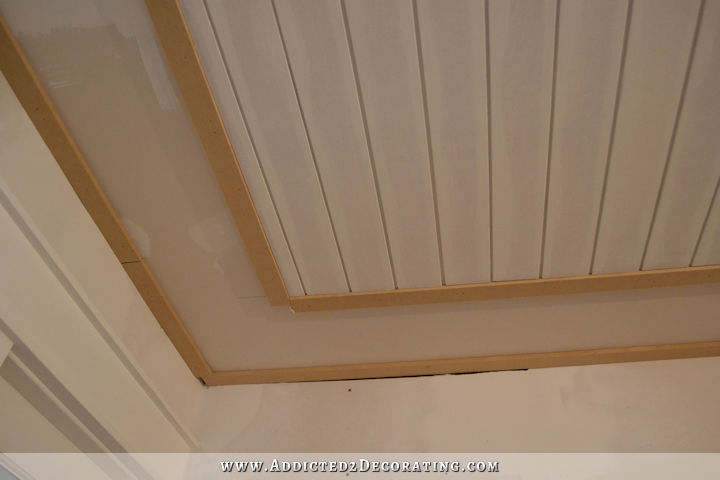
And then I attached 12-inch-wide pieces of 1/2-inch MDF to those strips using 16-gauge finishing nails.
For more detail on that step, click here.
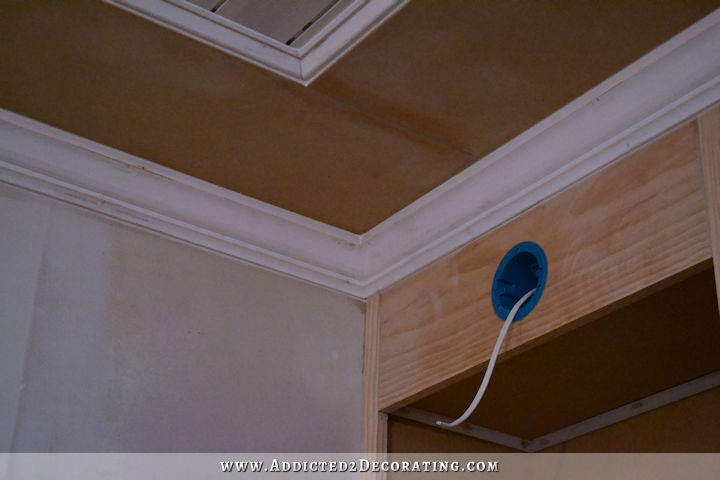
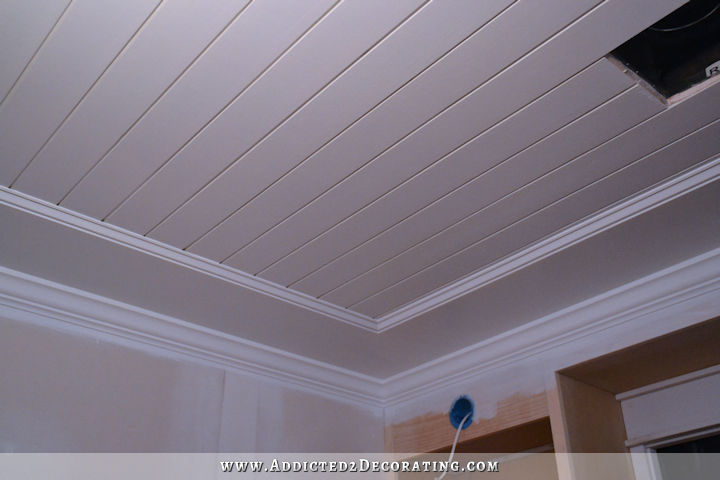
And after wood filling all of the nail holes and joints in the MDF border, and then sanding those smooth with my sander, I added decorative trim (I used base cap moulding) just inside the MDF border on top of the plywood strips. And then I installed crown moulding around the room.
And finally, before I could prime and paint, I had to caulk. I caulked above and below the crown moulding, and also caulked the small gap between the MDF boards and the base cap moulding. But before caulking between the MDF and the base cap moulding, I sanded the sharp corner off of the edge of the MDF piece by hand using 150-grit sandpaper. This just cleaned up the edge a bit, and gave that corner a softer, more finished look.
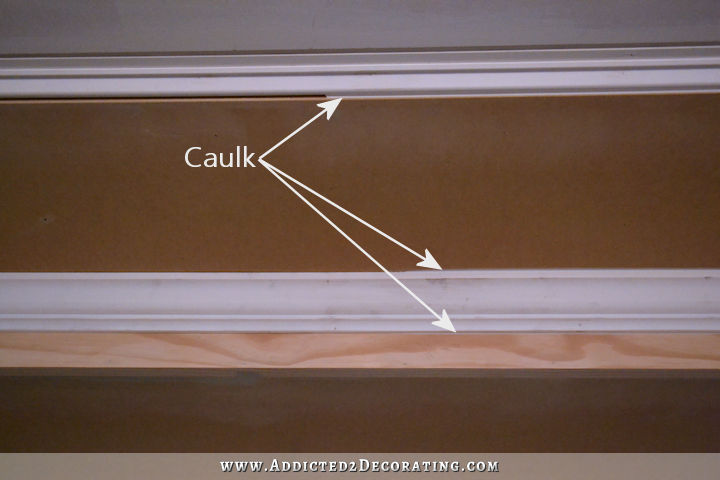
And of course, I caulked the corners where my crown moulding had small gaps. Before caulking, those corners looked like this…
And after caulking, they looked like this…
See why I love caulk so much? 🙂 The caulk I use for trim is Dap Alex Fast Dry latex caulk.
After the caulk dried, it was just a matter of priming everything, and then painting. Against my better judgment, I used water-based primer on this because it was all I had on hand, and it was late and I didn’t want to make a trip to Home Depot. I would normally use oil-based Zinsser Cover Stain to prime wood trim and MDF. I generally only use water-based primer on unprimed drywall, and use oil-based primer on just about everything else. The paint color that I used is my favorite trim color — Polar Bear by Behr.
I painted the trim and edges with a brush, and then used one of those small 6-inch rollers with a 3/8-inch nap roller cover (labeled for smooth surfaces) to paint all of the flat parts.
I finished at midnight last night, so when I see it in the daylight this morning, I’ll probably find that it all needs a second coat of paint.
But thankfully, second coats always go much faster than the first.
Now that my ceiling is done (or as soon as I do my second coat of paint), I can FINALLY get some paint on my walls! I’m still undecided on whether or not I’ll stencil my walls. For now, I’ll just paint and live with that for a few days to see how I like it. But I’m really liking the idea of making a custom stencil to match the design on my doors. It might try it out in one area just to see how it looks.

Addicted 2 Decorating is where I share my DIY and decorating journey as I remodel and decorate the 1948 fixer upper that my husband, Matt, and I bought in 2013. Matt has M.S. and is unable to do physical work, so I do the majority of the work on the house by myself. You can learn more about me here.

Wow Wow WOW! That looks awesome!
Absolutely spectacular – holy cow – love it
I loved how it turned out. It looks gorgeous. I think a stencil will look good too to give a subtle pattern to the wall.
Gorgeous! But, is your back killing you? So excited for you! I agree with you about living with the walls plain for a bit. (Although doing a stencil on a small portion will give you a contrast to view.) I feel that a stencil may be too busy in this small room. BUT, you have proved me wrong so many times! Lol. And a coat of paint is an easy fix. Love seeing so much progress in this lovely little room. Soon you will have 3 completed rooms!
Sheila F.
Your ceiling looks amazing Kristi!!! I love it.
Looks fabulous Kristi! Great job!
Love it! Well done ma’am.
Dear Kristi,
The ceiling looks wonderful. Love it.
I like your stencil ideas for the walls but first time I have heard you mention it. I am thinking of doing that on my foyer walls or dining room walls…..not sure yet so excited to see your plan with the door pattern.
Love your posits and love all the work in progress detail.
I have recently discovered you while doing my own renovations. I am convinced you are a genius and a true inspiration. Thank you for sharing your beautiful home and your process for starting and completing projects
you don’t know how much I look forward to your posts.
Not to be negative or anything, but I’d bet that you’re going to wish you had used oil primer. My husband likes the ease of the water base and used it on the kitchen cabinets he made. Bleed through started about a year later and now we have yellow-ish grain patterns on only 2 panels and our island. Also, I love your ceiling. I’ve wanted to do the same to our long ceiling that runs from the kitchen to the den but my husband thinks it’s too country. (*rolling eyes*) I hate our swirl textured ceiling.
Your updates make my day! The ceiling is just beautiful, and on a budget no less.
Thank you for all your hard work and inspiration.
Absolutely love!👏
What a beautiful ceiling! My neck hurts thinking of how long you had to have your head tipped upward while working on it.
Yeah – I bet you have a trip to the chiropractor scheduled for today!
The visual interest created by the slats, “mini-tray”, and molding is wonderful! Is your focus on the music room for now? I’m dying to see the 2 rooms together, with the overmantle, etc.
Regarding the stencil, I was one of the readers that was firmly in the stencil camp, but now I’m rethinking it. I’d say just paint in black and move forward for now. Once you decorate both rooms, you may decide you don’t need a stencil.
Regarding yesterday’s post (and one previously about how you plan to pay off your house in 5 years), I’ve commented before that I admire your financial diligence and I appreciated your commentary regarding how blogging is your business. I’m sure you’re probably not comfortable sharing too much, but I’d be curious to know how much of your total spend so far has come out of your “blogging” budget and how much has been out of pocket. Or, another question, do you know your revenue per post? It’d be interesting to know on a room-by-room basis how much blogging revenue you generate vs. what you spent. For example, you spent X on your kitchen, but wrote Y posts that generated Z revenue. So, your net spend on your kitchen was X-Z, which might actually be income! I’m a CPA. 🙂 These types of questions pop into my mind! And, I think they’re relevant for some of your other readers who worry about money. Not everyone who is renovating a home is generating income from it. So, when they see you redoing your work, they just see it as money spent twice. Hence, that’s probably where some of their negativity comes in. I’m not a super-creative person, so I don’t necessarily “get it” when you (and others) write about the positive energy that comes from the creative process. BUT, as a CPA, I do view you as a business. So, I fully appreciate that your redos might not actually be costing you anything at all, when you take into account the income generated by each post. Like the pony walls. You said you spent about $300 building them. You probably generated more that $300 from the posts. So, you probably didn’t lose money. 🙂 Not to mention the creative energy and the experiential value. Anyway, those are just some money thoughts from a business-minded reader.
Love your process! Keep it up!
Beautiful work as always!
i too love your blog and work
very interested too in these questions – the business side is fascinating. thanks for sharing what you did.
either way – keep it up we love all you do!
claire x
I am at least trying to get all of the basics done in this room (the ceiling, walls, doors, bookcases, and floor), but I’ll turn my attention to the dining room and entryway once I get that stuff done, and wait on the decorating and furnishing until all of the building-type projects are finished in both rooms.
Regarding the business of blogging, it’s almost impossible to determine my revenue for each individual post, because there are so many variables. For example, earlier this year I wrote a post about how to create a faux grasscloth look with paint. That was a sponsored post, so I got paid just under $1000 just for writing the post. Then it generated income on the day that I posted it because of the visitors that came to read my new blog post (the ads on my blog generate revenue each time they’re displayed when someone opens a page on my blog). But also, I really focused on the search engine optimization for that blog post as I was writing it, and so when you search “DIY faux grasscloth” or “how to paint faux grasscloth,” my blog post is the first one listed on those Google searches, which means I’m continually getting residual traffic on that post when people search for that info. And traffic = revenue.
There’s another project that I did a couple of years ago that probably doesn’t rank very high for any popular key work searches in Google, so while I got lots of traffic on that post the day that I originally posted it, I would doubt that I’m getting much (if any) residual traffic on that post. However, I sold the rights for that project to Home Depot for a large chunk of money, and they used it in their Do It Herself workshop.
Then there are posts that were NOT sponsored, but rank high in related Google searches, so I got the original traffic when I originally posted it, and I continue to get residual traffic through Google searches. And some of those are surprising. For example, last year I wrote a post about why I don’t like and don’t use Chalk Paint. I didn’t really try hard on the search engine optimization for that post, and yet it ranks #1 in Google searches for key words like “chalk paint hate” and “i hate chalk paint” and “i don’t like chalk paint,” and several others along that vein. Well, there must be loads of people out there who have tried Chalk Paint, hated it, and got online to see if there were other like them, because that post bring in constant traffic, and I continue to get comments on that post even a year-and-a-half later! Ha! That has been really surprising.
And finally, I have lots of posts that aren’t really about anything that anyone would search for, so they’re not search engine optimized. I got the traffic when I originally posted it, but other than a random visit here and there, those posts are pretty much dead and don’t bring in residual traffic (and therefore no more income).
And that’s probably way more information than you wanted. 🙂
As far as the money I spend, I really do try to stick to just the $1200/month, and some months I don’t spend it all so it accumulates the next month when I get my new “allowance.” But there are times when I need to take money out of our account to finish things up. For example, the kitchen cost just under $10,000, and it took me seven months. So that’s only $8400 that I got in allowance during that time, and the rest had to come out of our bank account, spread out over the course of the seven month remodel (generally at the end of each month when I’d run out of my money). The bathroom cost just under $5000, but I took a long time on that and paid for everything out of my money with the exception of the cost of the plumber. (I don’t pay for the plumber out of my money…ever. That’s just kind of a standing rule. 🙂 ) And of course, big purchases like the HVAC system come out of our account and not out of my monthly blog allowance.
Anyway, the bottom line for someone like me who doesn’t do a lot of sponsored posts (and I don’t do them because I hate them as much as any other blog reader, so I really, really, REALLY have to like a product to do a sponsored post) is traffic, and that requires writing posts that are search engine optimized that will bring in residual traffic long after the original post date. I don’t focus on individual posts very much (i.e., how much traffic/revenue each post brings in), but instead I focus on the cumulative and just focus on my daily pageviews, because pageviews are how I get paid.
Hope that info answers your questions! I know that blogging as a business is a mystery to most people. Heck, there are still so many thing about it that are still a mystery to me! 😀
Love all the info! Thank you! Since I’ve taken “the straight and narrow path”, I’m always interested in how others have used current technology to redefine making a living. 🙂
You left spaces between boards and you didn’t run calk between the boards… because that would ruin the effect seeing the individual planks. Did you have trouble with the paint filling in the space between the boards? Did the sanded edges of the boards get painted well with the 6″ roller?
I was wondering the very same thing. Looks very, very nice.
Also wondering.
Beautiful!!! I might use your idea for the ceiling on my hallway and landing 🙂
What a beautiful ceiling! You did a fabulous job. I envy your talent.
It looks lovely! Looking at your pictures makes me wonder how many times you had to move the ladder to caulk, prime and paint! It leaves me with one curious question, any particular reason for not priming and painting with a sprayer?
It looks amazing! I love the planks and the tray ceiling effect. You are making good progress. Good luck on the walls.
Your talent has amazed me again! I can imagine that your arms, neck and back must be dying. You’re doing such a beautiful job and I always enjoy your updates.
Beautiful detail work! I really love how this room is coming together!
Love your work, Kristi! I’ve had a thought that I wanted to share. Have you thought about adding the stencil to that section on the ceiling around the wood? Might just add the umph that you are looking for. Also consider putting color there instead – maybe the coral that’s on your buffet in the hall. Just a thought!
I love it! It looks really nice. I would never have been able to do all this!
Your original post on this ceiling gave me the push I needed to use it on my utility room ceiling. It also gave me an excuse to FINALLY get a cordless electric nailer! I seriously don’t know why I waited so long; I love that thing, and there’s no way I could have done this ceiling without it!
Thanks for your inspiration and tutorial!
Looks great in white, along with that wide border! I didn’t like the way the plain wood looked. You did a super job in caulking too!
I want to do this to my home, I HATE popcorn ceilings. I am thinking of looking for “free boards” from pallets I find in the garbage… do you think that would be a good idea? Or should I buy new?
Love this! Great idea I might need to try some day, after I get over my “paint ceilings light aqua blue” phase!
Oooo, I love the idea of a blue ceiling! Maybe That’s what I’ll do in my new laundry/utlility room.
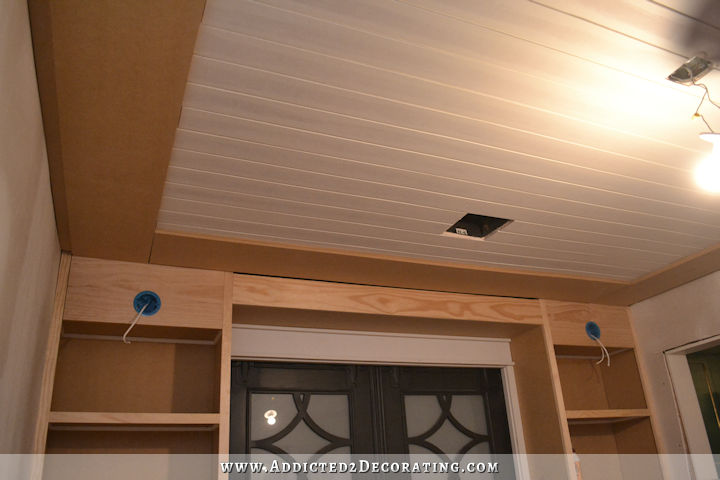
Very very nice! What is the square hole in the ceiling by the bookcases?
I would imagine that’s an outlet for AC and heat.
Looking gorgeous!
Absolutely gorgeous! I wish I could do this…sigh…can’t wait for the rest.
What if you stenciled canvases to match your divider and keep the walls a solid color? Say, a triptic of canvases. I look at your doors and think, that could SO be painted in stained glass colors. The sky is the limit, you could change the canvases by the season if desired. Pre-stretched canvases are pretty inexpensive these days.
I’m saving this because this is exactly what I want in our kitchen. Of course you make it look so easy. I will show my husband so he will think it is easy too. Thank you!
So AWESOME…….wow the ceiling looks simply stunning!!!!! Fantastic job Kristi. You must be so proud how it turned out.
That is amazeballs!!! Can you imagine how much it would cost you to hire that out? Geez, you must be in total pain after that ceiling work. You have me bowing at your feet girl! Incredible!
What did I miss?? I thought the music room was going to have birds painted on it…Redirect me to where you changed your mind please!
I like to keep y’all on your toes. 😀
https://www.addicted2decorating.com/my-big-idea-for-the-music-room.html
Quite the accomplishment!! You better be proud of yourself, it’s beautiful.
Why did you use plywood versus 1/8 inch paneling? I think you used that before in a bathroom.
Since this was going to be painted, I definitely would have preferred to use the hardboard (also called eucaboard, I believe), but the Home Depot I went to didn’t carry it, so I settled for the plywood. The hardboard cuts so much smoother and never has splinters along the edges like plywood does.
Kristi,
I noticed you did not have popcorn ceiling u dear your music room ceiling. Do you feel like that 1/4 inch underpayment would be to flemsy for popcorn ceilings? Should I scrape it first or can I just go with something thicker? Not wanting to spend the time really 😊
I’ve seen people cover over popcorn ceilings with 1/4″ plywood, but I don’t have any experience with it myself. If they were mine, I’d probably at least do a dry scraping and get all of the big stuff off before covering over it.
Do you see the grain in the plywood after painting?
I’m just finding this post in 2022 but it’s exactly what I’m looking for! I’ve searched and searched for planking material (now they have the specific plank kits for ceilings) but they are so costly. I’m hoping I can do this in some small 10×12 bedrooms!