My DIY Built-In Bookshelves Wall Is Finished!! (Before & After)
Well, it took me until half past midnight last night, but I finished my built-in bookshelves wall in my living room!! But only that wall, so promise that you won’t look at the two side walls, okay? 🙂

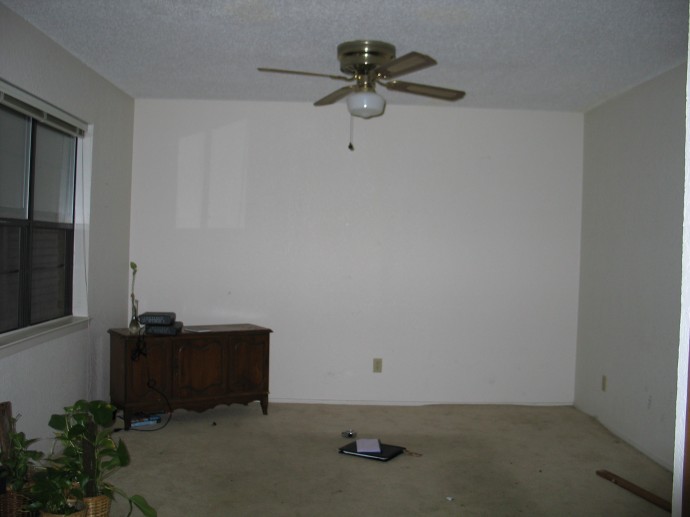
And if you’ll remember, here’s how that wall started out when we moved in…
I’ll wait a few days before putting anything on the built-in bookshelves, just to give the paint time to cure. But in the meantime, I love looking at my freshly painted DIY bookcases. 🙂
I’m really excited about how they turned out. There are definitely a few things I’d do differently next time, so it’s good that I did this first in the condo, so that I can get it exactly right when I tackle a project like this in the house.
My Built-In Bookshelves Process
Now if you missed any of the process, here’s a basic rundown.
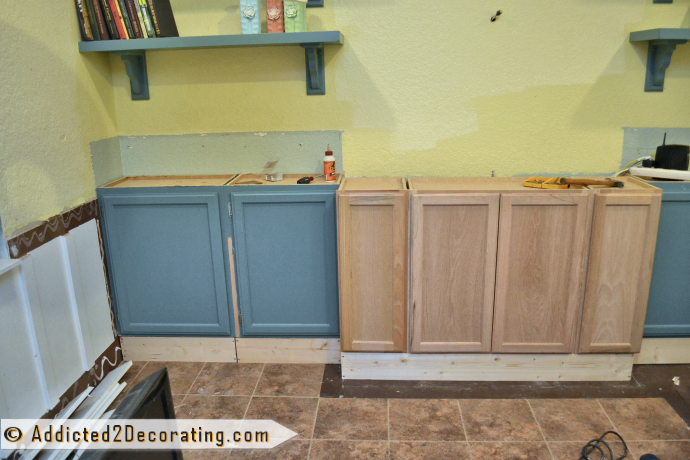
I started with stock cabinets from Home Depot. I used upper wall cabinets because I only wanted them to be 12 inches deep, but I set the middle section out a few inches. In order to use the upper cabinets as base cabinets, I had to build bases to put them on.
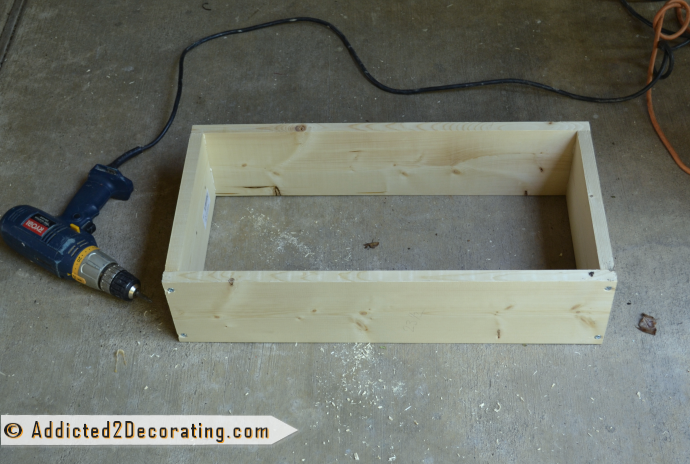
So when the cabinets were set on the boxes and put into place, they looked like this:
You can read more about that process here.
Then it was on to building the countertop, which I made out of cedar 2″ x 4″ lumber using wood glue and a Kreg Jig to put it all together.
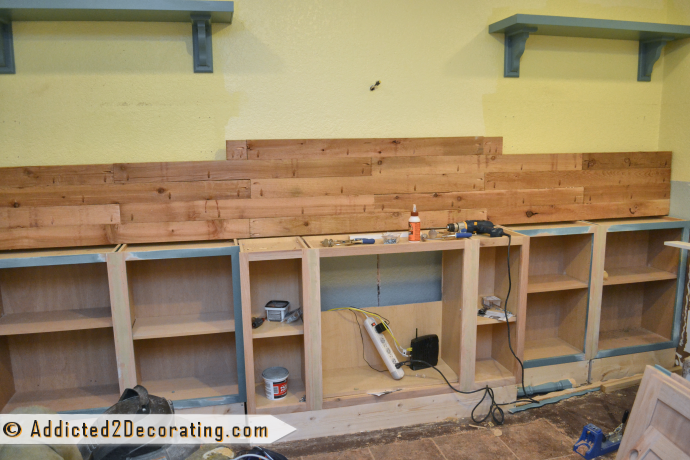
And then the built-in bookshelves on top were made from 1/2-inch MDF, and framed with 1″ x 3″ lumber. The basic DIY bookcase form looked like this…
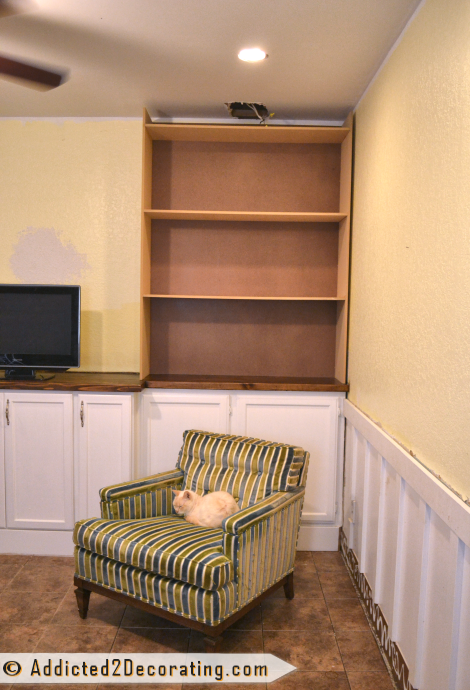
And then once it was framed out, it looked like this…
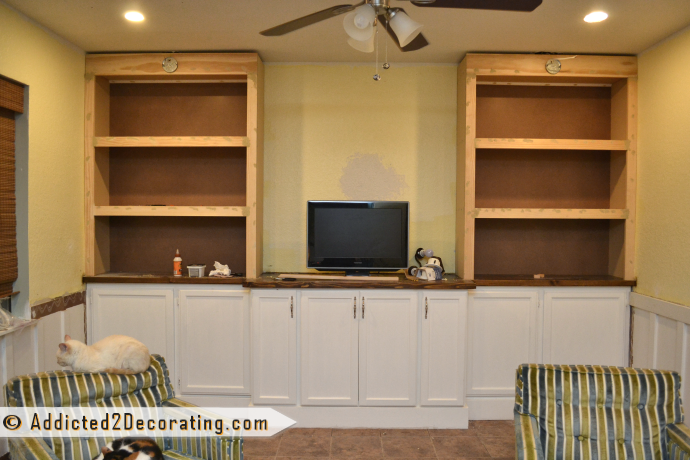
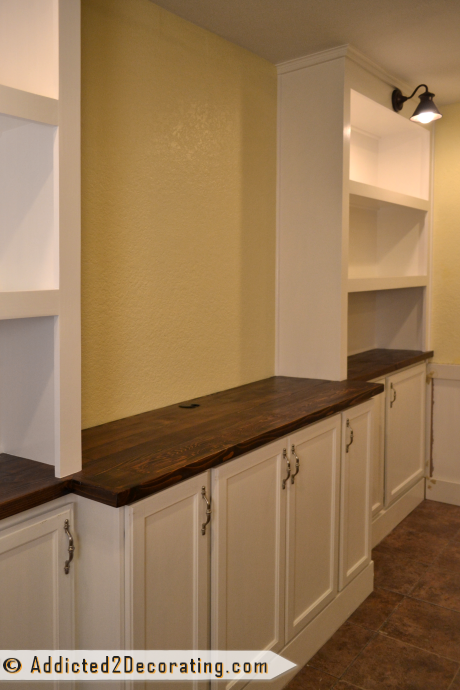
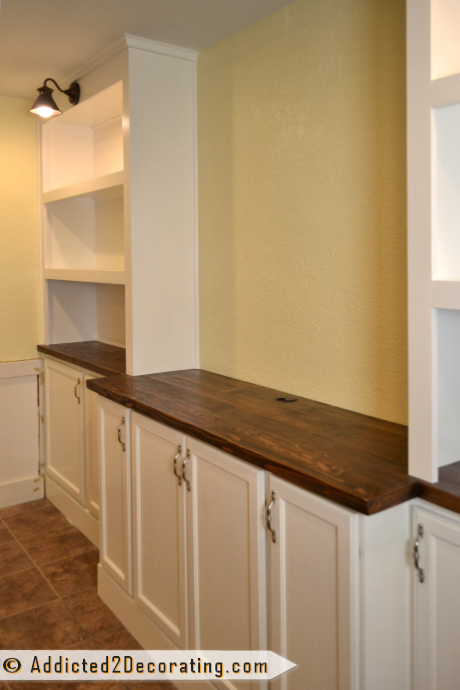
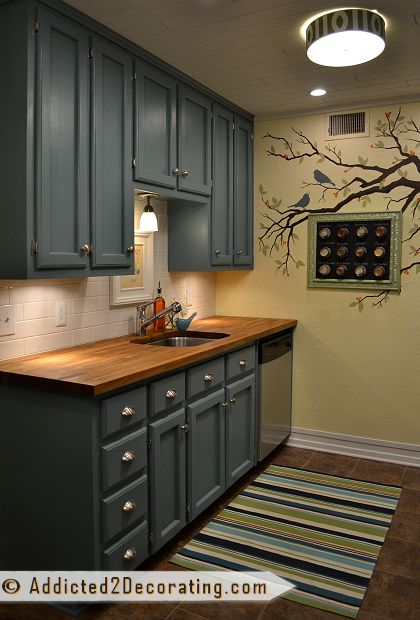
And then once trim was added to the top around the ceiling, and then whole thing was primed (twice) and painted (three times), and the wall touched up, it looked like this!
It was a big job, but I’m so glad I tackled it! I’ve had this vision in my mind for years of what this wall could look like, and I would have been incredibly disappointed to move away and never see it finished like I had envisioned.

Addicted 2 Decorating is where I share my DIY and decorating journey as I remodel and decorate the 1948 fixer upper that my husband, Matt, and I bought in 2013. Matt has M.S. and is unable to do physical work, so I do the majority of the work on the house by myself. You can learn more about me here.


Looks awesome
You’re amazing! If I had only one decorating blog to follow, it would be yours! Your attitude and hard work are such a blessing. I “wasted” 😉 an hour and a half perusing your site (again) today, and my creative juices got to flowing! 🙂 So excited that all you hard work yields such beautiful results!
So glad you’ve been inspired, Velvet! Now when you finish your own projects, you’ll have to send me pictures!! 🙂
Excellent! I wish I could do stuff like that! Just curious…..does your husband ever help you with these projects?
Hi Janet~
My husband, Matt, has multiple sclerosis and is in a wheelchair, so he’s unable to help me with any home improvement projects. I tackle these things on my own. 🙂 But last week, my in-laws were in town, so they helped me do some projects, like install ceiling fans, install/repair toilets, start on my tiny bathroom makeover, etc. But as a general rule, I do all of my projects by myself.
You are amazing!
So when you first started doing DIY stuff, did you have any prior experience? Or did you just one day buy a hammer and some nails and started whacking away? How long did it take you to be THIS good?!?!! That is AMAZING!!!
That looks wonderful! Your condo will blow away the comps in the area when you go to sell it. I think you need to have an open house for your neighbors to see how yours looks, especially the student 🙂
Looks great!! I love the lights..where did you get them??
The lights came from Home Depot. They were pretty inexpensive (less than $20 each), and I actually found them with the outdoor lighting.
WOW, just wow! You continue to amaze me with your creativity and talent. Seriously, that looks like you had someone professional come in and install that! I have loved seeing your condo transformed into what it is today, and I can’t wait to see what you do with your next home.
IMO, and please don’t take this wrong, but it’s the best thing you’ve done to the place. Beautiful- It’s transitional, elegant, timeless, and expensive looking. Congratulations on your completion.
Your Superwoman talents blow me away!!! This looks absolutely fantastic. I have a very small living room with 7’6″ ceilings throughout the house (mid century ranch) and have been going back and forth with what to do with our media wall. Thank you so much for the inspiration!
You should definitely think about doing something like this, Erin! I’m always amazed, but built-ins like this seem to make a room look and feel bigger and grander.
WOWSERS! (if that is a word 🙂 ) It is absolutely gorgeous! You did a fantastic job and I only wish I had a 1/4 of your talent!!
Great job…very classy…you should get a great return for all your work
Absolutely beautiful! I love them!!
Looks great! I know I would never tackle a job like that. You did prove the men wrong once again!!!! I have to ask…where do you plug in the TV and other electronic equipment?
There’s a 2.5-inch hole in the countertop near the wall where cords can go through, and then the wall outlet and t.v. cable is accessible inside the middle cabinet.
Just awesome. I love them.
Just awesome. I love them. You are one talented and determined woman.
Wow those truly look really great!!!
You inspire me!
Kristi, how exciting to look on your blog this morning and find that you’ve finished your bookcase wall! It’s beautiful! I would imagine you fell asleep last night with a HUGE smile on your face and a sigh of satisfaction for a job WELL DONE!! I found your blog a couple of weeks ago while looking for ideas on Pinterest for our remodeling project, and was pleasantly surprised to discover that we are fellow Wacoans! I love, love, LOVE your blog and have been just poring over your posts and projects. Your tutorials are so easy to understand and I appreciate your gutsy, no fear attitude. It’s really challenged me to tackle myself a couple of projects I’ve been wanting to try and sweet-talk my hubby into doing 🙂 Looking forward to following as you complete the remodeling of your condo finally realize the dream of moving into your new home! Who knows, maybe we’ll run into each other at Lowes or Home Depot one day! Blessings. . .
Well, well…hello neighbor! 🙂 Small world! So glad you found my blog! And I’m sure, if you go to Home Depot enough, you’re bound to see me there. I seem to go there at least once a day lately. Last week when my in-laws were here, I was averaging three to five trips per day. 😀
Oh, wow, that is amazing!! Love how it turned out!
This is absolutely beautiful! Great job
Wow that came out amazing! You did an incredible job with this, I so want one of these in my living room!!!
I looks so good…like you had a professional come in and do a custom built in. It also looks like you paid that professional some serous money too.
Girl…all I can say is you are FREAKIN’ AMAZING!!!!!!
I can’t put it any other way!!!!
I love the whole media wall – it’s absolutely beautiful and should go with any style that the new owner has because it is a classic piece. Beautifully done and you should be proud!
Great job! I love it!!
Lucky – – Lucky – – Lucky to the New Condo Owner! Beautiful work. You are so talented and very inspiring. God Bless You in your new move.
Fabulous. Seriously impressive. I want one!
Wow. I’m just breathless with admiration! You must have worked like a maniac on these!
BTW, how’s the weight loss/healthy eating thing going? No pressure, just wondered if you were finding it even harder, with all the work you’ve been doing lately?
Haha! It’s definitely been harder the last few weeks. The busier I get on the condo, the harder it seems to be to stay on track with our eating.
More or less how much was this expense? We’re looking in doing one but my husband wants to get a carpenter and he’s charging about 3k…
Big WOW for you. So impressed with what you’ve done with your (formerly) basic condo. 😀
Great job, Kristi! I think it even makes the space look larger! You are amazing!
It looks bigger with the bookcases!
Absolutely beautiful Kristi 🙂
You are awesome. I hope some day to get things done in my home. You have shown that there is a way. Excellent job and well done.
Marsha
Beautiful! I thought about you last night as my hand cramped up from too much painting and hoped you were finished. Wonderful job – hope you get a lot of enjoyment from them before you move on to your dream home.
ABSOLUTELY BEAUTIFUL!! You are SO talented!!!
Wow! This looks wonderful! I can’t imagine the extra value you are adding to your condo, but I guarantee you it will return a lot and be the most popular on the market with all of your custom touches! I imagine that it won’t be on the market for long! Good Luck! Hugs, Leena
Great job! And what satisfaction in seeing your dreams/visions played out.
It looks absolutely amazing!
All I can say is WOW!! You did an incredible job. I envy the new owners of your condo, and I wouldn’t change a thing you’ve done. You are my hero!
wow! It looks amazing!
you must feel so good about yourself! that is amazing work! kudos to you and it gives me inspiration to make my home more usable and beautiful, too!
Fantastic! Love how these turned out! I bet you’ll have a ton of interested buyers when you’re done!
Wow! WOW! Oh my gosh, WOW!
I hope you realize Linda, me and a host of other women are living out OUR dreams THROUGH you. YOU are what WE wished we had the gumption (is that a word?) to do. I wish you traveled around and had seminars that we could attend and have hands on demos. Keep up the great job. You are awesome!!~hugs to you~
who’s Linda?
Kristi, the result is amazing. It’s now a full-blown feature wall, and an impressive one at that. It really looks like one of those super professional companies that charge an arm, a leg, and your first born came in and installed those cabinets and bookshelves. The result is very high end and dramatic. I’m impressed as I always am with your vision and ability to execute it to look just like you planned. Also, and I keep saying this, your energy and ambition are amazing. I wish you could bottle it, I’d be a life-long customer and would probably actually get some stuff done around my place!
Hi Kristi! You never cease to amaze me! The way you tackle those heavy duty projects head on, as if there were nothing. I recently did a makeover on my nieces’ bedroom and I got a big appreciation regarding painting. I just had to paint a desk, a mirror, and a loft bed, but OMG it was such a pain. I even used a sprayer for the bed, but again not as easy as you’d think. Since I was outside painting, dust, grass and dirt particles kept flying into the painted surfaces, which was driving me crazy. After a while I just lived with it, thinking I’d have to sand it off later and re-paint. I also used high gloss paint enamel with a roller which had a knubby texture, not the smooth glossy finish I was dreaming about. This first became apparent when working on the desk. My husband said it was because I wasn’t using a brush and I had to lay it on much heavier, so I let him try it. After he made a mess he had to run and scrape off all the mess he made on the desk with the extra thick paint. Fortunately the end result was ok and for the most part you can’t see the problems. But now I know why painting booths are used! Anyway, I posted a few pictures on my facebook if anyone is interested. https://www.facebook.com/media/set/?set=a.10151700061455972.1073741832.365858170971&type=3
My kudos to you for making it look so easy!
A. Ma. Zing. Wow!
Beautiful, Kristi. Just beautiful. The difference between the before and the after is huge. I’m sure that little bathroom is also going to be a success.
Wow!! Wow!!! Awesome!
Congratulations! Totally inspires me to “keep on DIYing.”. Thanks for being an inspiration!
Another inspiring Kristi project and if it’s not worthy of a big TA DA, well then I don’t know what is! Very classic and elegant look that should appeal to all. BTW, I’m so glad you chose not to do the cubbies/baskets.
Totally awesome! And the bookcases are pretty great, too!
How did you solve the problem of cutting/trimming the countertop? Which saw did you use? Also, how do you attach it to the cabinets? Or does it just float? I apologize if you have already addressed these issues, I just couldn’t find the answer.
It looks spectacular by the way! So glad you’re sharing your processes, it’s very inspiring!
I need to know the answer to this question too. It’s so beautiful, I love love love it. great job as always.
Simply beautiful and great quality… I wish I had to patience for this sort of project.
They came out great! Looks like a total different room!
Gorgeous!! You are a rock star!!
Wow! Nicely done! This looks absolutely beautiful!
It looks amazing….a job well done…my hat’s off to you.
I just hope and pray the new owners love it, too.
Good luck with the sale of your condo and the move into your new home.
Blessings to you from a fellow Texan.
Hi, I just found this blog. Wow! Absolutely stunning work. I love built-in cabinets, they add so much character to a room. I really enjoyed the pics and the breakdown of the step by step process as you progressed through it. I am currently building my own bookshelves for my basement office. Thanks for the great idea of using upper cabinets as lowers. I may just steal this idea for myself 🙂 Saves me some space depth wise, and I could use it as the office area is a smaller room anyways. Great job!
Love it! I have a long wall in my townhouse living room that is dying for something like this. I’ve been dreaming about it the project and after seeing your work I’m very much motivated 🙂 Thank you so much for the ideas…great work!
Major success!!!
Beautiful work! I hope you enjoy this for a long time.
You are amazing!! It looks gorgeous and you inspire me to start building my own custom improvements to our house. Can’t wait to see what you do in the new house 🙂
I love the combination of colors, love the lights…love the whole look of it…!! Everything looks so balanced…!!…
Ummm, wow! That’s all I can say. How inspiring!!!
This is the best post EVER! I’m going to have to try it….
Wow! Such an amazing job, Kristi! It looks perfect for the space and you did an incredible job building it. Girl Power!
This looks amazing! I love the addition of the stained wood top and the lights.
This is amazing and really similar to what i want to do in my livingroom. Can I ask how much it cost approximately? Thank you for sharing
Hi Robin~
The total came to about $815.
You did an AWESOME job, as usual! It makes a huge difference in the room, I love them!
I saw your post on Pinterest and this is nearly EXACTLY what we want to do to our Family Room! THANK YOU SO MUCH for the step-by-step tutorial!! This should make my hubby less ‘uneasy’ about ripping up our Family Room! Great job too!!
Looks AMAZING! If our basement hadn’t recently flooded, this would be a project we would likely tackle in the near future. Unfortunately, any home improvement money that would have been alloted to this is now to “fixing” the wet basement!
Question – what is the name of the yellow-ish paint you used?
Hi Erin~
So sorry to hear about your basement flooding. 🙁 That’s a bummer.
The yellow paint is called Rich Cream. It’s a Behr color from Home Depot.
You have inspired me! I’m turning my dining room into a library and will try to create a wall unit like you have done! One question though, how did you attach the bookshelves to the butcher block? I’d love to hear how you attached the top shelves to the bottom shelves. Thanks!
I actually didn’t attach the bookshelves to the countertop. Instead, I attached them to the wall. I did caulk around the bottom of the bookcase where it meets the countertop, though.
This is beautiful but I have one question, How did you secure the book cases to the countertop or the walls?
The sides and backs of the bookcases are nailed into the walls.
I LOVE those bookcases! I am building some in my daughters’ bedroom and was wondering how to trim them out…I will definitely be using the 1×3’s….another jaunt to Home Depot tomorrow! I was also wondering what you used for the crown trim at the top.
Thanks for sharing your talent and inspiring projects.
how did you install the cabinets on to the bases that you made? Nail or glue?
Thanks.
I used wood glue.
Hi Kristi,
I love this project! Love it! It looks amazing! You did such a fantastic job.
My family is moving in a couple of weeks and I think I’m going to use your design for our family room entertainment area. I am going to put the t.v. in the middle of bookshelves and I’m sure it will look great now that I’ve seen your design.
You said that you would have done a few things differently next time and I was wondering what those things were.
Thanks so much!
Hi, you did a great job! But I’m curious about the lighting you installed with the sconces over the top of the shelves. They look hardwired. Did you do that yourself or did you have an electrician do it? Did you have to have to consult with a code inspector on that? I have lots of ideas about where I’d like to install better lighting, but electric is one thing I’m not sure about doing because of cutting into drywall to access lines.
Thanks, and great job!
My father-in-law did it for me. He has lots of experience with electrical work. It’s not something I’d ever do myself, though. If he hadn’t been here to do it for me, I would have hired an electrician.
What color yellow did you use?
It’s called Rich Cream by Behr (Home Depot).
I really love the built-ins. It really adds a lot of character to the room. About how much did this project cost?
This entire wall of built-ins, including the lights and hardware, came in at just around $800. That’s a lot of money, but when you consider how much a professional would charge to build a 12-foot-wide by 8-foot-tall wall of built-ins, it’s quite a savings.
I’m very inspired by your built-in! Quick question: what are the dimensions of your room?
The room is 11 feet x 12 feet. The bookcase is on the 12-foot wall.
Hi there,
just wanted to comment that this bookcase looks awesome!
The white paint that you used, did it turn out as a glossy finish or a matte finish? Any tips on how to get a glossy look to the bookcase?
Beautiful project! We’ve been trying to do this with our living room so I linked to your page over on my blog. The specific post is: http://www.diydanielle.com/2014/04/built-in-entertainment-center-cabinet.html?m=1
I hope that’s okay! Thank you!
Great job! Amazing shelving designs, it was perfect, I adore you for being such an artistic to make your place as cozy as this. Looking forward for more ideas you will share.
How exactly did you build the bookcase section? What is the back material? How did you secure the MDF? Also, how did you add the 1×3 to the MDF?
Thanks,
Kevin
I am about to start a similar (albeit less ambitious) project putting built-in bookcases around my fireplace with cabinets below. I am thinking about using wall cabinets like you did, and am wondering how (if?) you attached the frames to the floor, and then then the cabinets to those frames. It really looks great. Thanks.
You mentioned in the beginning there were a few things you would do differently.
1. Can you tell me what you would do differently to improve?
2. About how many hours did the project take from start to finish?
Thanks!
How did you anchor the shelving to the wall, and did you anchor the frames to the concrete floor? How did you ensure the gap at the top was small enough for the molding? Do the shelves have lips on them from the 1x3s or do they just hang down? Wife and I love the idea, we hope to duplicate in our own way.
We are trying something like this…only with a fireplace in the middle. I love the color that your countertops turned out to be – what sort of stain / treatment did you do? Thanks and I appreciate you sharing your work with everyone!
Hi!
First of all, this is AMAZING! I googled built-ins, and I came across your post. My husband and I have a corner fireplace/mantle that is flush from floor to ceiling. On that same wall, we are thinking of doing DIY built-ins. Do you think it would still work to do something like this? Do you have any suggestions for what to do on the side next to the fireplace?
Thanks! I’m already a huge fan of your work!
Just finished my bookcase and took my inspiration from yours! Thanks it truly turned out amazing!!! I wish I could post a pic!
Hi Kristi,
Thank you so much for this post! I just found it while searching how to build my own shelves. They look so great that I thought I’d never be able to pull this off but your tutorial makes me think I just might. Thank you, thank you, thank you:-) Just one question. On that piece of horizontal trim to the front of the shelves, how did you attach that to the mdf? glue or nail. I wondered if I I can nail it into the edge of the mdf board without it crumbling? Thanks again for this great tutorial.
Marie
I always use wood glue and nails to put shelves together. As long as you don’t use nails that are too big, you should be just fine nailing into the edge of MDF. I generally use 16-gauge nails.
Hi! I finally convinced my husband to build this beautiful built in for our family room. I was curious about one thing you mentioned. You said next time you would do some things differently. What are those things?
Use 3/4″ MDF to build the shelves, and make the shelves shorter.
We would probably have longer shelves since our wall is 16ft. 10in. compared to the 12ft. of your wall. Do you have any suggestions to help with the size of the shelf?
I just wanted to say thank you. I have been planning my new stand for my latest aquarium (4′ 120gallon) and im am so stealing your design! It’s gorgeous. I will be sure to send you a pic of my project as soon as I finish! Thank you again for the inspiration!!!!!
Wow, this is almost scary, I have been thinking this up in my head and here it is. And my before room looks exactly like yours, even the ceiling fan, blah. Window placement is the same, but I have a double folding louver door opposite the Windows. I’m taking those down and putting up pretty trim. I’m also selling this house. Thanks for showing me what it can look like. I love it!
Thank you so much for everything inspiration!!!!
http://i1330.photobucket.com/albums/w567/gnarley_marley123/20170205_174823_zpsl7o1zimj.jpg
Could you please let me know where you found your bookcase lights? I have been searching everywhere for something like this and can’t find anything remotely close to yours (which I love)!
This is fabulous!! Do you have an updated post about what you would do differently or a total cost for the project?
Loved the whole setup. I am trying build this shelf in my living room. I really think its time to get rid of my bookcase in the living room. I will be replacing the tv stand with this DIY wall shelf idea, so that my books and TV come along together under one shelf. My living room is a little bit fancy ,I am planning to add some fancy colors the cabinet. Anway thanks for this great article 🙂
Your work is fabulous, I had a question though, with the bookshelves being so thin how did you attach the trim? I have been contemplating a similar project and i have been searching the web to figure out how to construct what is in my head. Looking forward to your reply. Thanks
The trim is attached with wood glue and a nail gun.
Could you tell me what primer and sheen of paint you used?
Zinsser oil-based Cover Stain and Behr paint in a satin finish.
Hi Kristi, it looks like your post is a few years old. My husband and I are looking into custom built ins now, and are curious how stock cabinets hold up after 5 years. We have been told that stock cabinets aren’t as good quality when buying from a big box store, but this is also coming from people who want to built custom for us….
I don’t live in this condo anymore, so I can’t say how they’re holding up. However, I used these came cabinets in my kitchen remodel that I did in mid-2014, and they’ve held up perfectly. You’re not going to get all of the customized options that you get with custom cabinets, but that didn’t really bother me, especially considering the huge price difference. A good in between option is to use something like CliqStudios cabinets. They look custom, and you can get all kind of customized options, but you do have to put them together yourself. I recommended it to another reader, and she loved them. She didn’t seem to think they were difficult to put together and she saved a lot of money over custom cabinets.