How To Refinish Pine Wood Countertops
I’ve spent the last couple of days working on my hallway bathroom makeover. And y’all, I’m pretty excited because after years and years of struggling with staining pine, I think I’ve finally found the magic method for getting rid of those hideous (to me) orange and yellow undertones that come through when you put stain on pine. I have finally figured out how to refinish pine wood countertops!
I’ve had a love/hate relationship with pine for well over a decade now. I love it because it’s cheap and abundantly available. But every time I’ve tried to refinish pine wood countertops, I end up accentuating the orange and yellow grain, when I’d actually like to make it disappear completely.
But my pine-staining woes may be a thing of the past!
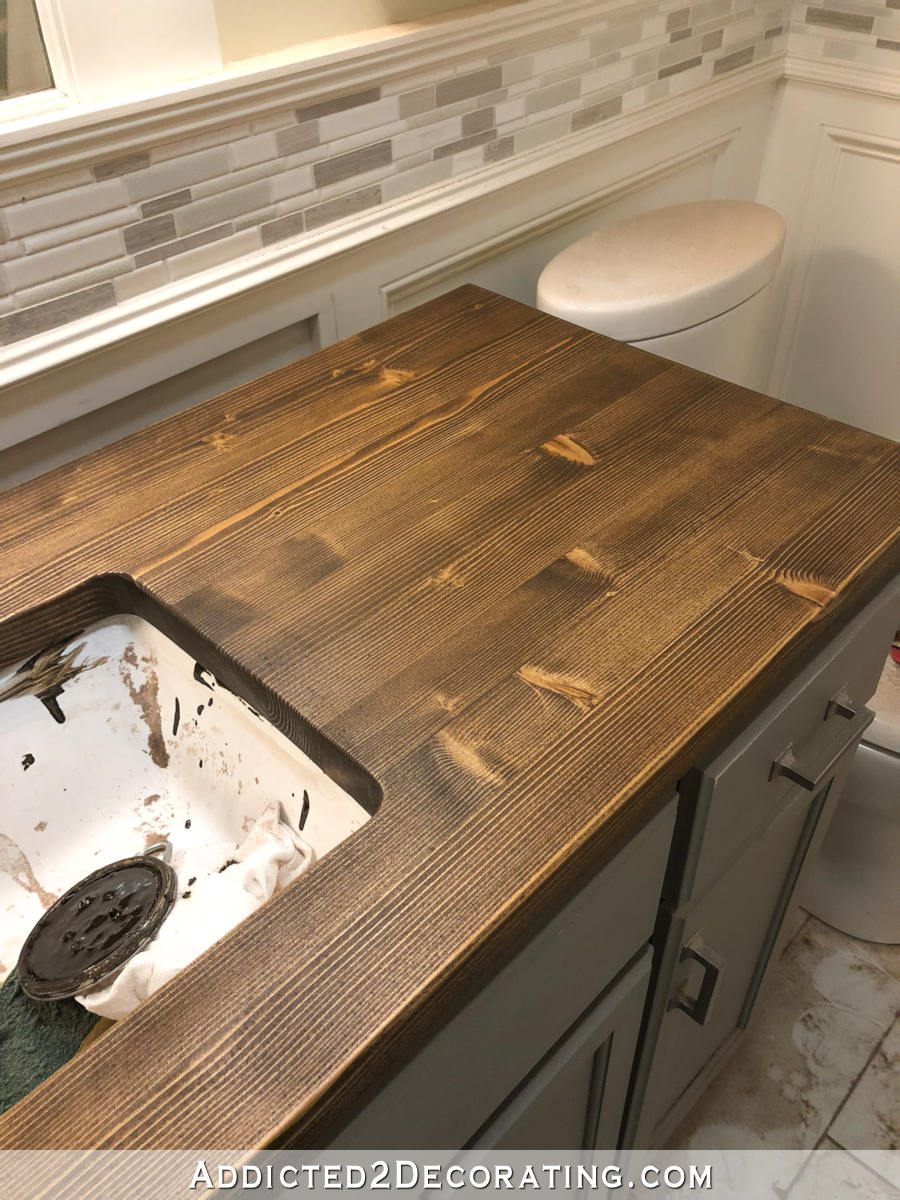
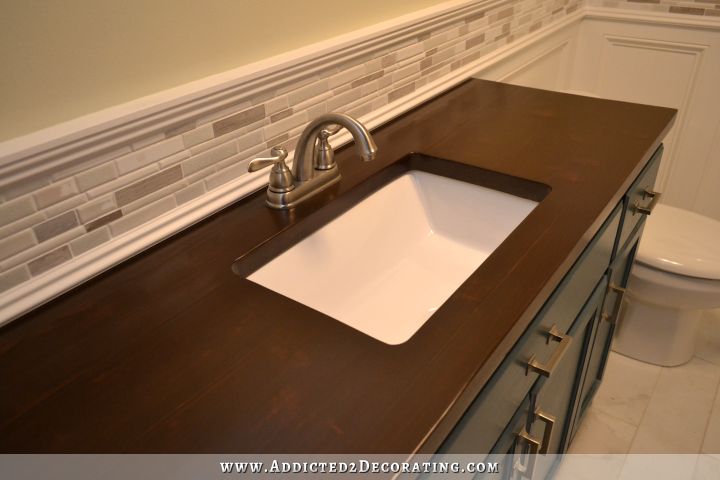
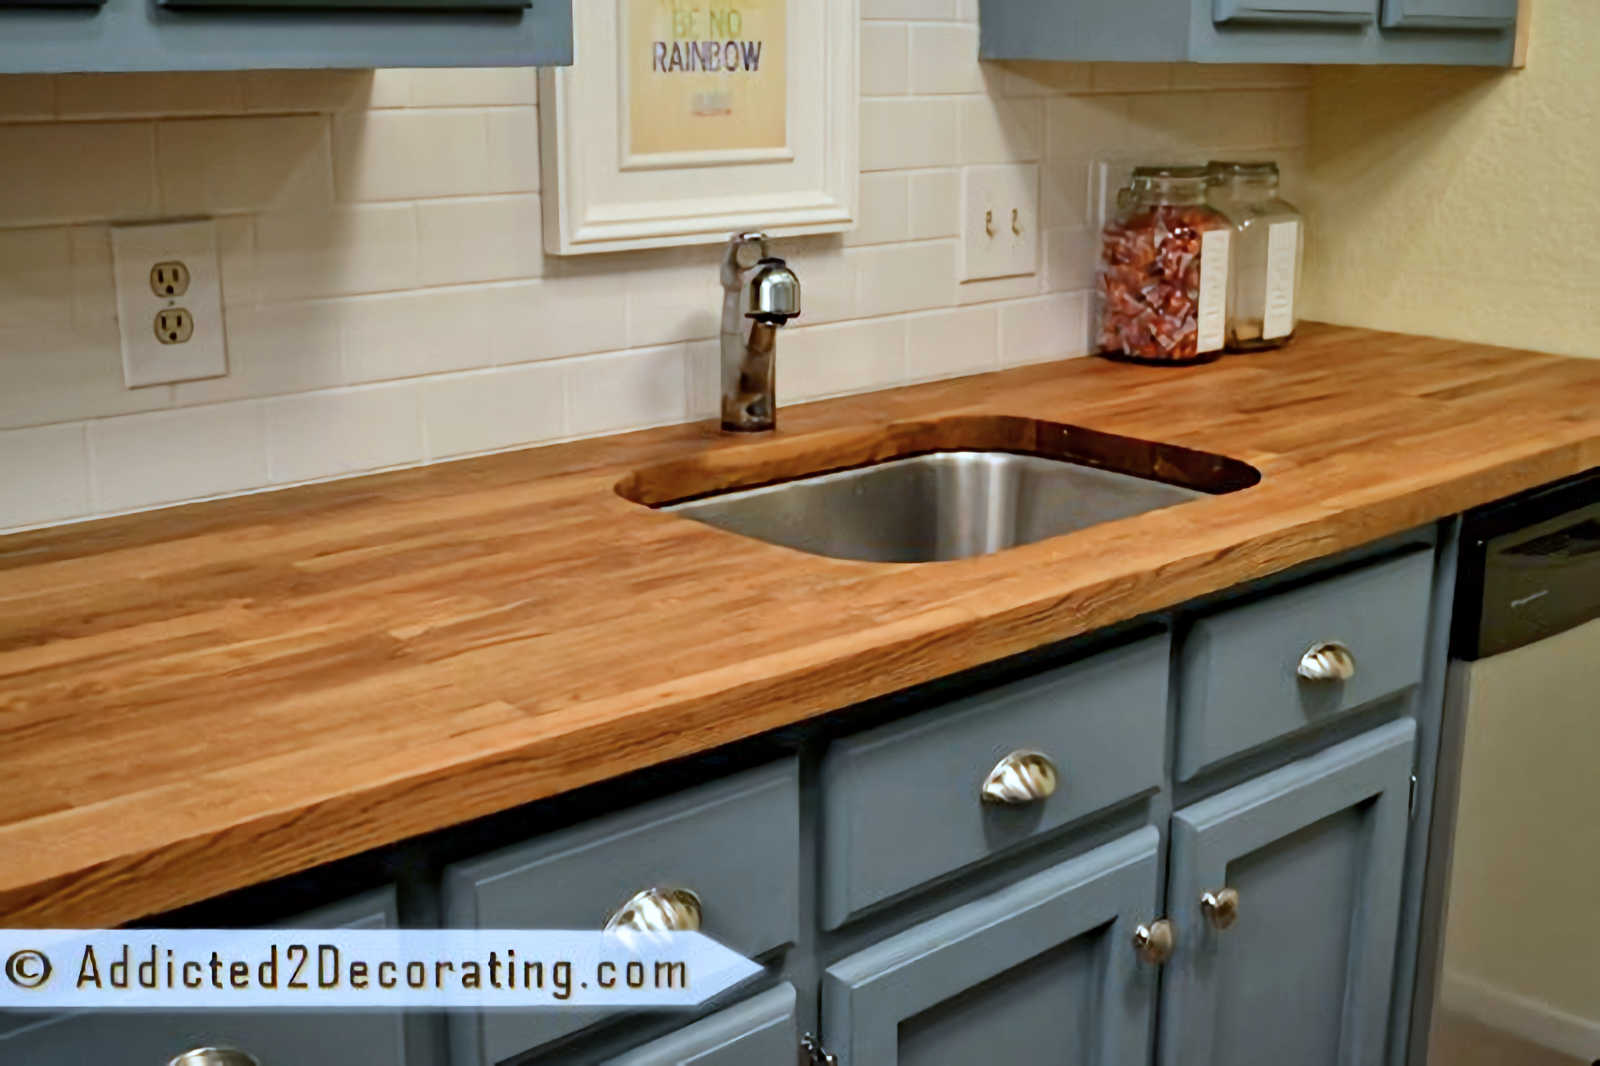
The pine wood countertop in this bathroom is one that I built from 2″ x 3″ pine lumber four years ago when I remodeled this hallway bathroom. I had such a hard time getting the finish right and getting rid of all of those orange and yellow undertones in the wood that I ended up with a really dark, almost opaque finish on the countertop.
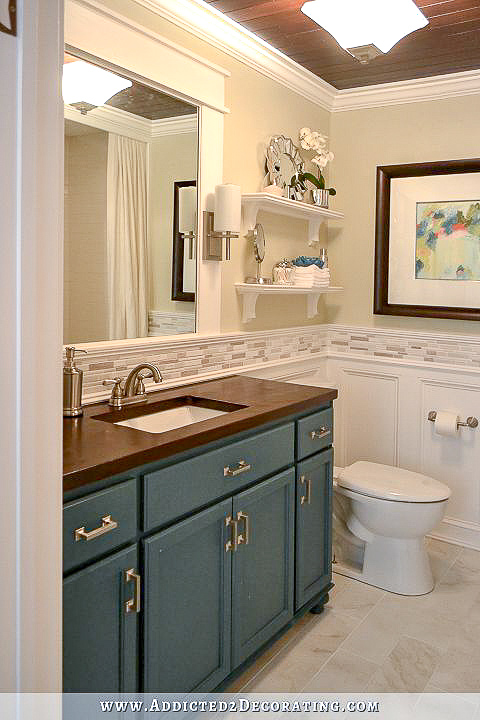
It definitely wasn’t what I had envisioned when I decided to do a wood countertop, but I ended up living with it for four years.
But in the last four years, I’ve learned quite a bit more about working with pine and staining wood, so I wanted to give it another go and see if I could create a finish that wasn’t quite so dark, that wasn’t so opaque, and that still allowed the wood grain to show through without turning orange and yellow.
And y’all, I did it! I finally found the magic formula! From now on, when working with pine, this will be my go-to process for getting a pretty stained finish.
How I refinished my pine wood countertop:
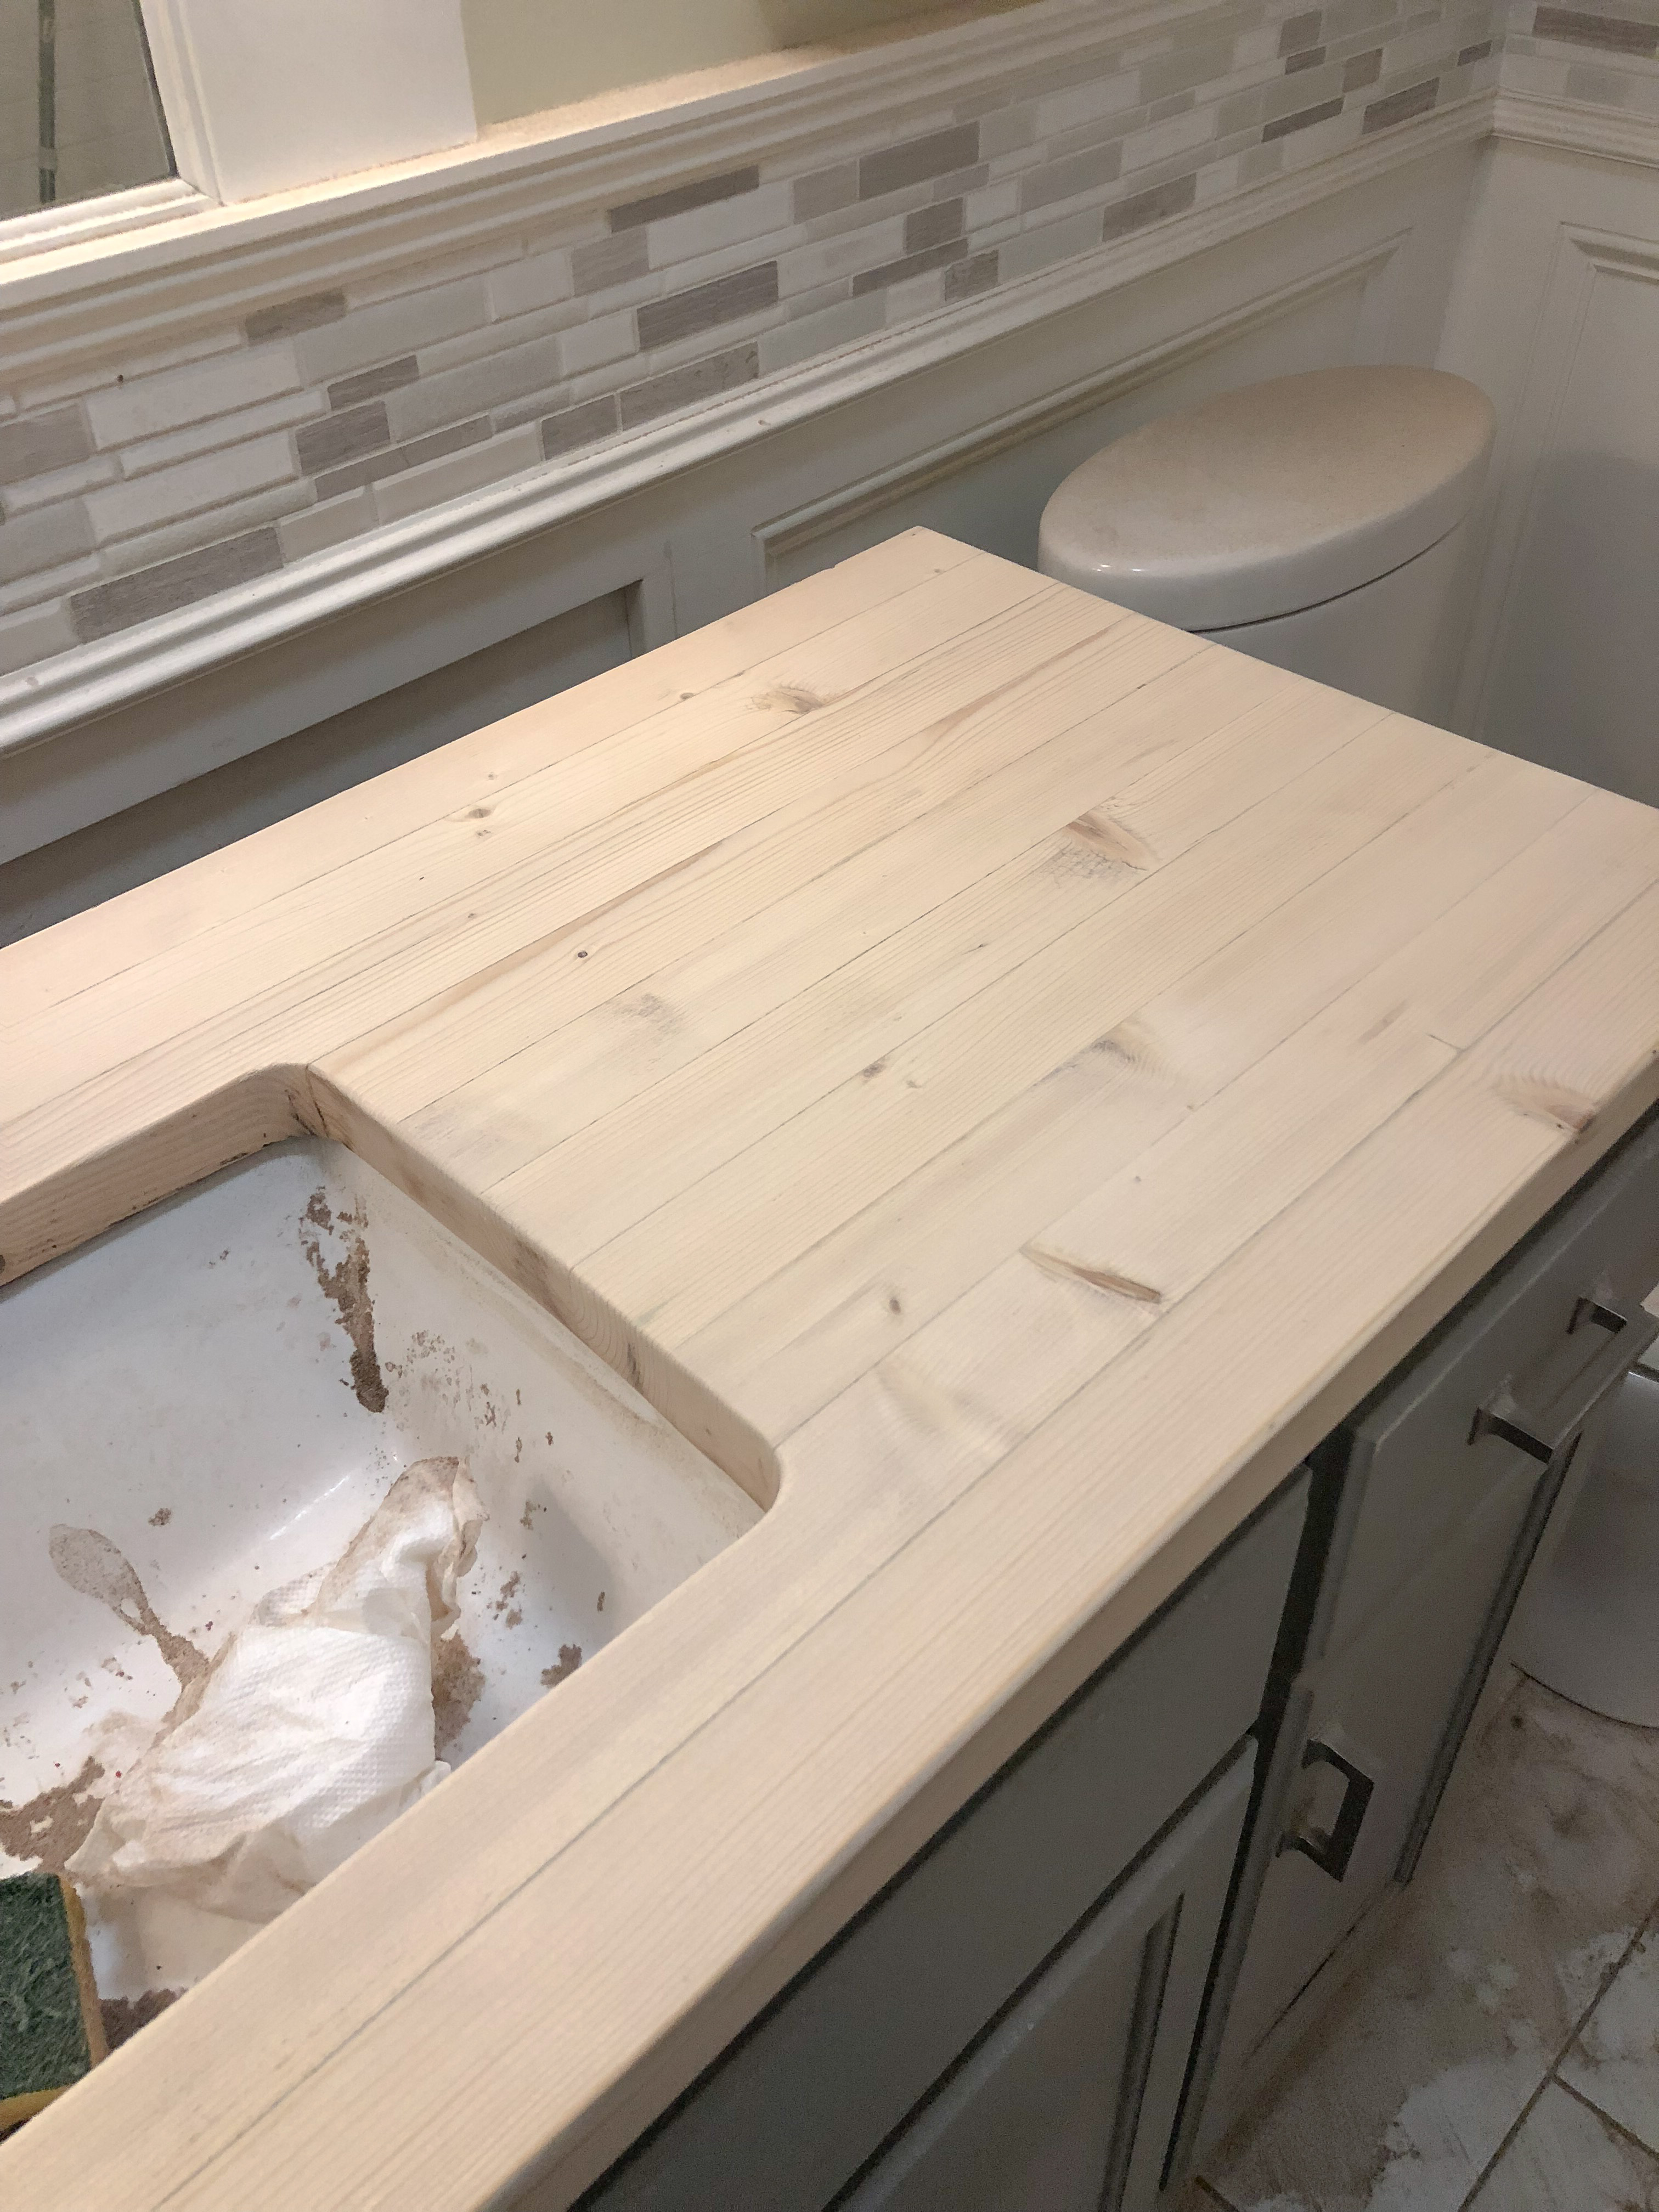
Step 1: Sand off old finish.
My first step was to sand off the old finish. I used 60-grit sanding discs to cut through that old thick finish. (And yes, I made a mess of my bathroom. I apologize up front to those of you who get anxious about my messy processes. 😀 )
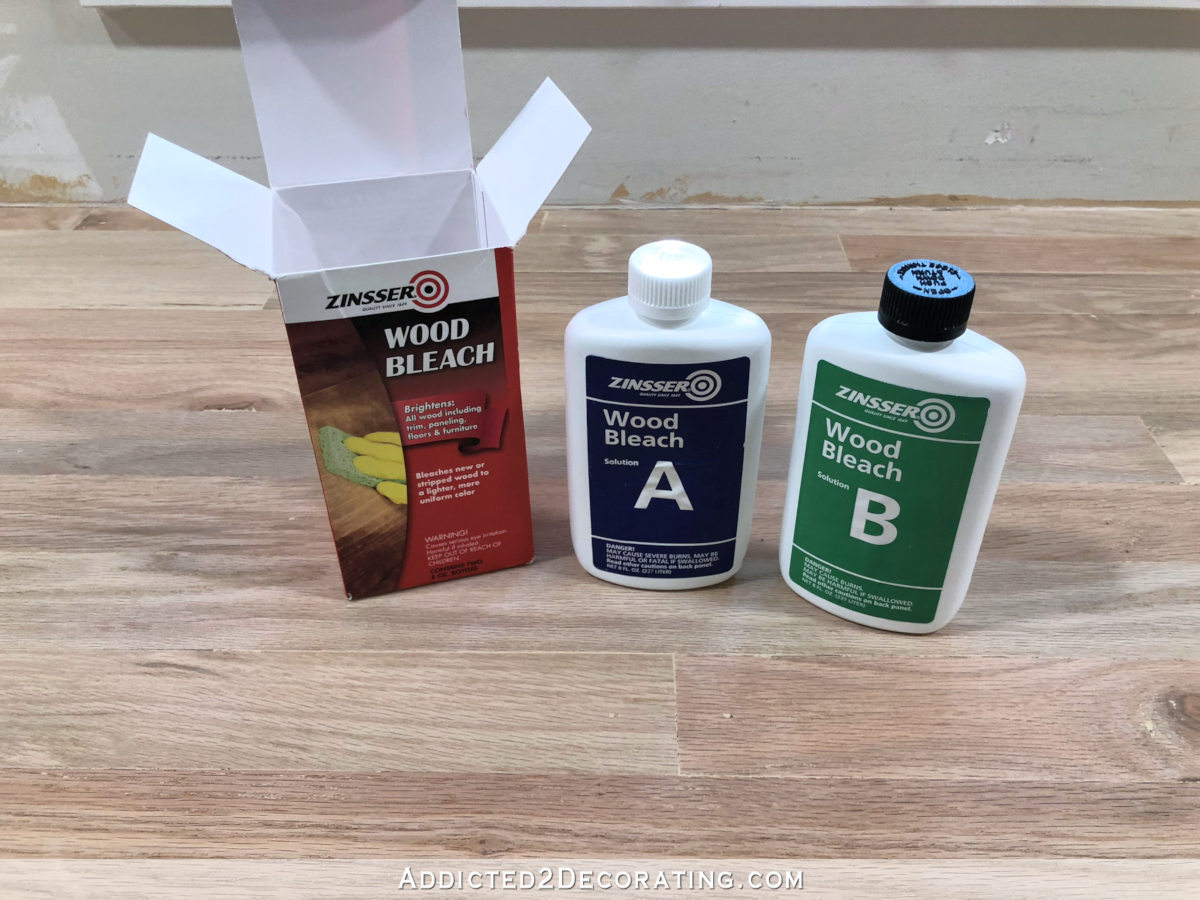
Step 2: Use wood bleach to reduce yellow and orange undertones in pine wood
After sanding down to bare wood, I used the same wood bleach that I used on my pantry countertop. This is a picture of it sitting on my red oak pantry countertop, not the pine bathroom countertop.
So here’s what the bathroom countertop looked like after I sanded and bleached it…
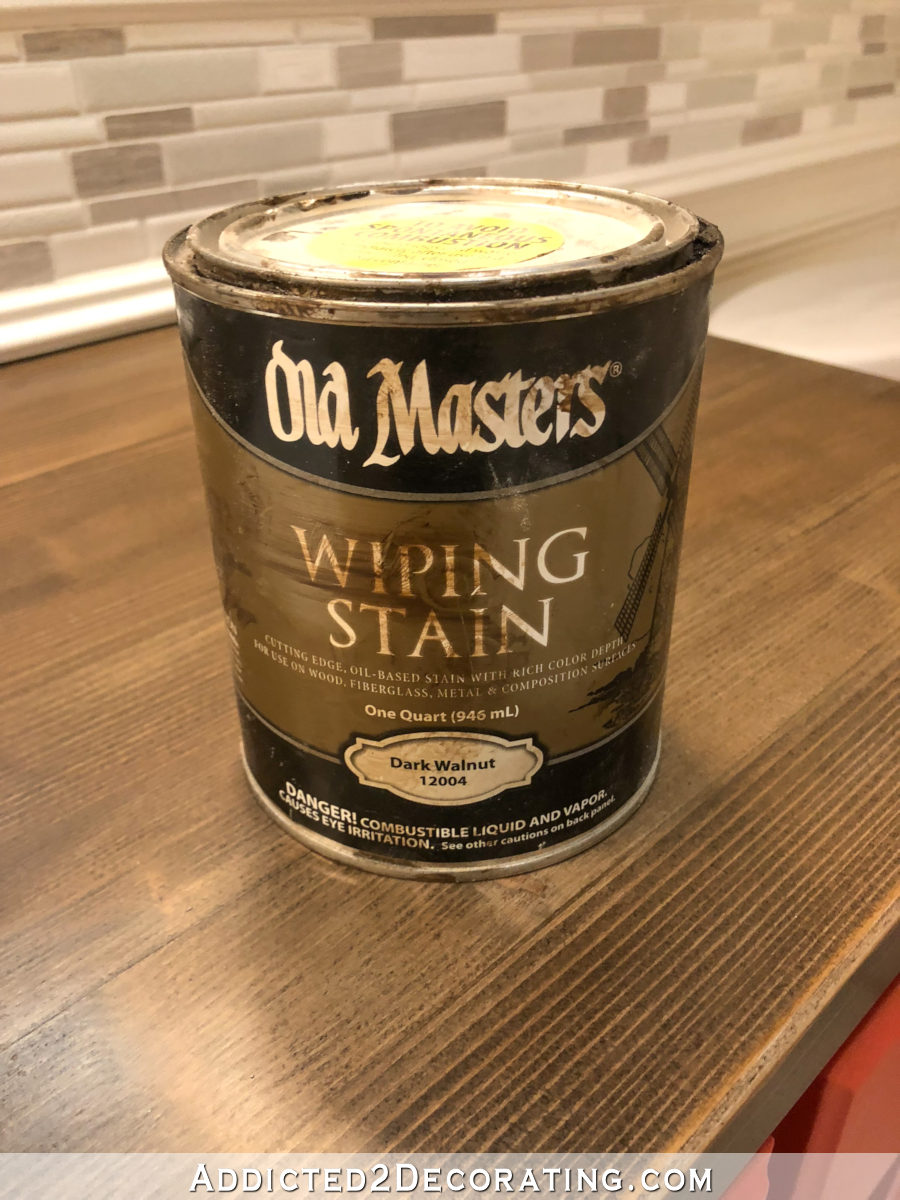
Step 3: Use a wiping stain (not a penetrating stain).
Next I wiped on a coat of Old Master’s Wiping Stain in dark walnut.
And then it looked like this…
Needless to say, I wasn’t pleased. The bleach did a great job at minimizing the orange and yellow undertones, but those knots! They practically glowed! If I had to do this project all over again from the beginning, I’d definitely pay a bit more for clearer, knot-free wood. I mean, those knots just stuck out like sore thumbs.

Step 4: Use a whitewashing/pickling stain.
After rummaging through my stash of stains and paints, I decided to give this white wash pickling stain a try over the dark walnut to see if it would even out the colors.
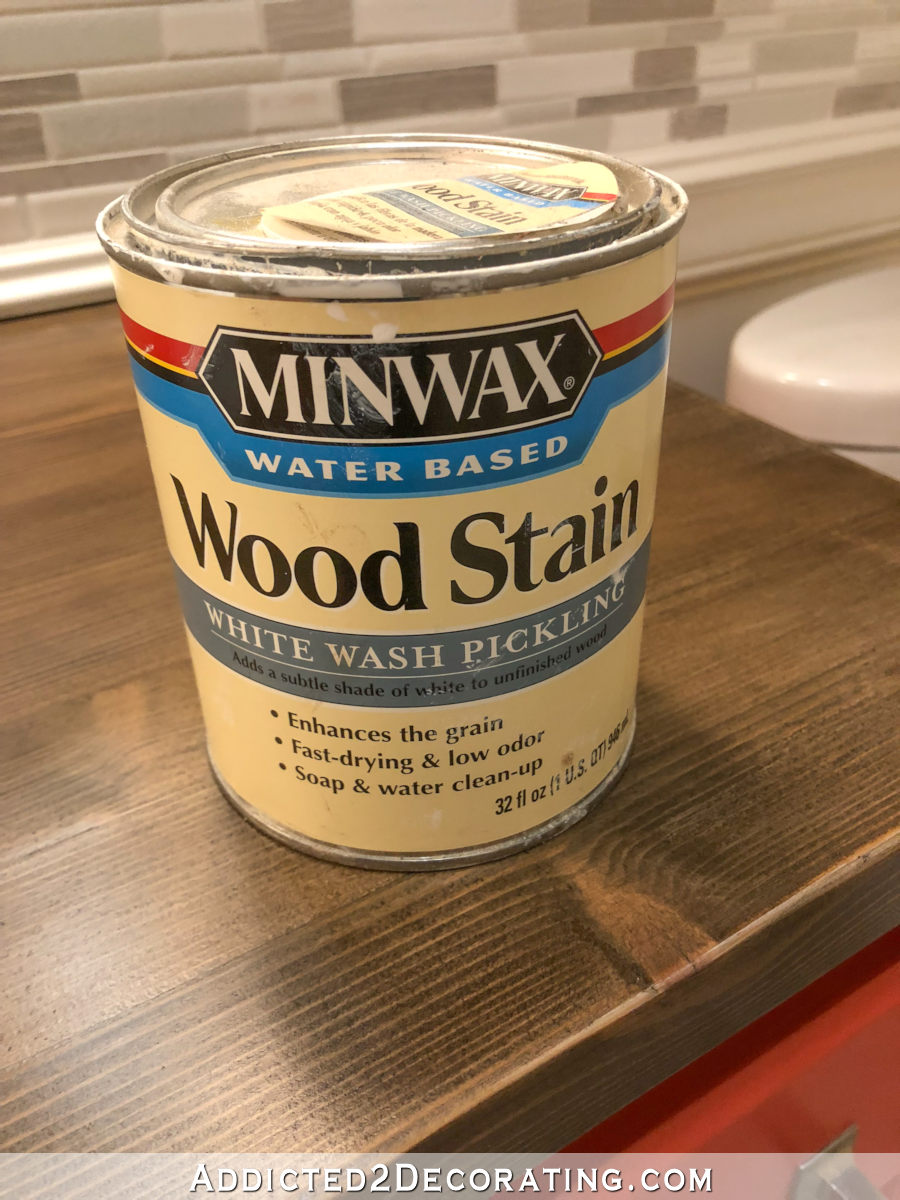
This stuff looks a little scary going on…
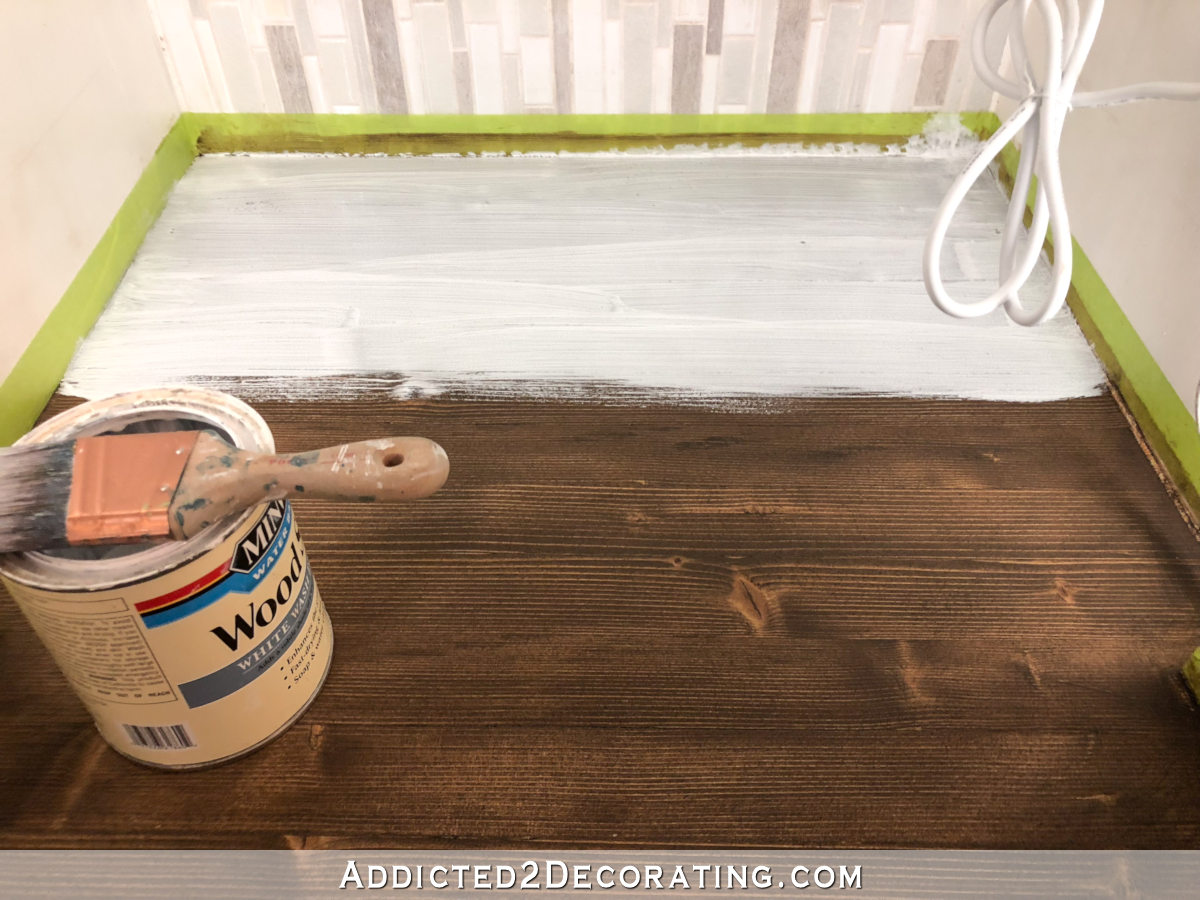
But once you wipe away all of the excess, it looks more like a light whitewash. I did have to use some 220-grit sandpaper strategically in some areas to even out the finish. It’s a water-based stain, and those are always more difficult to get an even finish with than oil-based stains are since they dry so quickly.
Step 5: Apply another coat of wiping stain.
After that whitewash stain was really good and dry (I gave it several hours), I pulled out the Old Masters Wiping Stain again…
And gave the countertop three more coats over the span of about 24 hours, letting each coat dry thoroughly before adding the next.
Step 6: Apply a clear coat sealer.
After the stain was completely dry, I gave the countertop two coats of General Finishes High Performance Top coat in a matte finish, sanding lightly with 220-grit sandpaper between coats.
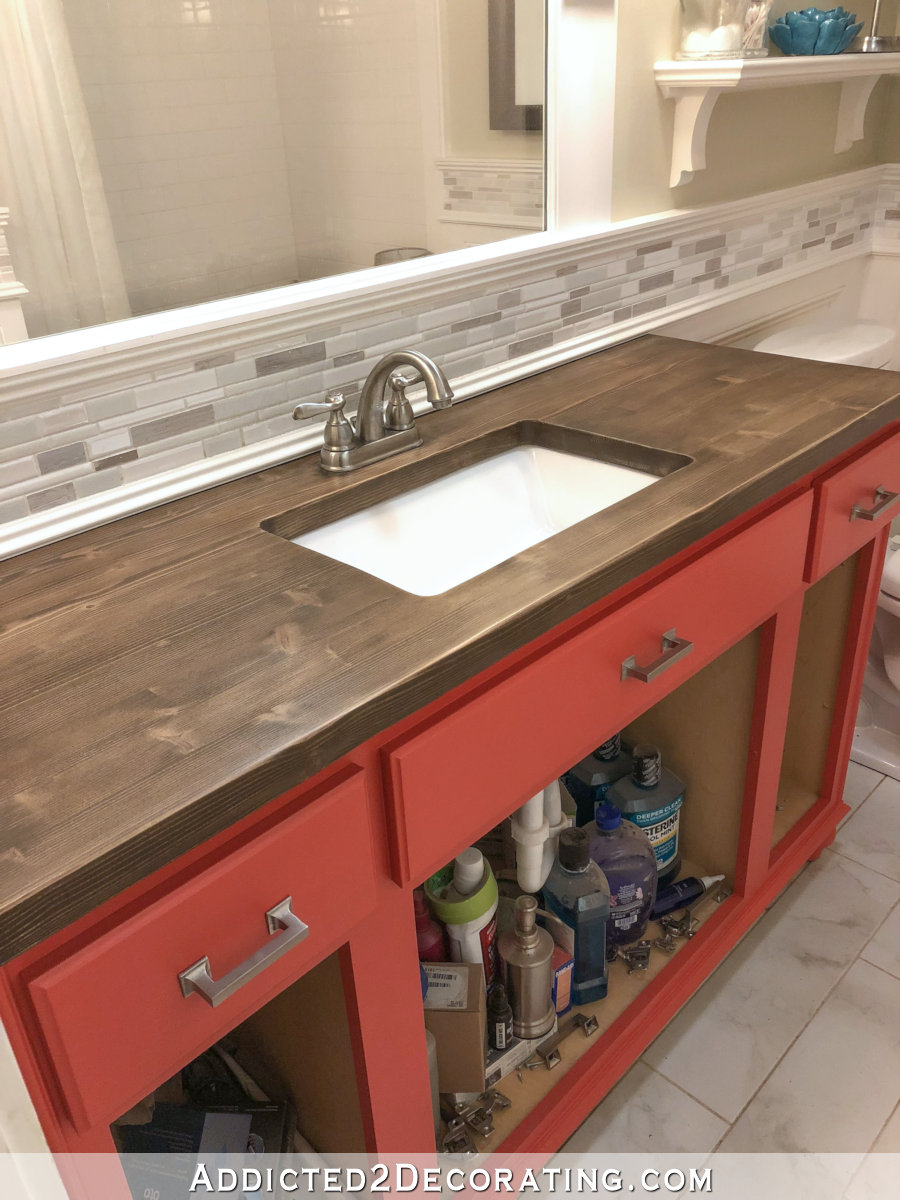
And what I ended up with is as close to perfect as I’m ever going to get with pine. Yes, you can still see the knots, but at least they’re not glowing. The water-based whitewash stain seems to have sealed the wood along with lightening it considerably, allowing the subsequent layers of wiping stain to give it a more even coloring.
It’s not as pretty as walnut, but for pine, I’m pretty thrilled with how this finish turned out.
So from now on, here’s my plan when I use pine…
My new go-to process for finishing or refinishing pine wood countertops and avoiding ugly orange and yellow undertones:
- Sand the pine down to bare wood (if it isn’t already),
- Use Zinsser wood bleach to minimize the yellow color,
- Give the whole thing a coat of water-based white wash pickling stain,
- Follow up with as many coats of oil-based wiping stain (not penetrating stain) as needed to achieve the color I want,
- Allow the stain to completely dry, and follow up with two or three coats of General Finishes Top Coat (I prefer the matte finish).
You’ll notice that the steps I listed just above are a bit different than what I actually did on my countertops. That’s because I was trying things and making it up as I went along as I worked on my countertop. But really, you shouldn’t put a water-based product over an oil-based product (note: the topcoat is fine as long as you let the stain completely dry first as noted in the directions), and I’m pretty sure the result would be the same if I left out that very first coat of wiping stain and just started with the water-based white wash pickling stain.
It’s taken me well over ten years to figure out how to refinish pine wood countertops, but I think I finally found a formula that will actually work consistently.
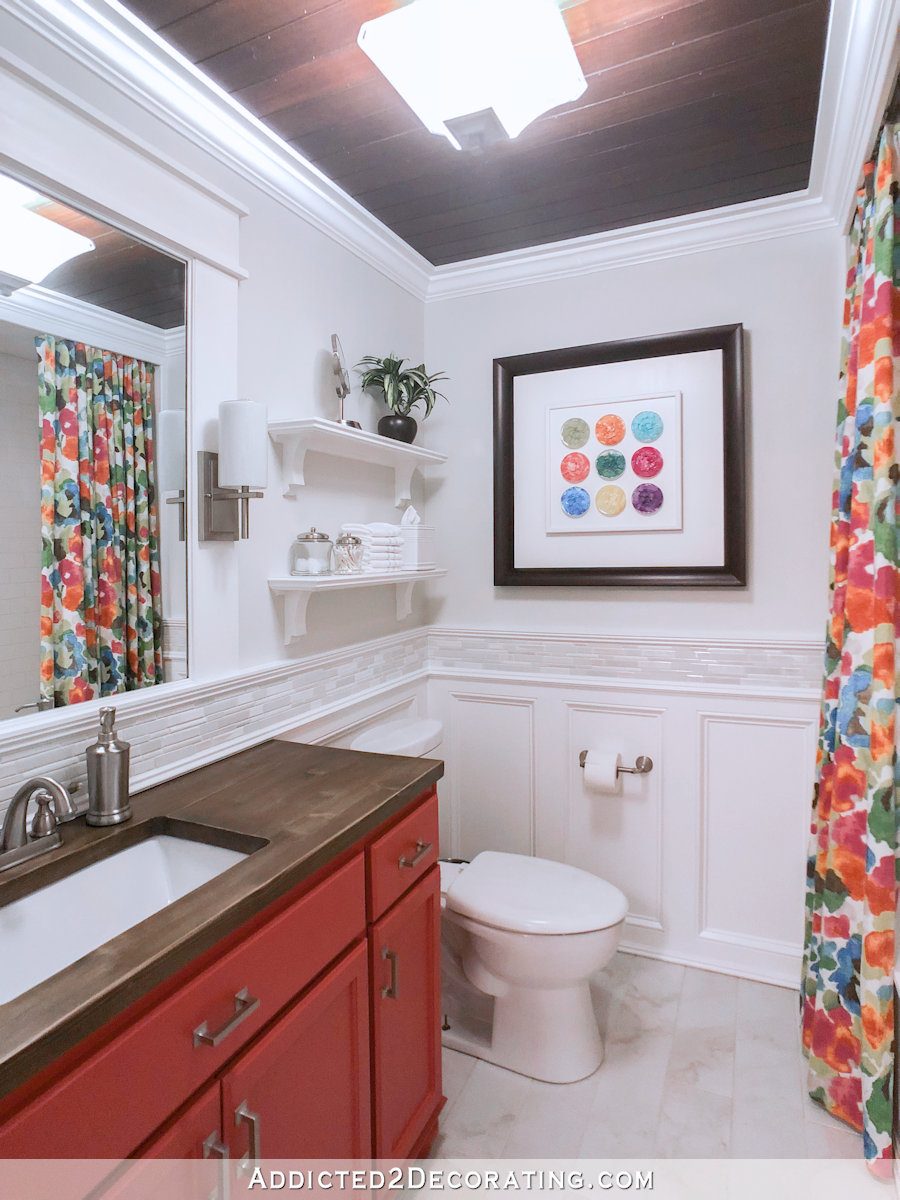
So hopefully I can get this bathroom finished up this weekend. Now that the countertops are done and the cabinet is almost painted (I used Behr Tandoori on the cabinet), I just need to paint the walls white and make a new shower curtain.
Helpful sources and products:
Want to see how I built this wood countertop that accommodates an undermount sink? You can see that here…
And if you missed the original before and after on this bathroom remodel (where I took the whole room down to studs, floor joists, and ceiling joists, and then rebuilt the whole thing), you can see it here…
- Minwax White Wash Pickling Stain – This is what I used to seal and lighten the countertop. It’s what I had on hand, but I would imagine any water-based white wash pickling stain would do.
- Old Masters Wiping Stain in Dark Walnut – This stain is amazing for any project where you need to even out a stain color or get consistent colors on different types of wood. This is what I used to refinish my piano, which had at least two, if not three, different types of wood that all needed to appear the same color. It did an amazing job. In cases like that, just be sure you get the wiping stain and not the penetrating stain.
- General Finishes High Performance Topcoat – This is, hands down, my favorite clear topcoat. It’s water-based, but it is so durable. This is what I used over my painted kitchen cabinets, and y’all know that I’m very hard on surfaces. But I don’t have a single scratch or chip in my painted cabinets, and my cabinets are so easy to clean. I always use the matte finish, which has just a slight sheen to it.
Update:
My bathroom makeover is finished! Want to see the entire project from start to finish? You can find every single post about the bathroom makeover right here…
Or you can skip to the end and see how it turned out. Here’s a peek of the finished bathroom…
You can see more pictures on the before and after post right here…
*This post contains affiliate links.

Addicted 2 Decorating is where I share my DIY and decorating journey as I remodel and decorate the 1948 fixer upper that my husband, Matt, and I bought in 2013. Matt has M.S. and is unable to do physical work, so I do the majority of the work on the house by myself. You can learn more about me here.


I love it! And I’ve never minded the knots in pine, so I thought it looked great when you refinished it the first time. I’m loving the coral color on the cabinet as well! You do great work!!!
Great information! I actually love the knots in pine as well. We are building a very industrial/modern home and I sought out pine to wrap our exposed beams with and also for some accent pieces. I like how it adds some rustic warmth to our space and makes it feel more homey!
Oh so pretty and I love the knots!!! I’m thinking that the cabinet color is just the splash you needed in there and with white walls it’ll really be pretty. Can’t wait to see it completed.
And, again, your eye for detail shows me just how bad I would be if I tried to do what you do. I didn’t think the old counter (or the interim version with the glowing knots) looked bad until comparing it to the new one! Great job!
Love the vanity color! So much fresher than the gray!
Great job minimizing the knots. The color is perfect. Onevtip on GF HPTC. Their matte isn’t as durable as the higher sheens, so they recommend a coat or two of a higher sheen first, then finish off with matte. On furniture, I do 2 coats of flat, 1 coat of matte.
Yes! Good tip! I think that’s a pretty consistent rule-of-thumb with basically all clear coats, both water-based and oil-based. The glossy finishes are the natural finishes, and they have to add something to make them matte. Whatever they add makes the finish not quite so durable. I always forget that, but that’s true with oil-based polyurethanes and Waterlox as well.
I was hoping this color would show up in a room someplace 🙂
The other issue with flat sheens is that the flattening agents can cause a white haze if applied too thick or when applying multiple coats.
Oops, sorry, replied in the wrong thread.
Another blogger that I follow always uses some kind of primer on pine before she stains it….it does a great job of getting rid of the orange-y tones. I think it’s made by Minwax. That would save a lot of steps.
If you’re talking about Minwax Wood Conditioner, it doesn’t do much on pine. It might minimize the splotchy appearance a bit so that the stain color is more consistent over the surface, but it doesn’t do anything to minimize the actual color (orange and yellow grain) of pine.
I really liked the old color cabinets but with the new stain on top and the white walls I must say the new cabinet color looks very nice! You have a lot of patience that I wish I had.
I love the new cabinet color! I think it will go really nicely with the artwork in the hallway and makes the bathroom feel more fun and bright (and therefore more like you!) Can’t wait to see what fabric you use for the shower curtain. I kind of hope that bold floral print comes back, the one you were originally going to use on chairs a year or two ago. 🙂
Spoiler alert! That’s the one. 🙂 The watercolor floral fabric that I originally bought when I tried to turn my living room into a dining room. 😀
Ah! Yes! It’s going to be gorgeous!
Called it (to myself, in my house, with no-one but me to hear it, btw)! Yay! That was super pretty!
Oooooooo! Love that print and I’d hoped that you wold use it for something!
OOOH! Super exciting! That will be a lovely contrast to the teals and blues. Yay! And, I’m really glad you’re going to try white walls for a while. I do think white walls will work well in there!
Ohhhhhh! I am so happy you went with the coral! I love the whitewashed pine. I may use that in our cabin. And I loved the knots in the first stain picture. But those are perfect for my rustic home not your eclecticly elegant home. The finished counter top looks wonderful. And did I tell you how much I LOVE THE CABINET COLOR! Lol
Sheila F.
I have to say, the countertop and new cabinet color are looking pretty awesome!
Hey there! I was so excited about the results of your vanity and decided to try it on a bar table I just built. I’m a little worried as after applying the pickling stain and two coats of the wiping stain, it does not look walnut at all. I’m not sure why!? I’m afraid I will have to sand it down and start over. It looks as if the wiping stain has barely tinted the pickling stain. I think perhaps I should have stained it once before the pickling as you did originally.
I’d love any suggestions of you have them!
Thanks for sharing your process; your results were lovely.
Spitballing, I wonder if adding some type of blue colorant/tint/paint might have helped with the orange undertones. Color wheel opposites.
I just made a pine-topped table and had to sand the whole thing down because it splotched. Yech. Second staining with conditioner was much better. Pine can be so porky… blotchy, stain reversal… it can be a such a crapshoot (no bathroom puns intended).
Love the new cabinet color and your counter turned out great!
I’ll be interested to see how the whole thing comes together with the shower curtain and the white walls. I suspect it will be stunning. I will say tho, that first picture of the gray cabinet with the countertop very light was quite attractive. I thought that was the finished version at first.
Love the vanity color. What is the brand and name?
Thanks
She listed it in her post: (I used Behr Tandoori on the cabinet)
Looks great, as always! Now that you have the organizing “bug” how about adding pullouts to the bathroom cabinets too? They might be helpful for Matt too…
Yahoo! I am so glad to see the coral color back in your home again! Can’t wait to see what beautiful shower curtain you create!
I so love that ceiling…
Did you spray the vanity or brush it?
Another example of why I love you! I would have ripped out that counter and built a new one, or bought a thin veneer of finish-grade something or other and covered the top with it. Guess I just don’t like redo projects! I once had to re-make double width drapery panels, and almost didn’t, because of the work involved. But I loved the fabric, only paid $10 for the 20 yard bolt at a closeout, so I soldiered on and did it. BTW, I also love the coral, and the shower curtains are going to top it all off! Love that fabric!
Love love love all the changes in bathroom! Fantabulous!!
Will be looking forward to the finished project. Do love the coral cabinets!
hi kristi! i love this! we did for a temporary counter in our kitchen. I didn’t notice the yellow until you pulled back the shot! great decision. I don’t think i have heard of wood bleach. laura
Love, love, love!! Beautiful. And I tho’t the gray was really nice. (just not colorful.) Can’t wait to see the fabric!
Colorful Kristi is back!!! I can’t wait to see how you transform and already lovely bathroom.
I love the coral cabinets too, that color will certainly brighten up the bathroom. But I also think that leaving the walls the soft shade of green would be great with the floral fabric of the shower curtain. I’m looking forward to seeing the completed room!
Beautiful counter, and oh the coral!! So a note about warm colors in bathrooms without much natural light. I am just beginning to facelift an 80’s full bath in our home and have so far gotten the blue country wallpaper off the largest wall, revealing navajo white paint underneath. it is SOOOO boring (esp since it matches the deep yellowy cream color of the tub & surround and cultured marble vanity top). I had been thinking I could do a color scheme of honey & white but now I see how bland and flat that would look with only a small window up high for light! I got to googling/pin searching and am very taken with coppery/rusty/faded clay colors mixed with whites or cream tiling. Not too ornate like the Tuscan trend era but simple and WARM. So I see your WARM vanity and I’m cheering! It does the right thing for your space and the surrounding cooler colors in the hall.
I love the new cabinet color, it really makes your hardware pop. Any chance you’ll be adding the same clever pull out storage shelves to the bathroom vanity? I’d love to see your ideas for getting those organized, mine become the pit of despair because the cabinets are impractical for all fo the little items that need to be stored. You’re amazing and I look forward to every single post! Thank you for keeping up this blog!
Love the counter top and that color is beautiful. Every time you walk by the bathroom, you will smile!
Awesome bathroom.
I’m just curious. I don’t mind your messy project time but I am wondering …. you don’t ever struggle getting things off. Example the stain on the sink? You never have to use any products to get that off that might damage the sink finish???
Just a sponge, water and some Comet cleaner. Wood stain won’t stick permanently to glazed porcelain. I guess over my 20+ years of DIYing, I’ve learned what products will stick to what surfaces, and which ones will come off easily (or with a little bit of scrubbing). The stain came off of the sink pretty easily. It was no more difficult than scrubbing soap scum off of a porcelain surface with Comet and sponge.
I really liked the vanity before and wondered why you would change it…..well, you were right again!! It looks fabulous! I love the way you tackle problems and aren’t afraid to figure things out as you go.
I have come to learn that I just can’t love coral furniture or fixtures. But I love that you are doing a new shower curtain in that pretty floral fabric! And warm colors in a bathroom result in more flattering light, at least in my personal experience! haha 🙂 I’m excited to see the finished product!
I love this coral shade. I love the contrast with the bathroom doors and hall doors. So so pretty! I always liked it before, but looking back, I realized it looked rather drab. This really pops and will look so fresh with white walls. And the floor and wall tile, and ceiling will still look beautiful in here. It’s great when you have an eye for a change that you know will go/compliment everything else, instead of feeling the domino effect after making one change to it.
Hi Kristi
I did not read all the comments, so I apologize if I am repeating something already mentioned. I just read a post/ blog from someone who always uses a black tea wash before staining the pine. It’s not used to change the colour, but he says it has something to do with the tannins in the tea. I’ll try to see if I can send the link.
Here’s the link for the pre tea stain that may also work to minimize grain and even out the colour.
https://pin.it/yle6tnshetuqnk
I hope it works!
Hi! I’m trying this out and may decide to use it to stain a kitchen table I want to build for my wife.
I’m in the middle of the process right now as I’ve just put on my first coat of wiping stain over the pickling stain. It’s an attractive sort of brown gray right now, but not exactly the depth of color my wife is looking for. I was curious if it’s the next two coats that drive it to that rich brown.
I’m a complete novice at this sort of work, so would you happen to have pictures between each coat? That would be fabulously helpful in terms of making sure I don’t go completely off course.
Thanks for the post and great work! It really is beautiful.
The first coat on my countertop did have a gray appearance to it. The second coat took away some of that gray, and the third coat got it just where I wanted it.
I just kept adding coats of stain until I got the color I wanted. And don’t rush the process. Make sure each coat is completely dry before adding the next coat.
Awesome! Thanks, so much. I thought that would be the case, but wanted to make sure I wasn’t completely off base.
I’m really pleased with the results so far and didn’t want to let my ignorance destroy it. 🙂
Thanks again!
Thank you so much for posting this! We had a friend build us a new dining room table and to keep cost down he uses pine. I had what I wanted in my head but had no idea how to make it happen and with the information in this post it came out perfect!
Thank you again!
That’s awesome! I’m so glad to hear it worked as well for you as it did for me!
What happened to you? I see your last blog post was in January, I miss you,
My last blog post was yesterday (2-8-19). Can you not see them?
My computer d a update and I think you are in my spam file. I will remedy this. Thanks.
I am assuming this would work well on a pine sliding barn door. What do you think?
Of course! 🙂
Trying this right now. I have a pine tabletop, wood from big box store.
What I’ve learned so far…
If you have to start over and strip off your mistakes, this strips off the bleaching too. I did not rebleach.
This whitewash stuff, Minwax, is great but fickle. Work in sections. Use a brush. A rag can leave streaks that are impossible to get rid of. It’s not like stain, more like thin sticky paste that dries super quickly. A brush looks much much better.
I started with wood conditioner, then the whitewash. I will start staining over the next few days and update.
Note: at first I tried just conditioner then Kristis wiping stain. It looked better than the penetrating stain, but still blotchy. I’m hoping to get results like hers on this tabletop.
Then, I will never make furniture with pine again😁
Update. Although I appreciate Kristis technique, it was not successful for me. However, I was ultimately successful r trial and error and I credit Kristi in a BIG way for getting me there.
So, what I learned, and please correct me if I’m wrong. The white pickling stain helps to create a more even color base and does seal the wood a good bit. The dark walnut stain on top of that, to me, seemed to act more like a glaze, staining mostly the pickling product and not as much the underlying wood. In hindsight I might have had success with 2 coats of pickling stain to start. Since this original technique didn’t give me the look I wanted (the wood was still uneven/blotchy, I did the following
Sanded to start over
Painted a base of light gray chalk paint (maybe 2 coats of pickling stain instead would have been comparable here?)
Lightly sanded and stained / glazed? Dark walnut over top of this chalk paint. This Gave it a nice mostly even color, and the grain still subtly popped through.
Still had some knots that simply wouldn’t take color. So I learned more about glazing. I poly’d, dry brushed matching $1 acrylic art paint on the knots, then after drying, poly’d again. I am happy with the results. It is a brown, very very slightly distressed look, and I’m pleased. I preferred no distress but I just couldn’t get things even and I gave up. Thanks Kristi, your info was an incredible foundation in me upgrading my skill set.
Hi! I love how your bathroom turned out! I am doing something similar with pine. Can I use Minwax wood finish penetrating stain or do I have to use old masters?
A penetrating stain won’t work with the process I showed. You need a wiping stain that sits on top of the wood rather than a penetrating stain that sinks into the wood. You don’t have to use Old Masters, though. I’m sure there are other brands that will work. I think that Varathane brand from Home Depot is also a wiping (non-penetrating) stain.
Great finish and an amazing amount of research. I have a knotty pine open riser stair case I’d like to use this approach on. I guess the same approach would work fine, aside from the topcoat, for which I would use an oil based Polyurethane clear varnish for durability.
Outstanding blog and thankyou!
Thanks for this! I have some plans involving the IVAR from Ikea. If it ever comes to fruition, I’ll send you a picture to thank you for figuring this out!
Everything takes so many going-overs. I want the easy option but I guess nothing with a good finish is easy. 🙂