Small Kitchen Makeover – Tiny Condo Kitchen Before & After
Well, my small kitchen makeover is finished. I was beginning to think it would never happen, but it’s finally done, and it only took three years. Or was it four? Heck, I’ve lost count by now. 😀

I still have a couple of projects to finish for the dining area, so I really am just going to show you the kitchen today. Hopefully I’ll have the dining area completely finished this week, so that before and after is coming soon. But let’s get on to the before and after pictures of the kitchen, shall we?
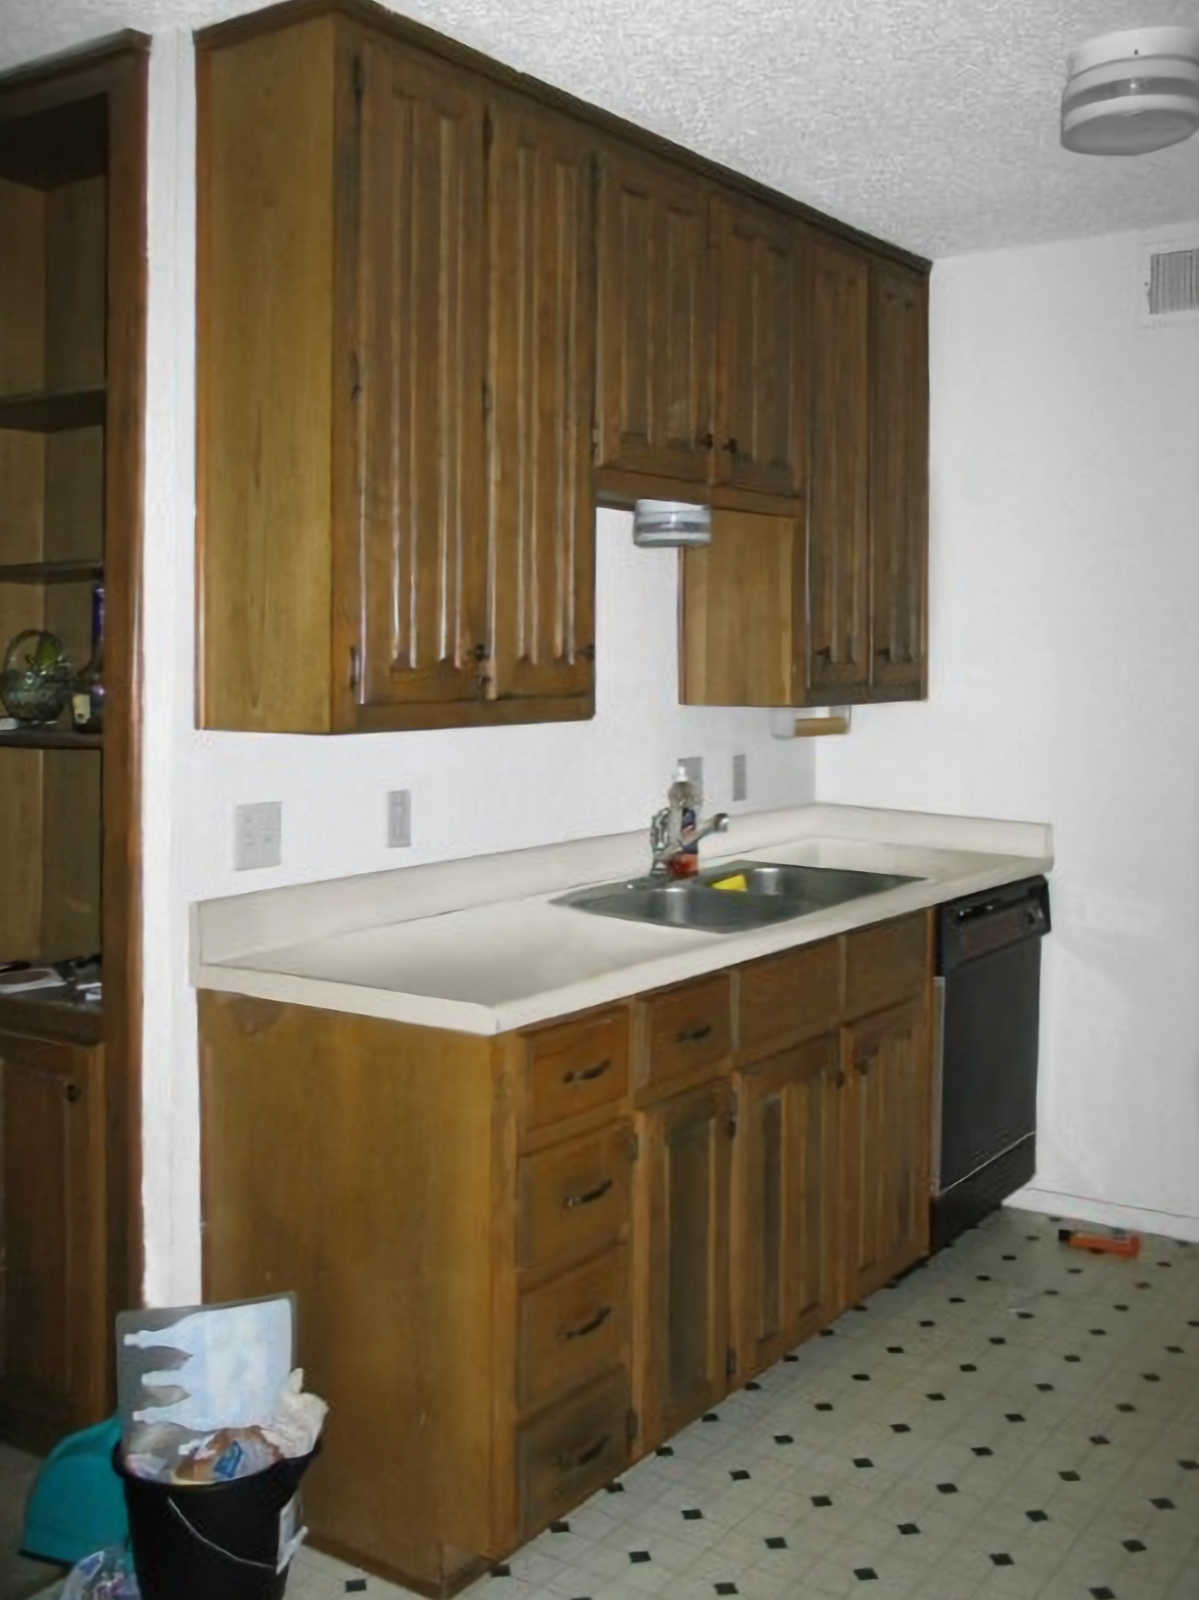
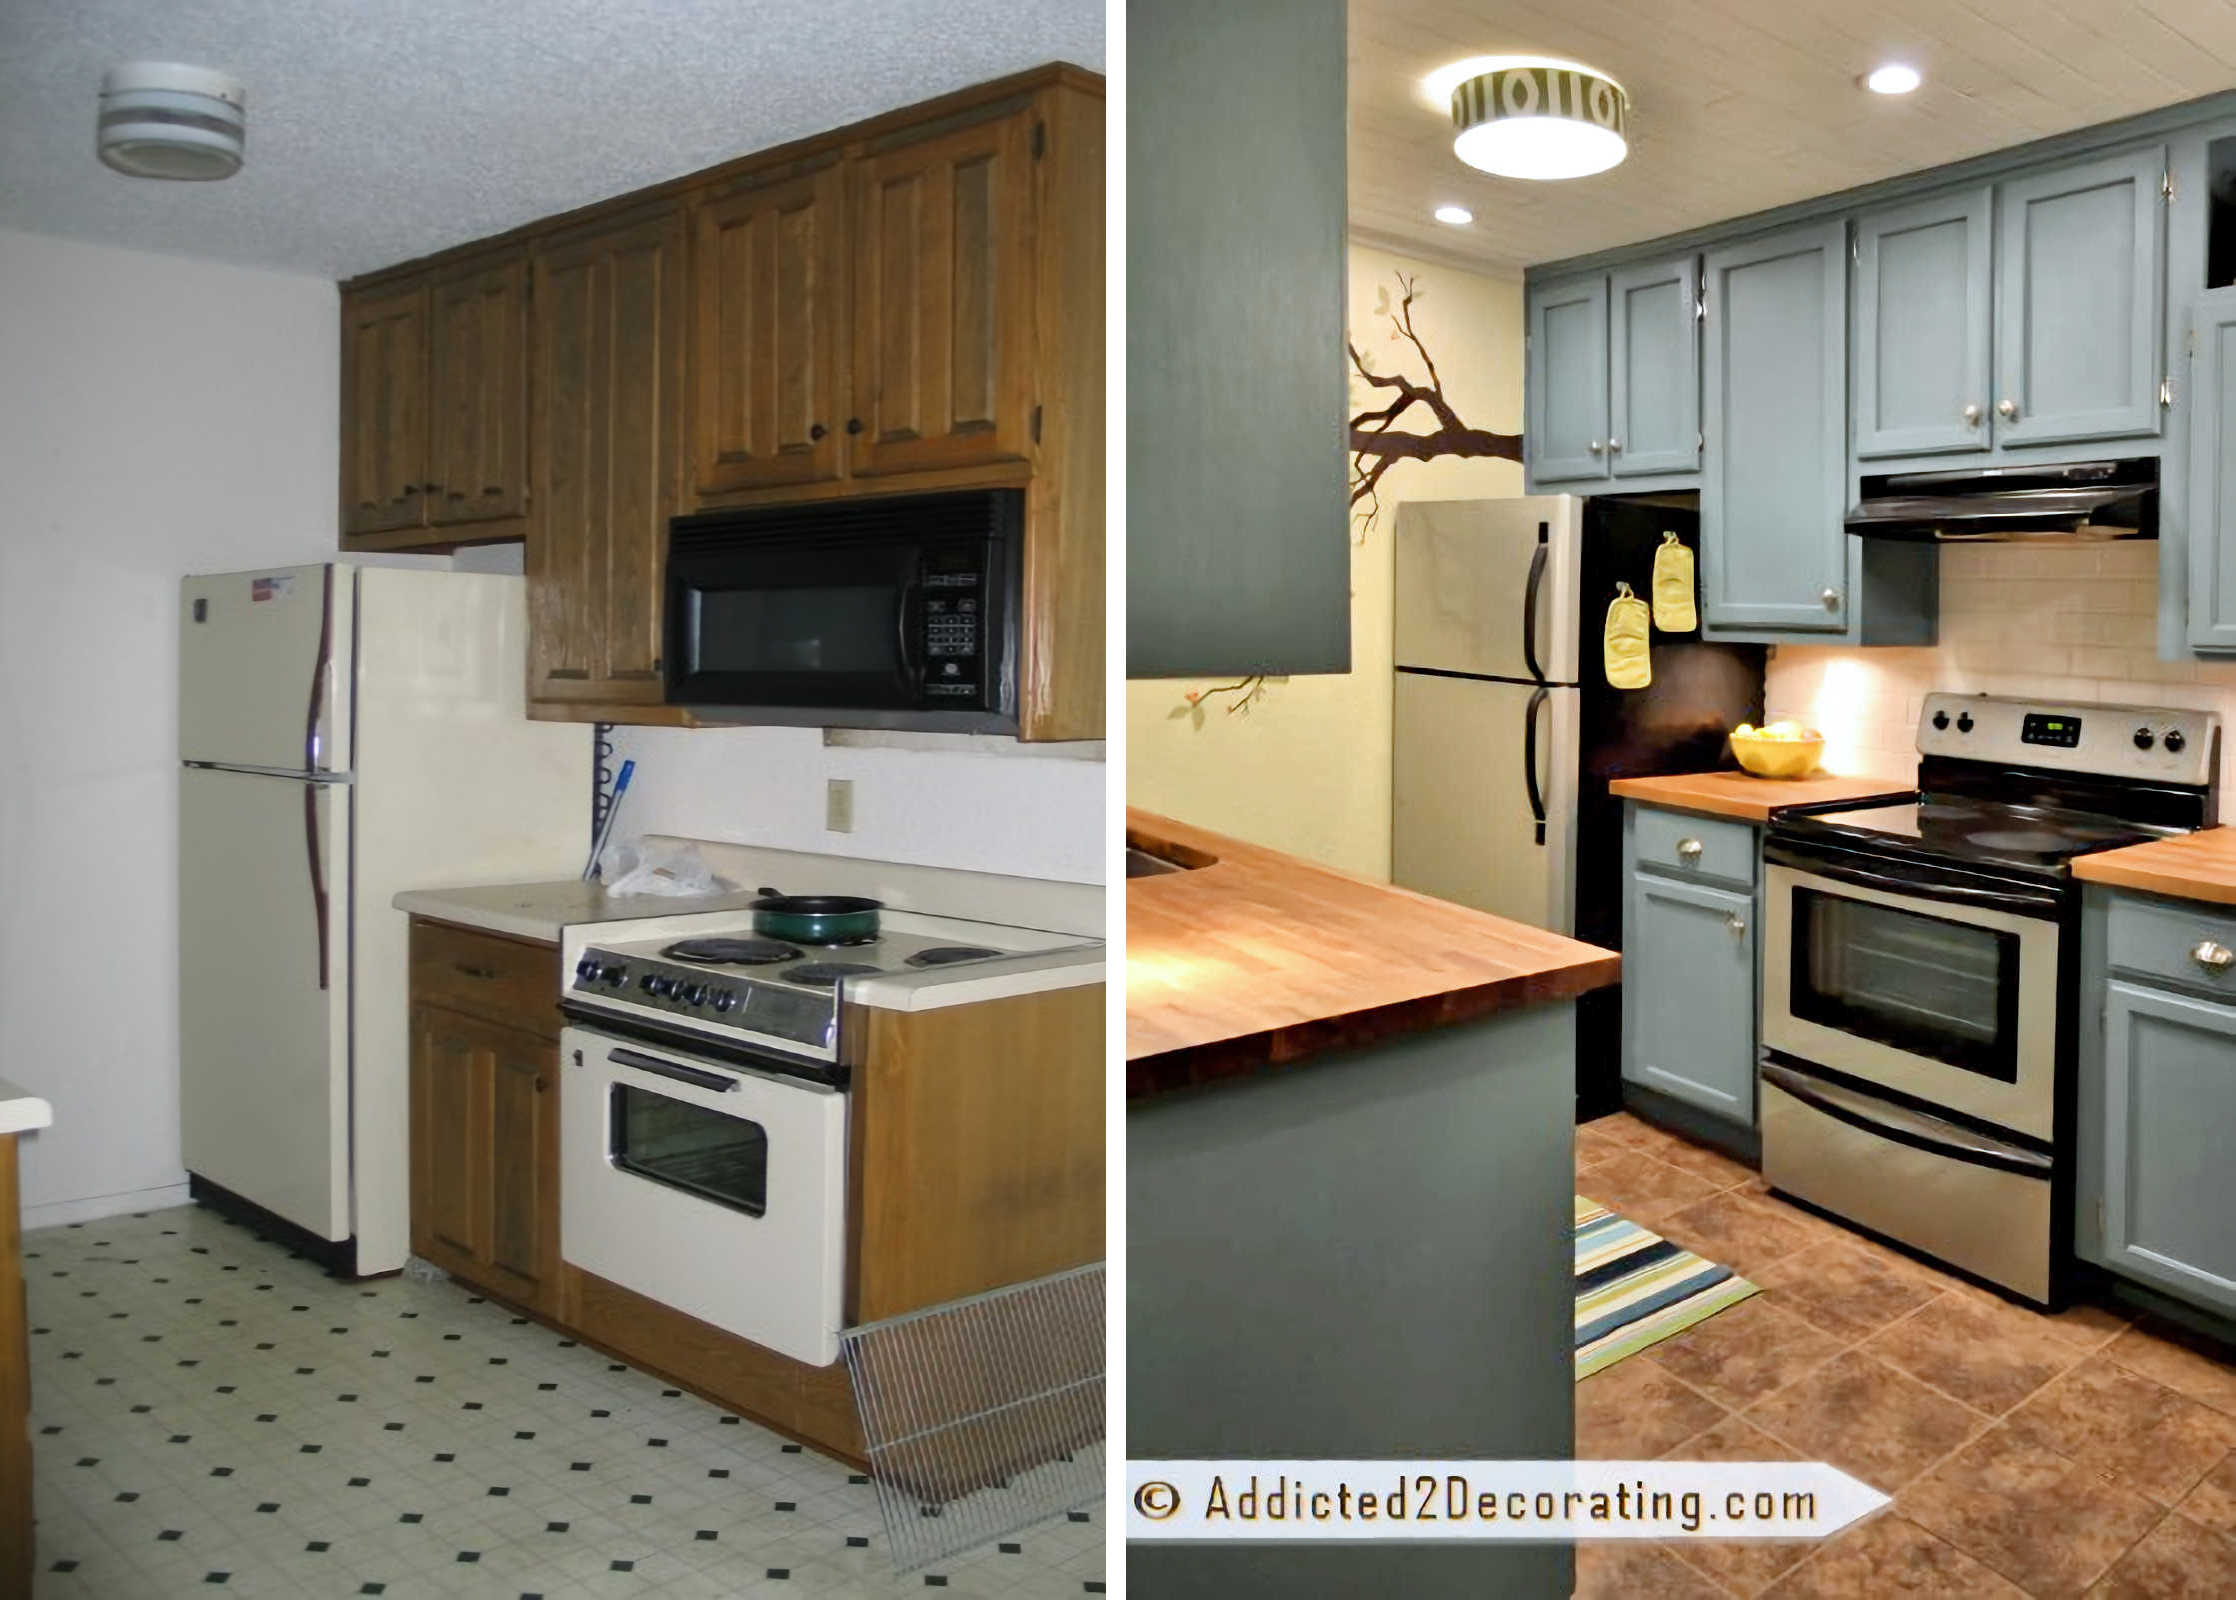
The kitchen was pretty pathetic when we moved in. These condos were built in the early 80s, and it didn’t look like a single thing had been updated between then and when we bought the place in July 2006.
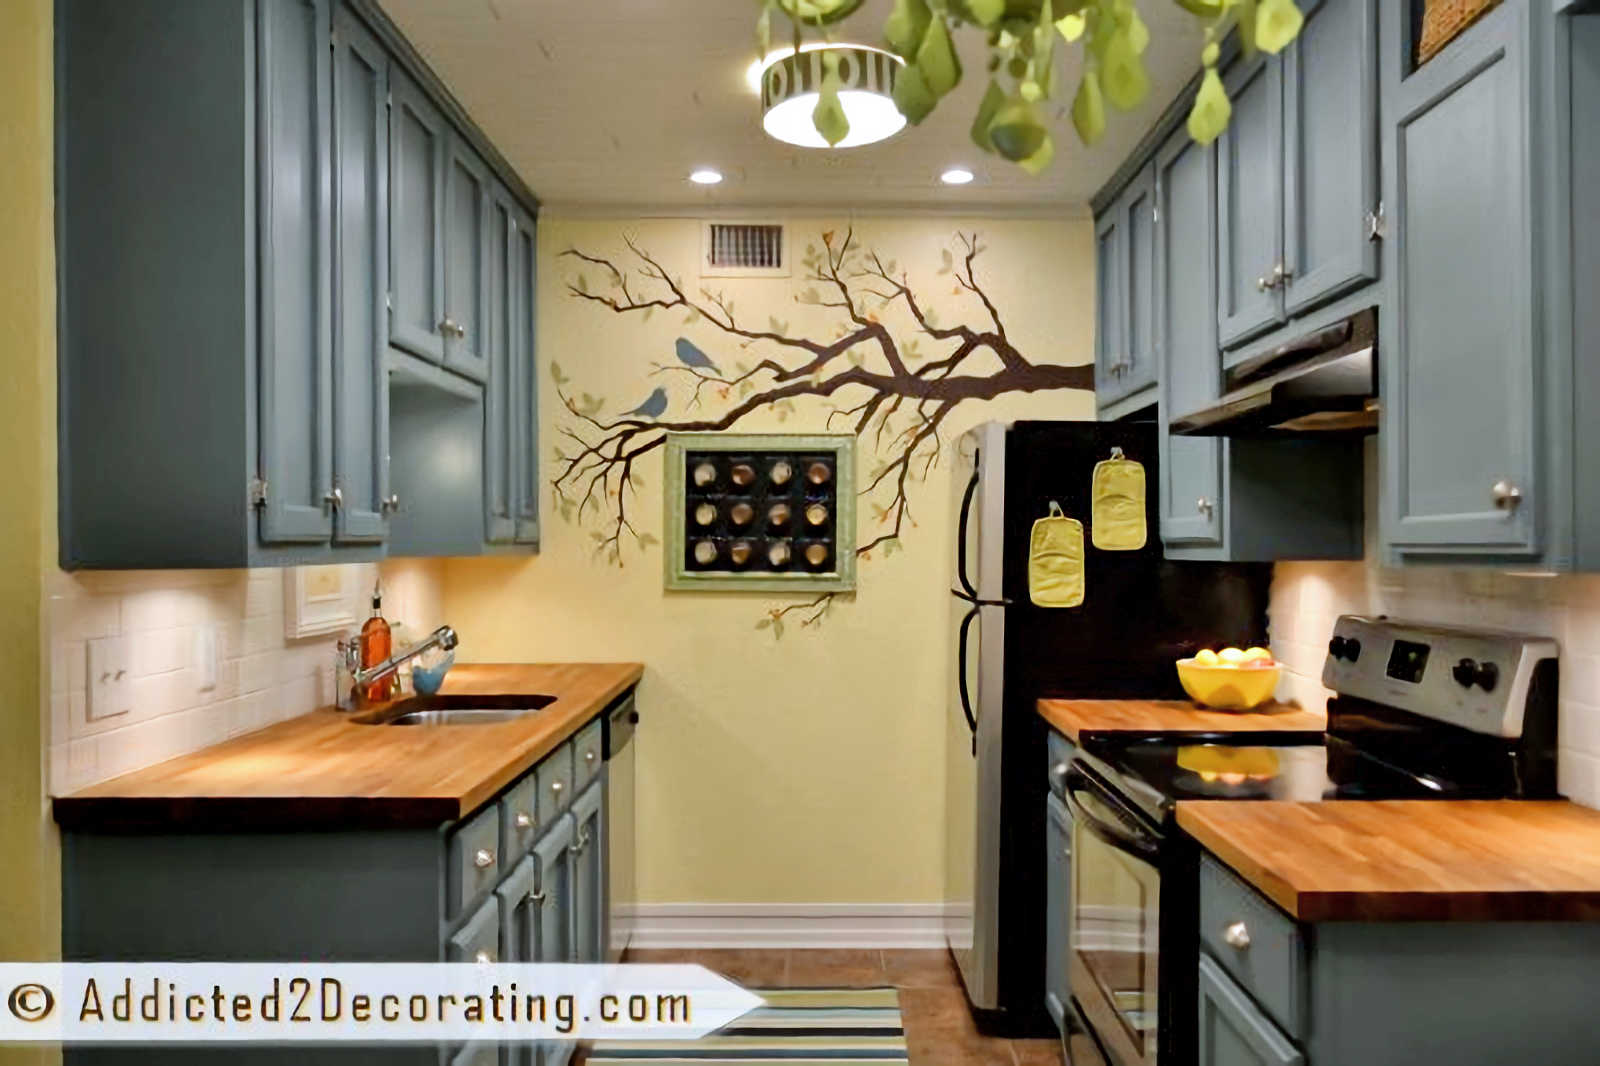
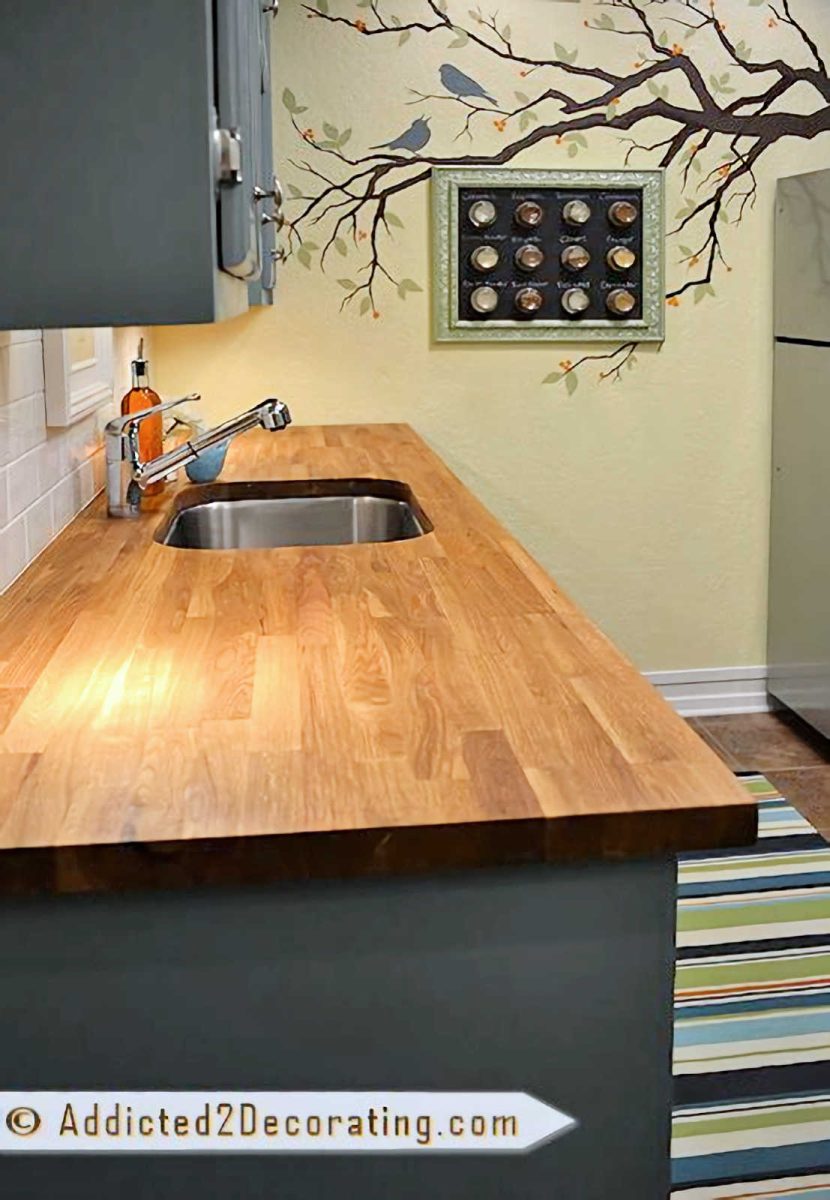
It definitely looks a little different now. After reworking some of the cabinets, I then painted them teal. I swapped the original countertops with a beautiful butcherblock countertop that adds so much warmth to the room. And instead of a plain painted wall, I now have a clean white subway tile backsplash.
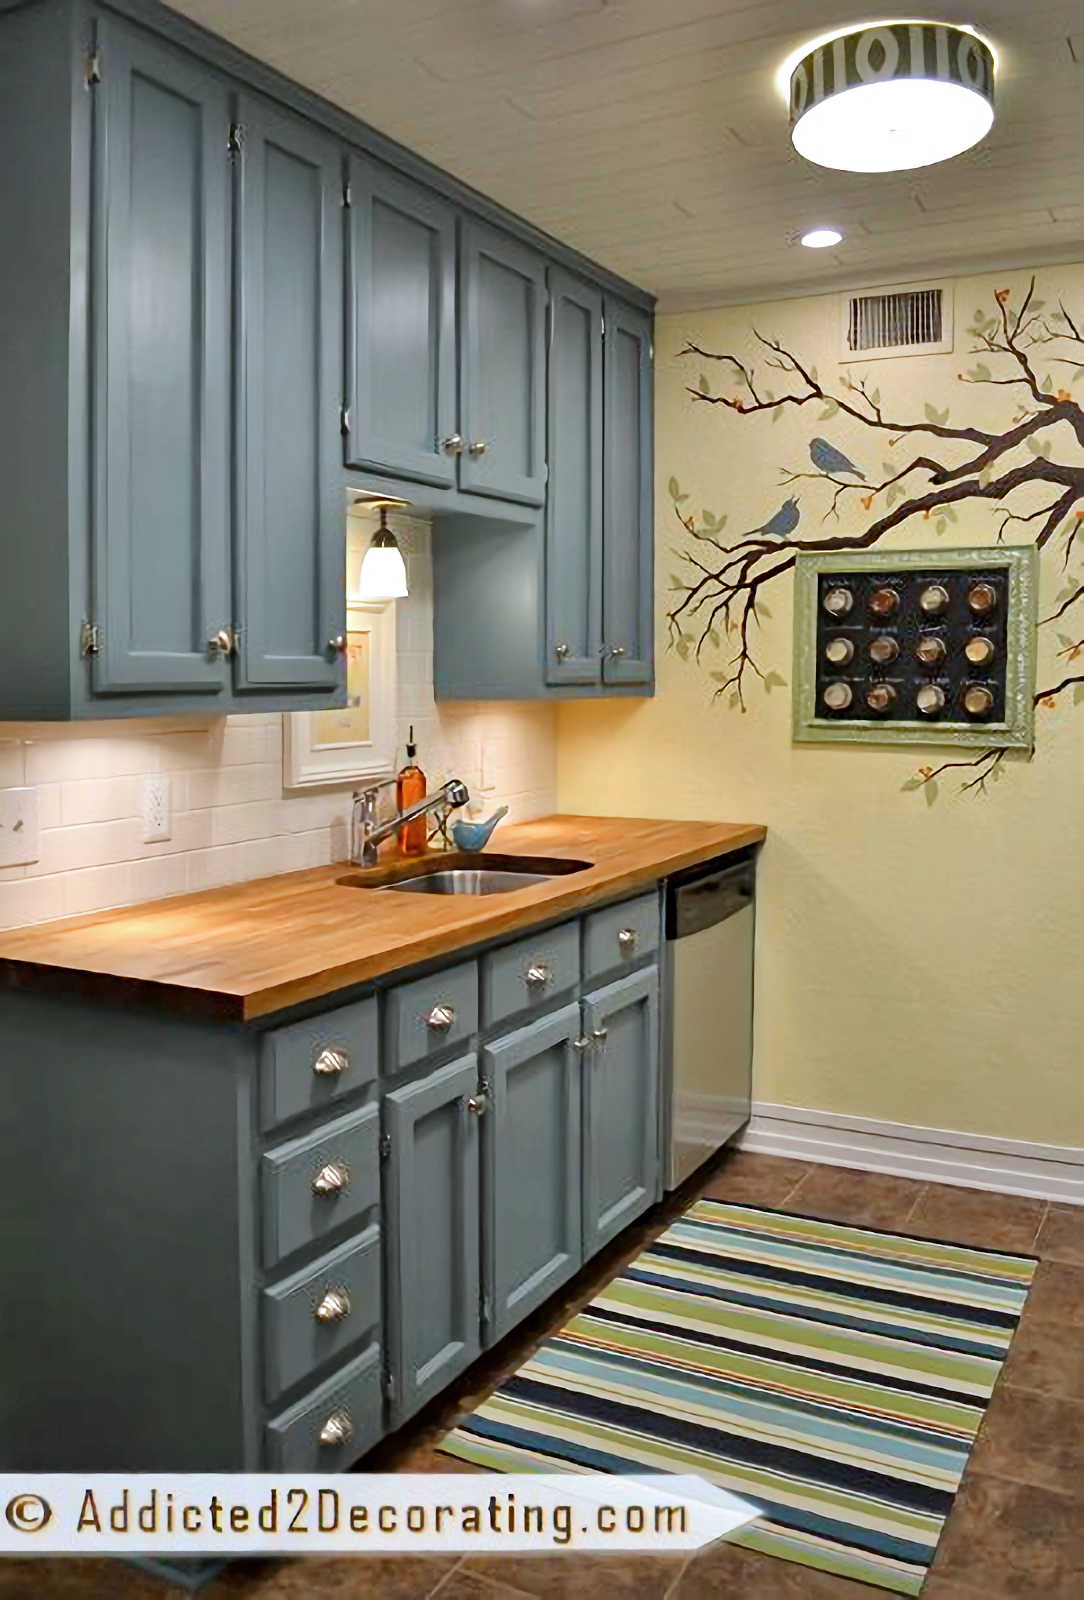
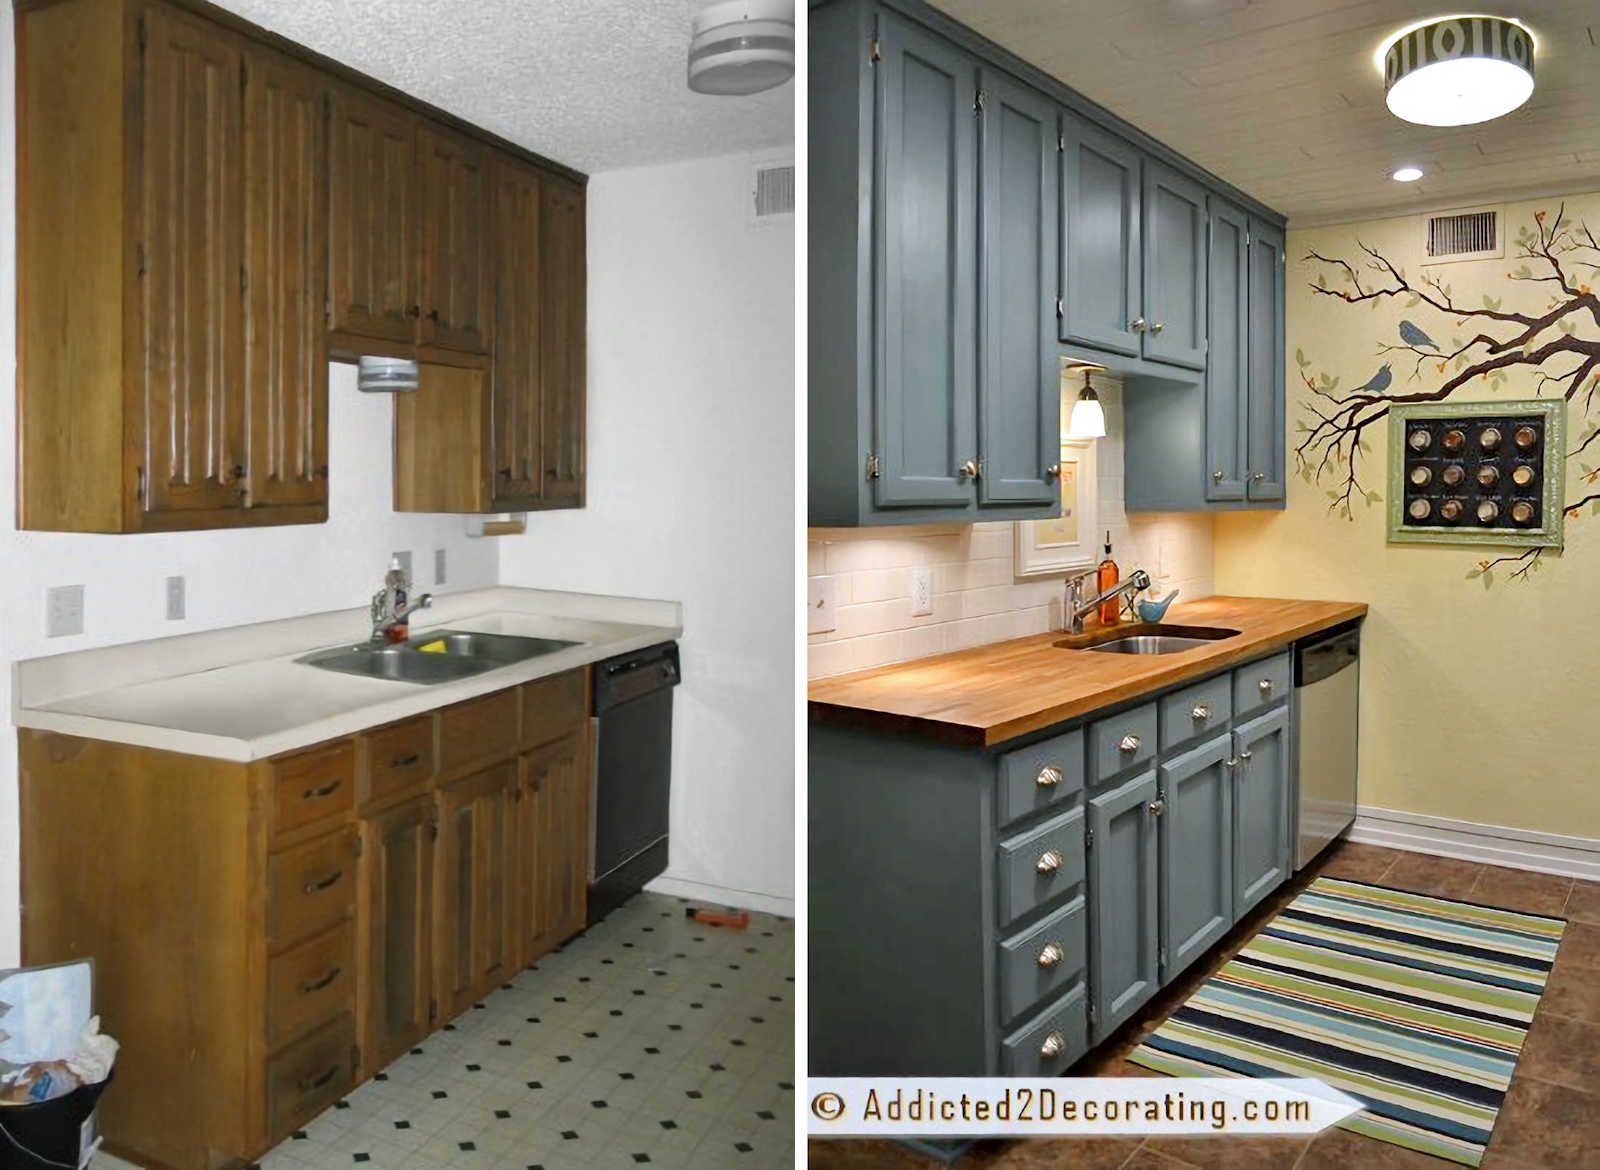
I wanted to costs down on this small kitchen makeover as much as possible, so rather than replacing the existing cabinets, I kept most of them and just painted them. It’s amazing what paint can do! I also did a little surgery on the cabinet doors to turn the raised panel doors into recessed panel doors. The raised panel doors (and some of them were double panels) just didn’t seem right for the room. I’m just not a big fan of raised panel doors anyway.
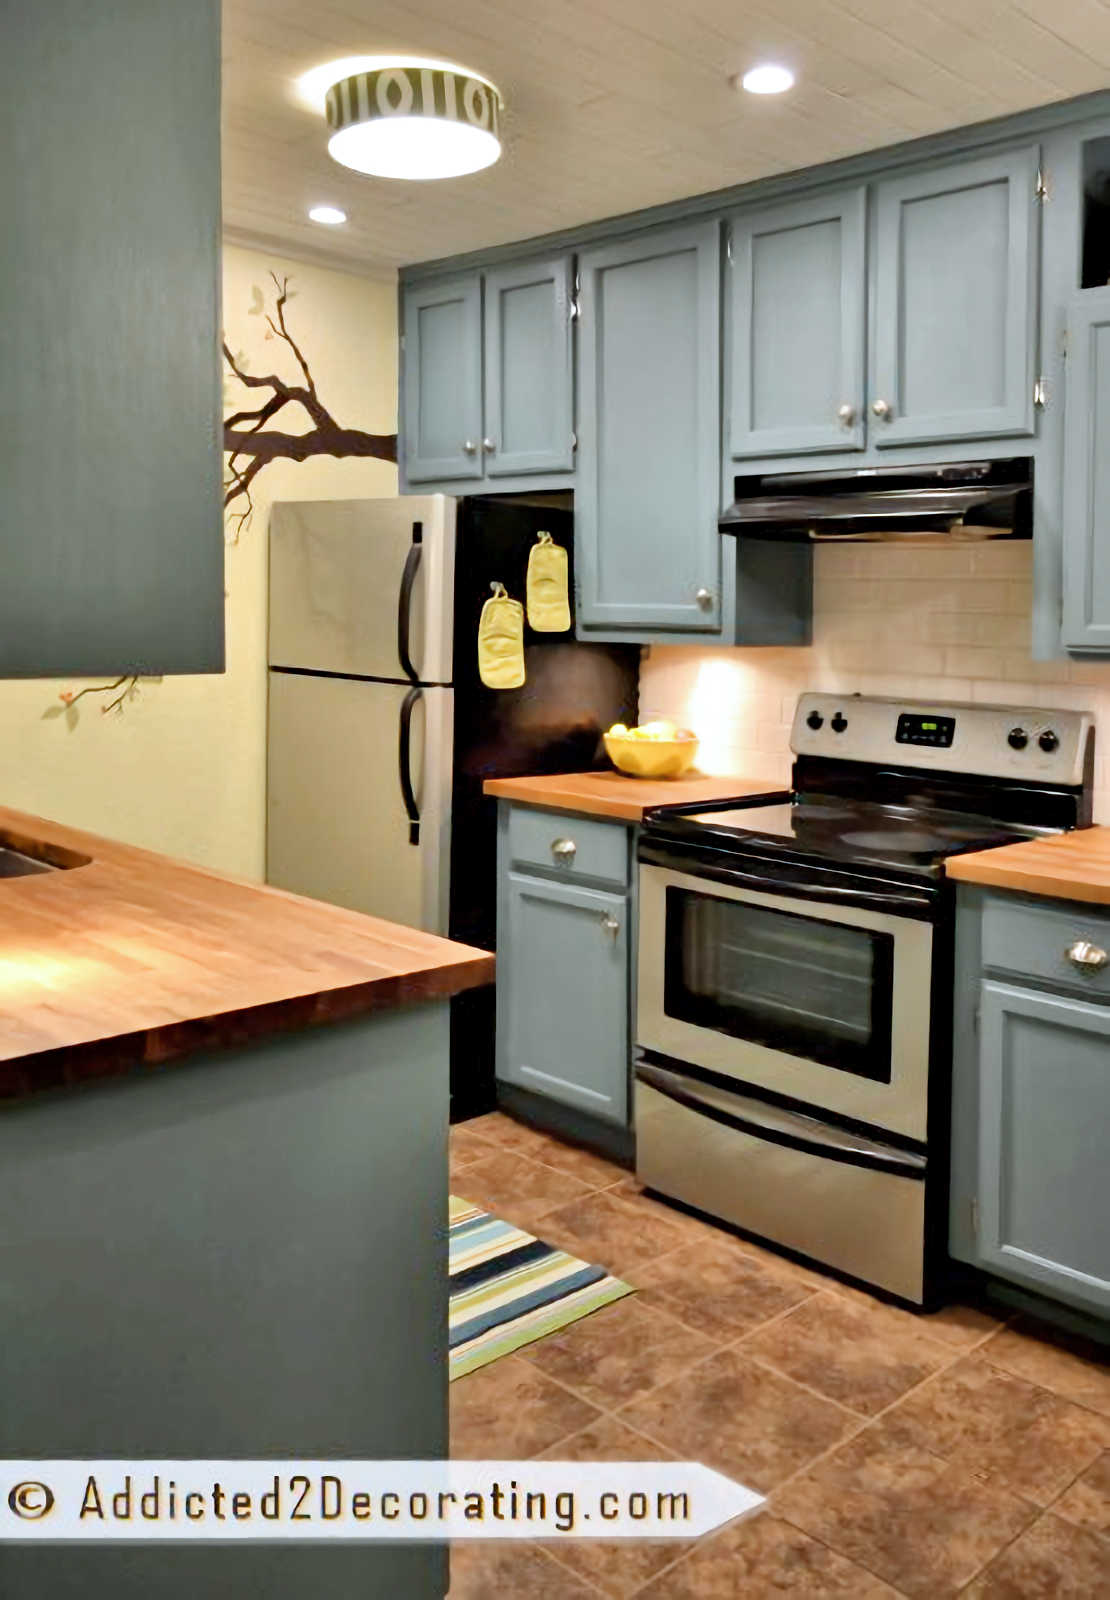
This side of the tiny kitchen originally had a very old-looking built in stove, a microwave above the range, and a very old refrigerator.

I ended up replacing the lower cabinets on the stove side of the kitchen. I just used stock cabinets from Home Depot. They’re not a perfect match, but close enough.
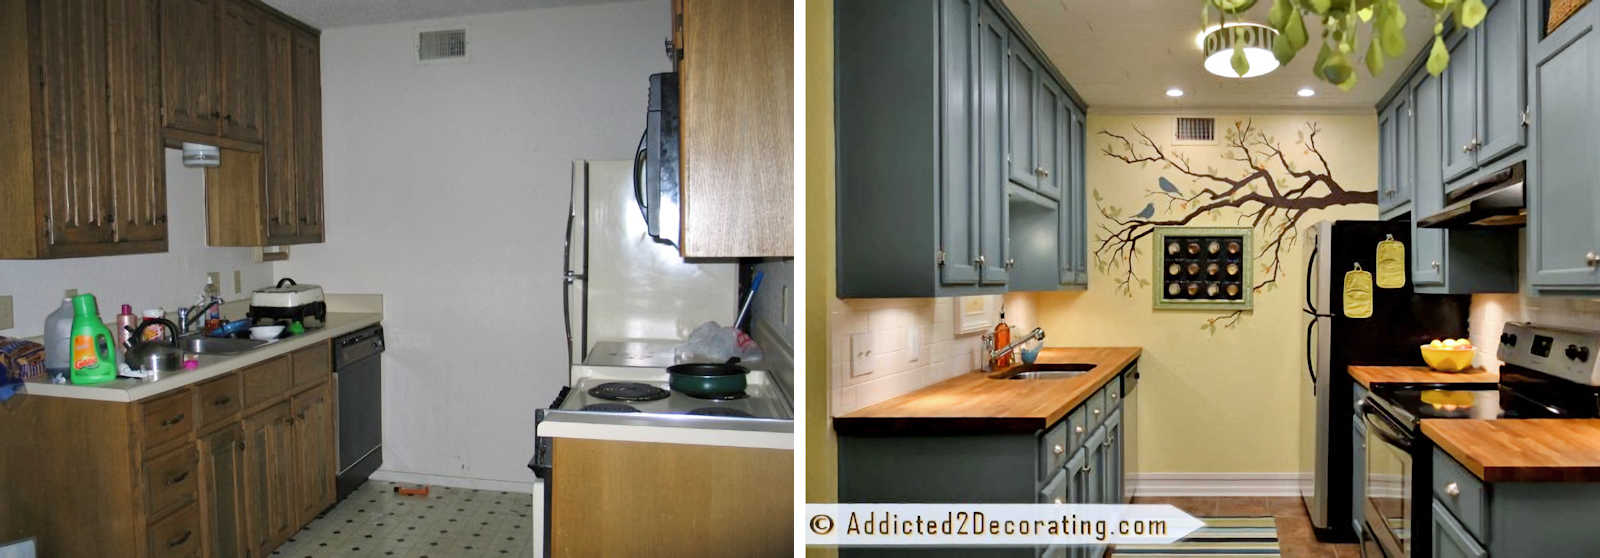
Unfortunately, as soon as we were handed the keys to our new condo, I was a bit too anxious to get the “before” pictures that I didn’t even bother to clear away all of the junk that the previous occupants left behind before snapping some of these pictures. Oh well. You’re getting the truly authentic “before” state of the condo. :).
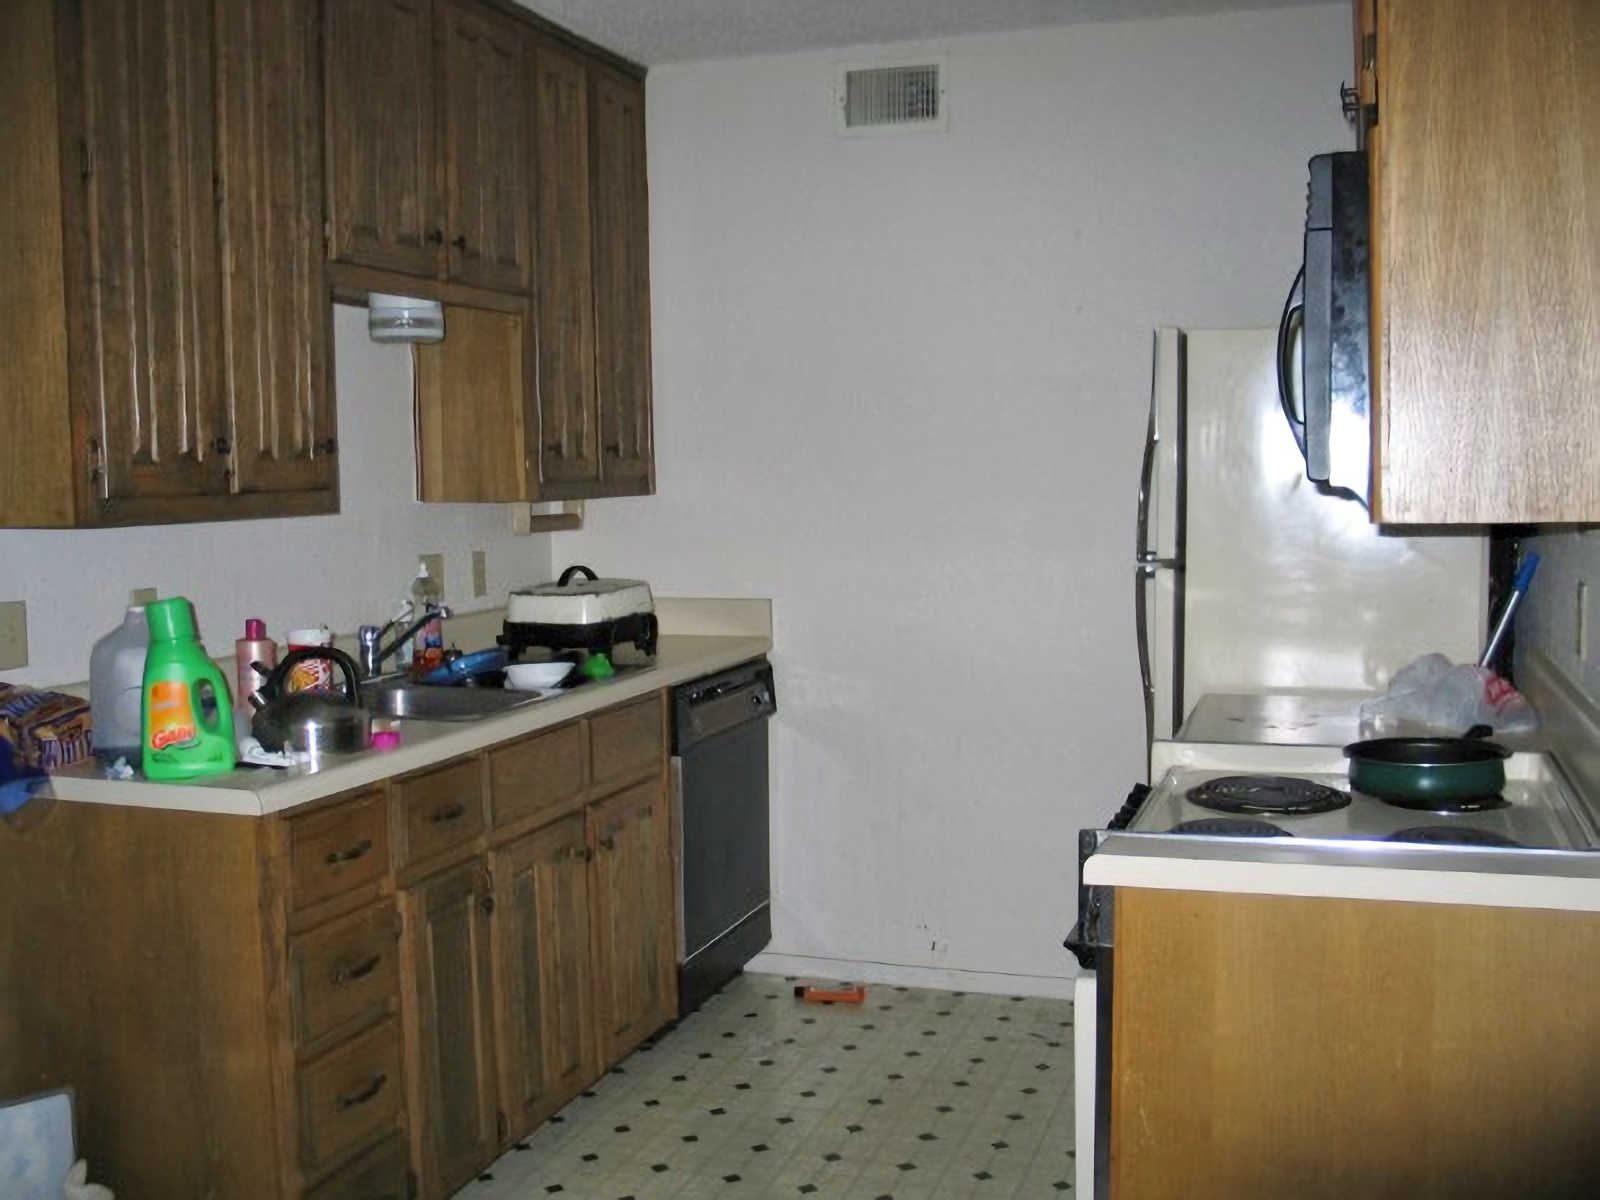
I actually did manage to clean off the countertops for the “after” picture, though. 🙂
Matt’s favorite thing about the whole kitchen is the tree painted on the wall. I painted it freehand, but it actually started out looking a little different than it looks today. Fortunately, my artistic mom offered her advice on how to fix some of the problem areas on my original tree to make it look better.
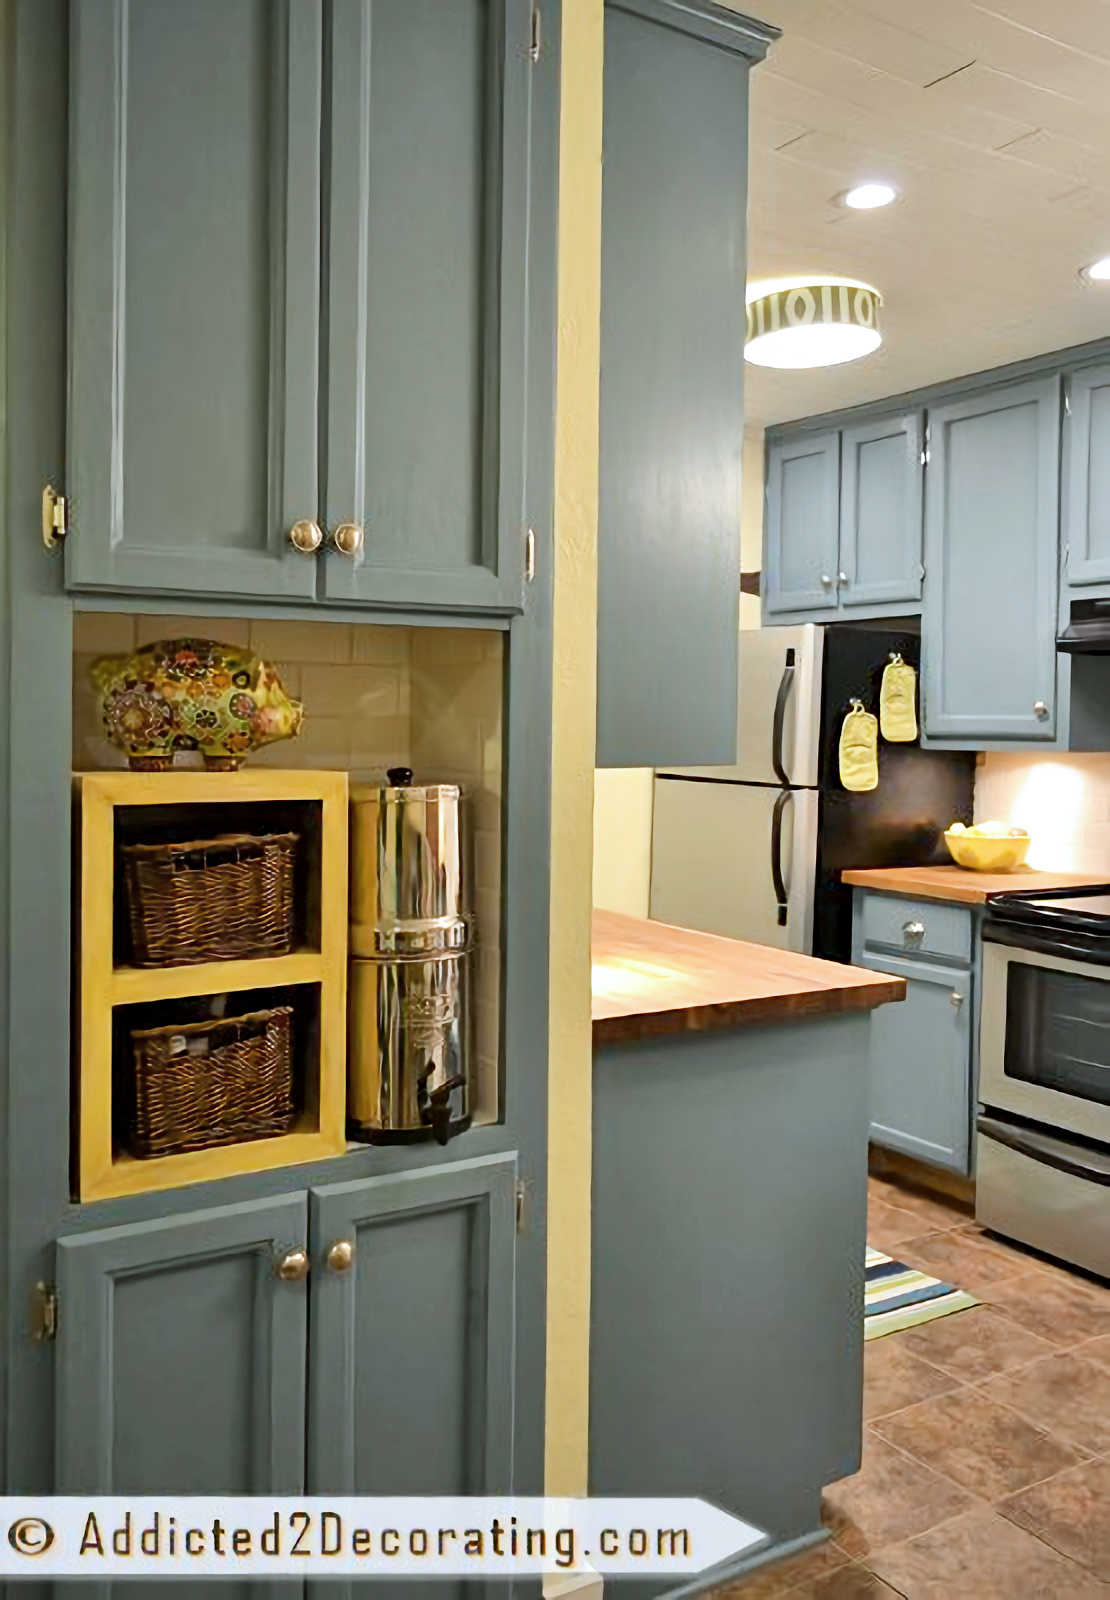
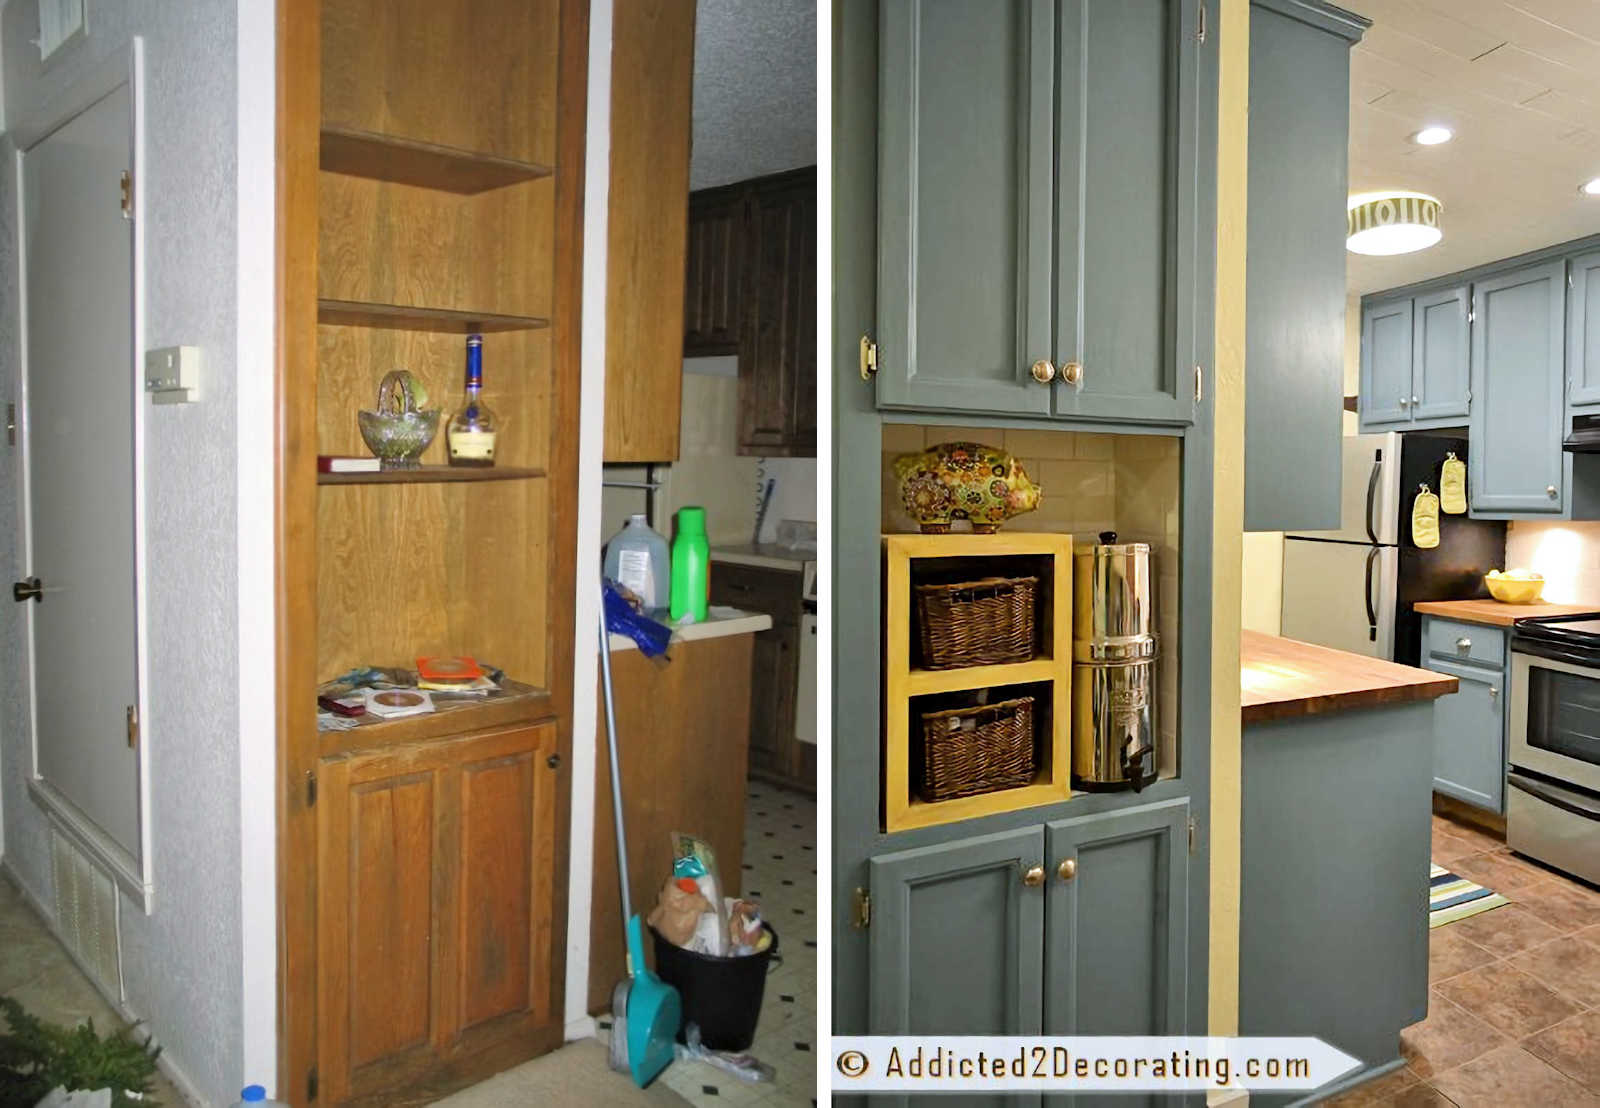
And of course, one thing that makes my kitchen feel complete now is my new pantry. It started out as a bookcase, and not a very pretty one.
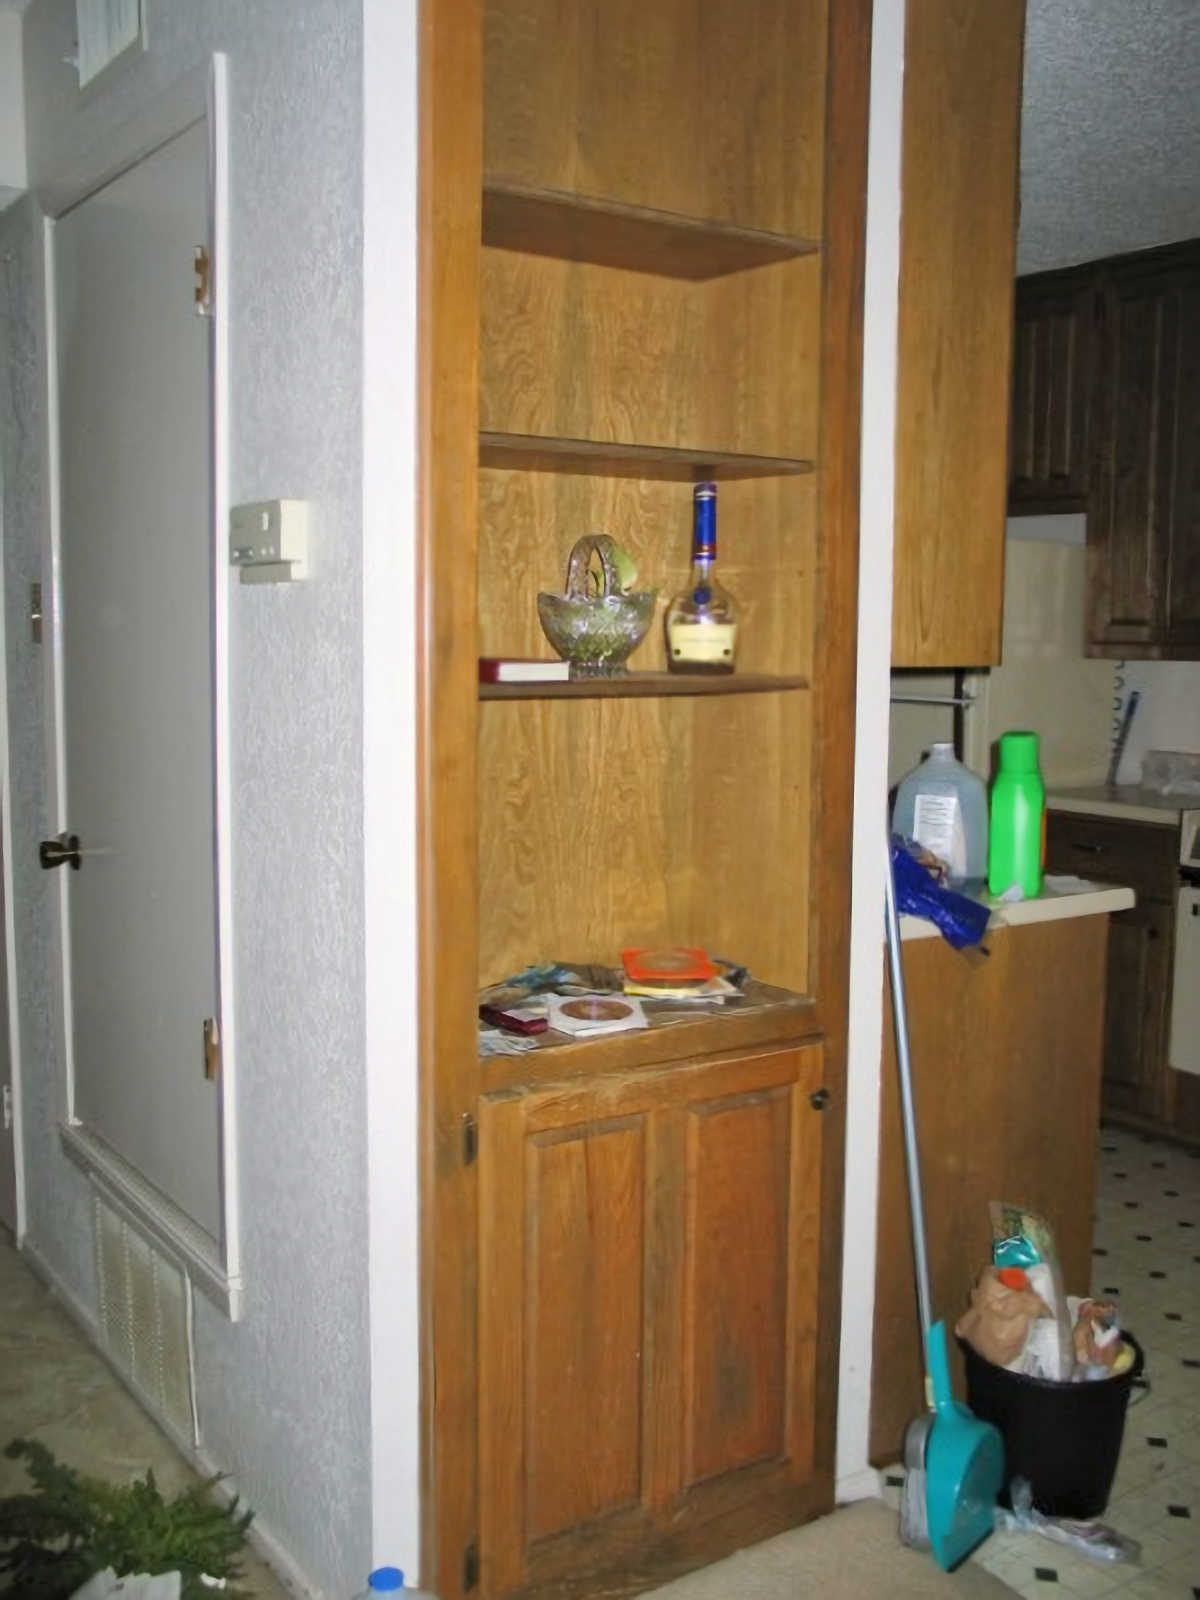
Now that I turned the built-in bookshelves/bookcase into a pantry, it’s now pretty and functional…
Those are the before and after pictures, but here are a few more pictures showing the details of the small kitchen…
My waterproof artwork above my sink is one of my favorite things. No matter how wet or dirty it gets (and I’m pretty messy at the sink), all I have to do is wipe it off with a sponge and it looks good as new.

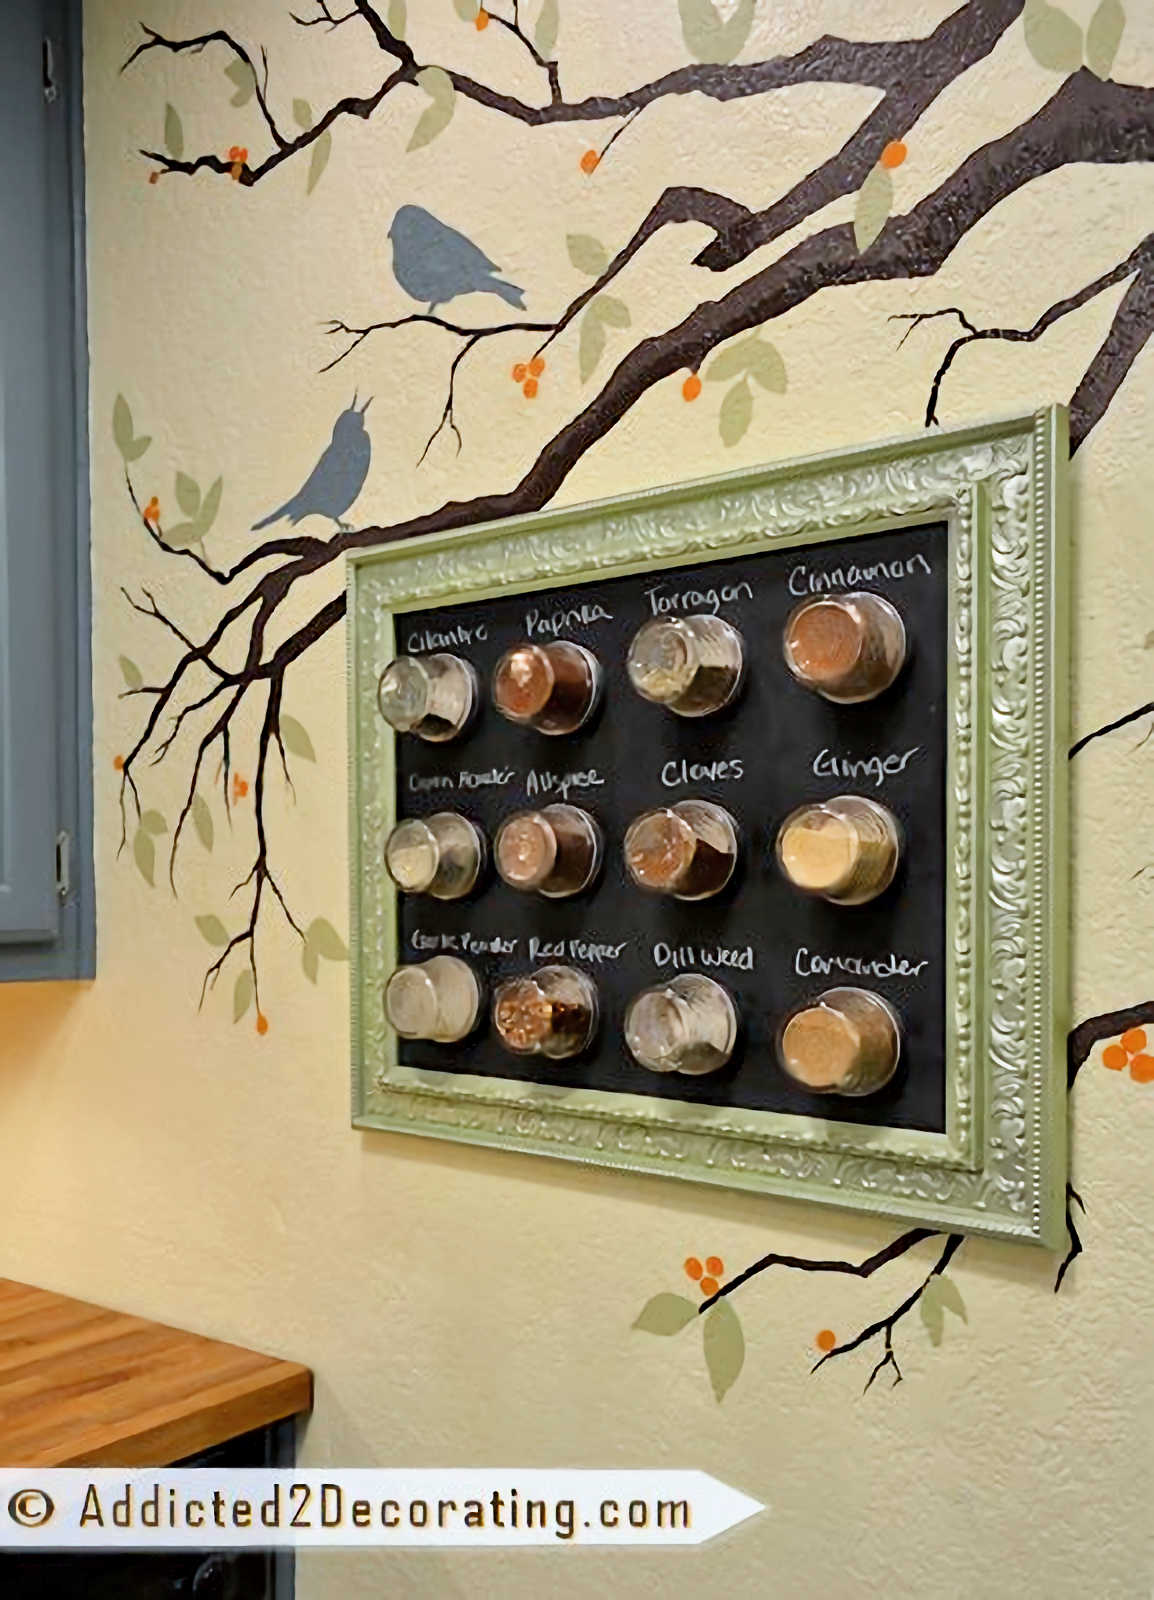
I actually get quite a bit of use out of my DIY magnetic spice board. I guess you can tell, since a couple of them are empty. Ha!
And here’s a closer view of my “new” countertop. I wish I had done them like this way back when I first installed them. I love the way they look when they’re freshly oiled (you can see how I oil and care for my butcherblock countertops here), and the medium brown color is just perfect. I didn’t always think that. I was convinced I wanted dark stained countertops, but I really do love the natural medium brown color now that my small condo kitchen makeover is finished.
And here’s one last view of my favorite before and after of this kitchen makeover…
Here are a few details about this small kitchen makeover:
- Cabinet color: Hallowed Hush by Behr (Home Depot), color matched in Kelly Moore interior oil-based paint in a satin finish,
- Wall color: Rich Cream by Behr,
- Cabinets: mostly original, but I remade the doors, changing them from raised panel to recessed panel. On the lower side of the stove side, I did use stock cabinets from Home Depot.
- Ceiling: I used 1/4″ plywood from Home Depot, cut into 4″ wide strips, and then cut into lengths of four feet. Then I attached them to the ceiling with 1/4″ spacing between,
- Backsplash: plain white subway tile from Home Depot,
- Wall mural: DIY project, and you can find the details here,
- Flooring: peel and stick, groutable vinyl tiles from Home Depot (similar),
- Countertops: butcherblock countertops (similar)
I think that covers everything, but if you have any questions, let me know!
There were a lot of projects that went into this tiny little kitchen. Some of them aren’t around anymore, but you can see all of them here:
[laurel_index title=”Condo Kitchen DIY Projects” cat=”condo-kitchen-diy-projects” amount=”30″ cols=”3″ display_ image=”yes” cat_link=”no”]

Addicted 2 Decorating is where I share my DIY and decorating journey as I remodel and decorate the 1948 fixer upper that my husband, Matt, and I bought in 2013. Matt has M.S. and is unable to do physical work, so I do the majority of the work on the house by myself. You can learn more about me here.


What a great transformation! I love the counter and the cabinet color, and the stenciled wall. Very inspiring, all of it! ~ Angie
Thanks so much, Angie! It’s actually not a stencil. I painted the design freehand. 🙂
Beautiful!! cabinets, counter… and odd as it seems… I had your original floor under my fooring when I had it pulled to lay tile… They must have loved that in the 70s-80s….
WOW! It looks so gorgeous. Of course I’ve been following along with your other projects and got a sneak peak at the gorgeous cabinet color, but seeing it in it’s entirety is awesome. Beautiful work. Looking at all your DIY projects in the space, I’m still contemplating whats my favorite… Great work Kristi! xo Jenna
wow!! Your new kitchen is fabulous! The cabinets and counters are beautiful! Enjoy your new kitchen.
FABBY
Excellent transformation Kristi, well done. I agree with Matt, the tree mural is very special.
Screaming with excitement for you…It is amazing!! I love it and it may have been a long process but so worth the beauty!!
Wow! Amazing transformation. That blue color looks so good with the natural color on the counters! The painted tree is the cherry on the top . Love it all!
love the make-over! what is the backsplash … at first i thought painted brick … is it tile?
It’s just plain ‘ole white subway tile from Home Depot. 🙂
Wow! What a difference! Love the new look and the new cabinet color!
The place looks amazing!!! Somebody is going to snack that baby up when it hits the market!!! Keep at it Kristi!!! I’m excited for you!!
Oops I meant snatch!!! :/
Awesome!!!!!!!!!!
It look so, so , so good. Kudos, Kristi! An amazing transformation.
YAYYYYY!!!!!! What a great feeling that must be, and it turned out fantastic! Every detail looks wonderful and so creative. It’s beautiful.
WooHoo!! You did it! And it’s gorgeous. I’m with Matt….the tree is fabulous and makes the room. But…so do the ‘new’ countertops. I really think they breath life into your sweet space. Can’t wait to see how the adjoining area comes together.
Love the color on the cabinets and absolutely love the tree!
Wow! What a transformation, you did an amazing job.
I have to ask, did you get rid of the microwave? I love the look, but sure hope it doesn’t take me that long, lol!
Matt and I haven’t used a microwave in nine years, so yep…I got rid of it. 🙂
Maybe it’s just me, but I think the ceilings look higher without the microwave above the stove. Good choice! Makes the kitchen look bigger! Beautiful!
WOW. That is an unbelievable transformation! Great job Kristi! I’m in LOVE with your cabinets and flooring.
Amazing!! It looks beautiful. And how awesome that you did it all yourself!!
This looks AMAZING!! I swear the kitchen looks bigger like this too. You have an excellent eye for color. I would definitely consider this worth the wait! 🙂
Love the beadboard ceiling too!
WOW! So cool to see how much it has progressed, and that you did it all yourself. You should be so proud of yourself!
Gorgeous! I love to see makeovers that use the old cabinets…cant always afford new ones. Great job!!!
Kristi – that is an amazing transformation! I love the mural and the painted cabinets. Beautiful!
Your kitchen is beautiful!!! You did an amazing job!
So Beautiful!! Love it!! I have to ask, and I may have just missed it, but what is the color you used on your cabinets? I love it!
Rebekah, the paint color on my kitchen cabinets is a Behr (Home Depot) color called Hallowed Hush, but I had it color matched in Kelly Moore interior satin oil-based paint.
You did a beautiful job! It is such a pretty makeover! – not over the top and not one bit less than it could be – just perfect!
Wow!!! You did such a great job. Who cares if took 3/4 years, you did it all by yourself and you should be so proud. Cabinet color is gorgeous. You deserve a big pat on the back.
GREAT choice for the color of your cabinets. Beautiful. I also love your choice of wall art–trees!
That is truly a night and day make-over. I love how much of the bones of the old kitchen were re-used, and I don’t think most people would look at the before and think there was a single thing left from the old kitchen. You really did an incredible job of it!
You rocked it!! It looks so amazing – from the counters to gorgeous color cabinets to that fun tree, you turned an 80s nightmare into a stylish pad!
4 years – but worth the wait! Pinning that tree – it’s fabulous (your moms tips paid off)!
Kelly
And what about that ceiling? What did you do there? Awesome space btw!
looks fantastic! and so roomy. GREAT job!
Lovely! And can I ask where you got the pig from?
Ha! That cute little pig came from Marshall’s about a year ago. 🙂
You did it!!! Looks absolutely beautiful. Hope to see the dining area next week to get a feel for the whole area.
Wow–what an incredible transformation! Really a testimony to the power of paint. We just finished a long-in-th-works bathroom reno, so I know how much work your kitchen was and how good you must feel to have it done. Love that cabinet color!
Terrific space… worth the wait!! Love the colour you’ve chosen for the cabinetry 🙂
Victoria
Impressive! Looks like a custom home!
Kristi…amazing renovation! Everything is just beautiful! I know your goal is sell it before long for the house you’re planning on buying. It should sell quickly with all you’ve done. Great job!
Beautiful transformation! You’ve added style, whimsy and made it a wonderful selling feature in your home. Be proud!
Such a lovely kitchen! I really like the metro feel of it. Great job.
What a beautiful transformation! It all takes so much time, but, in your case, so worth it!!! Congratulations and thanks for inspiration. We are going through the same process, but with a whole house!! Yikes! 2 1/2 years and counting. The painted cabinets with the wooden countertops are just wonderful!
Congratulations on finishing the kitchen! It looks great.
Your kitchen is absolutely beautiful. A wonderful improvement on the old one. I love the color of the cabinets. BEAUTIFUL! Enjoy! ~Linda
It turned out fantastic! You’re well on your way outta there and into a new place with that redo.
Bliss
Really came out beautiful. So tastefully done & the colors are just so lovely together.
I am so glad you mentioned the ceiling because I would have missed this amazing transformation! hate those popcorn ceilings and the plywood idea is genius. The whole kitchen is remarkable.
Awesome Job!! Love the colors.
Kristi, your kitchen looks amazing, from the new ceiling all the way down to the floor! The cabinet color is fresh and updated, and I want to put in those same wooden countertops when we redo our kitchen. I am in awe of your tree on the wall, too! Gorgeous!
Love your kitchen and I have to say LOVE the cabinet color!~ You did a fantastic job Kristi.
How beautiful the outcome turned out to be. I love how the kitchen come to live with the paint you put on it, I also love its design, so unique!
It looks fantastic Kristi! I especially love the ceiling light!
It look great!!
Absolutely stunning kitchen makeover! You’ve given me hope that mine can be done. 🙂
Congrats on completing your kitchen, Kristi. It is truly phenomenal!
Wow what a reveal Your kitchen is beautiful!
xx
Anne
Beautiful! I love the ceiling most of all!
I love this so much! My husband and I are about to move into a house that definitely needs some updating , so I am excited to try some of your tips!
Holy smokes it’s gorgeous! I love everything you did. It truly is dramatic. You must love waking up to this every morning 🙂
Love your makeover soooo much, stunning !!!!
Wow you kitchen looks incredible! I found you through the texas group on Facebook! Super cute–amazing job!
-meandmr.com
How did you apply the paint to the cabinets? Did you use a paint brush, roller or spray gun?
What a beautiful makeover! I found you from the Texans Who Blog group, so glad I did, you have so many great project ideas. My favorite part is the color combination of the cabinets and countertops. I pinned this to Pinterest.
AWESOME re-do. The magnetic spice board is great too! Love it.
I loved your kitchen so much I went to Home Depot the same day I saw it. the man in the paint dept was able to locate the paint on their machine, said it was not a Behr color, and made a sample that was almost white. definitely not your beautiful blue.
He must have been confused, or typed in the wrong color. I just went to the Behr website (http://www.behr.com), typed in the name, and found it right away. Hallowed Hush 500F-6
Thanks for follwoing up! My husband and I rarely agree on colors,. I saw your reveal, showed him, and we both said, what color- let’s get it! I will head back to HD with this info. 🙂
Your kitchen is just darling! It has given me inspiration to start decorating my new condo I just moved into! The color on your cabinets is such a beautiful color. Cute cute!
Beautiful Kitchen! Where did you get your sink? I’d like to keep my original cabinets in my kitchen, but the sink base is only 20 inches deep from front to back…so I have been having issues finding a sink that would fit there, but yours looks like it might. Thanks!
Beautiful! The color you chose is stunning and the pantry cabinet came out fantastic 🙂
Absolutely gorgeous. The ceiling is beautiful–what a creative idea to get that look! NICE!!!
Somehow I missed the big reveal. So glad to see all of your hard work come together. I love your blue cabinets with your wood counter tops. Your kitchen looks absolutely amazing.
How much did thiys whole remodel cost roughly?
LOVE your kitchen makeover. All of the colors are beautiful together. I really like the tree and the spice board. Oh yes, and the cabinets, the wall color, the ceiling, etc. Great job!
What a great makeover. I love the redo of the cabinets. I have always liked a wonderful painted cabinet. Here is a link to our article about how to paint kitchen cabinets for your readers if they would like to try.
I love before and after articles and this is one of my favorites. Keep up your beatuiful designs.
What a transformation, the kitchen looks amazing now.
What a stylish remodel, nice job!
what kind of paint for cabinets that will not chip
I use interior oil-based paint in a satin finish. But I always sand first, then use an oil-based primer (Zinsser), and sand again. Then I paint.
Great! you really wonderfully transform the old kitchen into a modern style.
I have been back here numerous times..Its beautiful..great job, so inspiring. I looked all over (i think) what is the color you used on the walls?
Thank so much, Jennifer! The light yellow on the walls is called Rich Cream. It’s a Behr (Home Depot) color. It’s the perfect shade of light, creamy yellow. 🙂
Thank you for sharing..I live in a mobile home and will be using this color. I love them all!!!
Kristi, you are AMAZING! Your creativity and talent leaves me speechless! I LOVE what you’ve done with your condo, and it has give me a lot of good dreamin’ for our old house. Thank you! I’m so glad I’ve found your website!
Lea
Thank you so much, Lea! I’m so glad you found some inspiration here on my little ‘ole blog. 😀
What size is your subway tile? 3 x 6 or 4.25 x 8.5? I am about to do my backsplash too, and I was wondering what size you used? It looks stellar!
Hi Jordan~
My tiles are 3″ x 6″. They’re the ones that they carry in stock at Home Depot. Nothing fancy. 🙂
are your kitchen cabinets a charcoal gray?
Nope, not gray. They’re teal. 🙂 It’s a color called Hallowed Hush by Behr.
Stumbled upon your site, just love your kitchen make over 🙂
Looks like you made your baseboards taller in the after photos. Did replace?
I LOVE everything about this kitchen. I am looking for new stainless steel appliances and really like the ones here. Can you tell me the brand and/or models that they are?
Hi Valerie~
My appliances actually aren’t stainless steel. 🙂 They’re a much less expensive, fake stainless steel version called Silver Mist by Frigidaire. We bought ours at Best Buy.
Thank you so much for sharing your butcher block counter saga. Our Ikea wood counters arrive tomorrow and I was pretty sure I really wanted them darker and was contemplating all kids of options until I read your blog. I think you just saved me lots of time and frustration. They do look nice natural by the way! Now if my hubby and I could just agree on a backsplash…
Love, love, love. Beautiful transformation. I have a question…did you just paint the outsides of the cabinets and the doors or the inside of the cabinets and shelves, too?
First of all, your kitchen is beautifully transformed and so warm/inviting. Next, I think you need to make and sell some of these things! I do not enjoy making these types of things, but I love to buy unique things for my house!! I would love to buy both the spice rack and the tree (made as a wall decal!) There — I just started a business for you, and I would be your first customer:)
Wow this is beautiful, Kristy! Great job! I absolutely love everything about it!
<3 …. I love everything about the kitchen.
That is an amazing makeover. I have been debating for some time what to do with the late 80’s oak cabinets in my kitchen.
Great job!
I just wanted to say that I happened upon your picture of the chalkboard door on pinterest and was blown away. I have a HVAC door like that and its one of the first doors you see when you walk into my house. I have been trying to figure out what to do to make it look better and now I know what I am going to do! CHALKBOARD! Then I kept looking through your blog and saw your kitchen and was amazed! Because I painted my kitchen cabinets a similar color! What good taste we have! Glad I found your blog!
Kristi,
Your kitchen makeover turned out so well! What an incredible before-and-after! I would love to pin this to The Home Depot’s Kitchen pinterest board, if you don’t mind!
Cheers,
Caroline
Senior Editor, The Home Depot
Thanks so much, Caroline! Please feel free to pin anything of my room makeovers and project that you like! 🙂
I am in love with everything you have done! I have been wanting to spruce up our small dated kitchen for a while so I am blatantly using all the wonderful ideas you have shared. The best part is my Husband likes them too! (you can now add peacekeeper to your resume:) One question…where did you get the cabinet hardware? (pulls, hinges, just all of it) Thank you!
Hi Mary~
I generally get my hardware at either Home Depot or Lowe’s. I’m pretty sure the hardware in my kitchen came from Lowe’s.
OMG! Absolutely amazing, this is a night and day difference. I love the cabinet color, the ceramic tile subway backsplash, the floors all of it. It is so perfectly decorated as well. I have to admit, my favorite is the spice rack wall board, cute idea!
This is so amazing! It is stellar! I had a question about your counter tops. When you chose a different sink, did you have it installed first, then had IKEA work around it, or did you have to pick the counter top first and chose the sink to fit the counter top? Sorry, don’t know how that stuff works, and I would really like to do that counter top! it looks really great! Thanks for sharing all your tips. 🙂
I absolutely love this kitchen! The hand painted tree with the birds is such a unique touch! It reminds me of the pillows I design using my nature photography. If you love this element check out my pillows at http://www.tahoe1969design.com.
The ‘after” is is fantastic – I love this. The colors are beautiful and the wood countertop is perfect, color and all. Has given me some great ideas – thanks so much for posting!
I LOVE YOU! I love how you DIY so many projects. I have always had to make, fix, redo, update it myself, on very low budget. I went to the Ikea site. I would love to order the counter top or make the cedar one for my bathroom. When I order from Ikea online… How should I cut the sink hole?
That’s actually the one thing I hired out. Because I wanted an undermount sink, I knew the sink hole had to be perfect (or close to it), and I didn’t trust myself to do it. So I hired someone. He charged me $50 to cut the hole and get it all sanded down smoothly.
After watching him, I realize that I could have done it myself. He used a circular saw to cut the straight sides, and a jigsaw to cut the rounded corners. Then he used a belt sander and a circular sander to sand and smooth the cut edges.
So inspiring! I cannot wait to be a home owner. Beautiful kitchen, and I can’t believe you free handed those birds and branches, INCREDIBLE.
It’s stunning! What a major difference. I agree with your husband, that tree is beautiful!
Just followed you on Bloglovin’. 🙂
Thanks for the inspiration! I just bought a 1941 rambler and am about to tackle the kitchen… I’ve saved it for last because I just couldn’t decide what to do, but your photos have inspired me!
Wow! I am an interior designer too.. (retired) I couldn’t believe it when I saw your kitchen..It is so much like my own.. the gray-blue cabinets.. my wall color is a light blue-gray. All the accesssosries including the knobs and pulls are in cobalt blue. Brushed nickel faucet, and fixtures throughout which includes the attached dining room. Your wall color is the color of my kitchen and door drapes.. I adore your wall treatment with the tree and birds.. It’s funny, everyone elses house gets designed, but your own, it’s the last to get any detailed design (at least that was my case). Now I’m having fun in my own home.. Would love to share ideas with you and your bloggers, if you are willing.
~Cheryll
Hi Kristi…I am new to your blog and am enjoying hours of viewing all your remodeling you have done over the years that are absolutely beautiful. The condo is outstanding…… the kitchen is my favorite. I have a question..what did you do with the microwave…I do not see it anywhere in that kitchen. I see you replaced it with a hood above the stove which looks great btw, but how do you live without a microwave? The tree mural is gorgeous..it is giving me an idea on what to do on a wall in my stairway to my theater room in our basement, I love this idea and will take a few things from yours yet do it a little different. Thank you for sharing your talents with us…can’t wait to see your newest house done, wish I lived close..I’d be peeking in the windows all the time..lol! You are one very talented lady!
I love the countertops and sink! Does IKEA cup the counters for the sink insert? I may just have to buy these.
Great job!!!.This is exactly the way I would like to do my future condo kitchen. Thanks,very inspirational
HI, for the Rich Cream wall color, did you use this is latex? Also what finish did you go with?
Also, the wall color in the white painted fireplace room, is that the Martha Stewart Rainwater? in latex or oil based? satin?
Thank you
I have a galllery kitchen ,too and I stay in apartment . They didnt want me to paint …but the cabinets were ugly. I found a solution OLD ENGLISH SPRAY FURNISH…..I did not paint …but it looks …sooo nice. Their kitchen give me so many ideas to try …Thank you …you are awesome!
Kirsti you do a great job of decorating and blogging.
I love all of your projects! So creative AND inspirational. Design style is much important for planning a kitchen. I am much impressed by your information and I will keep in mind all the things, which you have shared for designing my kitchen.
I love this, and I am very interested in knowing where you got the jars for the spices. I live in a trailer and my kitchen is small and would love that…. Great job!
I found them on Amazon. I just searched for “small jelly jars” and found them. 🙂
Thank you for proving to me that there is hope for my ugly galley kitchen.
What did you use on top of your caninets to protect or seal them?
I love the color of your cabinets so I went to get the paint today and the color is VERY teal/aqua compared to the photos. I even went to both chain stores and each mixed it the same aqua. So I had Home Depot add a bit of gray and it came out perfect. Not sure if their formula has changed but if you’re wanting the smoky blue hue you see here, beware and ask them to add a dose of gray.
I just finished coating my bathroom cabinets and will hang them tomorrow! So excited and was inspired by your blog. Thanks for sharing!
Great job on your kitchen! May I ask what color and brand of grout you went with? We are using white subway tile from Lowes (not the brightest white but softer) and trying to find a matching white grout to make it seamless. The first one we tried was too bright so it made the tile look creamier. Looks like you found a great match! Thanks 🙂
Well, I actually didn’t find a great match with the grout. I ended up painting my grout. 🙂 I just used latex paint in either a satin or semi-gloss finish (can’t remember which one), and used my finger to smear it on, and then wiped off the excess with a wet rag. Worked great! It still looked great when we moved out of the condo last October. The color I used is Polar Bear by Behr from Home Depot.
Hi. I love the color you painted the cabinets and want to do the same in my kitchen. I went to Home Depot today to find the swatch for Behr’s “Hallowed Hush” and was surprised to see how different it looked from the pictures on your blog. On the swatch the color seems much lighter and looks more aqua than grey. Will it look different once it’s painted on the cabinets? I also have the same question for the wall color “Rich Creme”. It looks much lighter and more yellow on the swatch.
Thanks
You’ll need to purchase a sample and test it in your room. Colors can look drastically different from room to room depending on lighting and many other factors. Hallowed Hush looks dark on these cabinets, but I tried it in the living room of the house we now live in, and it was way too light, but the living room also has three windows, including one 9-foot window, so it gets a lot more light than the condo kitchen got. There’s no way I can tell you how these colors are going to look in your house.
The color is definitely not gray, though. In the condo, it looks teal.
Holy smokes, that is absolutely gorgeous!! I love the colors of the cabinet and the tree picture on the back wall ties it all together and makes it look whimsical. Love it!!!
Love your butcher block! I was considering doing mine darker, but the more I look at pictures like this, the more I want to go lighter. Did you stain these? If so, what is the color of the stain? Thanks!
They’re just oiled with mineral oil.
Hi! Your kitchen is going to be my inspiration! I love the colors! LOVE!
The backsplash…is the white hard to keep clean? I have white cabinets currently and by mid summer they’re going to match yours! The white cabinets are so hard to keep clean, so I’m very skeptical about the white back splash…
No, it’s not hard to keep clean. It’s glazed ceramic tile, so as long as the grout is sealed, it’s all very easy to wipe down.
Who cares that it took 3 years….it is beautiful. This renovation stuff is a lot harder than it looks! I am redoing a condo from 1970. Stripped a living room wall this week. 3 layers of wallpaper and 4 colors of paint. Crazy! But my question for you is about the size of your sink. Our cabinet base is only 22″ and I hoped to be able to get a bigger sink but everyone is advising no. Can you tell me the length of your entire counter top with the sink and how wide is your sink? Thank you ever so much.
The cabinet are 24 inches deep, and the countertop is something like 25.25 inches deep and 8 feet long. I don’t remember the exact dimensions of the sink, but I don’t think it would fit a countertop that’s only 22 inches deep. I don’t live there anymore, or I would measure for you. I found that sink on Ebay.
I love your cabinets! I want to paint mine as well but don’t have the first clue about painting cabinets. Can you give me some pointers on how to do it?
Here are my tips for painting kitchen cabinets:
https://www.addicted2decorating.com/how-to-paint-cabinets-with-a-paint-brush-and-get-a-near-perfect-finish.html
Looks great! I’m wondering how the wood countertops have held up to use? 🙂
We haven’t lived there in five years, but when we moved, the countertops looked great. I learned the hard way that the best way to seal butcherblock countertops is with mineral oil only.