I’ve Made My Window Treatment Decision (and I’ve Made One Window Treatment)
Well, y’all. I finally did it. I finally made a decision on my living room window treatments.
For the longest time, the “all draperies” option was holding strong as the winner in my mind. Here’s a idea of what that would have looked like…
Of course, I was just using cut lengths of fabric that hadn’t been sewn, scraps from drapery poles, and cheap and awful sheers from Target. But it’s an idea.
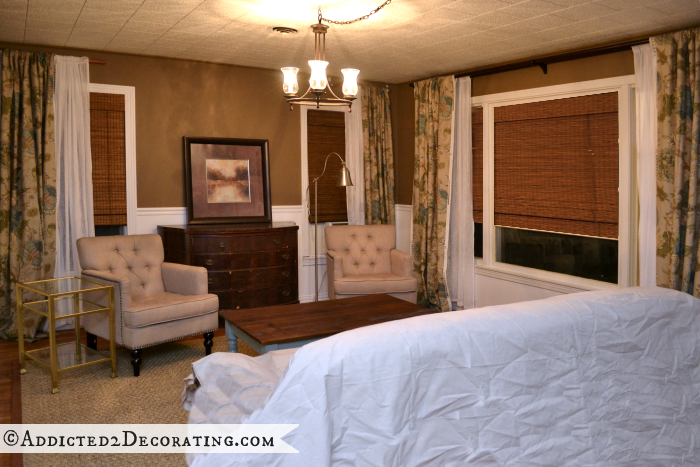
In the end, I decided to go with the Roman shade option on the two small windows. Here’s the mock up I did of that option.

The deciding factor for me came down to drapery hardware.
I purchased some really beautiful finials to use on the drapery rod on the big window. And if I dressed all of the windows the same, I’d want to use beautiful finials on all the windows. Makes sense, right?
The problem is that the two smaller windows are so close to the corners of the room that there’s no room for finials.
Also, it looked funny to have that small sliver of wall showing between where the draperies on the big window ended and the drapery on the small window started. So the natural solution would be to make that drapery rod an “L” in the corner. But then how would I make the other small window look cohesive?
Anyway, I simply couldn’t work out those problems in a way that was acceptable to me (meaning, I thought of a few different solutions, but I didn’t like any of them), so I decided to go with option 2 — Roman shades on the two small windows.
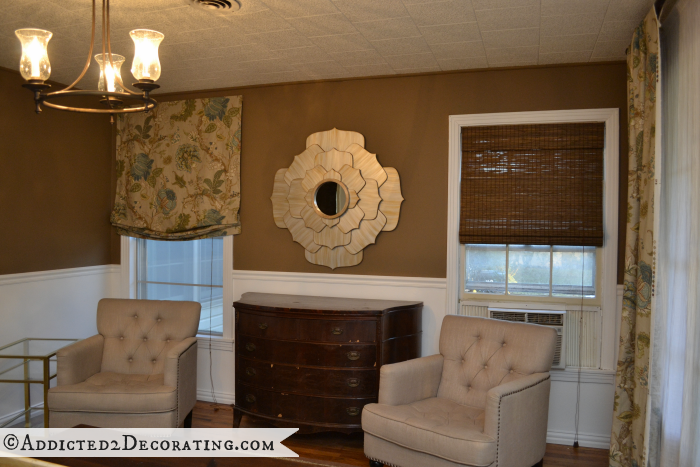
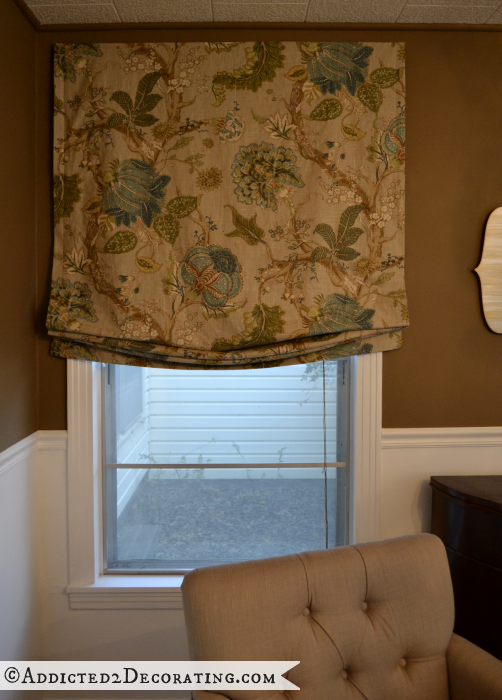
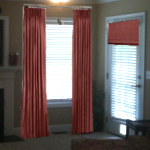
The mock up I did in the picture above was an awful Photoshop version of what Roman shades would look like. In reality, I decided to do an outside mount Roman shade, hung high above the window (at the same height as the draperies on the big window), and I made them relaxed so that they’re not quite so boxy.
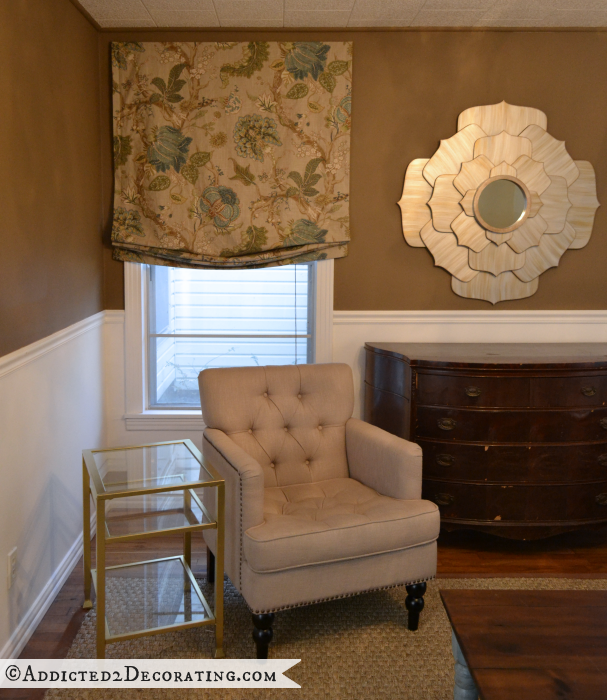
I lined them with blackout lining so that the pretty fabric would be clearly visible, and these shades are fully functional (or at least they will be as soon as my cord pulleys and cord locks get here), so they can be raised and lowered as needed.
I only had time to make one. I’m so out of practice on making these that it took me all day yesterday just to make the one! It’s been probably four years since I’ve made one, so I was having to remember the process as I went along. So I’m hoping that the second one will go much faster.
But since I only have one of them made and installed, I can show you the huge difference that the outside mount (hung high on the wall!) makes. Here’s the new Roman shade compared to the old inside mount Roman shade.

Isn’t the difference amazing? The outside mount installed high looks so custom, and really gives the window a presence in the room. It’s definitely worthy of a focal wall, in my opinion. The inside mount Roman shade on the right just looks so small, and really does nothing for the windows.
I’m still a huge fan of natural woven Roman shades, but I definitely prefer them used with another window treatment like drapery panels.
I did take pictures of all of the steps so that I can share a tutorial on how to make a lined, fully functional relaxed fabric Roman shade. I’ll try to have that in the next couple of days for you.
Then I need to get started on my draperies. (Did you notice I still just have the lengths of fabric pinned up? 😀 )
It’s such a relief to have finally made a decision. I have no idea why I made this so difficult on myself, but I’m really pleased with my decision, and I’m anxious to get the second one made and installed so I can get a complete picture of what this wall will look like.
Now I just need to replace that ugly aluminum window with a beautiful wood window to match all of my others. I see a trip to ReStore in my future. 🙂

Addicted 2 Decorating is where I share my DIY and decorating journey as I remodel and decorate the 1948 fixer upper that my husband, Matt, and I bought in 2013. Matt has M.S. and is unable to do physical work, so I do the majority of the work on the house by myself. You can learn more about me here.


I love this solution!
I love the way that shade looks. Can’t wait to see your tutorial. ; )
I love this. The relaxed look really works. I also really like that you went high and outside the frame. The beautiful fabric gets to show off!
You get so much done! Cudos for your solution.
I think you made the right decision! Our living room has 2 windows of roman shades and then drapes and it is perfect. Can’t wait to see the finished product!
I was totally against this solution until I saw the outside mount. It looks great and I can’t wait to see the rest of it finished. Now I know why I don’t really like the Roman shades in my bedroom. I don’t think your solution will work for me though. My configuration is three windows that are joined together with the middle one being taller. With an outside mount the shades would bump each other.
So glad you went with this option and I love how you went high and outside with the relaxed look. As I knew, you did a fabulous job. Really looks beautiful. In love with that fabric. Can’t wait to see the tutorial and see if it’s something I’d be able to tackle (total sewing novice). I have an inset window in my kitchen that has vertical blinds that I’m dying to get rid of. Been living with them three years. I think that’s enough! 🙂 I’d need three across because I think one huge one would be cumbersome as they are opened regularly. Can’t wait to see it all finished. You are making wonderful progress. Kudos to you!
I love the height that the roman shades adds to the room, makes the walls look taller, somehow. Although, I have to admit, I miss the warmth that the bamboo shades brought to the room. I think it will beautiful when you’re all done.
I miss that warmth and texture, too. Hopefully I can add some of it back in with accessories.
I actually think it looks cozy and the color on the walls brings plenty of warmth.
I love what you did, it’s beautiful & refreshing at the same time…brightens it up!
Relaxed and outside the “box”… great choices! They go with the drapery much better than the mock up did. I like!
Perfect choice, as usual! Would you hate me if i said I would love to see a row of piping (same fabric) at the top of those blinds? It’s a finishing detail that I usually put on custom romans and it would be a nice touch in your room.
I’ve never seen that done! Do you have a picture? I can’t picture how it would be finished off on the ends. Does it just wrap around to the bottom of the mounting board, behind the fabric of the shade?
It is stapled to the top of the mounting board, at the outside edge. It goes from the wall along the end of the mounting board, across the front and returns to the wall at the other end. I am not sure how to send you a photo in a comment, but i will pass along this link to Rambling Renovators which shows an inside mount roman with piping http://www.ramblingrenovators.ca/2013/05/relaxed-roman-blinds.html . I can email a photo of my daughter’s outside mount blind if you still need a “visual”.
I love that finishing touch! I’d love to see your daughter’s outside mount shade also. My email: [email protected]
Thanks so much!
I absolutely love everything you decorate, but I agree with Kim, definitely add some trim. Not quite diggin’ the plain shade covering up the white window trim.
Beautiful! I would love to know how you hung them. I have been wanting to do roman shades for my family room but wanted to hang them exactly as you did instead of the traditional way. I have never made romans before so I was having a hard time figuring out how to hang them. Great job!
Beautiful! I knew whatever you did would be though….:)
Google M’fay. She has patterns for everything. If you can sew then you can follow one of her patterns. 🙂
Sorry I posted this on wrong section
I think what might have been bothering you was how the inside mount shades wouldn’t have matched the height of the draperies. Now that they are on the outside, they will all be the same height and it will look so good. Do you plan on putting up some crown molding later? Will you then have to lower all the window treatments? What are your plans, if any, for the ceiling? So excited to see how it all comes together.
I do plan on putting up crown moulding, but that will be part of the final (phase 2) decorating of the living room. I’ll need to remove the polystyrene ceiling tiles, as well as remove the 1×4’s that those tiles are attached to. I’m also thinking that some drywall repair will be required on the ceiling. But once those are removed, that will give me an additional two inches (or just under) of height, so I don’t think the window treatments will need to be lowered.
Good call! I like the combination of the Roman shades with the drapes on the other wall because it’s adds more variety to the room. It’s more aesthetically pleasing this way. Great job!
Love the lotus too!
Bravo!
Love this. It shows off your gorgeous fabric to perfection. Gathered drapes are lush and lovely but they hide the beautiful pattern. This way you will have the best of both worlds.
looks amazing! i am having the same dilemna now and can’t wait to see your tutorial!
The outside mount and hanging the roman shades the same height as the drapery is the perfect solution! You now have the best of both options! We all knew you’d come up with a winner!
At first, I wasn’t sure I liked the outside mount. When I realized they created the matching height to the large window and brought unity through that, it made perfect sense. So now? They look great! Perfect solution!
Vicki and I have wondered why you don’t just take the air conditioner out of the window in the living room, at least for the winter. It lifts out–you could probably get the guys next door to do it. If you are going to do Central Heat/Air come spring, then you don’t need it and it does detract from the beautiful work that you have done in the living room. We are so impressed with what you have done with “our old house” so far! I eagerly await your postings daily!
That’s actually been on my “to do” list for a couple of weeks now, and I just always seem to find other things to fill my time. 🙂 It really never bothers me until I go to take a picture of the living room, and then I think to myself, “Why the heck haven’t I removed that yet?!” But as soon as my pictures are taken, I’m off on another project and forget about it again. 😀
I’m fully convinced you made exactly the right choice! Hanging the relaxed roman shades high and wide completely eliminated two more boxes, the window frames. This looks so fabulous. You’re brilliant. Your focal wall is amazing and you may never leave this room. I’m so glad you went through all that agony just to reach this great conclusion. You’re way past half-way of phase one now that this decision is made. Hope someone else is very busy fixing your plumbing problems while you’re being so productive inside. Tell Matt, just in case he doesn’t know it already, that he has married a decorating genius. I’m as proud of you as your mother must be.
The shade looks fantastic! And I do the same thing…labor over decisions. The living room is really coming together, Kristi.
It looks great!
I love the Metallic Lotus Flower Mirror on your focal wall, wow!!!
You made a good choice…I was just wondering…do u plan to do anything with that ceiling? I may have missed a previous comment on this?? I have a similar one on a enclosed porch at our little beach “shack” and was wondering what could be done about it???
I do plan to tackle the ceiling at some point, but it’ll have to wait until we’ve leveled the foundation. I’ll be removing the polystyrene ceiling tiles, as well as the 1 x 4’s to which they’re attached. Once I see what condition the drywall is in just behind those tiles, I’ll decide what I want to do. I might end up doing something like I did on the kitchen/breakfast room ceiling at the condo:
https://www.addicted2decorating.com/inexpensive-diy-wood-slat-ceiling.html
I am so glad that you went with Option 2 of the Roman shades. I love it! And the fact that you went to the outside was a great decision. It will look so much better level with the drapes. And it gives the windows the illusion of being much larger. Love love love it! Can’t wait to see all the drapes done. And btw…blech to Photoshop…lol …it so flops when compared to the real thing!
The shade is absolutely GORGEOUS! You can do no decorating wrong in my eyes 😀
The Lotus Flower Mirror looks stunning in your room. That was an awesome idea!
I look forward to your next move every day (no pressure) I just get excited when I see your e-mail. BTW, where do you get the energy??? You seem to be ALWAYS doing something.
You are a lady to be envied 😀
Co 😀
So glad you went with the shades. It looks awesome!
I love that you chose an outside mount for the shades. I’ve always felt they looked better in most instances. Great job on the sewing, btw!
Beautiful! I think you made the right decision. It’s so fun to see your progress!
I love this idea! It gives it a much cleaner look than if you had used all curtains. This way you get a couple of different looks with different focal points in the same room.
The fabric is so nice, you could have done almost anything with it, and it would look great! I really like the simplicity of the shades for those smaller windows.
Great choice! The soft draping really helps soften the boxy lines of the two windows, before it was ‘rectangle, rectangle’ now you really notice the whole area, not just the main window shapes. Really pretty!
Great Choice, Kristi. It really makes a great deal of difference to the wall and I love the outside mount. Now the woodwork around the windows doesn’t break up the wall and that fabric is delicious!
I love your solution. I’ve thought of doing the same thing with some of my smaller windows.
BTW…I love the light fixture. I’m looking for one for the screen porch we’ve just enclosed and made into a sunroom. Where did you get this one?
Merry Christmas
The light came from Home Depot. And the best part? It was under $100! 🙂
http://www.homedepot.com/p/Unbranded-Grace-3-Light-Rubbed-Bronze-Chandelier-14690/202806142#
Looks great!
It’s looks wonderful; the outside high mount made a difference and the room looks really much more balanced. great work!
The relaxed Roman Shade looks great, when I have done Romans I usually do them as an outside mount as well. To me it just makes for a cleaner look.
Love the fabric. Where did you find it?
I got the fabric from onlinefabricstore.net. It’s P. Kaufmann Florabunda Sea Glass.
I love it. Good job!
Great decision and great job. Can’t wait to see both windows done! Plus the big window and I love sheer curtains
Excellent choice! It is coming together beautifully.
I did not vote or comment previously, but I’m so happy you went with the roman shades on the one wall. This looks so crisp, clean, and open (and happier) than the all drapes option.
Also, I don’t follow any blogs except yours. I came across addicted2decorating about three months before you bought your house. I was so impressed and inspired by what you did with the condo that I was hooked. I just bought my first house (at 50+ years old) a little over two years ago and you’ve given me much inspiration. I like the fact that you are a DIYer; you amaze me with the jobs you tackle and the endless energy. I appreciate your creative spirit and the how-to tutorials. Thanks for being so open and giving with your talents/gifts.
Have a blessed Christmas!
This turned out beautifully! I love it! The room is coming along so nicely!
Really like the Roman shades! I felt like all the drapery was overpowering the room but this is a wonderful solution. Looking forward to your tutorial!
The shades look great, Kristi. I think just any of the choices would have worked, but like that this is what you chose. Looking forward to seeing the “finished” product. Thanks for giving us blogger-followers so much inspiration!
wow what an amazing job! I love these window treatments.
Great progress!!!! Love the look!
Okay,
I know you like honesty (at least I THINK I read that here somewhere). I didn’t like this option at ALL initially, but I didn’t like the drapes either – (but I DO/did like them on the big window). Anyway, I really like how this looks now.
Are you planning to ALSO keep the bamboo shades under the outside mounted roman shades? Reason I ask is because I also live in a hot, sunny climate (AZ) and have wood blinds. I love the versatility of them in that I can tilt them and let in as much light as I prefer. So just wondering if that’s an option. LOVE the mirror! Well done!
Do you mind sharing what fabric you used? I read through your post bout the floral fabric options you were deciding between but this one doesn’t seem to be one of those?
I’m looking for a similar jacobean design for roman shades in our master bedroom but wanted to do more orange/yellow. Thank you for this post- it was SO helpful- and I was COMPLETELY blocked on what to do with the one window above our bed that’s very short and long. I thought outside mount roman blinds looked horrible..until I stumbled upon your blog posting and now I’m in love!
This one is P. Kauffman Florabunda Sea Glass. I got mine at onlinefabricstore.net, but I’ve since seen it in another online store for much cheaper.