Prepping My IKEA Veddinge Cabinet Doors & Drawer Fronts For Paint — Sanding, Adding Trim, Etc.
When purchasing IKEA Sektion cabinets for my studio, I opted for the Veddinge cabinet doors and drawer fronts for one very simple reason. They were one of the least expensive options. And when you need as many as I needed for my studio (which is probably equivalent to a very large kitchen), those savings added up quite a bit. And while I didn’t want flat front cabinet doors and drawer fronts in my final studio design, I knew that I could add my own trim and still end up with quite a savings. Plus, my plan from the beginning was to paint my cabinets a fun color (you can see all of the colors I considered here), so adding trim wouldn’t be that big of a deal.
I did have a hard time deciding just how I wanted to trim them out, though. I considered lots of designs (some of which you can see here), and different options to get that design. I thought I had landed on the idea of using Overlays (which are laser cut designs that you adhere to the fronts of the doors), but the deciding factor all came down to the one cabinet right in the middle of the mural wall that has six 5-inch-high drawers. In the end, I decided that I wanted those drawers trimmed out individually, but no design I tried would fit on those short drawer fronts. In a computer drawing, it seemed to work…
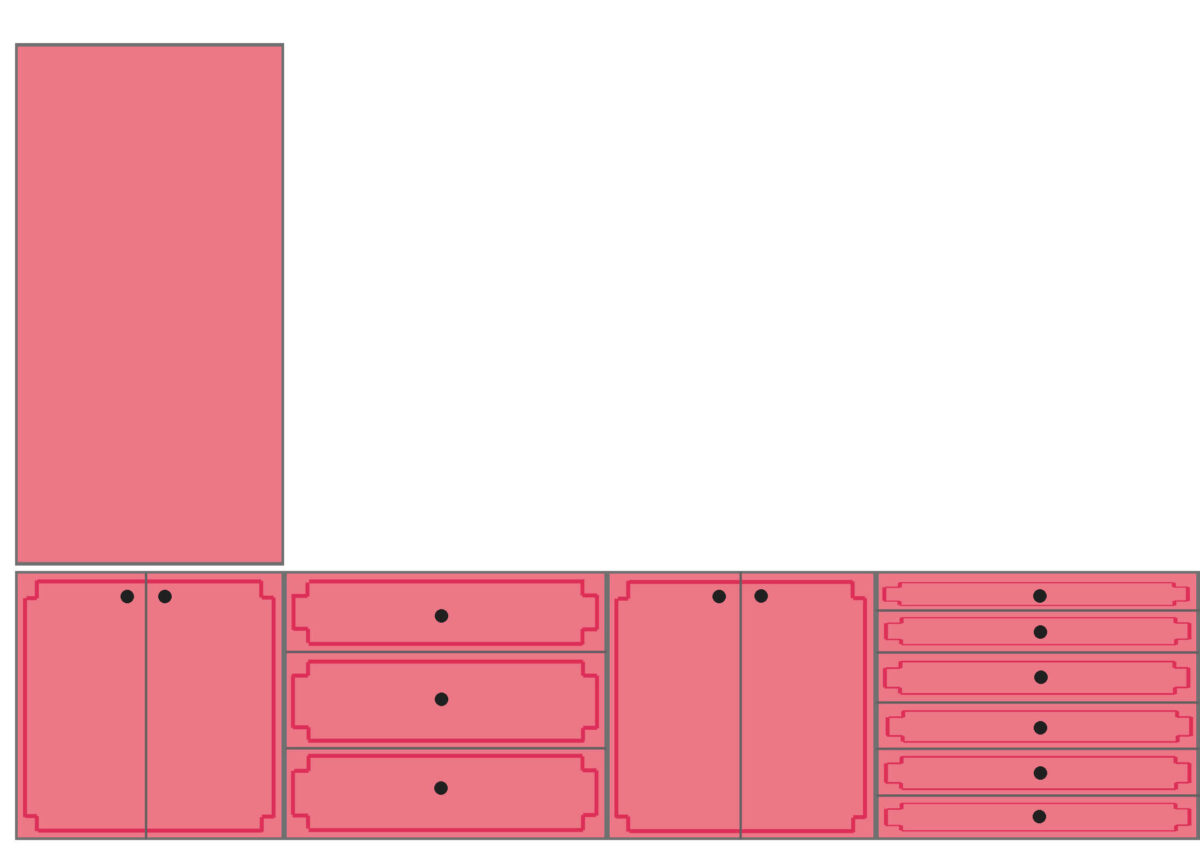
But when I tried that idea with real trim on a real drawer front, I realized really quickly that actual trim takes up way more space than a thin drawn line on a computer mock up.
After trying every design I could think of, I finally concluded that the only design that would fit on those doors was a simple rectangle. And if I’m going to do a simple rectangle, there’s really no need to order Overlays and wait their three-week turnaround time when I could just buy some simple trim, cut strips in the right length and mitered on the corners, and make my rectangle frames.
So that’s what I did. I had in mind that I would use wood lattice trim. The price for wood lattice is quite the range, from $1.48 per linear foot (which would have cost $556.48 for the amount I needed) to $0.98 per linear foot (which would have cost $368.48 for the amount I needed).


There’s also a small trim called screen, which I’ve used many times over the years for various projects. It’s $0.78 per linear foot, which would have come to $293.28. I probably would have purchased this one had they had enough in stock. But they were almost sold out.

And I’m glad I kept looking because I landed in a section that I never look at and never even consider — the plastic trim. It’s called polystyrene, which I always associate with Styrofoam. When we moved into our house, the ceilings throughout the house were covered in polystyrene tiles, and they had that same feel as a Styrofoam coffee cup. But this plastic is hard, but it’s not shiny plastic. The surface feels like a primed surface that will easily take paint.
They had the same screen trim in the plastic trim, but this cost $3.48 per 8-foot piece. That’s $0.44 per linear foot.

So that’s what I got, and it cost $163.56 for all the trim I needed for all three sections of cabinets in the studio.
To prep the cabinet doors and drawer fronts for trim and paint, I needed to sand the super shiny finish off of all of them. I did this using my electric sander and 100-grit sandpaper discs. I tried 120-grit, but that didn’t cut through that factory finish. (The finish on IKEA Veddinge cabinet door and drawer fronts is amazing and incredibly durable, FYI. I would imagine they’re all like this, and I’m quite impressed with the quality of the finish. If only they sold pink doors! 😀 ) The 100-grit worked really well, though. I took more of the finish off than was necessary on this first cabinet door. On the subsequent ones, I sanded just enough to remove the shine, but not really enough to see through the white paint.

After they were all sanded, I made myself a jig to mark where the trim would go on each door and drawer front. Since IKEA Veddinge doors are 5/8-inch thick, I made the jig with one piece of scrap 1-inch lumber ripped to 1 3/8 inch (remember that 1-inch lumber is actually 3/4-inch thick), and nailed that to another scrap piece of 1-inch lumber ripped to 1 inch. That way, when they were nailed together, the inside of the bigger piece was 5/8 inch to fit perfectly on the side edge of the door or drawer front, and the piece that would go on top of the door would mark the 1-inch space that I wanted to leave on the edge before the trim.

I cut the pieces to 36 inches long since that was the width of the widest drawer fronts.

So after sanding each door and drawer front, I placed my jig on the edge of the cabinet door with the 1-inch piece on top of the door, and marked that line. After doing this on all four sides, I had a perfectly spaced rectangle to mark where the trim would be attached.

Before actually adding the trim, I wanted to drill holes for the cabinet hardware. For the drawers, I bought these 10-inch pulls. So I folded a piece of paper (using cardstock or thick photo paper would have been preferable) and marked the width of the screw holes.

Then I used my tape measure to measure and mark the center between the screw holes.

Before marking the drawer fronts, I placed a piece of painters tape where the pull would go…

And then using my tape measure, I measured and marked the center of the height of the drawer. I did this in two places.

And then using a straight edge, I used those two marks to draw a line right down the center of the drawer height.

Next, I measured over from the edge and marked the middle of the drawer.

With the middle marked, I used the pattern I had made and lined up the middle marks, and marked the screw hole positions on the center line I had drawn.

That gave me the perfect spacing for the drawer pull.

Before I drilled the holes on the very first drawer front, I double checked the marks. But once I knew my pattern was right, I didn’t double check the subsequent drawer fronts.

And then I was ready to drill the holes.

And voila! Perfectly placed, perfectly spaced holes for the drawer pull.

I know that seemed like a long, drawn out process, but you only have to make one pattern (or one for each size of pull). Once you have a pattern, the rest of the process goes very quickly. I think it took me about two minutes to do each drawer front.
Once the holes for the hardware were drilled, I was ready to attach the trim. I cut all of the trim with my miter saw, cutting the ends at a 45-degree angle. The great thing about drawing the rectangle (using the jig) before cutting and attaching trim is that you can use those pre-drawn lines to make sure your trim cuts are the exact right length. I cut all the trim pieces, and then double checked the lengths by holding them to the drawn lines and making sure they were exactly right. Some of them needed a bit more (about a blade width) cut off to make them just right before attaching the trim. Also before attaching the trim, each trim piece needed just a bit of sanding with 220-grit sandpaper on the cut ends before assembling the frames.
I assembled the frames before attaching them to the drawer fronts, and I assembled them using my hot glue gun. It only took just a very small amount of hot glue to put the frames together.

I let the glue dry for a minute or two, and then flipped the frame over and added a bead of Loctite construction adhesive to the back. One thing I love about this plastic trim is that the back is actually indented, making it perfect to use with construction adhesive. When using trim that has a flat back, the construction adhesive usually squishes out the sides once the trim is applied. I didn’t have that issue with this trim.

And because I had already measured and marked the lines where the trim would go, putting the trim in place was very easy. There was no guess work, no measuring required, and no room for mistakes.
And here’s a peek at a drawer front with the new trim and a drawer pull sitting in place.
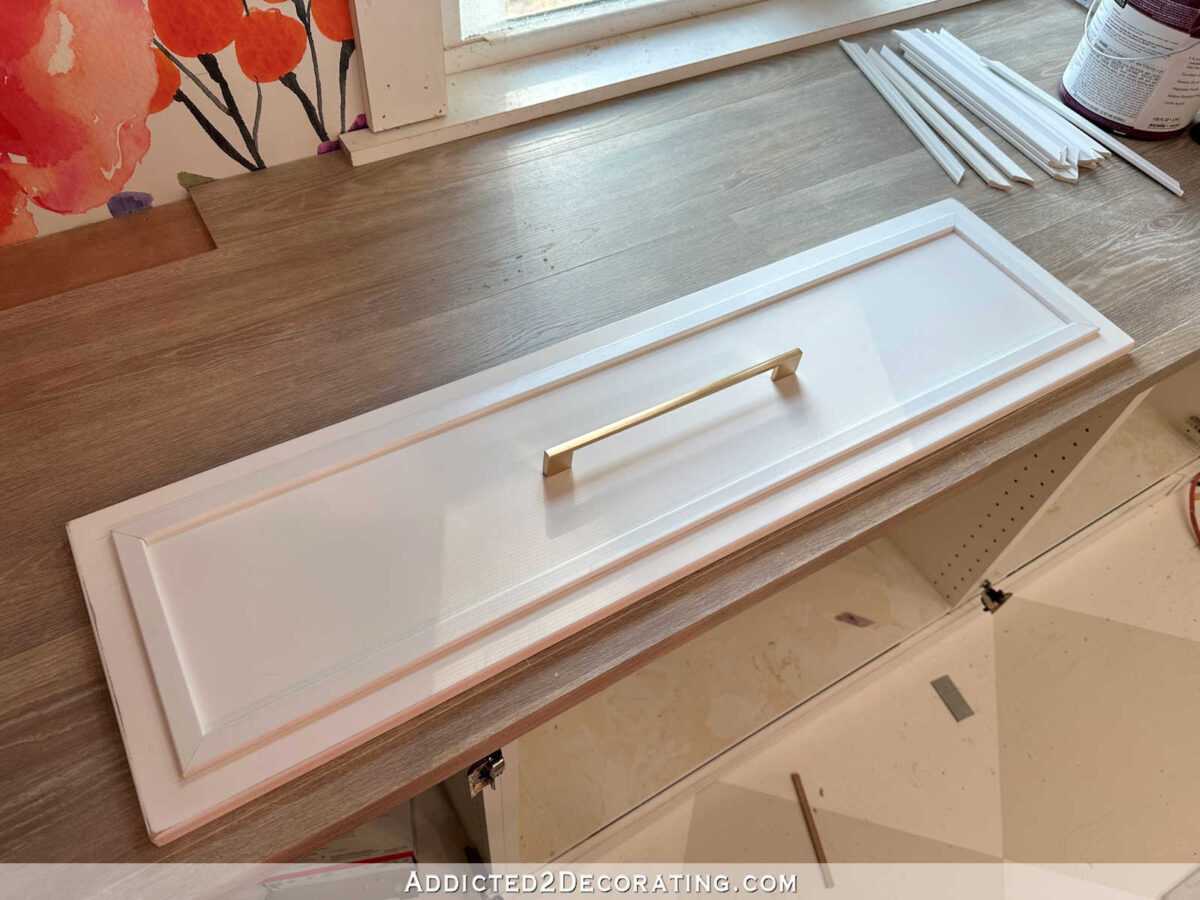
I’m not quite finished adding the trim to the cabinet doors, and once I finish that, I’ll have one more step before I’m ready for priming and painting. I still want to caulk the corners of the trim to eliminate those tiny cracks in the joints, and then I want to caulk all the way around all of the trim. That won’t be a quick and easy process since I have so many drawers and door fronts, but it will be worth it. Those types of details really go a long way to taking a DIY project to the next level.
So that’s the progress so far. My new order of IKEA cabinets is arriving today, so I’ll have even more sanding and trimming to do. But I’m really hoping I’ll be ready for paint by this weekend!



You do meticulous work! It looks very nice
I love the straight no fuss trim you chose. Wasn’t so happy with the laser cut stuff and it was crazy expensive 😳
I totally agree with CathyR!
That looks great! So smart to mark like that for the hardware.
What a good choice for trim. You used a very careful, detailed process that is so efficient! It is going to look SO good!
How amazing they are going to be, and you found a great trim to use as well. They are going to look great, and I love how you set yourself up to go through them much faster and accurately. Love the pulls as well. Gosh, you are moving right along in the studio, and before we know it we will see the new color for the cabinets. I am so happy with the Ikea storage in my office/craft area. I bought the teal color, and although there is less and less of them left, I purchased a few extras recently. They even have teal storage bins, so my room has lots of storage now. Love your plan.
PS) Please show us how to paint them…I painted a dresser and it doesn’t hold up well on the top. I’m sure you are doing the cabinet door in a durable finish. I need to learn! Thank you!
Amazing to me how you always figure things out. I think of myself as creative but you take it to the highest level! It’s going to look so good! Can’t wait to see it!
The trim and pull look very nice on the drawer. I liked the overlays but I think this a better choice – the simplicity will allow the wallpaper and cabinet colors to shine.
Yes, I agree — that was my first thought.
As I’m painting some wooden shelves rn, I’m looking forward to seeing you painting our cupboards! I know I pick up tips all the time when reading your descriptions, even if I’ve followed you for years and years and read about so many many painting jobs!! One question (which you surely have already addressed somewhere): What do you do with your brushed between coats of paint? I just realised that I need some toxic stuff to get the paint off the brush and have at least 3 more rounds of painting, so am loathe to go through the cleaning process every time (that cannot be healthy). is there a way to keep the brush with paint in it (a plastic bag??) which doesn’t harm it much? thanks in advance for some advice!
sorry,I meant, what do you do with the brushes…..
If it requires toxic stuff, I assume you’re using an oil-based finish. Is that right?
I’ve found the best method for keeping brushes for later use when you don’t want to wash them in between uses is to wrap them in plastic wrap. But before I do that, I load the brush up with paint. So I have my plastic wrap ready and spread out. Then dip the brush in the paint, and immediately wrap it in plastic. If it’s an oil-based product, I don’t put it in the refrigerator. I’m always afraid that if something has strong fumes, those fumes will get into food and drinks in the fridge. But I find that as long as the brush is loaded with paint before wrapping, it’s just fine the next day when I come back to it.
I used to try to get as much paint out as I could before wrapping them, only to find that when I did come back, the brush had dried bits of paint on it that would then get into the paint finish, causing me to have to wash the brush out anyway, and try to get those bits out of my wet finish. It was a real pain. That’s when I started wrapping really wet/loaded brushes, and that hasn’t been a problem.
I find that wrapping the brush in aluminum foil instead of plastic works even better.
Thank you Kristi, I will try that in the next round of painting tomorrow! It makes a lot of sense, but I would definitely not have thought of loading the brush with paint before wrapping it… I’m a bit confused about the color, as it says it is acrylic, but it needs this toxic cleaner (water just makes it very sticky). As it is a fairly old can that I just meant to use up for this small project, it’s fine. But from now on I will look for paint with which I can use water to clean the brushes, it is so much easier!
You are an awesome shopper. Don’t you feel good about saving all that money? Your room is beginning to come together. Then you can come to my house and do some DYIing. I do live
in Waco, after all!!!
Keep on keeping on.
I love all of the colors that you use. It all turns out beautiful!
I like this simple trim. Perfect for a design studio!
Looking great!!! You must be so excited!
The trim will look great! We had trim put on a wall with straight and 45 degree cuts and the handyman who did the installation recommended the poly/plastic trim because of how, um, particular I am – he didn’t think I’d be happy with wood. He said this way no uneven edges, no fill marks, etc. and he was correct!! Everything was glued with construction adhesive (no nails), all seams/joints caulked then painted and the wall looked great! He used liquid sandpaper on the trim before installing and again before painting and I was very pleased. Can’t wait to see your cabinets and drawers!!
This is so interesting, thank you for all of your instructions, it will be great!
we replaced most of the baseboards in home with this type due to the high humidity here in Houston. I love them, they paint and clean up beautifully, and I never have to worry about water damaging them!
Love it, what a great choice! I consider myself to be artistic, but you bring it to a whole new level of excellence! 🙂