Hand Painted Family Name Sign
Hello, and happy Monday! I actually finished a project this weekend–Project #3, the Hand-Painted Family Name Sign!! Again, let’s take a look back at the “roadmap” for the completion of my eating area:

If you’ll remember, I finished Project #1, the Chalkboard Basket Tags, a couple of weeks ago. So this weekend, I decided to tackle Project #3, the Hand-Painted Family Name Sign. I had already started on it a bit here, so if you missed that, you can take a look back and see what inspired this project, and how I came up with this design.
Oh, what an adventure this one was! It was time-consuming and tedious, and the more I worked on it, the more disappointed I became. I mean, this little sign was teetering on the brink of destruction, almost assuredly destined for the big landfill in the sky. And then, at the last minute…a miracle!! But more on that in a bit.
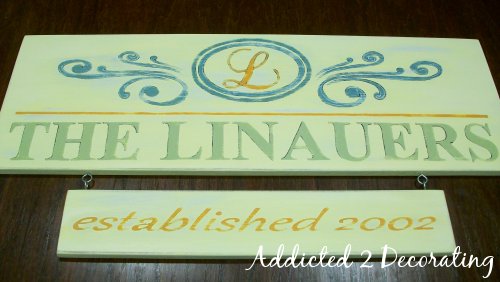
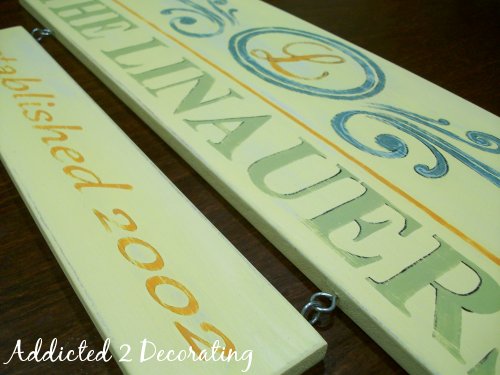
First, let me just go ahead and show you the finished product. I’ll warn you, I took about a bazillion pictures of it when it was finished because I was just so darn excited that I actually pulled it off. After being frustrated for about two hours, and being tempted to hurl the thing through a window more than once, I was shocked and stunned to actually end up with something that I’d be proud to hang on my wall. So…yeah…lots of pictures ahead.


It still brings a huge smile to my face. Shocked and stunned. I’m just shocked and stunned.
Okay, let me show you how I did it, and then I’ll have many more pictures at the end of this post.
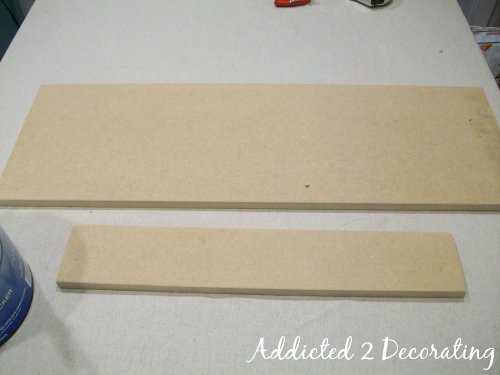
1. I initially bought lumber from Home Depot to make this sign–a 1″ x 10″ for the top part, and a 1″ x 3″ for the small section. However, when I got home, I realized that I have SOOOO MANY pieces of leftover MDF from various projects, so I returned the lumber and used MDF. After all, I wanted this to be a really cheap project. So, using my hand held circular saw, I cut pieces of MDF to the desired sizes.
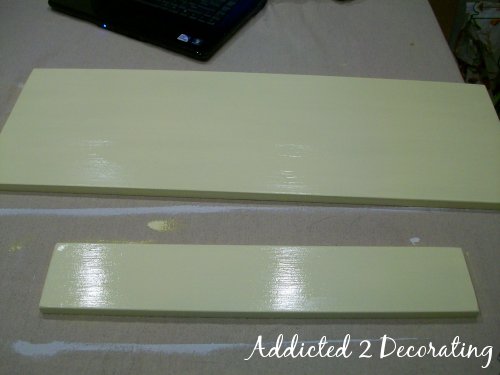
2. Next, I painted two coats of primer on the MDF.

3. And then I used one coat of the base color. I just used some leftover wall paint in a satin finish.
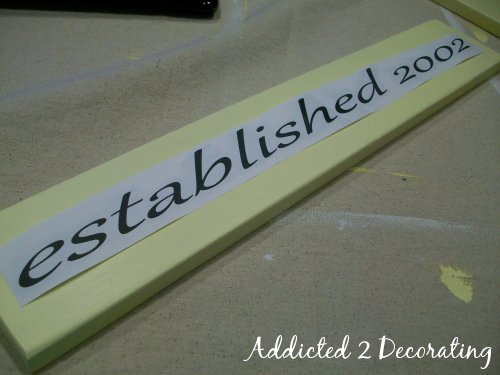
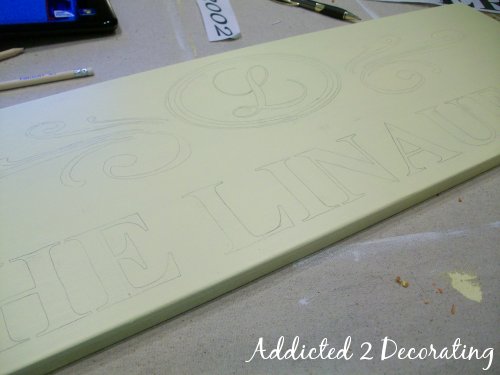
4. Next, I took my sign lettering that was printed out from my computer, and taped the sections together (since my sign is large, it printed out on several sheets of paper that I pieced together with clear packing tape). I then cut away all of the extra blank paper around the edges of the lettering.

5. Using a #2 pencil, I “colored” the back side of the sign lettering. I went over it a couple of times to assure that it was well-coated.

6. Once it was coated well, I placed the lettering right-side-up on the painted MDF. I used a ruler to make sure the lettering was straight across. I didn’t tape my lettering to the MDF, but if you have trouble with paper shifting, you can use painters tape to hold it in place.
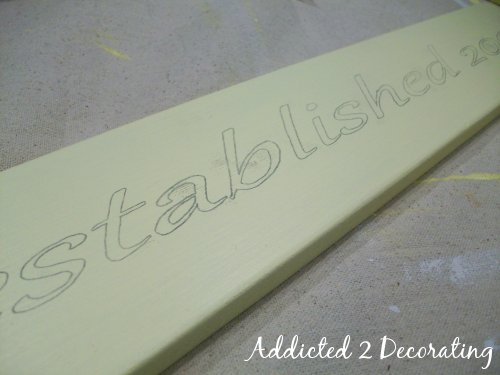
7. And then I used a sharp pencil to trace the lettering onto the MDF.

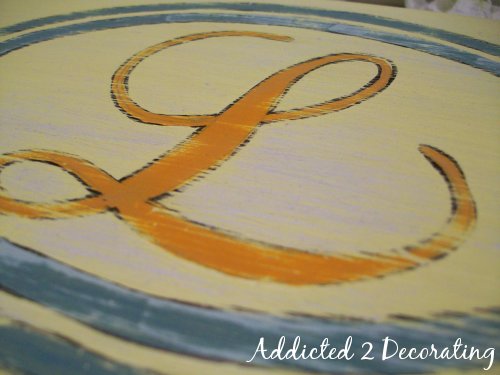
8. Once everything was traced, I was ready to start painting. I used tiny round craft brushes, and an assortment of paint colors of Behr sample paint pots in a matte finish.
Now here’s the kicker…because I really hated how this sign was turning out, and was convinced that I was going to hurl it into the dumpster, I stopped taking pictures. But I’ll explain the steps that I failed to document with my camera.
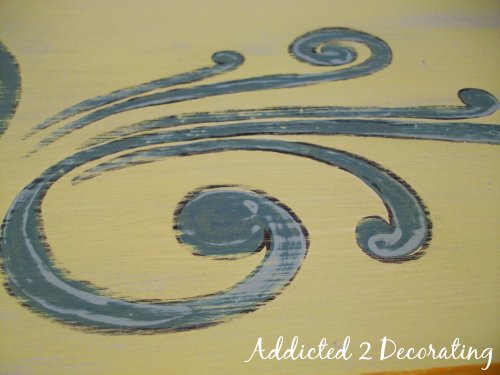
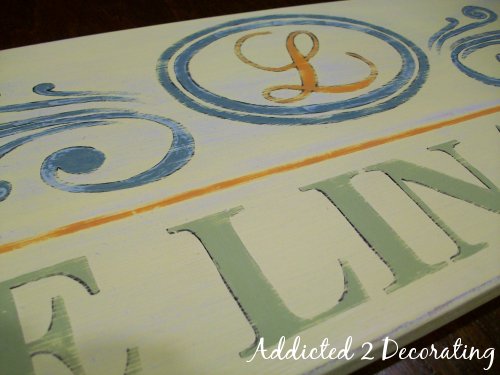
9. The swirlies at the top I actually painted first with a light aqua color. I hated how it looked with the yellow, so I went back to Home Depot and got a deeper color. However, it happened to be a very happy accident that I had that lighter color underneath the darker color.
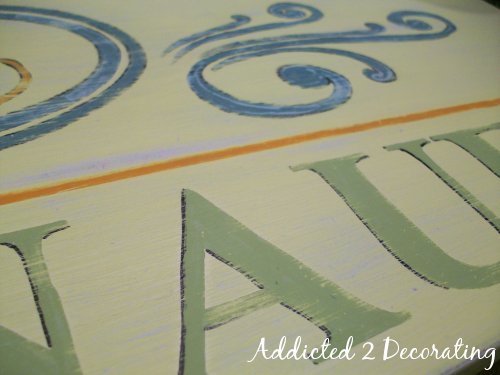
10. After everything was painted, it still looked horrible, so I got a big fat Sharpie marker (a Super Sharpie with a pointed tip), and started randomly outlining various parts of the lettering, thinking it would make it “pop”. It just made it look cheap. But determined to see it through to the end, I continued to outline, but the more I did, the more careless I got. Still, I was convinced that it was headed for the dumpster.
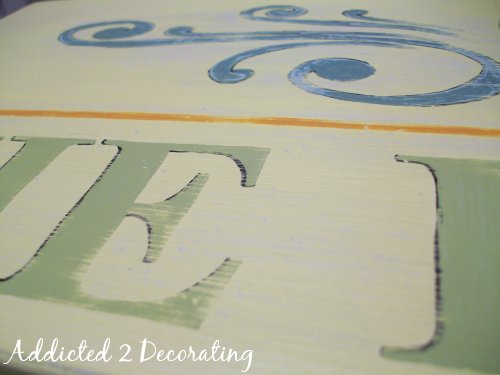
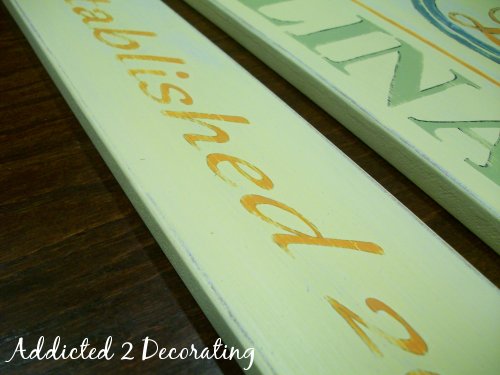
11. Knowing that it couldn’t get any worse, I decided to give one last idea a try–giving it an aged look with some sandpaper. I used 150 grit sandpaper and just started sanding (manually–not with my electric sander), and right before my eyes, a miracle occurred. My ugly duckling sign actually started transforming into a beautiful swan. Okay…that was cheesy…but seriously, I was amazed.
And remember that frustrating “accident” of using a light aqua that just did…not…work? I couldn’t be more pleased. I love the way that light aqua peeks out from the darker color.
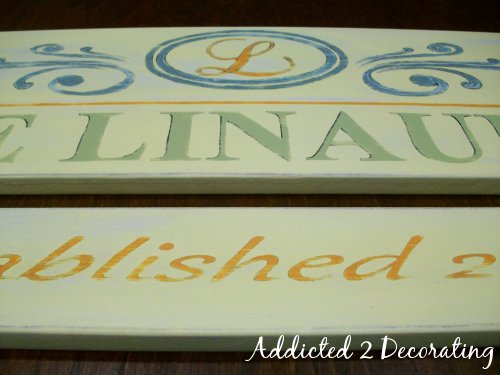
So that’s it! Well, I attached the two sections with some eye screws…and then it was finished!! I finished it so late that I didn’t have time (or the supplies) needed to hang the sign. In fact, I’m not really sure how to do that because it’ll be hanging on tile. Hmmm…I’ll have to think about that. It makes me really nervous to put a hole in the grout with a nail. I’m afraid it’ll crack the tile!! Anyone have any experience with this? Have any suggestions?
Okay, while you’re thinking about that, I’ll show you more pictures.


Okay, okay…enough pictures…I know. But seriously, if I had taken pictures of this sign before the sanding, you’d be just as amazed as I am. I mean, this thing was UUUUGGGGG…LLLEEEEEE!!
I’m anxious to get the sign hung over the banquette, but really, if you have any suggestions on how to do that, please let me know!!
This project was for my condo breakfast room makeover. Click here to see the whole before and after of the breakfast room makeover.

Or click on the thumbnails below to see other DIY projects that I did for my condo breakfast room makeover.
[categorythumbnaillist 494]

Addicted 2 Decorating is where I share my DIY and decorating journey as I remodel and decorate the 1948 fixer upper that my husband, Matt, and I bought in 2013. Matt has M.S. and is unable to do physical work, so I do the majority of the work on the house by myself. You can learn more about me here.


Kristi,
Could you hang it actually from the wood cabinets above it? Maybe with clear fishing line or something?
That's a great idea! I think that will work. I'll give it a shot.
It looks awesome! Great job and lesson: don't throw it away- make it work!
Or maybe hang it with a chain from the cabinets above. Put a hook in the wood then attach the chain near each end of the sign (on top) and put it over the top hook. The chain would let the sign hang as far down as you want it and might add an interesting touch.
I love the sign! Sandpaper did add the magic touch.
Mom
That's beautiful, well done! 🙂
That looks AWESOME! Well done!
How about using those 3M picture hanging strips? Not sure if they'll work on tile, but maybe….
http://www.amazon.com/3M-Command-17203-Picture-Hanging/dp/B000OF6X48
I LOVE it! You do such a good job with the tracing of the letters and numbers; I don't know if I could do it as well {although, you make it seem so easy}!
That turned out beautifully. I LOVE it…. would love to do a play on that same thing in my condo…. wow…
I love your sign! I think it turned out perfectly. It looks very old! Great tutorial!
thanks for sharing.
gail
Your sign is gorgeous!
I LOVE IT! The colors are perfect ~ nicely done!
This just made my night! It was almost as if I'd written it myself. I've had plenty of projects like this. But that's how I learned to paint. Only most of projects were on walls! I'd just keep painting, and painting, and painting.
I love that you distressed it. It's extraordinarily beautiful. Every little thing adds to the final product.
Sharpies? Ha! If you get a chance, read my post today!
I really like the way it turned out! You did a great job, and I'm so glad you pressed on until it turned out beautifully. (I think we have to do that in life, too.) Way to go!
I love the sign, good of you to hang in there! I haven't read the other comments so maybe I am redundant but you can drill in tile. Just stick some tape on it first so your drill won't slip on the slick surface. But personally I wouldn't drill. Just use sticky velcro or those removalbe 3m sticky things.
Enjoy your sign, and now let's all wait for project # 4
The sign looks great!
Hi Kristi 🙂 The sign is awesome! And it's all in the details, so, could you share the name of the fonts used for the monogram part and the other lettering? I love this idea and how it looks so cool in the eating area–sanding makes it really special and you are so talented!
Blessings,
Sindy 🙂
That is gorgeous!!! 🙂
I love it!! I use a sanding block to distress my pieces and it makes a world of difference! Great job!
Looks awesome – great job! For hanging, I'd definitely go with hooks or picture hangers with 3M Command Adhesive. It works great on tile or cabinets or anywhere else you don't want a permanent hole.
Thats looks really great
Ypu should be able to use command strips to hang it on tile. Use a couple depending on the weight
Something so customized is going to be lovely.It is extremely well done also…gives the look that s necessary on the account.
Wow that looks great, I can't believe that you painted it, amazing!
Beautiful!
We just had to drill in tile to install a microwave. They have a special drill bit for glass and tile. (I found this out after breaking two other bits.) And you need to keep the bit wet because it gets HOT. But I wouldn't drill a hole, I'd look for some other way to hang it. It would be hard to undo.
Beautiful sign.
I haven't read the other comments so maybe this is a repeat but I have used the 3M sticky squares on tile. I had a really quirky antique-ish aqua metal sign I wanted to hang on tile above our stove but I didn't want to drill in the tile in case I decide to change it out someday. It worked amazingly well and the sticky squares are VERY sticky so I just had to make sure that I got it centered on the first try. Good luck!
LOVE this… the monogram at the top is fabulous!
We have a friday fun finds party… we'd love it if you'd link to this! 🙂
Wow, great job! I've been wanting to try my hand at a sign, and after seeing yours, I just might go for it. Looks really good.
Love your sign,, looks very professional.
Wow! You did a great job…I love it!
Krista
This turned out amazingg..Im considering attempting my own for my mom's birthday present now 🙂 Thanks!
thx for sharing. I have had a sign like this pictured in my head for a long time….just can't seem to make myself do it along with my other 50 projects! I knew it would be time consuming. I paint tons of stuff and would prob toss everything if it wasn't for good ole sandpaper! I have totally been there. paint upon paint…thinking its the ugliest think on earth! Anyways, I wanted to comment to encourage u to not fear drilling into grout. I drill into clients grout lines all the time. (I'm obsessed with covering ugly un-used plugs on kitchen backsplashes) I have also had to install hooks into grout in bathrooms for the tiebacks. I have used regular small bits, but the dremel tile bits work best. U can easily fill a hole in grout if it is no longer needed by mixing a very small batch of grout and filling it in.
I was online trying to find how to make a sign for my entry and whala…LOVE the idea of printing the text on the computer and using the pencil! Now I can finish my breadbox that was waiting for a stencil but I am way too cheap to buy one…and get started on my sign. Also, definately going to use sandpaper!
Wow! You did a great job…I love it!
Krista
We just had to drill in tile to install a microwave. They have a special drill bit for glass and tile. (I found this out after breaking two other bits.) And you need to keep the bit wet because it gets HOT. But I wouldn't drill a hole, I'd look for some other way to hang it. It would be hard to undo.
Beautiful sign.
I love the sign, good of you to hang in there! I haven't read the other comments so maybe I am redundant but you can drill in tile. Just stick some tape on it first so your drill won't slip on the slick surface. But personally I wouldn't drill. Just use sticky velcro or those removalbe 3m sticky things.
Enjoy your sign, and now let's all wait for project # 4
Kristi,
Love this blog & DIY site! You do amazing things! This may sound silly, but the embellishments (swirls) on either side of the "L" monogram, where did those come from? Did you have a stencil or did you find them on your computer? The reason I ask, is that I am working on a label project and I can't find "swirls" like that anywhere to be used in photoshop! I was just curious.
Hmmmm…it's been a while since I did this project, but I'm pretty sure I just Googled something like "family name signs", and came up with several that I liked, and then combined different elements from each of them. I didn't use a stencil, and I remember printing them off from somewhere online. Not sure if that helps. 🙂
I like your mom’s idea the best: Chains. You’ve given your sign an “aged” look, and how were many old signs suspended?….by…CHAINS….!
Hi Kristi,
I love your sign. You are so creative. I want to make a sign now too. Not to meantion a lot more things that I am now inspired to do.
Thanks, Missy
I LOVE it!! Can I copy it…with my family’s name and est date, of course?!!
Hi Kristi. I’ve just begun decorating my new house after almost 2 years of just despising the lack of decor. I have a large alcove over the entry way closet and have NEVER found the right decor to put into it. I finally found a nice painting at Hobby Lobby, but it STILL needs more decor and I’m NOT the plant type. So I googled family signs and I saw yours out of the million images Google suggested and LOVED it! And honestly, it never occurred to me that I could MAKE the decor I want, rather than scouring store after store and the internet for stuff that does NOT suit my taste at all. So, I just wanted to say THANK YOU for sharing your ideas. You ARE a true inspiration and I LOVE your designing style 🙂 I’ll be attempting a sign similar to yours soon, wish me luck!
So glad you found inspiration on my blog, Christina! 🙂 Good luck with your sign!