The CORRECT Way To Sand Hardwood Floors
After taking the day off on Monday, reading every single one of your incredibly encouraging comments on my last post and on Facebook, and watching a few YouTube videos on how to sand hardwood floors, I felt rested, encouraged, and ready to tackle the floors again. So yesterday morning, my brother went to the rental place and picked up the correct floor sander for me.
I don’t have a picture of the useless piece of junk I rented the first time, but that one was called a square buff sander. If you’re about to refinish your hardwood floors, and you’re wondering what sander to use, just please…please…take my word for this. You do NOT want to rent the square buff sander.
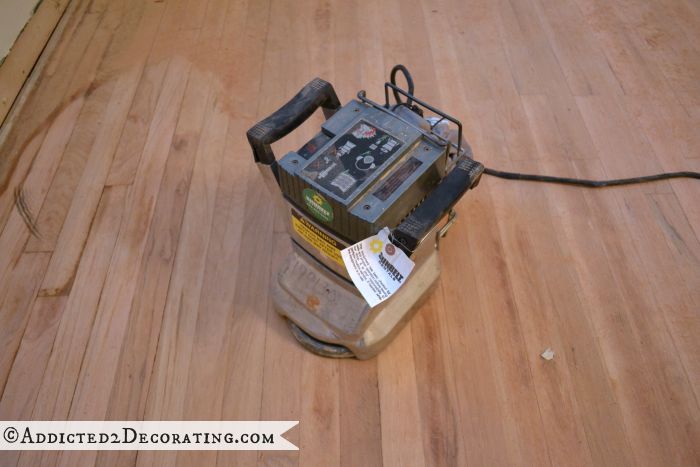
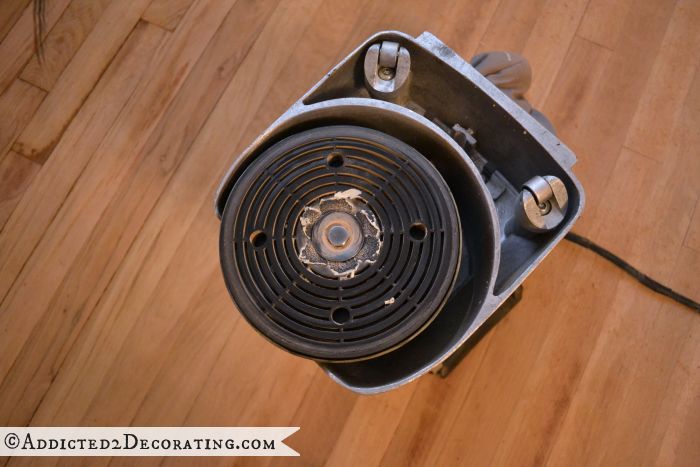
The correct sander is called a drum sander. This thing is amazing! It was really hard work, but I thought it was quite fun to use.
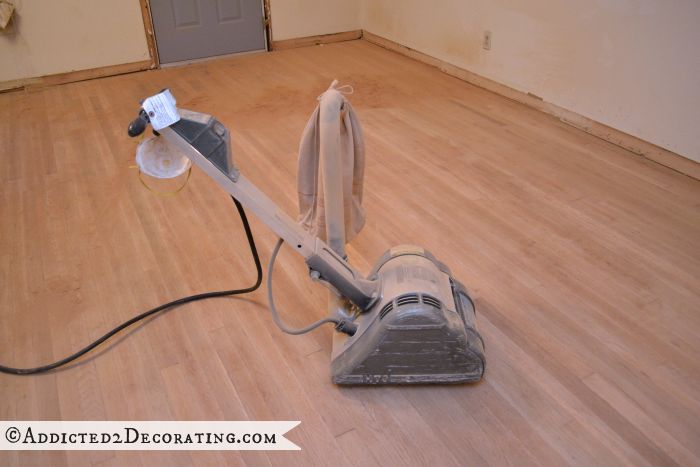
One of the things that makes it so much fun to use (for me) is that it actually does the job. You can see it cutting right through the finish and revealing bare wood below.
And the results were quite spectacular. It took me all day to do the living room, entryway, and dining room. But I didn’t even care, because they looked so good!! (And one reason it took so long was because the plumbers were there, so I was getting in their way, they were getting in my way, and I’m sure we were all slowing each other down.)
But this is how floors should look when they’ve been sanded.
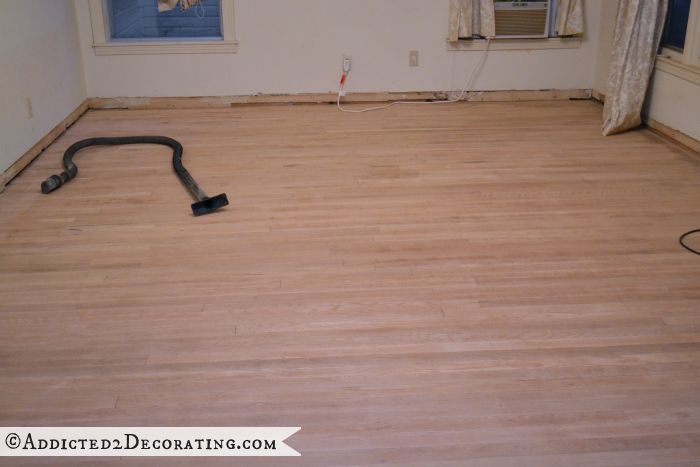
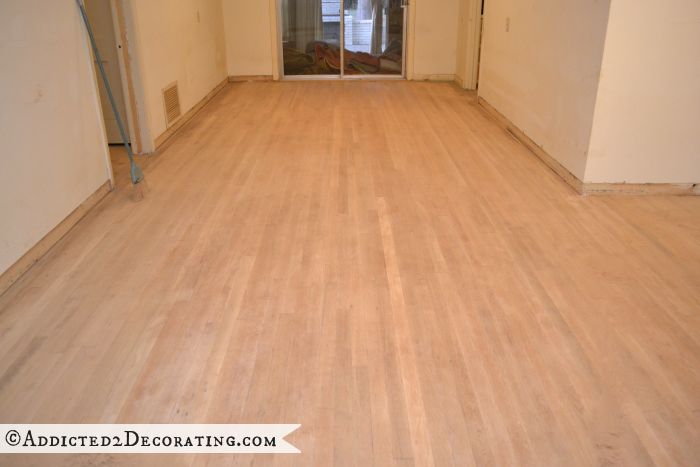
Am I the only one who gets a little giddy at the sight of freshly sanded, ready-to-be-finished wood? And what a difference from how it started!
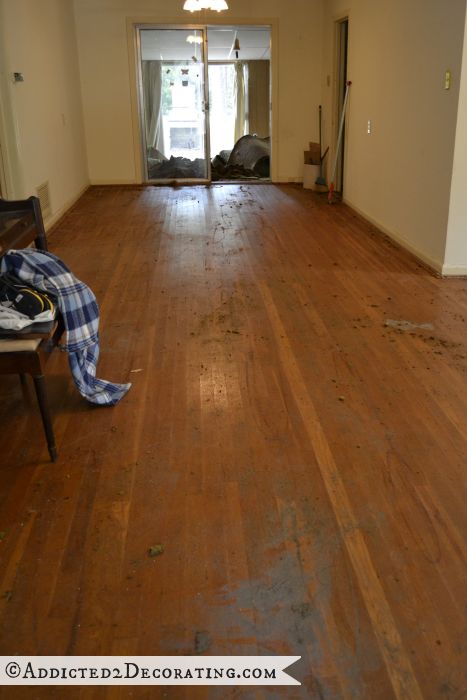
(That picture above was taken just after I took up the 30+ year old carpet, and before I did any sweeping or vacuuming.)
Now you might notice that the edges of the floor aren’t sanded all the way around the rooms.
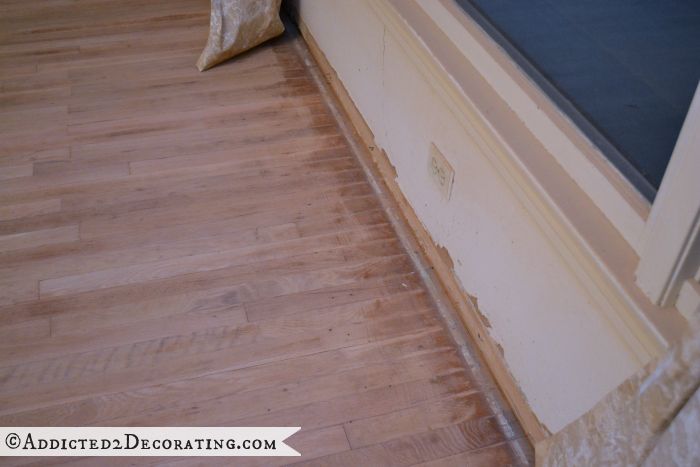
While the new drum sander and I got along swimmingly, the edge sander and I didn’t get along so well.
That thing is heavy, very powerful, and has a mind of its own. And for some reason, I could only sand about four or five feet before the sandpaper disc would rip off. Talk about frustrating! And I have no idea why that was happening.
I called the rental place this morning to ask about it, and the guy insists that I’m running into nails. I’m not running into nails!! There are no nails. I’ve checked and double checked.
And each time the sanding disc rips off, it leaves unsightly black marks on the floor, so those areas have to be re-sanded.
So if any of you have experience using these edge sanders, and know why the sandpaper discs might be ripping off while in use, I’d love your input. At this rate, it’s going to take 10 discs per room, and at $20 per package, it adds up quickly!
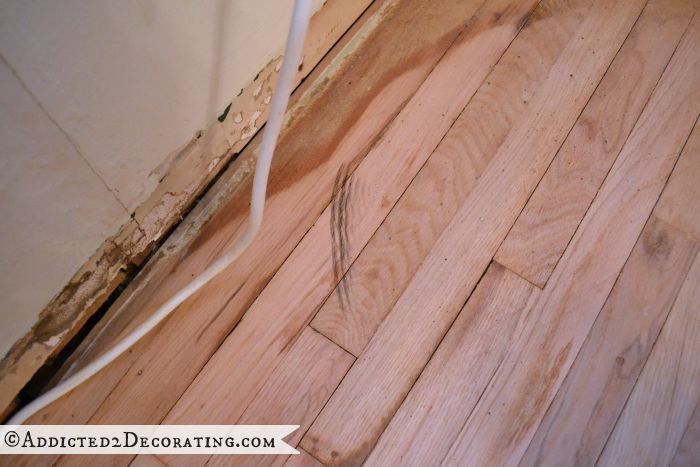
While I was sanding, I did uncover a few random nails in the floor.
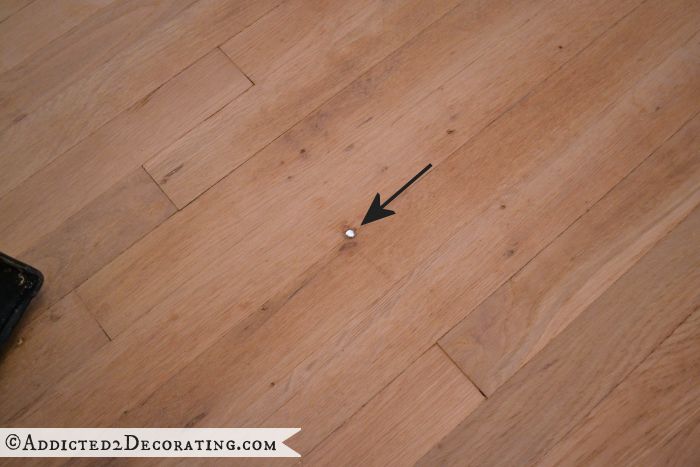
At first I was irritated by them, and wondering how in the world I was going to get them out without damaging the floor. But you know what? The more I thought about it, the more I realized that I actually like them. They add to the history and character of this house. So I’m going to embrace the imperfections.
So I have more sanding ahead of me today…and probably tomorrow…and maybe even Friday. It’s exhausting work, but so very rewarding when I know it’s actually being done correctly!!
For any of you who may want to tackle this project in your own home, I found this video from Pete’s Hardwood Floors to be the most helpful and thorough in explaining how to use a drum sander. But let me add a few things…
Three tips I learned about using a drum sander on hardwood floors:
1. If possible, find a drum sander that does not have a lever for raising and lowering the sanding drum.
In the video linked above, it shows a drum sander that uses a lever to raise and lower the drum. When I went with my brother to rent the sander, I was fully expecting this type of sander, and I was actually disappointed when they brought out one to me that didn’t have a lever.
However, after using that sander for an entire day, I can honestly say that I can’t imagine having to use a lever to raise and lower the drum. What a pain that would be because you’ll be constantly moving back and forth with the sander, and with each back and forth motion, the lever would have to be utilized.
Instead, the leverless sander that I used just required that I press down on the handles with slight pressure to raise the drum. It was incredibly convenient, and allowed my hands to remain on the handles at all times.
2. Don’t be afraid to use very coarse sandpaper.
In the video, they recommend starting with 36-grit sandpaper. Well, while I thought my floors were in great condition, it turns out that every single board on my floor had a slight bow to it. So I needed to start with something that would really tear through those high spots and get the wood all nice and flat.
The 36-grit sandpaper (used on the diagonal for the first pass like it shows in the video) wasn’t doing the job, so I went back to the rental place and got 20-grit to start with. That did the trick.
To most of us DIYers who are used to using hand-held rotary sanders, 80-grit sandpaper is generally thought of as being very coarse. Using a 20-grit would generally be out of the question. But trust me, for old solid wood floors, you have to start with either 20-grit or 36-grit, depending on the condition of your floors. And if your floors are like mine, they may look like they’re in excellent condition, but you may not realize just how bowed the boards are until you start sanding.
3. To get at stubborn areas, walk the machine backwards and lift up on the handle.
I had some boards that just would not give up the varnish. No matter how many passes I made over the board, that old varnish just held on for dear life.
I finally learned that getting the varnish off of those stubborn areas was much easier if I walked the machine backwards over that area (rather than pushing it forward like a lawn mower), and lifting up on the handle with little to moderate pressure while walking the machine backwards. That allowed the sandpaper to really cut into the board and get at the stubborn varnish.
I think those are all the tips I learned and wanted to pass on to you.
The main thing is that you just have to be sure that you’re continually moving if the drum is on the floor. And in fact, make sure that you’re in motion as you’re lowering the drum onto the floor. If you’re standing still while lowering the drum to the floor, you’ll leave grooves all in your floor.

Addicted 2 Decorating is where I share my DIY and decorating journey as I remodel and decorate the 1948 fixer upper that my husband, Matt, and I bought in 2013. Matt has M.S. and is unable to do physical work, so I do the majority of the work on the house by myself. You can learn more about me here.

Good job! :::whew!::: What a task!
The floors look amazing! The house is really beginning to shape up. I can only imagine how great it’s going to look when you’re all finished. I really enjoy watching it take shape. 🙂
Brenda, I don’t think Kristi will EVER be finished! By the time she finishes the whole house, she will have ideas to start over again–her ideas and creativity are neverending! And brilliant…
You did it!! Great job!
Wow! That is making a huge difference. You’re my hero!
I so want to come and be your assistant or gofer and soak in all you can teach me!! What an inspiration! I love it!!
Wow! The floors look great! I can’t wait to see them finished!
Your “new” floors look super and I am so very proud of you!
Great Job Kristi. Can’t wait to see the finished results.
They do look beautiful! Does that freshly sanded wood smell good too? I knew you could do it.
I’m impressed! I’m afraid I might have given up and started looking on Yelp for floor refinishers, lol. Good for you, Kristi — you GO girl!!
Awesome!
Wow! The floors look amazing. So glad you gave it another go!
Great job, Kristi-
I knew you would accomplish the job after you took a few steps back to reassess.
Hi Kristi,
The floors look fabulous! I betcha is smells REALLY good now 🙂
Tracey
Yay!! That looks great!!!
So glad you are off to a great start this time. 🙂 It’s so rewarding to sand down wood. It just looks so fresh and new. The floors look fantastic! I can’t wait to see the end results.
Thank you for sharing your experiences & also your wonderful tips. I an a single-women home owner and need all the “advice” or tips I can get. You’re great! Love your blog
The floors look AMAZING! Great job Kristi. It may be hard work, but I know you are loving it. Can’t wait to see the finished product.
I’m so happy for you. Wait a comeback this is. I was super down and bummed when your first attempt left you feeling sad and flustered. The floor are absolutely stunning and will be amazing when you stain them. Have you decided on a color yet? I know you are keeping with a vintage/traditional tone in the home, so I am looking forward to seeing it all come together.
Great job, but you’re making me tired. I’m going to go take a nap.
Wow, that’s all I can say. I love that wide entry more now than I did before, which was a lot! What about a pair of French Doors at the end of the hallway there? Can you just imagine the dramatic effect this would have in walking into the house.
I know, there are already plans in place. I seem to be dreaming myself into your house!
looks absolutely wonderful!!
I’m so glad you decided to keep the random nails. How cool is that? I am so happy for you. I felt really bad when I read your other post where you were feeling so upset. Every project I attempt seems to end up like that so I am SOOOOO happy when I see people get through it. Congratulations.
You SO deserve a gold medal. And even though I thought I had grit, I’m pretty sure I would have given up and sat down and cried and called someone else to do the work after your bad day. Is your husband as proud of you as all your readers are? We should set a celebration point where all of us close enough to your town (is it Waco?) come to take you out to dinner!!!! Maybe a time before move-in day even though you’ll still have many projects ahead.
Great job, Kristi! Can’t wait to see how the house progresses !!
These are looking fabulous! Hoping you can still move your arms!
Woo-Hoo! Seeing those unfinished floors is so exciting! Sanding those floors has already made a HUGE impact. The room looks brighter and more spacious now. Prep work is such a pain! But, I know you will have a fun time putting the finishing touch on those floors.
Amazing work, Kristi! I bet you are sleeping well at night. That is some serious work. When I refinished my cabinets, I was so exhausted and sore, that I took some Ibuprofen and passed out. lol 😉
Success! I expected nothing less…..congrats on a job well done!
What a fabulous job! I shared these tips on my Pinterest home reno/tut page so I can refer back to the when I need to refinish some! Great work! I know exactly how frustrating and upsetting ‘getting it done’ is; and sometimes the best course of action is to walk away for a bit. I have found the bigger the project the longer I may need away. Two thumbs up for getting back to the grindstone so quickly. Keep it up!
You are one amazing chick! You go, girl!
Your floors are going to be beautiful. Those random nails in the floor were probably used to stop squeaks. I removed one in my floor and now I have a lovely squeak in that spot. I sanded 3 rooms of oak in my mothers house with an orbital sander until it died and then a palm sander. Then I used the square buff sander on the 4th room, because it was so large. Our floors don’t look like yours, but we didn’t want them to look brand new. The house is 100+ years old and we wanted to keep the character. Just a note for some readers – not all floors are “hard” wood. The floors in my house are pine – very soft. I used paint stripper and then the palm sander so that I didn’t remove too much wood. They are also 100+ years old.
Wow, Kristi, your floors look FANTASTIC! Once again, I’m in awe of your energy and dedication in sticking with it! I was sad right along with you when the first attempt at sanding the floors was a bust, I really felt your frustration. I’m so glad you just walked away from it, sometimes, that’s the hard part, we get really stubborn and want to force things to work, and that’s when we get into real trouble! It all panned out for the better, your floors are just beautiful and it’s hard to imagine they are the same floors in the “before” pictures. Amazing results thus far, can’t wait to see the progress of this project.
The floors look AMAZING!!! So glad it worked out for you. So excited to see what’s next.
What a difference a day (or two!) and the right sander make! You must feel soooo much better. The floors are looking great! I’ve had experience with both the drum and edger sander, and you’re right: the edger is it’s own kind of BEAST. My first thought as to why the discs are ripping off is you might be hitting something, but if you’re sure that’s not the case, I wonder about the warp in the floors? or a faulty machine? It might be worth exchanging it for another if you can. The sander you’re using might be damaged, causing the discs to rip off. They should not be doing that, and it does slow you down and is wasteful, both frustrating aspects you don’t need. Nonetheless, continued good luck with the project. Lookin’ good!
I know it would be a pain, but might in the long run be easier, to buy a palm sander and use it. Much lighter at least…good luck:) It looks beautiful;)
Whew – I’m tired just reading all of that!
The floors look really nice all sanded clean! I love that we get to see the in-between steps so it’s not just magically revealed finished, but I am really looking forward to seeing how you treat/stain/etc. the final floors!
Woot woot! AMAZING difference. I applaud your fortitude.
love your progress. you are awesome.
I’m so glad that worked out. Looks so nice! I’m looking forward to seeing how you’re going to finish it. With the nails sticking out, if you did decide to get rid of them, I wonder if you can just set them in further with a nail punch and fill in with wood filler. Just a thought! I am so impressed by your hard work and persistence, I can’t wait to see more! sharon
The floors look amazing! I’m also happy you decided to leave the nails and imperfections – they certainly do add character to your home. Another tip of my cap to you, Kristi, for a great job!
What a great job you did. You are really going to make this place into something special. I look forward to reading every single post. Cheers
We refinished hardwood floors in a 1926 house. We didn’t use the small sander you are trying to use because it ate into the floor to deep. We just used a regular small sander, that I am sure you have, with a really gritty sandpaper. It worked very well.
So my homedepot rents “random orbital sander” and a drum sander. A friend who is a contractor told me to NOT rent the drum as he said that if you are not careful that you can sand too much and dig in on areas and make the floor uneven. he said that it is a skill to keep the sander moving at an even speed to make the floor ver even. Did you have any issues with this? Do you have any tips regarding and special skill needed to get a good result?
Your contractor friend is right. If you’re not careful, the drum will leave a groove in your floor if you leave it in one place. I do have a few spots where I evidently left it too long. But honestly, it really isn’t that big of a deal. I know they’re there, and I know what caused them, but I really don’t think anyone else would ever notice them.
It’s just a matter of always keeping the drum sander moving when the drum is on the floor. You absolutely cannot allow it to stand in one place for any amount of time. It’s really not that difficult.
I suggest watching the video that I linked in the post above. You’ll see how you need to raise and lower the drum while sanding. The sander that I used didn’t have a lever like the one in the video, and I was actually very glad about that. I just had to apply gentle pressure to the handles to lift the drum off of the floor when I needed to.
i have been doing floors and most everythong else for 7 years now and you did a great job most people mess their floor up with the drum sander also you want to do two good passes on the drum one forward and one backwards forward rips the varnish back rips the stain and it helps to stay at a constant speed so the floor ends up more even and level start at 36 grit work to 100ish and always shim the floor before you use the drum the square buff sander is basically for lightly damaged floor ie the varnish is screwed up or inbetween coats or when the grain raises as for you edger ripping sand paper its either the wheels are at the wrong height and its catching the grain or the sand paper is bad from moisture or uv exposure and you should find a different place to buy it because the whole shipment could be bad it should be very stiff and not flimsy unlike normally sand paper also try to not put too much wieght on it the weight of the sander will do the work for you hope this helped
so glad to hear someone say don’t be afraid to use the coarser sand paper!!! So many people doing guides to sanding their floors with 80 grit on an orbital sander… they have no idea lol
Good effort, nice article 🙂
Hi Kristi, I might be a little late on answering the question of why the paper ripped off the edger sander you rented. The reason is – the paper was not on tight enough – that is not your fault. Saw dust gets under the paper holding bolt. It needs to be cleaned out (by the rental center). One thing you can do if that happens, when the rental store is closed is put 2 pieces of paper on at the same time. This will help get the bolt tighter. Also that brand they rented you is not the easiest to use. We rent Clarke or Silverline, they are the best.
The edger disc were probably ripping off because they weren’t bolted down tight enough. That was happening to me until I tightened them up. Get them about as tight as you can with just your hand and the little tool that comes attached. Of course you will need to hold the disc so that it doesn’t spin while tightening ( who knows, maybe someone is tightening them up until the disc starts spinning).
Hi! Your floors look fabulous. Thanks for the tips. I was wondering , when you used the edger did it sand off too much? We just redid our floors and the edger sanded more than it was supposed to leaving the stain messy and darker around the edges. We made the mistake of getting the orbital sander. We are going to do round two and re do them- but was wondering if we should use a handheld orbital sander or the edger for edges and corners . Thank you!
The one I used was an orbital sander, but it was by no means “handheld”. Describing it like that makes me thing of a little 5-inch orbital palm sander. The thing I used was big, bulky, and metal. It weighed at least 20 pounds, if not more. And it required both hands, and lots of upper body strength, to operate.
If you look at some YouTube video’s you will be able to familiarize yourself with the machine which helped me, for sure! I’ll try to explain but if I make things more confusing go to YouTube and put in the manufacturer name and why sanding disk keeps ripping off.
Also watching how professionals use them is helpful.
Check out this video as to how they move the machine around.
https://www.youtube.com/watch?v=xf5IlNbYsDs
There is a slight angle on the machine that is about 3 pennies high in the back. Make sure it is indeed 3- pennies high. Then let the machine do its work. Dont try to put any pressure on it. Just hold on and keep moving it around. also, start it off the floor and then gently lower it.
I went thru about 10 disc’s before I read and watched and eventually became more successful…….