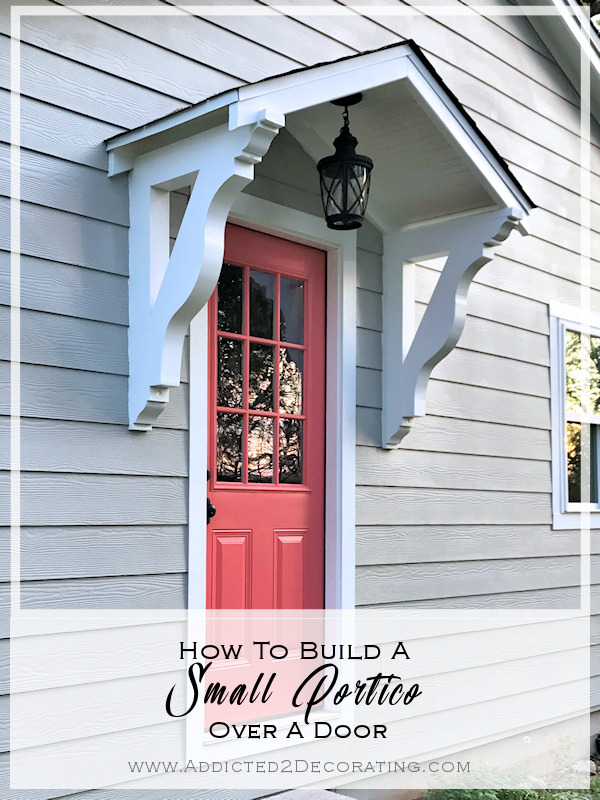
The Finished Studio Door Portico (Plus, One More Coral Door)
I have finally finished the portico over the side studio door! And it was just so darn cute that I couldn’t help but to paint that door coral also. Here’s how it turned out…
I’ve done several multi-post projects before, and I’ve done several projects that have taken me a while to finish, but this one takes the cake. It has been seven months since my last portico post!
If you missed the first two posts about this project, you can click the links below to see the details.
- Part 1 – How to build a small portico above a door — The basic frame
- Part 2 – DIY portico — Finishing the ceiling and the roof
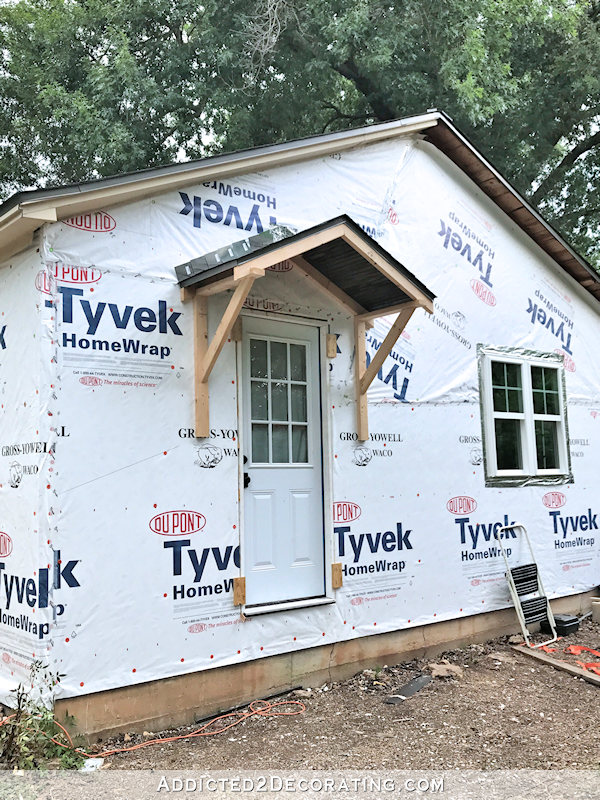
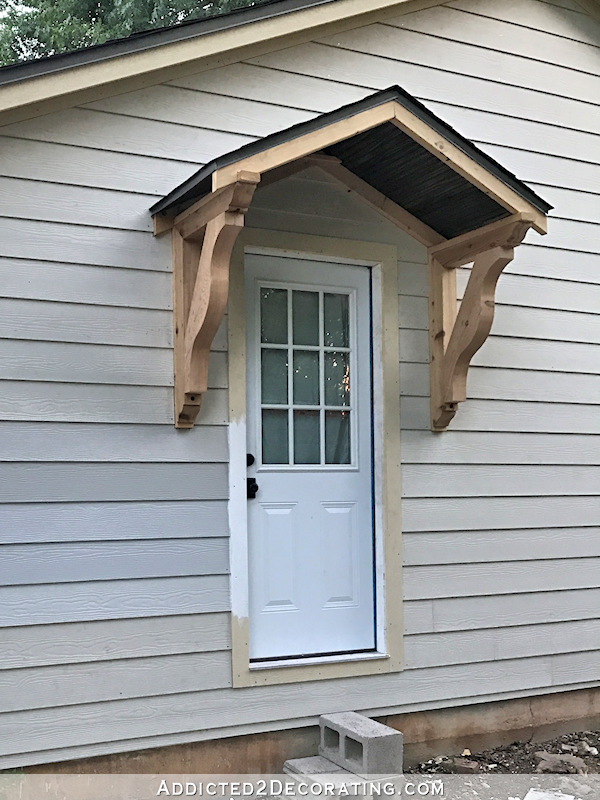
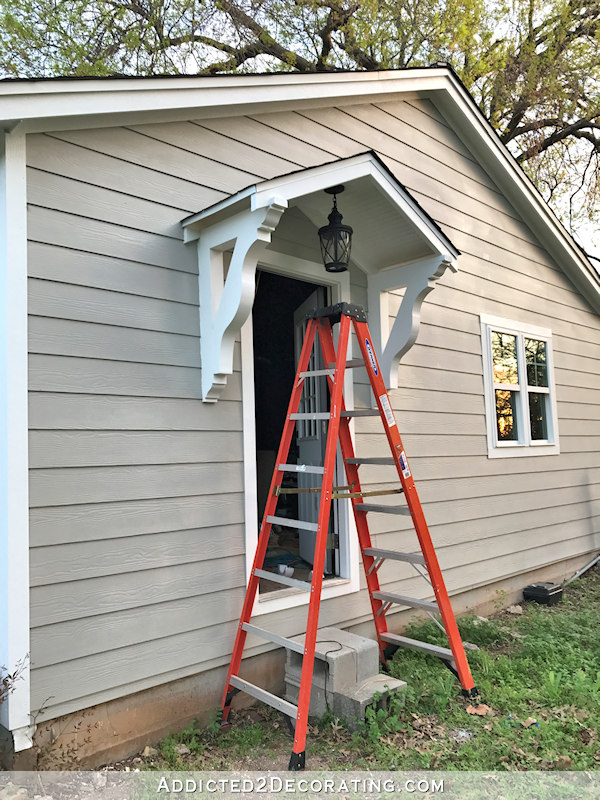
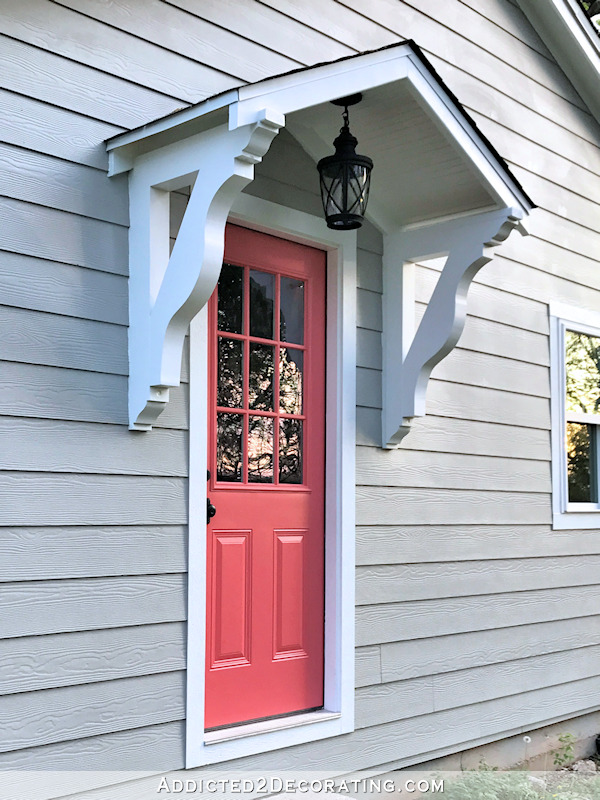
I was in a time crunch to get the portico roof to a certain point (flashing and shingles on the roof) before the guys installed the siding, but the pretty brackets that I ordered hadn’t yet arrived, so I originally built the brackets with three pieces of 2″ x 4″ lumber — one vertical, one horizontal, and one diagonal. The vertical and horizontal pieces were a permanent part of the structure, but the diagonal piece was intended to be temporary until my more decorative brackets arrived.
The brackets that I used are these 3.5-inch-wide, 24″ x 36″ western red cedar brackets. They weren’t cheap, but I think they’re totally worth it. They really elevated the appearance of the portico from a standard DIY look to a totally custom look.
To install them, my brother literally held the roof up as I removed the diagonal 2″ x 4″ piece of lumber, lifted the new bracket into place, and then screwed it into place while we both held it up there. I used HeadLOK screws (big screws that I found at Home Depot that take the place of lag bolts) screwed through holes that I had pre-drilled. And here’s how it looked with the new brackets…
When I had my house painted in January, they painted the portico for me. I was happy to have a couple of coats of paint on it to protect the wood from the weather a bit, but the portico wasn’t actually finished at that time. I hadn’t done any caulking or sanding, the flat ceiling still wasn’t installed, and there was no wiring for the light.
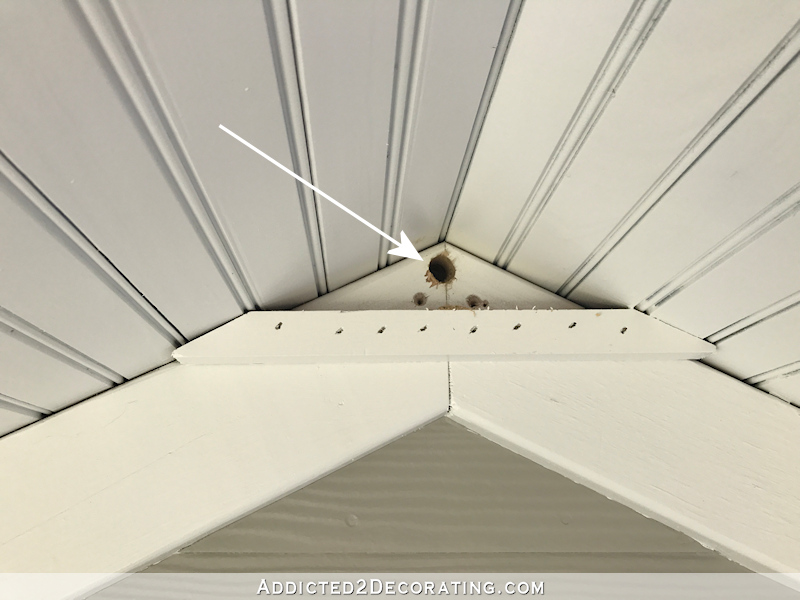
So last Thursday, I decided that a seven month wait was long enough, and it was time to get this portico finished. The first thing I needed to do was run a wire through the wall for the exterior pendant light that would go inside the portico. I had attached a horizontal piece of wood near the peak of the ceiling on both sides. You can see one of them in the picture below.
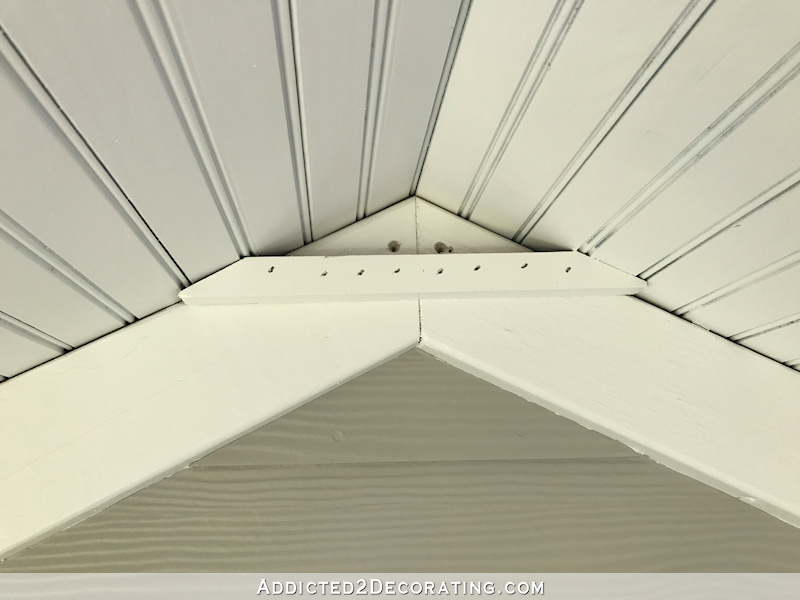
The purpose of these pieces was to give me something to attach a flat ceiling to (made from the same tongue-and-groove beadboard as the rest of the ceiling). This would give me a small space between the flat ceiling and the peaked ceiling above it to run wiring for a light.
So using a 1/2″ drill bit, I drilled a hole through the frame of the portico near the peak, through the house sheathing (i.e., OSB) and to the interior of the studio. Then I ran my electrical wire through that hole.
I then cut four more pieces of tongue-and-groove beadboard to fit inside the portico from front to back, and glued them together using wood glue. Once they were dry, I measured the width that I needed to create my flat ceiling, used my table saw to trim it to the correct width, and drilled a 1/2″ hole in the center for the electrical wire to come through.
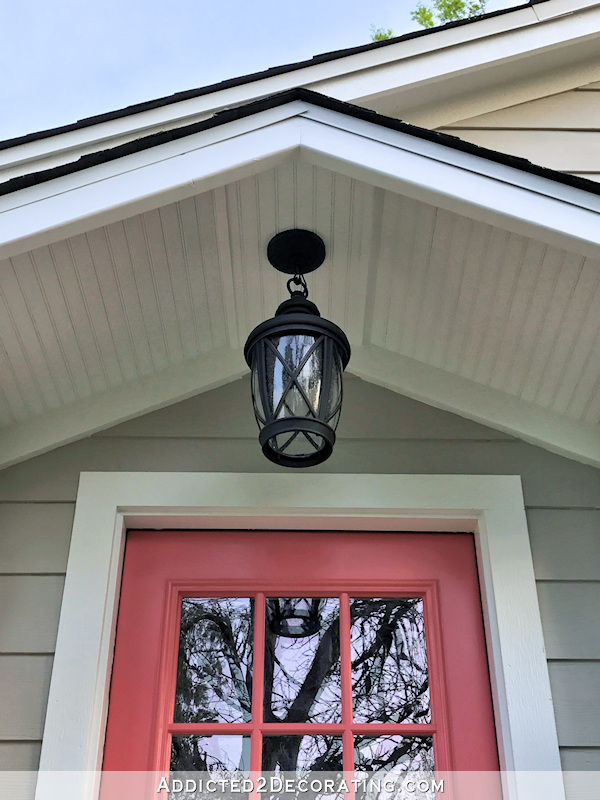
To install the little flat ceiling, I threaded the electrical wire through the hole and nailed the flat ceiling boards to those horizontal strips of wood. Once that was all caulked and painted, I could finally install my pendant light. I selected this Allen + Roth Castine pendant light from Lowe’s, which matches the lights on my front porch.
Here’s a closer view of the flat ceiling…
I had originally planned to rip the edges of the flat ceiling boards at an angle where they meet the angled ceiling so that it would look continuous, but I tried and tried and couldn’t get the angle right. My table saw only cuts angles up to 45 degrees, and I needed more like 60 degrees. So I ended up just ripping the edges of the assembled flat ceiling piece at a 90-degree angle, and then I used some scrap pieces of trim to cover the edges and fill any gaps. It doesn’t have that seamless look that I had envisioned, but once everything was caulked and painted, it looked fine.
This little flat ceiling posed a bit of a challenge for me. Since the space between the flat ceiling and the peak of the angled ceiling above it was so short, there wasn’t enough space for a regular ceiling junction box. But also, I didn’t want to cut a big hole in the center of a narrow ceiling that’s made up of individual tongue-and-groove boards that are glued together. A hole large enough for a junction box could potentially weaken the flat ceiling structure.
So I used a shallow box that is often called a “pancake” junction box and surface mounted it to the ceiling. (Just google “pancake junction box” to see what that looks like. I used a round 4″ diameter and 1/2″ deep pancake box.) I don’t think that is the true and proper use for a pancake box (so do so at your own risk), but it’s something I saw an electrician do years ago when I asked him to install two pendant lights over bedside tables in an area where there was zero space for junction boxes. so I figured it was better than no junction box at all. And most light canopies will fit over and completely hide a 1/2″ pancake box. They’re a little more difficult to work with than a regular junction box since there’s far less space to move wires around and to house the wires once the light is wired up, but they’re great for tight fits like this one.
The light doesn’t actually work yet since there’s still no electrical wiring inside my studio. So for now, the wire inside is just hanging there just inside the door, waiting to be wired up to a switch and powered in the near future. But for now, I can at least look at my pretty, non-functional light.
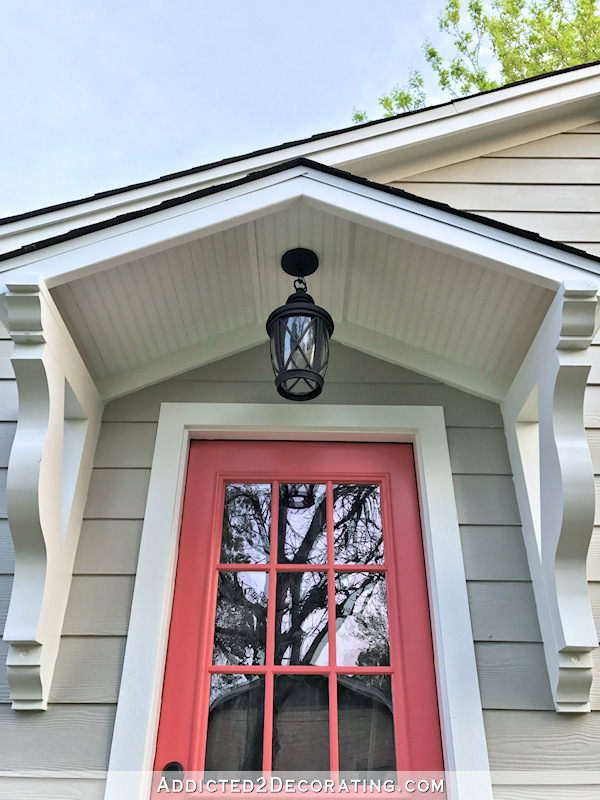
With the portico finished and looking all pretty, I wanted to go ahead and paint the door. But first, it needed a few repairs. Since I carry my heavy saws in and out of this door quite often, the door had gotten a few dents in it, so I mixed up some Bondo (which you can find at Home Depot or Lowe’s) and filled in the dents.
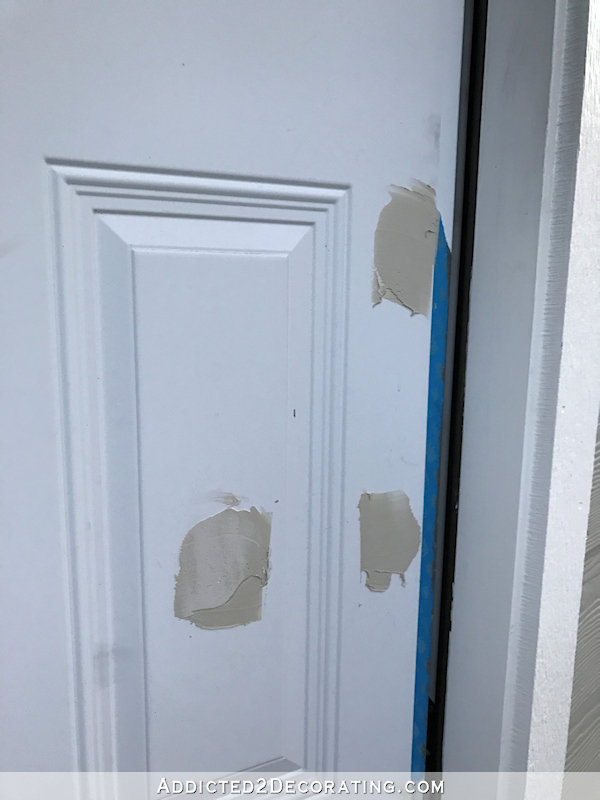
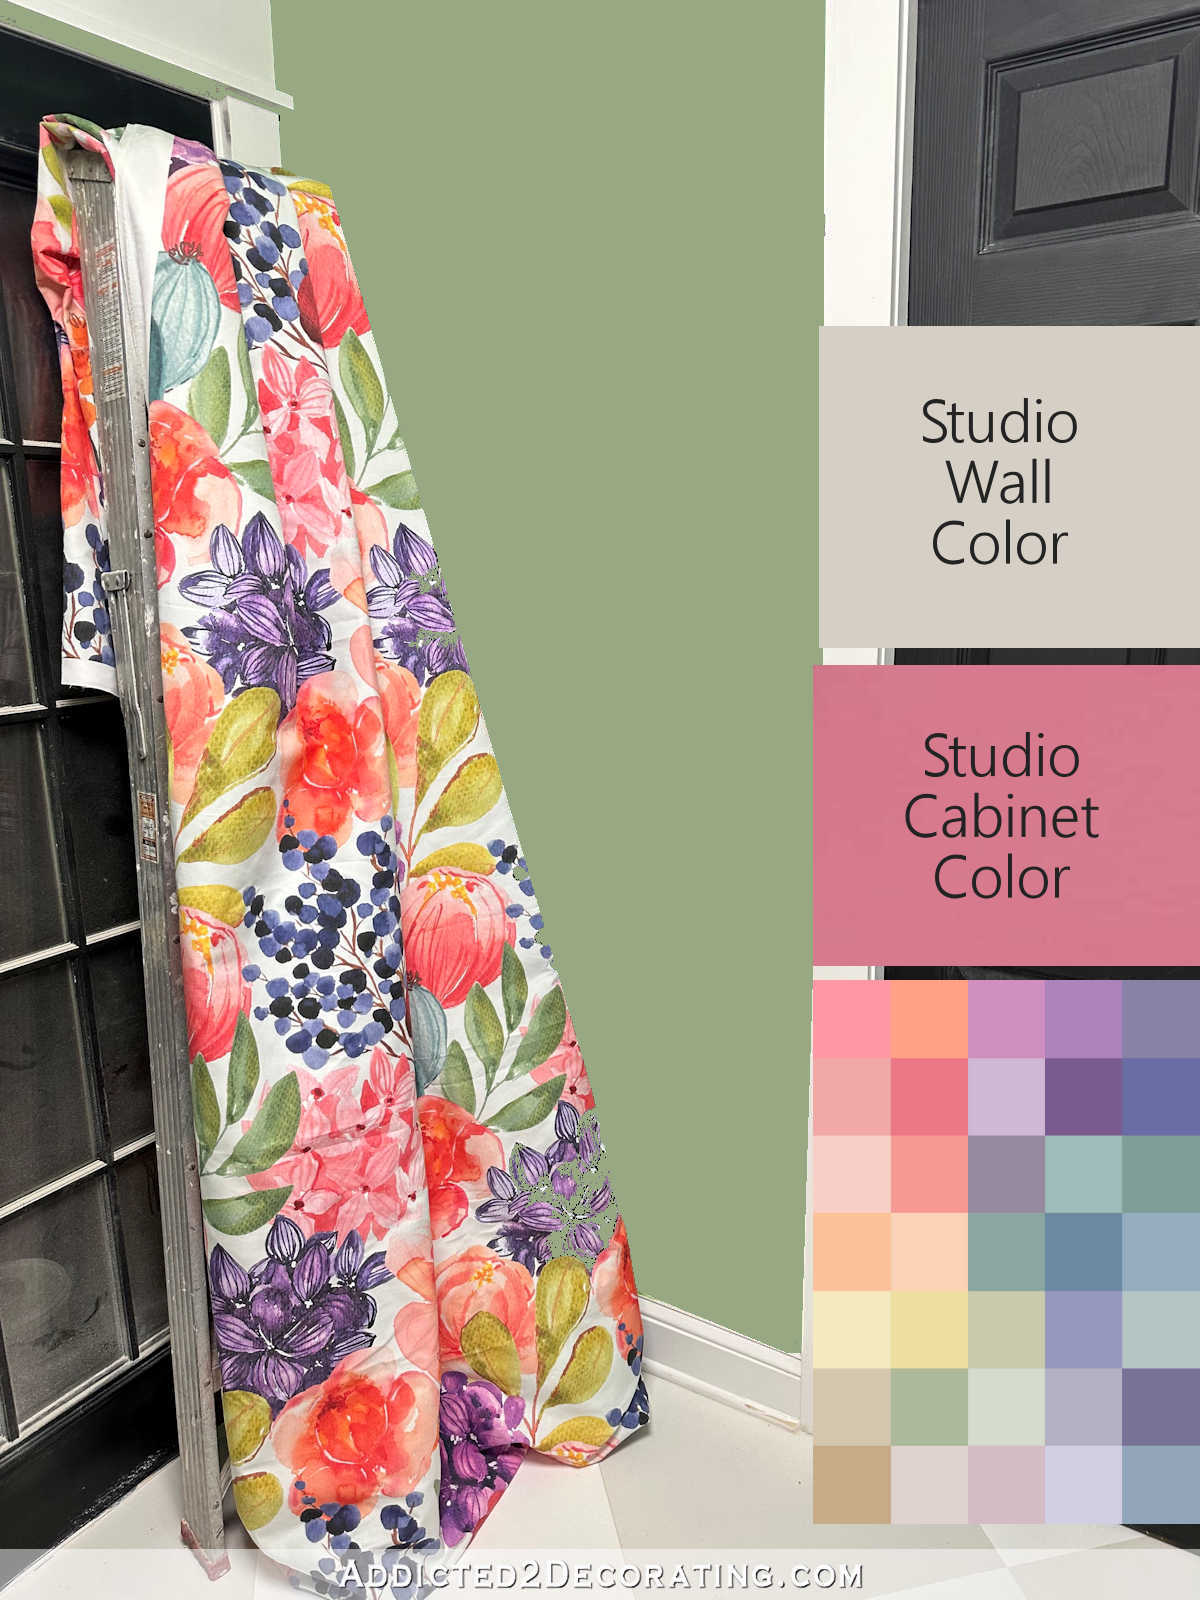
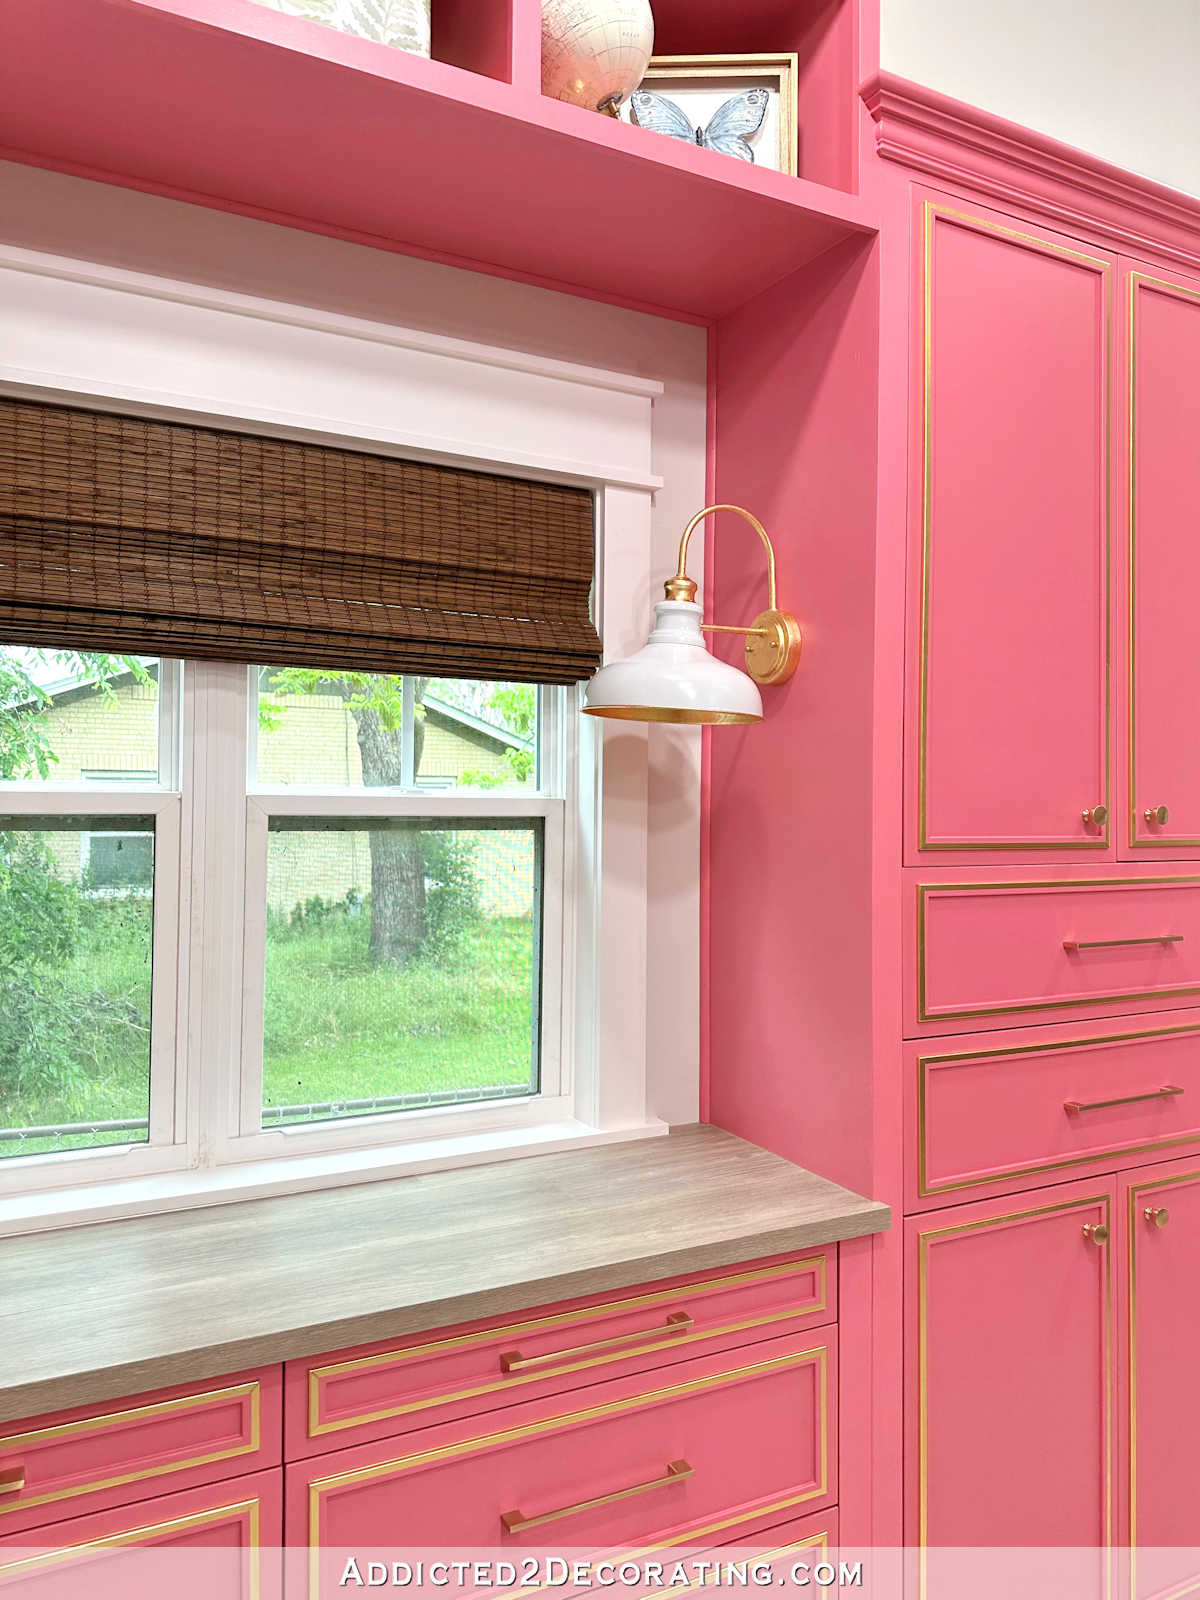
When it was dry, I used my electric sander to sand it smooth, and then painted the door the same coral color as my front door — Benjamin Moore’s Bird of Paradise.
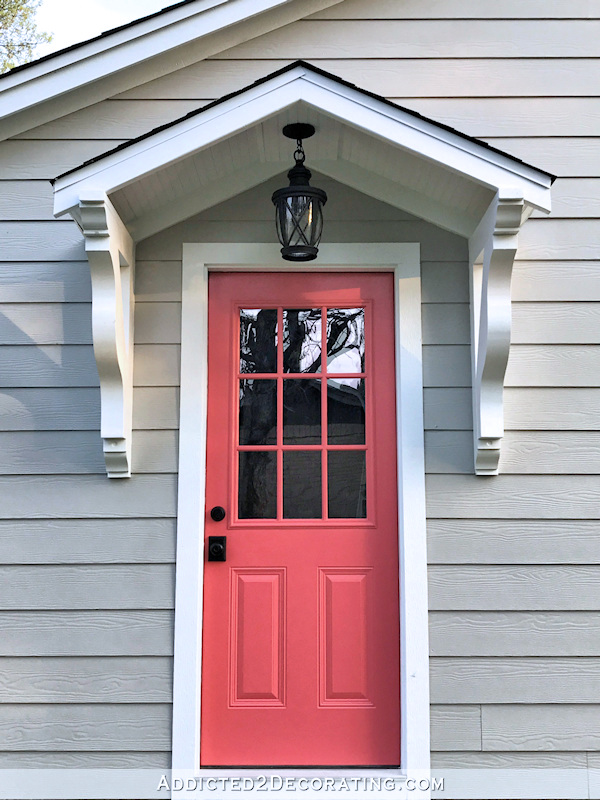
For the record, in theory I totally agreed with those of you who said that I should leave the coral just for the front door. That is completely logical and makes perfect sense to me. But in practice, I just love this color so much and it makes me happy to see it used with my cute little portico and pretty black pendant light.
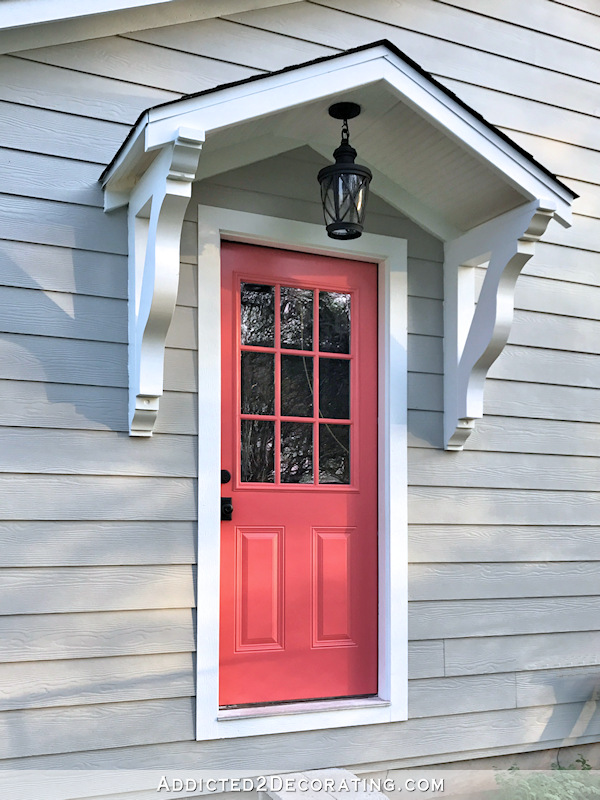
So I just couldn’t help myself. I now have a second coral door, and this little area just makes me smile.
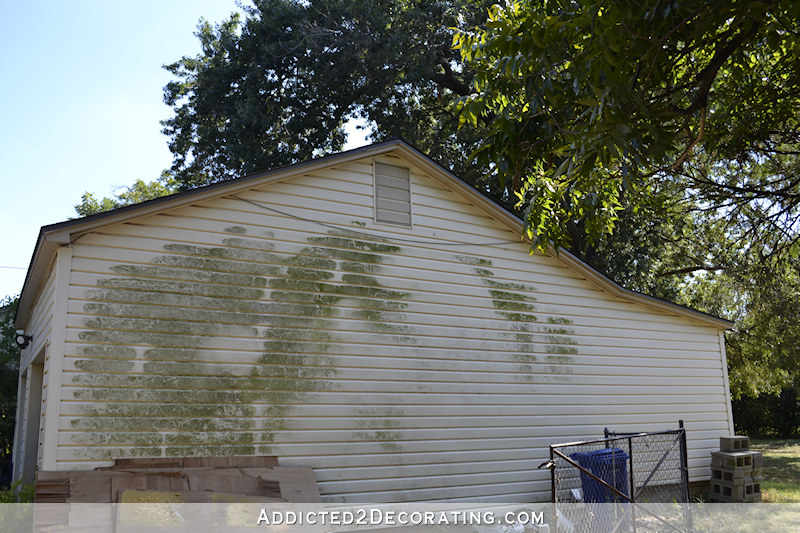
Do you remember what the side of the garage used to look like? I took this picture after that huge, overgrown shrub-turned-tree was cut down about three years ago, which revealed all kinds of mold and mildew that was thriving under that tree.
And now that area has been through quite a makeover, with its new siding, new window, new door, and cute portico.
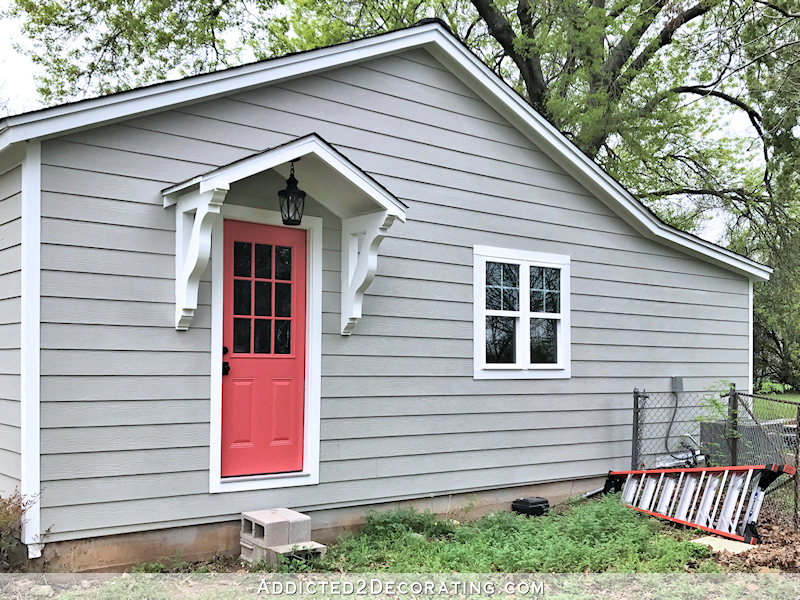
I still need to build some steps and handrails, paint those vertical corner trim boards gray, add shutters and a window box, and do some landscaping. And eventually, the chain link fence and gate will be removed, and the driveway will wrap around this side of the studio and lead to a carport in the back. There’s still so much more to do. 🙂

Addicted 2 Decorating is where I share my DIY and decorating journey as I remodel and decorate the 1948 fixer upper that my husband, Matt, and I bought in 2013. Matt has M.S. and is unable to do physical work, so I do the majority of the work on the house by myself. You can learn more about me here.

It’s LOVELY! That color is amazing!
I’m so glad you went with a second Coral door! I love it!!! The new corbels are gorgeous and totally worth the splurge.
Beautiful!!! Simply beautiful!
Absolutely beautiful, thanks for posting.
I agree!
I understand why you smile when looking at it – it’s absolutely beautiful and I think it’s perfect in coral! Everything else would either be too boring – grey, white, all the neutrals really – or would compete with your front door, which surely is a no-no 🙂
With the front porch “almost” done there’s no confusion about which is the main entry. Love that door color!
Beautiful job, and such a happy door!
The before/after is quite dramatic! This looks so beautiful and it made me smile to. 😀😀
❤️❤️❤️
Looks fantastic!!!!!!!
It is so cute! Dumb question here. How does/will your husband get in and out of the house?
Right now, we have a ramp that goes from the back doors of the music room to the sunroom and out the back slider. When all is said and done, we’ll have a ramp that will go from the back doors of the studio to the carport, and also the back door(s) of the family room that will lead out to a deck that will also have a ramp and a walkway to the carport. Our new master bedroom will also have the same. So now he has one point of egress with a ramp (although in an emergency, I can guarantee you I’d get him out of the closest door, ramp or not), but in the future, he’ll have three points of egress with ramps.
Looks awesome!!!
Great color choice. And great detail to add some umph!! to that sweet door.
I love it. The portico is adorable and I love that you painted the door coral.
Absolutely stunning!!! LOVE it!!
Utterly charming, I love it!
So beautiful. Your 50’s house is becoming the most beautiful cottage.
I love that you painted the door coral, it all looks amazing as always!!!
I’m so happy you went with the coral. The before and after is amazing! Can’t wait till it’s all done!
I am so glad you put the coral on that door too. Looks great
It’s beautiful. I can’t imagine it any other color. Congratulations!
I always eagerly await your posts. Coral, one of my favorite colors and it made me very 😊 happy to see that you went with your gut feeling and painted the door coral
Your portico & door are beautiful. You do such a great job.
Love it! Perfect mix of happy (and a little cute) and clean lines! I was one of the ones who recommended not painting it coral, so as to avoid confusion with the front door. But I actually love it coral and think that once you’ve finished your walkway and front landscaping I think it will be pretty clear that this is a side door. Yay!
Really beautiful! Love the before and after!
LOL! Your stepladder sides match the door! Lovely.
So cute I’m expecting 7 little dwarfs to come out that door with pick axes over their shoulders!
In the end go with your heart! Look how beautiful it is and you can smile at it daily ❤️
Both doors coral was the way to go! Looks great.
I was always FOR this door to match the front door, so I’m glad to see it done! Love the portico….everything about it. Good job, Kristi.
I love how inviting this entrance is! The happy coral door and adorable overhang…seriously hearts popping out of my eyes!!
I absolutely love the coral, and I’m glad you painted this one, too. Quick question- did you paint the door while it was hung or did you take it down? Our front door needs a new color and I’m debating which way to do it. Thank you!!
I painted it in place. I didn’t paint the edges of the door since the door has a natural stopping point where the “face” of the door on the front and back meet the edges (i.e., the metal that covers the front and back wraps around about 1/8″ on the edges where it meets the wood on the edges), so I tape off the edges and just paint the metal part on the front and back of the door. So I don’t have to wait as long for the paint to dry before closing the door. Also, I have started using Aura Grand Entrance paint from Benjamin Moore for my exterior doors. That paint is awesome, goes on smoothly, and dries pretty quickly. With other paints, I’ve had a problem with the paint sticking around the weather stripping, and sometimes even pulling off around the edges because most latex paints stay tacky for so long. But I’ve never had that problem with the Aura Grand Entrance paint. I was able to close the door completely within about 90 minutes to two hours, and the paint didn’t stick to the weather stripping at all.
How would this paint do for indoor cabinets? I have had sticking problems in the past even after curing on door to box and things sticking to shelves. I do live in the humid south.
Your exterior has had so much improvement it is hard to even find words to say . One thing I do suspect is that you are becoming one of if not the best house in the neighborhood. I am sure you have a giddy smile each time you drive up. You’ve come a long way baby.
Thanks so much for the great answer! I’ve learned more from you than I have every decorating magazine I’ve read over the years! I’m so relieved to know I don’t have to take the door down. Our house is slate blue, and I’m painting it lime green. Can’t wait for warm weather so I can get to it! Thanks again for the info!
Everything is gorgeous, the portico, the corbels, the door color, the lantern light. It all looks so pretty and so inviting! Great job Kristi.
So cute! I don’t think I had an opinion about the door color, but glad you didn’t what makes you happy! It will be the door you use the most once the studio is done so it makes sense. Way to go!
I love everything about this entrance. And the door color makes me happy too! Great job, Kristi!!! 7 months sure went by quick.
Everything you have done here shows how much talent you have and oh, so pretty! You trulyare an inspiration to me. (bow down to you!)
I think the door turned out nice in coral and I like the white beadboard on the underside. Are you going to use the same bead board as the underside of your front porch roof? I hope so.
I saw that you used Bondo to fix the nicks in your metal door. Have you ever used Bondo for wood? This is off the subject, but have you ever had to fill wood holes where screws have stripped the hole, so that new screw can fit in there?
I am no Kristi but I use bondo on wood all the time . I restore and decorative paint furniture for a living. That also have a bondo product specifically for wood but I personally do not like it as well.
Bondo for wood is the only one that can be stained , standard bondo has to be painted.
It’s so adorable! I wish I possessed even 25% of your ability and decorating sense! So very nice.
Beautiful and thanks for the tutorial!
Stunning and so welcoming!
I love this! Such a happy color! And I LOVE those brackets!
I have a question. I’ve been following you since you bought your house and I’ve never heard you mention anything about building permits. Where I live, I am supposed to get a permit for anything that costs more than $500, although I have found ways around it. Also, if your house is within so many feet of your neighbor, you are limited to a ridiculously small number of square inches for any openings on that side of your house. Seeing you go from no openings to a door and a double window made me wonder about building codes and permits in your town. Not judging, just curious.
What a welcoming entrance treat you have created! Wonderful things are going to happen on the other side of that pretty door. Have you roughed out a layout plan for the studio? All in good time, I know. That project intrigues me the most.
Just wondering whether your current front porch steps could be moved around to your side door, they seem like the perfect size and I love the curved edges and maybe the concrete dye you were thinking about…
Looks fantastic!
Question….not really related to your simply fabulous door—but do you have any tips for a clean, easy way to make mitered corners?
I’m struggling DESPERATELY to get mine even close to being usable!!
What a dramatic change! Looks fantastic! Love the coral too! Reminds me of the beautiful coral you where planning on using in the living room.
I love your second coral door. That color is awesome with the gray and white and I’m glad you found another place to use it! It IS a very happy color.
I’m working on a 1942 house that needed EVERYTHING when I bought it. I love your blog! I stumbled across it a couple days ago and everyone of the posts I’ve read have been full of helpful information. Actually yours is the most informative, interesting blog I’ve found about remodeling and construction. All the work you have tackled and completed – it is so impressive, you must be so proud! You’ve inspired me to roll up my sleeves and start the projects that have been so intimidating. Thanks and keep up the amazing work!
I love your second coral door. That color is awesome with the gray and white and I’m glad you found another place to use it! It IS a very happy color. The whole package -door, brackets and roof is so perfect . Now I’m trying to figure out a way I can use brackets like that on my house.
I’m working on a 1942 house that needed EVERYTHING when I bought it. I love your blog! I stumbled across it a couple days ago and everyone of the posts I’ve read have been full of helpful information. Actually yours is the most informative, interesting blog I’ve found about remodeling and construction. All the work you have tackled and completed – it is so impressive, you must be so proud! You’ve inspired me to roll up my sleeves and start the projects that have been so intimidating. Thanks and keep up the amazing work!
What is the main houseboat exterior color called? I love the coral door!!!
House*
It’s Sherwin Williams Mindful Gray.
Very nice 👍
I absolutely love it! What an unbelievable transformation! Love that you show the before and after pictures.
It does not look like the same house, the change is so dramatic. That portico is so beautiful and happy, I love it! Fantastic job, as always!
I’m about to tackle the same project this coming weekend. I’ve been putting it off for over a year because I couldn’t find a good tutorial anywhere on the internet, Pinterest, YouTube our social media. By the grace of God I found your posts last week and thanks to you I nowvhave the confidence to take it on.
Thank you so much.for taking the time to photograph and explain in detail how to do this from start to finish. Your project came out beautiful! I hope mine is half as nice.
Thank you. I’m going to build something like this above my front door. I have a question. How many of the headlock bolts did you use to secure the brackets?
I used two on each bracket. Just be really sure that they either go into studs, or that you add blocking inside the wall for them to go into. If your portico is any larger than mine, I would advise increasing the number of bolts to three per bracket.
I am also about to begin a project like this and have been debating between a single slope roof or a portico- one concern I have about the portico is needing to install step flashing on the house side due to clapboard siding. Did you use something like step flashing on yours?
Yes, I did. If you click the links to the previous posts about this project, I show how I did that.
Beautiful!!