Weekend Progress: 600 Tiles And Counting
My weekend was all about tile. And more tile. And installing a vent hood, and then more tile. And installing door facings, and then more tile. And more tile.
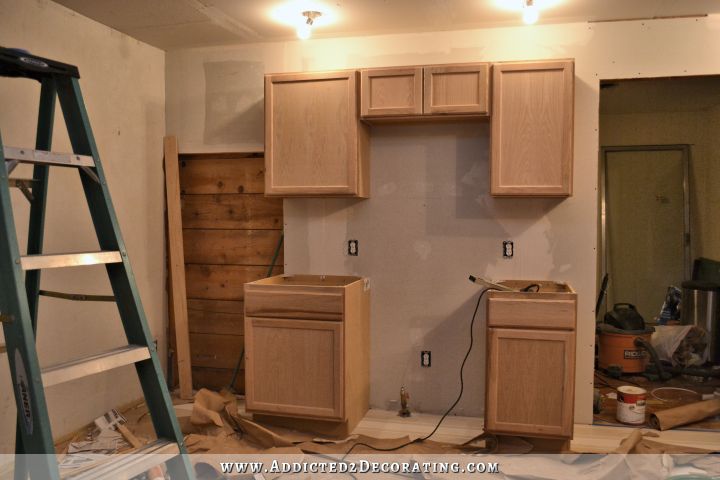
So far I’ve gone through six boxes of 100 subway tiles, and I’ve still got plenty more to do. When I left you on Friday, the backsplash behind the stove looked like this…
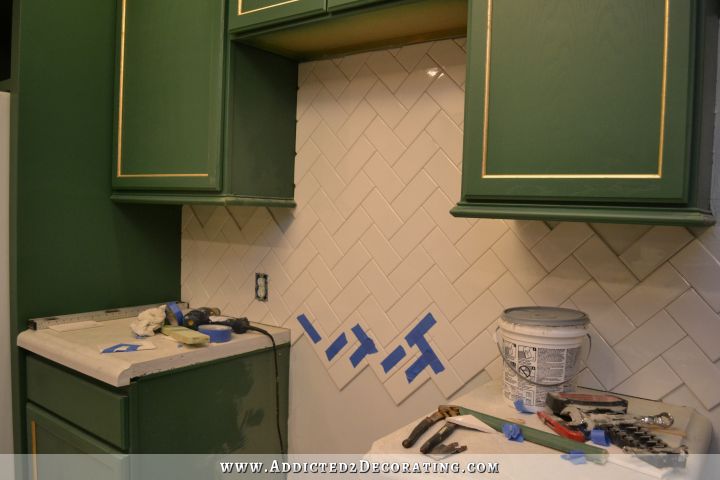
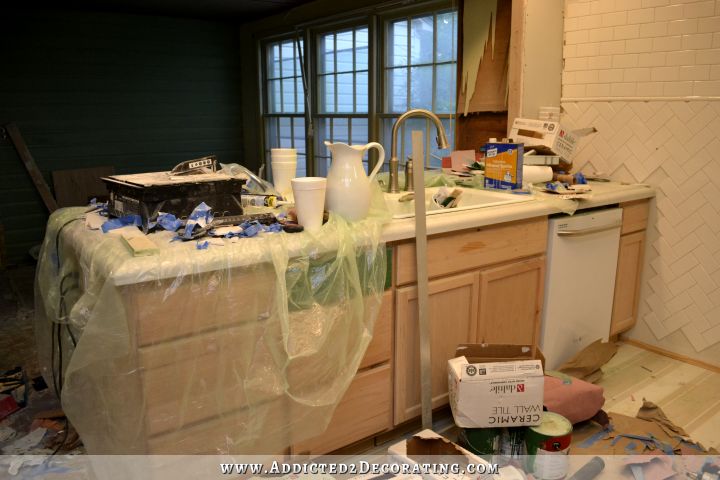
And now it looks like this…
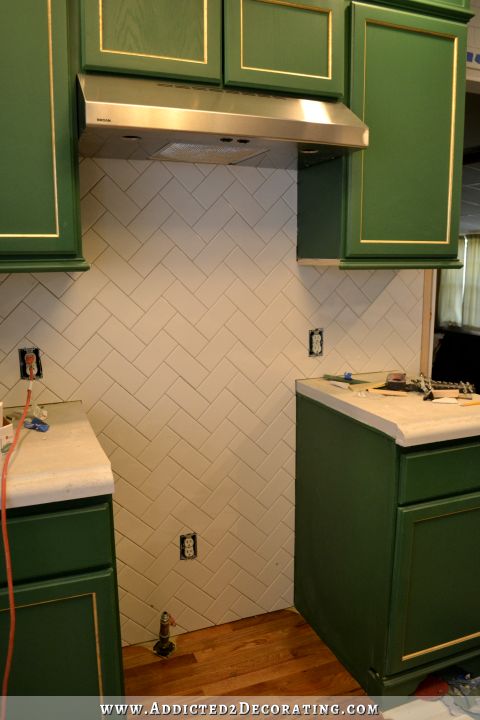
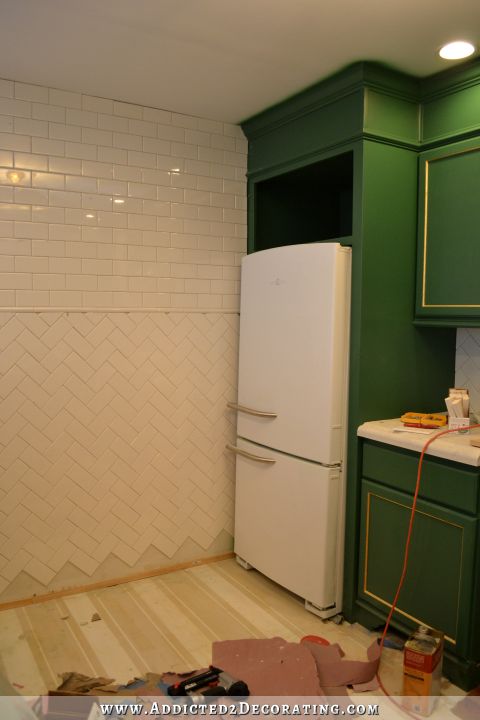
I tiled all the way to the floor because my momma told me to. 🙂
I still haven’t grouted any of the tile (except for the backsplash on the wall of cabinets, which I did several days ago), so I’m hoping to do that today and get the range moved back into place.
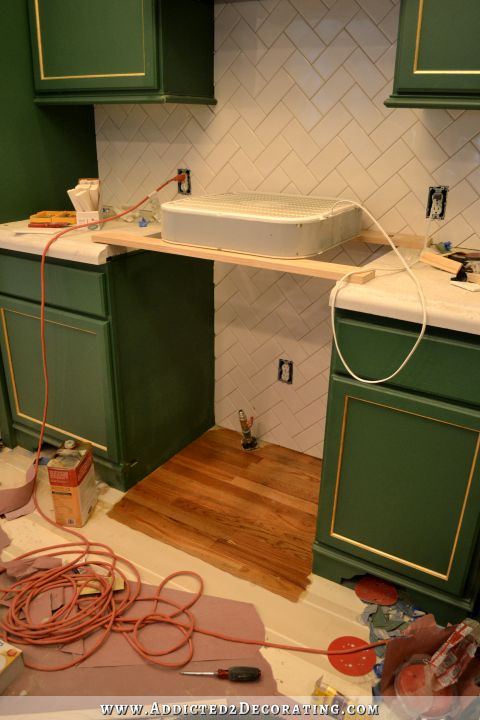
You can see that I also installed the range hood. It’s nothing fancy — just a simple stainless steel range hood.
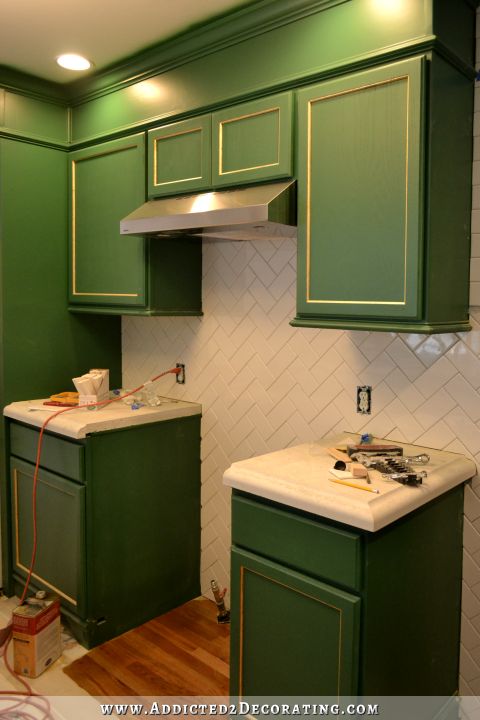
And yes, the selection of stainless steel was completely intentional. 🙂
I love mixed metals in a room, and when I decided to gold leaf the cabinet doors, I did so knowing that I already had lots of stainless steel in the room (all of the handles on my dishwasher, refrigerator and range, the big knobs on my range, and my faucet), and that the two would have to live side by side. Actually, it’s three different metals that I have — stainless steel, gold leaf, and antiqued brass. I know that look isn’t for everyone, but I love it.
Also, when I was trying to decide what kind of range hood I wanted in my kitchen (since the GE Artistry appliances don’t come have a matching range hood, but only have a matching above-the-stove microwave), I was very much inspired by Bailey’s kitchen at Peppermint Bliss. I loved her very simple stainless steel range hood, and I also loved how she mixed metals in her kitchen.
Of course, her simple stainless steel range hood sits above a range that I’m pretty sure costs more than my whole kitchen remodel. 😀
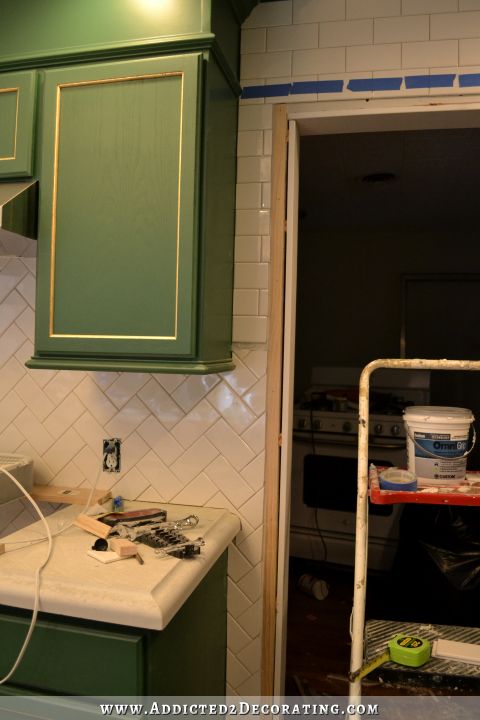
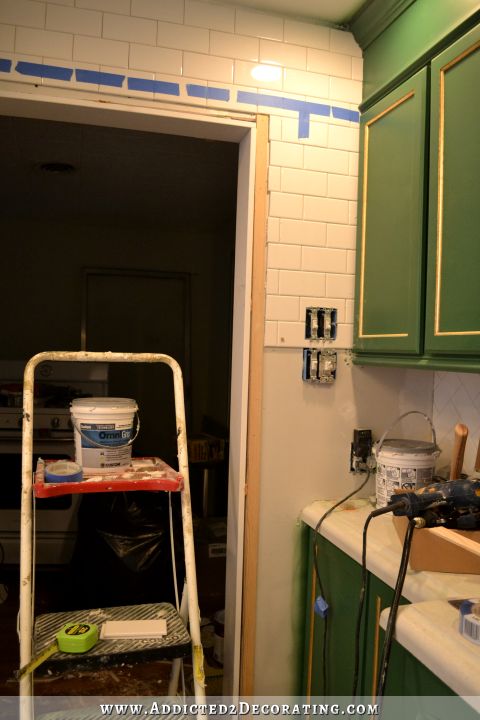
Anyway, I also got the entire wall opposite the wall of cabinets tiled, with the exception of the cut pieces around part of the perimeter.
And I also got quite a bit of the tiles installed around the doorway.

I did run into one problem that I’m going to have to correct. I thought I had planned it just perfectly so that the line between the herringbone and the running bond tiles would clear the bottom trim on the upper cabinets with plenty of room to spare. Well, I didn’t. And I also found that the cabinets on the wall of cabinets are hung just a bit higher than the other cabinets. *Sigh* Oh well. You can see where the dividing line hits on the refrigerator wall cabinets.
But on the wall of cabinets, the dividing line runs right into the bottom trim on the upper cabinets. That won’t work.
So to correct that, and hopefully camouflage the fact that the cabinets are hung at slightly different heights, I’m going to remove the bottom two rows of running bond tiles, and move the dividing line up. That means that I’ll have to do that on the wall of tiles also so that everything is at the same height. But that’s just a half of a step back considering all of the steps forward I made this weekend. No big deal. 🙂
And several of you have asked me how I was going to do the trim around the door. What I ended up doing is adding strips of lattice (which you can see in the photo above) that are approximately the same thickness as the tiles around the door opening, and then I tiled up to that lattice. The lattice will give me some additional area to nail the door trim to. And fortunately, that made the width of the door facings an exact 5.5 inches, which is the width of a 1 x 6 piece of lumber. It worked out perfectly!
I also installed a lattice strip at the bottom of the wall so that I’ll have something to nail a baseboard to.

And as an aside, you can really see how bad the floor is in that picture above. Lots of that is just dust, but see how the whole floor has yellowed? And then there are areas that are darker and more amber in color. That’s definitely a far cry from how this floor looked right after I painted it. It was so bright and clean looking, and now it’s just yellow and dirty looking, with random darker areas. Lesson learned for sure.
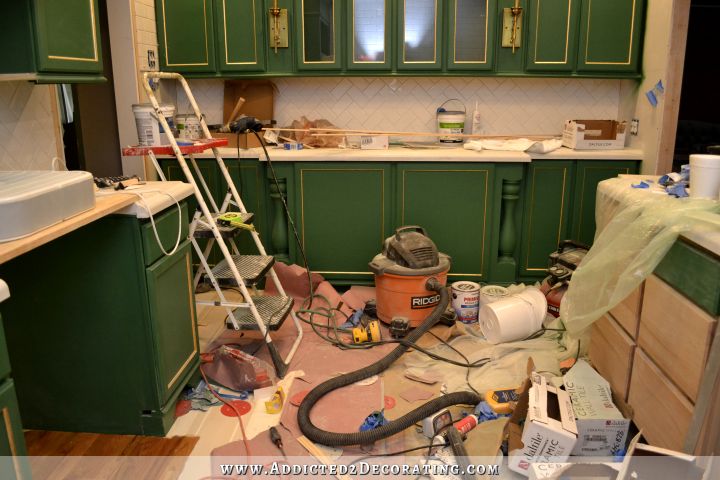
After my whirlwind weekend, my kitchen looks like a tornado went through.
Can you imagine trying to work in there? 😀
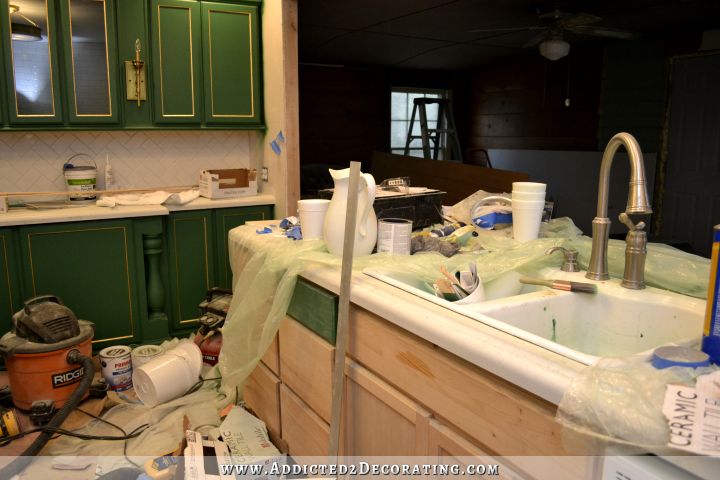
I kept telling myself that I could work so much more efficiently if I’d just take an hour or so and throw away the trash and put the tools away, but I didn’t want to stop tiling. So I just pressed forward through the mess.
But today, this will be top priority on my “to do” list. Working in such a mess really does slow me down…obviously.

I’m pretty sure I pulled out every power tool I own, plus lots of little tools, to get things done this weekend, and I didn’t put a single thing back when I finished. Sometimes I think of how nice it would be to be able to hire someone full time for the specific purpose of following me around all day long and picking up, throwing away, and putting things away in an orderly manner when I’m done with them. When I win the lottery, I’m gonna do that. There’s no telling how much I could get done in a day if I didn’t have to spend half my time looking for tools that have gotten buried in the mess! 😀
And finally, I put three coats of Waterlox on the floor that I had sanded in the area where the range will sit. I wanted to get that done so that when the range is in place and hooked up, it won’t have to be moved again.
I had set up a fan to blow on it to speed up the drying time because Matt has been asking me for two weeks how much longer it would be until we can start cooking at home. I told him that the range would be in place and the kitchen would be usable by the end of the weekend, but try as I might, I just couldn’t get it done. I came so close, though! And fortunately, I’m married to one of the most gracious and understanding men in the world, so he was okay with it taking an extra day or two. 🙂
All I need to do at this point is grout that wall, move the range in, and clean up the mess, and we’ll actually have a usable kitchen!
My goal is to have the kitchen completely finished in two weeks. What do you think? Can I do it? I guess we’ll see! Step up and place your bets! 😀

Addicted 2 Decorating is where I share my DIY and decorating journey as I remodel and decorate the 1948 fixer upper that my husband, Matt, and I bought in 2013. Matt has M.S. and is unable to do physical work, so I do the majority of the work on the house by myself. You can learn more about me here.

My bets are always on you! It looks awesome, you never cease to amaze. Keep up the great work; I am learning a ton from you!
My money is on you finishing ;before 2 weeks! The shim idea is great. Thanks for the tip. I find that trying to put trim into dryway often leaves me with loose spots. I will try this next time. I also love that you will redo the tile to make it perfect. I know it takes time now, but not living with it everyday and seeing it will be so worth the time. The kitchen just looks beautiful. And the wood floor is the way to go. Thank you again for sharing!
It seems like a mess to you but boy can I see how beautiful its all going to be! Love that you share the mistakes with the successes. And just seeing the part of the floor you redid for under the stove shows just how great that is going to look as well! You deserve such congratulations and a job well done, even if you’re not quite finished yet. I am betting this kitchen is going to bring you lots of advertising business and support out there in the business world.
You never cease to amaze me with what you can do! I’d never be able to keep up with you though! I’m betting you’ll have it done. I can’t wait until you can relax in there!
I am enthralled watching this kitchen take shape. But I do agree, take a little time and start cleaning up what your finished with. It will help in the long run.
Sure is taking beautiful shape girl.
Amazing. If there are no delays such as illnesses, weather etc you will have the kitchen completed! I so look forward to your post, in fact I searched for it earlier and said to hubby you work late into the night so you don’t post until later in morning the kitchen is beautiful!
Make it three weeks to allow for unexpected snafus and drying time for the floor, and you’re on! It’s really looking good, Kristi. Great design and great work makes for a winning combination!
I was one of the very, very few who wanted you to try to work with the painted floor somehow. I don’t think I realized the herringbone would be part of the fully tiled walls. Love what you are doing with those tiles and am oh so impressed with your skills and tenacity. So the majority was right about the floor! I’m still not totally stoked about the stained wood floor but barring other materials being introduced it is a good choice and looks nice and warm. And yes, you will finish the kitchen in 2 weeks!
Just when I thought I could not LOVE this kitchen MORE you add that wall of tile. Straight at the top and herringbone on the bottom. Kristi, perfection!! Thanks for all the great ideas. And thanks for showing us all the steps. It really helps me to see each stage. Can’t wait to see the next step!
Love the tile! it looks great. I’m sure you can get it done in 2 weeks, love watching the kitchen, and all of your other projects, unfold before my eyes. It’s like magic! Keep up the good work
I enjoyed your comment about having someone to follow behind you picking up after you. When I’m working in the garden weeding, I just let everything fall on the ground. My husband has to come behind picking up the weeds. He can’t understand why I don’t pick up as I go along. But that would take up so much time!
I say keep working on that kitchen until it’s done. You can clean up in your own good time.
OMG that wall of tile is going to be gorgeous…I am in love with it…I am so jealous!! Who would ever have thought that one blank wall could be so gorgeous…just can’t think of another word!!!
/drool at that gorgeous kitchen, tools and all! <3
Oh my goodness! Your kitchen is so beautiful! But do clean up a bit, I don’t want you tripping and hurting yourself at this stage of the transformation! I wager it will be done by next week!
This is the hood we chose. It came very well packed, was easy to install and has a killer exhaust fan, which is adjustable by tiny increments. I think it was worth the price we paid, and today it’s hundreds less.
http://smile.amazon.com/gp/product/B004V2L8QS/ref=wms_ohs_product?ie=UTF8&psc=1
Oops, I thought that you were still looking for a hood.
Talk about focused! I wish I could hang out with you just to tidy up for you a bit as you go, I could be your “helpful Hermione”.
That kitchen is gonna be a happy place in your home.Please do a post on your first homecooked meal with Matt, you know everyone will love it!
Wow!! You sure got a lot done over the weekend. I wish I had half the amount of energy you have – even a quarter would do 😉
You need to build something like Sawdust Girl to keep yourself organized. http://sawdustgirl.com/2014/07/28/rolling-air-compressor-and-tool-organizing-work-cart/
Nice work! I’m always so impressed by all the work you get done.
Rhonda
I was thinking the same thing about that cart!
Wonderful progress, it won’t be long now.
That was exactly what I was going to say.
Thanks for posting the link to the cart. Such a great idea, I think I’ll build one for myself!
I really wish you could just come to my house and work your magic!
You did an awesome job on the tile! Love your design.
No gal pals you can call on to help? If I lived nearby, I’d lend a hand for the price of a nice lunch in the finished kitchen. Looks amazing, Kristi.
I have a hard time asking for help. 🙂 My mom has said that she’ll come help me, and all I need to do is call. She’s still waiting on my call. 🙂
It all looks great! The divided pattern subway tile is a great choice, and with the stained floor the kitchen will be a masterpiece.
If I were you, I’d be too lazy to reposition the division line across the wall. But I do agree that the misalignment is unacceptable. So, I’d go for sanding off 2 – 3 rows of tile around the light switches next to the door for just a little bit. Just enough to make up for the misalignment. Seems that the tiles are not beveled, so it would work just fine, and since several tiles around the switches are cut anyway, it would not be noticeable at all. And so much less work than moving up the whole division line. But that’s just lazy me, following my favorite motto: “Don’t let the perfect be the enemy of good”
As always, I am so impressed with the amount of work you’ve accomplished and by the quality of the tiling job. It’s absolutely beautiful. Six hundred tiles so far? Crazy! Good thing subway tile is relatively inexpensive as these things go. Can’t wait to see what you have in store for us tomorrow.
I was reading this when my 2 1/2 year old wandered into room and he was asking me “What’s that, Mommy?” as he pointed at the vacuum cleaner hose. As we looked more at your pictures he said, “We need to get some green paint Mommy!” Um, I LOVE what you’ve done, but there is no way we’re painting our cabinets anytime soon! 🙂 We moved to this house a year ago to a newer renovated kitchen with beautiful cherry cabinets, they’re not getting painted! 🙂
Two weeks sounds like a lot. I bet you could knock it out it a week. May be a few extra days for a good clean up and decorating. Blessings Doll
I am glad you went with fan only instead of microwave combo. I chose the combo in my kitchen and it looks great, matches the stove and saves counter space but if I would give it up to have a plain hood fan that is quiet. The last one I had was awesome, you had to hold your hand up to it to see if it was on. It was so quiet I used it all the time. The combo ones are so noisy that if I have it on I can’t hear the TV in the adjoining room. It is a Bosch so it is not like it was cheap. Other people I have have talked to that have a combo all complain about the noise too.
The tile, of course , is stunning but if all else is done in the two weeks don’t stress about finishing the grout by your timeline. That much grout is an awful lot of repetitive motion and your shoulder could give you problems again. Take care of yourself. Hope you take a much deserved break after this massive undertaking but I imagine you already have ideas of what your next project will be.
Wow! That tile is stunning……………….love the herringbone pattern. It’s the perfect addition. As I look at your doorway, I don’t really “notice” that the cabinets are different! I just notice the even height of the dividing line of the tile. Can’t believe how much progress you made over the weekend. You’re almost at the finish line. Congratulations
That’s a huge amount of work in one weekend. Don’t give yourself time limits, just go with the flow. It’s all so beautiful.
You. Are. Amazing. I’m completely blown away by the beauty of your kitchen design and the fact that you have done all of this work yourself!
Can’t wait to see it finished! BTW…as my hubby is fond of telling me….”You have to play to win!” 🙂
Thank you for showing your mess! I think my husband thought I was the messiest person in the world. Now I have proof that I’m not! Love your blog and look forward to the progress every day. Keep up the good work.
Wow — I have been on vacation and just caught up with what I missed. You have done so much! Great job.
I am so glad you tiled behind the stove (Yay Kristie’s Mom!), it is a pet peeve of mine when the tile stops at the counter.
Your stove is much nicer than the one in the photo. Until you stated you had mixed finished I hadn’t even noticed.
The non-painted wood floor looks great against your cabinets. You will be done soon.
Your posts still haven’t updated with the rest of my blog list on my personal blog. Any ideas why it stopped?
I have no idea why that would happen. 🙁
WOW! Seriously …. wow, wow, wow! The transformation is amazing and looks terrific.
I’ll put cold hard cash on the two week deadline! You can do it. BTW, the natural wood floor looks amazing with the cabinets. I loved the painted floor, but think the wood looks much better with the style you have finished the cabinets in. Love it all, and the tiling job is great. I wish I had been following your blog when I tiled my kitchen backsplash. I only did a herringbone pattern behind the cooktop, but your method made it much easier than me doing all the ciphering on my own! I love it. I wondered why you were doing a running bond on the wall of cabinets and herringbone behind the stove, but seeing all together it totally makes sense! Onward cowgirl! I look forward to the finished product. Now I’m addicted to Addicted2Decorating. LOL
Of course you can do it! I have no doubt at all. It is looking great and that floor is going to be amazing!
Wowzers! That’s a lot of tiles to grout! : ) Kristi, you do great work and I am loving these tiles. Also think your Mama is a smart lady to suggest you tile all the way to the floor behind the stove/oven – easy to keep clean.
Do you have some kind of rolling cart that you could put your tools on? You could park it in the breakfast room and be able to retrieve and return tools easily and avoid a lot of things to step on/over/around. Just a thought to share.
Two weeks? Please don’t push yourself to the point that you are totally exhausted and burned out. Do what you can each day and it’ll all come together. Go Kristi!!!!!
I don’t have a rolling cart. I need to make myself one like the one on Sawdust Girl linked above! That looks amazing, and would possibly keep me organized.
That is quite a cart! I think it would probably work for you. In my mind’s eye I saw a two shelved cart (kind of like her ‘before’ photo) with a pegboard said for hanging tools/supplies. Good luck!
That should read SIDE, not said. Duh
I’m not sure if I missed a past mention of doing the two different tile patterns but whatever the case, it was a beautiful surprise when I checked out the progress today! Wow, that looks fantastic! Really coming together now!
Hey Kristi, is itmy imagination, or the lighting, or does the dorway appear curved at the top? I also wanted to say that I think the tile wall, withe heringbone and railroad tile look very vintage, and I think that is in keeping with your allliances and sink. Blessings
It’s not curved. I checked it with the level today. Must just be the “fisheye” distortion that cameras do.
That was a lot of work this weekend! I think two weeks might be pushing it if the floor re-do is included, but if anyone can do it, you can. You work fast. Your kitchen is nicer than the one in the photo you showed– that’s too cluttered.
I second (or third) the idea of that rolling cart that was linked. That thing is just what you need!
All I can think to say is, “wow!”
Your dreams are going to be white and rectangular. 🙂 Beautiful work.
It’s getting close and must be so encouraging for you to see a beginning of how it will look. Do you plan to take a DIY break when it’s done? I think I would just want to take a few days (weeks?) to stand in the kitchen, look around and enjoy at all the beauty.
I don’t think I’ll take a break completely, but I probably will concentrate on some simpler projects for a while. I might even do some crafty projects. One thing I’ve really wanted to do lately is make my own hammock and hammock stand before fall so I can spend more time outside and enjoy the cooler weather when it gets here.
I had to laugh at your talking about someone following you around putting things away. My dear husband would do that for me. If I was working on a big project, he always did the clean up, because he was all thumbs otherwise. But it would get to the point that I would set something down for a second, and it would be gone. After he would get everything caught up, I was I trouble! He had Alzheimers, so his power of reasoning had disappeared. It made twice as much work for me in the end. So, just because something SOUNDS delightful, maybe, not so much… Now it is a funny memory. At the time, it could get pretty frustrating!!!
If anyone can do it, you can! I like how the tile is turning out and how you have it running in two different directions, really pretty and gives it more interest.
It’s looking fantastic!! I’ll take the two week bet! No problem. Where did you get the tile? You probably said at some point.
It got it at Home Depot. It’s Daltile 3″ x 6″ white subway tile. They’re 22 cents each, so a box of 100 is only $22! Super cheap! 🙂
Or an accent like this in gold
http://www.houzz.com/bathroom-white-subway-tile/p/8. But the shadow at the top of the crown hints it could be accented in gold .
I know this is a bathroom too I like the metalic tike
http://www.decorpad.com/photo.htm?photoId=113771
Or this, imagine the black is gold and maybe one line
http://www.pinterest.com/pin/254171972695235907/
Not sure how they would work with your doorway wall, or other walls of tile though, which takes you back to art. ! Lol
What an impressive job. We are having our backsplash installed and a friend of mine told me that we should not use grout for the bottom of the tile that meets the countertop because water could potentially crack the grout. That instead we should use a grout that is water resistant that matches the grout color. Do you agree or what do you use. Thank you.
You should use caulk where the backsplash meets the countertop, and also in any corners where tile meets tile.
Bravo!!! Wonderful job!!!! I can’t wait to see the finish. Loving those cabinets!!!