Bathroom Makeover Day 12-14: DIY Mosaic Wood Tile Mirror Frame
I’ve spent the last three days making a DIY mosaic wood tile mirror frame to frame the vanity mirror in the bathroom makeover that I’m working on right now. I considered several DIY options for mirrors, and even considered purchasing a frame for my existing frameless mirror, but that seemed a bit boring for me.
I really wanted to make something custom for this bathroom, and I knew I wanted it to incorporate several shades of yellow. I realized the obvious choice was to make a mosaic tile framed mirror. The problem? There aren’t any mosaic tiles available that include the exact yellow of my vanity. So I decided to make my own…out of wood. Let me show you how I made my DIY mosaic wood tile mirror frame.
Step 1: Prepare and cut the wood tiles
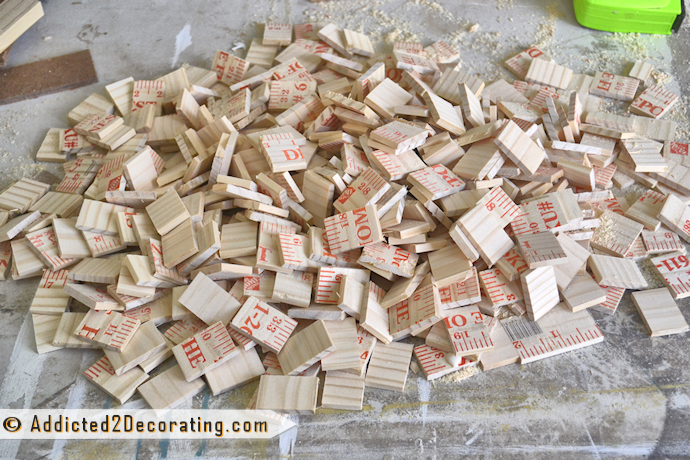
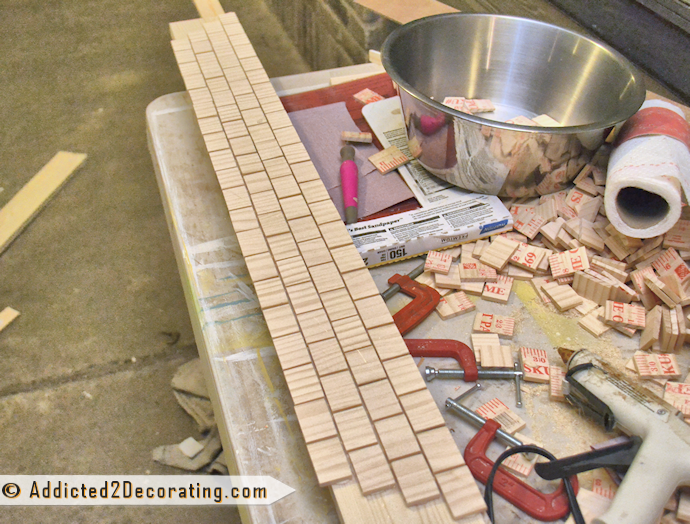
Obviously, I needed to make a lot of “tiles” for my large vanity mirror, but because of the quantity that I needed, the material needed to be very inexpensive. I chose to use wood yardsticks and cut each one into several rectangles to create the mosaic tiles. It took twenty wood yard sticks for me to have enough tiles.

At 68 cents each, this was definitely the cheapest material available. The lattice at Home Depot that was comparable in width and thickness was about three times the price. And even with the added cost of the sanding discs that I had to use, the yardsticks were still way cheaper.
I used 80-grit sandpaper to remove all of the markings on one side of each of the yardsticks, and then followed up with 150-grit sandpaper to smooth the surface.

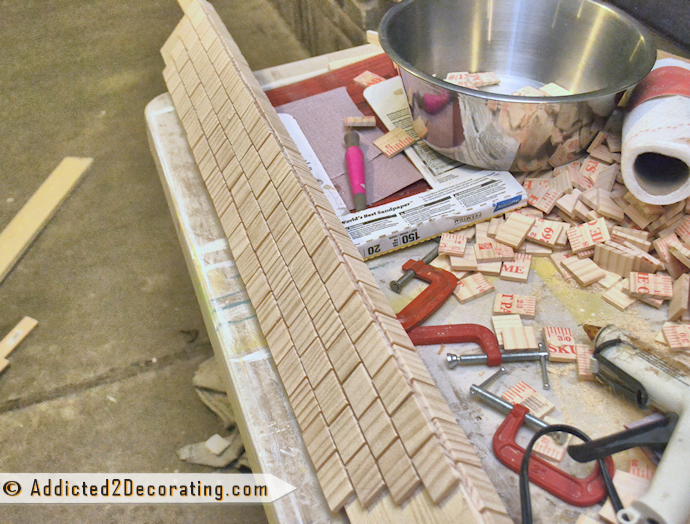
I learned from my custom vent cover project that you have to sand really well, or the markings will still show through after it’s painted. It takes more than just getting the color off. If you can still see any hint of the markings, they’ll show through. See how you can still see the “33” and the markings to the right of the 33? Those would show through a painted finish.

After all of the yardsticks were sanded, I used my miter saw to cut them into “tiles” that were just under one inch wide.
Step 2: Make the material for the basic frame
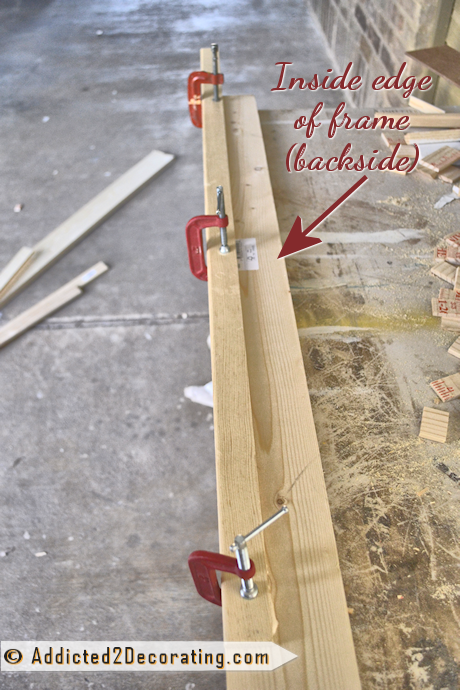
Then I moved on to preparing the actual frame. Since I don’t have access to actual frame moulding that has the rabbet on the back where the mirror would be inserted, and I don’t own a router that I can use to make a rabbet, I had to get a little creative.
To create the rabbet, I used a thick piece of lattice and glued it to what will be the outside edge of the back of the frame. Once the frame pieces are cut and pieced together as a large rectangle, the mirror will be placed into the inset area.
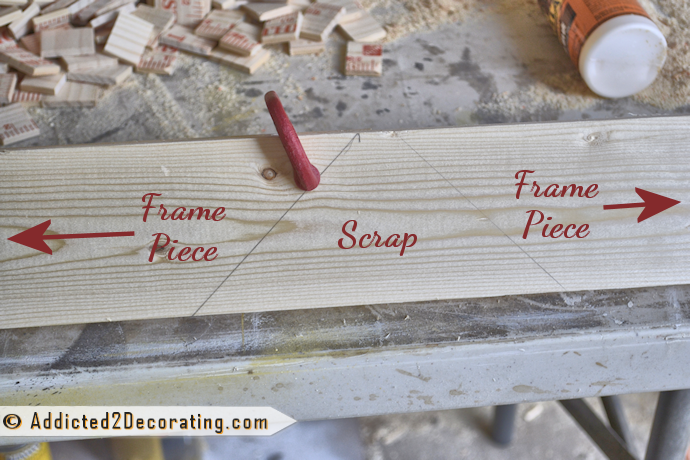
Then on the front of the 1″ x 4″, I marked where my mitered cut lines will eventually be. I did this so that I would know where to attach the wood tiles, and so I wouldn’t waste any tiles on areas that would be scrap.
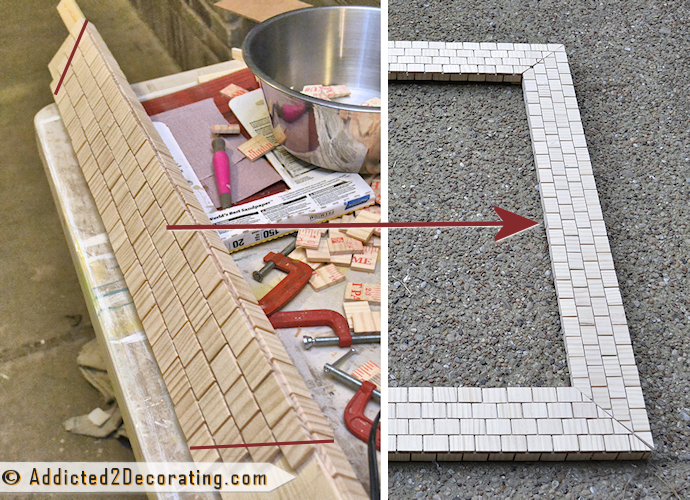
Step 3: Adhere the wood tiles to the frame substrate
After the glued lattice was completely dry, I removed the clamps and started attaching my tiles, beginning with the edge.
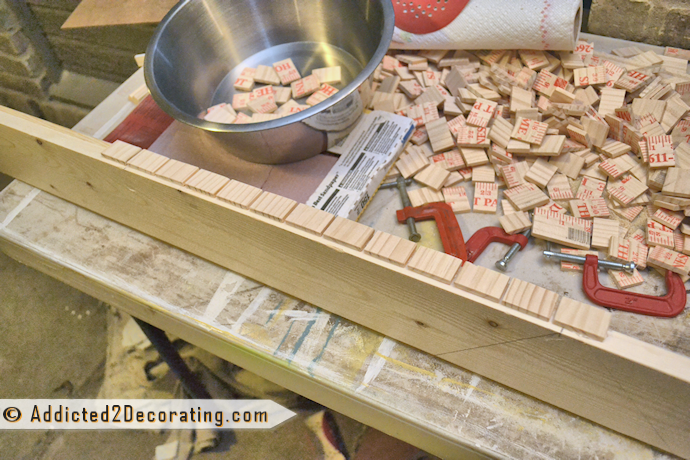
…and then continuing to the front.
Here’s what the one section looked like when it was completely covered with tiles on the edge and the front.
Now if you’re wondering why I attached the tiles before cutting the lumber for the frame, it’s so that I could attach whole tiles and then cut them, rather than miter the frame corners first, and the having to cut and attach tiny pieces of the wood tiles on the mitered corners. I thought this would also give me more accurate miters.
Step 4: Cut the frame pieces and build the frame
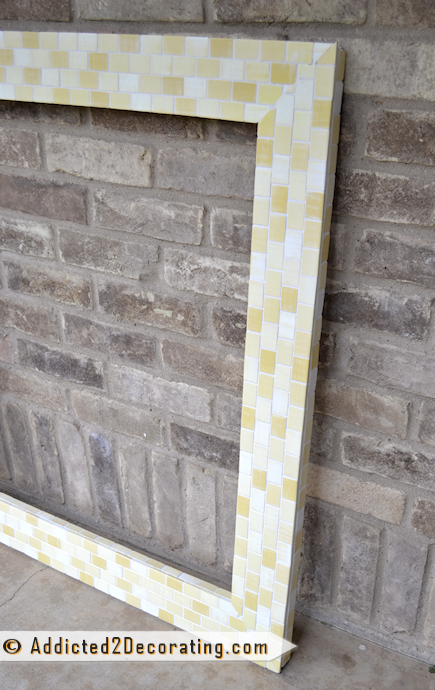
After all of the wood tile pieces were adhered to the frame substrate, I then used my miter saw to cut the four frame pieces with the mitered corners.
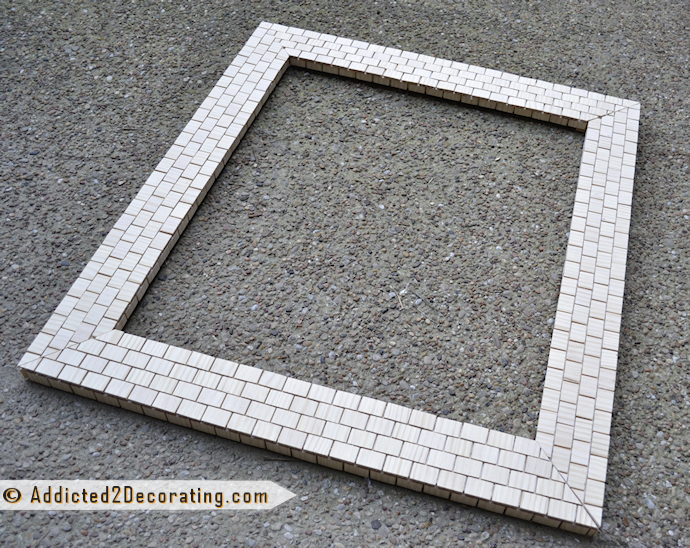
The tiles on the mitered corners don’t line up, and that bothered me for about ten seconds before I finally decided that perfection is way overrated.

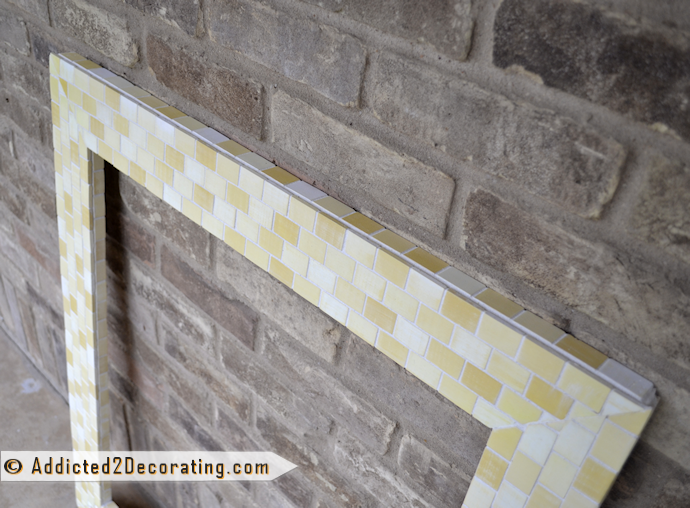
Just in case you got a little lost with the preparation of the actual frame and the piece I attached to make a rabbet on the back, here’s a view of it after the frame pieces were mitered and placed together.
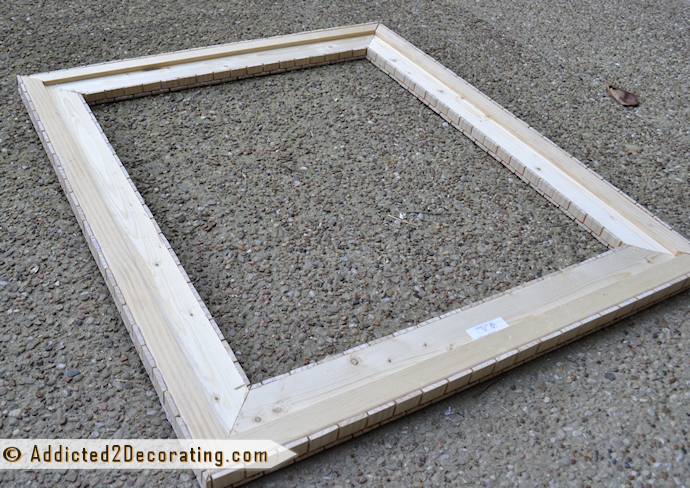
So now you can see the purpose of the lattice piece that I glued onto one edge of the 2″ x 4″, right? It’s on the outside edge of the back of the frame to form the rabbet where the mirror will be inserted once the frame is finished.
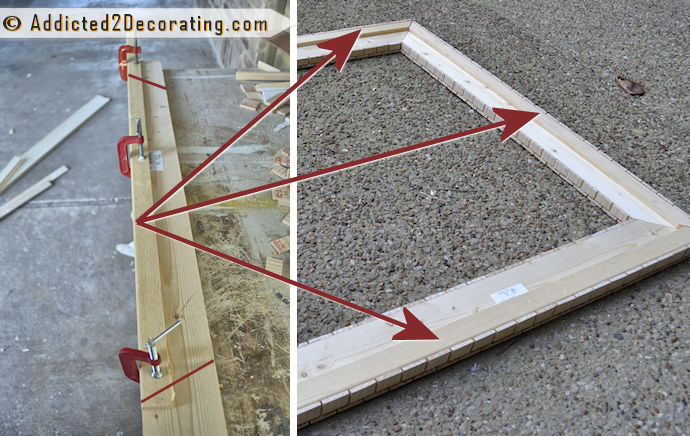
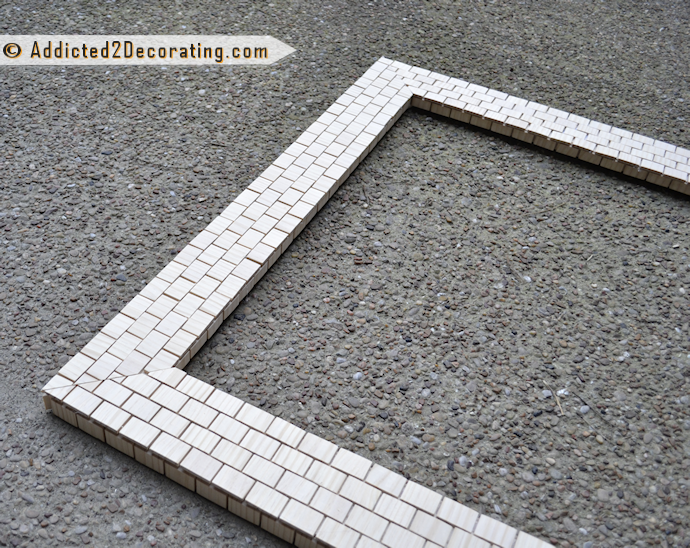
And here’s another look at how I attached the tiles to the frame first, and then mitered the corners (cutting through the tiles on the ends) to make the four pieces for the frame.
I hope that helps to clarify the construction.
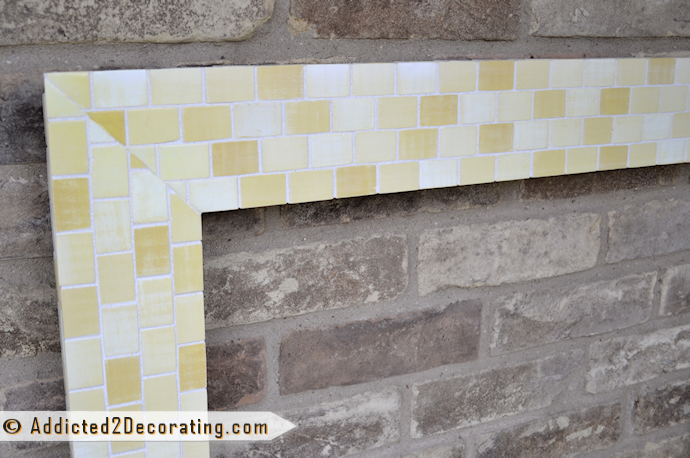
Step 5: Paint the wood tiles
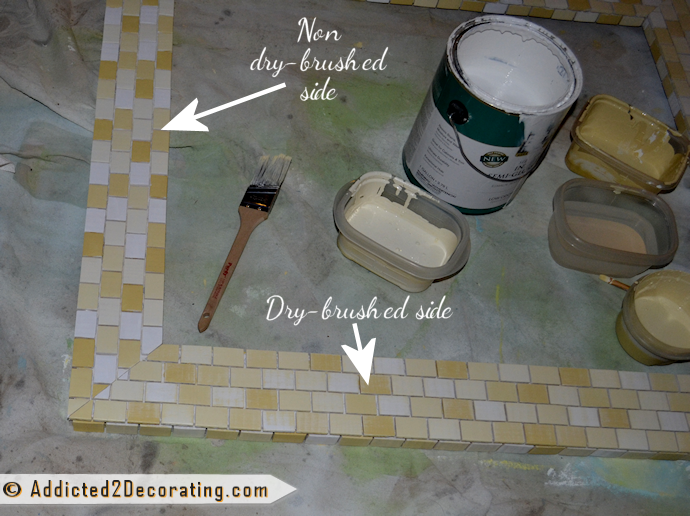
I started with the color of my vanity (the darkest yellow on the frame), and painted random tiles using a craft paint brush. Then I mixed some of that color with white, and painted more random tiles. Then I mixed in more white, and painted more random tiles. Then I repeated it one more time. Any remaining tiles were painted white.
When I finished that, the colors looked so harsh and “flat”. They had no depth or dimension to them, and real ceramic and porcelain tiles are seldom one perfectly solid color. So I did some dry brushing of all of the colors onto all of the tiles using a 2″ paint brush. I was amazed at the difference it made! It gave the tiles depth and color variation, and also softened the colors and made them blend beautifully.
I’m not sure if you can tell from this picture (since I took it well after the sun went down, and I was working by the light of my front porch light), but I’m hoping you can see the effect of the dry-brushing. It made a very subtle difference, but enough to make me go from really not liking it at all, to absolutely loving it.
Then I sprayed about four coats of Rust-Oleum Triple Thick Glaze…

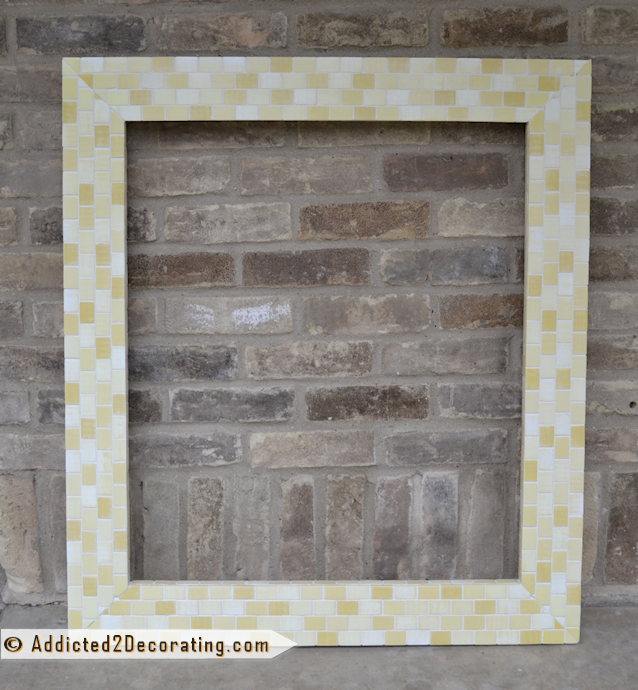
Step 6: Grout the tiles
After it was completely dry (I waited many hours to be VERY sure that the clear finish was thoroughly dry) I grouted the tiles using non-sanded white grout. I used non-sanded grout so that it wouldn’t scratch the shiny finish on the tiles. Sanded grout would scratch the tiles.
I really love how it turned out, and it looks amazing with my yellow vanity, next to the dark teal wall. I’ll show it to you as soon as I can.
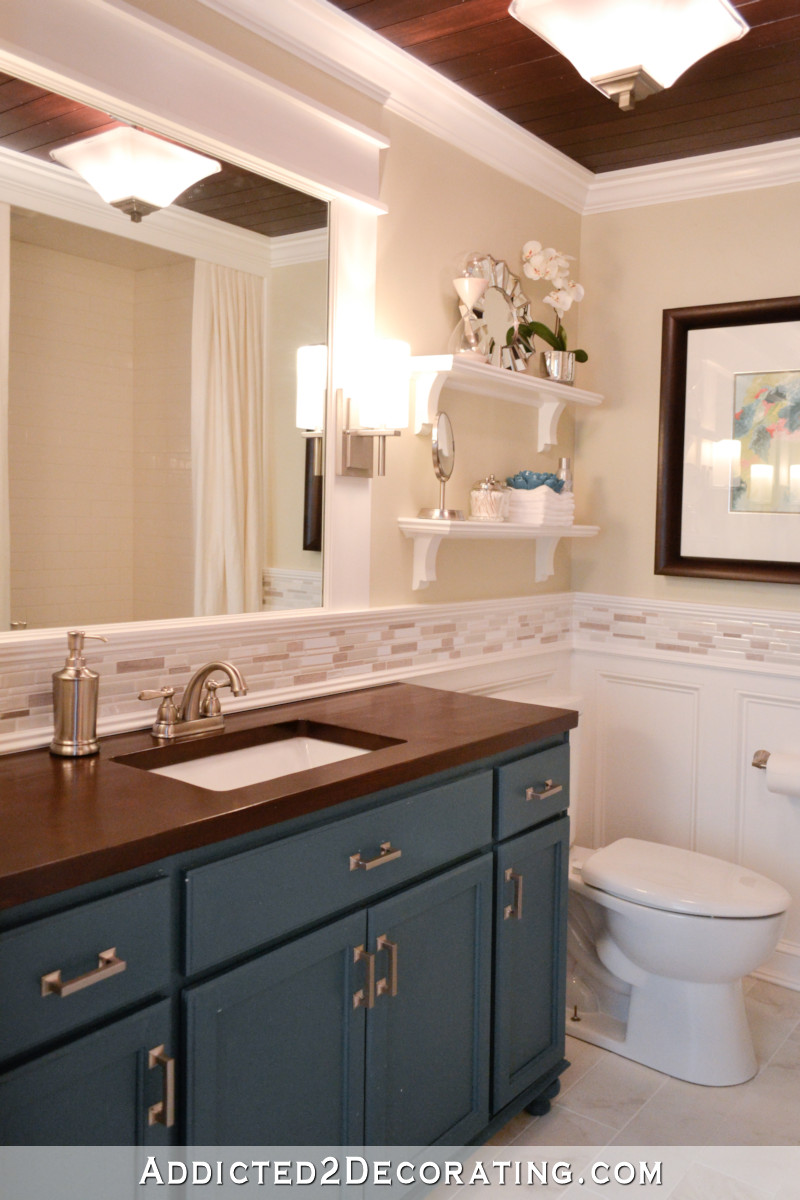
And here’s what it looked like after I put the mirror into the frame and hung it over the bathroom vanity…

Update:
The bathroom is finished! Click here to see the whole before and after of this condo bathroom makeover.


Addicted 2 Decorating is where I share my DIY and decorating journey as I remodel and decorate the 1948 fixer upper that my husband, Matt, and I bought in 2013. Matt has M.S. and is unable to do physical work, so I do the majority of the work on the house by myself. You can learn more about me here.
Oh wow… absolutely LOVE that frame! You are so crazy creative!
Totally agree with Mehgan..who would have thought that yard sticks could look like that…only you. Nailed it again..WOW!!!!
It looks amazing!
This looks amazing. I can’t believe the stuff you come up with! Love it!
Oh man, that must have been so disappointing when the mirror broke! The frame is beautiful, I love it! So so creative.
Well deserved nap! Curious to know what it looked like before you dry brushed all the tiles (I’m guessing with white paint to lighten it up, or am I getting that wrong?), I thought it was gonna be darker. Looking forward to seeing it hung up! Great job so far 🙂
Before I dry-brushed it, the tiles just looked so one dimensional, harsh, and “flat”. Not sure if I’m explaining it right. But you know how real tiles have subtle color variations that give them character and dimension? My newly-painted tiles didn’t have that at all. They just looked…well…”flat”. The dry-brushing didn’t really do much to lighten them up, but it definitely gave them some pretty color variation and dimension. It also softened the look some (so that the colors weren’t so harsh), and blended the tiles a bit, like you would see with real mosaic tile.
Hope I’m making sense! 🙂
I just added a picture showing the frame with one side dry-brushed, and one side not dry-brushed. I took it late at night, so I’m not sure if it shows up well, but hopefully you can tell the difference!!
Thank you for the extra picture, I do get what you mean, but I actually like the before dry-brushing, too. What matters is what you like, though 🙂 Also just thought of this, I think your mosaic wooden tiles concept would look awesome done with alcohol ink. Never personally done anything with alcohol ink, though, not too sure how to go about it… just a thought.
Beautiful! Why did you chose the triple thick glaze? Have you used this product before and can you talk a bit more about it? What other projects would this product be good for? TIA
This was my first time to use the triple thick glaze. My thought was that I wanted to coat the tiles with something that would make them super incredibly shiny before I grouted them, because I knew that the grouting process would probably dull the finish a bit, and I still wanted them to end up somewhat shiny (which they are). So I looked for the spray that would give me the absolute most shine. This one said it gives a “glass-like” shine, so it’s the one I chose.
Not sure what else I could use it for, but I’d love to use it on something else! The finish (before I grouted) really was super shiny and pretty.
Thanks for your response. I’m thinking lamps and refinishing ceramic vases.
Amazing! I love the frame! What size is it? I have three mirrors that I don’t need. I’m sure one of them would work. Come get it after your nap! Might be a good idea to take it right on to someone who can cut it down for you. 🙂
Bummer! The mirror needs to be 30″ x 34.25″ to fit into the frame. But I already called and ordered one! (And yes, I learned my lesson about trying to DIY mirror cutting.) 🙂 I didn’t even think about you having a mirror I could use!
Love, love it! Almost hate to see this project coming to an end.
You’re amazing, Kristi, and the frame looks FAB!
So awesome! It looks great
I love it .. the colors look awesome, can’t wait to see it on the wall 🙂
Absolutely fantastic – esp. what you manage in the time span of just one day!!! I would have taken days to paint the tiles for fear of leaking paint onto other tiles… How did you do the grouting? I cannot quite imagine how you applied it to the thin spaces between your tiles. Many thanks for sharing your idea – all your ideas – you are sooo imaginative, it’s very impressive and contagious!!!
Love to read your blog
Karen
Truth be told, I did the grouting with my hand. 🙂 I actually did purchase a grout float to use, but when it came right down to it, that grout float just seemed so big and bulky for such a small project. They’re great for doing big projects like tiled floors and walls, but for small projects like this, they almost seem to get in they way. (Some tile supply company really needs to start making craft-size grout floats for small projects!!)
So, I just dipped my hand right into the grout, and used my fingers to smear and smoosh it into the cracks. It was actually kind of fun. 🙂 Then instead of using one of the big yellow sponges that you use (again) to do big tile projects, I used one of the little kitchen sponges to wipe off the excess grout. Worked perfectly!
Kristi,
I’ve always wondered if putting the grout in a make-shift “cake icing bag” (something like a heavy-ish plastic formed into a funnel, with the tip cut off) and just “icing” between the tiles/into the grout lines would work? Of course, you’d probably want to overfill the grout lines a bit and then use your grout float to get rid of the excess so you could get an authentic grouted tile look. Just a thought!
– Kimberly
that’s exaclty how I tried to explain the grouting to myself and which made me ask Kristi in the first place – the image of a piping bag kept popping up in my mind 🙂 I guess it would be worth a try, even though I have to say that Kristi’s way of doing it seems so much easier – and the result is so great that it doesn’t actually need an improvement… but it’s great when you realise that other people come up with the same ideas 🙂
I love this!! So inspired to make my own! You are so creative, it’s such a great project!!
Girl, you amaze me every time I click on one of your photos! Was not expecting to see your “real” mosaic tiles look so…well, mosaic. Expected more of a yard stick I guess. Well done!
Wow! I have never come across a person as creative, imaginative as you. Your projects inspire me. Thanks for sharing.
I love your ’tile’ mirror frame and can’t wait to see the mirror in it and hung in the bathroom! That triple thick sealer provides shine and should make the frame easy to wipe clean/dry. Getting down to the end of the project and I’m excited for you to have this lovely new bathroom as a great selling feature in your home. Woot! Woot!
Love that idea, that tile mirror frame came out really great.
Supercalifragliticexpieladocious….!
Really awesome Kristi and I absolutely plan to copy this!
Don’t feel bad about having troubles cutting a mirror! I used to work at a custom framing store and we had big industrial glass cutters that were wall mounted and we turned away mirrors. Company policy didn’t allow us to cut them. they are an entirely different monster from regular glass. You are a brave woman for even attempting it!
Stunning! I love the dry brushing effect. I’ve done that to soften some of my projects, too!
I LOVE this!! It looks great!! Too bad about the mirror. That’s something that would totally happen to me.
Love the project, but I do have to ask … any particular reason you didn’t paint all the tiles before adhering them to the frame ? Seems to me that would have been much easier.
Also, when you did the dry brushing at the end to soften the colors, did you do that step with just white paint ?
You could certainly paint them first. For me, it seemed much easier to paint them after they’re attached. On most of them, you only have to paint the face of the tiles. The sides (unless they’re on the edge) don’t need paint. So the process was actually quite easy.
For the dry brushing, I actually used all five colors randomly.
Ah, yes … I didn’t think about the sides of the tiles. And I agree that the dry brushing makes them look much better. Great job, and interesting project !
Wow, you sure are creative! I live in Mexico where I think I can get little tiles to do this with…I’m not as ambitious as you! Maybe I’ll try it with little ceramic tiles…you are really inspiring!
Looks fabulous! Can’t wait to see it hung over your adorable new vanity!
Superb! Love it. Another awesome creation!
I would never guess that was made from yard sticks! Wow!
I just absolutely love your creativity and aptitude in making wonderful things with diverse materials on a limited budget. I especially like your honesty and “naturalness” and ability to really engage with your readers in your posts. I can’t wait to see this bathroom makeover! =o)
Oh my stinking goodness!!! That looks amazing!!!!!
Bummer about the mirror! I have learned not to attempt too much when I am tired….in other words, been there done that! Your frame looks fabulous! When I saw the first post about it, I didn’t have your vision, but WOW, it looks fantastic! Very clever!
Its amazing what you come up with!!! I cant believe it!!
I love your blog….
Can you show us a picture of the back of the frame and how your built it with the kreg jig… I am now so motivated to do something similar for framing a picture I have…
Thanks! you are a great inspiration!
Anika
I actually ended up not using the Kreg Jig to put it together. Because of the piece of lattice that I glued onto the back to create the rabbet, it wouldn’t sit flat in my Kreg Jig so that I could drill the holes.
So I ended up putting it together using lots of wood glue, and then I nailed it together (nailed through the edge of the frame, with two nails going each direction on each corner) using my brad nailer (the kind with the air compressor). Then I followed up with my staple gun, and put a few staples on each corner (on the back of the frame) to hold the two pieces together even better. Then I left it perfectly flat until the glue dried.
I love it! You set high standards for yourself. We will see the mirror over the vanity when the time is right. Take your much deserved nap!
WOW!!!! that looks amazing. How do you dream up such ideas? This one must be pinned for reference. Get some sleep girl – you sure earned it.
That is so beautiful!
Dry brushing definitely gave it life! Love the effect and your creativity.
Kristi,
You are so amazingly creative, it’s astounding! I’d love to crawl inside your brain and see how it functions … I bet ideas are just FLYING around in there! You always come up with the most interesting projects. You also have amazing problem solving skills. Why hasn’t someone hired you to host your own show?
– Kimberly
I could try crafting that but it wouldn’t look as perfect as what you just crafted. It just showed your creativity. I really appreciate people who make DIY projects look so easy. That was just a frame but it already looks good. I can just imagine how perfect it would look if there is already a glass and if it is already hanging on your bathroom wall. I hope you can post a picture of the mirror completely done. Thank you.
WOW!!!! That mirror is so cool!!!
Until I read the post, I actually thought you had somehow used mosaic tiles (you know the kind that’s all the rage now, no doubt that was your intention of what you wanted it to end up looking like – please excuse my grammar) I LOVE it! Thanks for all the details AND thanks for bringing new products to my attention!
I just found your website while looking for you faux wood plank wall and I am in love! Your house is amazing and you have some great tutorials!
I love this! I may do a small wall in my kitchen with this technique. I think it might be easier to paint the full yardsticks before cutting, rather than painting after…I imagine that (for a wall) not cutting the yardsticks would give the same look as your gorgeous green credenza…I *LOVE* that wood!! You have such great ideas and fabulous tips. Thank you!
I guess using yardsticks the cuts measure themselves! I bet it would also look nice with varying colorwash tones where you can still see the measurements.