Bathroom Makeover Day 8 – Faux Wood Plank Walls, Part 2
Well, y’all. I’m officially exhausted. But my bathroom is a complete mess, buried under a thick layer of dust, and almost unusable at this point, so I have to press on.
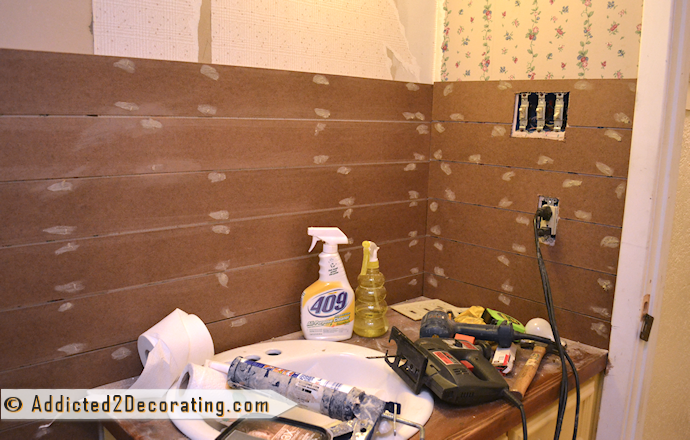
On Tuesday, I left you with this beautiful view of my faux wood plank walls that I made using 3/8-inch hard board (also called eucaboard) that I had the people at Home Depot cut into 4-inch strips for me…
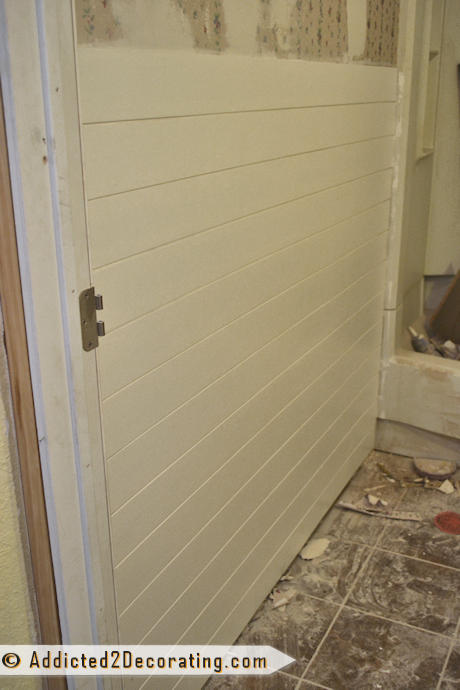
And while I didn’t have a whole lot of time to work on the bathroom on Day 8, I did manage to get it primed…

…and then painted…
Here’s a view of the sink side, primed and painted…
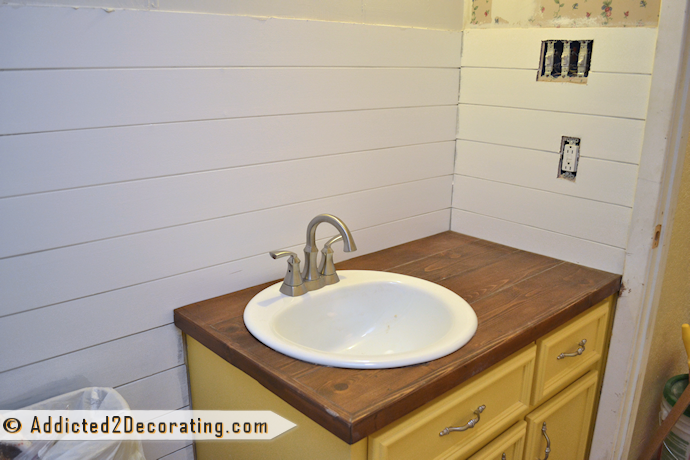
I’ve still got a lot of trim work to do…obviously. But so far, I’m very pleased with how it’s turning out.
I’ve gotten some questions about how steam will affect the hard board, and if I’m caulking between the boards, etc.
First, I didn’t caulk between the boards. I didn’t see any need to because I used oil-based primer on the boards, and I made sure that I got plenty of it in the gaps to seal the spaces between the boards and the wall. That also makes the boards resistant to steam and moisture.
But if you’re going to do this in your own home, I would just strongly suggest that you use a quality oil-based primer. My primer of choice is Zinsser Oil-based Cover Stain. It’s fantastic stuff, and easily sandable when it’s completely dry.
Now you may notice in some of the pictures above that I’ve actually started on the upper walls. 🙂 I’m a day ahead in my work now (since I took a break from bathroom posts yesterday), so the upper wall progress is actually Day 9, which I completed yesterday and will share with you tomorrow.
I’m not removing the wallpaper because…well…I hate removing wallpaper!! So I’ll show you my alternative to wallpaper removal. Stay tuned!

Addicted 2 Decorating is where I share my DIY and decorating journey as I remodel and decorate the 1948 fixer upper that my husband, Matt, and I bought in 2013. Matt has M.S. and is unable to do physical work, so I do the majority of the work on the house by myself. You can learn more about me here.


Looking good!
Okay, a coat of paint and I’m getting a better picture of what’s coming! Still loving the “chaos” pictures. Too often online we see the beginning and end of projects without the mess lived with in between. Looking forward to more!
You have such an eye for this stuff! It looks great!
Wow! It is so crisp looking (even without the top half finished). We have a very old house with slightly uneven walls. I think this would work great to hide the uneveness. I could sand (or chip away) the roughness underneath, then cover with these slats….I can’t wait to show the hubby when he gets home, he was having trouble visualizing it at first but I think he will love it too!
WOW!! Now you can really see the color of the vanity as well..It is so pretty..still amazed! I spent 3 days last week with my best friend peeling wallpaper off in her bedroom…sure wish we would have waited to see your plan..but we have 2 more rooms to do so maybe I will be able to talk her into what you do!
This is looking better and better each day. Love the nice white walls and should make the teal pop! Can’t wait for tomorrow!
What kind of paint are you using? Or what sheen?
This is really shaping up! Can’t wait to see more. You’re giving me inspiration!
Looking wonderful!
Looking more amazing by the day. I use Zinsser too for kitchens and baths. Best primer EVER. Can’t wait to see it all finished. I bet you can’t wait too 😉
I noticed you ran your boards horizontally. Most of the sample I see in rooms the boards are run vertically. Tell us why you made the decision to go horizontal…(I know the thinking for running flooring but walls, not so much.)
Thanks.
Small House / Big Sky Donna / White Oak Studio Designs / SW Michigan
Hand-Painted Vintage Furniture Transformations
Blog: http://smallhouseunderabigsky.wordpress.com
Facebook: [email protected] (for portfolio of chalk painted work)
The main reason I did it is because it’s not the norm. 😉 Wanted to try something different, and since I LOVE horizontal stripes, I thought that this would look nice.
I’m not sure the exact era, but I do know that here in the midwest it was common many years ago to run these wider (4″, 6″) boards horizontally on interior spaces, similar to siding. The wainscoating/beadboard around here that ran vertically was narrower, 2″ or 3″. I have seen some 4″ run vertically, but at least what I’ve seen the common was was narrow vertical & wide horizontal. To me this looks correct for a WWII or prior home.
You are such an INSPIRATION! Keep going, girl! We can’t wait!
Every time I visit this site I always find great useful home remodeling ideas, like this one!
I am super duper in love with those walls… and even more so your yellow cabinet! Thanks so much 🙂
I just found your site and I must say what I have seen so far, I LOVE!!!!! I love using the planks in the bathroom. I have been debating on doing something like this in my Master Bedroom. What do you think?
I will definitely be checking out your sirt more often.
what is the color yellow name in your condo bathroom? Cabinet with sink. Love your work and choice of colors!!!
Dying over this. Just found your site (byyyy the way) and i’m in LOVE. I’ve been really really wanting to do a wainscot in my master bedroom. It’s HUGE, the living space in their is phenomenol and the ceilings.. higher than high. But that means the room is just bare and boring, so i’d like to break up the walls a bit. Anyways, wainscotting has seemed like a viable option, But i’m having a little concerns. But this seems like it might be just what I was looking for. You rock! Looking forward to a finished product.
Hi Kristi!
I’m sorry to be asking a question so long after this project was finished, I’m just wondering if you could tell us what you did (if anything) to finish the wall planks where they meet edges, like the edge of the shower? Did you caulk or add some sort of moulding? I’m thinking about giving this technique a try in our master bath. Thanks!
~Claire
I used quarter round trim, and then caulked the edges, primed, and painted.