Cerused Oak Dining Table (Table Makeover) – Finished!
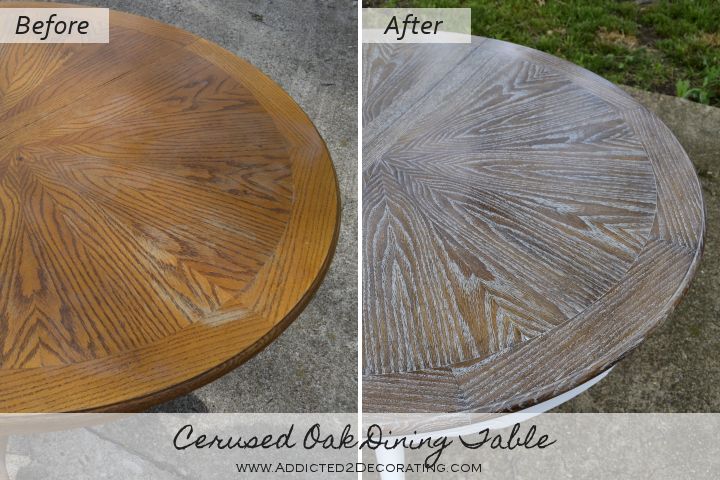
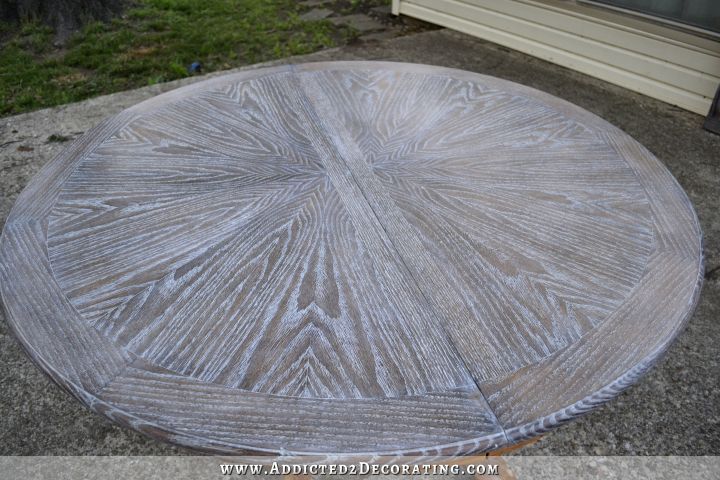
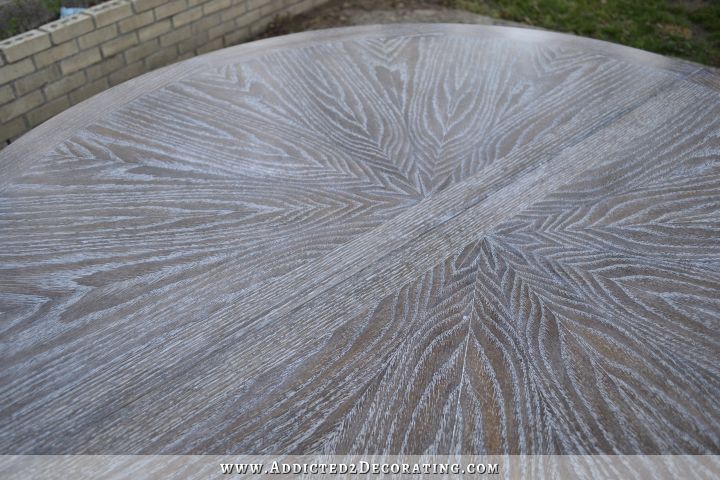
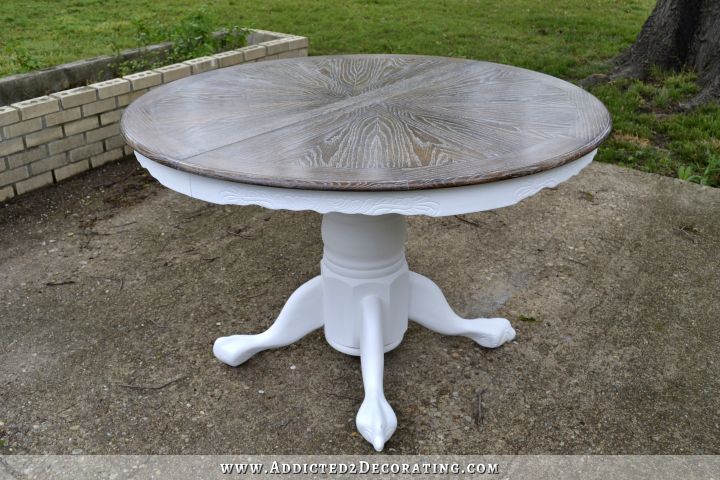
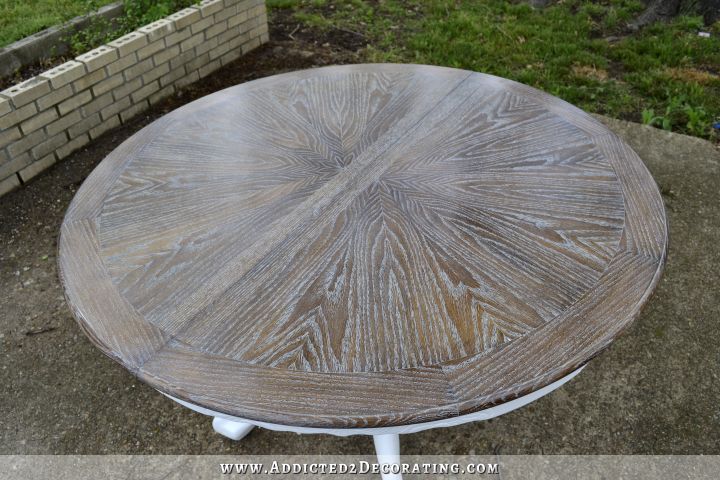
I finished my cerused oak dining table, and I love how it turned out! Here’s a look at the top before and after…
If you missed the first part of this project where I showed how I stripped and sanded the wood, and then wire brushed the grain, you can see it here…
That orange oak table with the sad dark grain has a fresh new, modern look with its not-so-orange stain color and white grain.
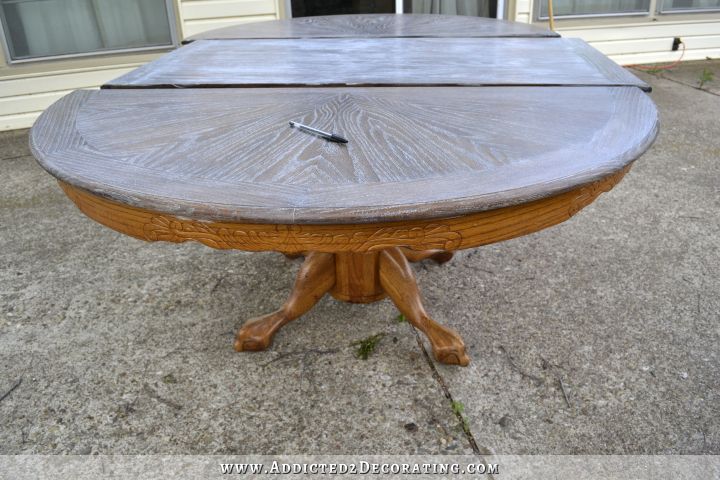
And here’s a look at the whole table before and after…
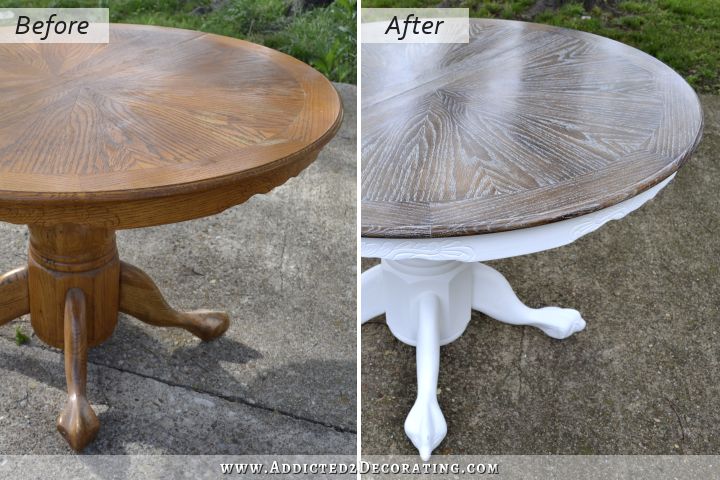
I did go ahead and paint the apron and base white just because I didn’t want anything competing for attention with that gorgeous cerused top.
I’m tellin’ ya, I could stare at that top all day long. It turned out way better than I expected.
Okay, so let me back up and share the details of how I achieved this look.
How to ceruse wood — continued…
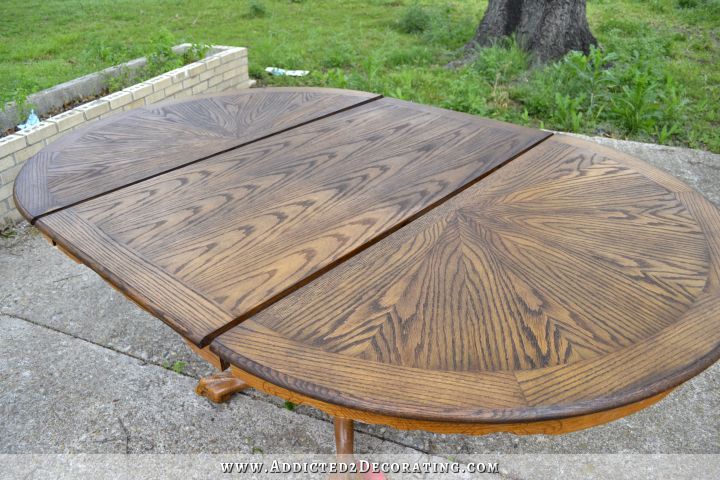
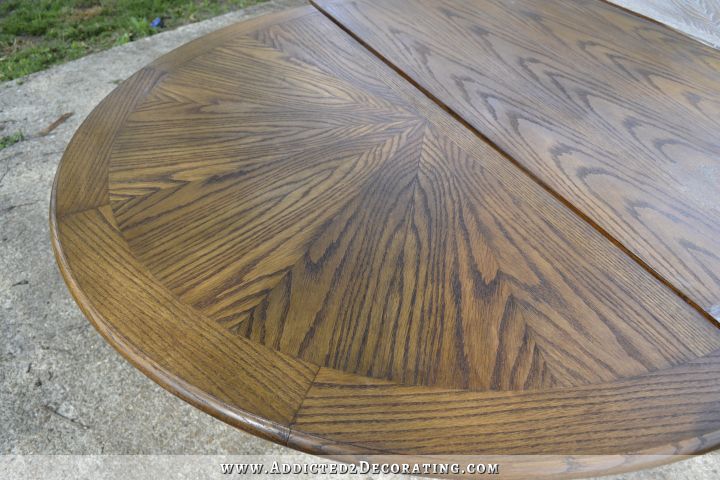
When I left off on Friday, I had just stripped and sanded the top. Then I scrubbed the entire surface with a brass wire brush going the direction of the grain. And I followed that with a coat of stain. I used Minwax Jacobean stain on my table. So after all of that, the table looked like this…
When the stain was dry, I scrubbed the surface one more time with the brass brush going in the direction of the grain. I applied medium pressure to the brush. In other words, I didn’t put all of my muscle into it, but I also didn’t baby it.
After that second scrubbing, I tried applying the liming wax.
It was actually a disaster at first. The liming wax seemed to stick where I didn’t want it, but came out of the areas where I wanted it to stay as I scrubbed it with the steel wool. And I was scrubbing quite hard. I kind of panicked for a second. (And evidently when I panic, I scrub against the grain. Don’t do that. Don’t ever do that.) 🙂
Then I remembered that this one tutorial I found said that you have to shellac the surface before cerusing it. So I used some mineral spirits to remove the liming wax from that area, and shellacked the whole table using Zinsser Clear Shellac. It didn’t really change the look of it at all.
It dried in about an hour, and then I gave it a quick sanding with 220-grit sandpaper.
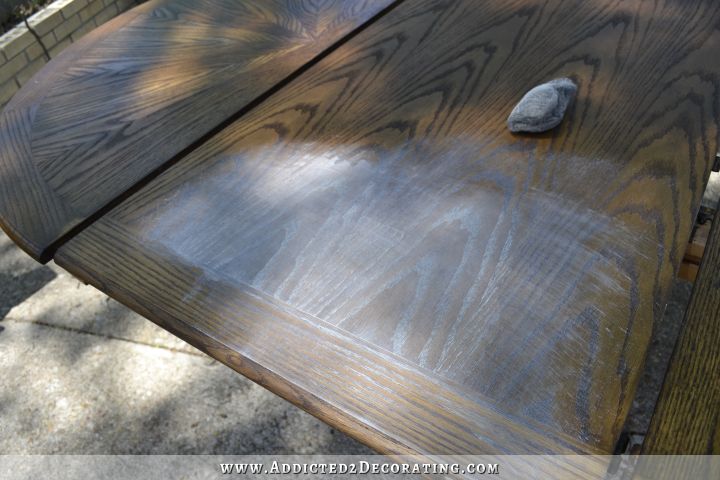
Then using a small scraper, I worked the liming wax down into the grain of the wood.
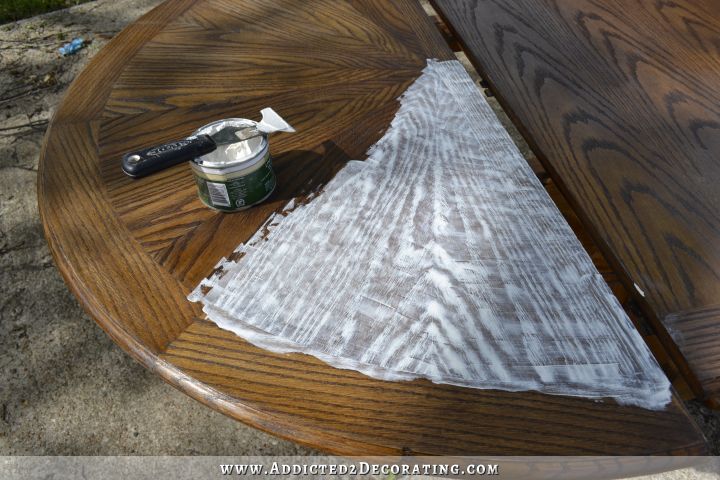
I covered 1/3 of the table at a time and then let it sit for a few minutes to dry a bit.

Then I used #0000 steel wool, which is evidently the finest steel wool available…
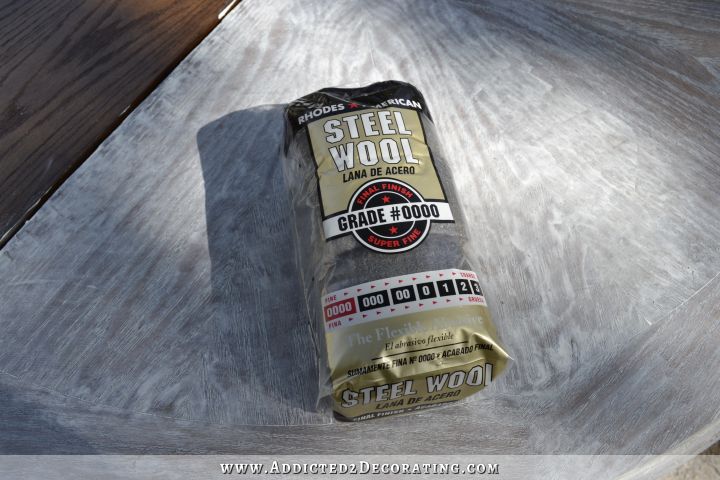
…and I began to scrub off the liming wax with the steel wool.
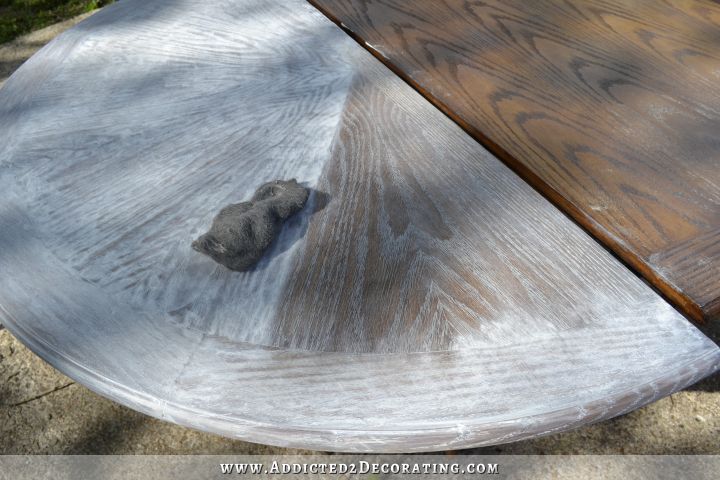
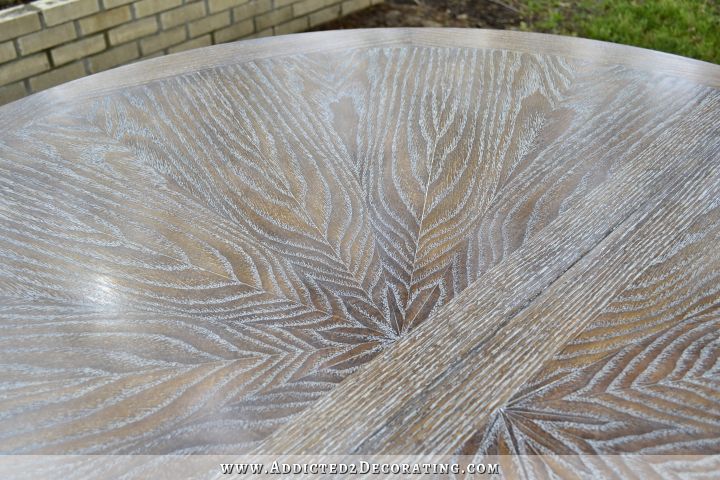
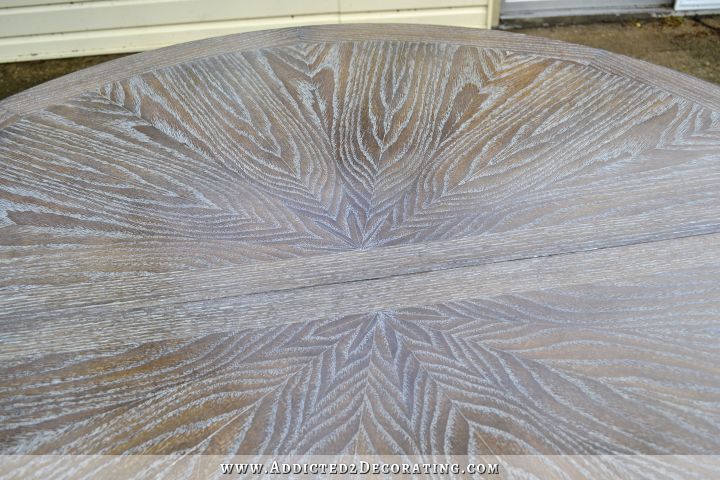
And I could see the wood grain pattern emerging. After I scrubbed the entire surface once with that first steel wool pad, it looked like this…
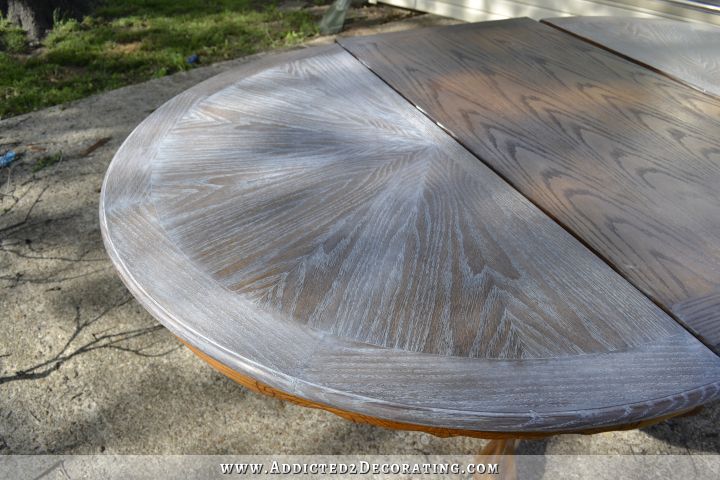
You can really take off as little or as much of the liming wax as you want. If you want the entire surface of the table to look limed, just don’t take off as much of the liming wax. But if you want more of your stain color showing with the liming wax only settling in the grain of the wood (which is what I wanted), then grab a new steel wool pad and scrub the surface again.
I used three pieces of steel wool on each section before I got it looking just like I wanted it. (Steel wool is just like sandpaper — it’ll get dull and fill up with dust/wax as you use it, and become less effective. So you have to keep using new areas of the steel wool pad, and then eventually just use a new piece once that one gets dull and full of dust.)
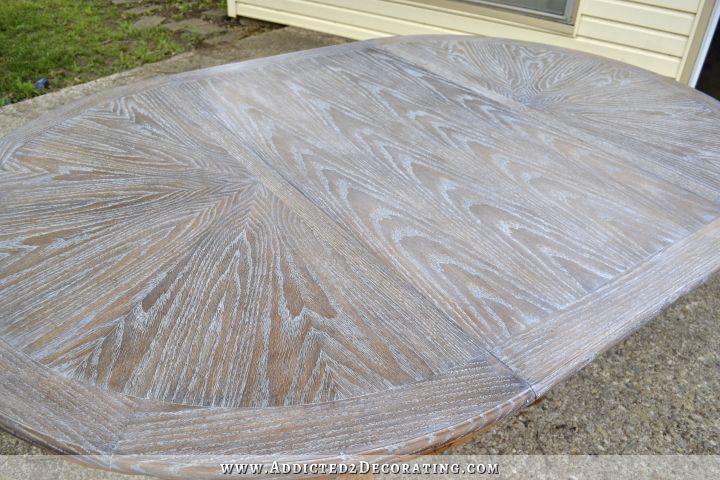
I won’t be keeping the leaf in my table on a regular basis. That’ll only be used if we have company and need the extra seating. So normally the table will look like this…
I love it! 🙂
But I wasn’t loving the orange base with it, so obviously that needed some attention.
(That picture was taken before I had completely scrubbed the center section of the table with steel wool.)
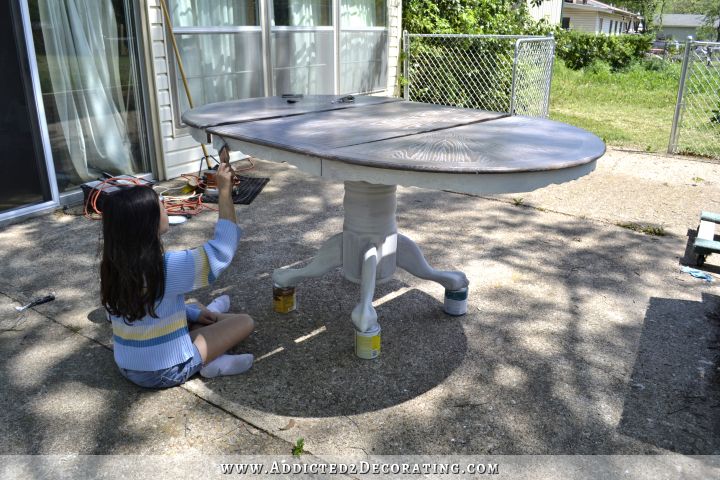
The base of the table got my usual treatment — sanding with 150-grit sandpaper (by hand), and coat of Zinsser Primer, and then two coats of latex paint. I used a Behr color called Polar Bear, which is also what I used on my fireplace. It’s my “go-to” white paint color.
And I also had some help with the priming — my 9-year-old niece Yaleana, who handles a paint brush better than most adults! The girl has DIY in her genes. 🙂
After the base was completely primed and painted, and after I had the top scrubbed with steel wool enough to suit my taste, I needed to seal the top.
I really debated over how I was going to seal the top. I do not like using water-based polyurethanes on surfaces that are used often (especially if there’s any moisture involved), and we use this table for three meals a day. An oil-based poly would hold up much better to that kind of usage, but an oil-based poly would also be amber in color and will yellow more over time (as all oil-based products do). And I didn’t want anything mucking up the bright white grain on my table top.
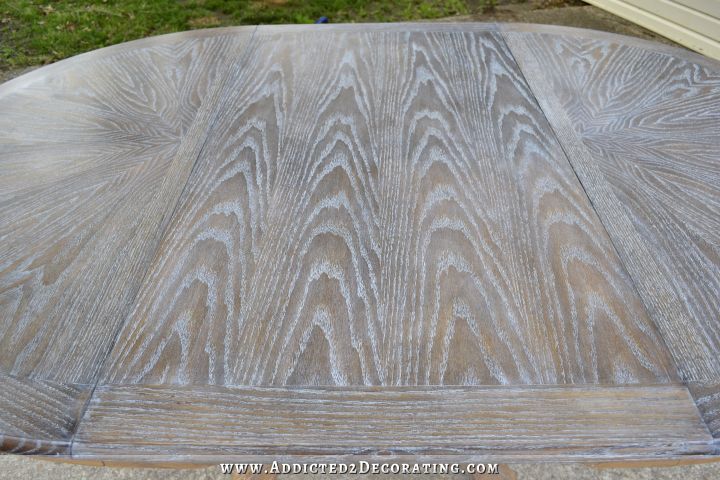
So I finally opted for a waxed finish using Minwax Paste Finishing Wax. It’s very easy to use. You just rub it on with a clean cloth, wait about 15 minutes until it becomes dry and a bit cloudy, and then buff it with a clean cloth. It leaves a beautiful satin finish. It’s not as durable as polyurethane, though, so I’ll need to keep an eye on it and see if it needs to be waxed again in a few months.
But it gave the stained wood an even richer appearance, which I love.
On the apron and base, I sealed that with Annie Sloan clear wax. My reason for doing that is because the Minwax Paste Finishing Wax does have just the slightest bit of amber color to it, and I didn’t want to take a chance on it dulling the white paint. Annie Sloan clear wax doesn’t have any color to it at all, and it’s specifically made for using over painted finishes.
Truth be told, I don’t like the Annie Sloan wax nearly as much. Where the Minwax wax dries in 15 minutes or so and is ready for buffing, the Annie Sloan wax still felt just as waxy and freshly applied several hours later as it did when I first applied it. So I still haven’t had a chance to buff it out. I’ve been told by several people that you need to wait about 24 hours before buffing it.
But other than buffing the apron and base, it’s finished! And I love how it turned out. My very least favorite wood just might become my very favorite now that I know about cerusing. 🙂
Helpful sources and products:
- Brass wire brush – This is needed to open up the grain of the wood before waxing the grain.
- Minwax Jacobean stain – This is the color of stain that I used on my table top before cerusing, but of course, you can use any stain color to achieve the specific look you want.
- Zinsser Clear Shellac – This is what I applied to the stained table top before adding the liming wax to the surface. It makes it much easier to remove the excess liming wax with the steel wool.
- Briwax Liming Wax – This is the white wax used to achieve the look of the white cerused grain in the oak table top. This product worked beautifully!
- 0000 Steel Wool Pads – This is what I used to remove the excess liming wax from the surface of the table.

Addicted 2 Decorating is where I share my DIY and decorating journey as I remodel and decorate the 1948 fixer upper that my husband, Matt, and I bought in 2013. Matt has M.S. and is unable to do physical work, so I do the majority of the work on the house by myself. You can learn more about me here.


Just Beautiful!
Wow. Lot of work. Beautiful. I have a 10 foot table. Have to decide if I have that much energy. Love the look.
Wow!
Beautiful! Anyway you want to do MY table? Yours is gorgeous! I had never heard of this until last week’s post. I love it!
It turned out beautiful and you were so lucky to have that beautiful grain on the top. I don’t know how you keep up with all the work you are doing and not get too discouraged!
lovely
How awesome is that?!?! I love that you just keep going til you ‘get er done’!!!
Love it! It’s gorgeous.
That is an awesome project! I swear, you are the DIY queen.
It looks really great! I don’t care for oak myself, but you made a believer out of me!
Love love love!! Great job!
GORGEOUS!!!!!!! I have never seen oak look so good!!!! And I will never look at an oak piece the same way now that I know it’s a diamond in the rough!!!! 🙂
What a transformation! You were so right about the lovely piecing of the top – the wedges almost look like feathers, and the center looks like a little flower. I am so impressed with your talents and vision!
Your table came out great!!!!!! I’m mentally planning to redo our kitchen table. Mine is very similar to yours except mine has the dreaded tile top, with a 2 inch boarder of wood. First I thought to take out the tile and put some kind of wood in the groove, then maybe cover whole top with wood and now I’m thinking make a new top and attaching it to base, making it look more like a farmhouse table. Decisions, decisions!! Any fantastic ideas??
I really enjoy your blog!!!!!
Or you could just keep an eye out for a “new” table on Craigslist. 😉 That’s where I found this table!
Beautiful! love it!
It’s so striking! Wondering – can other types of wood be cerused? I’m assuming you’d need a heavy, visible grain. I’ve got some vintage Ethan Allen maple furniture that I would love to do a limed finish on the top. I don’t want to paint the entire piece – but was thinking the stain/cerused top and a white lower would look great in a beach house. Not sure maple has enough grain. Thoughts?
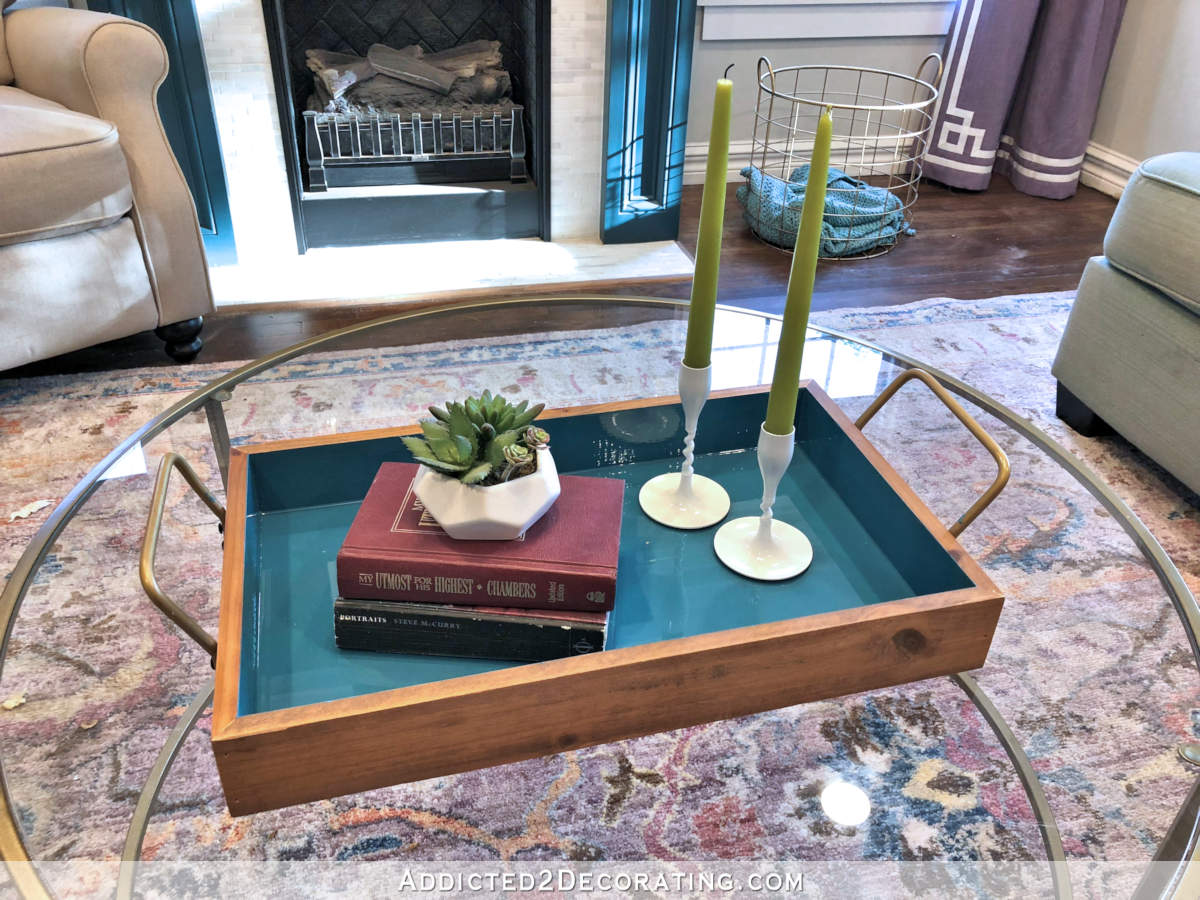
From what I read, cerusing works best on hard woods, and on wood with lots of visible grain. So that makes oak the most suitable, and the most commonly used, wood for cerusing. I’m definitely tempted to try it on other woods, though! I was going through my scrap plywood last night to see if any of it had enough grain to make a cerused serving tray for my living room ottoman. I want to try a white tray with gold cerusing. 😀
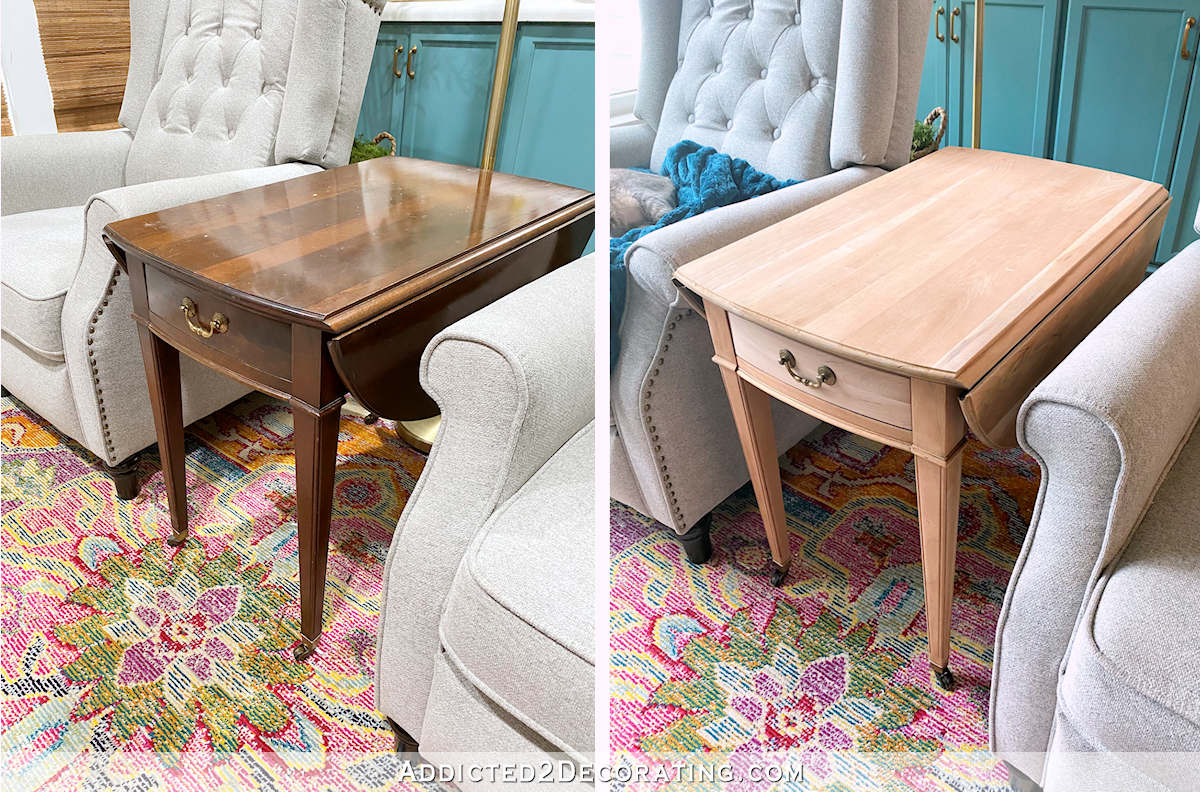
Thanks, Kristi! I am looking at a drop leaf table right now that I believe is either maple or cherry … it has some nice graining, but is an uuuuuggggly orange stain. I smell a project! Will be sure to take before, during and after pictures.
What shellac did you use… widget not visible for me.
Zinsser clear shellac
FYI General Finishes makes a poly that does not yellow.
Love your table and am amazed at what you do by yourself
Stunning!
Girlfriend, you ROCK! That table will be a gorgeous addition to your space. I am very impressed, and enjoy your creativity and hard work. I genuinely look forward to seeing your progress. Very well done, professional, and impressive. You are the best!
Beautiful! Absolutely beautiful! I think that is the perfect example of Cerusing. Beautiful! 😀
Unbelievable transformation! It is gorgeous.
The table turned out lovely! You are a hard worker, I get tired reading your website!
I am very interested in seeing how your waxed table top holds up. I waxed the top of our kitchen table and every hot plate or pizza box melts it and leaves it dull. I’m looking for an alternative. Your table looks amazing!
Ugh…I was kind of afraid of that. 🙁 I very well might be looking for another solution. I might just have to go with the polyurethane.
I just saw this beautiful table and wanted to do the same to my oak dining table. I’m hesitant due to the durability of the wax at a family table. Did you end up using polyurethane? Some sites say that polyurethanes aren’t compatible with wax. Just trying to figure out how to get the great look you achieved and keep that look low maintenance! Thanks so much.
Did you do the chairs?
Hi, I am wondering if you ever put a polyurethane over the wax and how that turned out? I want to do this to our large oak dining table, but I want it to be able to endure our large family. I’d so appreciate hearing how you ended up protecting the finish and how it held up to heat and water.
Thanks so much!
Like you, I can’t stand golden oak, but your ceruse finish is gorgeous. And how lucky that you have a table with such a beautifully done veneer! That’s true craftsmanship. White for the base and apron was the best choice. Beautiful job; congratulations.
Oo-la-la! That is beautiful and will be a hit in the room!
10/2020
Just curious as to why you chose to use Briwax Liming Wax but chose Minwax to finish the top?? Why not stay with Briwax for the entire project?
Just because I already had clear Minwax on hand. I don’t use clear wax enough to spend money on more when I already have a full can.
To be honest, I was not liking it until I saw it with the base painted. It looks great!!! Nice job and its great that you can see it long before you actually do it! Just wow!!!
Oh my word, Kristy! That table is absolutely gorgeous! Until you did the post on cerusing, I had never heard of it. But I am in love now!
A M A Z I N G !!! What a transformation! Wow! There is NOTHING you can’t do!!! I can’t wait to see this in your finished kitchen!!!!
Very interesting finish.. The pattern of the wood grain looks like large feathers to me, very pretty. Painting the lower part of the table white was the right choice, and gave the table a fresh new look.
I, too, had never heard of this before. We all learn so much from you! What a gorgeous table you now have!! Can’t wait to see more from you.
$75.00 plus some latex paint…not bad at all. It turned out beautiful!! The veneer is so pretty, I love oak wood grain. Maybe I’ll give this a try on my entertainment center. I had watched this with interest since I have a dinning table that needs some work due to too much wax being applied at the factory but my dining set is wormy maple so has no real grain to it. I’ll have to wash all the wax off (almost a 16th of an inch!) with mineral spirits and put a light fresh coat on. Great work!!
Beautiful!! I’m pinning on the outside chance that I might be able to work a piece, too.
That was a lot of hard work, Kristi….how’s your arm?
P.S. Marian Parsons/MMS has referred to a non-yellowing poly. You might want to search her site for that.
Love the table!! You did a beautiful job!
Cutie pie helper too :^) I had three in that age range this past weekend….. We had a ball, but I remember how OLD I am today :^(
Blessings,
J
Another fabulous project! I’ve always loved oak, but you’ve once again taken it to a whole new level. Great job, Kristi, and a BEAUTIFUL table!
I have this very same table. I have never heard of this technique before and I’m so pleasantly surprise how it turned out. I would love to see how it looks in your dining area of your home. I don’t think I could be brave enough to do the same with my set. Beautiful job though!
Absolutely GORGEOUS!!!!!!!!!!!!!!!!
Love it!!! Besides the floors from Cameron Diaz’s kitchen that you posted, I recently saw something else that was cerused (sorry, can’t remember the website) and fell in love!!! Thanks for the helpful tips. (as always, YOU ROCK!!!) I can’t wait to try this technique!
This is my very favorite project you have done !!!! I have a table just like yours that I also got on CL and can’t wait to try the ceruse technique – I hope I can be as successful.
The wood grain pattern reminds me of heads of wheat. It turned out georgeous! My daughter achieved this look on our desser using her dad’s deodorant. 😉
It’s beautiful, Kristi. It kind of reminds me of the old pickled look, except that the contrast between the stain and the liming wax makes it so much more ooh-la-la.
Serious tie between this table and the credenza for my #1 favorite change. I want to try but I’m afraid. .it looks like a lot of work.
It was definitely a lot of work, but none of it is actually difficult work. 🙂
The table came out beautiful. I wonder how this technique would work on the interior doors. This would definitely minimize the wood grain.
It looks fabulous!
The table is beautiful! There was a step that you did in the process of doing your table that I just can’t understand. When using the wire brush to open the grain up even more, doesn’t that scratch the surface of the wood veneer??? Wouldn’t there be lots of scratch marks on the surface? Would love to try this!
I thought the same thing, and was a bit nervous to try it. But everything I read about cerusing said that this is the most important step of the process, so I just trusted and did it. And it worked! It didn’t scratch the wood at all. I imagine that might be why they suggest doing this on hard woods specifically, though. Hard woods can withstand all of that scrubbing with the wire brush, where soft woods would probably get scratched up. I’m not sure about that, but it’s just a guess on my part. 🙂
But I will say that one tutorial I read (the one I linked in my post above) said to use a brass brush specifically because it’s tough enough to open up the grain, while being soft enough that it won’t scratch the wood. So perhaps a stronger, stiffer metal brush would actually scratch the wood. Not sure, so I stuck with the brass, and it worked perfectly.
Beautiful job on something that was very tricky
WOW!!!!
I’d never heard of this before either, but it’s definitely what I want for my coffee table finish!!!
Love it!!!!
designdreamer
Your table is gorgeous! This is the first time I have seen that wax method used so I learned something new today. Thanks for sharing!
Oh, and great minds think alike…..I use Polar Bear too as my go to white color and I love it. Its on every molding and trim piece around my house and I love how crisp and white it is! I can’t wait to get a final home tour when its all said and done. You have done so much thus far and everything looks FAB!
Absolutely gorgeous!! And yay for help! Go Yaleana!!!
How fabulous! I have seen lots of faux graining and that was what I originally thought you had done. I hope to screw up my courage enough to try it one of these days. Beautiful job!
Beautiful!! Do you always put some type of wax on after you paint furniture?
No, I almost never put anything over a paint. Even on kitchen cabinets, I’ll just stick with the paint without putting any type of clear coat over it.
I treated this one differently simply because it’s a dining table that gets lots of use every single day — three meals a day plus it’s where I spend quite a bit of time using my laptop. So I wanted to give it a bit of extra protection. I actually wish I had used two or three coats of satin water-based polyurethane on the apron and the base, and I’ll probably end up going back and doing that just for the added protection.
Your table is absolutely beautiful. Everything that you touch turns out so nice. I was wondering if the white paint is a flat finish because the Annie Sloan wax doesn’t work on semi-gloss paint? If you use it on semi-gloss it always feels sticky. Trust me I know from experience.
I used flat paint on the apron and the base. 🙂
I was wondering about the wire brush scratching the surface of the wood also.
Absolutely beautiful. The person who made that table is quite talented. I never heard of that technique but you did a fabulous job! Gorgeous!!! I think I’d protect the tabletop by having a piece of glass cut to size.
I love it and I also think this would be great on your doors! I am partial to the distressed look so I would have done that, however I know you are NOT 🙂 I have used Annie Sloans wax several times and I have found if you use to much wax it will stay tacky for a very longeriod of time. You have to wax it and them rub the access off with a clean cloth, then buff. In my experience if you used the right amount of wax you should be able to buff very soon after wars. I painted my table and waxed it as well with Annie Sloans wax. I was worried about not having enough wax on the top to protect it from….ya know children and husbands so I over waxed on all coats and I shouldn’t have because it feels tacky in spots still and it’s been at least a month and plenty of meals have been had there. I used placemats, never set hot things on it Without a pot holder or something and always wash it with something that is not to harsh, I use disinfecting wipes. I have also waxed other furniture with it where I was not so concerned about protection so much and did not have a tackyness issue at all. Not sure if this helps but it’s my experience anyway.
Holy mackerel, Kristi, that table turned out GORGEOUS! So hard to believe its the same table, the transformation is just that remarkable! It was a nice table before (aside from the orangey finish), but now it’s a designer showpiece. Nice work, as per usual!
Wow that is one beautiful piece of furniture. I never heard of this technique and now I want to try it. Wondering if you are considering doing this with your interior door? Cheers
Love! I know what I’m doing this weekend.
This is amazing!!! Wow!!! I can not wait to see this all come together! You have some kind of stamina! Just go, go, go, and your table results are proof. It’s amazing.
It looks great Kristi and so glad you shared…..
Once again you amaze me. One question that I didn’t see answered in the comments: Could you do this technique on a piece with angle and carving? Something like a hutch? Or would you recommend only doing this with flat pieces like your table top?
It’s definitely easier on a flat surface. I don’t think I’d try it on something that has angles and carvings.
lovely.
Just wow, Kristi. My sister in law has a beautiful house build in the 80’s. She just had the most beautiful counter tops, stone flooring, and updates put in her kitchen. But the cabinets are the old 80’s full-on nasty grain that everyone loved in that era. Now it just takes away from the work and big bucks. Dear Abby, how do I tell my sister in law that this procedure would look mighty awesome in her kitchen??? I would even be willing to do it myself 🙂
Gorgeous! Who knew golden oak could look so good! Will remember this when looking at pieces made of oak!
Love the stain color. Could please share brand and color?
It’s Minwax Jacobean. 🙂
Thanks for responding. Was going to donate a mission coffee table and side table until I realized they were solid Oak. Considering Ceruse for the top, but mostly just love the dark color stain as opposed to the “oak” look. May go with just stained top and distressed soft turquoise for the bottom. Or Ceruse and white. Love the way your table and chairs turned out.
Is there any way you would consider doing a video tutorial on how to do this? I have the exact same table and want to do this, but am afraid of messing something up. A video would be wonderful! Maybe on just a small piece of wood? Please consider it! 🙂
This is one badass DIY. Great job, lady.
This looks awesome, you did a great job! I saw Steve Fanuka do this one time on his show “Million Dollar Contractor” and thought it was a very interesting process. Yours looks just as good as his, haha!
I want to do this to a picnic table I am building in my back yard. What can I seal it with?
It will be exposed to the elements. 100% of the time. My husband loves the color you ended up with, and I don’t like the idea of it yellowing after sealed. Any suggestions?
Your best bet will probably be a waterbased outdoor spar urethane. I’m sure you can find that at Home Depot or Lowe’s.
It is probably mentioned before. But can it work on pine? I just realized all the wood is pine! And that is not a hardwood!
I’m really not sure. You’ll have to try it and let us know! 🙂
Beautiful work!
How many hours (approx) did it take you to complete this table and chair set?
This table is amazing! Is there a such thing as opposite of cerused? I wanted a limed look but didn’t know what I was doing. I did a white/gray wash onto bare oak. It is seeped into the grain but bare wood is underneath. Could I stain over it and the stain not absorb in the grain where the paint already is and get the same effect or close to it? I hope this makes sense. Thanks!
You’ve done a fantastic job! The finish looks fantastic! Thanks so much for the inspiration!
Your table is beautiful! I have the same table and have pondered staining the top and painting the bottom. Thank you for the inspiration!
I have this same exact table. You have inspired me to make it over! Your table is beautiful, but I’m not sure I could do all that work. In Part 1, you stated you didn’t sand through the veneer. If I didn’t want the wood grain, would it be okay to sand down completely and stain the top? Thanks!
This table is gorgeous and has inspired me to do my own ugly orange oak table! Two questions for you 🙂 Did you only do one coat of stain? Do you think I can make my own liming wax by adding white paint to beeswax? (I’m in Canada and Amazon won’t ship to me)Thank you so much.
Simply beautiful!! Just wondering how the liming wax is holding up? Did you end up putting a poly on the top? I’m in the process of doing this and I would like to poly the top but not sure how it would adhere to the wax? Thanks! Cheryl
That table has so much going for it. Even without the treatment the grain lined up like that is awesome. My project is much more prosaic. I am decorating a wood cabin and am trying to find ways to cool down all that warm wood that is everywhere. My colors are Grey, white and light blue with touches of black. Literally I am trying to get those colors on as much of the wood as possible. I guess it won’t work on walls and ceiling since they are softer pine but I think the cabinet fronts are cherry. The other finish I am attempting is ebonizing to get the light grey weathered barn color. Would love to try cerusing on as many appropriate surfaces as looks right. Thanks for exposing me to this technique:)
I know you have had this posted for some time but I found your tutorial and have been trying to attempt it for a couple of weeks now. I have had to redo the table twice, to fix my mistakes. One big question I have is your use of stain. The tutorial, you said you followed, says “DO NOT USE STAIN”. Then, you said you used stain. When I am trying to put the liming wax on the table it only wants to go into certain areas. It just isn’t working for me. Can you help me figure this out? Should I use a dye (like most other tutorial read) or should I use the stain? I just want my table to end up looking like yours. Thank you!
I have this same table and chairs..and now know what to do with it to update it..yours looks very nice
Very beautiful! Love it! Did you paint the chairs that went with the table white?
I cerused the seats and painted the rest white.
Love! I am working on refinishing my husbands family dining room table as a kid (this exact table)!! Mind if I ask what you did with the chairs? Did you keep the original set and paint them or do the line finish? Just restain them? Thank you!!
Sorry I didn’t read all the comments above!
I am so glad I came across this project! I have this same table and have been wanting something new and now knowing its potential, how exciting!
I am curious though what you did with the chairs? Or if you have any tips for the chairs??
Beautiful!
Haha, just saw comments above. Never mind 🙂
This is absolutely amazing. I am looking at my table which is exactly the before picture. I would love to do this, but I am wondering if you refinished the chairs too. Would you do those solid white, or a combination like the table? Thanks for the inspiration!
I did a combination like the table. I cerused the chair seat, and then painted the rest white.
Was the top real wood or vaneer?
What really makes that piece special is the attention that was spent on the part of the furniture maker in joining the oak so carefully in a sunburst design, and what you did just made it all the better for bringing out that design. Very nice. Oak has large pores, I’ve never tried the technique as you describe it, I do it as a technique I picked up along the way called pickling. When I do it I just use a contrasting color paint in the wood grain, wipe off the excess, let it dry, then use my steel wool, turns out just fine for me, then I finish it with Butcher’s wax, but I don’t mind a slight amber tinge….
Love this look. I have this same table, what did you do to the chairs?
Gorgeous!! I actually have a table that I’ve been trying to figure out what to do with, and this is just perfect! So, my question is, for painting the table – I noticed you painted the apron and the base. Is there anything under the table that needs to be painted for it to look decent? I mean, there’s no paint or stain on it now, but I just wasn’t sure. I’m still a novice at refinishing furniture. Thanks for your help and input!!
How is this holding up? I love it and was just wondering. I have waxed some furniture too with anne Sloan wax and I too didn’t really like it. Any help would be appreciated.
I’m so very excited that I found your post! I have the exact same table and was looking for ways to update the look. Thanks for the step-by-step instructions and links for purchase. You made finding the right project super easy. Hope my table turns out to look just as fabulous!
Hi Kristi! Your table looks amazing! Did you ever go back & polyurethane it or did you stick with the wax? Looking for a low maintenance route for myself! Thanks!
Wow! I’m inspired. I got a table from my friend that needed help. I sanded, and stained it and put epoxy over it. It did not turn out as I would have liked. It has beautiful grain like your table so now I want to try to recreate this masterpiece. Now the hard part will be getting the epoxy off. Thanks for sharing your expertise. I love it when someone messes up a little so that I can learn from their mistakes instead of dealing with my own.
Did you have any trouble with the liming wax pulling up when you waxed the top? Thanks!
No, I didn’t.
Your table is awesome. Obviously, tons of people think so. I really need to know how the wax has held up to plates of hot food?? I recently did my dining table in crackle. The top coat is a creamy white. I finished it with Polycrylic. No yellowing. I’ve used it for years, but I’ve never done any liming. I want to lime my 500 sf of pine porch floor — yikes! Nooot using your table’s method!! Please, how did the wax finish hold up to hot plates? Tks soooo much!
It held up okay, but it isn’t as durable as a polyurethaned finish. I’d probably save the cerused/waxed finishes for side pieces and stick with polyurethane coatings (my new favorite is General Finishes topcoat in a matte finish) for dining tables and surfaces that get a lot of use.
I have one such table and was just going to paint it and dry brush, I love this technique and am thankful Pinterest sent this my way. Brava!
This looks fantastic. My grandparents had a similar table as their first dining room table. Later on, they made it into a coffee table. My issue is that now I’d like to change it back into a dining room table. Even if I only used the top, I’m unsure what type of legs to use.
This is amazing! I just found a cheap used oak table and I was looking to see if I could get a look I like by refinishing it and stumbled on this. I am going to give this a try!
Hi Kristi! I just came across this post as I was searching cerused wood makeovers. I’ve a 30 year old dining table and corner hutch, “oranged” oak now, that I would love to ceruse and brighten up. Can you tell me how your table held up over the years, are you still happy with it, and would you have any additional advice on the process after all this time? Many thanks x
I don’t have the table anymore, but it held up fairly well, and we used it regularly. What I didn’t love is the wax finish that I used on it. Wax finishes just don’t hold up well on dining tables that get regular daily use. I wish I had done a bit more research and found a more durable clear finish to use over the top of the cerused finish.
I really appreciate the advice Kristi! Love love your blog and all your work, been following you for years, but hadn’t seen your cerused oak dining table until I came across it while googling cerused wood furniture projects!