Condo Bedroom Built-In Closet Progress
I’m making steady progress at the condo, and by the end of this week, I should have this built-in closet project wrapped up.
If you missed the beginning of this project, you can click here to see Part 1 of this cabinet-style bedside closet project…

I finished building the second closet yesterday, and then got the baseboards installed and added the top trim on one of the closets. I still have a bit more trim to add today, and then I can start wood filling, caulking, priming, and painting. But here’s how the second closet turned out…
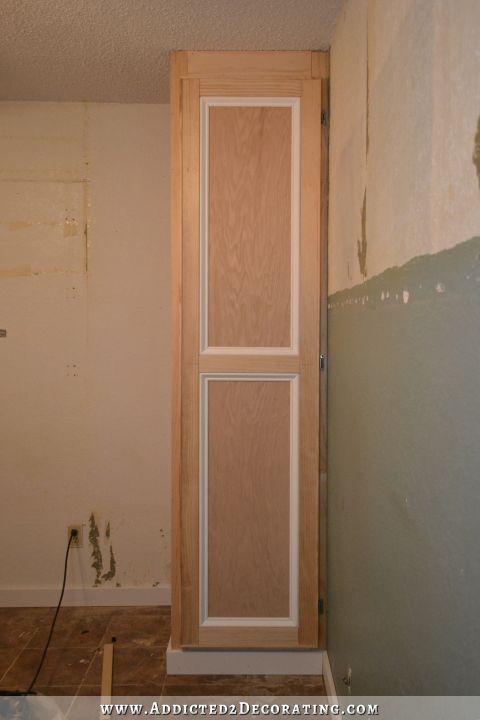
It looks so narrow, doesn’t it?! 🙂
It is narrow, but there really is a good deal of storage space inside. Each closet has about 23 inches of interior width for storage, and they’re 24 inches deep and 7.5 feet tall. I’ll be adding a shelf and a hanging bar for long clothing items in one of the closets, and in the other I’ll add two hanging bars for shorter clothing items. That’s a total of 69 inches of hanging storage, which is actually 13 inches more than the original closet (the one that is now shelf and drawer storage) offered.
These closets are very strong and sturdy. I feel much better about the construction of these closets than I did the previous ones. On the previous ones, the bottom “floor” of the closets wouldn’t hold very much weight at all. But I got inside these closets yesterday to mark the placement for the magnetic cabinet door catches (I used these), and they were incredibly sturdy.
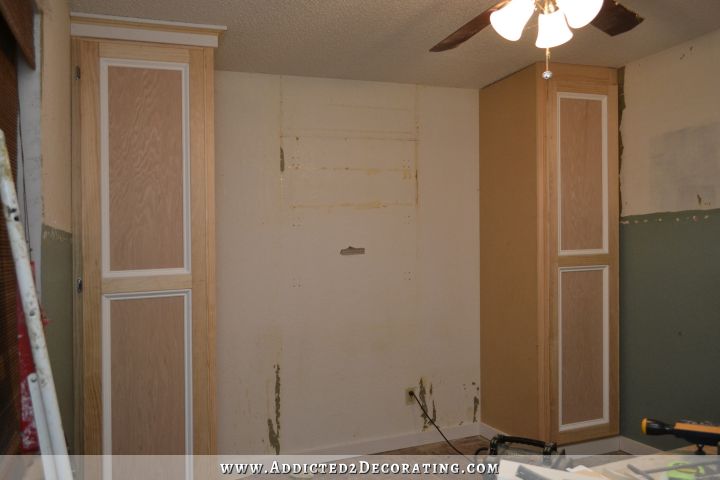
Anyway, I tried to get a picture of the entire wall showing both of the closets, but this was as close as I could get…
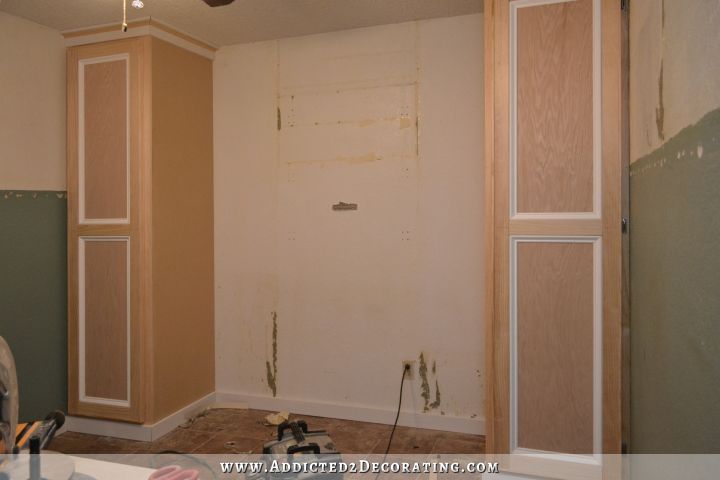
These rooms are so small that there just isn’t room to get a full view of the whole wall, but you get the idea.
Someone the other day asked me if there was room enough between the closets for a king size bed if someone opted for that rather than having shelves or small bedside tables. I mistakenly said that there was room for a king size bed, but there’s not. The space between the closets is 73 inches wide, and a king size bed is 76 inches wide. Oh well. A queen size will fit very comfortably.
You may also notice that the grasscloth is gone. After I got the second closet built yesterday, I was just about ready to start wood filling and caulking, but realized that I really needed to add the quarter round at the corners where the cabinets meet the walls first since that trim would also need wood filling and caulking. But in order to install quarter round, I needed to re-install the chair rail moulding first. Well, it turns out that with the big, thick, chunky chair rail moulding in place, the closet doors wouldn’t open all the way.
So rather than wasting time and money going to Home Depot and buying new, thinner moulding, I just decided to take it all down and paint. It seemed like a much easier option rather than repairing the pieces of grasscloth that had been torn off, and installing new grasscloth where the narrower closets left exposed wall, and purchasing, cutting, and installing new chair rail moulding.
As much as I loved that grasscloth, right now I love the idea of whatever is quickest, easiest, and cheapest even more. I do still have some clean up to do on the walls before I can paint them. You can see that remnants of grasscloth were left behind here and there, and I have some nail holes to fill, but for the most part the grasscloth came off pretty easily in whole sheets.
Doing it this way also meant that I didn’t have to add any type of crown moulding along the ceiling, so this saves me more time and money. With the grasscloth in place, crown moulding was a necessity to hide the roughly cut ends of the grasscloth at the ceiling. Now that it’s gone, the crown moulding isn’t needed. That also meant that rather than spending more money on trim for the top of the closets and around the whole room, I had plenty of scrap lumber left over to finish off just the tops of the closets. And instead of crown moulding (and the frustration that always results when I try to figure out how to cut crown moulding), I used some leftover 1″ x 3″ MDF boards, 1″ x 2″ MDF boards, and pine cove moulding to do a cheater’s version of crown moulding.
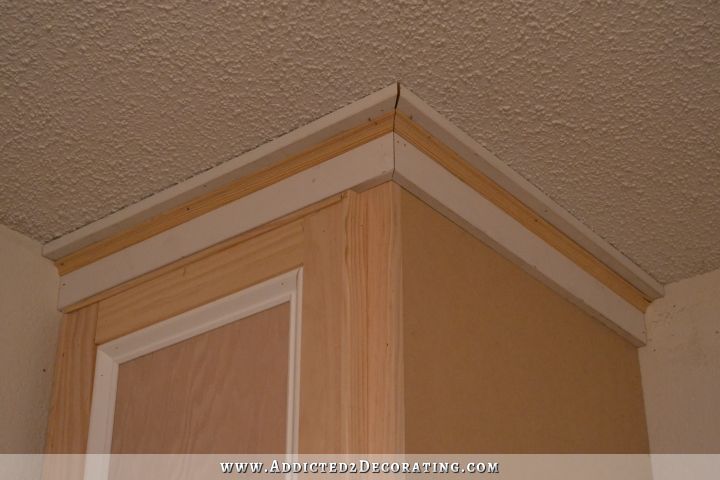
I attached the 1″ x 3″ MDF board first, right at the top of the closet. Then I attached the 1″ x 2″ MDF board to the ceiling. And finally, I cut cove moulding to go right in the corner.
And for those of you who have told me in the past how perfect my mitered corners are…well, you can see the truth here. My mitered corners aren’t always perfect. Let’s just say that wood filler and caulk go a long way to helping the finished mitered corners look really good and pretty close to perfect even when my cuts are far from perfect. 🙂
Y’all, I feel so good about this project, and I’ll feel so relieved when it’s finished. It’ll feel like a huge weight has been lifted off of my shoulders. I’ve had this closet project hanging over my head for years now, not feeling confident at all about how I built the original closets (I’ve learned so much about building since then), and not wanting to finish them because I just didn’t like how I had constructed them. I didn’t know how to proceed, so I didn’t proceed at all. I hate that feeling of an incomplete project hanging over my head, especially when the quality of the construction is in question. So to finally have the closets almost finished, and have an end product that I really do feel very good about, is so satisfying. It’s such a huge relief to me. I feel like after this, all of the other projects in the condo will go fairly quickly.
And one final note…
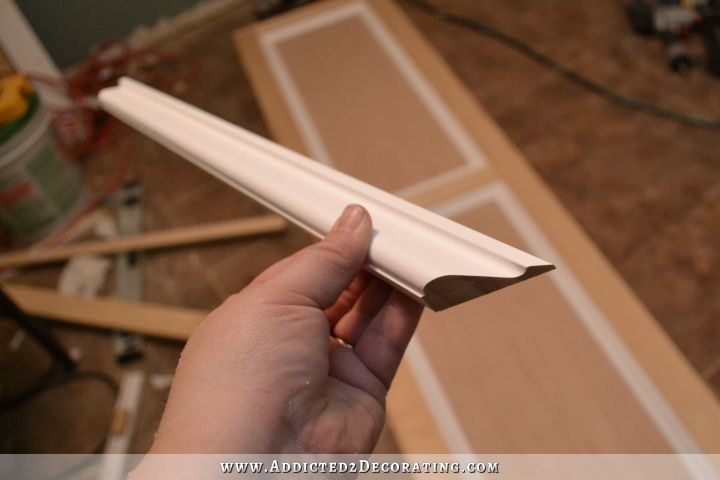
I had someone ask me about using a framing square to make sure things are square. Framing squares are shaped like a big “L” and look like this…
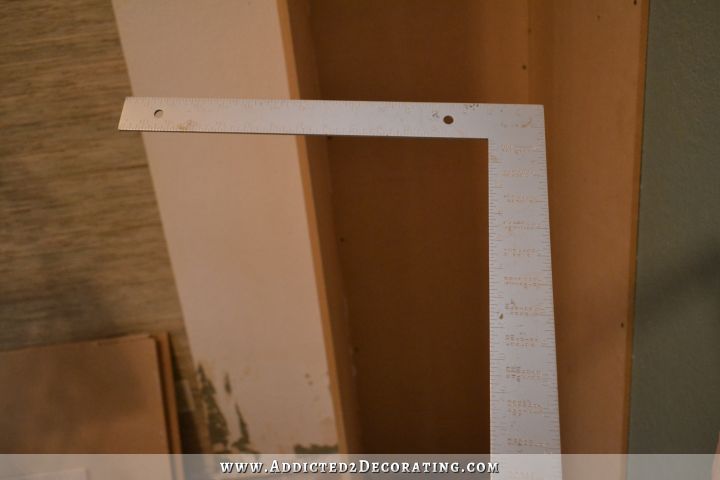
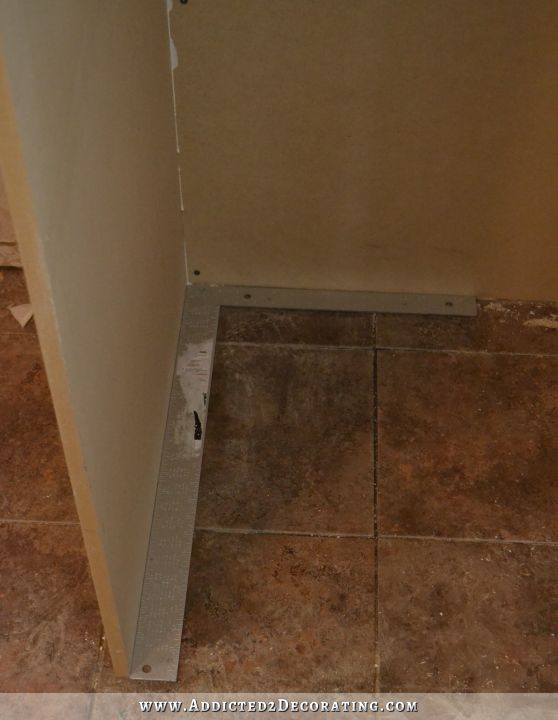
Mine has a short side that is 16 inches, and a long side that is 24 inches, and it’s perfectly square. So depending on what you’re building, you can use either the inside or the outside of the squared corner to be sure that your project has perfect 90-degree angles. In order to check the free-standing sides of the closets for square, I simply placed the framing square on the floor flush with the back side of the closet, and then moved the free standing side of the closet into place until it was perfectly square and flush with the framing square.
I also used the framing square when I added the rails on the closets.
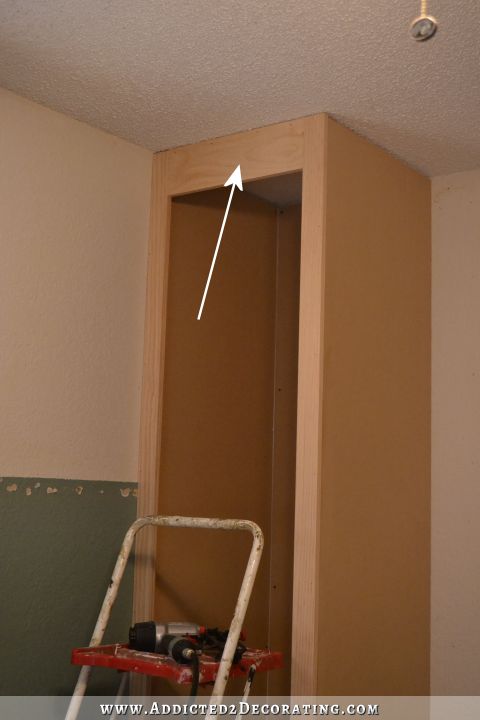
Before nailing those into place, I held the framing square up to the corners where the rails met the stiles to be sure they were perfect 90-degree angles.
If you’re going to be doing quite a bit of building projects, whether it’s furniture or actual home improvement projects like adding doors and such, a framing square is a necessity. And they’re pretty inexpensive. I think mine cost somewhere around $8.
I’m heading back over to the condo today, and I’m really hoping I can get everything wood filled, sanded, caulked, and painted. I love the feeling of progress.
UPDATE: Click here to read the final post on this cabinet-style bedside closet project…
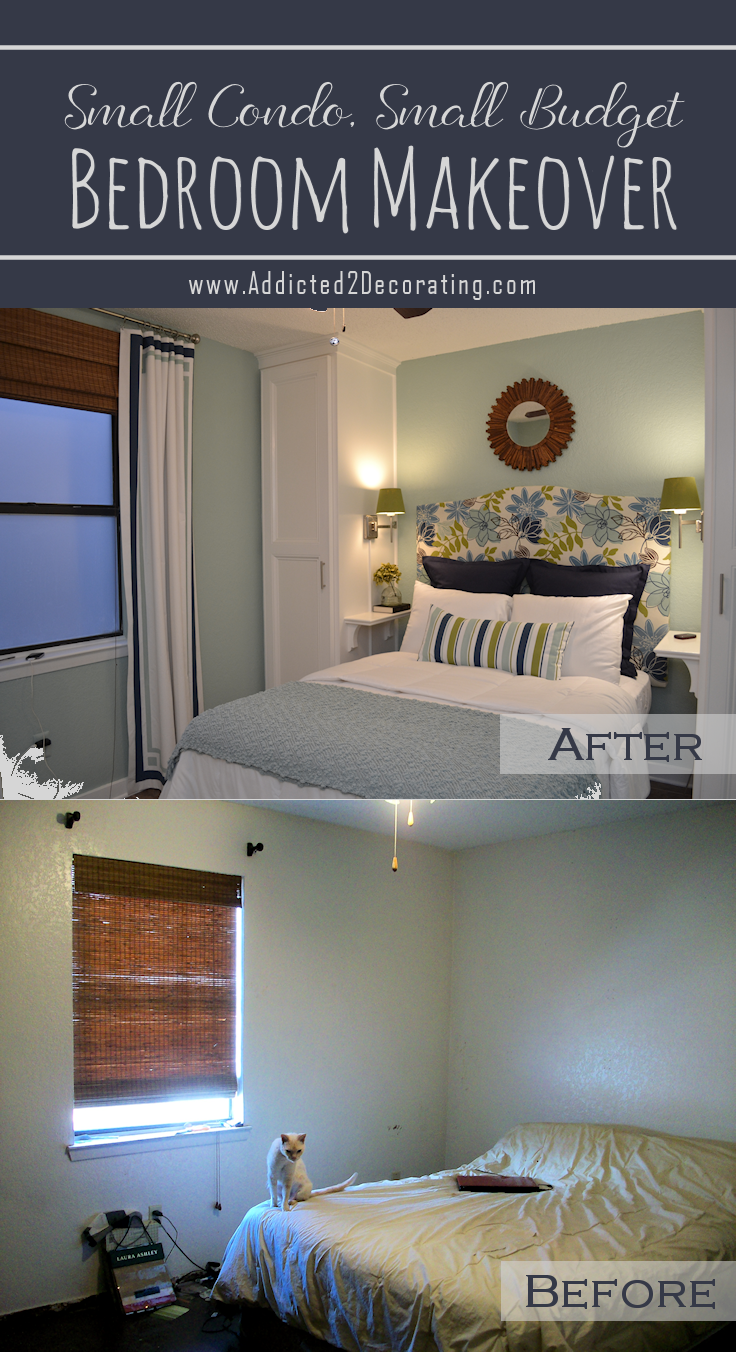
And don’t miss this finished bedroom makeover! You can click here to see the whole before and after of this small condo, small budget bedroom makeover.

Addicted 2 Decorating is where I share my DIY and decorating journey as I remodel and decorate the 1948 fixer upper that my husband, Matt, and I bought in 2013. Matt has M.S. and is unable to do physical work, so I do the majority of the work on the house by myself. You can learn more about me here.


It is looking great and I don’t blame you one bit for removing the grasscloth and chair rail! You are right…whatever is fastest, easiest, and cheapest is the way to go.
You are fantastic! It’s looking great! 🙂 I keep checking for another update on your diet section-really interested to hear how it’s going!
I posted an update on Monday. Not sure if you saw that or not since I forgot to add it to my sidebar section.
http://addicted2decorating.com/personal/2014/11/10/hcg-round-1-finished-the-results-the-lessons
A California King bed would fit because it is 72″ wide x 84″ long.
Oh, that’s good to know! I always forget about California king size beds. I don’t see those very often.
It looks great! Thank you for the closet tutorial. I appreciate specifics like that 😉
The closets look really good, Kristi! And a queen size bed is what most people have anyway. Will you be staging the condo when you put it on the market? That would make a great blog!
I do plan on doing some staging, as long as it doesn’t cost a lot of money. I have plenty of stuff in storage in my garage, as well as two mattress sets, that I can use.
You go, Girl! You have to really be feeling wonderful about all your progress. You are a treat to read, and root for!!!
It’s looking good. I would have been thrilled if my old condo had that much storage space. I’m sure the new owners will appreciate it.
And on another note, you look fantastic. What a difference from the “before” photos. I can see the weight loss everywhere on your body. Hope you are feeling as good as you look.
Well, for me a queen size bed very well makes up for the built-in closet, LOL. Who needs a king size bed, less distance is better on bed. I love the idea of a built-in closet, especially how simple they look and yet how space they offer without people realizing it. Wish to build my dream home one day later. It will involve a super big bedroom with big closet space and great view 😉
Good idea using what you’ve got for the trim at the top of the closets! Btw, This Old House has the best step-by-step on how to install crown moulding that I’ve ever seen. Here’s the link: http://www.thisoldhouse.com/toh/how-to/intro/0,,1016651,00.html
Hopefully that works for you.
This is great! I really appreciate the visuals. You said you have learned how to build better and my question is, how? I mean did you buy a book, watch videos or exactly how did you learn to build better? I wasn’t born with many of the skills I now have and reading is how I gain most of them. I’m just curious about your method of learning skills and wonder if you have any recommendations for reading/viewing materials? Or is it just trial and error? That seems an expensive option, to me anyway. Love seeing the progress!
It is definitely looking great. Glad you don’t have to deal with the unnecessary grasscloth. Your condo already has so much more appeal than normal that it wouldn’t make much sense to keep embellishing. Just finish the necessities and move on.
You really are the queen of trim! Since you are taking tutorial requests (haha)… I would love more details on your wood filling/ caulking/ sanding/ painting process. I can never quite get a final product as great as yours, so I would love some tips! Maybe this already exists in your archives. Sorry if this is redundant!
ALSO, I agree that it sounds like a standard king would be too big for the room even without the closets. However, a California King might juuuuust fit, and you could state that in your marketing materials.
Nevermind, I just found it all under “DIY Basics”
Wow, love the way you did the crown on those closets, it’s brilliant! Looking fab!!
Kristi, the closets look great! Okay, now for a really hard question……what color are you painting the room?!!! Whatever the color, I know it will look lovely! Girl, you do wear me out!
Can’t wait to see the finished project.
Your blog has been my favorite blog since I found you about 6 months ago.
I love that you made a long hanging closet and a two short hanging bar closet. Perfect and with the shelves and drawers in the other closet there is plenty of space for the next owner. Great job!