Painted Bathroom Faucets & Shower Enclosure
Please note: This project is something that I did in someone else’s house. This is not my house. I get comments and e-mails all the time from people wondering how it’s holding up after a year. The truth is I don’t know. I haven’t seen this bathroom since June 2011, which was six months after I painted them, and everything still looked great at that time. I have not seen them since then, and have no idea how well they’ve held up since then.
Well, I lived through the experience and I’m here to tell the tale. Painting outdated bathroom faucets and shower frames is certainly possible, but it’s definitely more involved than I had ever imagined. The painting wasn’t the problem. The prep, the taping, the papering, the covering everything in sight…that took forever!!
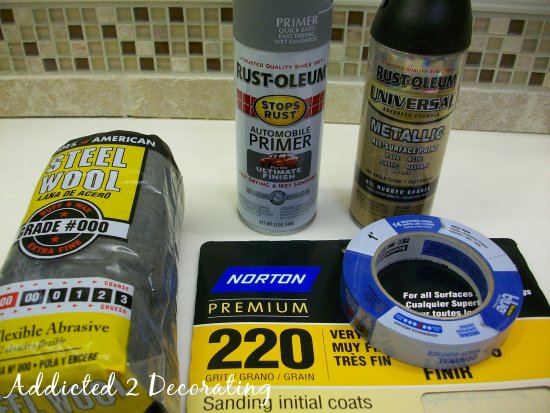
Here are the products I used: 220 grit sandpaper, #000 steel wool, painters tape, Rust-Oleum automobile primer, and Rust-Oleum Universal spray paint in oil-rubbed bronze. I also used a roll of the brown paper that you can find in the paint department of Home Depot or Lowe’s, as well as several plastic drop cloths.
First, I removed the faucet handles.

Then, using the 220-grit sandpaper, I started sanding the surfaces. This really is the most important step. I mean, I sanded the heck out of these things!! And when I thought I had sanded enough, I sanded some more.

After all of the surfaces were sanded, I went back over it with #000 steel wool. Then I used a damp cloth and removed all of the dust from the surfaces.

The next step was to do all of the detail taping with painters tape. Click here for my tip on taping around curves.

Next, I covered all of the surrounding areas with brown paper. If you’re just painting a faucet, there’s no need to cover the entire room. Because spray paint is such a fine mist, it dries quickly in the air. Once it floats a few feet away, it just falls as a dust that can be wiped up.

After everything was taped off, I used the Rust-Oleum automobile primer. I used it according to the directions, and only used one coat. When using spray paint, it’s imperative to use it according to the directions!! Each brand may be a bit different. If it says to apply a second coat within one hour or after 48 hours, it means apply a second coat within one hour or after 48 hours.

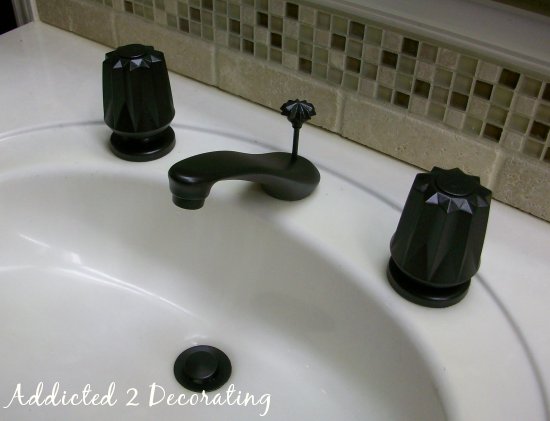
When the primer was dry, I applied the first coat of Rust-Oleum Universal in oil-rubbed bronze. Then I waited 48 hours, and applied a second coat. At the same time I sprayed the faucet inside, I also sprayed the handles and the drain plug outside, using the same method.

After the second and final coat, I gave everything a couple of hours to dry, and then reassembled the handles and drain plug.

I then used a brand new razor blade and scored around the base of the handles, the faucet, and the drain. I didn’t use much pressure, as I wasn’t trying to cut through the tape, but only score the layer of paint.

Then I carefully removed the paper and all of the painters tape. In a few places, I did have some “feathering” of the paint onto the white countertop/sink. I simply used the razor blade and carefully and gently scraped the paint away.
If you decide to try this, I would highly suggest waiting a few days before regular use just to allow the paint to fully cure.
I’m actually still debating whether or not to use a clear topcoat. If I do, I think the only type I would really trust is the clearcoat made for cars. You can purchase it at most auto parts stores, and a quart costs somewhere around $25. The only thing that’s holding me back is that the only sheen it comes in is glossy. I’ll let you know what I decide.
Now with the shower enclosure, I used the exact same process…sanding, sanding, sanding, detail taping, then the big taping and papering.

The only additional step for the shower was the removal of the caulk where the shower enclosure met the wall.
It was certainly a process. I used a very sharp knife to cut it away, and it took about two hours to do the whole thing. But if you try this, I would highly suggest that you DO NOT skip this step. If you try to paint right over the caulk, you won’t get a nice sharp line against the wall/floor, and it could look really sloppy. And let’s face it, if you’re going to go to this much trouble to paint your shower enclosure, you may as well do it right.
Of course, that means that once the paint is completely dry, you’ll need to re-caulk, but I think it’ll be well worth the added effort, the extra time, and the additional few dollars you’ll spend on a tube of caulk.
Okay, so there was actually one more additional step I took for the shower enclosure, and that was to tape off the magnetic strips. These didn’t seem that strong, and I didn’t want to take the chance of the paint making the magnetic strength even weaker.
I simply used painters tape and lined it up on one side of the magnetic strip…

…and then I used a new, sharp razor blade and slid it down the groove on the other side of the magnet.

I taped off the magnet strip on the door in the same way.
Okay…just one more thing…I promise.
To tape off the plastic part of the shower head, I started by placing tape over the whole thing, and using my fingernail to press the tape into the crevace where the plastic and metal meet.

Then I used my razor blade and cut away the excess tape.

And voila! A perfectly taped shower head.

Okay, I think those are all of my little tips. If I’ve left anything out, feel free to ask!
Psstt…This bathroom is finished now! Want to see the completed bathroom makeover? Click here to see the whole before and after.

Addicted 2 Decorating is where I share my DIY and decorating journey as I remodel and decorate the 1948 fixer upper that my husband, Matt, and I bought in 2013. Matt has M.S. and is unable to do physical work, so I do the majority of the work on the house by myself. You can learn more about me here.

Thanks for sharing this- I am so going to try this myself- when I have time:)
I did this on my to towell bars, spa tub jets and faucets. I also did my shower head and valve. Turned out great. I used the same paint. Rustoleum Oil Rubbed Bronze. I got the idea from a salesman at a lighting store.
Do you suggest using the same paints and techniques for kitchen cabinet door handles and hinges?
Thanks for the advice on the shower fixtures. I am looking forward to doing this, maybe in the spring? Who knows…
You are the best–thanks! I can't wait to attack my master bath, our powder room, the…
I love this! I've painted brass doorhandles before, and it works great. I think the prepwork is so important, and a step that should not be left out. Keep us posted on how it holds up.
Looks amazing!!
These are such wonderful tips and guide! Looking forward this weekend and have some stuffs painted!
HI Kristi-
I want to do this on two faucets in my house, but have hesitated as I was afraid the condensation on the faucet would make the paint come off eventually. Yours looks great and has given me the inspiration to go for it. I already have the oil rubbed bronze paint from another project on hand. I will just have to get the auto primer. Thanks for the great tutorial.
My best – Diane
This looks fabulous! What a transformation.
Hugs,
Sherry
I just did my master bedroom door knobs, was wondering how it would hold up over the plastic on my faucets as well. Hmmmm….
Wow. amazing. Thanks very much for the tips and the specific product list.
I am worried about it holding up. Especially with all the movement and touching these items receive. Is there a way to safe guard against that?
You are a painting fool! Way to go, love this. Thanks for sharing. I'm stumblin' you.
Brittany
http://www.prettyhandygirl.com
i can't wait to try this i think im going to take the shower doors down…thanks
Obviously the shower might have been a little tricky, but is there a reason why didn't you just disassemble everything and spray it somewhere else? You probably could have saved a lot of time prepping, you would have had much better ventilation and you wouldn't have to worry about over spray ruining un-protected surfaces.
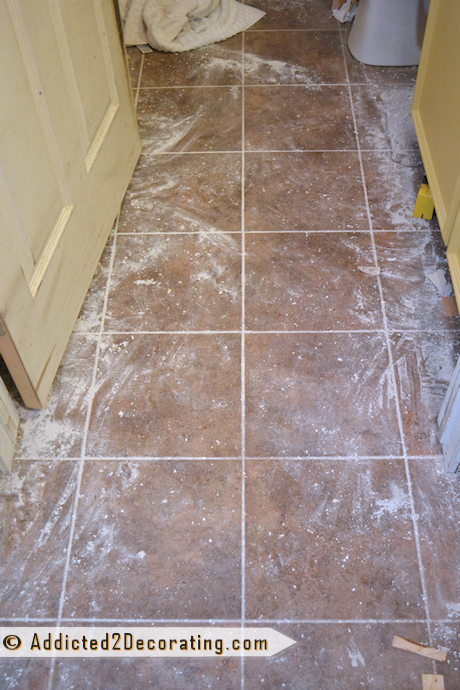
quick question, everything looks great by the way. On your tile above your sink, did you simply tile over the existing white marble, or did you break out the existing white marble backsplash? I have the same thing on my sinks, the white backsplash is attached to the premade white counters, but that simple tile you put on looks great, can you share your ideas and maybe detail pictures? thx Nick, TX
Hi Nick~
I actually removed the existing 4" cultured marble backsplash before I installed the tile. It took some work, but I was finally able to pry the backsplash off of the wall.
There should be a couple of close up pics on this post where you can see the detail.
I just did my master bedroom door knobs, was wondering how it would hold up over the plastic on my faucets as well. Hmmmm….
Love what you did.
Were the handles acrylic or metal? I couldn't tell.
If a acrylic, how are they holding up? Were they sanded and primed/painted with the same paint as the rest of the faucet?
Frameless Shower door enclosures are the latest bathroom remodeling trend. check it out!
Frameless Shower Door
The handles were acrylic, and I primed and painted them the same way as the rest. So far, they're holding up well!
thanks for sharing these tips on cleaning them.. Now i dnt have to pay someone to do it haha.
Other sites suggest that the paint will come off over time. So, how is it holding up after 4-5 months? Joe
So far, so good!
Did you sand after you sprayed on the auto primer before you sprayed the oil rubbed bronze paint
I may have done some spot sanding in places where the primer didn't go on perfectly smooth, but other than that, I didn't sand between the primer and the paint.
wow am i impressed with your tenacity on doing this project. it is absolutely great!
Using this kind of faucet only requires small amount of energy. We've tried using this one and it worked out well.
Impressive! There are countless magazines and web pages devoted to bath and kitchen remodel design ideas. Even powder rooms can benefit from new bathroom faucets and fixtures.
I am planning to paint our new renovated bathroom but I am searching for great colors that will make it big and pleasing.
The handle be acrylic, and I ready and tinted them the similar
method as the relax. So far, they're investment up fine!
Wow…just wow! It looks amazing and you did it so inexpensively! Your tips and instructions are exhaustive…in a good way! I think I might try this on my rental home in GA.
What a difference!! I love the color of the faucets now! I linked this up on my blog today! http://vixenmade.blogspot.com/2011/08/amazing-spray-paint.html
Wow!!! Amazing!!!
I realize that several months have passed since you completed this project, and you've indicated that it is still holding up well. I was just wondering, have you decided to topcoat it with the clear topcoat made for cars? And, if so, how did that go? I'm in the midst of this same project myself now, and am wondering just how many more steps I should be taking. Thanks soooo much for all of your help and guidance. I think I've found a true "kindred spirit".
Kelly, I would still not recommend a clear coat, simply because without the clear coat, touch ups are very simple. With a clear coat, it would be just one more step when something needs a touch up.
Kristi,
You are very brave. I may just take a chance and see what happens!
Thanks!! glass
cleaner
How do I make old discolored bathroom tiles look new again or even give it a different color without retailing?
I was googling that and saw recommendations to use spray epoxy like appliance paint. I just used this white appliance paint today to refinish my old white tub and it looks great! I didn’t do the tiles around the tub because they’re in good condition.
WOWZERS – that is awesome! It looks so much better. I wonder if in my new house after 10 years go by I'll be doing that to all my Oil Rubbed Bronze finishes….probably bright gold will be back in *Sigh*
If anyone does go the clear coat route, I would suggest making sure you choose compatible paint types. In other words, don't put an acrylic clear coat over enamel paint or vice versa, as the two layers may react in bad ways and compromise your hard work. Otherwise, a good, correctly-applied, multi-layer clear coat can go a long way towards alleviating the need for "touch ups" altogether.
I am so glad I found this site! I am going to try this this weekend on my shower. We have the same situation with the outdated brass. Quick question,. why did you use the auto primer versus the self etching primer? I am wondering how that would work??? Any advice would be appreciated! I am off to go get all of my supplies….and start sanding and taping and covering!
Kristen, it came down to a decision between those two–self etching and auto primer. I honestly can't remember why I settled on the auto primer, but I remember reading all of the info on both cans thoroughly before making my decision. Darn, I wish I could remember why I went with auto primer, but I just can't. Just be sure to read the cans and make a comparison before selecting which one you'll use.
That's a stunning transformation Kristi. How often do you kick a project like that off? I was pretty impressed by the thoroughness of your masking. Pop across and see us some time if you are looking for some door handle ideas for yourself or your readers.
Okay, I have looked over several pages now of your bloggie. This is amazing… no, rather, YOU are amazing. I have learned a lot. I am pumped.
My house is 10 years old and the fixtures are — yeah, "golden".
I think Fall is the perfect time to do some spray painting.
I am following you with my kitty's blog on Blogger (Pierro's Happy Place) but I will just hop over and friend you on FB right now!
best wishes to you and thank you for being so nifty 😀
Your subtle humor is also a delight
I want soooo bad to do this, my husband thinks I am totally nuts. Does the paint not come off eventually as you use the knobs? The idiots who built my house really scrimped on hinges and door knobs, we have some silver and some gold! I guess they found a good price for them at a yard sale or something.
debbie H.
I just bought a metal day bed, white w/ the gold balls on top. I'm going to be painting the whole thing like this. Thanks so much for the info!!
I just finished spray painting my old gold towel holders, & toilet paper holder and JUST when I thought we'd be stuck w gold faucets & shower frames for a while, I found this! YAY! The problem I am having is the paint "running" when I miss a spot & have to go over it…. I get too much in 1 spot I guess…. How do I prevent this?
Actually, yes, there was a reason I painted everything in place.
The whole reason I went the route of painting these fixtures was because we couldn't find a plumber who was willing to change the faucet on the cultured marble tub (which would involve removing the entire side panel of cultured marble). If someone had been willing to remove it, I would have simply purchased new faucets and had all of them replaced.
With no one willing to remove the existing faucet, I was stuck with the faucet, and had to figure out how to update it in place.
The shower enclosure would have been way too complicated to remove and then re-install, so it had to be painted in place as well.
With the entire bathroom having to be draped in plastic to paint those two items, it would have been ridiculous to then disassemble the two sink faucets and take them outside to paint. Much easier to just tape those off and paint them in place as well.
Hello all, I am a plumber by trade and am troubled that you had to do all that taping and papering. The escutcheons and fill spout are easily removed. The two escutcheons are simply threaded on the valve body. The fill spout should have a set screw in the back facing the backsplash. This makes me very upset at my fellow plumbers. Most are underqualified and undetermined. With God all things are possible. Ive been wanting to do this for my wife because we cant afford new trim or faucets. She likes the orb finish. Just remember that all the trim on most any faucet can easily be removed and taken elsewhere to paint, saving all the taping. Happy new year and God Bless.
Omg!! What a great idea a million thank you's!!! You just saved me sooooooooooooooo much money!! I htought this was going to have to be a when we "get a chance project"!! But now so excited because we can do in a couple of days!!! Thank you thank you!!!
Wow it's amazing.I can have a new look bathroom with my style.
I simply want to mention I am just new to blogging and site-building and actually liked you’re blog site. Probably I’m going to bookmark your blog post . You actually have fabulous posts. Cheers for sharing with us your web site.
Wow! I stumbled on your site after googling decor ideas for bathrooms with brass fixtures–we just bought a house built in ’84 that has had very little updates. I’m trying to love the brass but I’m just not there. This is a solution that I’d never have dreamed of! Thanks!
We just spent the weekend on this project! the prep for the shower surround and door took forever but if it isn’t prepped correctly, it isn’t going to last. Speaking of…it is now a year later, how has the paint held up, especially on the inside of the shower? Tomorrow the big unveil! Can’t wait!
How has the paint held up after one year?
I actually haven’t been inside this house in about six months, so I’m not sure. I do know that after six months, it still looked great.
Why did you spray the paint instead of brushing it on? When I’ve used this type paint on lawn furniture, I’ve found it to last longer and be stronger if brushed on. Could avoid much of the cover-up too.
Two reasons: (1) I’ve never seen oil-rubbed bronze metallic finish paint that can be brushed on…and I did look, and (2) I think a sprayed finish looks more factory-finished. Brushed on paints, no matter how carefully applied, always leave some sort of brush marks, and I wanted to avoid that.
I’m doing it! I have been researching etching-primer versus auto primer as well. I think either one would do the trick. I called Rustoleum and asked what they recommended. I was looking at American Accents and she steered me towards the Universal. She said it was much stronger paint. She also said I could just sand and primer/sealer wouldn’t be necessary because the paint is THAT strong. I don’t have confidence in brass with clear coat on it, though…even if I DO sand it. So I think I’ll do it the same way you did it. I do think I’m going to do an automotive clear coat, though, so I never have to do tough ups.
Hi Kristi, It’s been more than a year now. I am just wondering how the paints are holding up? I am especially interested with the shower flange and the faucet. Been thinking on doing one myself.
Also do you mind posting a more detailed picture of the faucet? Something high resolutions, so we can all see the details of the result?
Thanks.
Wow! I just posted how I painted my master bathroom roman tub faucet (it was gold) to an oil rubbed bronze, but I did not see your post until after the fact! I too am impressed with your taping skills-great job. I wish I would have seen your post first, that way I would have taken more steps to make sure it stays on. I was wondering about the shower door as well, but now that I see how time consuming it looks, I will probably opt for a new door instead. I am going to suggest your post at the bottom of my post so others can see your instructions. Thank you for sharing! Here is my post if you are interested in taking a looksie! http://www.redheadcandecorate.com/4/post/2012/03/using-what-we-got-master-bathroom-makeover.html
Thanks again!
~Julie
It would much easier to remove the faucets in the sink than to tape off the entire sink. Looks great though can’t argue with the results.
This is seriously such a great idea and a great way to save money! I have some shower doors at my house that are in desperate need of a makeover. How has everything held up?
Thank you so much for posting your project!!! Totally amazed by the transformation! I plan on doing this to our bathroom as well though I have a few questions. Why the sanding? Do I take all the caulking off of the shower frame before I tape it up? What about the temperature gauge that shows you which way to turn the shower handle? Thank you again!!!!!
Thank you so much for posting your project!!! Totally amazed by the transformation! I plan on doing this to our bathroom as well though I have a few questions. Why the sanding? Do I take all the caulking off of the shower frame before I tape it up? What about the temperature gauge that shows you which way to turn the shower handle? I’m new to this so sorry the questions might be silly. Thank you again!!!!!
The sanding helps the paint adhere better. If you apply paint to a really slick surface, it can easily scratch off. By sanding and roughing up the surface with sandpaper, you’re giving the primer and paint something to stick to.
Definitely remove all caulk before first…even before sanding.
I personally painted everything metal, including handles in the shower. If there are parts you don’t want painted, i.e., diagrams on the handle showing hot and cold, just tape off those areas before you paint.
Hello Kristi! So you’ll be happy to know that I have successfully painted all our faucets in our bathroom from silver/brass to oil rubbed bronze. I saved the shower enclosure because that was a piece that would take a lot of prep and time. So now the shower enclosure and the light fixture are the last two things to do. My question is for the shower enclosure. It has caulking around some of it but then some really thick plastic piping between the frosted glass and brass frame. Did you take that off did you tape around it? Thank you, Amanda
I love the white scalloped mirror. I am going to keep a can of the bronze spray on hand now!
I know this was done a long time ago, but I just did mine as well. The big question I have is how long did you let the paint cure before the shower was usable?
So glad I found this! I have that bathroom sans the carpet and cannot WAIT to paint the brass shower frame! Thanks so much for sharing 🙂
Hi Kristi – thanks for providing great pictures to go with this project post. Taping off the areas is a definite must step in order to get the pro finish you’ve accomplished in this bathroom. The final results are great!
This seems to be the only place online where I see a project like this detailed out. It would be awesome to get an update on the long term durability for those of us considering taking on this project!
Any way to contact the owners you did this for and give honest feedback?
The previous homeowners attempted this, but it is peeling and flaking terribly. How would you recommend removing it so we can do it ourselves?
I’d say you just have to do a lot of sanding. Start with some pretty coarse sandpaper and work your way towards finer sandpaper. I wouldn’t think you’d necessarily need to remove all of it if you’re just going to repaint. Just get all of the paint off that’s peeling and flaking, and make sure that the rest of it is still on securely.
A vibrating hand sander greatly reduces sanding time and effort.
I am attempting to do this now but opted to remove all the facets which was a good thing because there was a lot of corrosion on some of the parts. So replaced what was needed and I am going to sand even the new pieces and use a brushed nickel spray paint by rustoleum in the universal line in flat. All of my fixtures were brass including the lights. Have painted one light and the hand towe bar. They look awesome. Feels like a new room already.
I trial, painted the faucets in my guest bath 3 years ago, to test them before I tried them at an Interior Design customers home. I have not spoken to my customer but it was because she had an old Jacuzzi tub/faucet that is irreplaceable because the company went out of business, so we had to figure out something to make the tub faucets match the other oil rubbed bronze Moen faucets used!
I did the exact same thing as Kristi showed above and they are holding perfectly 3 years later!!!
If you coat the spray painted faucets, door knobs….etc with Plasti Dip clear coat you will NEVER have to do touch ups again! The spray paint does chip and peel even with proper prep work (due to water, wearing down, cleaners, skin oils). The clear coat comes in different finishes for matte or gloss. Rubberized and stands up to water, oils, and cleansers. I’m an avid DIYer and have done projects ranging from painting a vehicle interior, rims, bottom of a pair of high heels, and handles of silverware with plasti dip. I don’t get paid to endorse anything. I don’t even have a blog. Just an every day mom with 5 kids. I won’t post a link for the product but it can be found at auto stores and online at very reasonable prices. Good luck to you all!
I have completed the painting for our guest bedroom and it turned out fabulous. I was also wondering about the wear so I thank Valerie Sims for the top coat suggestion. I didn’t sand before painting honestly because I didn’t think about it. If it wears I’ll sand and repaint thanks for the ideas