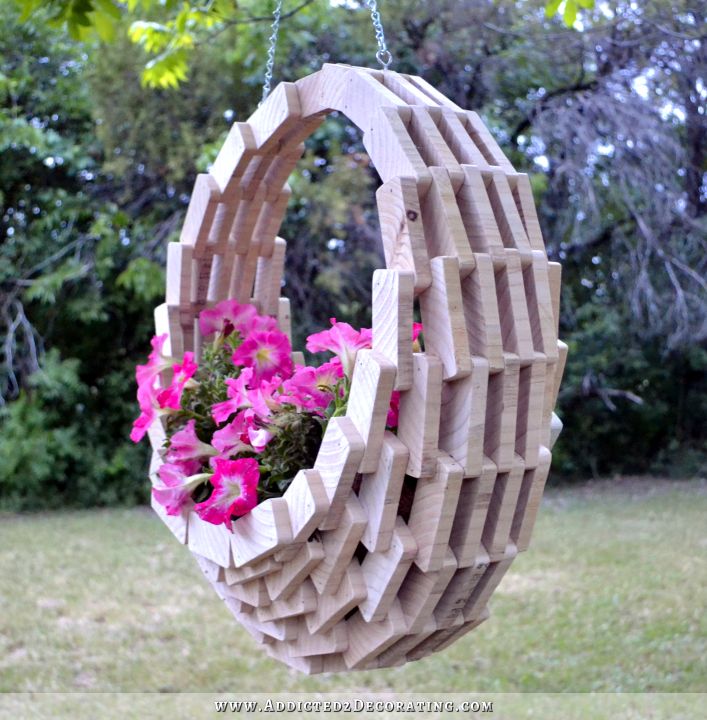
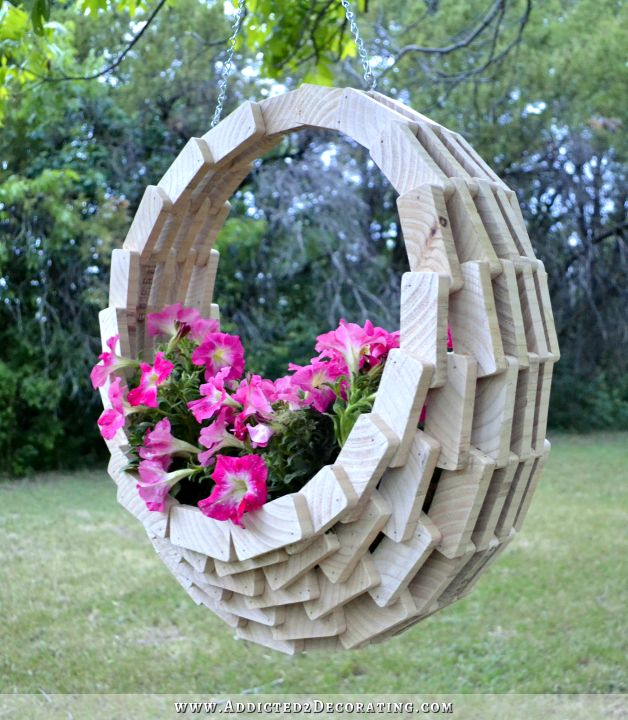
Easy & Inexpensive DIY — Pieced Wood Hanging Flower Basket
After another week of working in a still-very-ugly kitchen and breakfast room, I needed a break from the long-term project stuff, and I needed to work on something fun, quick, and easy that I could start and finish in a day. Plus, I also wanted to spend the day outside yesterday so that I could enjoy the gorgeous weather. So I decided to make a cute little pieced wood hanging flower basket for my back yard. I got this idea from my neighbor, who has a very similar basket hanging on her front porch.
I made it out of scrap lumber, which I almost always have on hand, along with wood glue and brad nails for my nail gun. So the only out-of-pocket cost for this was for the eye screws, S-hooks, chain, coco liner, and flowers. I think in all, I spent about $17 on this basket, including the coco liner and the flowers. If you don’t happen to have scraps of 2 x 4 on hand, you’d also need one 9-foot 2 x 4, which would add about $4 to the total price of this project.
I also decided to leave my wood basket a natural color for now. Once I decide if I want to paint it or not, I’ll need to seal it somehow so that it can last longer being outside in the weather. But as of right now, I still haven’t decided if I just want to leave it natural and seal it with a clear sealer, or if I want to paint it. I did actually buy some white spray paint for it, but then changed my mind at the last minute.
But here’s how I made it:
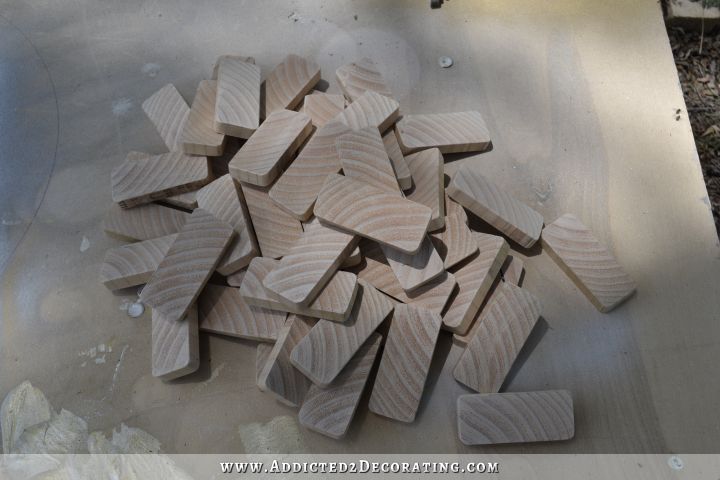
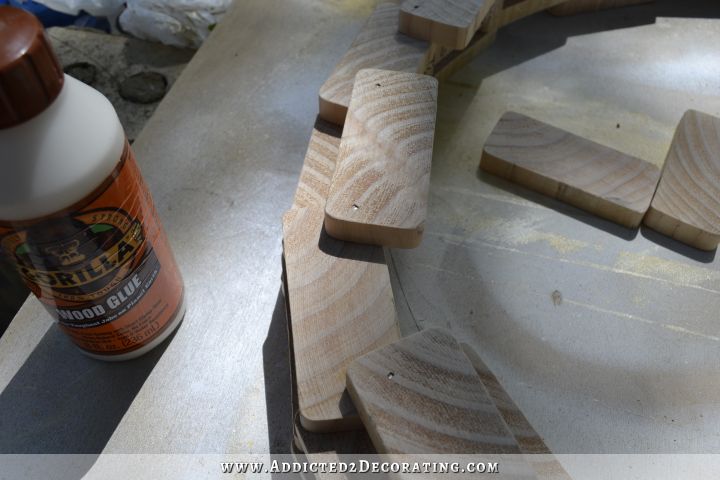
I started by cutting 137 slices of 2 x 4 lumber to about 1/2-inch thick, and sanding them quickly around the edges to remove any splintered wood.
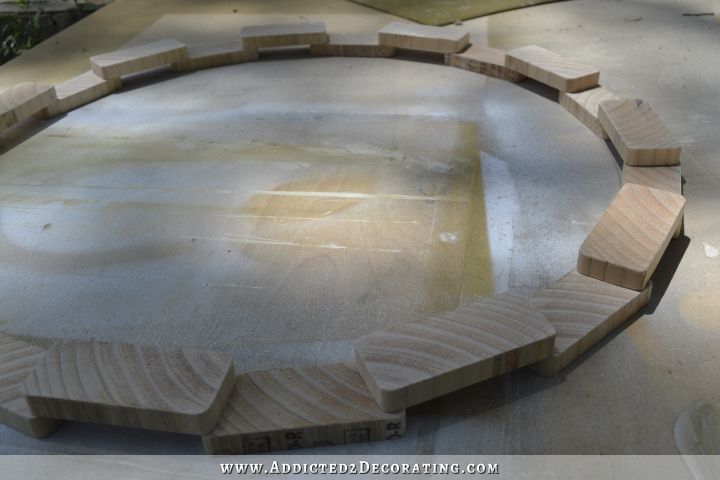
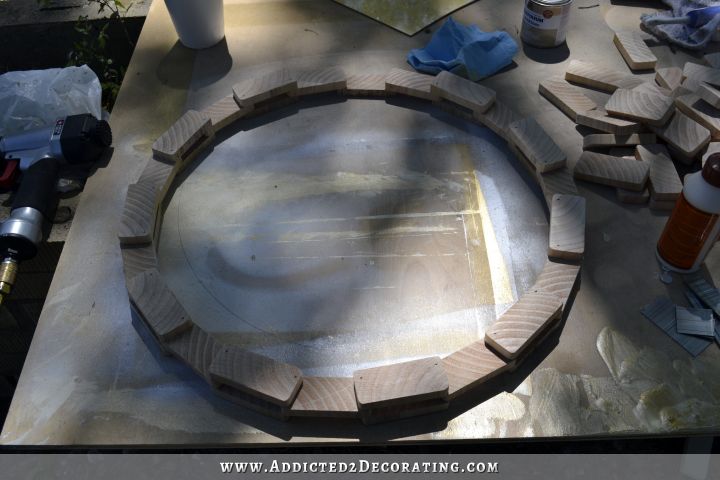
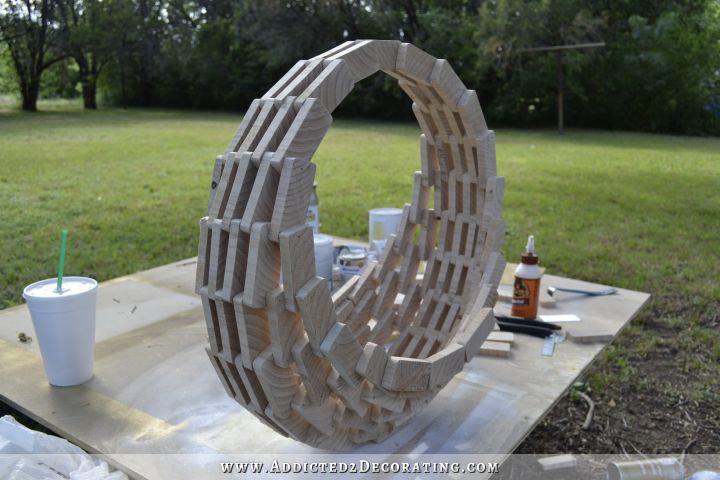
To put the pieces together, I started by drawing a 19-inch-diameter circle on my work surface (i.e., a scrap piece of plywood), and then I spaced 11 pieces of wood evenly around the circle. And then on top of those original 11 pieces of wood, I placed 11 more pieces of wood to fill in the gaps. Once I had everything spaced just right (I just eyeballed everything), I glued and nailed the pieces together using my nail gun and 3/4-inch brad nails.
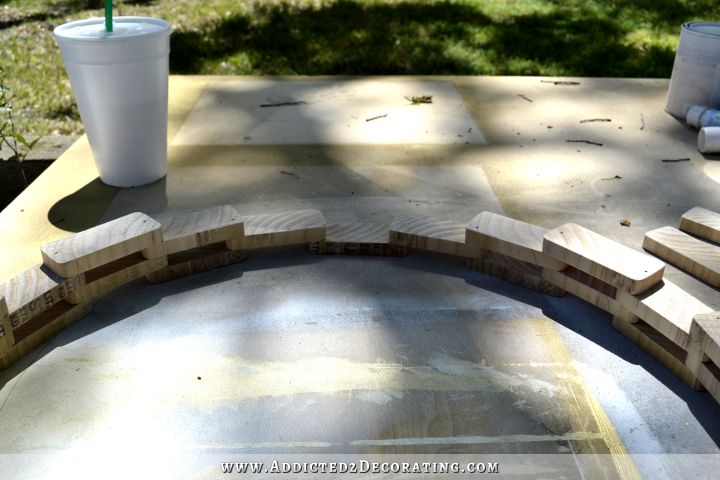
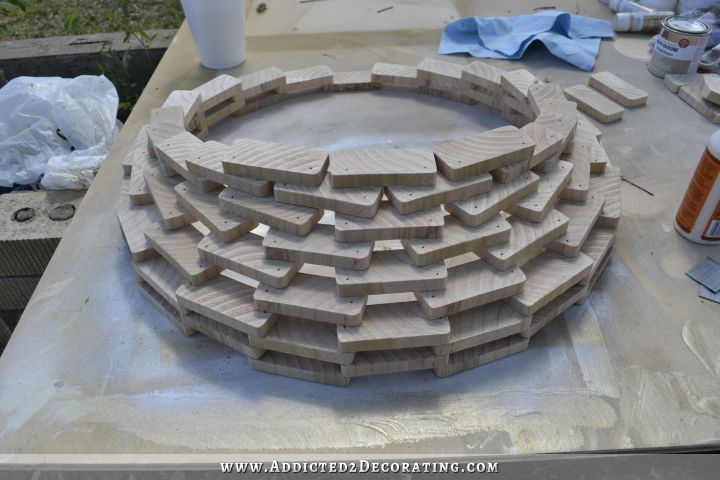
Then I started on the third row, and I skipped one piece, so I only used 10 pieces on the third row. This created a stair step effect on what would eventually be the “handle” of the basket. I glued and nailed those pieces together.
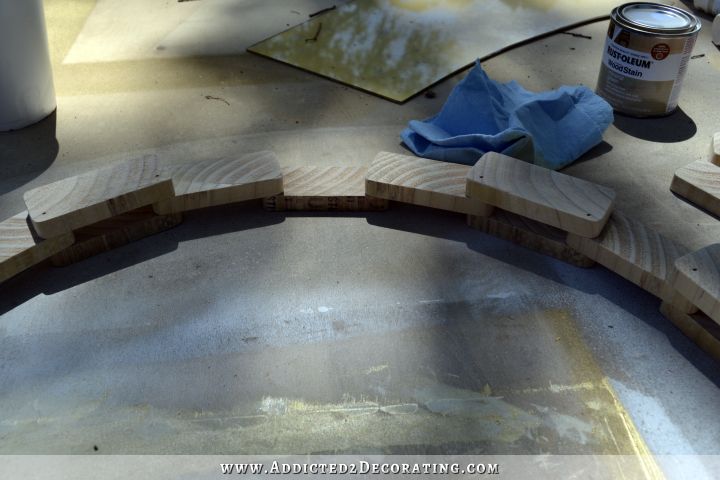
Here’s a full view of the third row in place. You can see the missing piece at the top that creates that stair step effect.
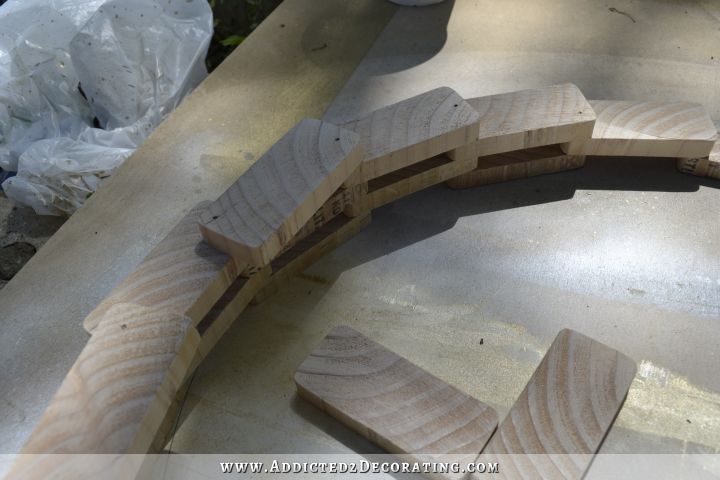
And then on the fourth row, I used only 9 pieces of wood, continuing with the stair step effect on what would be the top of the basket.
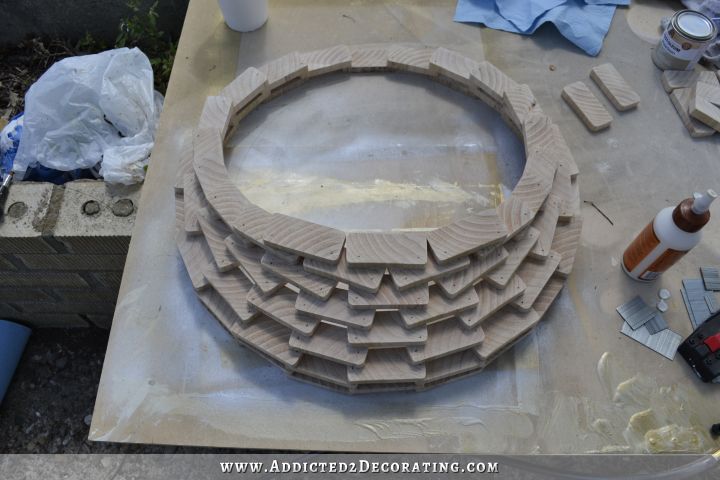
Starting on the fifth row, I changed things up a bit so that the shape would start creating the front side and back side of the basket. The fifth row required eight wood pieces. On the very first and very last piece of the fifth row, the end closest to the top stair step area of the basket is lined up just like all of the other pieces have been, but the end closest to the bottom of the basket is moved over so that half of the bottom width is hanging off of the piece that it’s attached to below.
That’s how I did the first and last pieces of the fifth row, but all of the other pieces in that row are moved over so that only half of the wood piece is resting on the pieces below.
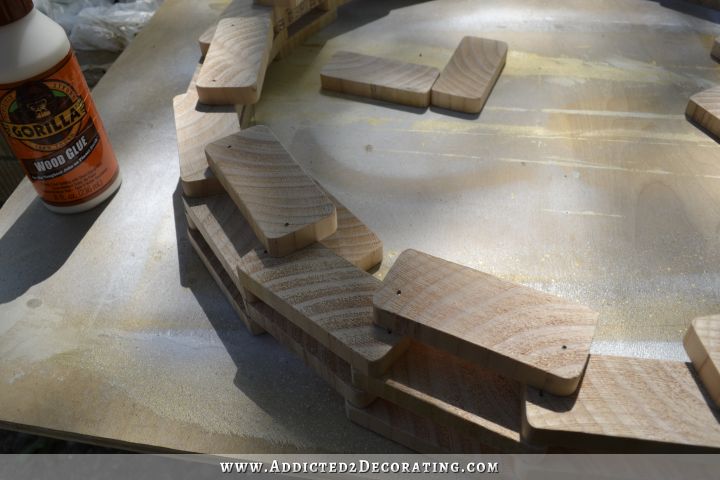
I did a total of 10 rows, with each subsequent row using one less wood piece that the row before it. And rows 5 through 10 were all done in the way described above, where the first and last wood piece were sitting askew, and all of the tiles in between were moved over so that only half was resting on the wood beneath it.
With that side of the basket finished, I flipped it over, and started work on the other side of the basket. I did it in the very same way, and since the first row was already in place (both halves of the basket shared Row 1), that meant that I started with Row 2 and added a total of 9 rows to this side of the basket.
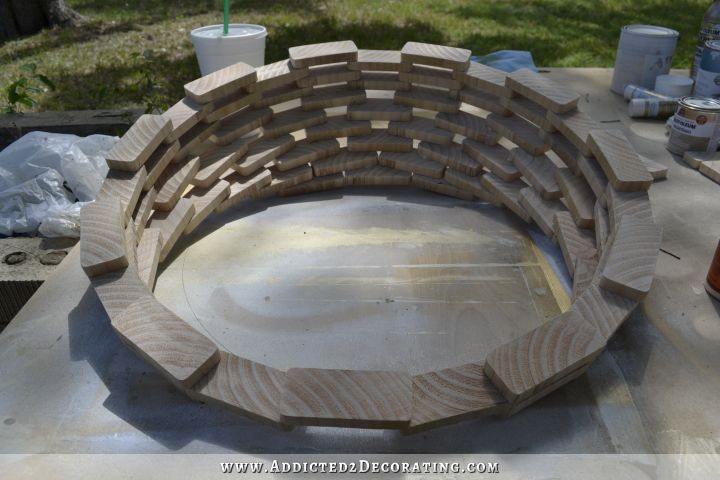
And with all of the pieces attached, and 19 rows in total, the basket looked like this…

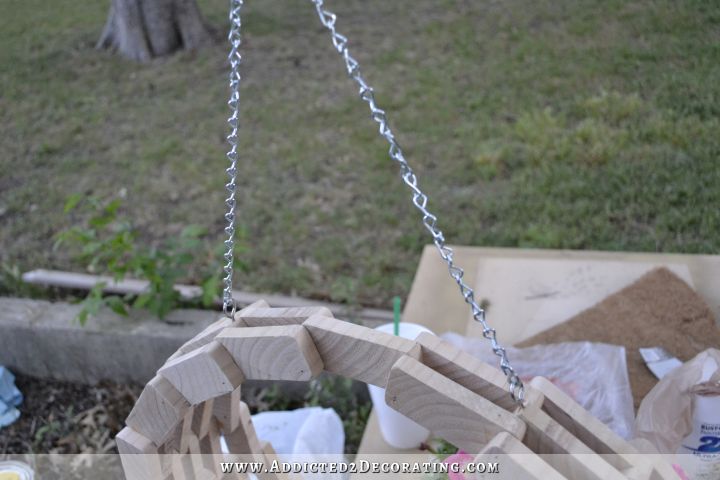
I didn’t want all of the hanging weight to be concentrated on the one single piece at the top, so I used eye screws, S-hooks and chain to distribute the weight to two areas that seemed a bit stronger. (Really, all of it was strong since I used wood glue and brad nails, but I still didn’t want to take the chance.)
And then I was ready to add the coco liner (I bought one called a Replacement Coco Liner from Home Depot, which basically looked like a flat circle, and just cut it down to fit) and flowers, and then hang my basket in the tree.
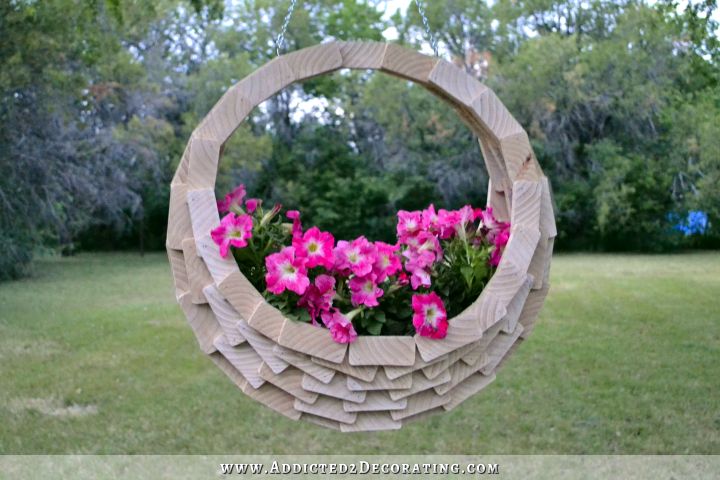
I’ll probably end up just sealing the wood with a clear sealer because I really like the natural color of the wood with the colorful flowers. I think the white paint that I had originally planned might look a bit stark.
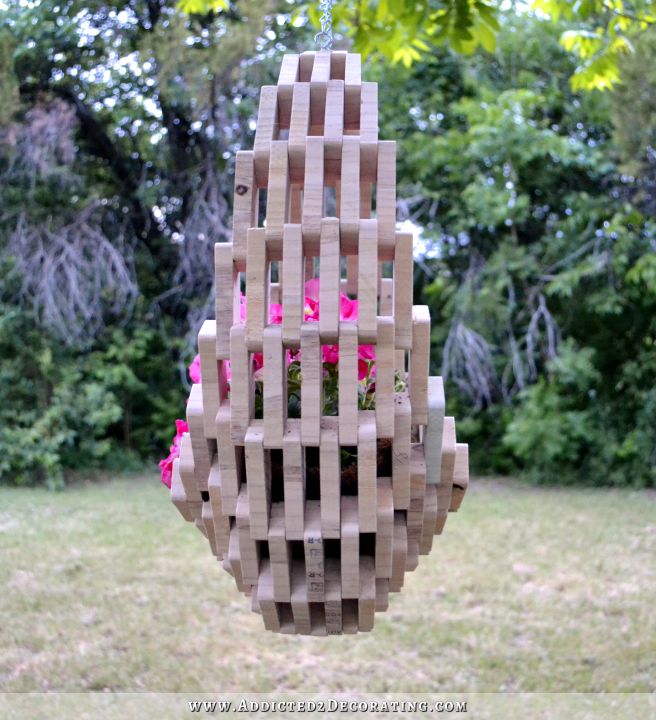
I love the way it looks from the side, with the hint of color from the flowers peeking through.
So easy! And cheap! And pretty darn fun to make. Those are my favorite kinds of projects, especially when you can work on them outside in gorgeous weather.
And now it’s back to the kitchen for me. I got some paint samples to try out some different painted floor ideas, and we’ll be finishing up the rest of the electrical wiring and then drywalling the ceiling tomorrow. Unfortunately, we won’t be able to drywall the walls until the house is leveled, and that doesn’t happen for another week (Friday, May 9th!). But I’m sure I can find other ways to occupy my time until them. 🙂

Addicted 2 Decorating is where I share my DIY and decorating journey as I remodel and decorate the 1948 fixer upper that my husband, Matt, and I bought in 2013. Matt has M.S. and is unable to do physical work, so I do the majority of the work on the house by myself. You can learn more about me here.

Very cute! Just reading the post made me nervous — I wish I could do things like this. Give me a cabinet to make or drywall to hang instead.
I absolutely LOVE this!!! It’s beautiful…I think I’m gonna try this myself. Looks expensive. =)
Won’t this make each piece very weak because it’s cut across the grain ???
It would only be weak if it was laying on its side. As long as it’s hung the way it’s designed you have your wood grain stacked as should be ensuring to structural integrity.
great project!! so cute!
Oh my gosh, all of those pieces, wow. You amaze me. Love it though, and I might try it myself. Great job once again!
Your post is so fortuitous … I’ve just been surfing the web for a DIY idea for a housewarming gift and this is perfect, not to mention gorgeous! Going to give it a go and if mine turns out half as good as yours, I’ll be a happy camper. Thanks ever so much for sharing and good luck this weekend… hope it’s more eventful than uneventful!
Good idea to keep it natural. I think the white would make it look like a cheap plastic hanging basket. Jealous you had nice weather!
I love this. It is so sculptural. How do you find the time? You did this while in the midst of your kitchen project? I wish I were more like you.
That’s EXACTLY what I was thinking Denise! I am in the middle of a DIY kitchen remodel, and I can’t imagine stopping to do something like this, lol. A bit tedious for MY brain, but VERY cute Krisit! I, too, wish I could switch gears like you do!!
That is really nice! And what a fun way to use up the bits of 2×4 from projects!
Oh I just love this basket! Such a great tutorial! You really are the best at tutorials. Well done!
This is very unique and I love it! Am going to go search my scrap wood!
Love it! I think it would be a gorgeous front door wreath, too, if you only built out one side.
Beautiful project and you did a great job! I would need a table or chop saw thought 🙁
I LOVE this! I would definitely keep it in the natural wood. Going to make one or maybe two of these!
Really gorgeous. The design is certainly eye catching and will get lots of “second looks”.
Too darn cute – what a great look !!!!
Love this project I am definitely going to try it out. One question would be what is the size of each piece? 1/2 inch by what?
The pieces are the dimensions of a piece of 2″ x 4″ lumber. You just take a 2″ x 4″ piece of lumber and use your miter saw to slice it into 1/2-inch-thick pieces like you’re slicing a loaf of bread.
Bet this would look really cool made out of white-dot wooden dominoes.
Funny. I was just thinking about all the time you’ve spent on your home in the last couple of months and have missed those creative ideas. (Not that your home remodel isn’t creative. LOL) Today, I open up your blog and ‘ta da’ there is a beautiful basket of flowers! I love it!
absolutely MUST figure out how to do this so it can sit stationary — I adore it! Well done! Well done indeed! 🙂
I made this yesterday and the good news is through its design it has enough of a flat bottom to sit perfectly level. Cutting and sanding the 137 pieces was a bit tedious, but the basket came together relatively quickly and is a great statement piece on the patio. Thanks again Kristi for sharing … I see a few more of these in the making to be given as gifts!
Has anyone ever nominated your blog for any kind of award, Kristi? I dont know what’s out there, but i feel sure some site or some co. gives awards to diy blogs. And yours is by far the best of any I’ve seen. If anyone knows of one, post so i can nominate superwoman Kristi!
Thank you so much, Michelle! That’s so kind. 🙂 I’ve been nominated for the Apartment Therapy award each year for the past several years, but I’ve never come close to winning. It’s my experience that the people who win are the ones who will beg and arm twist their readers for votes, and that’s not quite my style. 🙂
I totally get it. But I’m gonna keep looking into it. You are just too good not to get recognition and rewards, in addition to the reverence you get from your readers! Keep it up. We love you, your work and your blog.
There are the Better Homes and Garden ones, too. DIY Blogger of the Year. I would vote for you, Kristi!
You are absolutely right! Lots and LOTS of begging…
You are amazing!!
I COULD NOT believe you in a post few days ago when you said once this house is leveled it will be full steam ahead!!! Like it hasn’t been already????? You amaze me! And Inspire me!
Great hanging basket!
Hugs,
Claire x
Well, I’ve definitely kept myself busy. 🙂 Rather than “full steam ahead” perhaps I should have said that there will be no more roadblocks once the house is level. I don’t think I can work any faster than I have been, but at least I won’t have a project I really want to do, but then be faced with the fact that I can’t do it yet because the house isn’t level. 🙂 So, after this Friday, no more roadblocks!
What size r the pieces? I get the 1/2 in thick but what about rest of domensions?
Thank u!!! Amazing project
I just used a 2 x 4.
How long was the 2×4? and How long did this take you to make? It’s beautiful!
I was thinking the same thing. I understand you took a 2×4 and cut it 1/2 inch thick, but what I am wondering as well is how long are you cutting each piece from the 2×4? To make this work each piece would need to be the same thickness as well as same length. To make it so u understand If you are working with all the same length of scrap pieces of 2×4 you would be set, but if you bought a 9 foot length of 2×4 you wiuld have to cut them up into the same lengths what would that be?
You purchase a 2 x 4 piece of lumber that is 9 feet long. Then cut it into slices that are 1/2-inch thick. The ONLY thing you’re cutting is the 1/2-inch-thick cut over and over and over again.
How long is each piece, I get that you used a 2×4, that is size of board what is your length?
So the final dimensions of each piece are 1/2″ x 3 1/2″ x ?
What is the length of each piece?
Thanks, looks great.
You use the dimensions of a standard 2 x 4 piece of lumber. It doesn’t matter where you buy it — Home Depot, Lowe’s or any other lumber yard. A 2 x 4 is going to be standard no matter where you get it. So you purchase a 2 x 4 that is 9 feet long, and then cut it into slices that are 1/2-inch thick. The only thing you’re cutting is the 1/2-inch-thick slices. Nothing else.
How long is each piece? 4 inches, 6 inches? I get everything except you never mentioned the length of each piece. 1/2 x 3 1/2 x 4?, 6?, 5?
I have cut the 10 ft 2×4 into 1/2 inch strips and now I need to now how long to cut the strips.
Please see this explanation: https://www.addicted2decorating.com/easy-inexpensive-diy-pieced-wood-hanging-flower-basket.html#comment-1311379
I know this is an old question, but did you ever figure out the length you’re asking about is half an inch?
You have to be one of the most ingenious (and inspirational) people on the planet!! I LOVE reading your blog every day. Please never stop telling us about your projects great and small. So glad that you are able to make yourself take time out to do something fun like this project. Life is all about balance isn’t it?
I think I’m seeing future Christmas gifts! Thanks for the idea!
oh my GOD..you KILL me! This is so clever and beautiful. I want to move next door to you so I can watch and learn..plus quit this day job that tires me out by the time I get home so I don’t have the energy to do the stuff I really want to do which is make things like THIS!!!
Seriously, I love all your posts. Today, I am in love big time with your planter and am going to make some myself. . . in the meantime, I am anxiously awaiting your new kitchen. . . 🙂
so cute!!!! I can see this in my sun room 🙂
LOVE IT………….!!!!
love it!
What a beautiful wood hanging flower basket. Definitely, I will make one by using your concepts. You are ingenious. Amazing sharing.
Just showed my DH the planter, his first comments were that since you used the end grain of the wood it will eventually crack and split like crazy. Hope he is wrong.
Well that’s what happened to mine. Day one I got it hung with flowers and soil. Morning of day two we heard it crashing to the ground. We were having issues with the wood splitting when we were cutting it too. I figured I just had a bad piece because mine had an internal split/crack or weak spot in the wood but further down it was doing fine. When I was screwing in the hook the piece of wood cracked and eventually broke which caused the whole thing to fall and break off the entire top portion from the weight of it falling upside down. I’m so sad. I worked so hard on it. I really blame myself though. It was very heavy (probably too full) and the crack told me it couldn’t last. I tried filling it with wood glue but wasn’t enough to hold it.
Someone I know made one of these, I saw it as she was finishing it. Looked so good I decided to try. Made six of them in one go, that was a lot of cutting and sanding! Am selling for charity. Thanks for the great idea and for sharing it. One tip to those building, sand the 2×4’s before cutting to remove any writing and or rough spots. Also round the corners, it helps later on when you don’t have to sand in hard to reach places. If you plan on making more than one I suggest an 18 guage nail gun, can not imagine the job without this tool, only 19$ at harbor freight.
This is definitely one of the most creative designs I’ve seen on the web.I ought to make one.
Thank you for sharing
A friend sent me a picture of your basket and ask if I could make it from the picture. I made the first three rows,
free hand, before I saw and read your description of how you made them. I will use the one I started as my base and see how it turns out, using your plan. If I like what I see, I’ll do more on the same style.
Can’t wait to get back to the wood shop!
Thanks for sharing.
Wood worker from Rome, Ga
Tom
I would like to make these since we have tons of scrap wood. Can anyone tell me how to avoid splitting and breaking before I start?
You say that each piece is 1/2″ wide, but what is the length of each piece?
It’s a 2 x 4 piece of lumber. 2 x 4’s are a standard size no matter where you buy them.
I understand that, but what is the LENGTH of each piece? They appear to be about 6 inches long, but would like to know for sure.
I don’t know where the misunderstanding is happening. Go to Home Depot and ask for a 2 x 4 (i.e., a two-by-four). They will ask you what length you need. Ask them for a 9-foot 2 x 4. Bring the 2 x 4 home and slice it into pieces that are 1/2-inch thick. Think of it like a 9-foot loaf of bread that you’re slicing into 1/2-inch-thick slices. The 1/2-inch thickness is LITERALLY the only thing you’re cutting. You’re not cutting the length and width of the pieces because you’re using the dimensions of the 2 x 4 piece of lumber. You’re JUST slicing it into 1/2-inch-thick pieces. That’s it. That’s the ONLY cut you’re making.
Ah, I think I get you now.
Got it, FINALLY. Thank you!!!!
A 2″ x 4″ x 9′ is standard is actually 1.5″ x 3.5″. Your cutting 1/2″ thick pieces thus your pieces are going to be 1.5″ x 3.5″ x .5 “!!!! That is no other measurements to know.
The reason people don’t get the length of each piece is that the photography makes it look like a monsterous project versus the actual size…which is about the size of a microwave oven. The photography makes this look like each piece is a 5 or 6 inch piece of 2 X 4, To me, the project looked like it was the size of a porch swing, so when you mentioned using ONE 9 foot piece of 2 X 4, I thought it was a strange thing to say. To include a common object in the photography for reference would have helped me “see” its true size.
Sorry, now I see the glue bottles in a few piks. But, I guess I’m not alone in my lack of attention. haha
Hello, I know this is an old post, but I just came across it and love it. Thanks to your walk through I was able to make one for my mother for Mother’s Day! I was wondering if you ended up polying yours or painting? I’m thinking I’ll poly but I don’t know if I should cover the nail holes or leave the nails visible and just poly? I think I like the nails but it looks very rustic lol! Just wondering what you did :-}. Thanks!
Absolutely beautiful, Definitely going to give this ago. One day lol x. I would like to thank you too for this page. You are very inspirational.
Thank you for the detailed step by step instructions. It was as you said a simple and easy project that took very little time to make. Scored brownie points with the wife who loved it. Love to see more. Thanks for sharing your creative talent.
Ran across this project in a web search for “garden art” and what a find! Your talent and passion for your craft is motivating and inspirational. I have made two since and will make many more. After reading the posts associated with your instructions I hope I have a couple of suggestions for anyone who would like to make your design. If you want to keep a natural wood look use a redwood 2×4 8′ vs pine (at Home Depot $5 for pine…$9 for redwood). Be sure to get the redwood decking 2×4 (finished/smooth) as opposed to the fence verity which is a rough cut. Also, after my first try, I switched for 3/4″ brads to 1″ staples. The staples hold much better than the brads and even at 1″ there very little (if any) penetration to the pieces below. 3/4″ staples would work well but I wanted the planter to be as strong as possible.
Your idea/project hatched to get out to to enjoy a beautiful day has given me (and many others) great ideas. Building out only one side will make a perfect fence or wall planter and with variations on this theme, I have ideas on outdoor light fixtures and a killer wind spinner. Great website, design, ideas, and instructions…thanks so much!!!
Thank you for this. I used 3/4, too. I looked for other wood. Only other one Home Depot carried was Fir. Not the best choice, but I am willing to try it.
How did you avoid splitting the boards when you shot nails into the end grain?
I used very small brad nails, so splitting wasn’t an issue for the most part. I think I did split two or three, and I just removed those and replaced them. It could also be that the 2 x 4 had a bit of moisture in it and wasn’t completely dried out.
I split quite a few. Mostly from knots, some from not having the support to nail the piece in. Another issue was positioning the pieces so you have enough room, otherwise they just chip when nailing. I love it, though. Lots of fun making.
Oh so pretty!
How very imaginative. Love it. I hope you set up a jig on your miter saw when cutting those 137 pieces. Might just have to try it!
Had fun making it. Difficulty is when you flip it over. The pieces have no support when you nail them. You also need a miter saw, otherwise it will take forever to cut the wood.
On your planter how to long are your 2×4 pieces and have you cut each piece 1/2 inch thick
Thank in advance
I really loved that basket❤❤ and like you I have a lot of scrap 2 x 4. A most try. Thanks a million for this great use of scraps and your vision to see and use
I made this a year ago and finally hung it up in a protected area out of doors. I received many comments and the basket really looked great. It all lasted about two weeks and a squirl managed to jump on it, tight bond III glue is usually great but the squirl really damaged it. I plan to make another one and this time drill to pre-drill holes for screws then glue and put in a single flat heat screw. That and I will be more patient this time by letting each layer dry before starting another. That and I will paint it white as that will also help hold it all together.