Bathroom Progress & Vanity Design Decision
I don’t have a whole lot of progress to share (mostly because I’m the slowest drywaller in the world!), but I didn’t want to break for the weekend without sharing the progress I’ve made on the bathroom. As I said, it’s not much.
I got the wiring and junction boxes in place for the vanity sconces, and then I got the vanity/toilet wall drywalled.
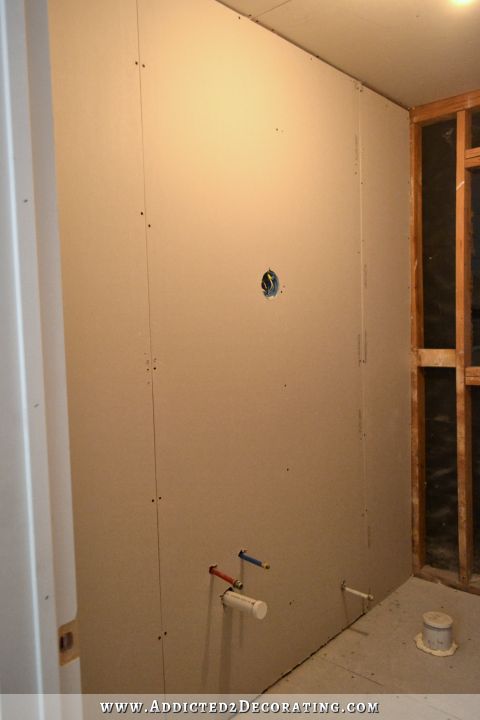
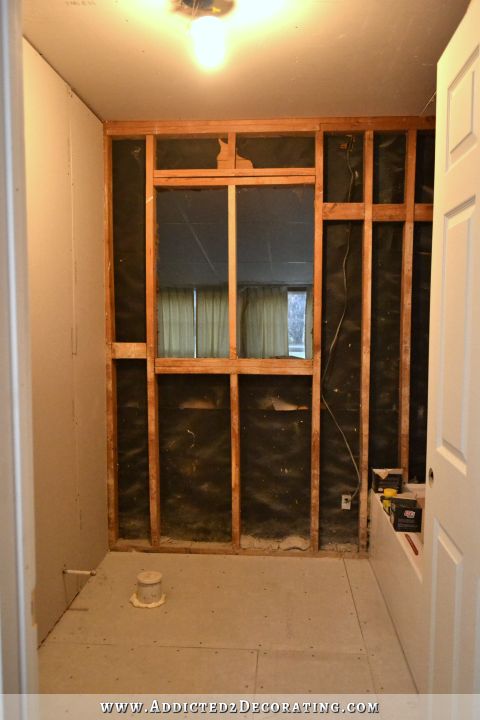
And then finally, I got the window removed, and added a 2 x 4 in that space so I’d have something to screw the drywall to. I’ll be sad to lose that natural light that comes in from the sunroom, but I’ll eventually add a solar tube in the bathroom to have natural light once again. That’ll have to wait, though, because I’m running low on money this month for this project, so it’s not in the budget right now. Maybe next month.
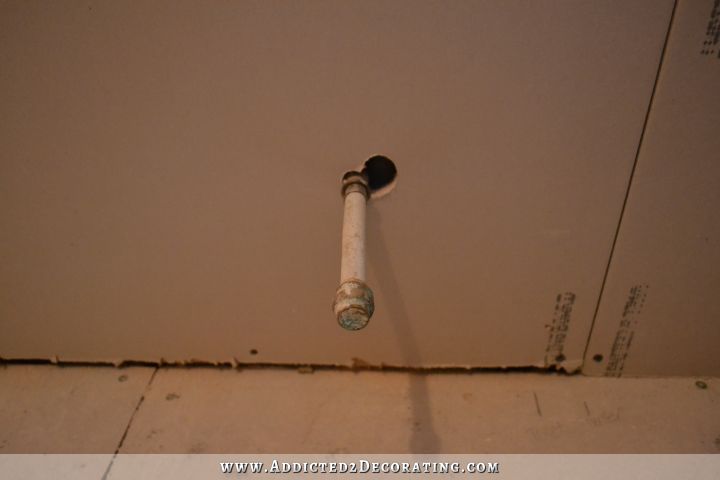
My least favorite thing about drywalling — even worse than taping and mudding — is using the Roto Zip to cut holes for pipes and junction boxes. Y’all, I STINK at using that stupid tool! I don’t know why I have such a hard time with it, but when I turn it on and put it into the drywall, it just seems to take on a life of its own. I just can’t seem to get the hang of it.
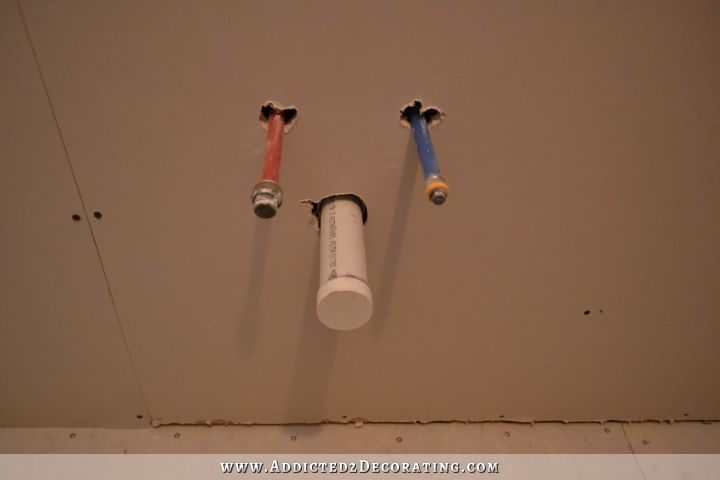
I did a little better on the boxes for the sconces, with just a little blip at the top, but that was after I measured wrong and started cutting in the wrong place! *Sigh* I guess I’m just never meant to have perfectly nice drywall. 😀
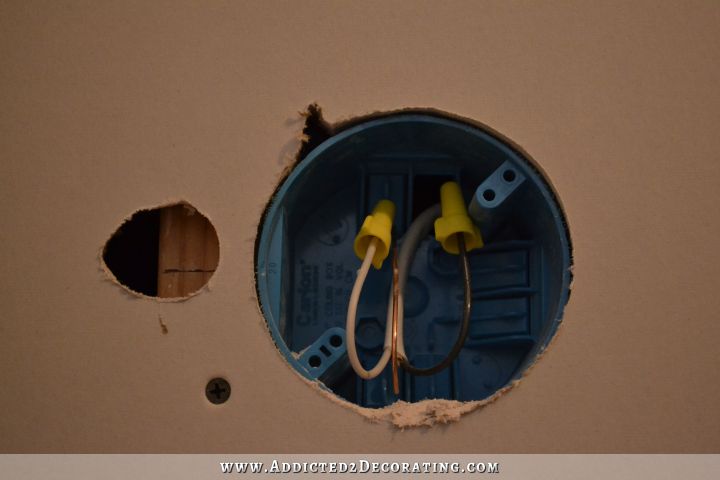
And this one…well…I don’t even know what happened here. That stupid Roto Zip is just my least favorite tool ever.
But at least drywall can be patched fairly easily, so it’ll all work out in the end.
I kind of had a hard time making a decision on the vanity. If you’ll remember, at one time I said I was going to use a spindly-legged table that my mom gave me.

But if Matt is going to be using this bathroom in the future, I really need something that will be solid and secure for Matt to use to steady himself and help him get up and down. That table wasn’t solid enough for Matt to put weight on.
Then I thought about using the credenza that I refinished a while back.

The reason I bought that credenza in the first place was in the hope that I could use it as a vanity in that bathroom. With the door in its original position, the credenza was way too big and stuck out too far past the door. With it in its new position, it will fit. But now that it’s refinished and has those striped drawers, I think it would be too busy for such a small room. Plus, it just really doesn’t go well with the other design choices (like the mosaic tile) that I’ve already chosen and purchased. I’d rather have the tile than the credenza vanity.
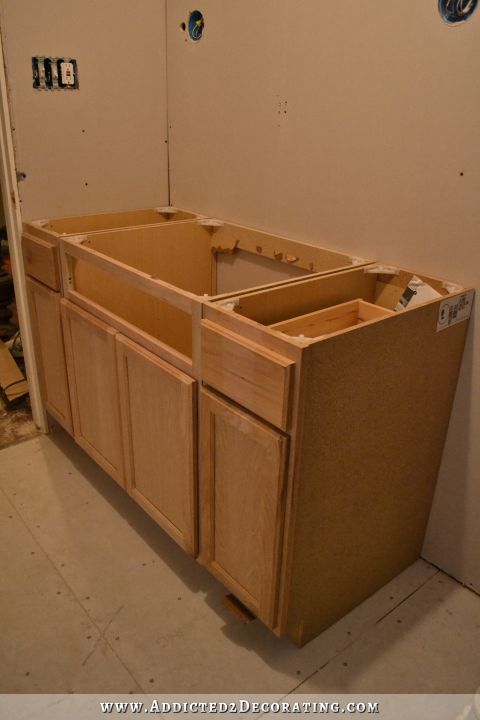
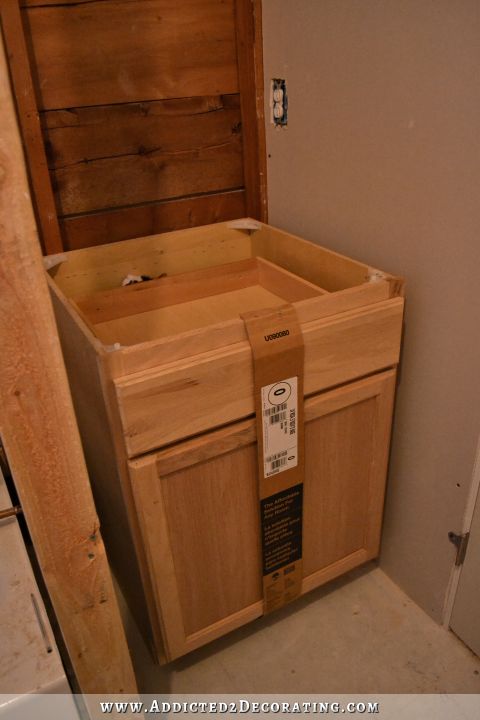
So I finally decided to just go with stock cabinets…again. These are the same ones I used in my kitchen.
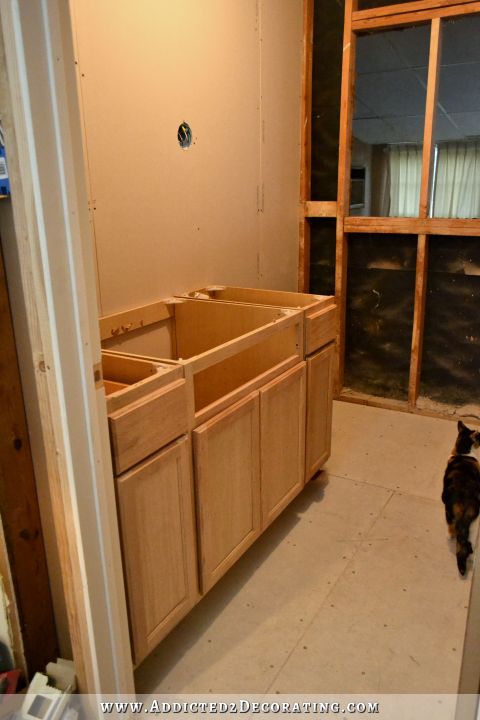
Stock cabinets are really intended for kitchens and utility rooms and such. Once you add the countertop, they’re about 36 inches tall and 25 inches deep. Bathroom vanities are traditionally about 32 to 33 inches tall, and about 22 inches deep. But after doing a bit of research, I’ve learned that 36-inch cabinets are becoming the new standard height for bathrooms used by adults, and 32 inch cabinets are still the standard for use in children’s bathrooms or bathrooms shared by adults and children. So I’m not concerned about the height at all.
However, the depth won’t work. They come too close to the door, and take up way too much space in this small bathroom. So I’ll be using my circular saw to cut about six inches off of the backs of these cabinets so that they are a better fit for this bathroom.
And of course, I’ll customize them somehow so that they look a little less like stock cabinets.
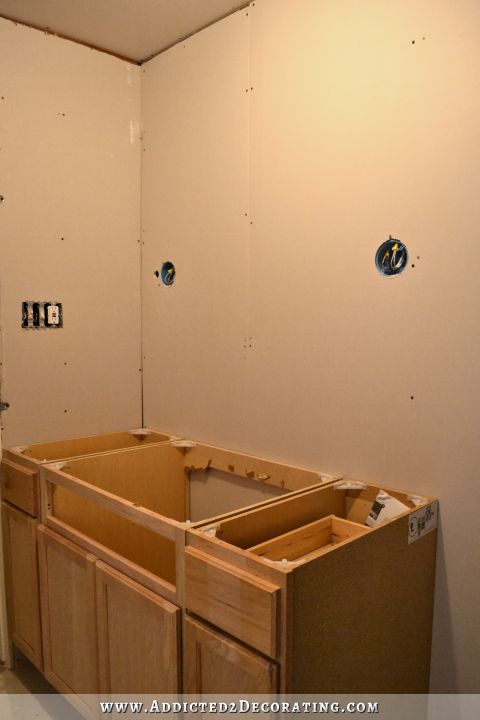
And then behind the door, where the linen closet used to be, I plan to use one more base cabinet.
Then I’ll add open shelf storage above that. And the main reason I wanted an outlet back there is because, instead of a nightlight in this bathroom, I’d like to find a pretty little lamp to set on this countertop that will act as a nightlight.

So that’s the progress and the plans so far. I’m really hoping to stay focused and get a ton of work done in here this weekend. I’d love to have the rest of the drywall finished, the concrete board installed and waterproofed, and the cabinets tweaked and installed by the end of the weekend. We’ll see on Monday how close I get to that goal. 🙂

Addicted 2 Decorating is where I share my DIY and decorating journey as I remodel and decorate the 1948 fixer upper that my husband, Matt, and I bought in 2013. Matt has M.S. and is unable to do physical work, so I do the majority of the work on the house by myself. You can learn more about me here.

it is really coming along… I love the 36 inch high for bathroom, no need to bend to wash your hands! I am not even tall (average 5 5) and it is so nice.
good luck with the dry wall, not a big fan of the job either!
with what you accomplish when decorating those stock cabinets, you shouldn’t hesitate to use them all over your house, because they’ll look fabulous when you’re done with them! and that beautiful credenza deserves a space where it can be admired some more then every now and then from the bath tub or toilet…
am I right in thinking that you haven’t yet cut those cabinets down to size? Because this way they are really taking up an awful lot of space in my opinion.
btw, I love it that your cat is always sitting in your pictures – how does she behave when you’re working on stuff: Is she always around then as well or does she have a sixth sense about when you’re in photo mode?! Take some time to enjoy life and don’t work flat-out the entire weekend…
No, I haven’t cut them down yet. I hope to get that done this weekend.
That cat is into everything. Her name is Peeve (yes, she’s our pet Peeve…that was Matt’s brilliant idea 😀 ), and she does her absolute best each and every day to live up to her name. 😀 When the subfloor was up and the crawl space below the house was exposed, she did her very best to get in there. I’d keep the door closed, and she would pace back and forth outside the door and scratch under the door to try to get in. She actually did sneak in twice without me knowing it, and spent quite a bit of time exploring under the house. 😀 In the picture above of the closeup of the cabinet behind the door, you can see her little nose and ear sticking up from inside the cabinet. She’s the most curious cat I’ve ever been around. 🙂
I really like the 36″ vanity height too. I built cabinets in my old house to that height and it was so much better. Planning on doing it in this house too in the master. Just easier to use for us.
I know they cost more, but have you considered replacing the side cabinets of the vanity with drawers, might be more work than you want to deal with since you are reducing the depth. Just easier to get to stuff than digging through a cabinet. I guess you could always build pull-outs. BTW I’ve seen stock vanity bases similar to the kitchen cabinets at HD with various sizes.
Where the linen cabinet is – have you considered making the bottom cabinet a laundry hamper pull-out? I’m mentioning this as I’m considering this for our bath as that lower portion tends to get less use in our house and this would get rid of the hamper from our closet.
I would have LOVED to have drawers! Unfortunately, the smallest drawer base cabinets they have is 18 inches, and I needed two 12-inch cabinets.
I probably won’t put a laundry hamper in this bathroom since it’s really a guest bath, and I’d rather have the storage. But I am making a list of things like that that I want to be sure to include in our master bathroom when we remodel!
Good point – ours is the master I’m talking about.
How about making those side cabinets pull outs – you know like a pantry pull out. I bet with your mad hacking skills you could do that. Just need some drawer rails on one side and build a structure to hold the pull-out.
You mentioned that you would prefer drawers. There is a company close to Dallas that has unfinished base cabinets with drawers in the 12 inch size. You could check to see if those would work for you.
here is their website http://www.sbmtx.com
I hope that helps.
Only in Kristi-World is this “not a lot of progress.”
Sigh. I swing between inspiration and self-loathing when reading about how much you get accomplished. It’s looking great.
LOL! Exactly my thoughts as I read Kristi’s lament about lack of progress. Kristi, mere mortals are in awe of your progress. Truly.
Have no fear about the stock cabinets. With your style the finished vanity will be very beautiful and you will still have that great credenza for elsehwere in the house.
I agree. For me a “lot of progress” is choosing a paint color. I may never get around to actually purchasing paint, and painting. I am in awe of your skills and the amount that you accomplish.
My thoughts exactly, lol. Every time I read the latest installment of your blog I am struck by the way you fearlessly tackle these projects and your willingness to modify your materials. I want to be you when I grow up, Kristi, lol! (okay, I’m much older than you, but you still inspire me).
LOL! I totally agree. What do you consider is a lot done in a day, Kristi? :-D.
If you have previously addressed this, sorry I didn’t refer back, but had you thought of a more universal design for your vanity so Matt can roll his wheelchair to the sink? Although at this time neither my husband nor myself have the need for it, I’ve been looking online at the many designs as I’m wanting to remodel one of our small bathrooms as we want our home to be our “stay in place” home. Have a good weekend, Kristi and I’ll be looking forward to Monday’s post!
I was going to ask a similar question. My husband is in a power chair and has to sit sideways of the vanity or stretch a good distance when facing the sink.
I didn’t consider that simply because Matt will continue to use the other bathroom, which is much more convenient for him and has a lower vanity, until we’re ready to do our big remodel. Then he’ll just need to do use this bathroom for a matter of months (hopefully) until the master bathroom is ready. In the end, it was really his idea to keep things in this bathroom more standard and inexpensive, and save the money and customizations for accessibility for when we do the master bathroom remodel
I don’t know if Matt is planning to use the tub or not, but I saw a really neat trick (on TOH again…yeah, I’m addicted). Before putting in the drywall or concrete board, they put 2×8 or 2×6 blocking in-between the studs right about where the handicap hand rails would go. This gives you a good wide solid surface to hit when installing the hand rails later and you don’t have to worry so much about locating the studs.
Just a thought. Before you cover it up.
I was planning on doing that on the wall by the toilet so that I can put a small grab bar for him, but I hadn’t even considered it for the tub area! Great idea! And even if Matt doesn’t use it, it’ll be great to have since we’re planning on this being our forever home, and some guests may find it helpful as well. I’m gonna do it!
I also have a husband who is wheelchair bound, so I’m wondering about accessibility for Matt? Have you considered a vanity that he could roll under? Is there a need for a lot of storage in the vanity if you will have the space where the linen closet used to be?
Matt will continue to use the other bathroom, which is much more convenient for him and has a lower vanity, until we’re ready to do our big remodel. Then he’ll just need to do use this bathroom for a matter of months (hopefully) until the master bathroom is ready. In the end, it was really his idea to keep things in this bathroom more standard and inexpensive, and save the money and customizations for accessibility for when we do the master bathroom remodel.
Can’t wait to see what you will do with that stock cabinet, after seeing how you transformed the ones in the kitchen. And I’m so glad you’ve decided on the solar tube; I think you’ll love it.
I love your site!! Also, I love the fact that the standard on counters is heading towards 36 inches…… I am 5’11” and my husband 6’4″….. Now, when are they going to start making the toilet taller!!
You can purchase ADA toilets now that are a few inches taller than standard. They do however have the open front seat.
I have become a Addicted2Decorating junkie! I’m always amazed at what one woman can do, it truly inspires me to take on projects alone. Off topic, but I’ve also been wondering how your weight loss is coming along. There hasn’t been an update. Can’t wait to see the progress from over the weekend!
I really don’t know about this stuff but shouldn’t you do the floor before you install the cabinets?
Oh, goodness! Yes! I need to add that to my list of things I hope to get done this weekend. 🙂
I know you think out everything…but, why didn’t you use a pocket door to open up the bathroom and be able to see the cabinet next to the tub?
Two reasons: (1) This is a load-bearing wall, and shoring up a load-bearing wall for a pocket door insert was more work than I wanted to do, and (2) there isn’t enough room. By the time the door was moved over, it only left about 30.5 inches between the edge of the door opening and the back wall of the linen closet area. A pocket door frame for a 32-inch door wouldn’t fit in there, and with Matt in a wheelchair, our doors can be a minimum of 32 inches wide.
I loved the idea! If that hadn’t been a load-bearing wall, and if the bathroom was just a few inches wider, I would have gone for the pocket door.
I wondered if you were going to use the sliding door hardware like you have for the music room. But I wasn’t sure how that would have worked for Matt or the layout of the house. Keep up the good work! It looks great!
We added a bedroom addition onto the back of our house which necessitated closing off the window in the hall bathroom too, and I can’t say that I’ve missed it. For some reason, when I’m using that particular room, I like not having even the possibility of someone peering in! It also makes a good storm room if necessary.
You are making great progress, Kristi, and it’s endearing to see that you too have little quirks with your mad skills. But as you said, drywall is relatively easy to repair. I’m looking forward to seeing your progress!
Onward and Upward!
I only found your blog a few month ago, but have been continually AMAZED at what you can do! As a single woman I have done a lot of small home improvement projects, but nothing on this scale. I am envious of your ability to take on such projects.
Kristi — re your issues with the Roto-zip – is there a reason you didn’t use your Dremel Multi-max instead?
I’ve tried, and just don’t have much success with it either. One problem with the Dremel is that the blades are all too wide/flat, so cutting around circular items is challenging. I thought I had looked at all of the blades available, but it’s quite possible I’ve overlooked something. Is there one specifically for cutting out drywall that can work around circular items? I do have one called a drywall jab, which is great for cutting straight areas like around doors.
I don’t use a powertool to cut around those things. I just use a regular drywall saw or whatever they are called. Short with very jagged edges and a tapered width blade. I will use a hammer to push it in a bit to a slightly wider part of the blade and then just saw it by hand following the contour of the box – it won’t cut the box. Easier on round than rectangles. There I jab each corner and saw the straight cuts.
Kristi, you’ve never mentioned using a drill. I personally think every household should have one. 🙂 All you need to cut perfectly round holes in drywall is a drill and hole cutters. In UK they are also called core drill bits or holesaws. I have a rotary cutter similar to your Roto Zip and I don’t like it either. Used it only once to cut a big (about a foot) temporary hole in the ceiling for access to the electrical cables. For anything smaller I would use a hole cutter.
Kristi…….
You’re doing AWESOME!!!!!!!
I am thrilled to have seen your post this morning.
Have a great weekend……and enjoy some down time…..we’ll know you…..maybe!
The stock cabinets are fab! Did you get them at Lowes or Homdepot?
Big IDAHO hugs….dear one…..
I always get mine at Home Depot. I’ve seen other people use the ones from Lowe’s with great results, but every time I look at the stock cabinets at the Lowe’s here in Waco, they’re all cracked, broken, have broken hinges, etc. The quality just seems lower than the ones at Home Depot here.
Your,re a DOLL….thanks so much for the reply!!!
When my husband and I closed up a window in our bathroom where the window looked out onto an enclosed back porch where we had made an office, we put in a 18″ tall strip of frosted glass just above where the old window had been. It let some light in, and looked really nice. Was unable to see anything (even shadows) through it. Also, we used the deep kitchen lower cabinets in our bathroom, also. So nice to have that up a bit.
I get a foot print of the bathroom now that I didn’t have before. I thought the vanity was going in with the side butted up against the bathtub. Should have known that wasn’t going to happen! I’m sure you thought I was nuts from my last post! 8=}
So curious to hear more about how you make magic with these stock cabinets since we’re considering using them in our kitchen! (I think I even tried to email you about it a while back…) What are you going to do to protect the frames (which are composite, right?) from the inevitable splashes and spills from the bathtub and sink?
Kristi. Just wondering if you are leaving an access to bathtub pipes if they needed repair? Looks like cabinet will be in the way.
I look forward to your posts every day. Thanks for all your information.
That would be a great idea! I’m not sure how I’d do it with the proposed plan. I’ll have to give it some thought.
I suppose you are going to box that cabinet so that it would become a built-in. It would look great with the open shelves on top! Perhaps you can cut a hatch in the side panel and make a frame to which the hatch can be screwed, so that there is access to the pipes.
I wander though when reading that you and other people use kitchen cabinets in bathrooms – are they fit for the humid environment?
Cabinets here are all built out of one of three materials — plywood, MDF or particle board. These three materials are used for any and all cabinets, regardless of the room they’re going in.
this is really selfish of me and maybe you have already posted a how to on this subject so if you have please point it out to me, but I need a lesson on mudding drywall! I am drywalling parts of our kitchen and will also need to do a skim finish on the rest of the wall in the kitchen and I just seem to have a mess! I watch the how to videos which make it seem so easy.
Thanks!
Dana
Norton, VA
Oh gosh…I’m probably the last person in the world (maybe second or third to the last) who should be giving drywall tips! 😀 I really stink at drywalling…not just the Roto Zip, but the actual installation and the taping and mudding. I muddle through (with 3/4-inch gaps around the top of the walls, and lots of necessary patch work), but I’m not good at it at all.
I do remember reading a post or two on Young House Love about drywall when they were redoing their laundry room. They gave some really good pointers and walked through the whole process. That might be worth looking up!
I can’t remember your floor plan but since you have the window wall at the stud stage would it be useful to out a door on the window wall opening into the other room? I pt a second door in a powder room to save walking all around the hall and bedroom to get to it. I used that new door almost exclusively. it was so much more direct.
Hey Kristi, will you be showing how you shorten the depth of the stock cabinets. I just bought some of the “kitchen” stock cabinets for my bathroom, and may actually need to do the same thing with mine!
Also, as far as counter tops for the bathroom, I know you mentioned going with wood. I just wondered if you had considered doing the concrete ones like with your kitchen in the bathroom?
Yes, I thought that concrete countertops would look great in the bathroom too.
Could you somehow make an access for the tub pipes by going through the vanity side? That way you won’t have to disturb the tile around the tub. Just an idea. I am in awe of your work and your ideas. Don’t ever apologize for your work or changing your mind. You are a remodeling dynamo!
You made me LOL when I saw the pics produced by the Roto Zip. I totally get it! Thanks for sharing Everything with us! Have a good weekend!
You are amazing! It overwhelms me to think of all the work you accomplish in such a short amount of time. I too am a addicted to your blog. I look forward every day to see your latest project.
Thank for sharing.
Your cat must have a ball with all the constant changes. His/her whole house is a playground. 🙂
You are amazing. I could go into detail about how inspirational you and your blog have been as I battle through the renovation of our 1930’s house. But I am thinking Merle Streep in The Devil Wears Prada…. You are amazing…”That’s all”
Kristi your doing a great job! Drywall and mudding are two very thankless jobs. I dislike both myself. I know those cabinets will look awesome when your done with them. After seeing your kitchen cabinets I have total faith they’re going to be original Kristi cabinets. All and all your doing a swell job! Keep up the great work! I enjoy your site very much!
The baths’ looking good so far, but your lil’ plumbing inspector is the cutest!
Missed you yesterday, can’t wait till Monday to see what you do over the weekend. Enjoyed reading about the kitty antics of Peeve the cat.
” but I didn’t want to break for the weekend without sharing ”
Hi kristi
Above is the reason I love your blog so much. I look forward to each and every post no matter the subject. As a blogger you are very thoughtful of your readers. As a designer, decorator, carpenter you knock it out of the park.
Cheers
Lesley Ann
Maybe I missed this part, but im wondering if the stock cabinets were less expensive than a stock vanity or was there another reason for selecting them over a vanity cabinet?
They only had one vanity that I really liked, and it was $600. But the vanities also didn’t come in the right size. They were all either 32 inches, 48 inches, or 60 inches wide. I needed something around 52-54 inches wide.
Your going to really like the taller cabinet in the bathroom. We remodeled my parents bathroom over Thanksgiving and used the exact same stock cabinet from HD that your using and it worked perfectly and they love it. My Dad is physically challenged and needs a hard surfaces to steady himself and the cabinet we added helps with that…
Please show how you cut down the cabinets as I need to do the same thing and want to buy cabinets rather than have to build them from scratch.
The first thing I thought when I started reading was…”but how about that cute little table you were going to use?’ But I certainly understand your reasons for the change. I love decorating my home…and ALWAYS on a budget. I get many compliments from people who happen to stop by~~~~~but you are in another league! Mine are only cosmetic changes. I live in a nice large townhouse, which I bought new 10 yrs. ago~~~~so everything is quite “modern”. I love to paint furniture, find objects anywhere that I can use in one of my rooms, decorating for the seasons, or holidays. I used to do all my painting (of walls) myself, but I have Fibromyalgia, so I’m unable to do so now. I’ve had to hire a painter the last few years. To me a room is never “done.” I’m always finding something whose colors are “perfect” for a certain room. I love your ideas & your ENERGY, & how you’re never afraid to tackle anything. Love your blog!
We recently did all of this in our master bathroom. And are now doing it in our laundry room. We even tore down a wall to make it bigger. Lots of work, but I am already seeing the results and am loving it. Just found your blog and am loving the serious DIY stuff you have going on. Lots to learn from you I can see!
This has nothing to do with your bath but is in reference to a solid wood look’ mantel you blogged about in 2011. My question is about the veneer you used. 1. What kind was it, and 2. Where did you get it? I’ve googled everything imaginable and finally decided to ask the source. Thank you!
I actually bought that locally, and I can’t remember the brand. You can find veneer on Amazon, though. Go to Amazon and search “PSA backed wood veneer” and you’ll find several species of wood veneer with the peel and stick adhesive back.
What type wood was your veneer. I see there are different cuts. As you can tell I know little about veneer. Hate to bother u about a four year old project. And, oh yea, I live in the sticks so very hard to find things.
I honestly can’t remember. I know for sure it wasn’t oak. It might have been maple.
Moving right along. Sorry to hear about the knot on your head. Bless your heart.