Scalloped Console Table – Part 1
After spending Saturday lost in indecision over my sofa table (which I’m now calling a console table, and you’ll understand why later), I finally just decided to go for it yesterday, and I got all of the building done.
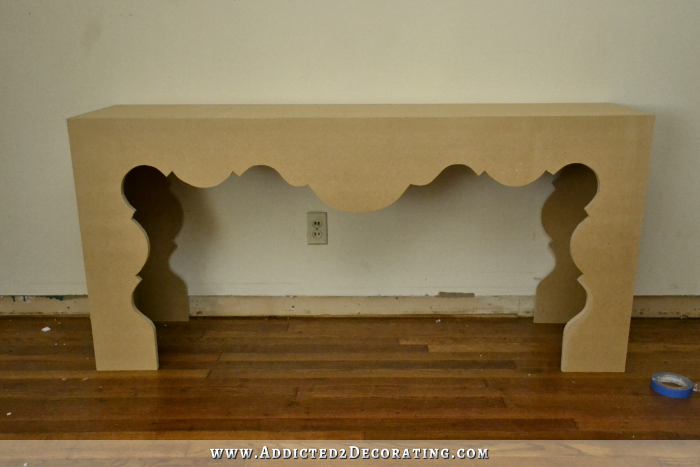
It’s still far from finished, but here’s what the basic structure looks like…
I kind of combined ideas from three different console tables as my inspiration. First was this Sasha Scalloped Console from Horchow, which retails for $2329.00.

I liked the way that the sides were enclosed, and the scalloped design was just on the front and back. But the scalloped design on that one was a bit skimpy for my taste.
Then there was this Fabiani Console from Horchow, which retails for $1139.00.
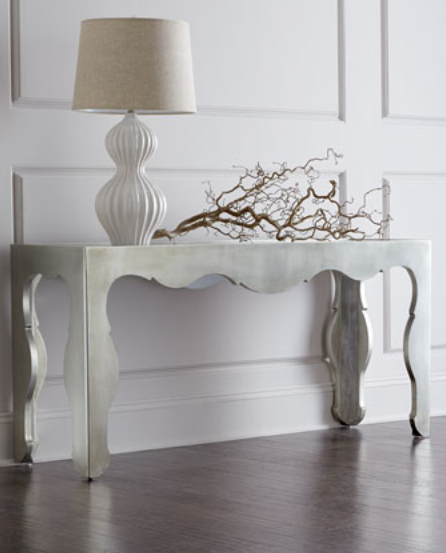
I liked the bulker scalloped design on that one, but I didn’t like the open ends. It reminded me a little too much of the IKEA Trollsta sideboard, without the cabinet. I also liked how the scalloped pattern wrapped around to the legs, mirroring the design on the top.
And finally, there was this console table-turned-vanity from a Romanian home tour via Desire To Inspire.
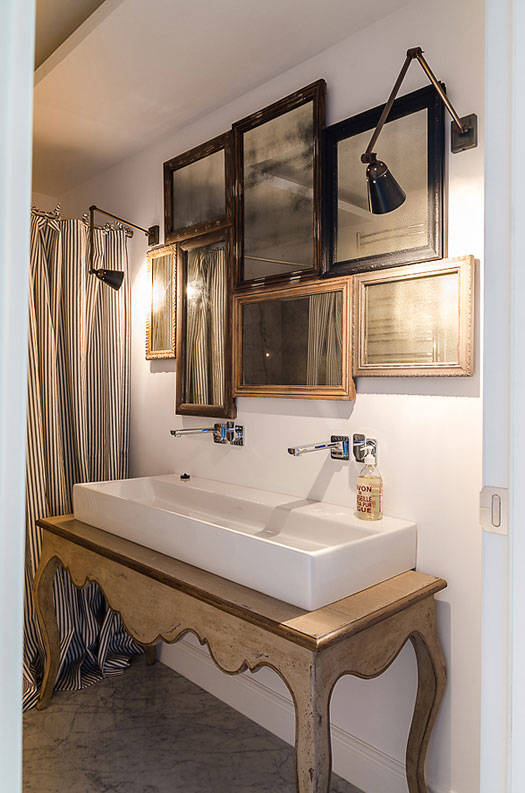
This scalloped design was my favorite, so it’s the one I based my design on. (Thanks for the link, Steph! 🙂 )
So after putting all of those ideas together, I wound up with my scalloped console table.
I started out by having Home Depot cut the top and the front and back pieces for me. The top is 64″ x 14″ and the front and back pieces are 64″ x 30″.
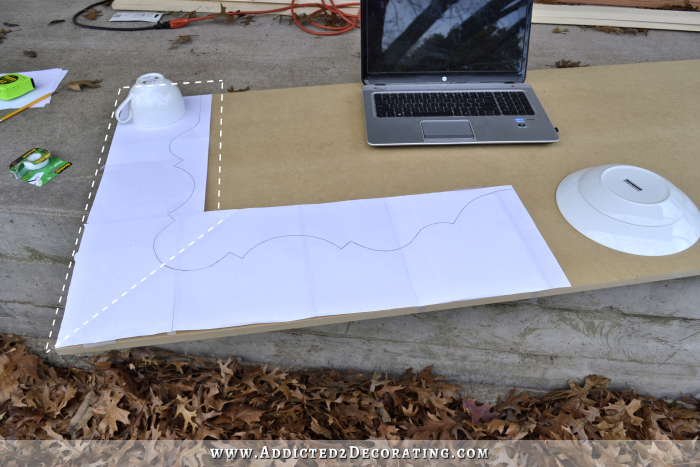
Next, working one one of the large pieces, I made my pattern. Y’all have seen me do this a few times already on other projects, but any time I want to make an item where the design is mirrored on each half, I made a pattern that fits 1/2 of the item, and then I flip it over to use on the other half. That way I end up with a perfectly symmetrical design.
To make my pattern, I simply tape together pieces of paper to cover the area where my design will go.

When I’m making a pattern based on something I’ve seen online, I always keep my computer handy so I can look at the inspiration piece while I’m drawing the design.
Also, any time I’m making a pattern that includes curves like this one, I gather up plates, bowls, cups, and any other perfectly round object I might need to help me in creating perfect curves. Don’t think for a second that I’m capable of free-handing perfect curves like that. 😉
This pattern was also a little different from others I’ve made in the past in that I wanted the design to wrap around from the top to the side “leg” with an identical pattern on each, just like the Fabiani Console above. I did that by drawing the top design first (the part outlined in the dotted line below).
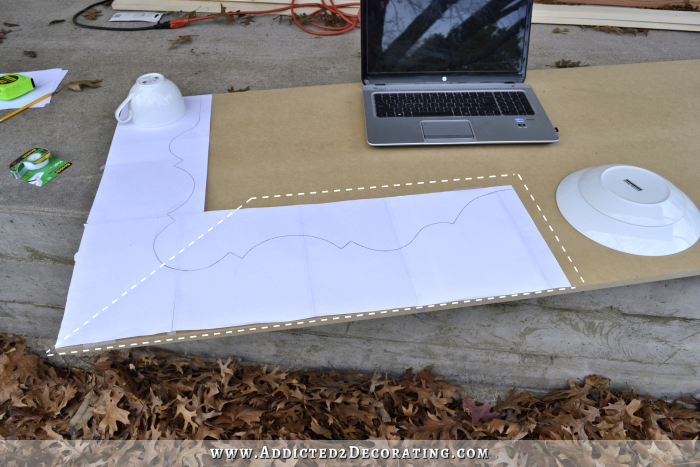
And then I folded the side up at an angle so that the two outside edges were perfectly lined up, and I traced the top design onto the side pattern. Then when I flipped the side piece back down, I had a continuous pattern that mirrored the top.
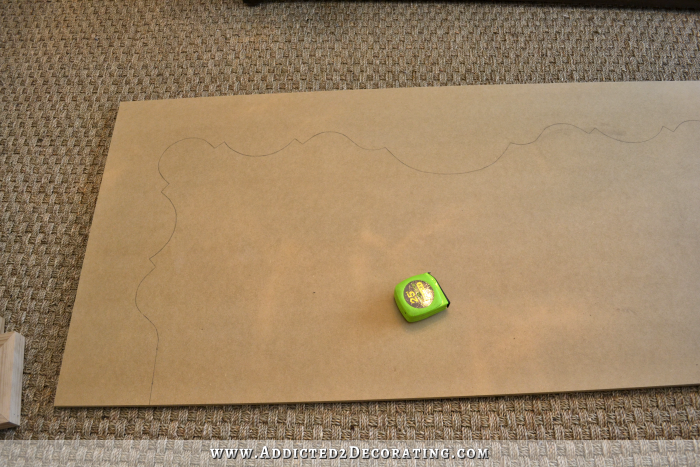
When I was finally satisfied with my pattern, I cut it out with scissors, and then lined it up on my MDF along one edge, making sure that the top only went right to the middle of the MDF. Then I traced around it with a pencil.

Next I flipped the pattern over, lined it up with the other side, and traced again.
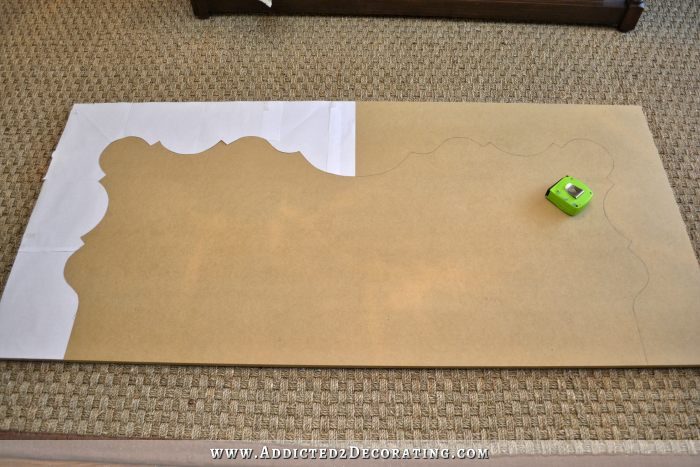
By using this method, you always end up with a perfectly symmetrical design.
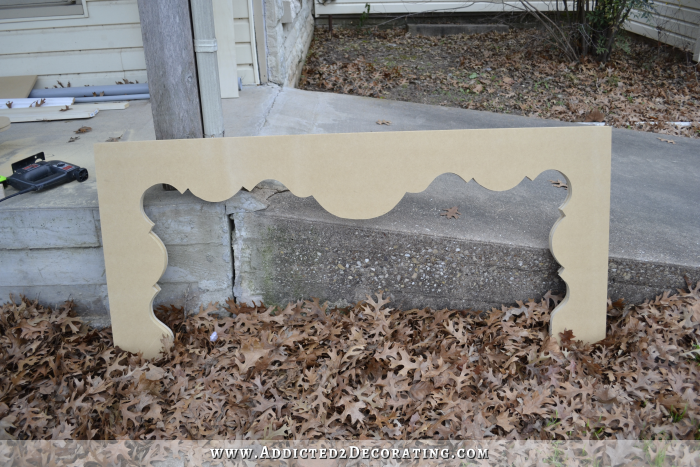
Next I used my jigsaw to cut out the two pieces. I initially tried to clamp them together and cut them out at the same time, but when I realized how incredibly slow that process would be, cutting through that thickness, I decided to do them individually. That went MUCH faster.
And just in case some of you aren’t familiar with a jigsaw, it looks like this…

It’s a hand held saw with a thin straight blade, and on most jigsaws, you can also adjust the speed of the blade.
TIP: When cutting a scrolled design like this, it is very important that you use a blade that is made for cutting curves. These blades are shorter, thinner, and narrower than other blades, and they also have more teeth on them. This allows for better control and more detailed cutting.
When I had my two pieces cut out, they looked like this…
As I mentioned, I had Home Depot cut out the top and the front and back for me. I cut out the sides myself using my circular saw, and I cut them out of the scrap that came out of the portion that I cut away from these scalloped pieces.
The side pieces that I cut measured 29 3/8″ x 14″.
So after cutting out the side pieces with my circular saw, I lined up the top piece and one of the side pieces, and secured them using wood glue and 1 1/4″ nails in my nail gun.
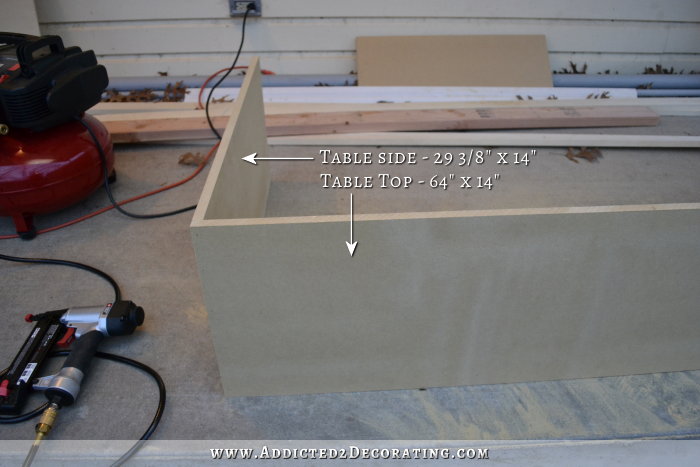
And then I attached the other side in the same way.

Then I took one of the scalloped pieces and placed it right on top. I made sure that all of the edges were aligned, then I lifted it up just enough to get some wood glue between the pieces and then nailed the scalloped piece to the edges of the top and side pieces.
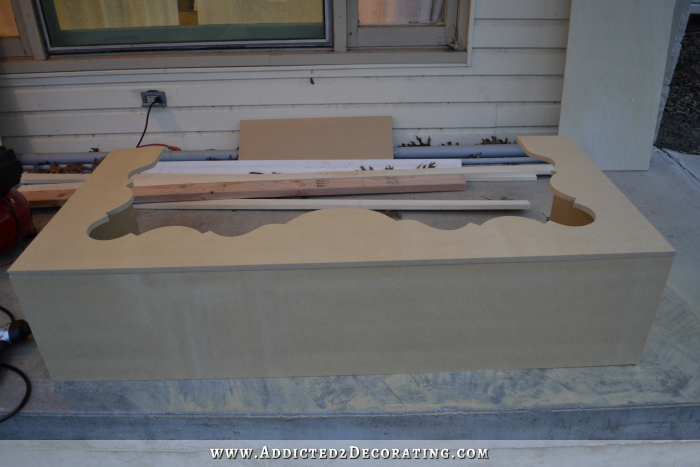
Then I flipped it over and attached the other scalloped piece. (I didn’t get a picture, but it’s the same as above.)
At that point, the basic construction of the table was finished, which was a good thing because I was losing daylight fast!

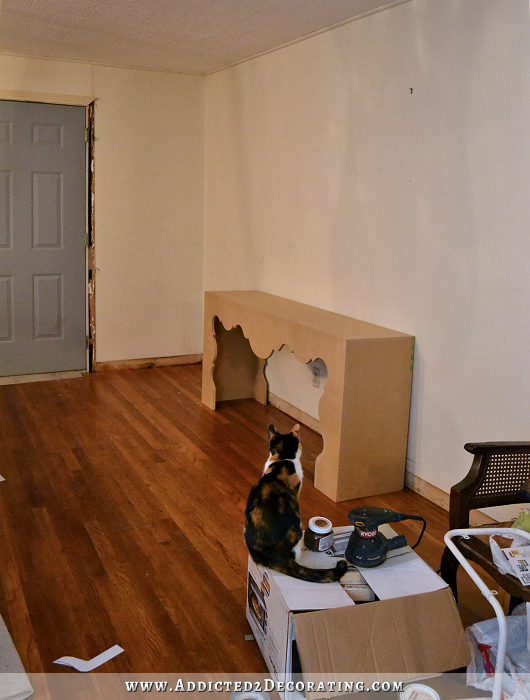
So that’s where this project stands right now.
And why am I calling it a console table instead of a sofa table? Because when I brought it in and tried it out behind my sofa, I realized that I don’t want a sofa table. 😀
Instead, this will be living against the long wall in the entryway, which is directly opposite the credenza wall.
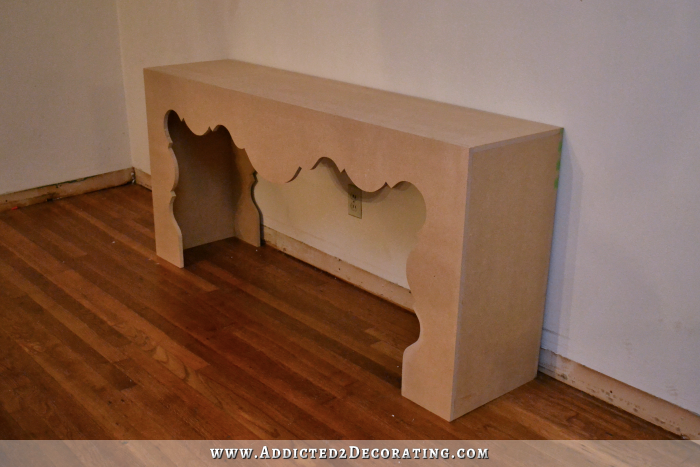
The funny thing is that when I was building this, I was worried that it was too big and bulky. But now that I’m using it against that big, empty wall, I’m concerned that it’s too small. Here’s the big wall I’m talking about…
Sorry…I didn’t clean up for y’all. 🙂 That’s okay, right? We’re all friends here.
And I also haven’t done any trim in this area because as far as our house being unlevel, this one wall is probably the worst in the whole house. The previous owners had a piano here, and I would guess that it sat there for at least a couple of decades, but probably longer. And it was an incredibly heavy piano. You can literally feel the slope in the floor right here just by standing there. So I’m really trying to hold out until we get the foundation level before I start adding trim here, or else it’ll look like a mess once the house is leveled.
Anyway, back to the table. As it turns out, I’m very thankful that I made it big, because this wall needs something big like that. And of course, the table isn’t finished, and I’ll add artwork, lamps, and other things to fill in so it doesn’t look so sparse.
But overall, I think I’m going to like it. I really wasn’t sure yesterday, but as soon as I placed it on this wall, I got excited about how the finished wall looked in my mind. 🙂
I’m still not completely sure how I’ll finish the table. I’ve considered paint (the easiest), but I’ve also considered covering it in fabric, or possibly some vinyl that looks like leather. I’ve also considered nail head trim.
So we’ll see where this ends up. More than likely, it won’t be finished tomorrow. 🙂

Addicted 2 Decorating is where I share my DIY and decorating journey as I remodel and decorate the 1948 fixer upper that my husband, Matt, and I bought in 2013. Matt has M.S. and is unable to do physical work, so I do the majority of the work on the house by myself. You can learn more about me here.


I love it!!! You have done a fab job on this table. I have one on my radar to start when I complete our china hutch make over. Yep, still going on that one! I can’t wait to see the finish you will put on this and where it will go. Great job Kristi! You always keep me amazed by your talent. – Linda – Hello I Live Here
Are you going to put anything behind the sofa?
Right now, I’m not planning on it. I don’t want a table there, and I can’t think of a non-table item that would look good behind a sofa. Have any ideas?
For a non-table i like a quilt rack. I would probably add a plant next to it too.
Great job! And so fast. I’m so relieved to see I’m not the only one who uses their dishes for everything imaginable. Quilt patterns, you name it. LOL. While I was in love with your idea of a sofa table, I have one, and d one for my daughter. But it had entered my mind that you probably couldn’t put a console table on the entry wall if you used a sofa table. And you had to have something on that wall. Such a beautiful table will command interest. I love how you solve a problem before it becomes a problem. The back of your sofa won’t need anything because it will have such an outstanding upholstery job. Now for stools to go under that console table. I LOVED the ones shown under one of your three inspiration tables, but they would be impossible to build.
Pretty calico, and he/she sure is eyeing it’s newest playground.
I don’t think the table looks too small. I think once you’ve accessorized with a lamp, maybe an oversized piece of art hanging above it, etc. it will look just fine. Also, instead of using stools underneath the table, what about putting a side chair next to it? Joss & Main had a really cool high back chair a couple days ago that would look super cool. Something like this, but not this one.
https://www.jossandmain.com/Hue-Harmony-Covington-Side-Chair~FV30184~E8239.html
Well done! How about a lacquer in an unexpected color that make it look like a million $$. I think fabric or vinyl will detract from design of table.A solid color would be most dramatic, especially if lacquered. Patterns and texture will come from artwork and accessories. A beautiful rug between sofa and console will tie the area together. The rug should have flooring showing around it. Just some ideas.
Agree with Brenda – a patterned fabric could definitely take away from the lines you worked to hard to showcase. A solid fabric with maybe some trim to outline the curves or nailheads. And instead of stools underneath, a nice chair beside it. Mirror above. Big plant. Table Lamp. Mama, I’m home!
This is amazing! Bravo!!!
A modern take on the turnings on your floor lamps. Oh, nicely done!
Wow…This looks absolutely stunning Kristi! Great work 🙂
Wow. This looks fantastic. I vote for fabric covered! (Mostly because I want to make a fabric covered console for myself and a tutorial from you would be very helpful!)
ooooh You said leather and nail head trim! The funny thing is that from the one diagram you posted with the dotted lines- THAT’s what made think sleek smooth fabric with nail head trim! lol
Wow….so beautiful!!! I can’t wait to see the finish!
Kristi, I am not only amazed by your talent, but also by your DECISIVENESS! Seriously, it takes me months/years to decide on decor! Then I end up with nothing…sighhhhh. I’m trying to convince myself that it’s better to have SOMETHING — that can always be tweaked later on — than wait until I am 100% sure or have made THEE definitive choice…and end up years with blank walls and empty rooms. Old habits die hard, but I’m trying to change my ways. You inspire me. Keep up the good work.
Love the table! Love your blog! Love you!!
Fantastic! Got a couple of Questions….How much did Home Depot charge to cut out the pieces and what type of wood did you use??
Thanks in advance
Great job Kristi, as usual. I think it will go along way to establish this area as an “Entry”. A choice for the finish that I think would look really good is a metallic finish similar to one of your inspiration tables. Also, a metallic finish while a statement maker is also a great neutral. If you ever decided at a later time to rearrange the area, a metallic console could be used anywhere. They also have such beautiful metallic finishes available. I like the idea of a lacquer as suggested in some other comments. Amy Howard has a line of specialty finishes (amyhowardathome.com) including DIY lacquer. I haven’t seen any comments or reviews on how hard/easy is may be to use, but its the first of its type I’ve seen. I believe her line of finishing products is a derivative of her furniture line. I can’t wait to see your finished product.
I have a question. What kind of brad nailer do you use? I wish I had one. What kind of air compressor do you have?
Joy
Kristi, this is a brave undertaking, and honestly, when I first saw the pattern I pictured myself trying to handle that jigsaw! The results are nothing short of amazing, though! And you know what? I don’t think that big wall is going to overpower the piece at all. Once you hang art, it will be a stunning entryway.
(If I can help you with art, give me a holler.)
I do have a question. You said you had Home Depot cut out the top pieces. Just curious what you had to pay for that – or is it something they offer free? To me, it’s worth the fee to save me having nightmares over those beautiful curves in the pattern. The results look wonderful.
Kristi,
You always do such a fabulous job on all your projects. I’m truly amazed and inspired by your skills ACROSS THE BOARD–painting, fabricating, constructing, upholstering, sewing, refinishing…and the list goes on. This will turn out to be fabulous like all your projects. Your new house is looking great!
Beautiful table and I love the placement. My choice of ‘finishing’ for the table would be the ‘leather look’. It would be rich and earthy looking and very welcoming.
As for the back of your sofa, I agree that you don’t need a table but how about a floor lamp and a large basket for magazines or throws?
Can’t wait to see what your next step will be.
Kristi, that would’ve taken me and week and a couple temper tantrums just to get my head wrapped around the pattern. I can’t believe you did ALL that in one day. You are such a superstar! It’s gorgeous! I like the idea of a color like on your greek table legs, the rubbed-gold, but the nailhead trim is also an awesome design the other direction. Where do you get all your energy? 🙂
I opened my newest House Beautiful magazine just now to find your table on page 68!!!! Go look!
Oh bummer! Mine’s still being delivered to the condo. I wanna see it!! 🙂
I saw that last night. Looks wonderful.
This is fantastic! I really love the inspiration image you used for the bathroom.
You amaze me! I am so envious of your talent, ingenuity and fearlessness. I wish I could kidnap you and bring you to NY.
every one can learn to do stuff. Maybe not all at once. But take a class or find a small project and just try it. keep trying you will imporve each time. I started small too. but now I can do fun nice things.
You are insanely talented. Your blog is quickly becoming my favorite. I check every day to see if you’ve posted! 🙂
I check every day, too! Your process is so fun to watch..including the thought process. I could definitely see your table in leather and nail head trim. How on earth would you do it?
Whatever you do, add nailhead trim. That would look so high end! You did an awesome job!
Dang, girl, that is one hot table! You could start a business selling those! I wish there was an easy way to cut mirror- that would look realllly cool as a mirrored table.
I can totally picture an embossed leather with nailhead trim maybe in the blue from that wonderful ottoman with a brown wood inlaid top. Or a soft nubuck in brown with a blue top. Blue chalk paint (without the distressing) might be pretty too I can’t wait to see what you do. It will probably be something I would never have thought of but will love.
I like the color it appears to be in the shadowy last picture, sort of a smoky blue, a shade or two lighter than the ottoman fabric.
It looks great. I would paint it, personally-or put a mirror top on it perhaps….because I always set drinks, etc. down on tables and if it was fabric I would mess it up. You probably wouldn’t…:)
I saw a table in a photo that had objects and lamps on it, and then because it was a large wall area they had a lot of decorative plates spaced out all around it on the wall. You could do the same thing with art or photos.
Then, build a couple of cube padded stools covered in leather look vinyl with nailhead trim to sit underneath.
It is looking fantastic – I can’t imagine how something would look if I tried to build it. You should look at Pam’s blog – Simple Details. She did an Ikea hack with faux ostrich covered rast. She does some really beautiful things. I think center the console and as you said you will have your art/lamps etc. I like consoles with matching chairs on either side – I also like tall plants on either side as well. Whatever you decide will be beautiful. Love your talent and your sharing.
love love love how this is coming along its going to be awesome cant wait to see how you finish it
Thanks for the inspiration! Question about the corners…are they mitered?
Nope, I didn’t miter any corners on this one.
Hi Kristi, great job on the table. I’m assuming you used 3/4″ thick MDF? Can you please tell me how you secured that big piece so that you could the design out with the jigsaw. That part always gives me a hard time.
I am so impressed! I just received a jigsaw for Christmas, but I would be terrified to attempt to cut something this intricate. I learn so much from reading your blog. Thank you for sharing your expertise.
WOW! You never cease to impress me with your determination & imagination! I’m torn between the leather-look with nail head trim and a lacquer finish – both much easier to keep clean than fabric & not a tempting scratching post for the kitty – but lean toward the leather/nail head as first choice.
Absolutely LOVE this!! And thanks for sharing your inspiration pieces too – helps give a good visual of how you ended up with your design. I love the inspiration picture using the table as a vanity for a vessel sink. I need a new vanity in my powder room and this might just be perfect! I’d have to adjust the width as it’s smaller, but totally do-able. Thanks for sharing how you did the template too! Awesome! 🙂
Great job. I think it’s the perfect size for that wall. Can’t wait to see how you finish it. You always seem to go in a direction that I think I won’t like, but when I see the finished product I love it. You’ve definitely pushed my design appreciation in to areas they haven’t been before. Thanks for the shove!
I, too, am impressed with your speed! I have to “mull things over.” As I read this post I couldn’t help but think how a few months ago you were LONGING for a garage – a place to work on projects, run your power tools, spread out all your pieces, then step away if you needed to. Congrats! So happy your endeavors are no longer hampered by space limitations! You go girl!!
In the photo where you were loosing daylight, it almost looks like the inside is a different color than the outside and I thought that would be a beautiful way to paint it! I can’t wait to see what you’ll do.
By golly, you out-designed all the inspiration pieces! Don’t let it go to your head… I can’t draw stick people, but I’m really impressed. That room is already transformed!
To say the truth I didn’t like the basic structure, but now, looking at the pictures I understand how wonderful it looks! You are absolutely right that have made it big (this wall on the picture isn’t small so the tables suits it) you can put some green flowers and family pictures on it. Or decorate it with hand-made candles.
You are so incredibly talented!