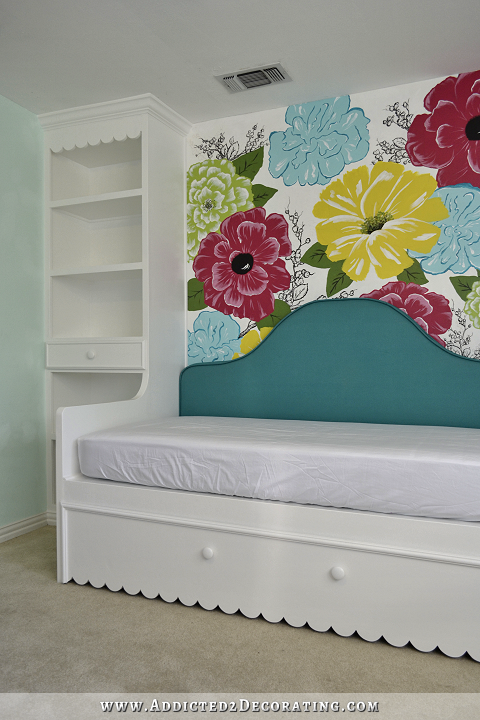
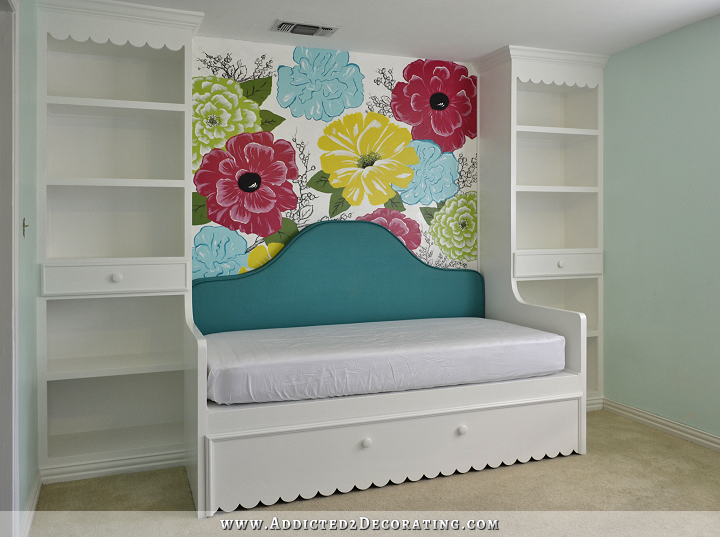
Bedroom Built-Ins Finished! (Bookcases, Daybed, and Trundle Bed)
The biggest project in my niece’s bedroom makeover is finally finished! These DIY bedroom built-ins took me nine days to build from start to finish, and if my mom hadn’t helped with some of the wood filling and sanding, it probably would have taken ten days. If you missed the posts about the building of these bookcases, daybed, drawers, and trundle bed, you can find them here:
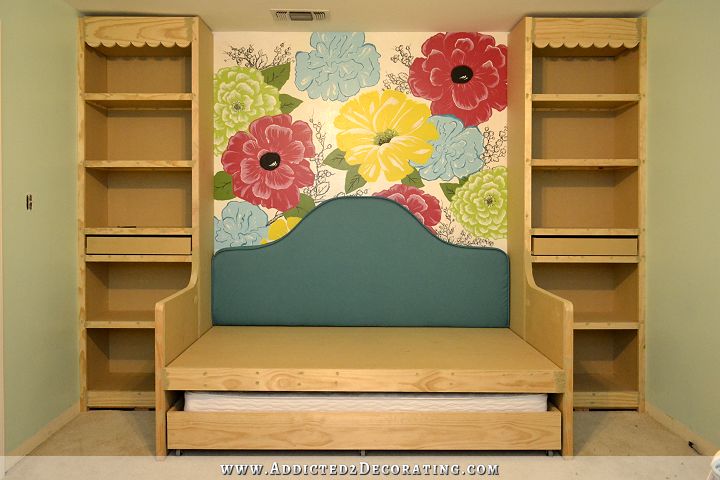
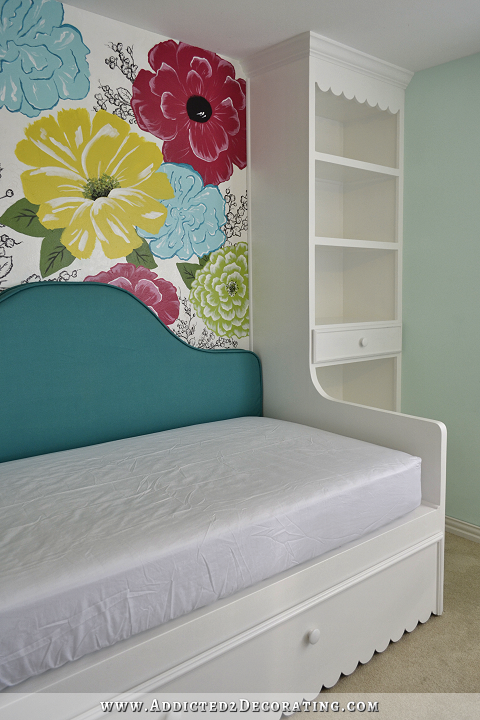
We haven’t purchased/made all of the pillows and stuff for the bed, and the shelves are all empty right now (I just finished painting on Tuesday, so we’re giving them a few days to dry before putting things on them), but here’s how the built-ins turned out…

The last time I showed you my progress, I had just finished most of the building (with just a bit of finishing left to do), and it looked like this…
To finish it, I added baseboards on the bottoms of the bookcases, and crown moulding along the tops of the bookcases. I also added drawer fronts to the plain drawer boxes using 1/2-inch plywood and two layers of small cabinet moulding, which I explained in this post.
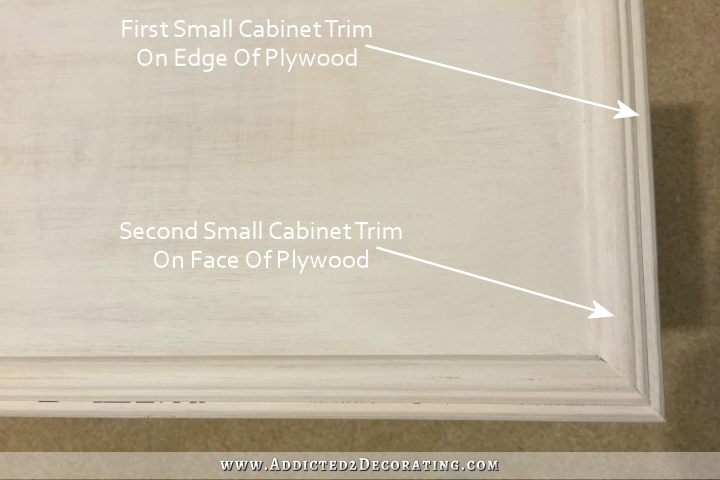
Once those were finished, I attached them to the drawer boxes with glue and finishing nails.
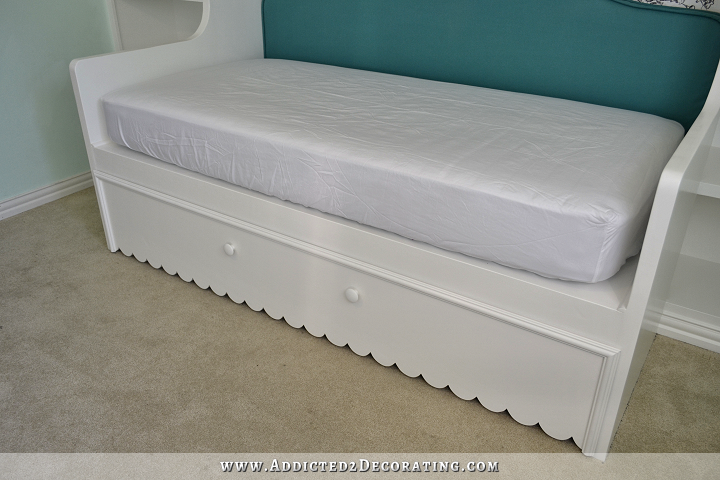
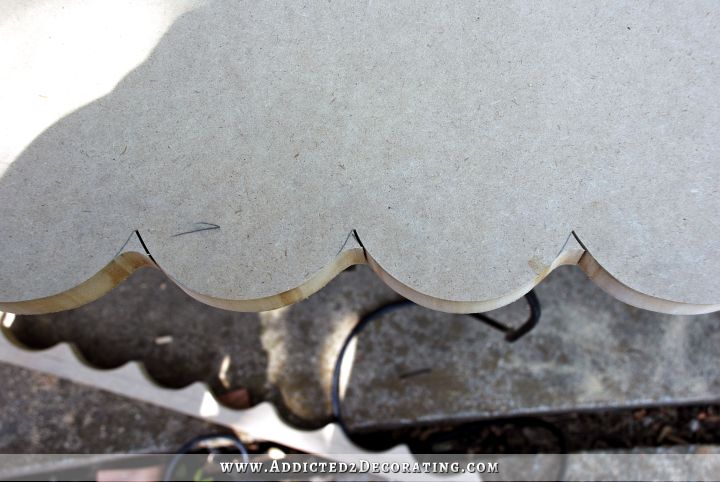
And finally, I added a decorative piece to the front of the trundle bed, much like a really big drawer front. I made it out of MDF and then added large cabinet moulding around the edges to hide the gaps when the trundle is pushed up underneath the daybed.
To cut out designs like this, I use my jigsaw. I start in one direction, and cut out as much as possible. Since I’m right-handed, I find it easier to do the bulk of the cutting working from right to left. I cut out around the scallops, and up into the corner. Then I back out a bit, curve around to the next scallop, and cut into the corner. Back out a bit, curve around, and repeat.
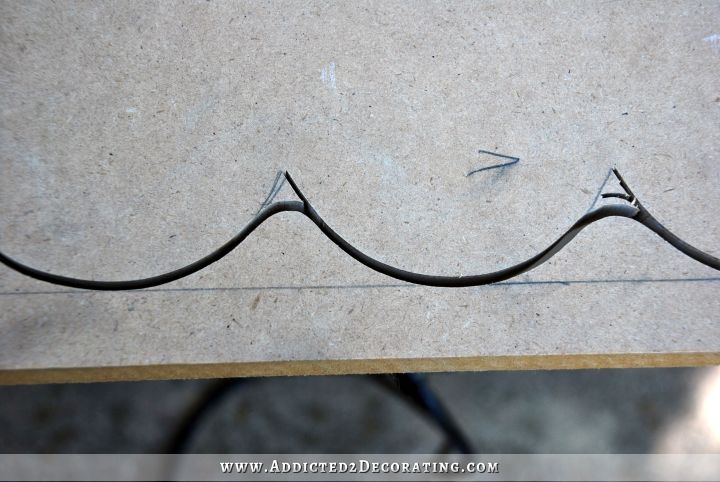
So after working in one direction, it looks like this, with little bits still left in the corners…
Then I work in the opposite direction, from left to right, to clean up those corners.
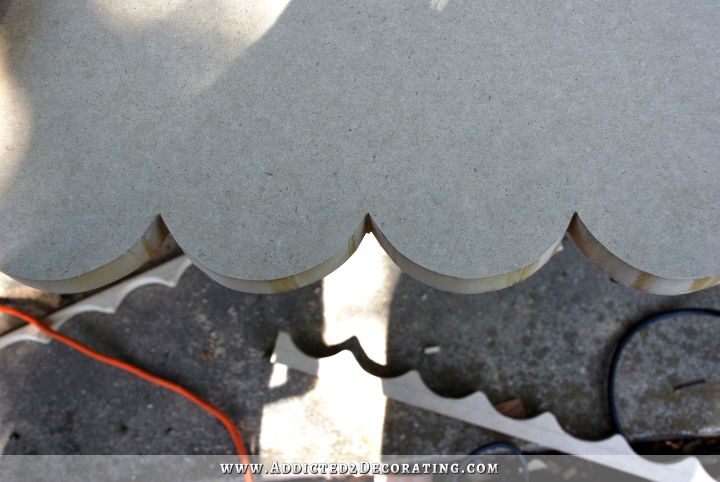
Once it was all sanded, I attached it to the trundle bed box just like a drawer front — with lots of wood glue and finishing nails.
I’m so happy with how everything turned out, especially those bookcases extensions that form the ends of the daybed frame.
For the life of me, I couldn’t figure out how to build those, and so many of you had some great suggestions. I finally decided that for me, the easiest way to do it was to it was to build the bookcases as I usually would, and then add the extensions to the front of the bookcase using my Kreg Jig.
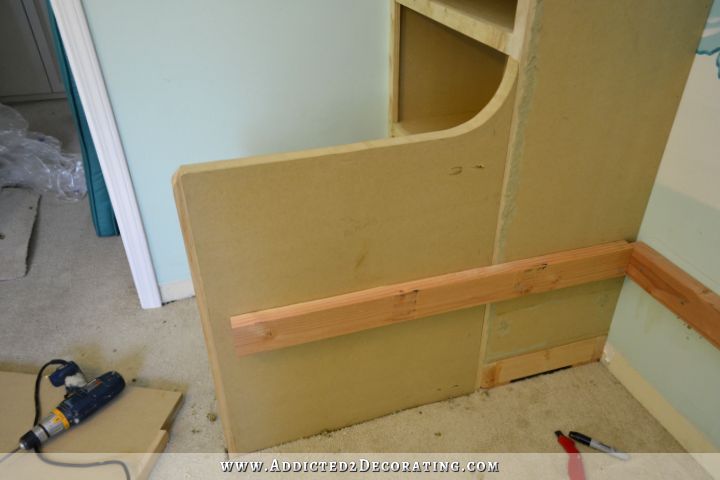
Once everything was wood filled, sanded, primed, sanded, and painted, I couldn’t even tell where the two pieces meet. So that worked out perfectly. I can’t remember who suggested that method, but thank you!!
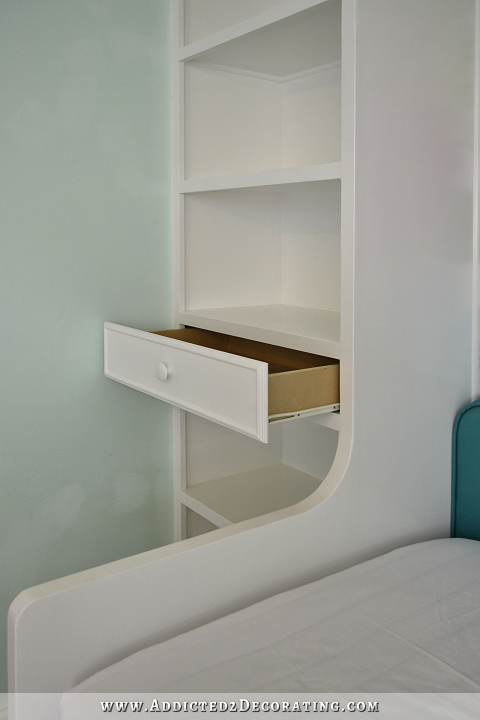
This was also my first time to build drawers. I don’t know why that process has always intimidated me before. As it turns out, it’s quite easy. The main thing is to get the spacing of the drawer glides and size of the drawer just right. I found that installing the drawer glides inside the bookcases first, and then measuring for the exact size of the drawer box and building the drawer box based on those measurements, was a pretty fool-proof way to go about it. (More on that in this post.)
The trundle bed will be great for when my niece has friends over.

It’s basically built like a really big drawer, but without drawer glides. It rolls on casters, and is completely separate from the actual daybed, so it can be moved out completely and to any part of the room where she and her guest want it.
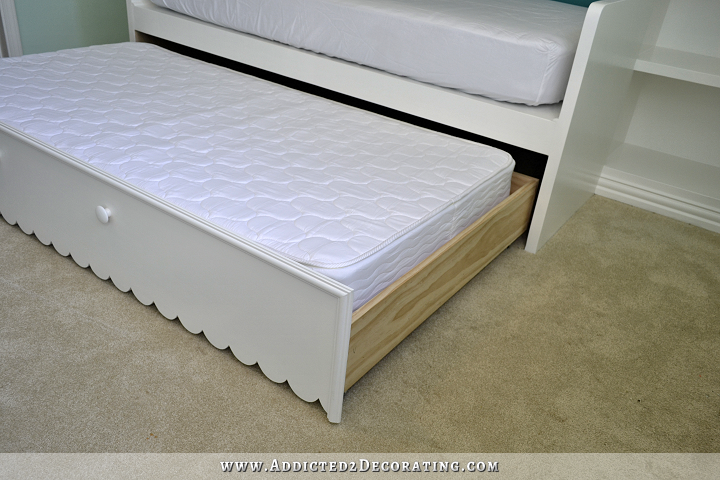
And when it’s tucked up underneath the daybed, the trim around the edges covers the gaps and just makes it look like a decorative piece on the front of the daybed.

One thing that my mom insisted on was having a couple of extra inches at the ends of the daybed so that there would be room for her hands to slide in there easily while changing sheets.

So I added an inch-and-a-half to each end, and to the back, of the daybed. When we put the sheet on yesterday, it was very easy to get our hands in there, and it was also easy to slide the mattress out just a bit to reach the back to put the sheet on. If you want to replicate this design (or a similar built-in daybed design), I highly recommend allowing that extra space on the ends and the back for easy sheet-changing. That extra space probably won’t even be noticeable once we put a comforter on the bed.
I’m so glad it’s finished! This was a big project, but I’m so glad I tackled it. I learn a little bit more about building with each and every project I do. And now I know I can build drawers! I love learning new stuff. 🙂
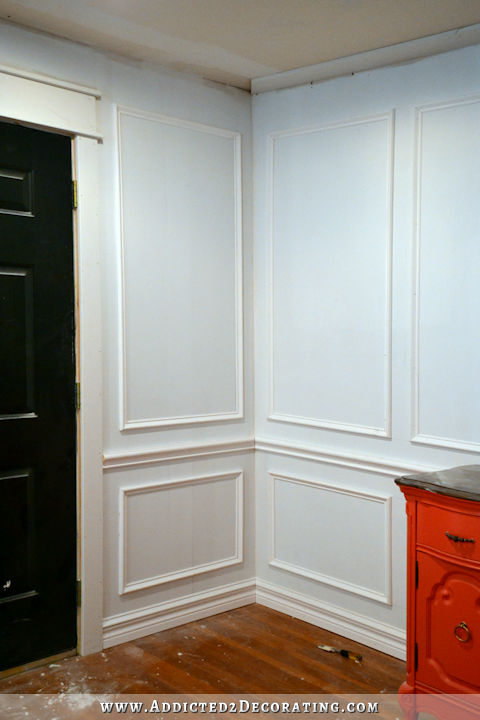
And finally, here’s a quick “before” and “progress” comparison of this wall. Here’s what we started out with…
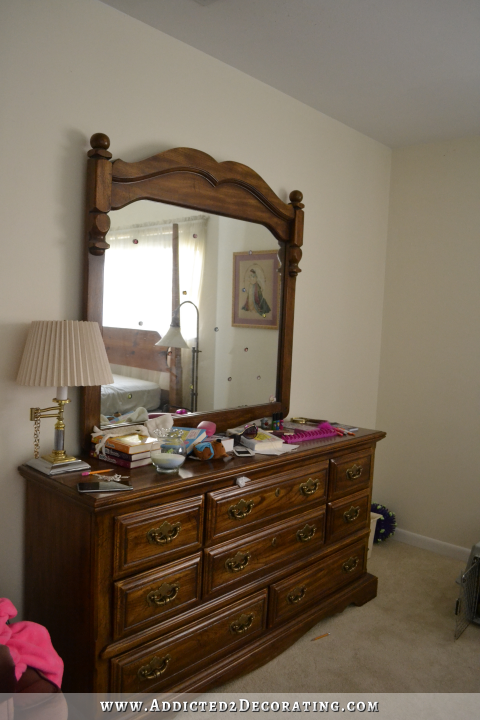
And here’s the progress…
That’s quite a change! 🙂

Addicted 2 Decorating is where I share my DIY and decorating journey as I remodel and decorate the 1948 fixer upper that my husband, Matt, and I bought in 2013. Matt has M.S. and is unable to do physical work, so I do the majority of the work on the house by myself. You can learn more about me here.
Your niece is a lucky girl. Such a talented Aunt and Grandma. This will be a wonderful space for her. I’m sure she will be thrilled and just as anxious as we are to see it all complete.
Exactly what I was going to say!!! Great thinking Mom about the “changing sheets” space. 🙂
Again, exceptional and so space conscious. Great idea for many of us with small bedrooms. Really did this quickly. Your mother is a good influence! Your niece must be feeling the love!
Just the greatest. Sure she feels really loved.
Great job and I agree. One very fortunate young lady to have an Aunt and Gram that would do this for her.
Just like everything you do this is spectacular!
First off, will you adopt me as a niece? You and your very talented mother did a fabulous job…I am in awe of how beautiful everything is. Your niece is going to be so happy with her new room. Thanks for sharing, Kristi.
This look great!! I’m loving the slideout on the bed. How fun!!!
Seng
She’ll love it! It came out beautiful!
Absolutely adorable! What a dream room- she’s going to love it!
Absolutely FLAWLESS!
Great job! I can’t wait to see the whole room dressed!
Fantastic work as always!
Awesome! What an adorable bed! As always your work is AMAZING!
Good Morning Kristi,
You and your mother did an awesome job. I love the scallops! Your niece is going to feel so happy in her new room. I love the wall color, would love to know the name. Have a Blessed Day.
The wall color is Behr Pastel Jade.
That is so fresh and pretty and functional. You could sell this set by the thousands. But this is built with love with a special girl in mind.
Kristi, Kristi, Kristi! What are you doing?! You’re unbelievable, really! I am an awe not only of the skills displayed but of your ability to explain, in minutiae, the method. You make it look so doable that I just might build myself a bookshelf or two. But that bed!!! Yelena is squealing with delight, this we know–because all of us are. Your mother and you have pulled off an incredible build, on a budget. Good for you (both!)
I second that! Excellent!
I’ll third that. Darn woman your AWESOME as always. Love that bed and built ins. Gorgeous darling simple gorgeous.
Love, Love, Love how this turned out. My daughter is asking me to make her one for her room and I am seriously thinking about doing it! Would save so much room and add a ton of storage too if we decided not to put a bed in the trundle.
You did a fabulous job on that bed and bookcases. Of course, we all knew you would!
This is totally fabulous. Your niece is one lucky girl and I know she will love it. Not only is it great for her now, she can grow into it as well. Great job!
I’ve just realised how I can do something I wasn’t sure about. The idea to cover the gaps arount the trundle with trim is brilliant and I am going to adapt it for one of my projects. Thank you very much Kristi! You are great!
I have been contemplating building bookcases on either side if my king bed. Love the drawers you built (I was always intimidated by them too!) and it has inspired me to do this in my master bedroom!
Love, love, love it! That painting on the background is fabulous too!
Looks great! I love that the shelves are wider than those in the inspiration room.
BTW, after reading about how much you like cloth shower curtain liners, I recently replaced our plastic liner with a cloth one. I am so happy with it. What an improvement! No more plastic liners, ever!
I want to be you when I grow up!!!!! Marvelous, simply marvelous! What a lucky little girl!
You did a fantastic job. Your niece will never forget this and you are probably her very favorite aunty. 🙂
By the way, that wallpaper is just so fantastic.
Not wallpaper, her mom painted it!!!
Your niece should be very thrilled with her stylish new bedroom. It should be very functional for her too, leaving plenty of room for dresser, desk and whatever else her heart desires! What a great auntie and grandma she has! Lucky girl.
I love the way you describe the details of your projects Kristi. Like leaving the space between the sides of the daybed frame and mattress for changing sheets and tucking in the bedding.
Has she chosen the bedcover/pillow fabrics?
I am truly impressed! Makes me think things like this are really doable and just not a picture in a do it yourselfer or cabinet making magazine that is soooo intimidating. Truly Kristi my mouth is hanging open!
You constantly amaze me with your amazing skills and can-do attitude! It looks amazing this young lady is very fortunate to have you in her life!!
It looks very nice. I’m anxious to see what kind of bedding you (and your niece) choose to complete the look.
Kristi
You always deliver in spectacular fashion!! I love that you take advice from your readers too! At your level of experience and success it would be easy to become egotistical. Thank you for staying down to earth and awesome!!
i rarely comment but read your blog every day! this is BEAUTIFUL!!!! what a lucky niece!
Amazing!!!!!
Who wouldn’t love that, great job!
Wow, these look really fabulous. Seriously good job! And I just LOVE that flower wall. : ) Fun Fun!
What a terrific job. Way to go!
Wonderful transformation Kristi… it is just beautiful!! I am wondering if you are going to use the dresser from the before picture? That would look stunning painted… and would provide heaps more storage.
On a scale of 1-10 this rates a 20! Looking for the right word….ahhh….splendid. Absolutely splendid!
So so cute
Great job! You do know that you and your mother have set a standard, pretty difficult for a lot of us Grandmas and Aunts to live up to. lol.
Absolutely fabulous. Kristi, you continue to wow us. Beautiful execution!
Absolutely, without a doubt, just a gorgeous space for a little girl…..love everything you’ve accomplished thus far!
That is so inviting for a young lady! I love the built in bookcases and that bed is great. My favorite art? The scalloped edges!
Following you has been a joy for a home interior decor dreamer like me! My husband’s current job keeps us from having our “forever home” right now, but you serve as an inspiration for when that time eventually comes. I’m especially inspired by all the amazing things you build. I wonder, “how in the world could I ever imagine learning how to construct that kind of stuff?!?” I guess it all starts with one project; I can tell myself I have time to grow and learn. Anyway, just wanted to share a comment as one of your many, many fans. I look forward to following your adventures! Thank you for sharing 🙂
WOW! This is incredible! Great job!!! I’ve been searching for something to do with my little girl’s room, and I love this! I have a wall with a double window (down to floor) to contend with, as well as a floor vent. Doesn’t look like I’ll be able to duplicate this, unless someone else has a genius solution?
Could you tell me what the sides of the cabinets (that extend to the end of the bed) are made out of? The part the you rounded? They are nice and thick and I would like to use something similar in my project.
THANKS
You are just amazing. Wow that is the cutest thing I ever saw.