DIY: Make A Burlap & Ribbon Tassel
I’ve seen several great tassel tutorials around the blogosphere, but I’ve yet to see anyone make a tassel like I make them. So today, I’m passing my technique along to you.


Of course, these are the instructions to make a tassel that looks just like the one I made. You can change it up, use fabric instead of burlap, use less or more ribbon–the possibilities are endless. But let’s just start with the basics.
Tools & Supplies:
- Large candle cups (available in the unfinished wood section in craft stores),
- Primer and paint in the color of your choice (I used spray, but you can brush it on as well),
- Hot glue gun,
- Scissors,
- Burlap, jute, and at least four different ribbons (I used three different colors of 3/8″ grosgrain, and one color of 1/8″ grosgrain.),
- Drill with 1/4″ drill bit (optional, but makes the assembly much easier)
Instructions:
This first step is optional, but it will make the assembly much easier if you do it, and it only takes about two minutes.
Take your candle cup…

and using your drill, enlarge the hole in the candle cup.

Then prime and paint the candle cup.


While the candle cup is drying, begin cutting all of your ribbon, jute and burlap.

I cut mine as follows:
- 8 strips of burlap 1 inch wide and 15 inches long;
- 8 pieces of jute 15 inches long;
- 8 pieces of 1/8″ grosgrain ribbon 15 inches long;
- 4 pieces of 3/8″ grosgrain ribbon 8 inches long (green in the pic);
- 4 pieces of 3/8″ grosgrain ribbon 10 inches long (turquoise in the pic);
- 8 pieces of 3/8″ grosgrain ribbon 12 inches long (orange in the pic).
Using your hot glue gun, glue the ends of each of the 8-, 10-, and 12-inch pieces of grosgrain ribbon in half and glue.
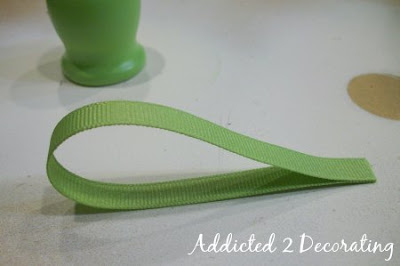
Beginning with the 8-inch pieces, hot glue them into the inside of the cup, spaced evenly.

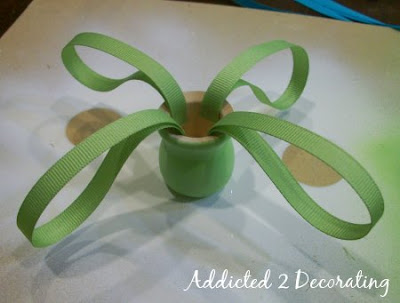
Now glue the 10-inch pieces between the 8-inch pieces.

And then glue the 12-inch pieces so that they’re centered between each 10- and 8-inch piece.

When it’s turned right-side-up, it should look like this. As you can see, you could choose to continue adding layers of folded ribbon and it would be really pretty.

But I wanted to add some earthy textures to mine to tone down the bright colors.

Cut a piece of jute 20 inches long and lay it on the work surface. Then lay the burlap, jute, and 1/8″ grosgrain ribbon on top, perpendicular to the 20-inch piece of jute.

Bring the two ends of the 20-inch piece of jute together, and tie a knot. Then slide the knot under the burlap.

Thread the 20-inch piece of jute up through the candle cup, and out the hole in the top.

Pull as tight as possible, and tie a knot in the jute right up against the candle cup to hold in place.

And ta da! You’re done! You now have a pretty little tassel to use as a decorative touch in your home…


Or to use as a cat toy. 🙂

Note: I ended up giving mine a little trim after it was hanging to shorten the jute and burlap.
So there it is…now pull out that glue gun and let’s get crafty!
This project was for my condo breakfast room makeover. Click here to see the whole before and after of the breakfast room makeover.
Or click on the thumbnails below to see other DIY projects that I did for my condo breakfast room makeover.
[categorythumbnaillist 494]


Fabulous! I love it!! Ann
Wow – so neat, and so neatly done! Love the colors. I just some fabric-covered rockes, and these colors are so similar!
http://www.azramomin.com/2010/03/river-rocksrock.html
That is so cool, thanks for sharing!
I really love that you added those earthy tones 🙂 I did something similar recently, but I just used crepe paper and I made small pompoms. This is definitely something I should try
I loved your step by step directions making your tassel. I have been agonizing for months on how to put a tassel together and you made it so simple and I can't wait to get started. Thank you so much. By the way, your tassel is beautiful and I love the idea about making it a kitty toy.
Thanks,
Sandy
Anyone here? 🙂 Does burlap need any treatment so that it doesn’t unravel or something? Thanks!
For a project like this, it doesn’t need any kind of treatment.