DIY Black & White Horizontal Striped Draperies – Part 1
Well, I procrastinated as long as I could, but my black and white horizontal striped draperies for the dining room are finally underway. I don’t know why I make a big deal of sewing in my mind. I’ve got it in my head that I really dislike sewing, so when I have a sewing project that needs to be done, I drag my feet as long as I can. But I generally find that once I get started, it’s actually pretty enjoyable and even relaxing, and a nice change of pace from the harder and more strenuous projects I take on (like the building projects that tend to be my favorite).
Anyway, I’ve had a few of you tell me that you are waiting for me to do this project so that you can have directions for your own striped draperies. So I hope I can pass on some helpful tips and tricks.
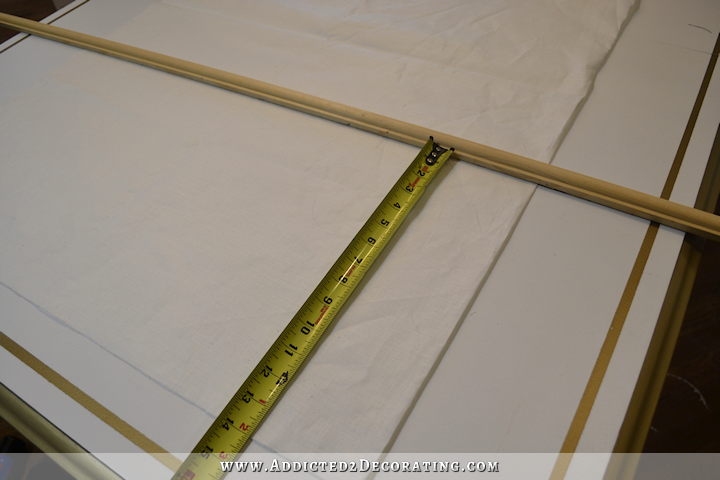
Before I began on the draperies, I installed the drapery hardware (including the rings) so that I could measure the exact finished length before starting on the draperies. This is simple a matter of using a measuring tape to measure from the floor to the inside bottom of the drapery pin ring, which is the small ring that that’s attached to the bottom of the main ring that goes around the drapery pole. That tiny ring on the bottom is what the drapery pin slides through.
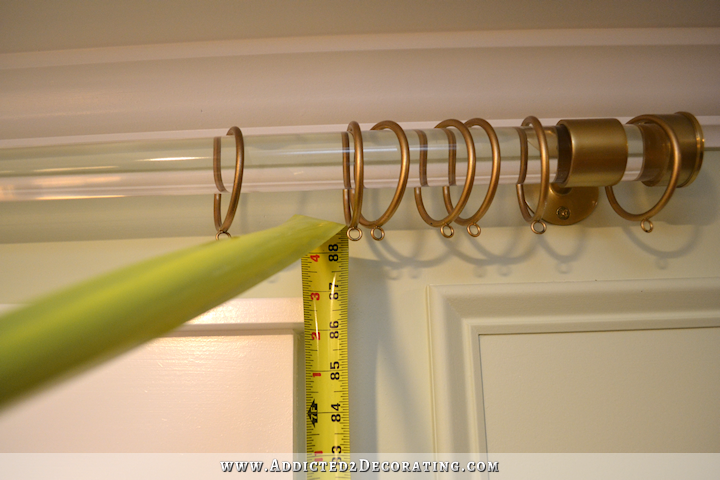
Once you have that measurement, you can add add or subtract as much as you want depending on the style you want. For example, if you want your draperies to puddle on the floor, you can add up to 12 inches or so, depending on how much of a puddle you want. If you want your draperies to break on the floor, add an inch. If you want your draperies to be right at the floor, but not break, then subtract about 1/4 inch.
To be clear, I couldn’t find any striped fabric that would work for my draperies. I wanted a specific number of stripes (exactly seven stripes), and I wanted each stripe to be close to exactly the same length. So finding a fabric with stripes that would work out to exactly seven stripes per panel, with each stripe being the exact same height, and that would perfectly fit my needed finished drapery length of 88.75 inches, would just never happen. So I purchased solid black linen and solid off-white linen and pieced them together to make my own stripes.
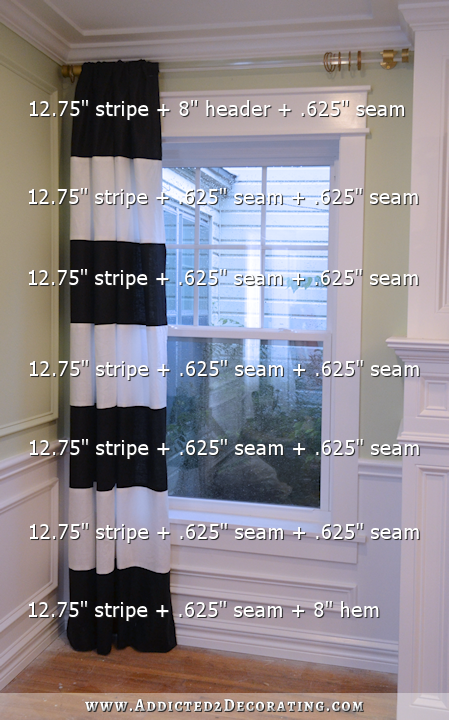
So once I had my finished drapery panel length, it was just a matter of dividing that finished length by the number of stripes to give me the finished length (i.e., without accounting for the extra fabric needed for seams or hems) of each stripe. Mine came to something like 12.68, so I just rounded up to 12.75. We’re not building rockets here. 😀 That tiny discrepancy in measurement won’t matter in the end.
And finally, I added in the amount needed for seams and hems. On the top and bottom black stripes, I added 5/8 inch for one standard seam allowance. But those stripes also needed allowance for a hem (standard hem for the bottom stripe, and header for the top stripe), so I added eight inches to both for a cut length of 21 3/8 inches for the top and bottom stripes. On the other stripes, I just needed to add an allowance for two standard 5/8-inch seams, which made the cut length 14 inches for those stripes. Here’s a visual (on a very unfinished panel) for those of you who are visual learners like I am:
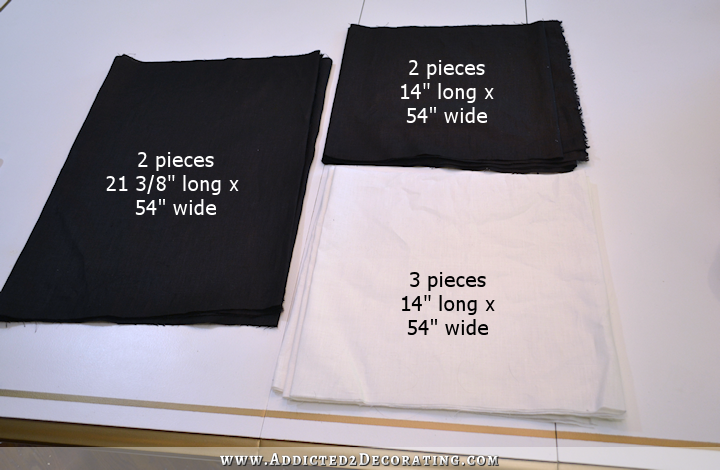
So for one single-width drapery panel, I needed 2 black stripes at 21 3/8 inches, 2 black stripes at 14 inches, and 3 white stripes at 14 inches.
The biggest challenge on this project is cutting all of the stripes as perfectly straight and square as possible. This is the easiest way I’ve found…
First, I fold the fabric in half lengthwise so that the two selvage edges are together, making sure that there are no pulls or wrinkles along the folded edge. If the folded edge pulls and wrinkles, that means that the selvage edges aren’t together evenly. I just adjust them until the folded edge lies perfectly smooth and the selvage edges line up with each other. Then I place a framing square along along the folded edge, and mark and cut along the bottom of the framing square.
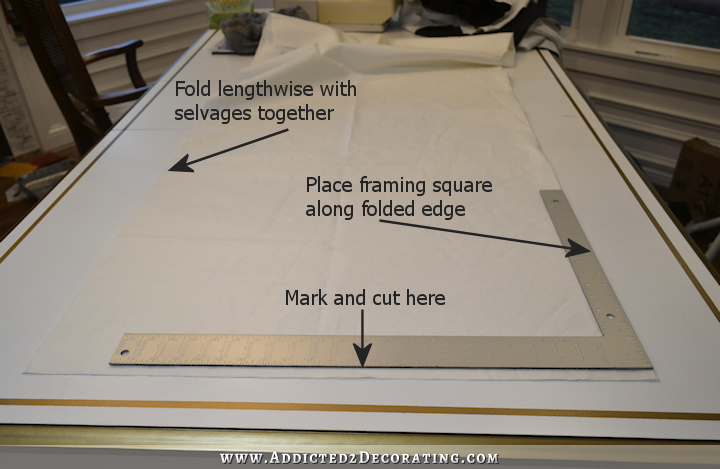
That method is the easiest I’ve found for giving me as straight and square of a starting point as possible.
DON’T EVER TEAR YOUR FABRIC!!! I’ve seen people do that, thinking that fabric always tears straight and square, and it just doesn’t. Plus, tearing the fabric also stretches the fabric. If you start with a torn end, you’ll end up with draperies that look like the cheapest of cheap clearance curtains. Take the extra time and effort to start with a perfectly straight and square end, and it’ll make a huge difference in how your draperies turn out.
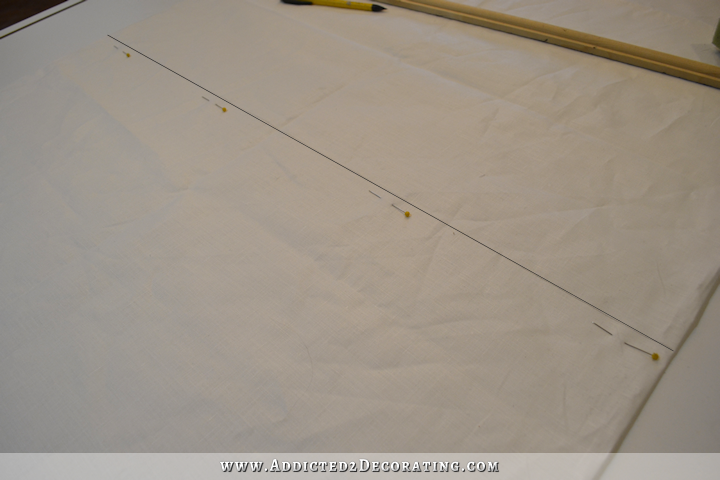
Once I had a straight and square end to start with, I just used a straight edge (generally a piece of extra wood trim, since I always have plenty of that lying around) and a measuring tape to measure out the stripes. I took my time to measure in several places all the way across just to be sure it was as straight and square as possible before marking and cutting.
When I had the straight edge perfectly in place, I marked the fabric with a pen or pencil. And yes, I marked right on the fabric. It won’t show since it’ll be hidden in a seam. Then I removed the straight edge, and pinned the two layers of fabric together before cutting. I find that the pinning is very important to prevent the fabric layers from crawling and shifting as I cut.
As I cut the strips, I marked each one so that I would know which side was the right side, and which edge was the top.
It’s very important to always do this when cutting solid fabrics or patterned fabrics where the pattern doesn’t have an obvious top and bottom.
You always want to keep the fabric going in the same direction because some fabrics have a very subtle nap or directional sheen that may not be obvious until you get your draperies finished and hung, and then it becomes glaringly obvious that one stripe (or one drapery panel) is sewn with the fabric going in the opposite direction from the others and looks slightly (or not so slightly) darker/lighter/duller/shinier than all of the others. Just always be sure to mark your panels or strips so that they’re all coming off of the fabric bolt the same way. I do this by always putting two straight pins (just in case one falls out) in the top left corner of the right side of the fabric. That’s my system, but you just find your system and stick with it so you’ll always know the direction the fabric needs to go when you start sewing.
Now just one more very important piece of advice when making draperies — cut off the selvages!
On just about every fabric I’ve ever seen, the selvages are pulled and puckered. It may not be much, but it’s enough to make a difference in the side hems of your draperies if you leave them on. You can see what I’m talking about on this black strip that I cut.
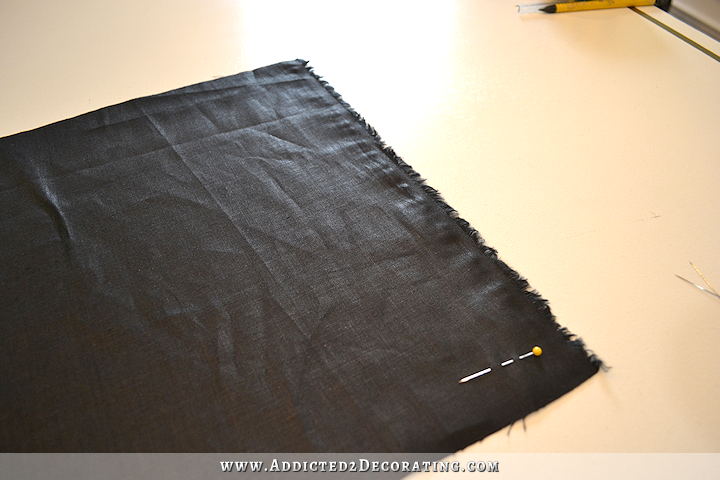
Just take the extra time and cut the selvages off so that the fabric can lie perfectly flat instead of being pulled and puckered along the edges. That will give you the best end results, and will give your drapery panels the best chance of hanging perfectly straight along the side hems.
When I was cutting the black strips, I cut the strips and then cut off the selvages. When I was cutting the white, I did it in the opposite order — cut the selvages off of the whole length of fabric, and then cut the strips. I’d recommend the second way, as it makes cutting the strips much easier, faster, and more accurate.
And the rest is pretty self-explanatory. I pinned the strips together (making sure to use a longer black strip at the top and bottom for the hem/header), seven strips to a panel, and sewed them together.
Once they were all sewn together, I pressed the seams open and flat to give a really nice, crisp appearance on the front.
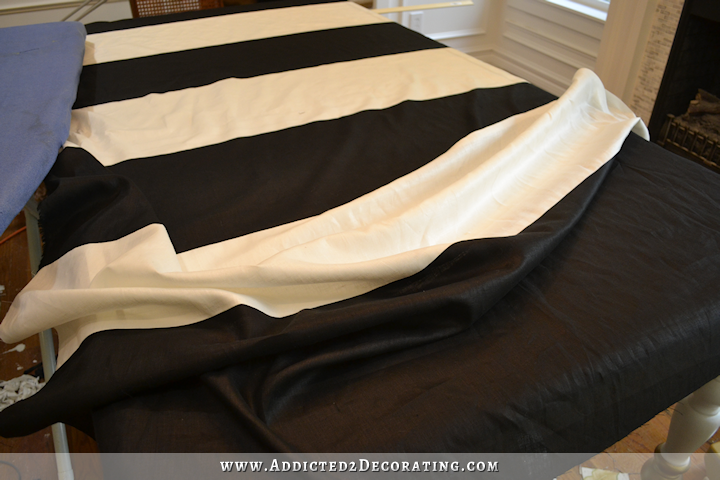
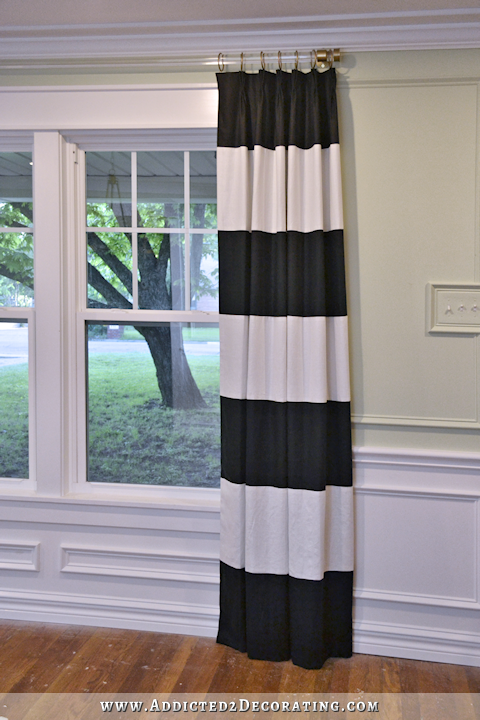
And that’s as far as I’ve gotten so far. 🙂 I did pin one of the panels up onto the drapery rod just so I could get an idea of what the striped draperies will look like. Of course, it’s not hemmed, there’s no header in it yet, and it’s not lined. This is just the face fabric.
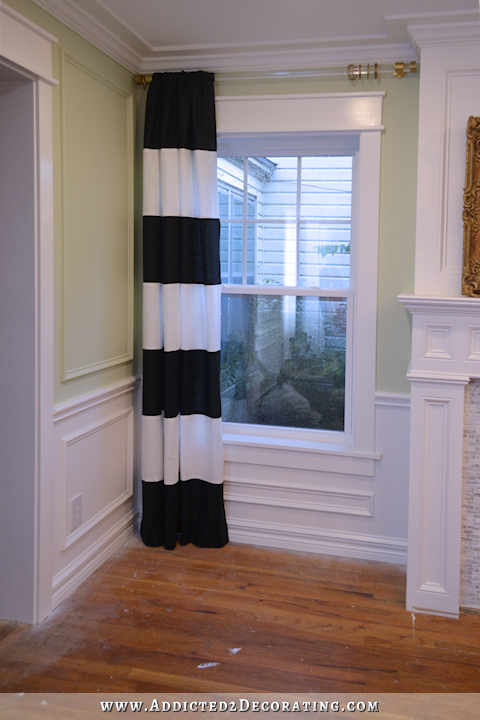
I love it! 🙂 I’m so glad I went back to the striped draperies. It’s what I’ve wanted all along, and I think I would have been disappointed with anything else.
UPDATE: The draperies are finished! Click here to see how they turned out…

Addicted 2 Decorating is where I share my DIY and decorating journey as I remodel and decorate the 1948 fixer upper that my husband, Matt, and I bought in 2013. Matt has M.S. and is unable to do physical work, so I do the majority of the work on the house by myself. You can learn more about me here.

OMG! I love, love, love the way this looks! Thanks for the tutorial.
I didn’t realize you were making the stripes, I thought you had purchased striped fabric. So at the beginning of your post, I was perplexed at your measurements. Silly me! 😉
they are looking awesome!
One thing I might comment on, if you haven’t finished yet, would be to press the horizontal seams to the dark fabric, to make sure it doesn’t show thru the white.
I once made a set of drapes double width (118″), and did it crawling around on the floor to cut, match pattern, etc. It was a back-breaker of a job, but they turned out so awesome, and only cost me $20! I managed to get a 25 yard bolt from my old job for that price when we were closing the store. They are more awesome to me than the ones that cost me $100 in fabric! I know, lucky me!
Same here. I originally thought you had purchased striped fabric for the draperies, so I was a little confused by the measurements at the beginning of the post but quickly figured out my error. Your striped drapes are going to be beautiful and absolutely perfect for this room.
I press my seams because I always use blackout lining, so since sunlight doesn’t stream through the fabric, the pressed seams never show through on thin/light fabric. But that’s definitely something to keep in mind if someone is using a thinner lining or making unlined curtains.
same here, I couldn’t for the life of me imagine what you were doing in terms of measuring… had to scroll down to the pics and see that you actually made the stripes! Awesome! as well as the look of them!!
Always amazing! I, too, love this look! Waiting to see where the watercolor fabric will appear!
How let me count the ways… I love these and thank you for the how to i have been wanting to try this for my daughters room!! I am so excited to see this room when its all done!
I love them!
I was beyond excited when I saw the title of your post this morning. I have been patiently waiting for today ever since you announced stripes were back…I was one of the ones who screamed “nooooooo” when you decided to not do the striped curtains. I knew that the other curtain plans you talked about just weren’t right, and weren’t you.
I am planning on making some of these for my dining room and have been waiting for you to show the easiest way to do this. This project is at the top of my list for when I ever get some spare time. I cannot wait to see all of them finished!
Very fresh look! So pretty!
I know they’re not finished but it’s obvious how beautiful they will be! The green walls look so pretty next to them too. As always I am looking forward to the finished product!
So happy you have a sneak preview! So exciting!
Great tips about the selvage edges and grain tearing.
One question on pressing the seams open: might you be able to see the black seam allowance under the white once it’s lined? Or is the white thick enough to hide it. NOT trying to butt in, I promise!
That’s actually a good point. I always use blackout lining, so I don’t worry about things like that since blackout lining doesn’t allow even a little bit of sunlight through the fabric. But for those using anything thinner than blackout lining, that would definitely be something to consider.
I l.o.v.e. the stripped panels. So stunning. I also love, love, love the hardware! May I ask where you purchased them?
Oops! I meant to include that. I’ll gather the info and include it in the final drapery post (hopefully Friday).
Awesome! Thank you 🙂
I love the hardware too! I started searching for acrylic or is it lucite rods? I look forward to your post on where you purchased these too. Absolutely stunning.
I am a fairly new stalker to your blog…I just love everything you do and enjoy going through your creative processes! One of my most favorite things about your tutorial posts are that you write not only what to do, but what Not to do! You are a funny person!
I too have been waiting for the drapery tutorial and reveal (I kept thinking, she’s stalling), and I had no idea you are creating the stripes! Yikes! You are a brave and talented lady! I cannot wait until they are complete and up!
You are the only blog I hope to see daily…no pressure! I just miss you more when you take time off…
Your Newest Stalker,
Oh my!! Just love them. And the drapery rod and hardware…to die for. What is the diameter of that rod?? I love it, it looks huge…I’m shopping for rods for my master bedroom and that is exactly the diameter I want.
The rods are 1.5 inches diameter.
Thank you for the tutorial Kristi! I asked you about how do you measure the length of the curtains, thank you for the explanation and the picture! Can I ask you some more questions, please?
Do you measure at several points, like both end and the middle of the rod? What if the floor is not strictly horizontal and the measurements are slightly different? I would imagine, if the rod is horizontal and the floor isn’t, the correction should be done at the hem. But would you do the hem while sewing the curtains (as in your previous tutorial somewhere in the archives of the blog) or would you rather hang the curtains with the hem unfinished, pin the hem making sure it is the same distance from the floor (1/4 inch or so), and then finish it?
And one more, theoretical for me question, as I am not making striped curtains, but is might be interesting for someone else. If the window is wide and you need to join 2 or more widths of the fabric, is it better to sew the individual stripes first and then sew the blacks to the whites?
Measuring at different points would depend on the style. If you’re making draperies that puddle, then there’s no need. If you’re making ones that break on the floor, there’s really no need for multiple measurements. But if you like your draperies to hang barely above the floor without touching the floor, you’d need multiple measurements, and basically each drapery panel might be a slightly different length.
The correction would be done at the header. When you make draperies, the very first step (after you have your face fabric prepared, e.g., sewing strips together to make a striped panel) is to hem the panel. That’s literally step one in making lined draperies. So any adjustments to the finished length of the panel would need to be done in the last steps, i.e., folding the buckram into the header.
If I were making double-width striped drapery panels, I would sew the single-width strips together to make each panel first, and then sew the two panels together.
I’m making drapes this week also. You bring up an interesting point…Do I cut off the selvage edge of the lining also? I’m not using blackout lining…just regular lining.
Blackout lining and dimout lining don’t have selvages since the rubbery part that the fabric side is backed with keeps it from unraveling on the edges.
The regular fabric lining like you’re using will probably need the selvages trimmed off. But keep in mind that drapery lining is generally wider than it needs to be for the face fabric, so during the process of joining the face and lining together, it generally needs to be trimmed down anyway. So don’t waste time trimming both edges before you get started. Just trim one edge, attach that edge to the face fabric, and then trim the other edge as you’re adjusting for the needed width.
Thank you so much for your advice.
These drapes are beautiful. I had to laugh at myself as my first thought (“Is she painting the stripes?”) was immediately trampled by, “No! This is Kristi! She actually constructs drapes!” Thank you for the tips! I’ve sewn most of my life (self-taught), but I’ve learned many new tips from you each time you post a sewing project … or most any other project. I look forward to the end result!
Please name of color and mfg. of the green paint – just love it – thanks
The green is Feng Shui by Behr (Home Depot).
Oh, and another question, if you don’t mind – did you pre-wash the fabric? And the lining? If not, how are you going to clean the curtains, if necessary? I’ve read some fabrics can shrink even after dry cleaning.
I never pre-wash the fabric and lining when making lined draperies. All decorator fabrics that I’ve seen are dry clean only, and washing them generally changes the feel of the fabric considerably, and sometimes changes the look. It can certainly fade the colors.
As far as cleaning them, I always tell myself that I’m going to dry clean my draperies on a regular basis. (Annually?) But I’ve actually ever had draperies cleaned. I find that they stay perfectly clean if I vacuum them with an upholstery attachment on a regular basis.
going to be absolutely stunning!~ so glad you went back to your stripe plan.
So glad that you returned to your original idea. The black striped adds a modern element to the traditional background. Love it with the color green, too
Thank you for another great sewing tutorial! I followed the one you did some time ago for pleated, lined draperies and they look completely professionally sewn. These ones that you are making now look dramatic and exciting in your space. 🙂
When I think of “stripes” I always see vertical, up and down, not sideways (horizontal) LOL
I am sooooo happy you went with stripes, I love stripes plus they look super good in the room and most importantly, you would not have been satisfied with anything else…
The draperies are beautiful, I’m also glad you went back to them. 🙂 As I know you appreciate tools, I thought I’d mention a couple that would make this job much easier. I sew a lot and these may not be worth it for you, but a cutting mat + rotary cutter + ruler (one meant for using with a rotary cutter) would save you the pinning/marking step and the cutting goes way faster as well. I know you don’t sew very frequently so it might not be worth it for you at all, but I mention them in case you don’t know about them and want to check it out. 🙂
Another one wondering if you prewashed!
This is looking amazing. Was also confused until I realized you were making your own striped curtains. =D I love the view of the outside – people are going to be able to walk by and see amazing landscaping, a yellow house, and striped curtains, and get a feel for you right away. It’ll also be beautiful to look out at.
I don’t pre-wash. I don’t like what that does to decorator fabrics (changes the texture and fades the color), and almost all decorator fabrics are dry-clean only because of how washing changes the looks.
I find that the draperies stay perfectly clean with regular vacuuming with an upholstery brush attachment.
Thanks for the info! =)
I would be surprised if they saw the stripes as she is using blackout lining. The lining will face the window and the outside.
Aw, that’s true – what a shame, they would make quite the statement outside!
I love it. T-Square. Metal measuring tape. Piece of wood trim. This is how a carpenter sews!! LOL!
don’t forget the carpenter’s square. When she rocks, she rolls. Kristi, because of you, I made drapes for my home from Painter’s drop cloths from Home Depot and table linens from Walmart and absolutely love them.
Wow the striped drapery looks amazing, and I too didn’t realize you were making your own stripes, but then again you are a wonder woman and so talented. I would never have thought of making my own striped fabric. I would have been looking, looking and looking for it, but you have a vision and make it happen and that’s yet another thing that makes your blog so appealing. The drapery rods are simply gorgeous and really give the wow factor! Can’t wait to see this dining room reveal.
Love the stripes!! They look awesome and make such a statement. Very striking.
One thing I would add/suggest on sewing the seams that I do just to make the measurements easier to deal with, is use a 1/2″ seam allowance. Just seems easier to use when making the calculations on widths and lengths. I could never understand why or where the 5/8″ seam allowance came from. I have been sewing for 50 years and clothing was always done with 5/8″. But with home dec sewing, I think the 1/2″ is an easier measurement to work with. Hope this may help someone. Can’t wait to see the whole room come together. You are getting close!! Thanks for sharing your days and projects with us.
LOL…you’re so right! I have no idea why 5/8-inch is the standard seam allowance, but I’m old school and can’t break myself of it. 😀 Who the heck came up with that?! I’ve tried to use 1/2-inch seams, and just can’t do it. But it’s perfectly fine to use 1/2-inch seams, and it definitely makes calculations easier!
OMG, this is the most beautiful drapery I have ever seen. I eagerly await a posting from you every day, and I am always amazed at your talent, foresight, and ability to do everything yourself. Remember the song, “God Must Have Spent a Little More Time on You” – or some such thought – I think of this song every time I read one of your posts. I am sure this song was written for/about you! This is the best, most useful blog on the internet.
I’m always so impressed by how you are able to achieve your vision – these look just as I’d imagined they would from your mock-up photos. And I’m so glad you went with the stripes! They’re classy and fun. I know exactly how you feel about sewing (I’m the same way). To quote a friend of a friend, “I hate sewing; I love having sewn.” Although I don’t mind it once I get into it. It’s the getting into it that’s hard!
Your room is really coming together, and everything is beautiful. I am always in awe of all your skill sets. Thank you for the tutorial.
I am obsessed with those curtain rods! I really love them. Where can I purchase them?
I’ll gather the info and include it in the post with the finished draperies (hopefully Friday!). 🙂
L O V E them – they are fabulous!
Thanks for the ACTUAL PICTURES accompanying the directions – the measuring is where I always get mixed up 🙂
Beautiful! Looks amazing with the wall color.
I love the stripes too! I wanted thick-striped curtains in my home, and was terrified I would sew my grey and white fabrics crooked, or that the material would pucker and I would end up with awful panels. I decided to paint the stripes on instead. (:
Just beautiful! I’m so happy you went with the stripes, you have wanted them for so long. I thought you were purchasing striped material, you certainly have patience along with talent!!
Gorgeous clean color! I was skeptical about the stripes but they look beautiful, nice vision!
I’m so happy to see the stripes back. And I just LOVE the rods and hardware. It’s so exciting for me to see it coming together, I can only imagine how excited you must be as each project gets underway.
The draperies are absolutely STUNNING (or will be once they’re finished). The panel you photographed at the window took my breath away–just gorgeous. Some above mentioned a mat and rotary cutter to get clean, straight cuts and I would second that. I can’t imagine doing all that cutting with scissors! But your first panel is proof that you can do it. Again, so very elegant and beautiful. I’m glad you went back to stripes too.
Hi Kristi – I’m new to your blog, found you because I needed instructions on painting my cabinets and have been wandering around your site since then. I have learned so much. I also love to make things that make me happy. As so many others have stated, your skills analyzing and then creating are impressive. I also quilt. The rotary cutter/mat/ruler combo is the best thing to happen to quilting since a sewing machine. You will find that your cutting time is reduced dramatically and is very accurate if you wanted to give them a try on future sewing plans.
Best wishes – your projects are beautiful.
These drapes are just going to be awesome!!! I think I could even handle this sewing (at least what you have done so far)!! I can’t wait to see them when they are done!
Hi Kristi
I have to say that I am soooo happy you bought the sewing machine. You need a good machine! With all the DIY you do, it is like any other tool. Good for you!
The drapes are beautiful BTW.