DIY Colorful Shower Curtains (In A Watercolor Floral Fabric)
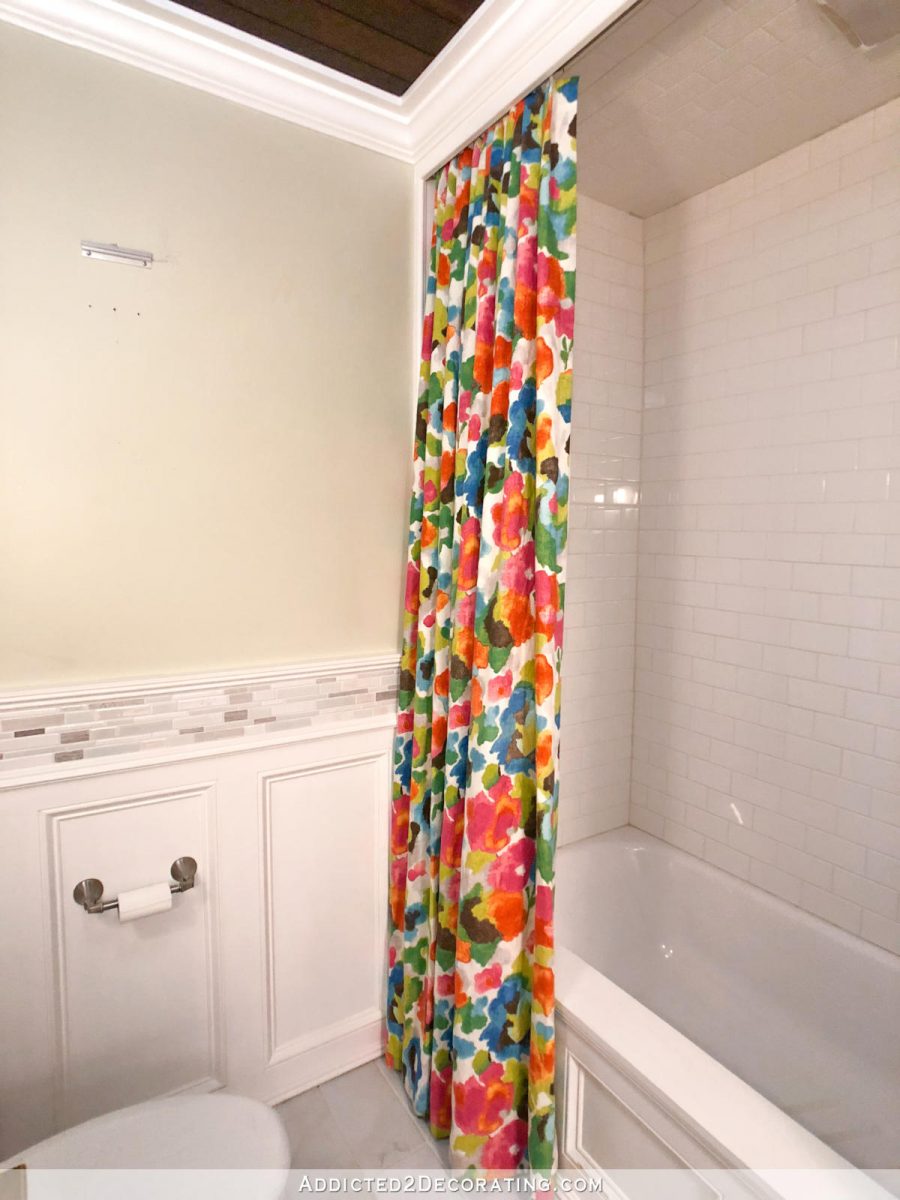
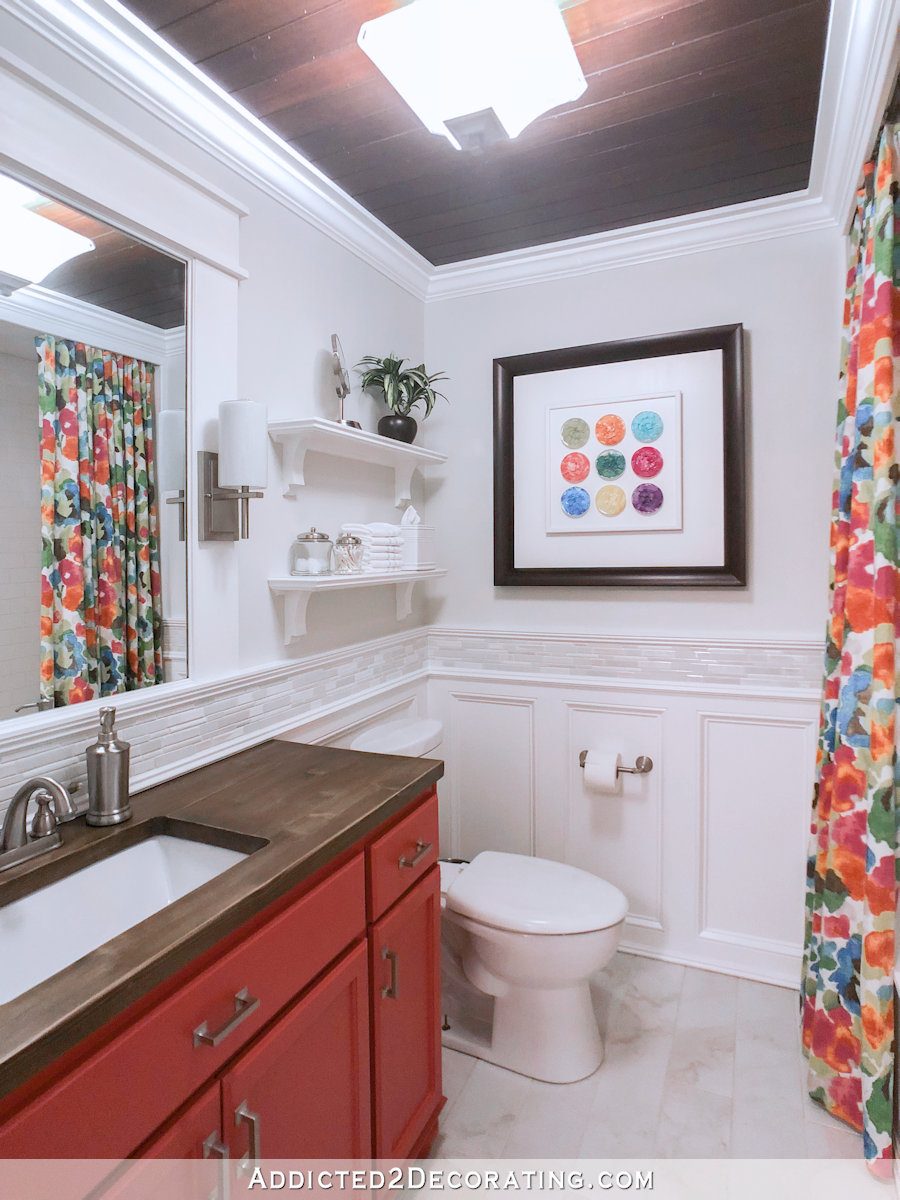
I love colorful shower curtains, but I always have a hard time finding ready-made shower curtains that I like. So I always opt for a DIY shower curtain for my bathrooms. They’re not difficult to make at all, and they really lend a custom look to the bathroom. And I finally got the one for the hallway bathroom makeover made! I think the bright watercolor floral fabric adds so much color and life to my previously blah bathroom (which isn’t finished yet…obviously)…
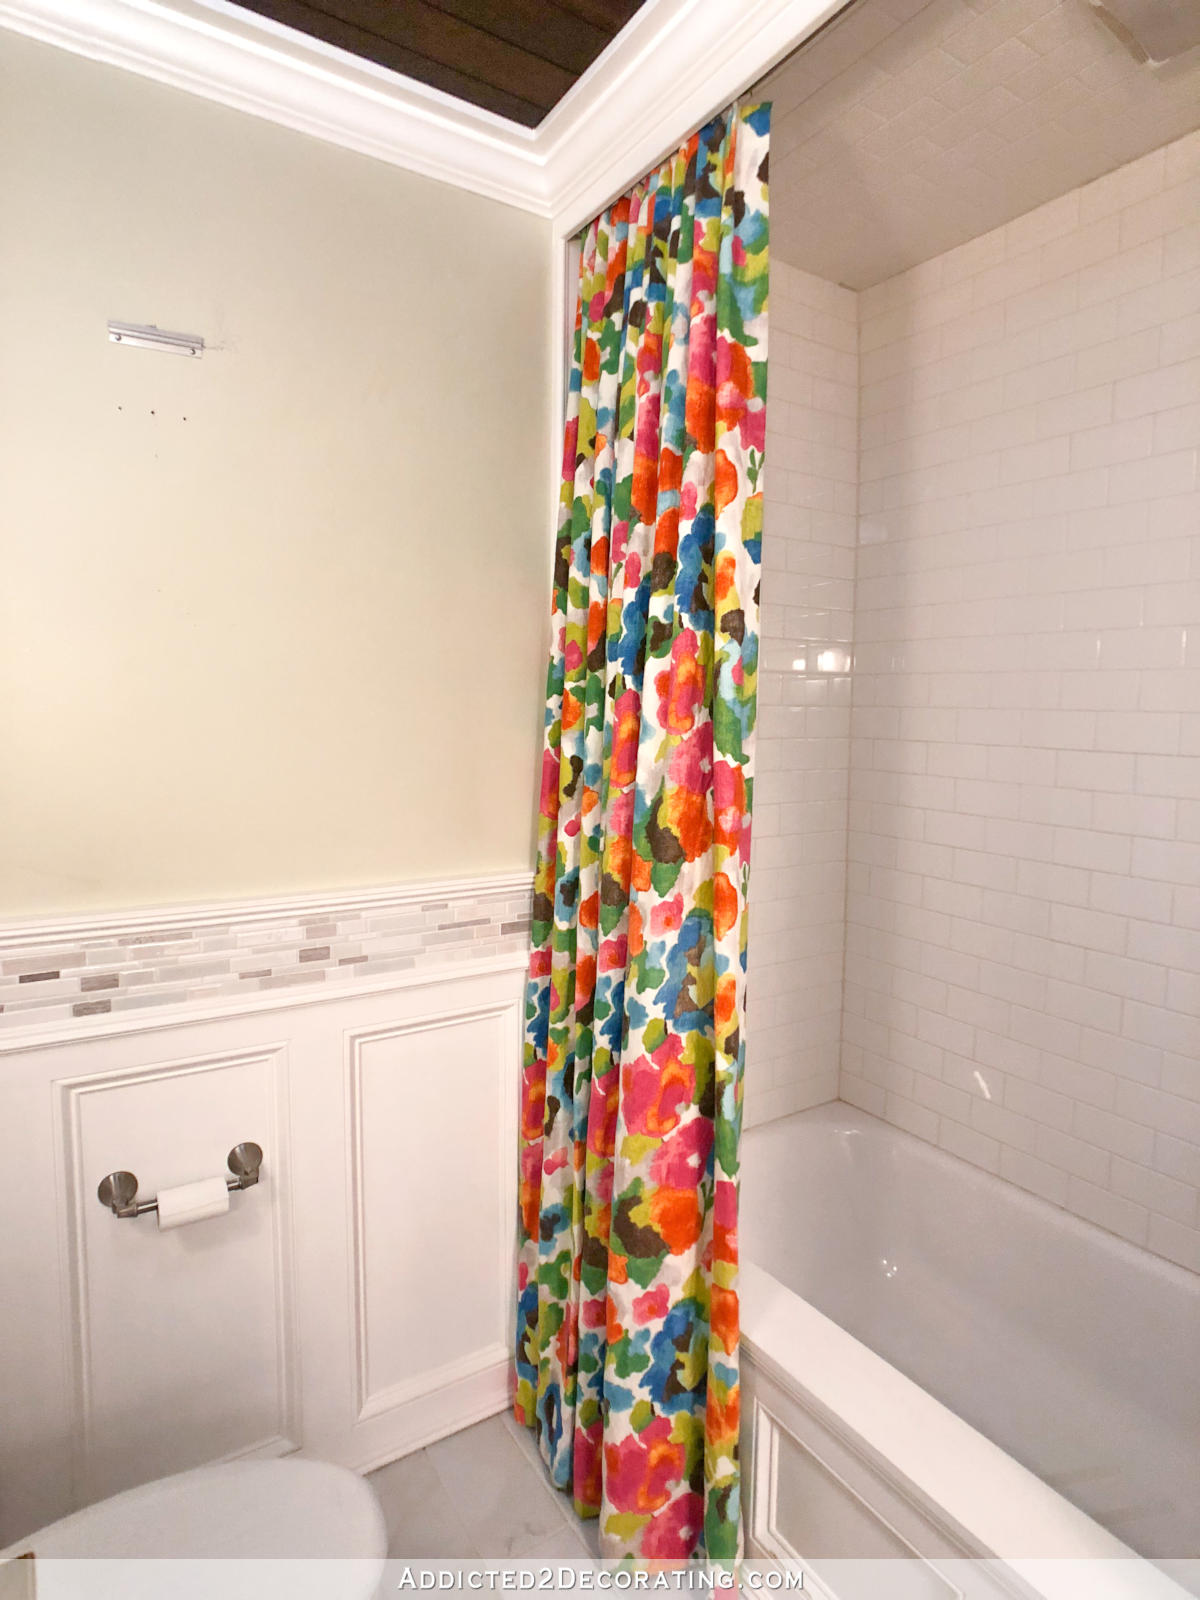
I still haven’t painted the walls, and that drab green color is doing the room no favors. It will soon be a bright, clean white. I wish I could change the tiles in the accent border, but that’s way more than I want to do right now. So for now, the tiles will stay. But I might swap those out later this year or next year after I’ve gotten way more done on the rooms I’m actually supposed to be working on this year. 😀
Here’s a peek of the new shower curtain with the colorful resin petries that I intend to frame for the wall, and a glimpse of the new cabinet color.

I didn’t take pictures of the process while I was making these colorful shower curtains, but I can explain to you exactly how I made it. I mean, in reality, this should be a very simple project. Mine was pretty frustrating because of sewing machine problems, combined with the fact that I was using some of the most hard-to-work-with fabric I’ve ever used.
I think it probably would have been better had I not washed the fabric first. You’re really not supposed to wash decorator fabric, and I almost never do. In fact, I never wash fabric when I’m making draperies with it, but then they have to be dry cleaned. I didn’t want to have to dry clean a shower curtain, so I pre-washed the fabric, and with this being a linen blend, it just destroyed the body (i.e., the hand, the weight, whatever you want to call it) of the fabric.
I washed it by itself, and I clean out my dryer lint trap after every single load of laundry without fail. So out of six yards of fabric, this is how much lint came out of that shower curtain fabric…
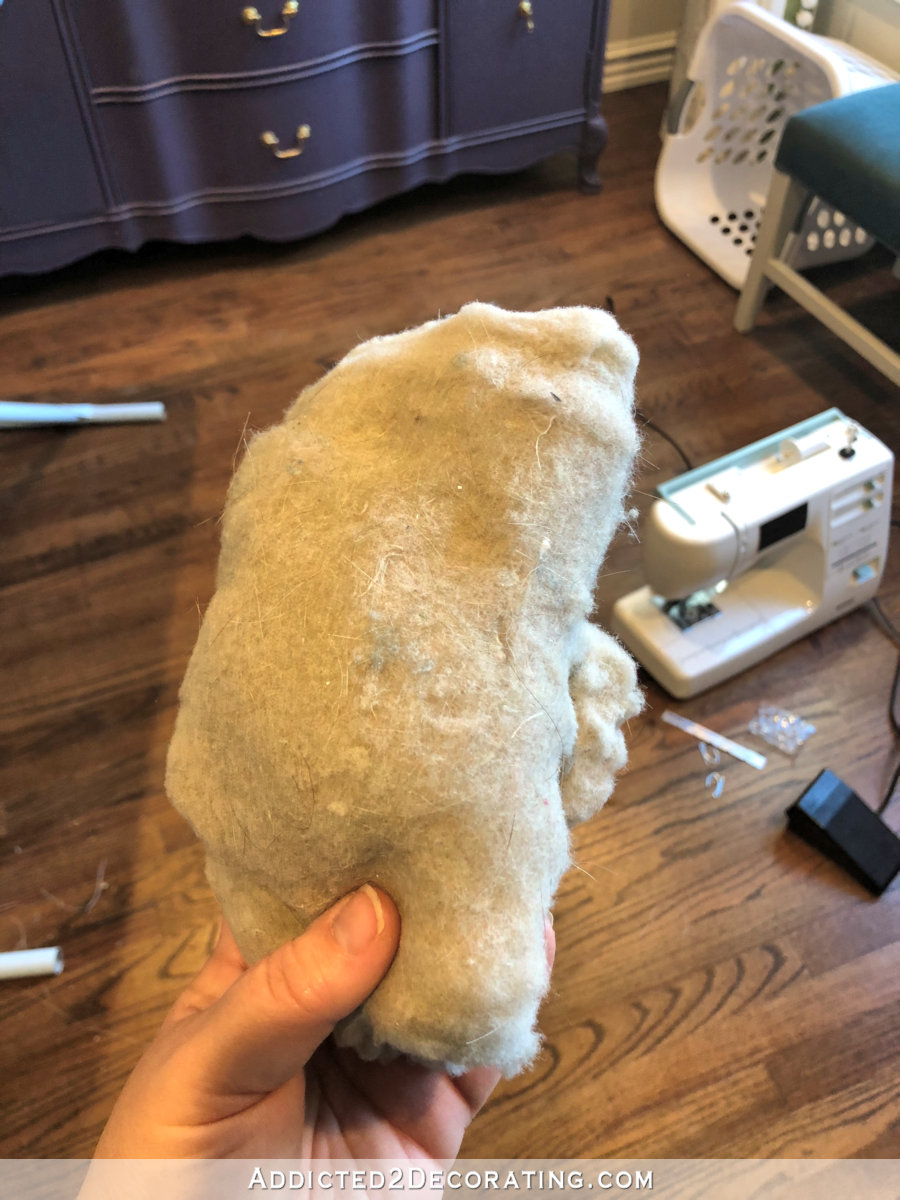
Isn’t that crazy?! I’ve never seen that much lint from pre-washing fabric! And it’s rolled up like a burrito, so it’s that thickness all the way around. Just crazy.
So this fabric was a pain to work with. It would crawl and shift as I’d work with it, and it didn’t even have enough body to it to hold pins. I’d pin a hem, and then go back to sew the hem, and half of the pins had fallen out.
The lesson here is that if you don’t have a lot of experience sewing, stick with cotton. 100% cotton in a decorator fabric weight is a dream to work with compared to crawly, shifty fabrics like pre-washed linen and thin polyesters. If you want a simple sewing project, 100% cotton decorator fabric is always the best choice.
Steps To Make Your Own Colorful Shower Curtains
1. Sew two widths of fabric together lengthwise.
Shower curtains are generally 72 inches wide. That’s 12+ inches wider than the standard width of decorator fabric. So to have enough width for a shower curtain, you have to sew two width of fabric together along the length of the fabric.
I cut two lengths of fabric that were about three yards long, and then I sewed them together lengthwise. I tried my hardest to match the pattern, but I finally gave up and just decided that close enough was good enough this time.
2. Sew in the bottom hem.
Along the bottom edge of the fabric, and with the fabric lying face down on my work surface, I turned the fabric up 2.5 inches and used my steam iron to iron in the fold. Then I turned it up another 2.5 inches and ironed again. Then I stitched the hem into place by sewing through all of the layers of fabric along the top fold.
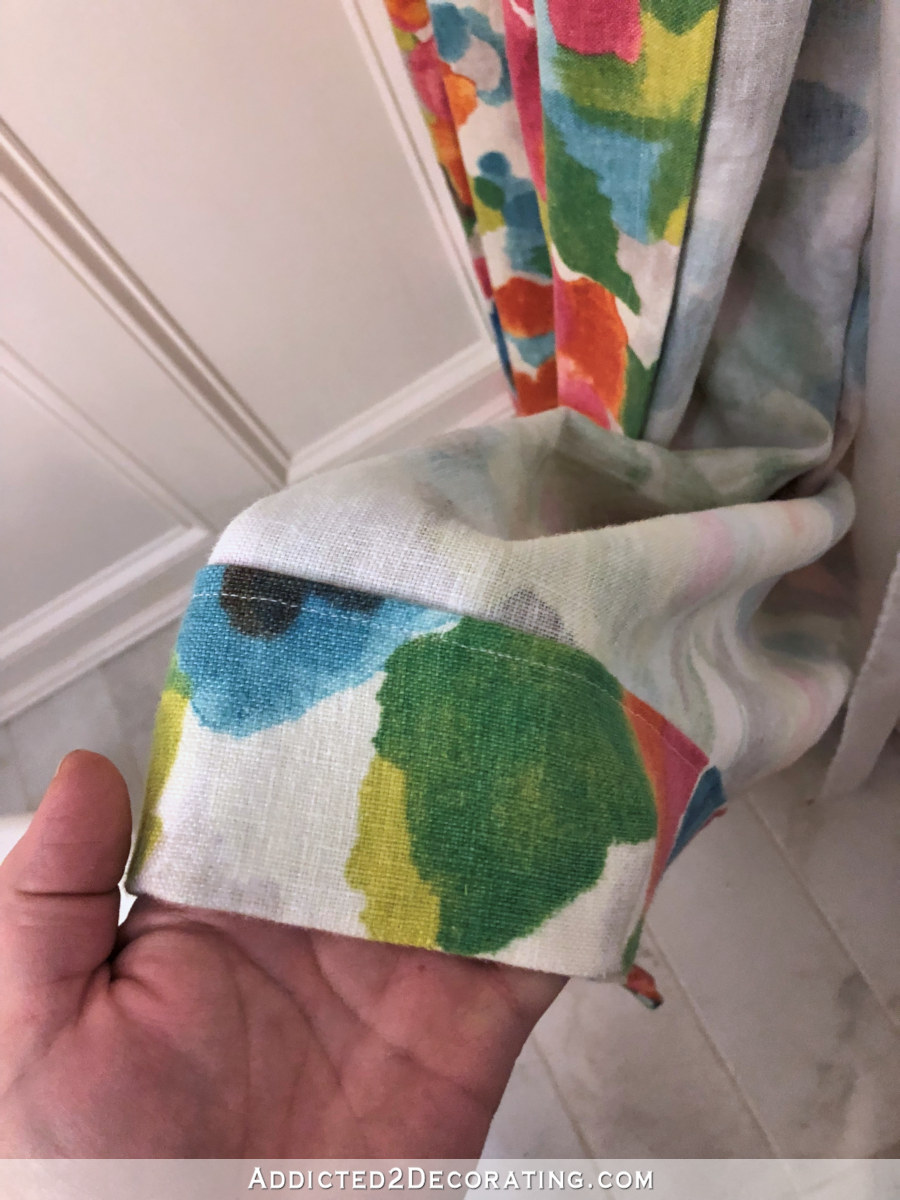
When making draperies, I would never sew through all the layers of fabric like that and have the stitching show from the front. On draperies, I always use a blind hem stitch so it doesn’t show from the front.
hese are colorful shower curtains, and I was already fed up with the fabric and my sewing machine, so blind hem stitching was the last thing on my mind. 😀 But if you want a higher-end look, you should definitely use a blind hem stitch.
Step 3 – Sew in the side hems.
This is basically the exact same thing as on the bottom hem, except that I make them smaller. This time, I fold the fabric 1.5 inches and iron. The fold another 1.5 inches and iron. Then sew into place along the inside fold.

And again, you can use a blind hem stitch if you want. But again, I didn’t care at this point. 😀 I was in “just get the !@#$% thing done!” mode. 😀
Step 4 – Sew in the top header.
Sewing in the top header is similar to bottom hem except that I sandwiched in a strip of three-inch buckram (i.e., non-woven drapery header tape, as it’s called at JoAnn Fabrics and other stores) into the fold.
So I folded the fabric up three inches, ironed the crease into place, and sandwiched the header tape between the layers. Then folded up another three inches, ironed into place, and sewed along the inside fold.
If you’ve read my blog for long, and have seen my plethora of drapery tutorials, then you’re very familiar with this step. If you’re feeling lost, I’ll link some helpful tutorials at the bottom of this post.
But do not skip the header tape!! That’s what will give the top header enough body to actually stay upright and not slouch between the hooks.
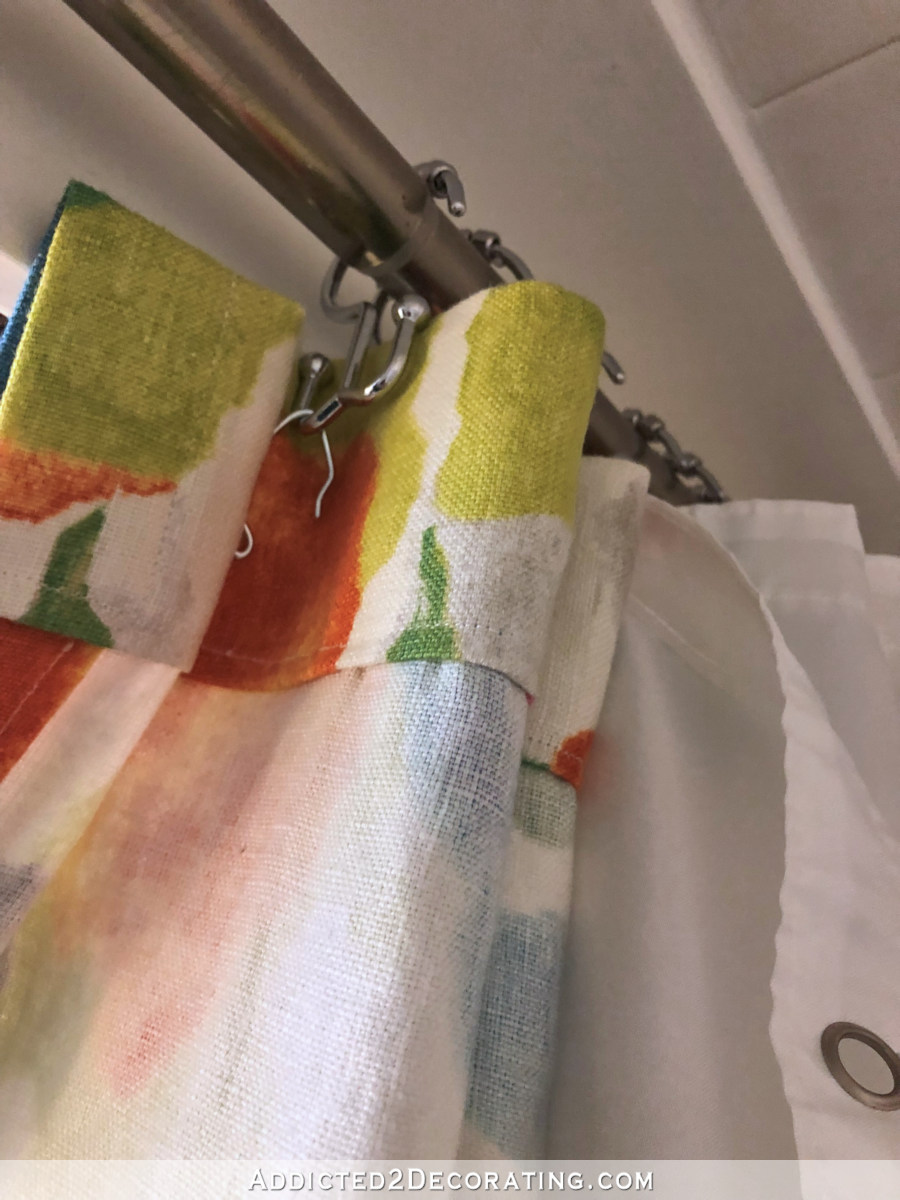
Step 5 – Finish the header with pleats (optional), and hooks or grommets
I’ve shown y’all how to make a shower curtain using grommets in the past. If you prefer that method, I’ll link it at the bottom of this post.
For this shower curtain, I chose to make it more like a drapery panel by skipping the grommets and adding a few single pleats. Since shower curtains generally use twelve rings, I made twelve single pleats at the top of my shower curtain.
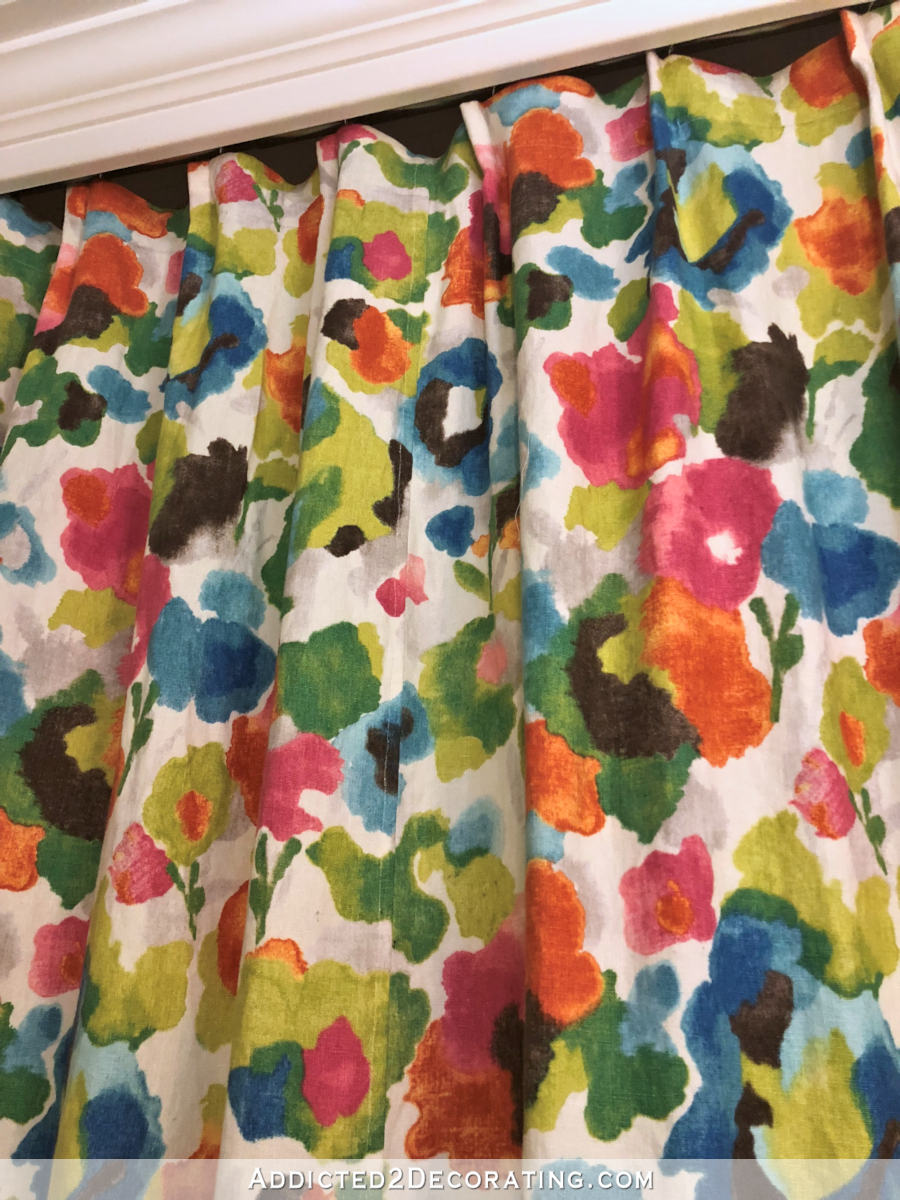
The main purpose of the pleats was just to take up some slack. Most shower curtains and liners are 72 inches wide with about 6.5 inches between the grommets. My DIY shower curtain using two widths of fabric was 98 inches wide. I wanted to allow two extra inches on each end, so that meant I needed to take up 22 inches of extra fabric width with 12 pleats. That came to just over 1.75 inches per pleat.
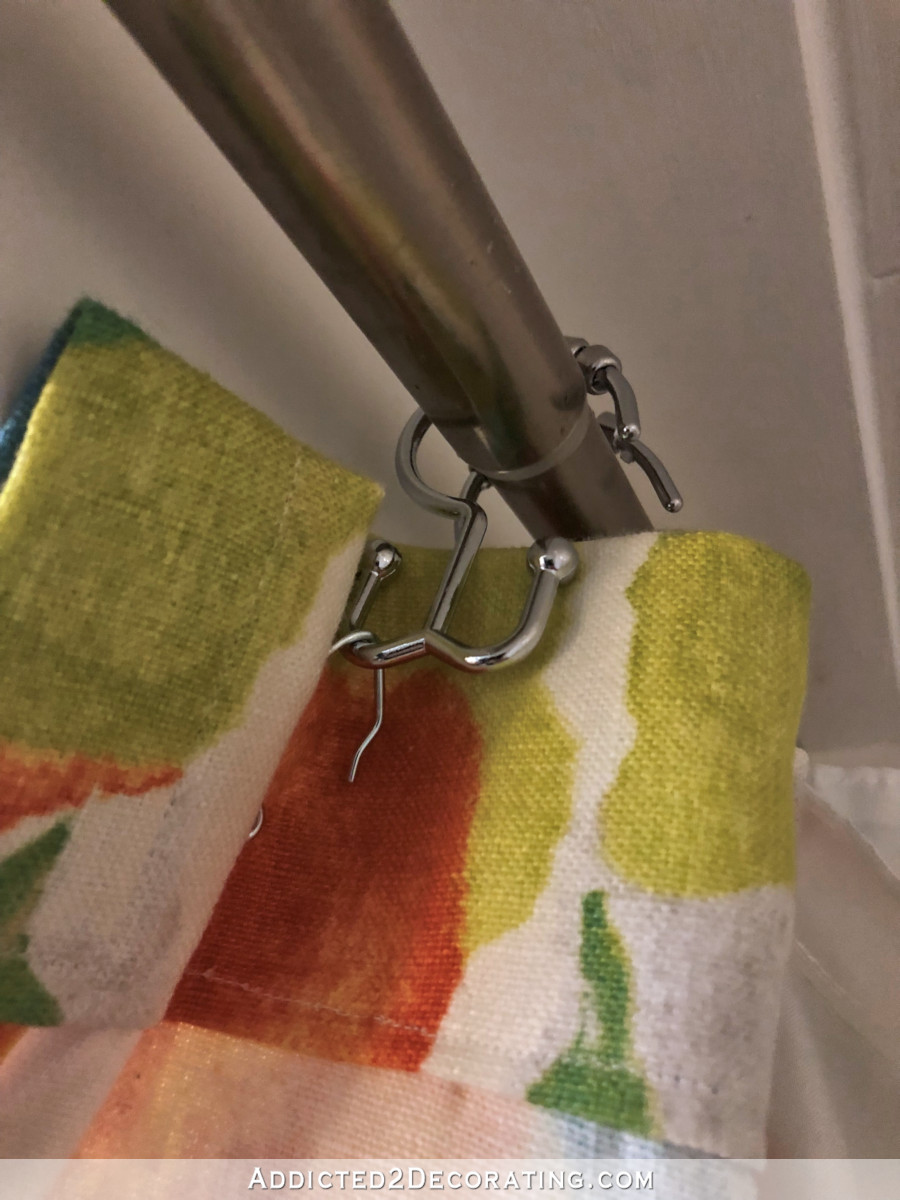
After sewing in the 12 pleats, I added a drapery hook to the back of each pleat and hung it on the curtain rings. I used the type that has two hooks per ring — one hook for the decorative shower curtain and one hook for the shower curtain liner (i.e., the part that goes inside the tub and actually gets wet).
I hadn’t actually intended to use drapery hooks for this shower curtain. I had planned to use large plastic rings that would be sewn on. But again, by this point, I was in no mood to do more sewing, and especially not hand sewing, so I went with the fastest option that would get this project over with the quickest. The plastic rings would really be better, so once my frustration with this DIY shower curtain has completely worn off, I might go back and add those. 😀
With the decorative fabric DIY shower curtain hung, I could then attach the store-bought shower curtain liner to the second hook on each shower curtain ring.

And that’s it! I’ll be the first to say that this isn’t exactly my best work. I generally don’t tolerate top stitching on hems, and I always hand-stitch the ends of hems and headers so that they stay perfectly flat. But right now, I’m okay with it just being done like it is.
Now I can’t wait to get rid of that drab green wall!
Recommended Liner For Your Colorful Shower Curtains
Now as far as the shower curtain liner goes, I never use the thick plastic ones. I can’t stand those things since they can’t “breathe”, and that seems to encourage the growth of mildew. Instead, I use the woven polyester hotel liners that feel more like fabric and are breathable. And I buy them in the extra long length. So when I need to shower I just put the liner inside the tub and pull the curtain closed.
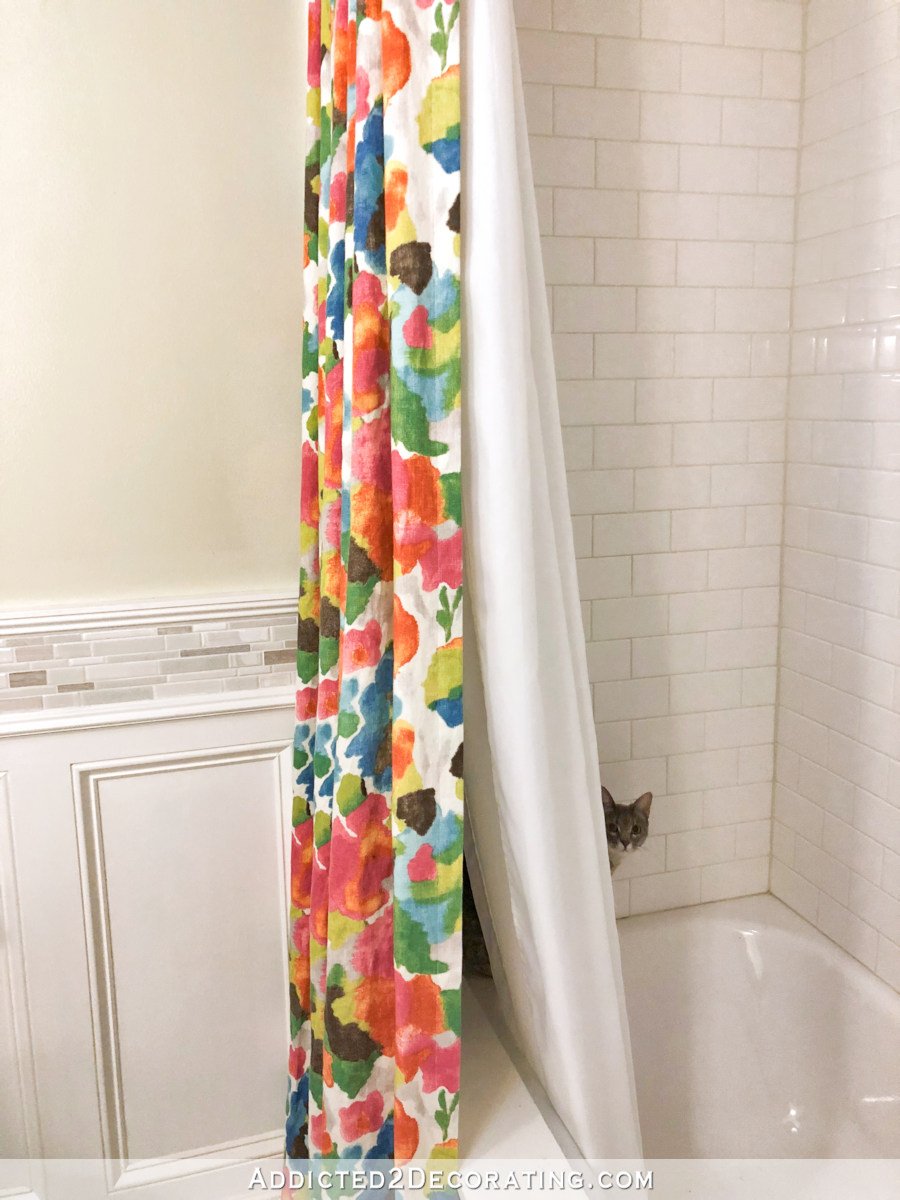
And then when it’s dry, or if I have guests coming over, I can simply tuck it back behind the decorative fabric shower curtain so it’s not so visible.
Helpful sources and products:
Want to see a shower curtain I made using a grommet header? You can see that here…
Need more thorough instructions on adding header tape to a shower curtain or drapery panel header? I have that info here…
- Fabric shower curtain liner – These are the only shower curtain liners I’ll use. They’re polyester, so they’re still plastic, but they’re a woven, breathable fabric rather than a solid piece of plastic. They’re washable but not bleachable, so I just add some OxyClean to the wash, and they come out bright white and clean as new.
Update:
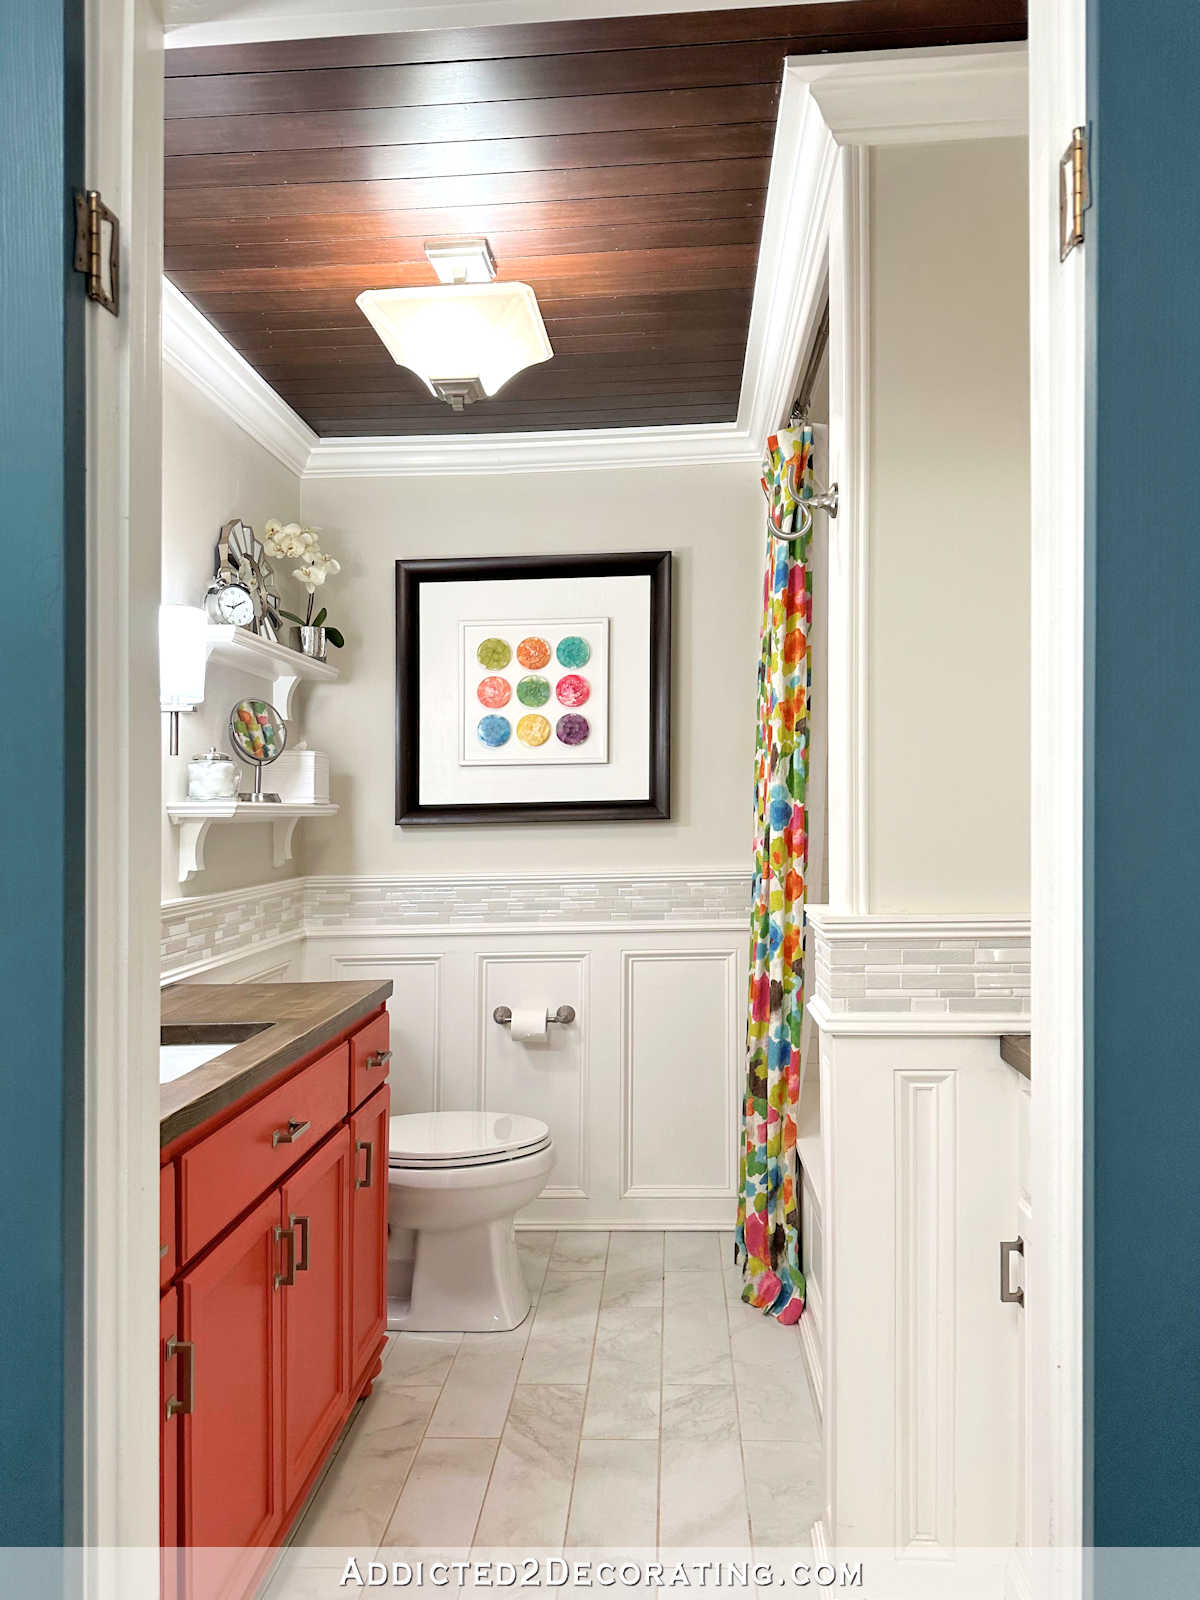
My bathroom makeover is finished! Want to see the entire project from start to finish? You can find every single post about the bathroom makeover right here…
Or you can skip to the end and see how it turned out. Here’s a peek of the finished bathroom…
You can see more pictures on the before and after post right here…
Please note: This post contains affiliate links.

Addicted 2 Decorating is where I share my DIY and decorating journey as I remodel and decorate the 1948 fixer upper that my husband, Matt, and I bought in 2013. Matt has M.S. and is unable to do physical work, so I do the majority of the work on the house by myself. You can learn more about me here.


For a quick fix, can you paint the tile?
The shower curtain is beautiful with the resin dishes! ♥️
Yes! I was thinking the same thing! I did that to my kitchen backsplash and it held up great until I could come up with another solution!
The green walls have got to go! They’re even making that beautiful fabric go flat! GAAH!
I like the idea of painting the border tiles. I like the texture of of the tiles (the variation of the size and shape tiles), but colorwise they might not be the best now.
It will all look lovely when you are done, I’m sure!
I’m glad you went with the dark vanity counter. It keeps the relationship with the ceiling in place. I’m still totally in love with that ceiling. How is it holding up?
It’s holding up great! Looks exactly the same today as it did four years ago when I finished it. 🙂
Yes, Gahh!! to that green! I thought white too, and that is the same liner I use. I wish they made double shower rings like that since it would make the removal of the fabric liner easier, but I keep the rings with the ball part toward the inside, so it’s easy to remove the poly fabric liner, when it’s wash time.
Love the curtain and the peek -a -boo kitty.
OMG! It’s totally you!!! I love the colors! Great job kiddo!!
I think that once the walls are painted and the resin petries are framed and hung, the border tiles will probably look just fine. Right now they look rather “blah” with the muted, muddied green on the walls, but I think that against crisp white, with all the other bright colors and “movement” of the watercolor fabric and resin art, the geometric shape and natural “stone” color of the tiles will bring balance to the room (they coordinate so well with your counter tops and ceiling, in my opinion). But, of course, it’s your house, so you should do whatever makes you happy. 🙂 Keep up the great work, Kristi!
Love what you did. This shower curtain looks perfect. So lovely with the new cabinet color. Just a thought- you may want to check to be sure those drapery hooks won’t rust- since they are normally not in a damp location.
Great job. Hope your sewing machine gets repaired soon.
I am mostly surprised you said the walls will be a “clean white”. That will be lovely and won’t take away from the colors in the fabric. The curtain looks like it blends beautifully with the new cabinet color. Love the resin tiles as well. Excited as always to see the finished results.
Painting the tile was my first thought also. Love the new colors in the bathroom.
I’m a quilter and sometimes sew with cotton/linens that are difficult to work with. I’ve learned to press the fabric with either starch or a product called Best Press after its been washed to help give it a little more substance. Your shower curtain is beautiful!
Agreed! Any time a washable fabric is too limp to behave properly in the feed dogs, just add some spray starch. When finished, just wash again. The relaxed nature of linen is what makes it such a beautiful drapery fabric.
OK — I LOVE the shower curtain print — and the kitty picture too!
You’re funny! Taking the time to hide the inside shower curtain from guests! They don’t care – they come to see you, Kristie! It looks lovely anyway! Give Peeve a base-of-the-tail scratch from me.
The shower curtain looks great just as it is. If you plan to launder it any, the stitching through all fabric layers will hold up better. Don’t be hard on yourself, just enjoy the new look and life and carry on! The bath is SO MUCH MORE YOU NOW.
Love the changes except for the vanity color. The brown and orange give the room a dated 70’s vibe. I think you might be happier if you paint the walls and vanity the same color. The white walls and woodwork with the brown countertop, ceiling and flecks in the tile will provide a neutral background for the colorful curtain and artwork. As an added bonus, you can easily switch the curtain and artwork whenever you feel so inspired! So impressed by your talents!
I was just reading that coral is the new “in” color for 2019, so Kristi will be right on the cutting edge of this new fabulous look.
Just you wait! Soon the chic aspects of 1970s design will be in, since it’s technically retro!
I ♥♥♥ that colorful fabric, have since you first showed it. But most of all I love the picture of your sweet kitty peeking around the shower curtain!
Exactly. Coral and orange are two very different colors. I love it.
I feel your pain with that fabric. I know just how bad it was to work with, and how it totally changed when you washed it. As if you hadn’t already been ready to pull your hair out!!! UGH! But the pattern is so pretty, I’m glad you were able to overcome your aggravation for the sake of the “look!” Have you ever thought of doing buttonholes for the shower curtains instead of grommets or rings? They can sag a bit, but if you don’t make them very large, they work fine. I hate to hand sew, therefore I will do buttonholes or grommets over hand sewing rings, only to have them get brittle over time and need replacing. Once you paint the walls, it will look awesome, and I so love the cabinet color! Yes, you could paint the tiles, but I think they will improve once everything else is done.
“Lint burrito”. I purchased a King linen sheet set last year and the first time out of the dryer I could not believe the amount of lint that came off ONE sheet. Just amazing.
Yep. Linen sheds a ton of fibre for the first couple of washes – as I discovered when I purchased a linen sheet and duvet bag a couple of years ago.
love The cat, ceiling, vanity and shower curtain. That is one sassy bathroom.
Yeah, I just love the cute little friend peeking out behind the curtain. That must be Felicity, doesn’t look like Peeve.
Even working with 100 percent cotton can be tricky. The ticking I used for draperies was washable, although the online fabric store suggested dry cleaning. The reason: shrinkage. Still I wanted washable drapes, since the lining was washable. I cut the first panel, adding three inches for shrinkage. After hand washing in cold water, the fabric actually shank three inches PER YARD. Luckily, I was able to fix that by sewing a header on the panel. After hitting it with a steam iron, the fabric came out looking as nice after washing as it did on the bolt and it still had body. The wash water was surprisingly dirty but there was no visible lint. (The panels were air dried.) Luckily, I had enough fabric to offset the shrinkage of the rest of the panels.
That is BEAUTIFUL! (sorry about the yelling) I really love the fabric and it’s colorful flowers. It’ll look amazing with white walls and those pretty plaques you made. I really don’t think the tile trim will be the eyesore you think it will. Throw a colorful set of hand towels in there and Wham! you’ve got a bathroom with a lot of pizzazz!
Love, love, love! That vanity just makes me happy when I see it! The shower curtain looks great. And the resin dishes are the icing on the cake! Usually I cannot “see” a decor problem until you work your magic to change it. But yes, your lovely wall tiles are just not cutting it in this redo. Hopefully you can just paint them for now and later work your artistic magic with resin to have some more art in your bath. For now this bath will be a happy wake up each morning for you. I am looking forward to your Master bedroom rebuild. I firmly believe having a sanctuary for sleep is so important for both you and Matt. I just think what will Kristy accomplish when she has a room to totally sink in and relax!😁 Anyway, I am really enjoying your journey with all the little side trips!
Sheila F.
Hi Peeve! You make a great decorator model! I love the whole bathroom! Whew! Who would have thought it could be such a pain! But that fabric is fabulous!
Go on and paint the tile! We just did it in a 50’s bath that had blue tile (quite lovely) but barn red trim (not lovely). We masked off, and used white Krylon Tub and Shower spray paint. It’s glossy and seems durable. Complete transformation.
oooooooh, I didn’t know they made Tub and Shower SPRAY paint. I’ll have to check that out. I have a weird half bath that has a Jacuzzi tub and a vanity. The tub and surrounding tiles are almond with Hunter green accents. I recently had a contractor come to tell me what it would take to turn that into a master bathroom, and he scared me away saying it’d probably cost $15k +. SO, paint it is 😀
Sherre — The areas we painted are not high use areas. They don’t get scrubbed or walked on. Although manufacturers of tub and tile paints — there are three I know of — make it sound easy and durable, it’s not a permanent solution, it does take careful prep work, and the fumes are strong and unhealthful. Read some reviews on Amazon before you make the jump. It will probably be fine for your green accents. And wear a real, respirator mask, not a little, paper one.
How did you get the body back into the curtain fabric after washing?
Skimmed and hoping that this is not repeat info. When the pins want to fall out, take 2 stitches with each pin, instead of just one. It really takes very little extra time, and they will be far less likely to fall out.
I made my shower curtain because I wanted them to reach ceiling,,,,I bought drapes 90″ . Perfect but no liner that size available so I bought 2 polyester liners and sewed them together to get correct length. HAPPINESS. Added bonus is that liner is machine washable. WINNER
I was just reading that coral is the new “in” color for 2019, so Kristi will be right on the cutting edge of this new fabulous look.
Love, love, love the shower curtain. Color is a good thing.
That fabric is beautiful and the colors are so you. Can’t wait to see the petri art up on the wall!
Please tell me where I can get those double hook shower curtain rings. I need them!
It’s so pretty! I love the watercolor look and the petri art will be a great accent. Honestly, I don’t think you need to paint those trim tiles. Maybe frame the petri art in one of the darker shades in the trim tile…your ceiling is dark so that would be a good balance. Love the cabinet color!
Spray starch makes linen (and almost any fabric) behave beautifully for hemming. And in a real pinch, you can quietly iron in a bit of heat n bond hemming tape. A small square of it here and there will help keep the hemline from slipping while you sew it. Another old seamstress trick is to pin in a strip of tissue paper. The paper can be torn away after seaming and offers extra body to limp/delicate fabric.
Hiya Kristi,
I haven’t received your notifications for some days and thought I’d visit your site to see what happened and there are several posts I’ve missed (hurrah, now I can binge-readvthem :)). I’ve just entered my name and mail adress above and hope that was right – even though I was already subscribed to your notifications?
And on another note, love the way you cat is finding new positions to appear in your pictures 🙂
Hi Kristi, I am with you on the fabric shower liner – it makes all the difference in the world. But were you able to find one that is longer than the standard? Or did you modify it at all?
I buy the extra long ones from Bed, Bath & Beyond.
I had NO idea… thank you!!
Hi there. I absolutely love the fabric!! I was wondering if you posted the source for it. If you did, I totally missed it. If you wouldn’t mind sharing, I’d appreciate it!