DIY Pull-Out Shelves For Pots And Pans Organization
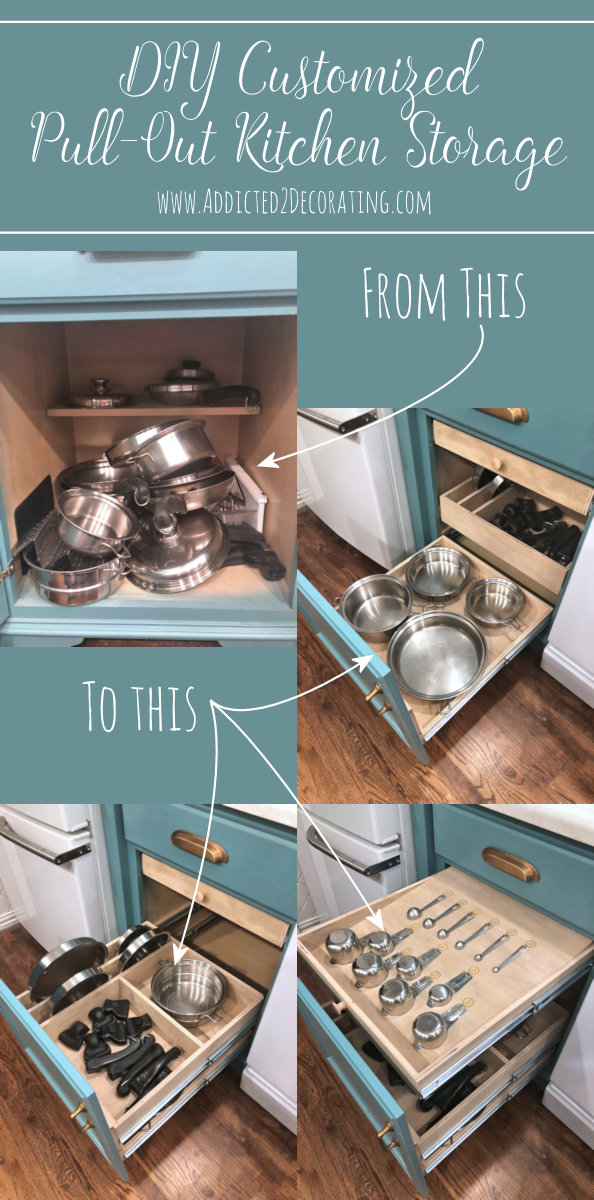
I am in full-blown organization mode right now. After solidifying my organization plan for my kitchen, I jumped right in and started implementing my plan by turning a plain box of a cabinet into a customized powerhouse of pots and pans organization with three DIY pull-out shelves made specifically for my cookware, and customized for the way that I use my kitchen.
This is embarrassing, but let me show you how this cabinet started out…
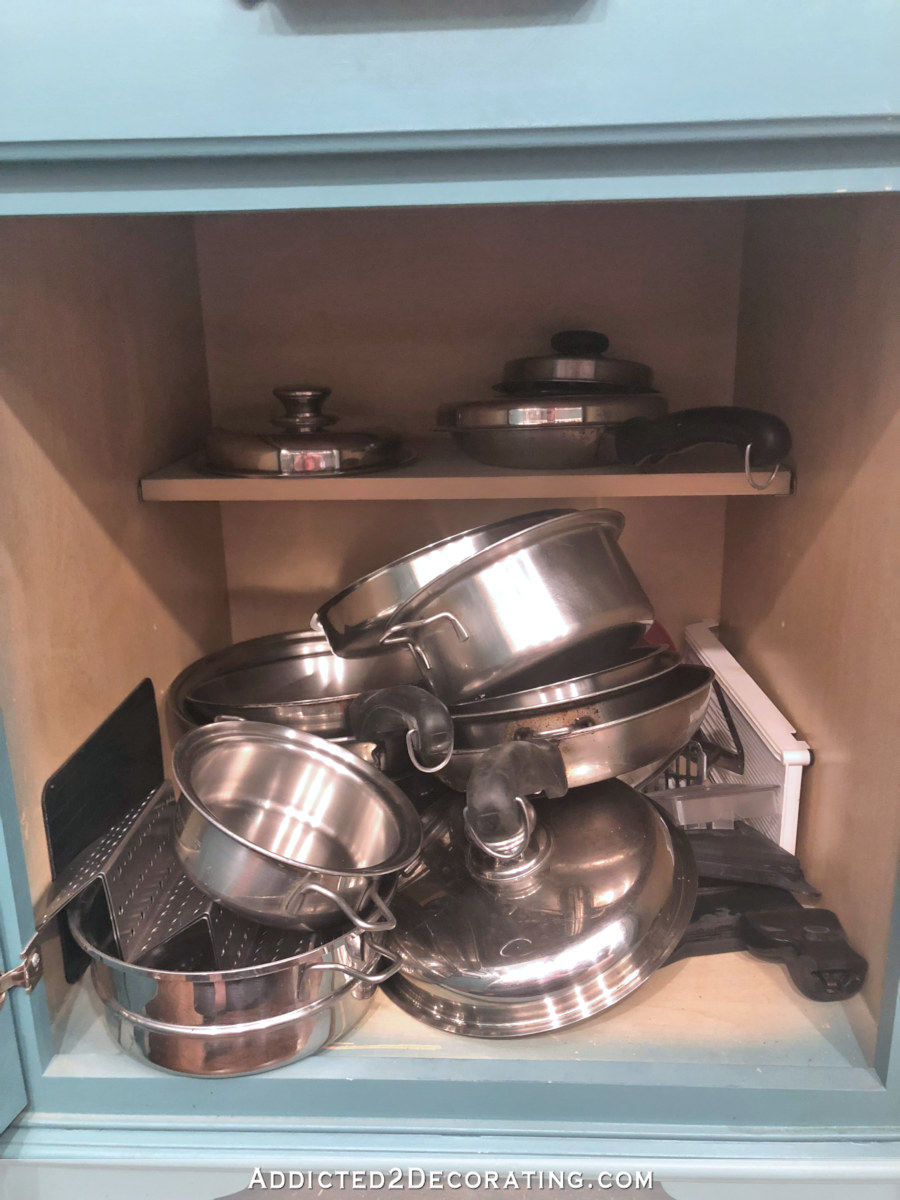
I’ve said it before, and I’ll say it again. Organization just isn’t my thing, and if it isn’t incredibly easy to get and keep something organized, then I probably won’t do it at all. That’s why my cookware cabinet always ended up looking like that. I could straighten up the stacks, and a week later it would look just like that again, so why bother?
Well, enough was enough. After removing the door, creating a couple of customized DIY pull-out shelves for pots and pans organization, and attaching the door to the front of the lower pull-out shelf, I now have a completely organized cookware cabinet.
Here’s the lower shelf, which now houses my four most-used pots and pans (i.e., the ones I use pretty much every single day)…
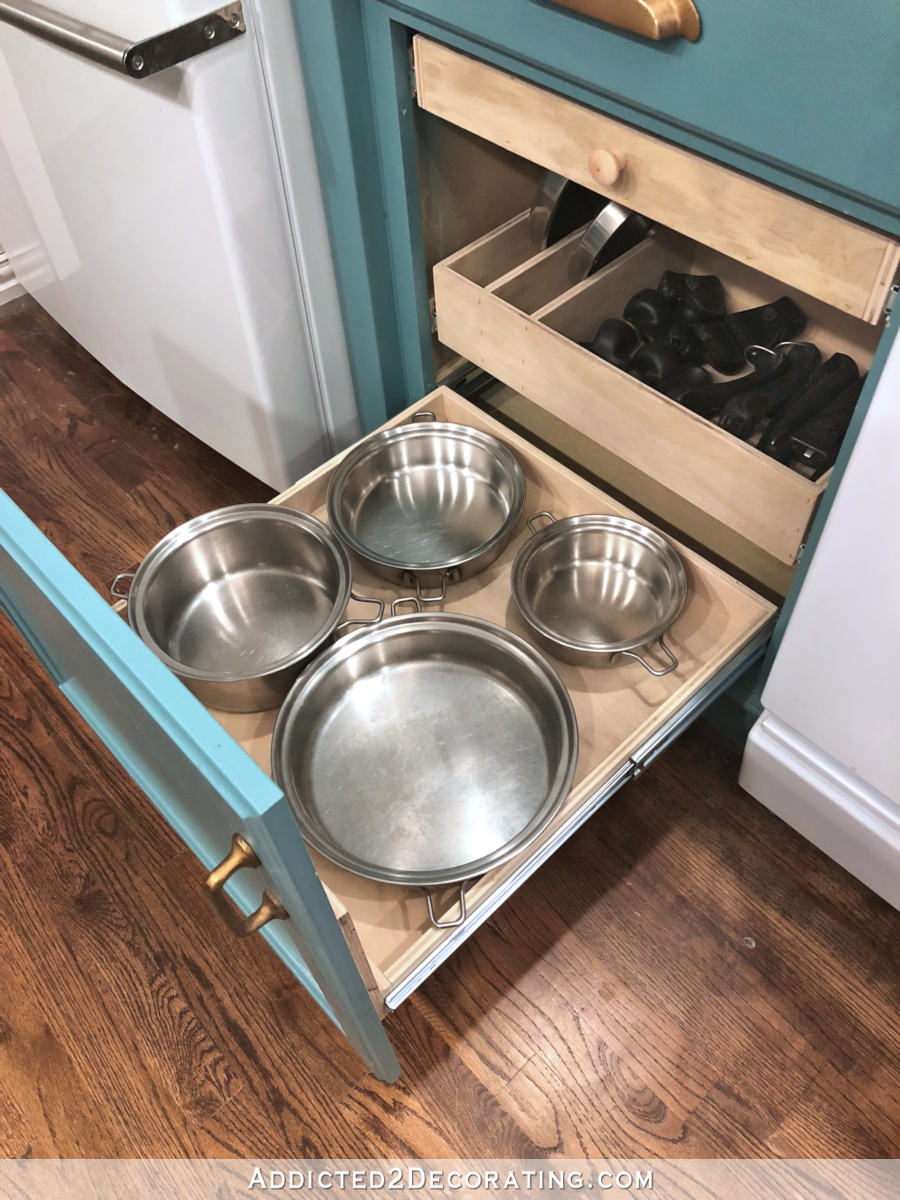
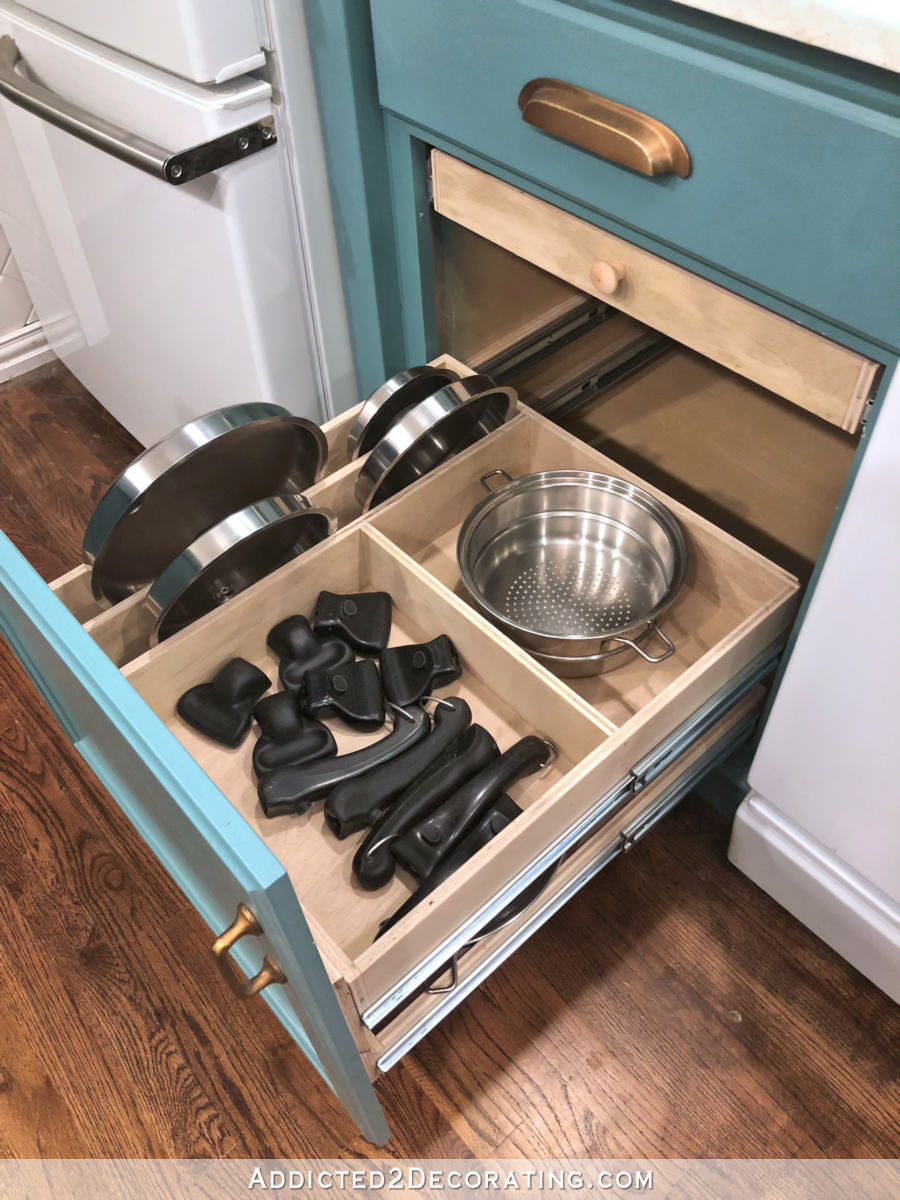
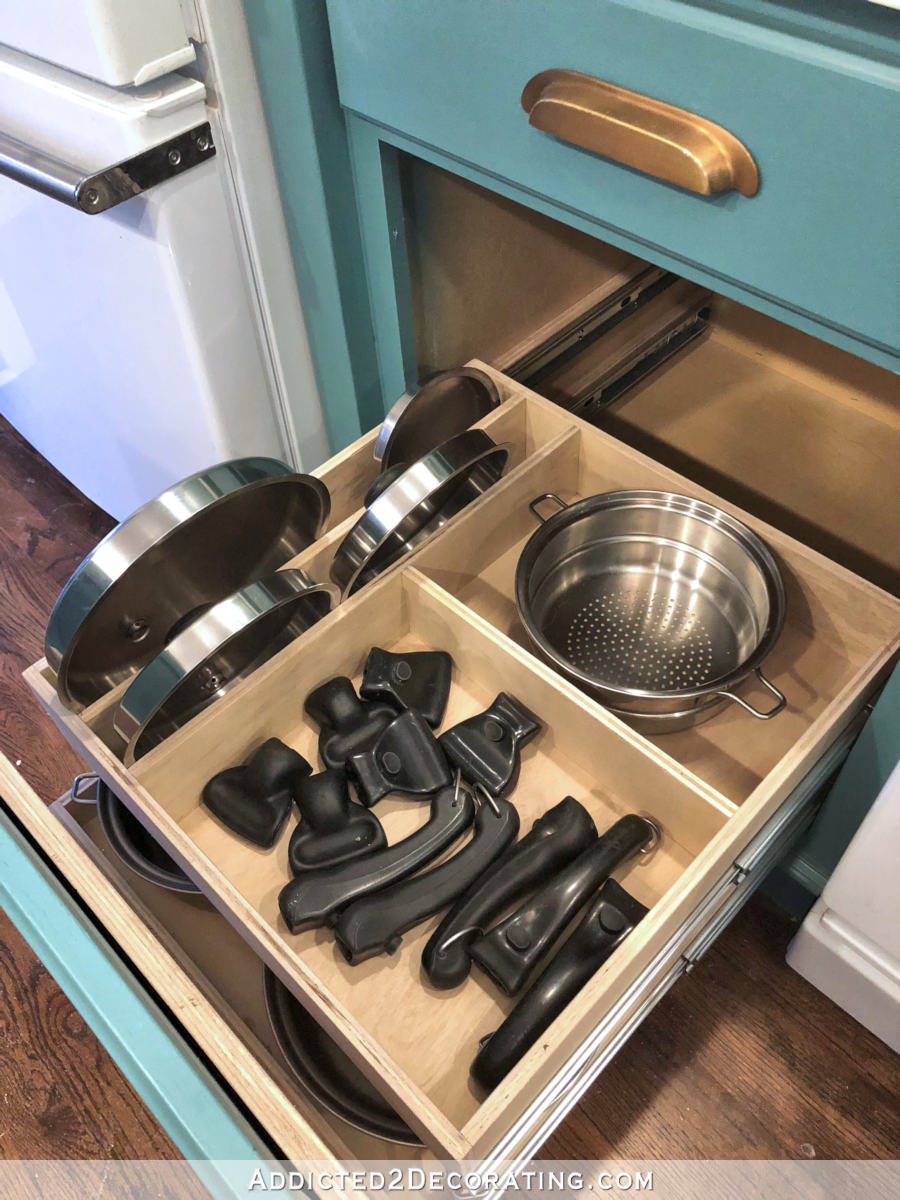
And on the middle shelf, I created DIY pull-out shelf with custom-sized slots to hold the four lids that specifically fit those four pieces of cookware. Then I created a section for the handles. (I use Saladmaster cookware, which has removable and interchangeable handles.) And then I had enough room on that shelf to create a section for the steamer insert.
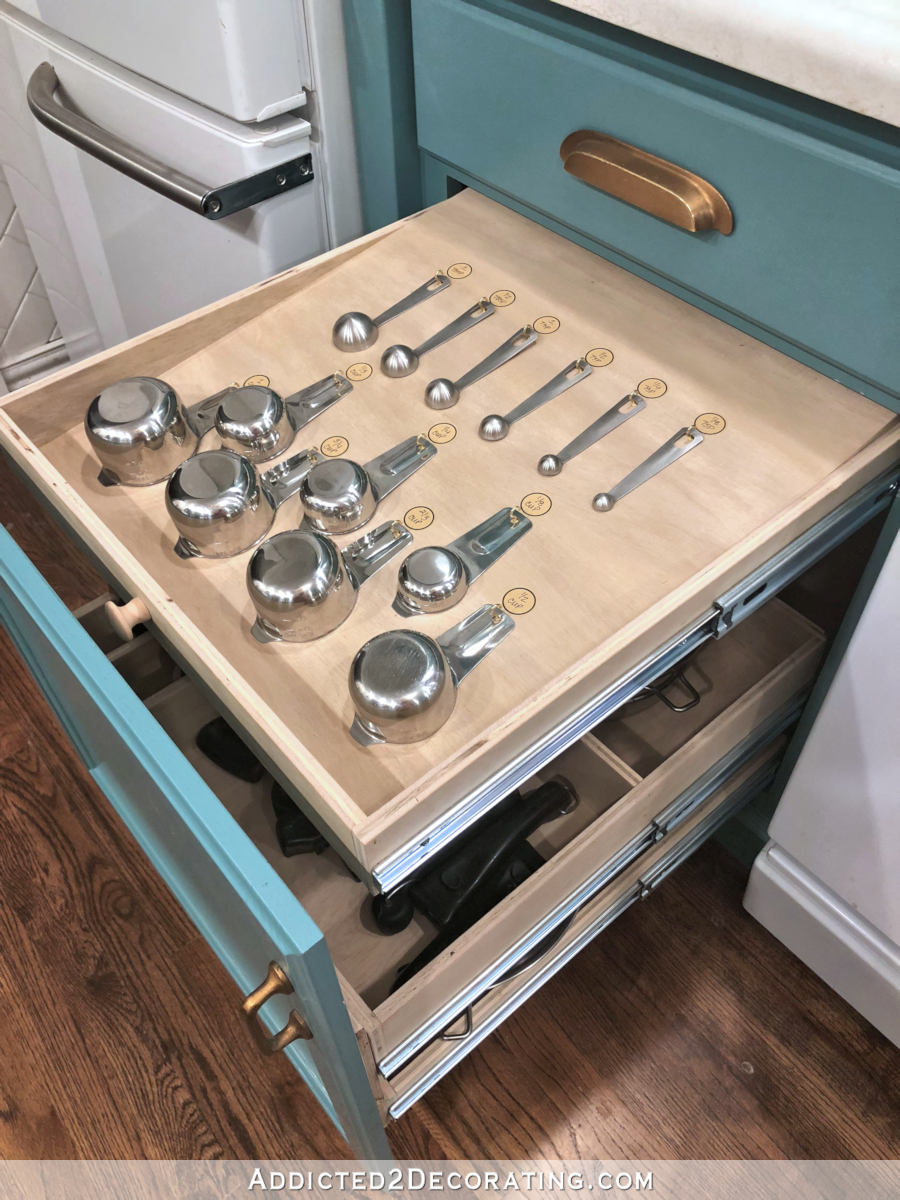
And after I had everything in that cabinet that I absolutely needed and wanted in there, I had a little room left at the top, so I created one more DIY pull-out shelf that is customized specifically to hold my measuring cups and spoons.
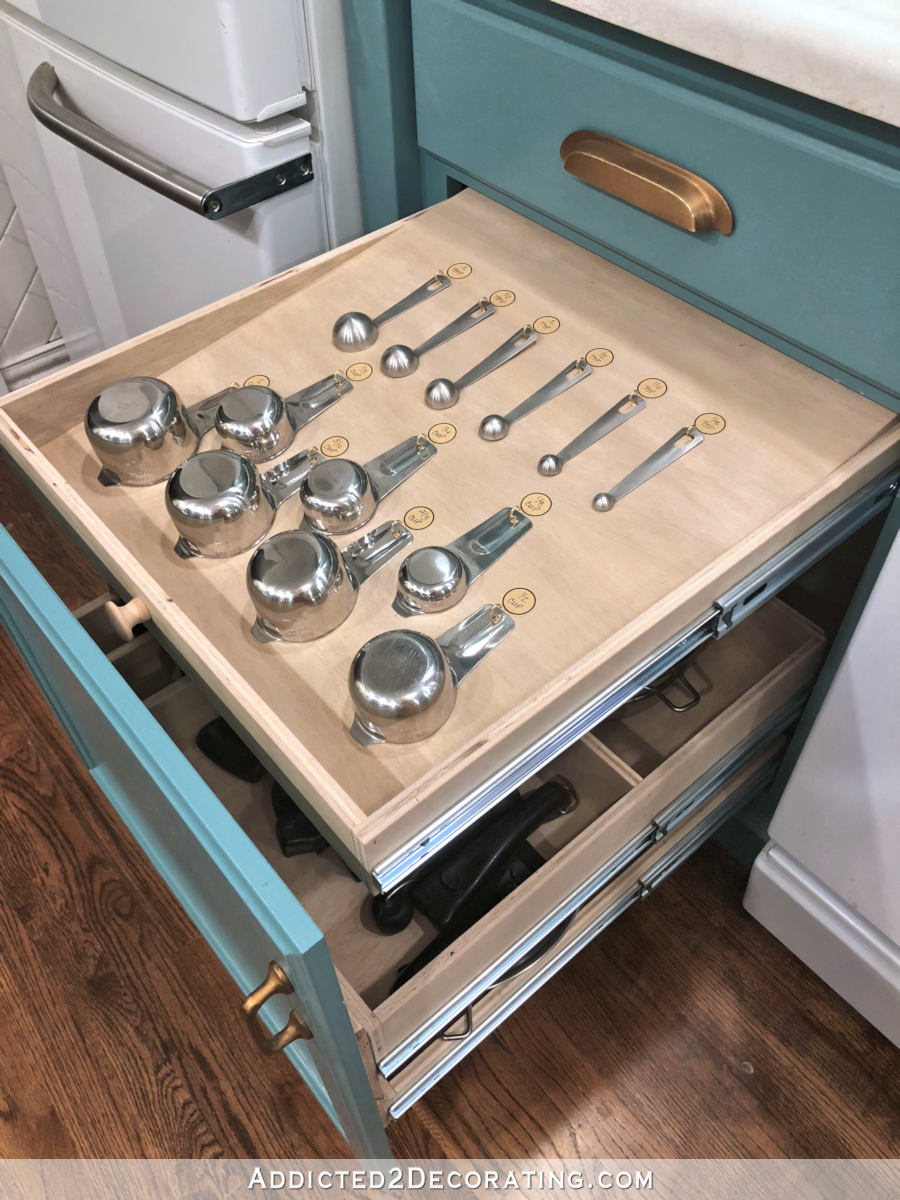
I know that probably seems ridiculous to some, but it’s perfect for me. I’ve said before that I really dislike cooking, and anything I can do to make the process easier is a bonus. And one thing that seems to frustrate me just about every single time I cook is digging through stacks of measuring cups and spoons to find the one I need. This way, they’re all there, they’re NOT stacked on each other, they’re easy to grab, and I can easily see if one is missing (and probably sitting dirty in the sink).
And that, to me, is the best thing about starting out with plain, open cabinets and customizing the pull-outs yourself. You can customize them to fit your specific cookware and your specific likes, dislikes, needs, processes, etc. I’m having so much fun thinking through exactly how I use my kitchen, exactly where I want to store and access various things, and what problems I can solve with very customized-to-me pull-outs.
So now let me show you the process…
How to build DIY pull-out shelves for pots and pans organization:
1. Install the drawer slides in the cabinet.
I’ve mentioned several times that when I build drawers or pull-out shelves, I always install the drawer slides first. Then I pull them out slightly and measure the distance between them to get the finished drawer width. Installing the drawer slides before I even begin building the drawer takes all of the guesswork out of the process.
2. Cut plywood for the bottom of the shelf.
So after installing the bottom drawer slides and taking the measurements I needed for the bottom shelf, I cut the a piece of 1/2-inch plywood for the shelf bottom. Then I placed my four pieces of cookware on the plywood to see how I would arrange them…
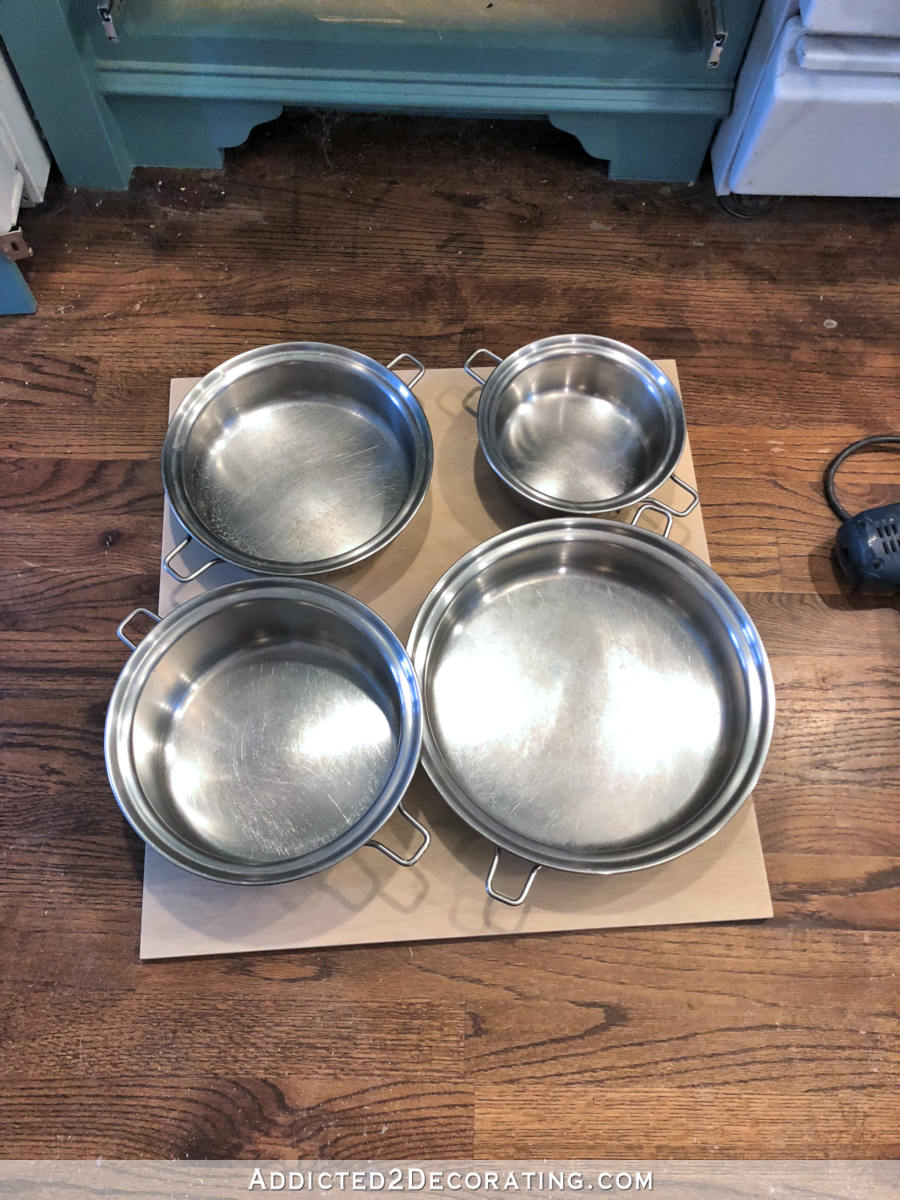
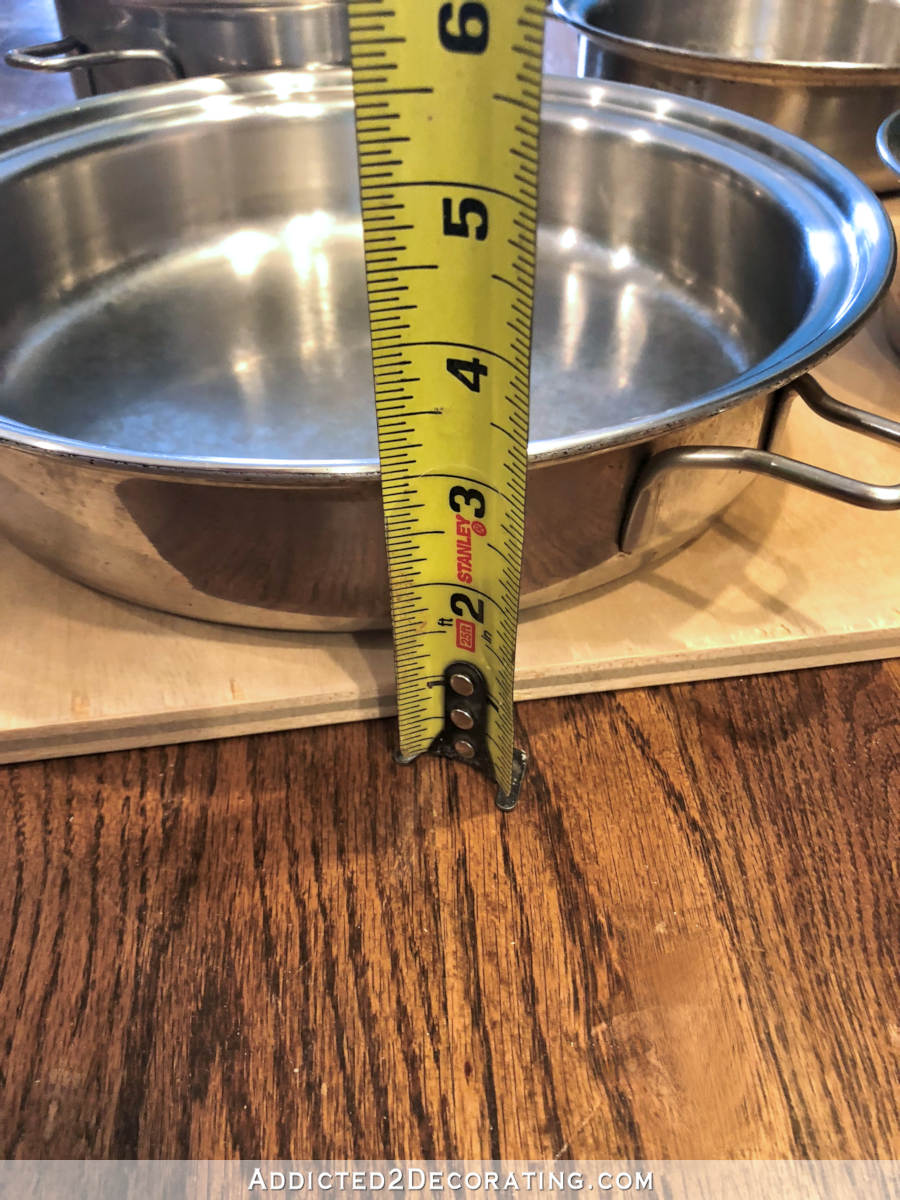
And then I measured how high the shelf sides needed to be to allow enough clearance for all four pieces to fit on the shelf. The three small pieces fit inside the footprint of the drawer just fine, but the top lip on the biggest piece went over the edge just a bit, so I knew that the drawer sides had to be lower than the lip on that biggest piece.
3. Cut and attach plywood to edges of bottom to create sides of shelf.
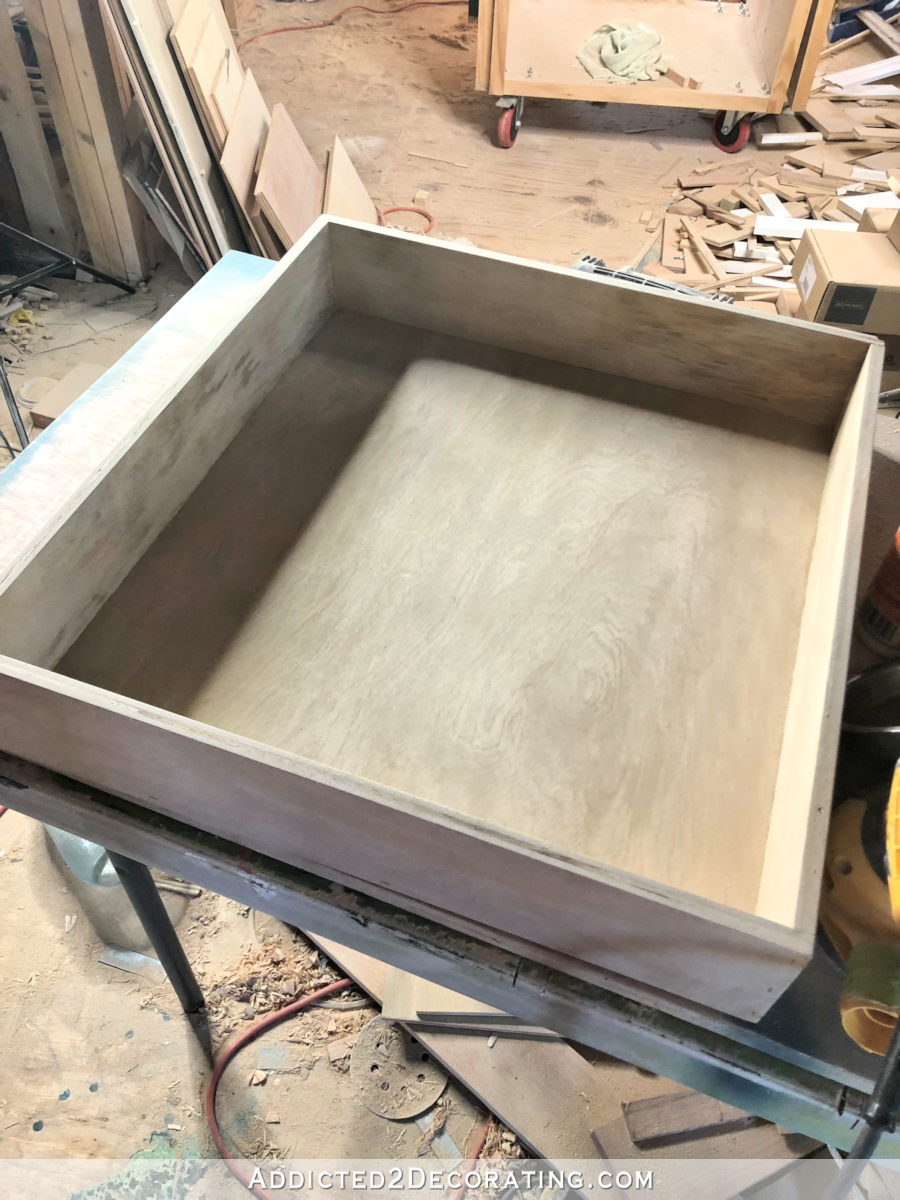
I settled on 2.5 inches for the height of the sides, and build a very basic box. I didn’t take pictures of this process since I’ve done this (and shown y’all) so much lately, but you just cut your bottom piece, and then attach the side pieces to the edge of the bottom piece (and to each other) using 3/4-inch narrow crown staples and wood glue. I don’t use fancy joints where the side pieces meet. Those are just butt joints glued and stapled to each other. It’s really so easy.
4. Remove cabinet door and attach to front of drawer. (optional)
This bottom drawer required a bit of extra work since I wanted to convert the cabinet door from a door to what is basically a drawer front. First, I had to use a piece of 1/4-inch plywood to make the recessed panel area flush with the outside frame. I don’t know of any nails or staples that would have worked for this without going through the face of the cabinet door, so I just used wood glue for this.
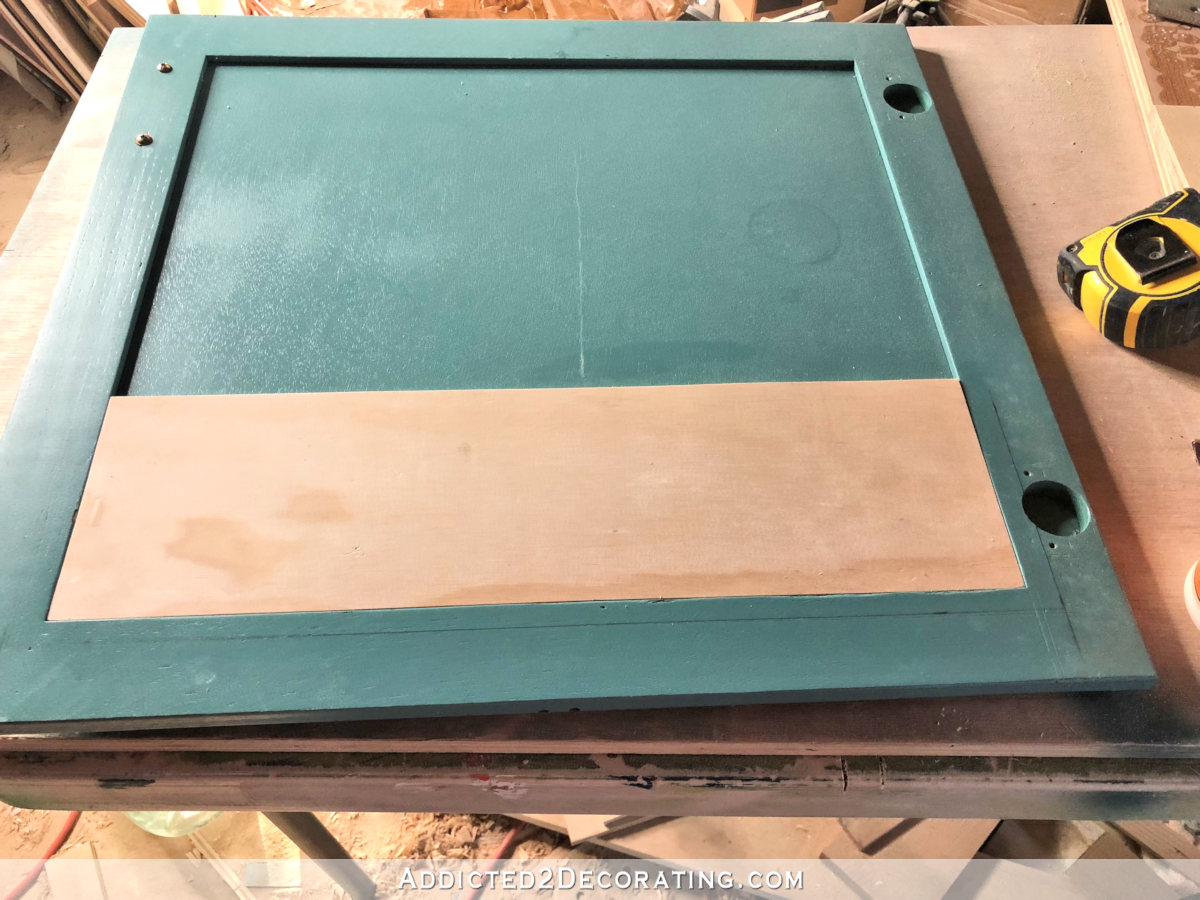
And I forgot to get a picture of this, but next I cut a piece of 3/4-inch plywood to fit the width of the pull-out drawer, but I made it eight inches high to cover all of the area that I had covered on the door with the 1/4-inch plywood. I didn’t get a picture of the 3/4-inch plywood piece, but you can see the black lines on the picture below indicating the area that the 3/4-inch plywood covered.
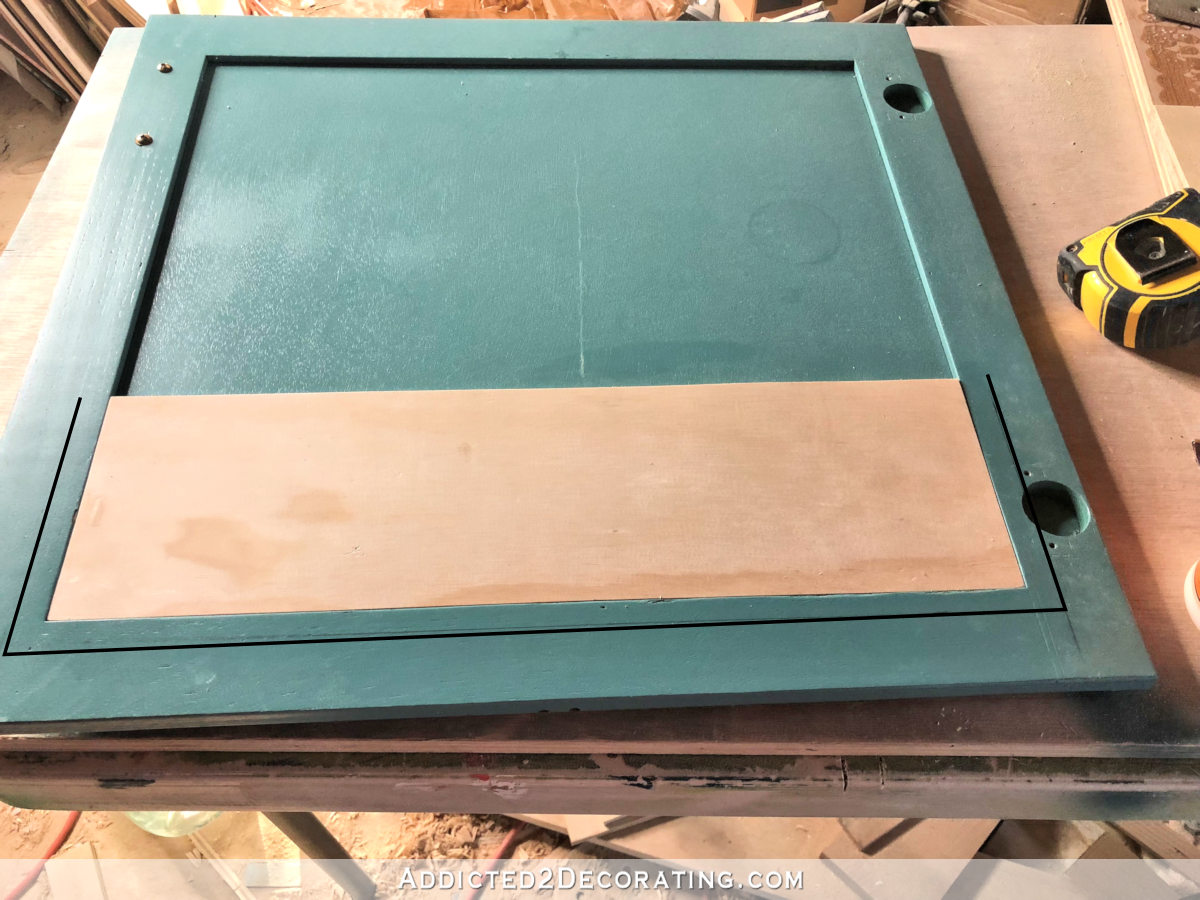
I attached that piece of 3/4-inch plywood to the front of the pull-out shelf first, using nails and wood glue. After giving it about 30 minutes for the glue to start drying, I then put wood glue on the area within the guidelines I had drawn on the back of the cabinet door, and then placed the pull-out shelf onto the back of the cabinet door, lined up the plywood with the guide lines I had drawn, and secured them together using 1.25-inch 16-gauge nails around the side edges.
Note that I only put nails where they would go through the plywood and into the frame of the door, making sure that I didn’t put any nails through the thin recessed panel on the door.
5. Install drawer slides on the side of the drawer and install.
After setting it aside for about an hour and letting the glue dry enough to hold (a few hours would have been preferable, but I’m impatient 😀 ), I attached the drawer slides to the sides of the shelf, installed the shelf in the cabinet, and added the pots and pans to test out how it worked.
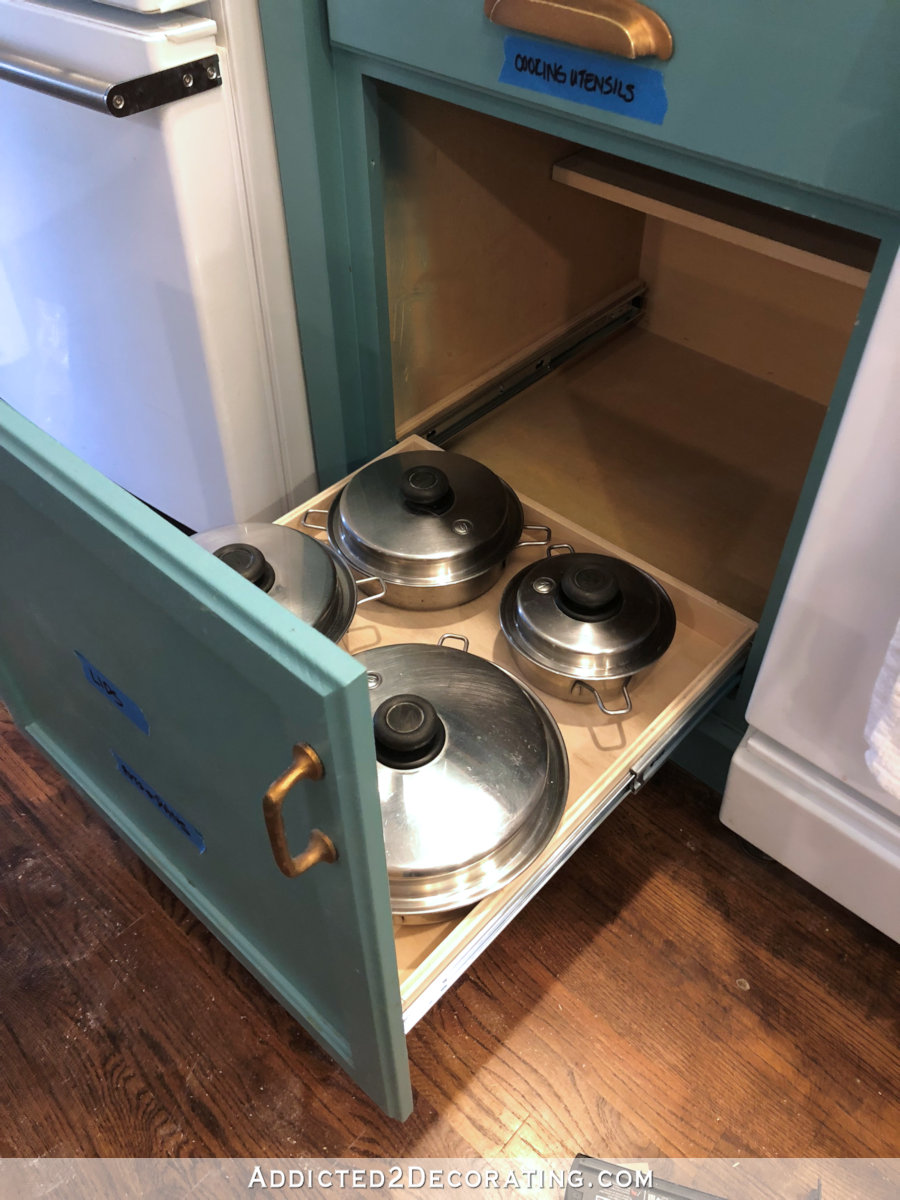
It worked perfectly! And with that in place, I could then measure for placement of the next (middle) shelf.
DIY pull-out shelf for cookware lids and handles
For the middle shelf, I built the basic shelf exactly as I outlined above (with the exception of attaching the shelf box to the cabinet door, obviously).
But for this DIY pull-out shelf, I wanted to customize it a bit to hold the lids. So after the basic drawer box was built, I cut two pieces of plywood to serve as dividers, and then placed the lids in the drawer and determined the placement of the first divider.
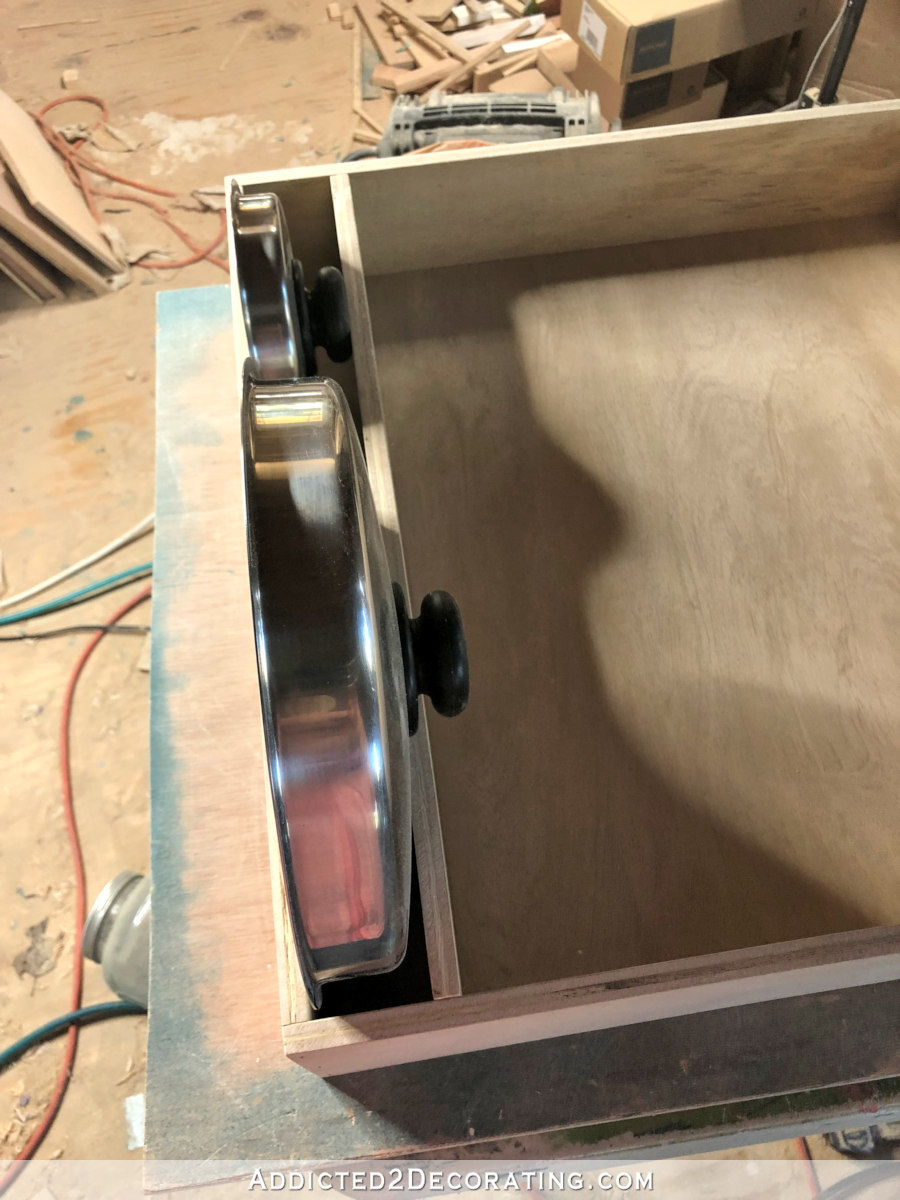
With the placement determined, I measured how wide that space needed to be and cut two pieces of plywood to use as spacers…
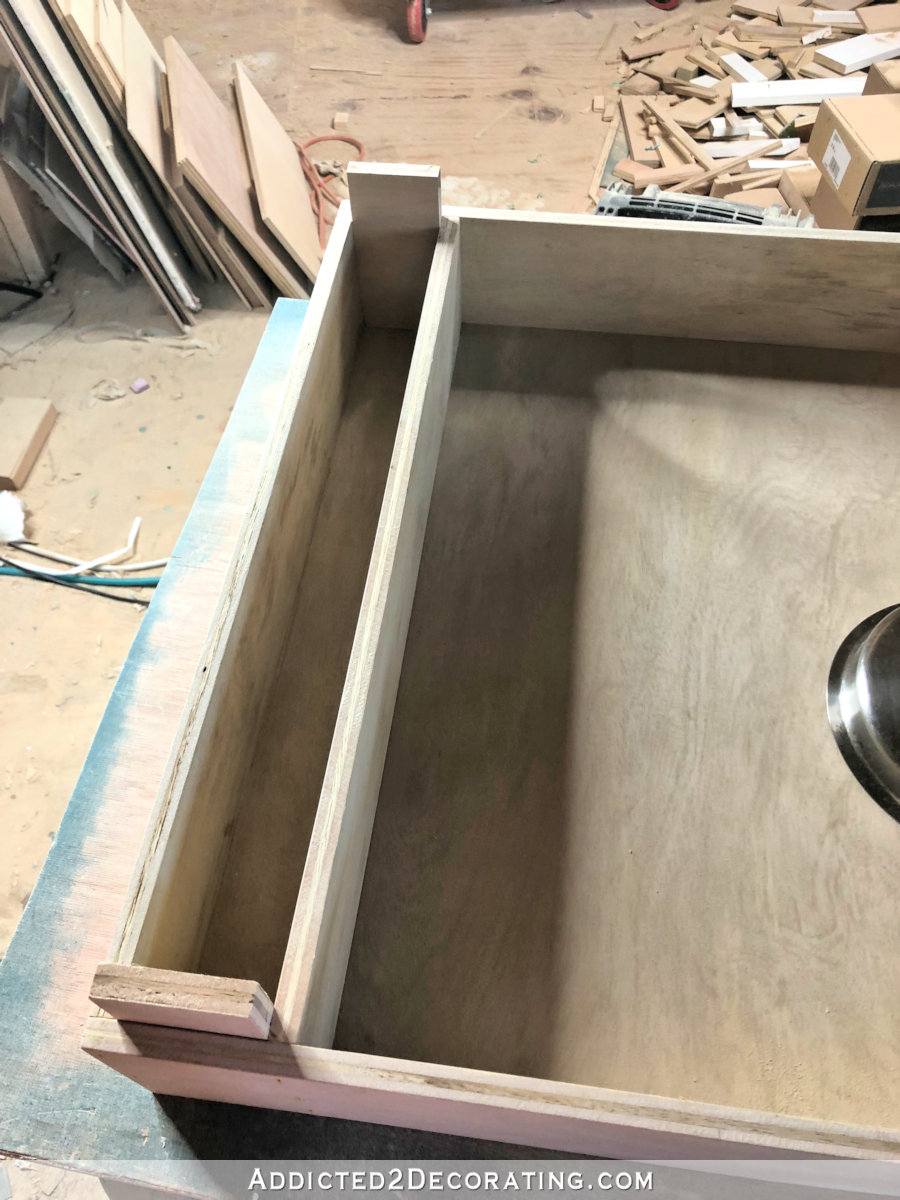
And then I stapled that divider into place, stapling straight through the front and back sides of the drawer box and into the edges of the divider.
I repeated that process with the second divider. It wasn’t until I thought the drawer box was finished and I had attached the drawer slides to the sides, inserted it into the cabinet, and loaded it with the lids and handles, that I decided I didn’t really need such a big section for just for handles. So I decided to add one more divider and use the extra space to store my steamer insert. It was a bit more challenging to add that divider at that point, but I managed.
So here’s how that second drawer turned out…
That’s really all that I had planned for that cabinet, but I had just a little bit of space left at the top that I hated to waste. At first I thought about just making a shallow drawer for odds and ends, but then I remembered a comment from someone who used to have their measuring cups and spoons hanging on the inside of an upper cabinet door.
I had been planning on that same design for my upper cabinet, but that commenter said that she liked having them stored that way, but the clanging and banging noises would scare her if she opened the door too fast. I hadn’t even thought of that, and the idea of hearing those noises every time I open a cabinet door didn’t really appeal to me.
So I decided to utilize that top shallow space in a similar way with each cup and spoon on its own cup hook and neatly labeled, but I’d only be pulling this out when I specifically needed a measuring cup or spoon. And bonus…no clanging noise!
DIY pull-out angled shelf for measuring cups and spoons
To make this customized DIY pull-out shelf, I installed the drawer slides and measured for the drawer width just like I always do.
But instead of starting this drawer box by cutting the bottom and then attaching the sides to the edges of the bottom piece, instead I cut the sides and stapled those together. Then I cut the piece for the bottom, but I cut it so that it was the correct width, but the length was a bit too long. This allowed it to sit at an angle, with the back edge sitting on top of the side frame.
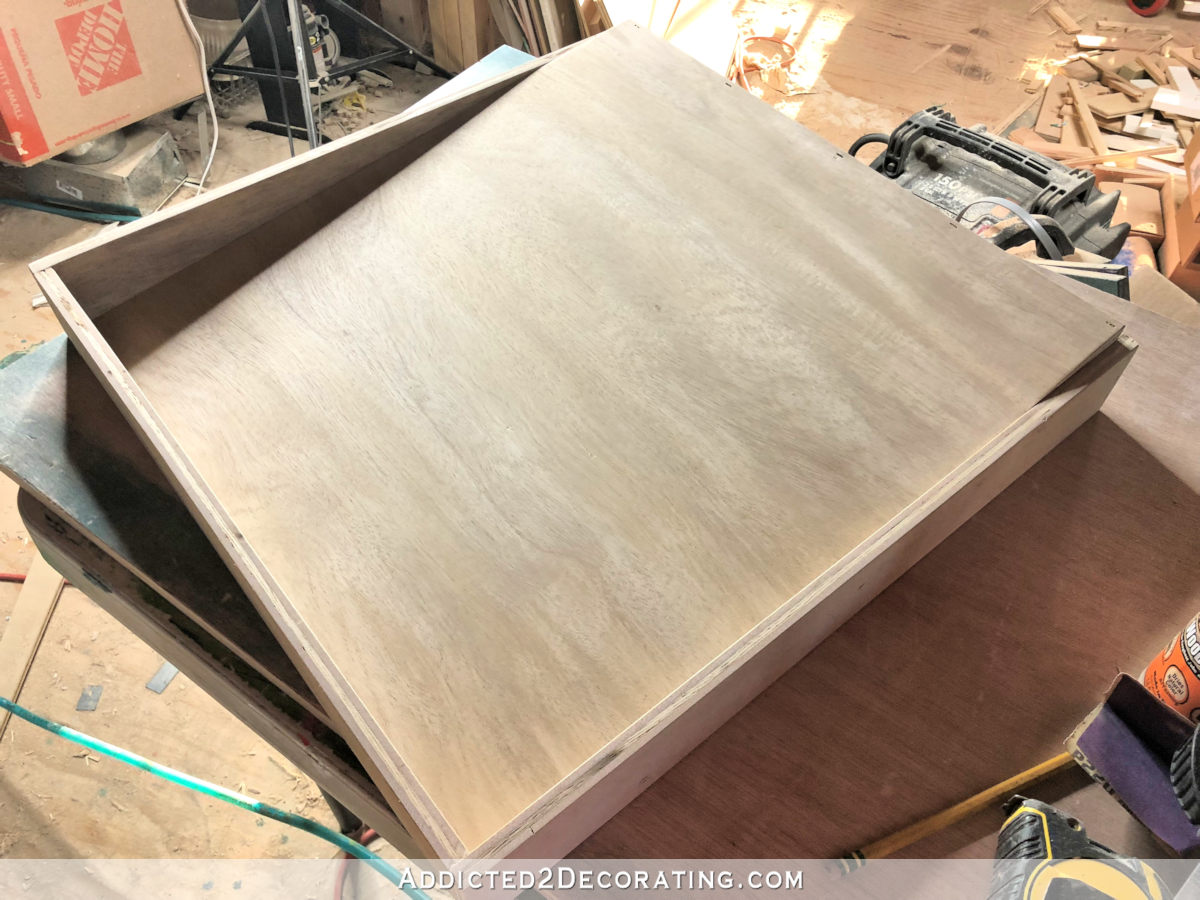
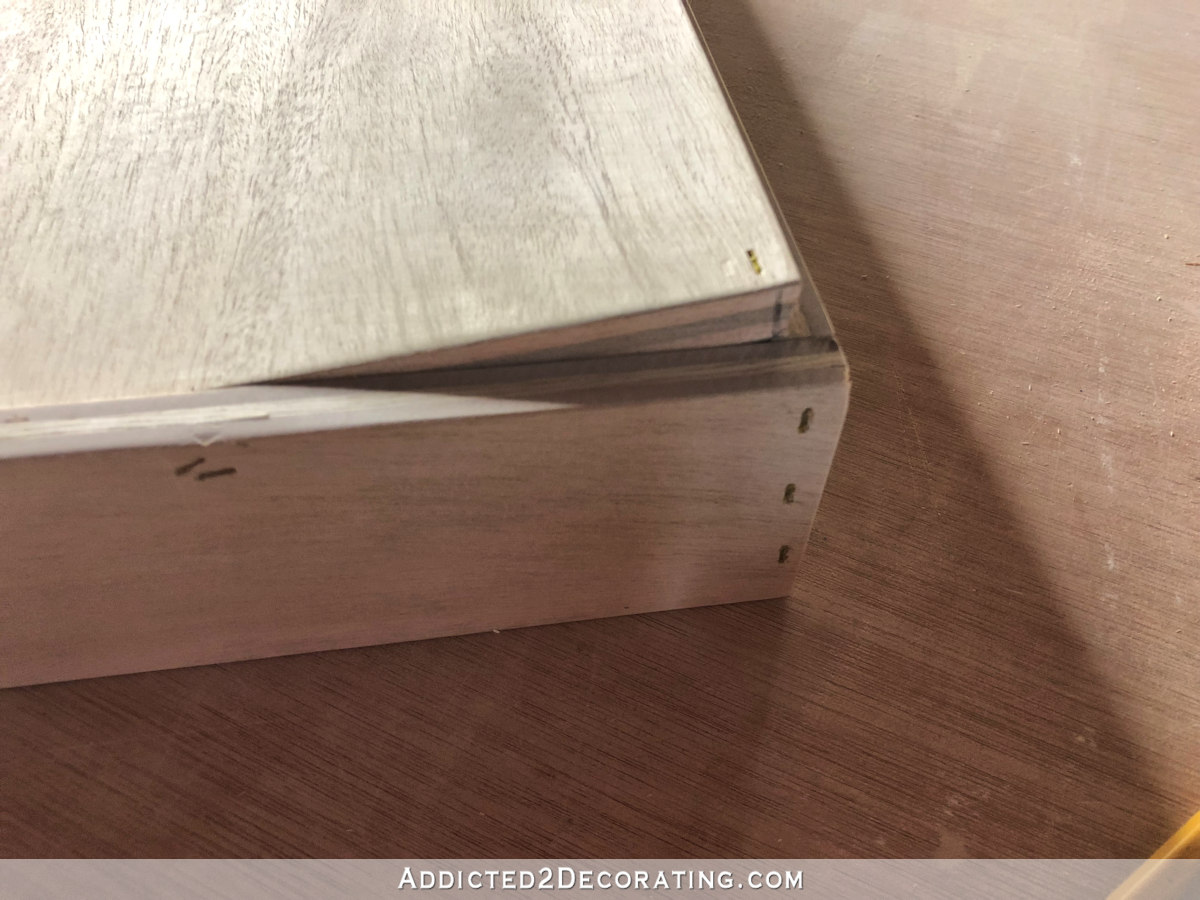
Then I added small cup hooks and labels so that each cup and spoon has an assigned spot. And because this pull-out shelf is so close to the top of the cabinet frame, I also added a small wood knob on the front to make it easier to pull out.
I’m so excited to finally have this customized pots and pans organization in my kitchen! I went from incredibly disorganized to feeling kind of fancy with my custom DIY pull-out shelves. 😀 So here’s another look at them.
Here’s the lower DIY pull-out shelf (attached to the drawer front that easily opens with the pull of the cabinet handle) with my four most-used pieces of cookware…
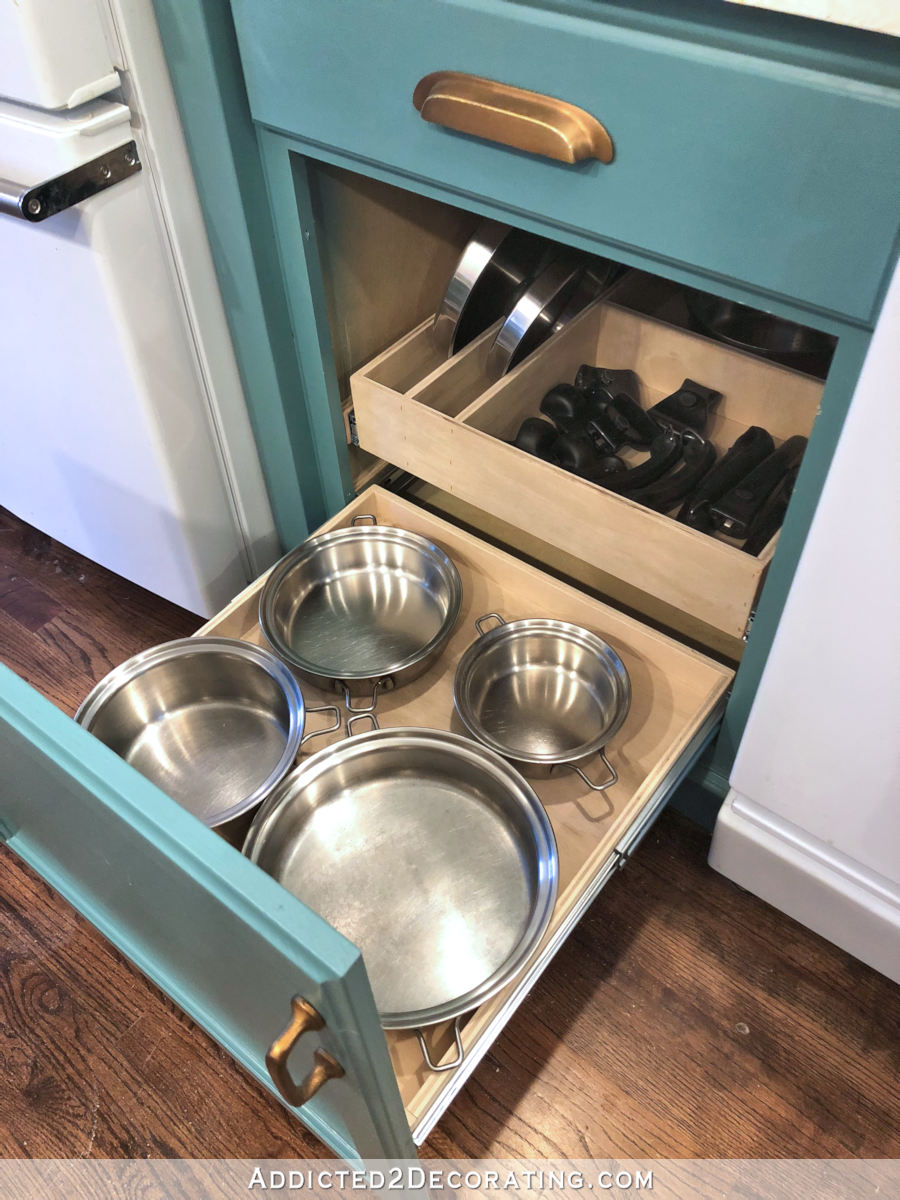
And then the middle DIY pull-out shelf with the lids, handles, and steamer insert…

And a DIY pull-out shelf customized just for my own sanity with a labeled spot for each of my measuring cups and spoons…

Now I know some of you are wondering, “Is that all the cookware you have?” No, it’s not. The cabinet to the right of the stove will house my four skillets and their lids.
I also have an electric skillet, an electric pot (similar to a crock pot…kinda), a seven-quart pot, and an eight-quart pot, all of which were part of my Saladmaster cookware set. Since I don’t use those pieces on a daily basis, they’ll all find homes in the pantry. My goal was to just keep the cookware that I use on a daily basis in the kitchen cabinets and eliminate clutter and improve efficiency by moving the rest to the pantry.
This whole organization thing is addictive. I’m finally understanding why there are whole blogs dedicated to the topic. 😀
Helpful sources and products:
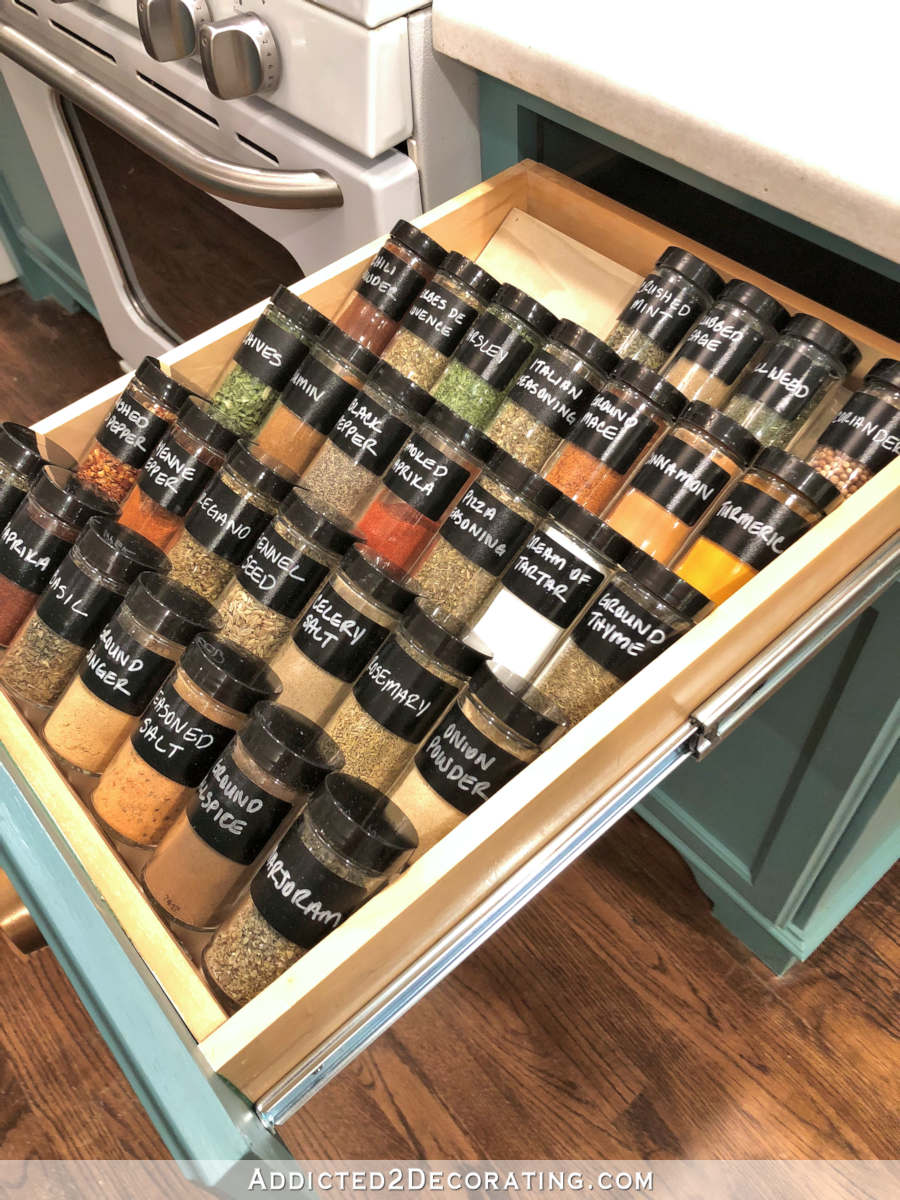
Want to turn a drawer into an amazing spice rack? Here’s a peek at mine…
I share the details on that project here…
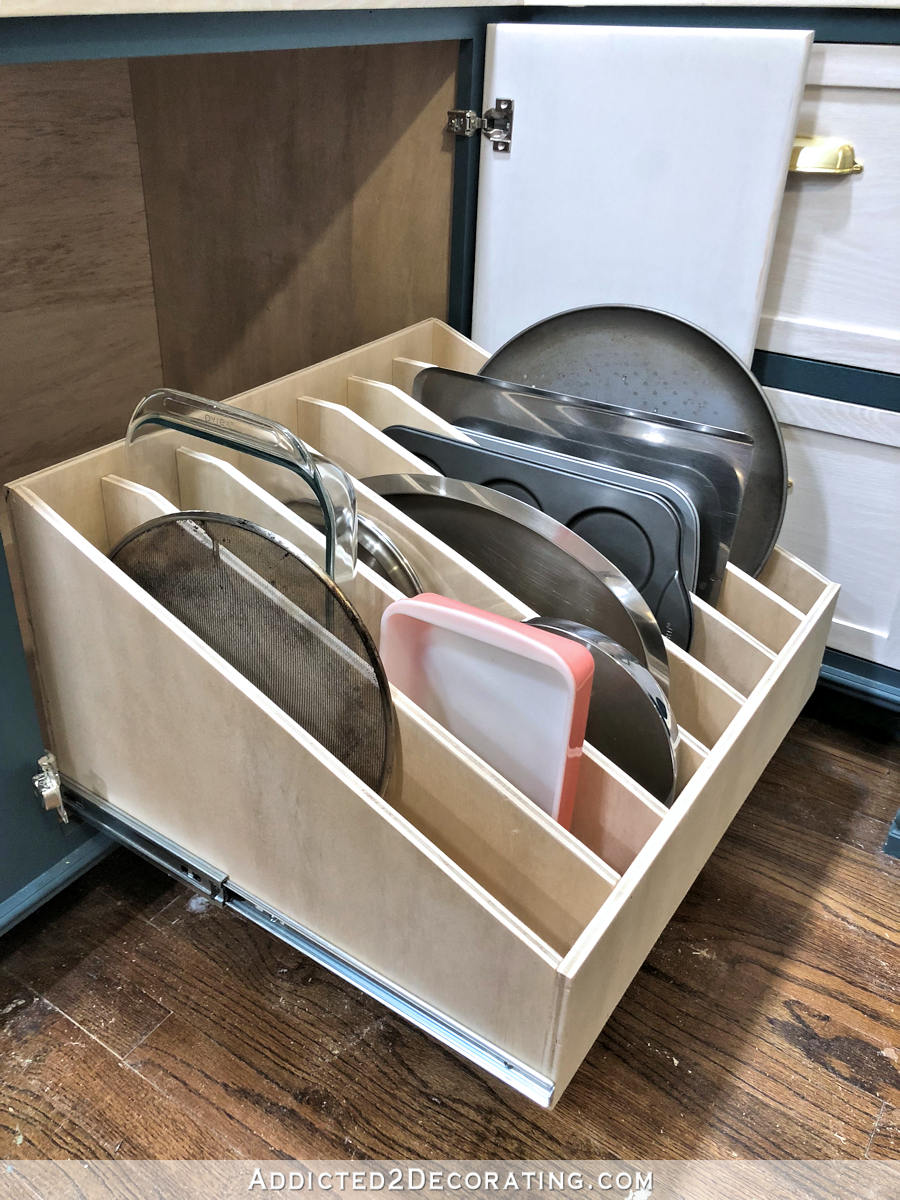
I also built a custom DIY pull-out slotted drawer for my bakeware. Here’s how that turned out…
You can see the details of that project here…
Addicted 2 Decorating is where I share my DIY and decorating journey as I remodel and decorate the 1948 fixer upper that my husband, Matt, and I bought in 2013. Matt has M.S. and is unable to do physical work, so I do the majority of the work on the house by myself. You can learn more about me here.


Brilliant what a difference!
Perfect!
Awesome! I’m curious, what brand are your pots/pans? The handles come off? I love that! That has to make storage so much easier.
They’re Saladmaster.
I have an island that has three swinging doors on it, but is open inside. Any ideas on how to implement sliding drawers with that application?
You would either have to cut some pieces of plywood to put inside and create sides (which could be done somewhat easily with a Kreg pocket hole jig) and then use side-mount drawer sides, or you would have to build shelves inside at the heights where you want your drawers and then use bottom-mount drawer slides.
There are also drawer slides that attach to the face frames of the cabinets in front, and then to the back panel of the cabinet, so no sides or shelves are needed. I personally don’t trust those as much to hold as much weight as the other options, especially if your back panel is only 1/4-inch thick, which is common for lots of ready-made cabinets.
When can you come to my house?
I’m next in line!
Exceptional. I can hardly wait to see it all organized and the feeling you will have. Nothing like knowing there is a purpose and home for everything. Your never ending talent and perseverance is admirable
I did not marry this. I am just not ready for this kind of organization. It does make me feel all warm and fuzzy though. 😀
Lol!
Cute Matt…!!!
Ha! What an adventure!
Good one, Matt. My chuckle for the day.
Ha ha…you are now entering the twilight zone! Don’t ever leave it!
I remember my first day there. I came home from a 12 hour graveyard shift, and Kristi tried to move a sofa to our second story. I had to climb through it to get upstairs. So been there for a while. 😉
And that was almost 16 years ago, way before I started tearing out walls and and opening up floors to expose the dirt beneath the house. 😀 Things have only gotten crazier since that “sofa stuck in the stairwell” incident, but at least you can’t say I’m boring! 😀
Great job!
Saladmaster…yeah! I had my parent’s 1968 Saladmaster shredder. When we bought our new cookware, they traded us a brand new shredder for our old one, so they could show how well it had held up over 30+ years.
Love the new storage, though I also like having my cookware hanging from the iron rack that the previous owners had custom built.
Lol (at Matt ‘The Hubs’) comment! I am in the process of having my kitchen redone after a massive water leak last June. I have great insurance, so while it’s a pain to go through the rebuild, it’s nice to get things the way I want them. I am showing this post to my cabinet guys with some ideas for my personal situation – you are brilliant Kristi! Thank you for these organization posts, your timing is perfect!
That slanted drawer for the measuring cups is sheer genius.
I collect organization systems on Pinterest (I’m building my own custom kitchen next year) and it’s the most clever one I’ve seen to store measuring cups and spoons.
Thanks for the idea!
Yowsa! This is the most impressive project yet. I have drawers instead of cabinets. I was pretty happy with how organized they were, but yours shame mine. Thanks for ideas to improve even more. Love your work!
YOU are my HERO!
Kristi, I hope you discover (as I did) that having a well-organised kitchen makes the chore of cooking easier.
I love this!
This is so brilliant!
That organizational stuff is really pretty neat * but * when are we going to get to see the finished pantry?
As soon as it’s finished. 🙂
I was thinking the same thing. I get so excited about the rooms that Kristi is working on and when she gets distracted, it’s just too much to bare! I hope she gets back to it soon, it’s going to be wonderful when it finished!
I’m not distracted. 🙂 The kitchen and the pantry go hand in hand. I couldn’t finish out the inside of the pantry cabinets until I knew exactly what I was going to be storing in there. And I couldn’t know what was going to be stored in there until I went through my kitchen cabinets and sorted everything into “stay in kitchen” and “move to pantry” piles. But that also required me to decide exactly how much could actually stay in the kitchen, and I had to make sure I had room to store all of the “stay in kitchen” items. That process created quite the mess in my kitchen, and while I can live with a mess for a while, I do use my kitchen daily and cook every single day, so I at least needed to get my pots, pans, and skillets that I use every day off of the floor and countertops and back into the cabinets, but I wanted to do it in an orderly fashion rather than just shoving them back into piles. 🙂 But the two go hand-in-hand, and I promise that the pantry WILL get done soon now that I have a clearer idea of what needs to go in there.
Genius!! You organize, I’ll cook😉
How wide is the opening of that cabinet? I love this, but need an idea of size as much cabinet may be smaller.
The opening is 21″ wide, and the drawer is 20 inches wide by 22 inches long. My cabinet on the other side that I’ll be using for skillets is only 15 inches wide.
I love organization, don’t always achieve it, but am blown away by this project. Love, love, love it. The spoon setup is just perfect; you really thought about it, angle, no noise, labeled, wow! Super job.
i love the drawer for the meaduring cups and spoons— you should patent that and sell it!
You are So Smart, So Talented, and well on your way to being So Organized.
Your blog makes my day. THANKS for all you do…and for sharing it all with us.
Love organization in my kitchen ! You are speaking to my language. You are inspiring me to renovate mine – thankyou!
One question using ply for those drawers do u intend to stain them or line them? I ask purely for the purpose of cleaning them- wouldn’t ply be tricky to clean as its not perfectly a flat shiny surface? thanks rachel
Oooo, all this beautiful organization makes my little heart go pitty-pat!
For readers who don’t like clanging measuring cups when they open their cupboard doors, just attach a strip of felt or other material where the cups make contact with the door.
Such creative and really genius ideas! I thought my kitchen was fairly well laid out and organized, but so many new ideas to think about incorporating. Warm and fuzzy hah!
I’m an organized freak and seeing this is has me gleefully dancing around my office. I mean, your measuring cups and spoons neatly organized AND labeled!?!?! I NEED THAT APPLICATION IN MY LIFE!! Our to-do list for the winter just expanded – 🙂 🙂 🙂
Ditto.
Like major happy glee’s 🙂
Oh how I wish I could kidnap you for a few days! I love these posts on organizing your kitchen & pantry! I look forward to each one. Thank you!
I love organization, and your solution for your measuring cups/spoons is THE best. Another genius idea and product you could sell Kristi. Love it.
I love being organized myself. Everything has it’s place. You will love all of that once it’s completed..
Love all you do….!!!
Your talent amazes me every time!
How do we spell. J E A L O U S ????? You not only have the space and the imagination — you have the skills to do it ! You continue to amaze……..
I’ll save this post so that I can come back to it when we redo our kitchen. Have two questions:
1) What is the benefit of storing the lids separately from the pots? Why not keeping them on the pots? The only thing I can think of is if sometimes the pots are used on their own without a lid. But I have never had drawers like this and have never stored the lids separately, so might be missing something.
2) Any particular reason to have the 2 bigger pots next to each other at the front of the drawer? The mathematician in me protests 🙂 My instinct would be to have the biggest and the smallest pot together at the front, and the other 2 at the back (or vice versa). It doesn’t matter really, the drawer is made and you sorted out the problem with the biggest pot overhanging the side of the drawer, I am just curious. But brilliant job, brilliant ideas. Glad we haven’t done our kitchen yet, so I can incorporate your ideas when we start.
Thank you for this post and for the whole blog!
The answer to both of those questions goes back to me thinking exactly how I use my kitchen, my habits and processes when I cook each day, and acknowledging those little things (like stacked measuring cups and spoons) that just irritate the heck out of me and finding a way to solve those little irritations.
You’ll notice that in the picture I took right after I finished that first (bottom) shelf, I actually did have the lids on the pots. I almost kept them that way, but as I was thinking through how I cook, I changed my mind. About half the time, I don’t use lids at all. Other times, I might be putting a recipe together and adding ingredients at different stages for up to 30 minutes before I’m ready for the lid. I decided I’d rather let it sit in the cabinet until the exact moment I’m ready for it rather than taking it out and setting it aside either on the countertop or on the stove. I don’t have a lot of countertop space to spare, so I like to keep them as clear as possible during meal prep, and I’d also like to avoid getting things out if I don’t really need them. If I get something out and don’t use it, but it’s been sitting by the stove or near food while I’m cooking, I still feel the need to wash it before it goes back in the cabinet. I’d like to avoid any extra dishwashing. 😀
As far as the arrangement in the cabinet, I just wanted my two most-used in the front if I could. If there had not been enough room to arrange them that way (i.e., if the overhang would have been so much that they would have bumped into the frame of the cabinet), I certainly would have rearranged. But since I could get away with putting my two most-used in the front and still have plenty of clearance to get them through the opening of the cabinet, I decided to go with it.
Thank you, both make sense 🙂
You are a remodeling rock star!
Looks like the hooks for the top drawer items are curved like cup hooks. Doesn’t that make them harder to use since you’d have to flip or twist them to remove/ replace? There are a variety of hardware pieces that are straight that would seem easier to use.
I was wondering too what you are going to do to seal the raw wood. Raw wood begins to look really nasty after awhile.
I do have a tip for anyone planning a new kitchen. One of my pet peeves is the crud & nasty stuff that shows up on a cabinet at the knobs. Doesn’t matter how often you clean it, the skin contact leaves oil residue. My solution when I remodeled my kitchen in 1998, was to use the very plain “wire pulls” but attached them on an angle across the corner of the doors which has a recessed panel. The door pulls were 8″ long and with the recessed panels, allowed plenty of depth so fingers and wood never touched. Friends are amazed that the doors still look new after 20 yrs. Drawers, not so much.
I bought the cup hooks when I thought I was going to be hanging the cups and spoons on the inside of the upper cabinet door. When I changed plans, I didn’t want to make another trip to Home Depot (I try to keep it to one trip a day, if possible 😀 ), so I went ahead and used the cup hooks. They’re really not that bad, but if I find that I start getting irritated by them, they’re easy enough to swap out for something else.
At some point, I’ll be using a clear topcoat on all of the plywood drawers and pull-out shelves, especially the ones right by the stove.
Awesome job Kristy!
I am super impressed. Applause. Applause.
Oh my gosh, you make it look so easy Kristi!
I have started a list of tools and when I’m ready, going on a shopping spree to hopefully build some of my own.
Wow! Just wow! Loved Matt’s comments. I can’t wait to see all the changes and the finished pantry…….Merry Christmas!
I love reading your posts, Kristie. I don’t have the option of all the customizing that you have, so my measuring cups are hanging inside a cabinet door on cup hooks. But to keep them from clanging, I just attached a Velcro strip on the cabinet door where the cups would actually touch… Now no more clanging. 🙂
Wow. I am so impressed. Well done!
Beautiful drawers! I love how you made a spot for lids.
I am curious…why did you attach the door to the bottom drawer instead of just swinging it open and pulling out the drawer? Isn’t the tall door in the way when you reach for your pans on the bottom?
I wanted access to my pots and pans in one motion, like a drawer. I’m only five feet tall, and the height of the door isn’t a problem at all. I find that I generally stand to the side and reach for what I need, but even if I lean over the door to grab what I need, it’s no problem at all. It would have to be about four inches taller to be in the way.
If I’m seeing this correctly, you have to open two things (the cabinet, and then the slider) to get to your measuring spoons, etc. That would drive me nuts. Also, you have 4 pans – that is PLENTY. I have four, also. I only mention it because you seem to think it isn’t enough. They each sit on their own shelf with their lid on (I hate stacking), and the one with the strainer is stored with the strainer in it. I keep my spoons on hooks on the side of my frig – super accessible, but not good if you can’t stand anything to be out all the time. Everyone is different. You did a beautiful job.
If I only had four pans, I couldn’t cook the way I do. Everyone is different.
I’m in the process of refacing my cabinets. Basically just got some old golden oak cabinets off of craiglists to make a huge kitchen island and put new veneer on the rails/stiles and found some $5 shaker doors at my local cabinet shop’s scratch and dent section. Paint and good as new! Anyway, looking to incorporate some pull-outs when I put the doors on, so your post comes at a great time! I really need to think about HOW I use my kitchen so I can best organize it. Your previous post on your thinking behind the organization has helped also… things I never really gave thought to before but make such a difference! Thanks for all your amazing, detailed posts! 🙂
Kristi- I thought you were off base when you said you were taking your dishwasher out. I thought about it and now my husband and I are going to take ours out. We needed to replace it, but both agree there are only 2 of us so why not. I could use the space in my very small kitchen. Thanks for inspiration. I love all you do.
Kristi,
I just saw this idea for plastic-ware storage and thought you might like to see it for an idea. It follows along how you like to store and ii like the look of it. Maybe you can glean an idea from it as well.
https://www.familyhandyman.com/kitchen/build-an-ultimate-container-storage-cabinet/view-all/?trkid=soc-fhm-facebook&fbclid=IwAR11H5LjYujqAYmvAumODE_-RwV0utLeGU6Q5XfIpggl-M3YQp19zHrHQ_Y
It’s a long address, so I hope it will take you to the link.