DIY Triple Layer Scalloped Mirror
I was beginning to think that I would close out an entire week without actually finishing a single project. It wasn’t for lack of trying. It’s just been one of those incredibly frustrating weeks where nothing seemed to go right. But yesterday, I finally got something finished, which is why I’m here with a rare Saturday post. And the project that I finished is this triple layer scalloped mirror that I made to go over my piano in the music room.
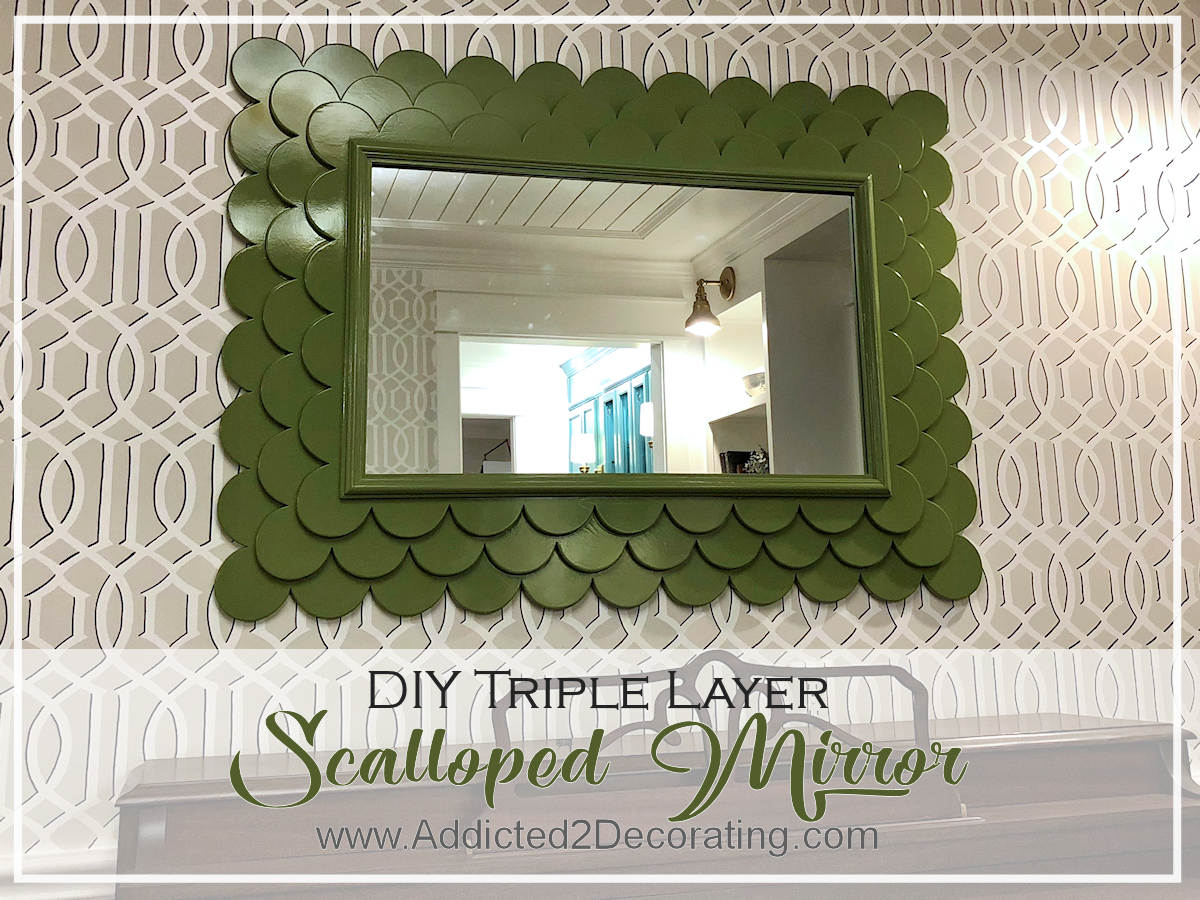
I’ll just tell you up front that this is not a quick and easy project. I mean, it’s not difficult, but there’s certainly nothing quick about it. There were hours of sanding. Hours, I tell you. There was so much sanding that if I decided right now to turn to a life of crime, I’d be good to go because I’m pretty sure my fingerprints are gone. 😀
I’ve been looking at least since December (maybe longer) for the perfect mirror to go over my piano. I had my heart set on a mirror (instead of artwork) but I had no idea what I wanted it to look like. I looked at wood framed mirrors, metal framed mirrors, mirrors with thick painted frames, mirrors with delicate gold frames, round mirrors, rectangle mirrors, carved mirrors, and on and on.
In all that time, the only mirror that I really got excited about was the Atoll Mirror from Ballard Designs. I just loved that scalloped design with the ruffled edges. I would have snatched it up immediately, but the size was too small. I found several others similar to it, and even one (from Ethan Allen, I believe) that was the right size, but the price was way more than I wanted to spend, and it wasn’t nearly as pretty as the Atoll mirror.
So I had kind of given up on the mirror search. I was still keeping my eye open for anything interesting, but I wasn’t actively searching anymore. And I was open to either purchasing a reasonably-priced, ready-made mirror or DIYing something,
And then last week as I was scrolling through Instagram, I saw it. It was the one. It was this scalloped mirror from High Point Market. It’s available in lots of different colors with a beautiful lacquered finish, but it’s also $1850. As in, one thousand eight hundred fifty dollars. If you know me at all, you know that ain’t happenin’. Three hundred dollars was about my limit, and even that would have been hard for me to part with for a framed mirror.
But it’s just scallops. And I have a jigsaw. So I set out to make my own triple layer scalloped mirror at a cost of about $90. I had to buy 1/2-inch MDF (although I found one piece that I needed on the 70% of pile at the back of the store), lattice and moulding, a mirror, spray paint, and spray lacquer. I had everything else (sandpaper, wood glue, nails, etc.) on hand.
So let me show you how I did it.
How To Make A Scalloped Mirror Frame
Step 1: Use a lid or other round object to trace a scalloped design on four sides of the frame.
I started by marking a line parallel with the end of my 1/2-inch MDF board, about five inches from the edge, and then I measured and marked the center of the line. Then I found a lid that was the size I wanted for my scallops. For reference, I think a can of Bondo is the same size as a standard quart size paint can. I marked each side of the lid with painters tape, just shy of a full half circle. This painters tape would give me guides for lining up the lid with the pencil line. Starting in the middle (at the center pencil mark), I drew one scallop, and then I worked my way towards the sides. For the long sides of the frame, I drew nine scallops.
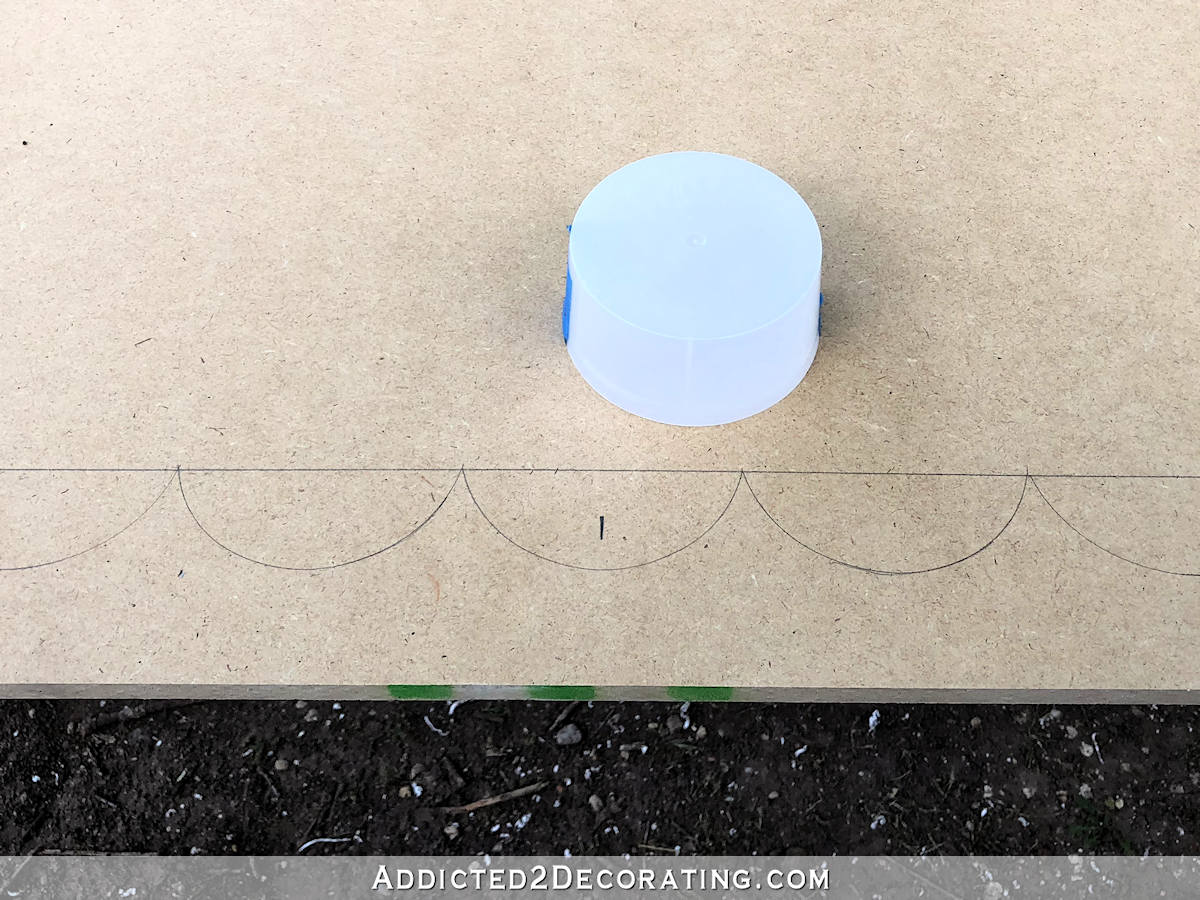
On the last scallop at each end, I used my speed square to draw a 45-degree line, and then I measured and marked that line at 3.5 inches from where the scallop meets the line.
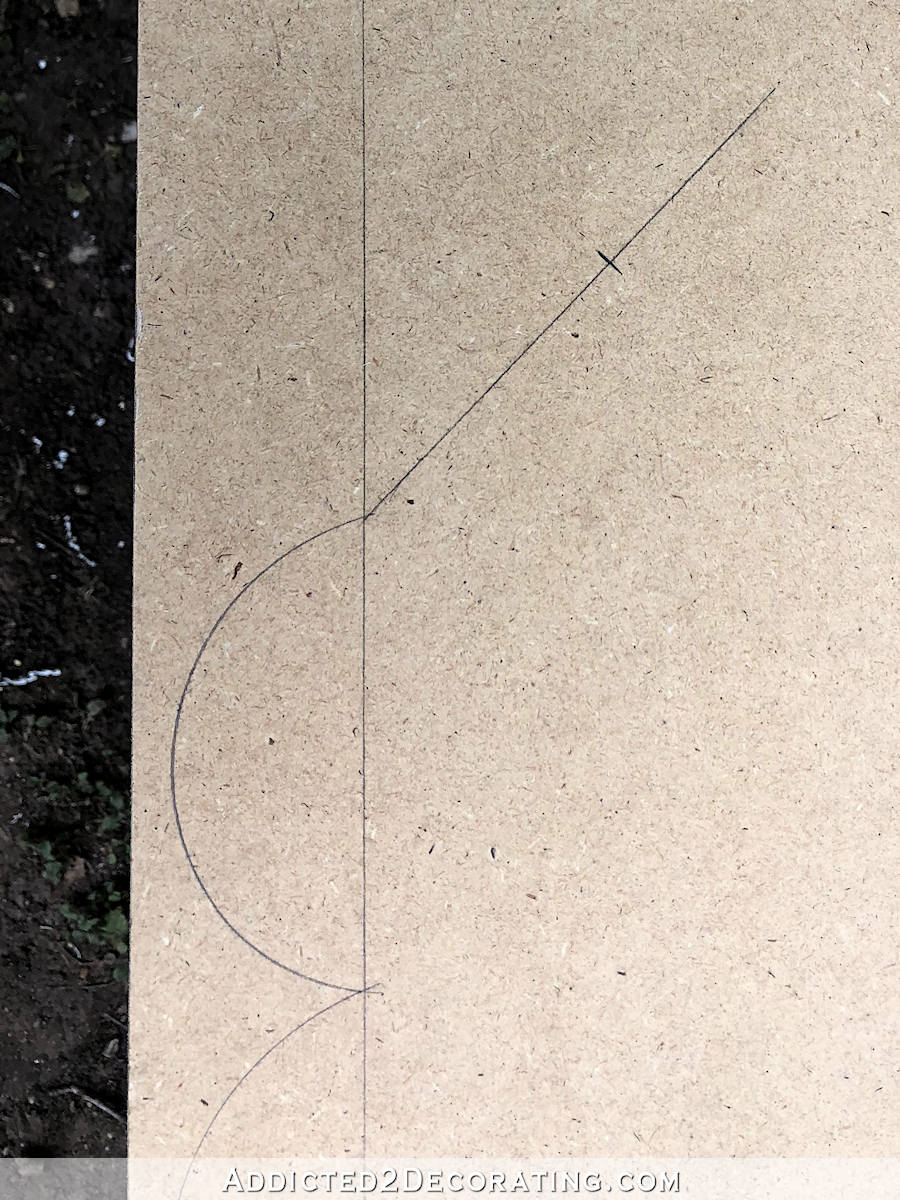
And then I used that mark at 3.5 inches on the diagonal line as a reference for drawing the perpendicular side of the frame, which I did using a framing square. Then I traced my scallops on that side. For the short sides of the frame, I did six scallops.
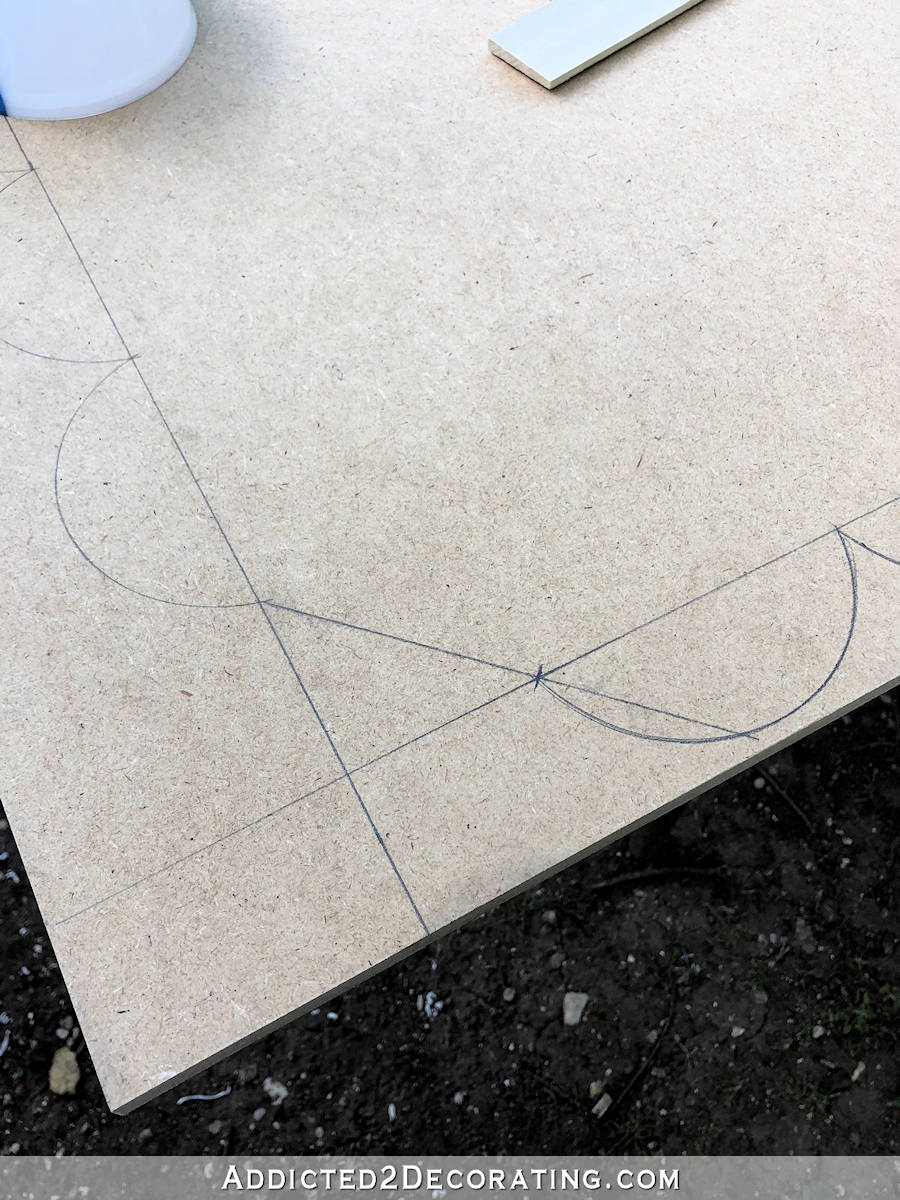
I continued around the other two sides of the frame the same way — marking a 45-degree angle from the last scallop, measuring 3.5 inches on that diagonal line, drawing a line perpendicular to the previous row I had drawn, and tracing scallops on that new line. Then repeat.
Step 2: Connect the sides with a corner scallop.
Once I had the scallops traced on all four sides of the frame, I went back and did the corners. I simply added one more scallop on each side…
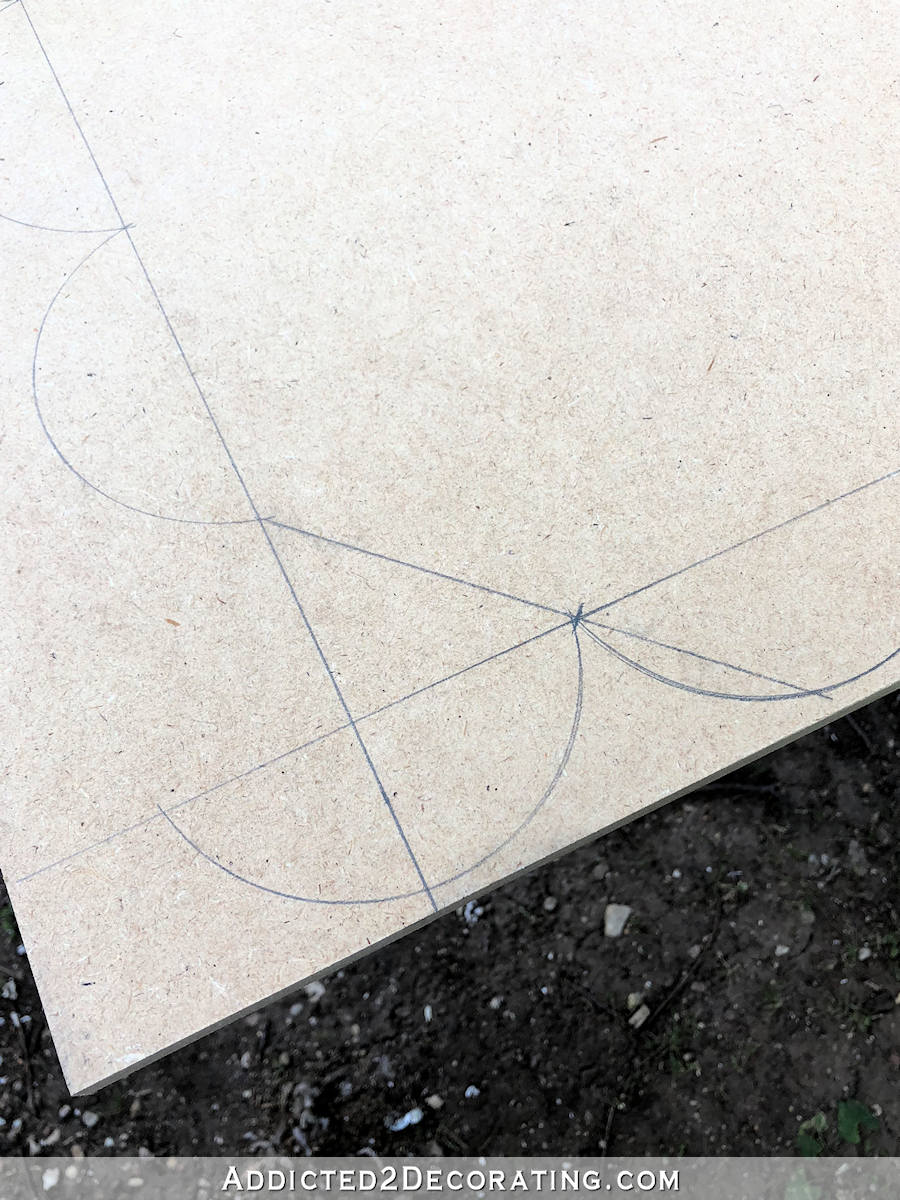
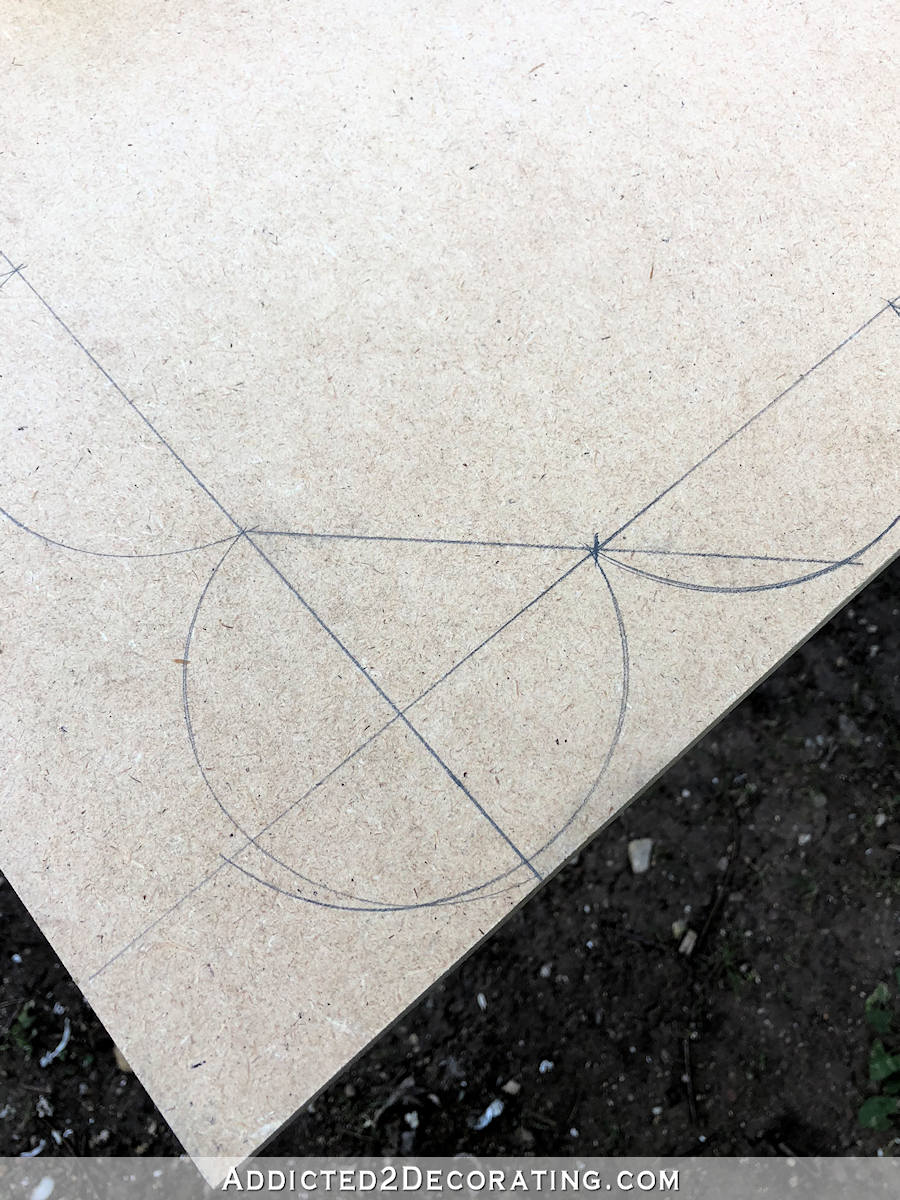
And since I avoid actual geometry at all costs, and simply guessed at how long the diagonal line needed to be, you can see above that the two additional scallops didn’t quite form a perfect circle. I wasn’t concerned about that. I just used a pencil to round that pointy intersection of the two lines before I cut out the frame with my jigsaw.
Step 3: Draw two more scalloped rectangles
After I had the first scalloped rectangle drawn, I used that exact method to do two more layers, reducing the numbers of scallops on each side by one with each smaller layer.
So the first (bottom) layer has nine scallops on the long side, and six on the short side (not including the corners).
The middle layer has eight scallops on the long side, and five on the short side (not including the corners).
The top layer has seven scallops on the long side, and four on the short side (not including the corners).
Step 4: Cut out the scalloped rectangles with a jigsaw.
I cut those out using my jigsaw on the slowest setting (i.e., for smooth cuts) and used a blade made for cutting curves/scrolls. These blades are just narrower and a bit shorter than standard jigsaw blades. I shared some tips for cutting out scallops in this post about building my niece’s daybed.
Step 5: Cut out the center rectangles to make frames.
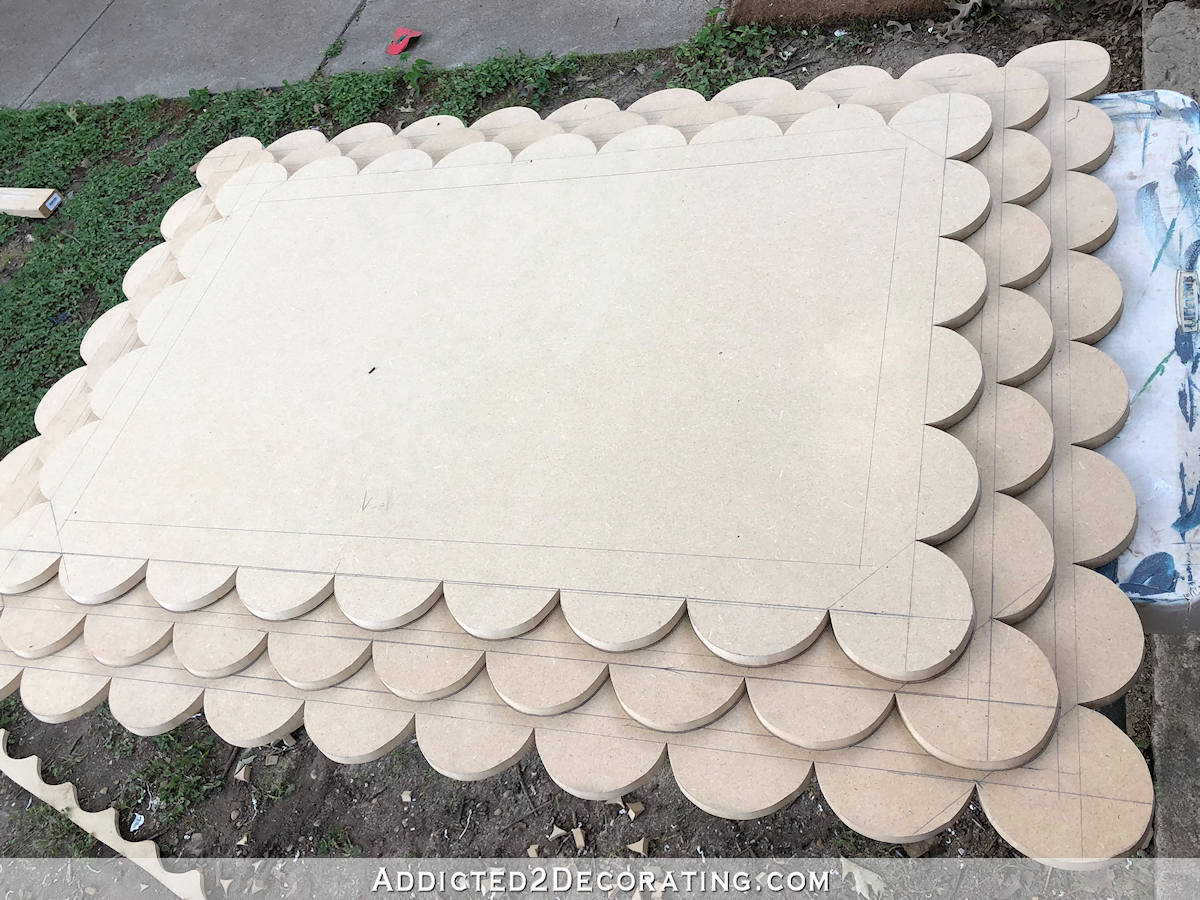
To turn these layers into an actual frame, I needed to cut out the middle rectangles. I used a 1 x 2 piece of lumber (which is actually only 1.5 inches wide) to mark a line 1.5 inches from the innermost cuts on the scallops around all four sides of the frame. You can see those lines in the picture above. Then I used my jigsaw to cut out those rectangles. I cut one layer at a time.
Step 6: Sand, sand, and sand some more.
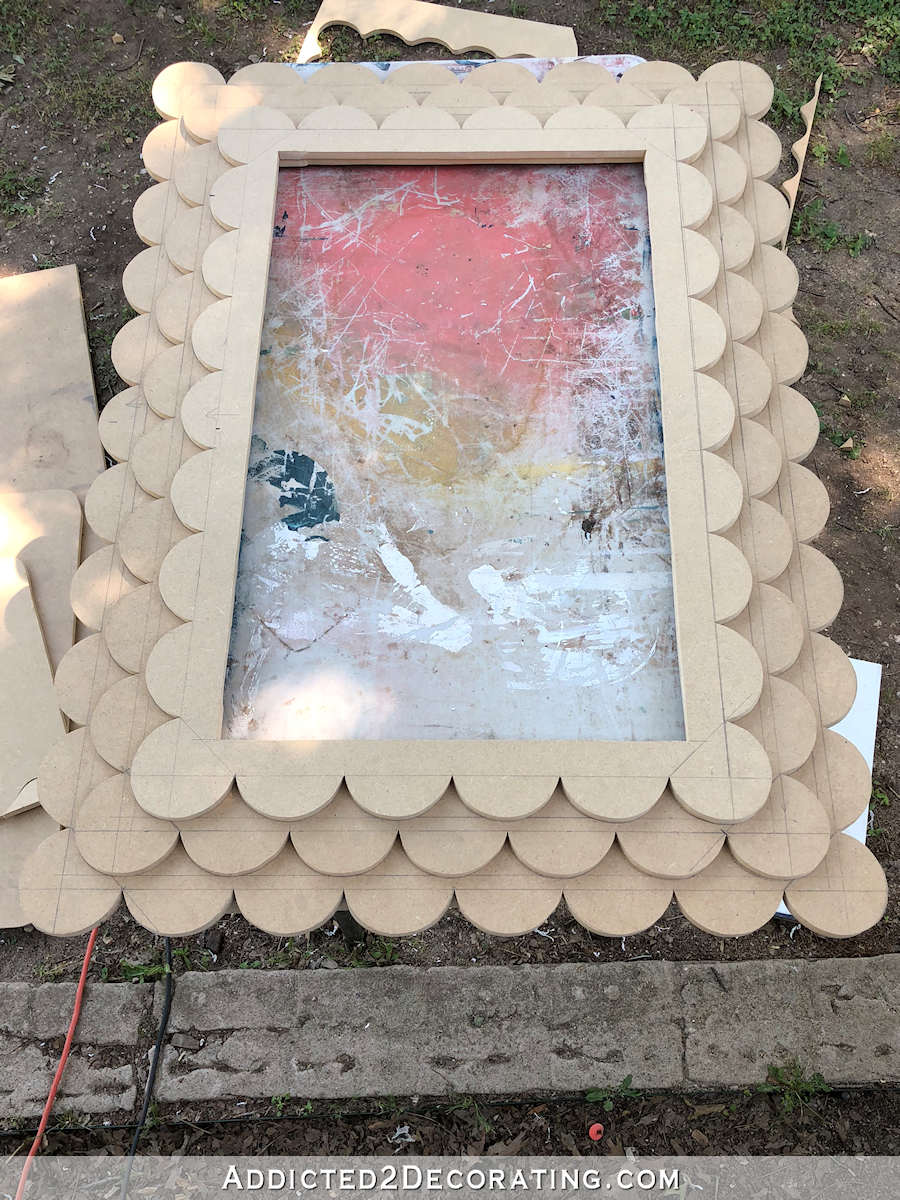
But it still wasn’t ready to assemble, because all of those scallops needed to be sanded first. It’s a huge pain, and a very tedious process since most of it has to be done by hand, but it makes such a big difference in the appearance.
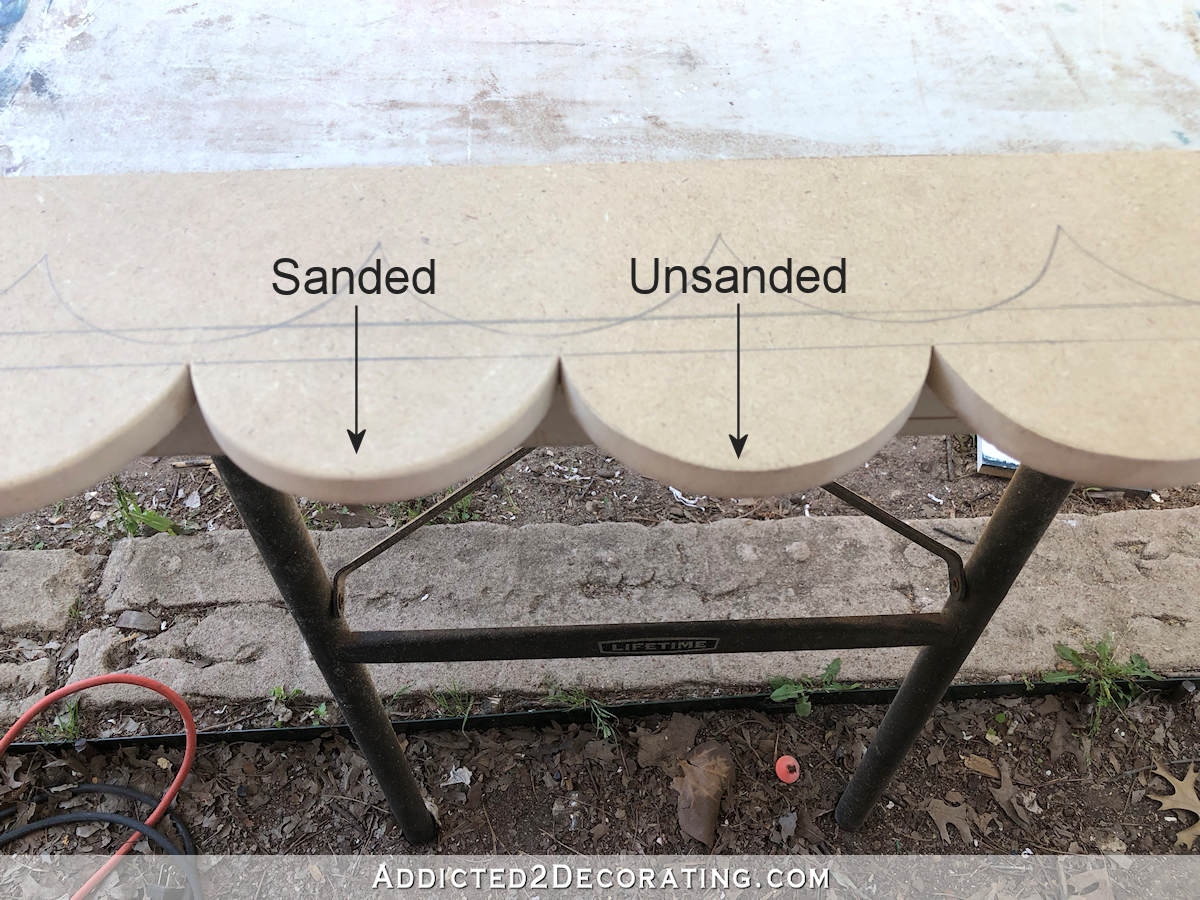
Step 7: Assemble the frame.
After hours of sanding (and unfortunately, that’s not hyperbole), I was finally ready to assemble the layers. I didn’t use any nails on this. I just used wood glue.
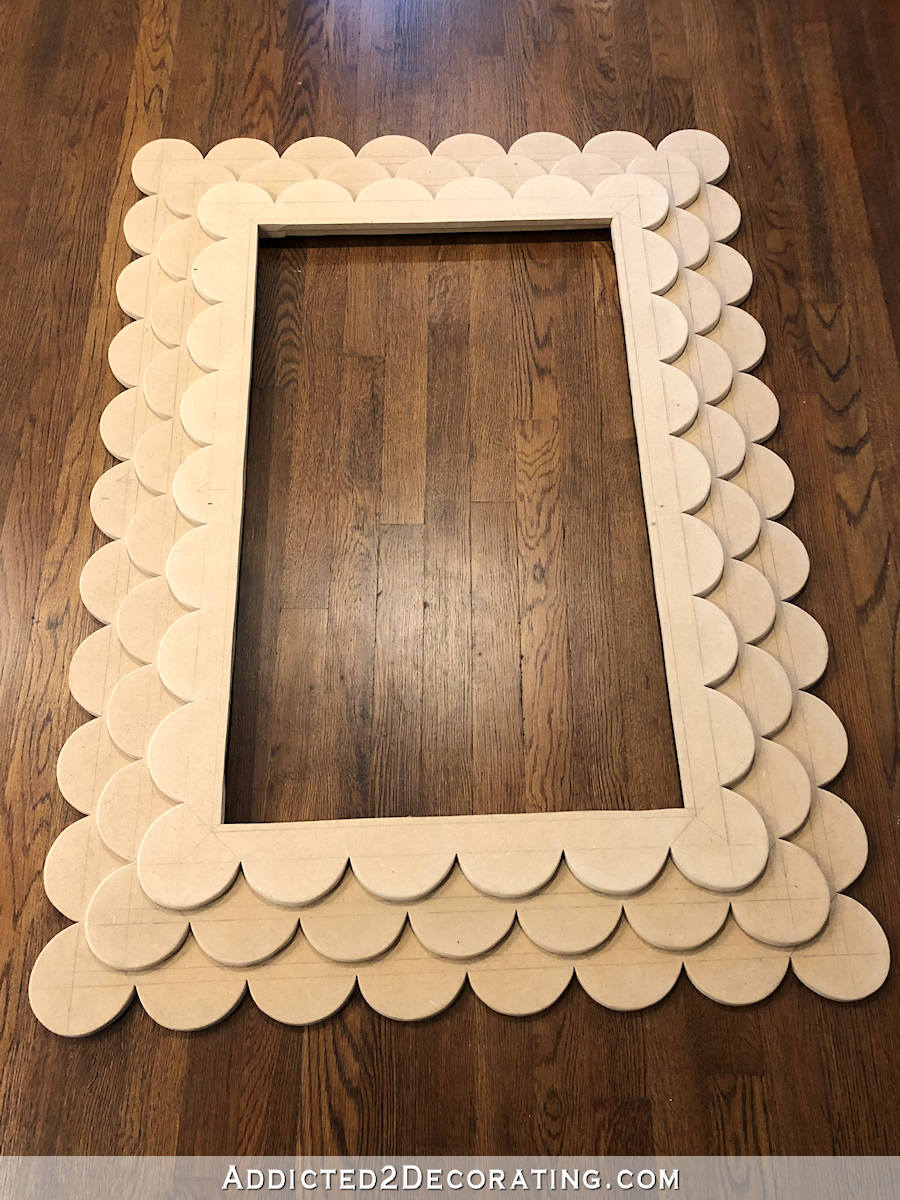
I gave it about two hours for the glue to dry before moving it, and then I used my miter saw to cut some pieces of lattice to frame the cut out rectangle area. I measured and attached these pieces so that half of the width of each lattice piece was on the MDF, and the other half was over the cut out area to form a rabbet that the mirror would rest on when it was installed later.
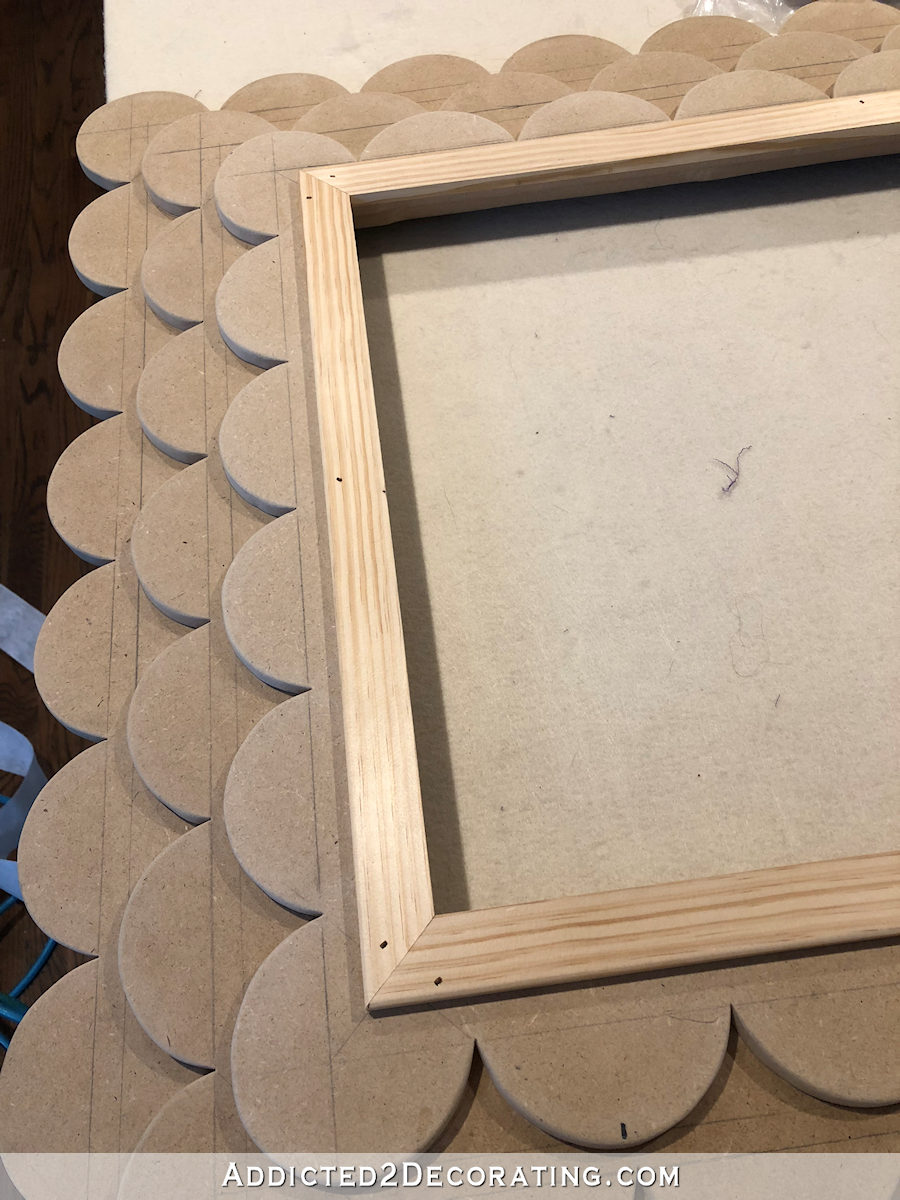
I actually ended up adding one more piece of decorative moulding (a medium-sized cabinet moulding) on top of the lattice just for a more decorative touch. I forgot to take a picture of it during assembly, but you can see it on the finished mirror frame.
Step 8: Prime, paint and lacquer the frame.
I brushed on a coat of primer, let it dry overnight, and then sanded it with 220-grit sandpaper. Then I used Rust-Oleum Painter’s Touch spray paint in the color Eden. I followed up with about four coats of Rust-Oleum Lacquer. It’s a heavy mirror (MDF is heavy stuff!), so I used an Ook Hangman French cleat to hang it securely and easily on my wall.
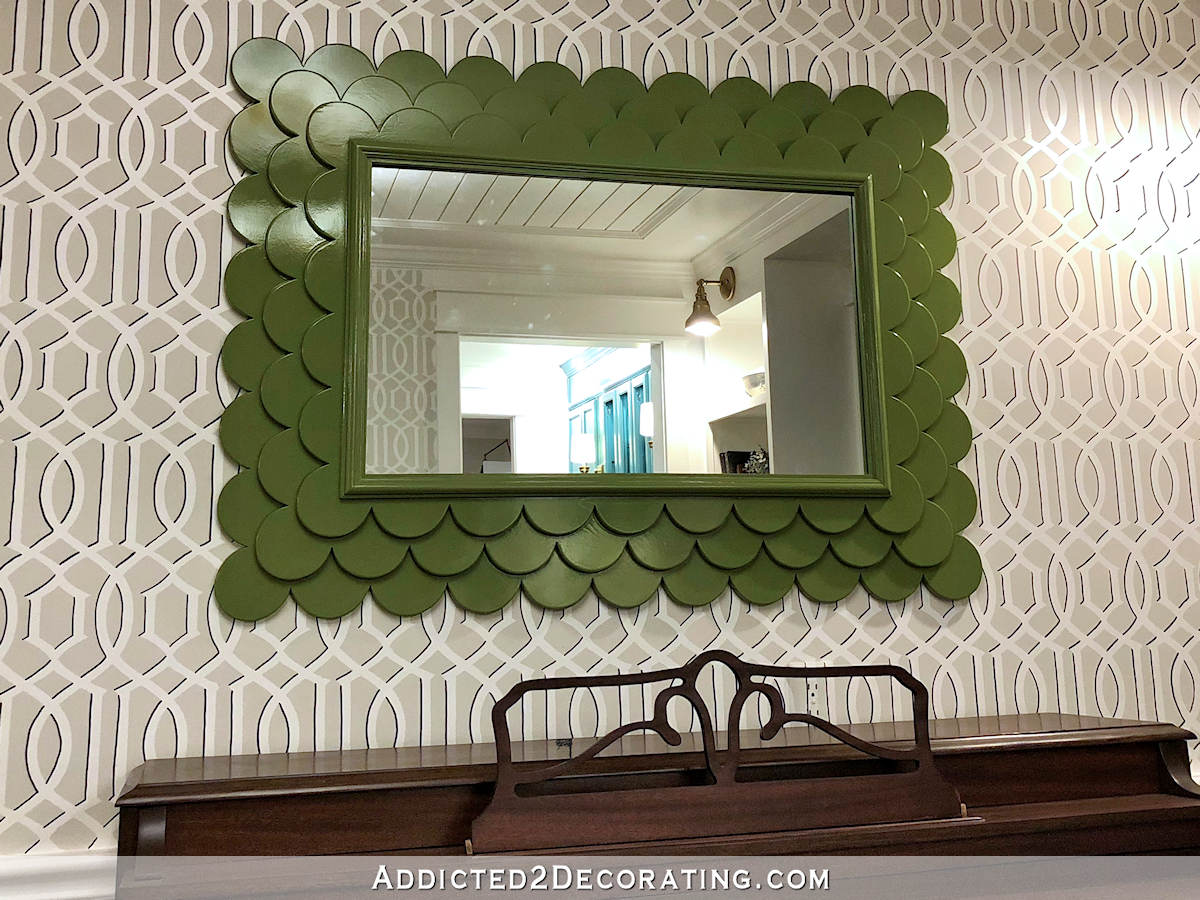
It was a lot of work, but totally worth it to save $1760. And I love it in my music room. That room has been so neutral and colorless for so long now, and it’s amazing how just one item with color has breathed some life into that room. I’m anxious to add more color in there now!



Holy cow – you are waaay more patient than I would have been with all that sanding! Looks amazing! 💚
Congratulations for sticking it out to finish this truly spectacular mirror!! It is beautiful.
LOVE the scallops! That is really a beautiful piece and I am always so impressed by your creativity.
That cost is out of whack!!!!! So glad you are a clever one and made your own. Looks stunning!
Genius, would love to see more pics in the space! I like the overall design, but feel it needs something to give it more depth and dimension. Maybe gold flaking the frame so it stands out? It feels a little lost at the moment. But overall, awesome job!
Yes, I feel like as it is, it isn’t quite sophisticated enough for the music room with its lovely lattice walls and shiny new piano. Gold leaf or something would definitely bring it up a notch!
What a fun project!
I agree! The design is really beautiful, but It lacks something, I don’t know what…
Not sure I have the patience to do this, but sure loving the finished project!
This is stunningly beautiful!!
It is beautiful! I love it!
It stunning!
I really love this!
Question: did you have to use 1/2 inch mdf, or did you use 1/2 inch mdf because you found a piece 70% off?
Just wondering if 1/4 Or 3/8 would work and be lighter to hang?
I had intended to use 1/2-inch MDF to get the dimensional look that I wanted. 1/4″ MDF wouldn’t quite have the same effect, but also my Home Depot doesn’t carry full sheets of 1/4″ MDF, and I needed a full sheet to get the large size frame I wanted.
So, I’m not surprised it’s stunning! Those crafty–albeit fingerprints-less–hands are incredibly talented! But the sanding part… ugh. I agree that saving $1,700 is worth the grief and skin regeneration regimen you’ll have to go through. All kidding aside, I admire your will to try and, sometimes, fail. And this was a total win!
This is absolutely stunning. You am so impressed by all your gorgeous work.
Love the mirror! Wonderful job! I got really excited when I saw that bright orange mirror, thought that color was awesome. I was always a fan of that coral buffet. I must admit I’m not a fan of the green, but I know you have a vision for your room, and I can’t wait to see it. Happy Decorating.
“There was so much sanding that if I decided right now to turn to a life of crime, I’d be good to go because I’m pretty sure my fingerprints are gone.”
TIP – get a box of “finger cots” from Walmart.
You have totally saved $1760 because it looks just the same. It’s beautiful! It reminds me of when Joanna told Clint to make a table with scallops. His eyes narrowed at the thought of scallops. And you have beautifully made ten times that many scallops.
You are the bomb! Why don’t you have an HGTV show? It would be riveting.
I second Carol’s comment: You should ABSOLUTELY have your own HGTV show! Each segment could be a simple DIY of any number of projects you’ve done in your home. The decorating world could use a SANE, budget-minded, skilled craftswoman like yourself to prove that DIY-ing can be fun, frugal and fabulous! Kudos <3
Now that the Gaineses are leaving, HGTV should totally bring you on board. You would be the next Waco sensation! Those scollops looks so perfect it almost looks die-cut. You have the patience of a saint.
Mad props for your jigsaw skills.
Gorgeous!
It looks exactly like the $1800 mirror for $90. Wow! How many hours did you put in?
I honestly have no idea. I worked on it for about two-and-a-half days, though.
What a great mirror, I love the design. You are definitely more skilled with a jigsaw than I am. My hand would get too tired making that many curves. I might cheat and do it with 3 or 4 inch disk painted and glued to a backer.
Marvelous job! It is a very good copy of the pricey one! Props for all your hard work and tenacity once again! You are NOT a quitter, that’s for sure!
How is your pup doing? Is he getting better and not knocking you down anymore?
He’s doing much better. His anxiety and fear of the back yard and the neighbor’s big metal shop door and dogs has gone away almost completely. He hasn’t knocked me down anymore. He’s much calmer indoors now, and he’s learned some commands. But he still gets crazy hyper and uncontrollable at times. I’m doing a dog training course, so hopefully that will help me learn how to train him better.
Good. I hope the training helps! He seems like a sweet dog!
So impressed! Love it…thanks for the Saturday post! Missed you this week!!
How did you secure the mirror in the frame?
I just used scrap pieces of wood (similar to square dowel rods) and pressed them against the mirror and hot glued them to the side MDF. But you can also use glazier points, Fletcher points, or small brad nails used like points to hold the mirror in.
Love, love, love, love, love it! Not in love with the color, though. I don’t think you’ll keep that color after living with it awhile and once the house is finished. Actually, I like that shade of green and have used it; just don’t care for it there, especially with the kitchen cabinets reflecting in the mirror.
Congratulations on another DIY, money-saving triumph!
SMH! Amazed at those critiquing your work. Unless somebody particularly asks, zip it! Wouldn’t it be boring if we were all the same with the same taste?! As always, awesome work. Not fond of sanding so kudos to you because that was a big job. Looking good!
I’m chewing on my tongue, thinking the same!
Bravo! Standing ovation. That mirror is fantastic.
Great job. The mirror looks awesome BUT and I am just being honest, I do not like what it reflects. Perhaps it looks different from what I can in the photo.
It reflects my kitchen and breakfast room, which I think are beautiful. I sat in the chair to take the picture in the post because after finishing that beast of a mirror and getting it hung on the wall, I was too lazy to clean off my kitchen countertop and move my mess out of the breakfsat room. So instead of standing to take the picture (and having it reflect my messy kitchen countertop, messy breakfast room that I’ve currently turned into a sewing room, etc., I sat in the chair to take the picture.
I think your kitchen, breakfast room and all you do is beautiful so I’m sure it looks great. Mirror reflections are a bit of a pet peeve of mine….please forgive me!!! 🙂
Nothing to forgive! 🙂 Just wanted to put your mind at ease that the mirror doesn’t really reflect the ceiling. That only happens when I’m too lazy to clean the kitchen. 😀
🙂
I am literally speechless!
If you ever tire of the mirror please send it my way as i think it is gorgeous!
I think that some of the negative comments are due to the differences between the two comparison photos. The replication of the great mirror is spot on-fine job! However, the two placements are very different. In the comparison photo the color contrast between the navy and vermilion are complementary on the color wheel and frequently used as décor choices. Additionally, the contrast of the straight angled geometric wallpaper is juxtaposed against the curved lines of the scalloped mirror, where your walls already have a serpentine lattice combined with an angled lattice. More curves in the mirror detract rather than contrast. Both of those differences combine to make your use just look a little off. Great job on that mirror it’s a winner!
Missed you last week Kristi, so what a lovely surprise to see your Saturday post. You’ve done a great job on the mirror and such a lot of hard work, especially all that sanding, but your efforts certainly paid off. It will be exciting to see your vision for decorating, styling and furnishing your music room, now the new mirror is in there.
Aaahhhhh, yes, the Atoll mirror from Ballard Designs, I’m very familiar with it as I’ve been drooling over it for quite some time now! Your scallop mirror is gorgeous, and I’ll never cease to be impressed with how talented you are, and how much energy and tenaciousness you have in finishing your projects.
In re to the price of the original mirror — do you ever see stuff like that and just laugh and laugh and then laugh some more? Isn’t it stupid how overpriced some things are? I bet you got a chuckle out of it, then set to creating your own!
Kristi, I went to the site for the scalloped mirror to see the other colors, and yours looks like the mirror in the ‘Parakeet’ color! Of course being a beach lover, my favorite shade is ‘Oceanfront,’ I think you’d like that color as well. Truthfully, I like your mirror better than theirs, your scallops are more defined and even. Their third row (largest set of scallops) has corner scallops that look a little off or squished to me. And of course their price tag is enough to knock a girl over!
You are amazing. That is all.
You could sell these unfinished!! Spectacular!!
Hi! Do you sell these by any chance?
No, I don’t.