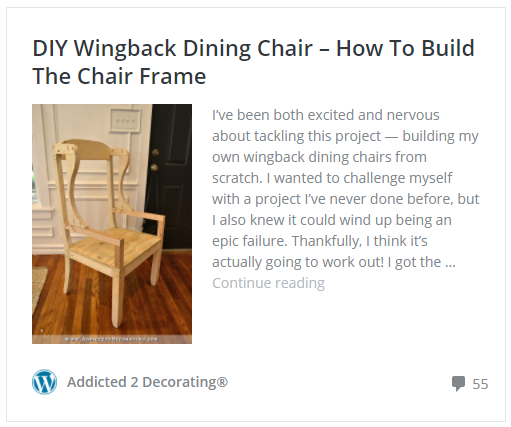
DIY Wingback Dining Chair – How To Upholster The Frame (Part 1)
Since it was a holiday weekend, I decided not to pressure myself to get the entire wingback dining chair upholstered. I did get all of the front upholstered, though. And to be honest, it’s probably a good thing I’m breaking the upholstery process into two posts, because I have over 35 pictures to show you just for the front! For tutorials, I’m definitely a “more is better” kind of person when it comes to the number of pictures I use. 🙂
Anyway, if you missed the first part of this project where I built the frame for this chair, you can find that here. This is truly a DIY made-from-scratch wingback chair.
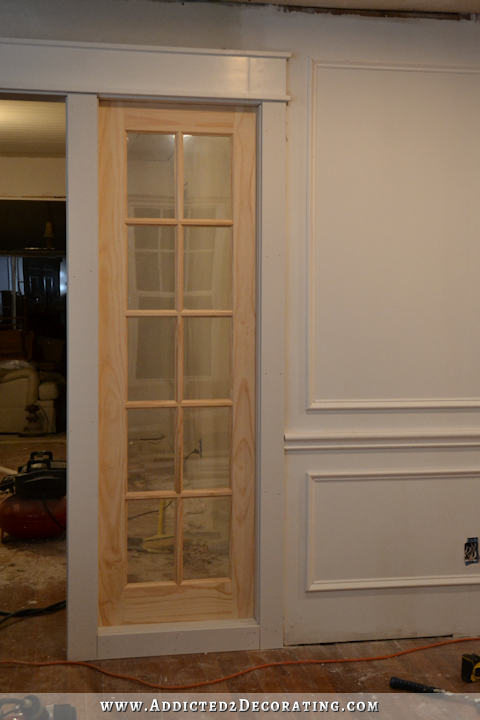
So at the end of the last post, I had a frame that looked like this…
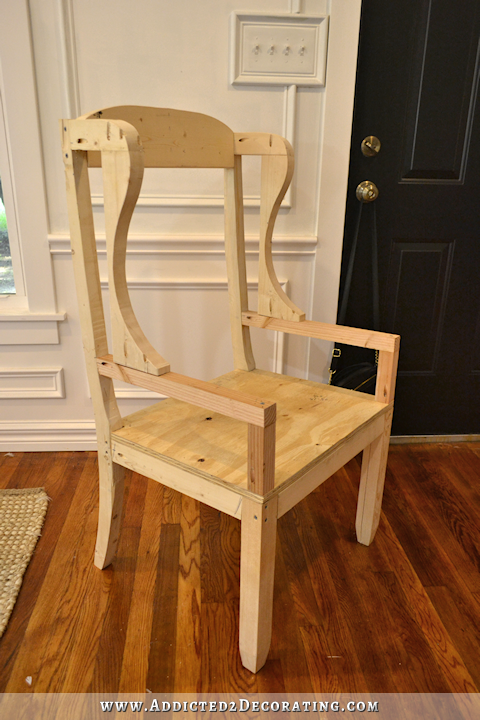
Before I could get started with the upholstery, the chair needed a bit more framing that the foam, batting, and fabric could wrap around. The horizontal pieces are called “stretcher rails” and the vertical pieces are called “stretcher posts.” So inside the framing on the back of the chair, I added a stretcher rail along the bottom, and then a stretcher post on each side. I attached the rail with wood glue and 2.5″ 16-gauge nails through the outside of the chair frame into the ends of the rail, and then I attached the stretcher posts with wood glue and pocket screws.
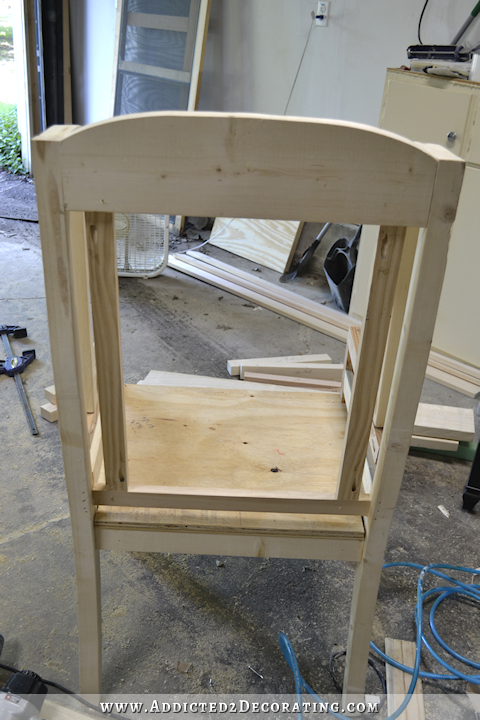
I also added a stretcher rail inside the arm framing. And finally, I used my rotary sander and 100-grit sandpaper to round the corners of the arm.

And with that, the upholstery process could finally begin.
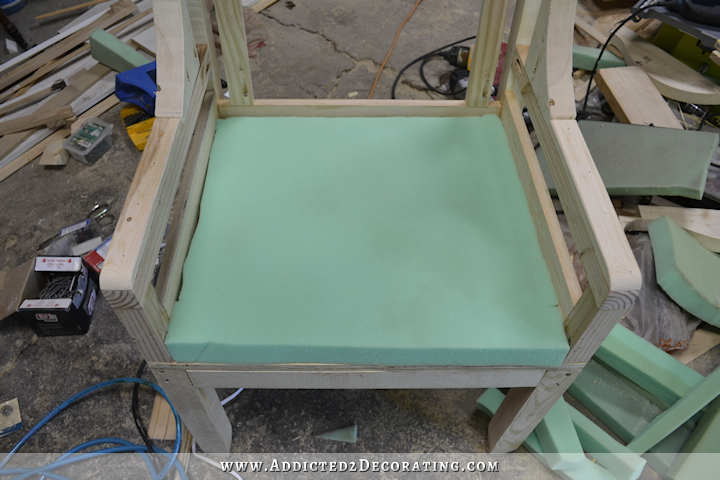
I started by cutting a piece of 2-inch foam to fit inside the seat area, and gluing it into place using spray adhesive.
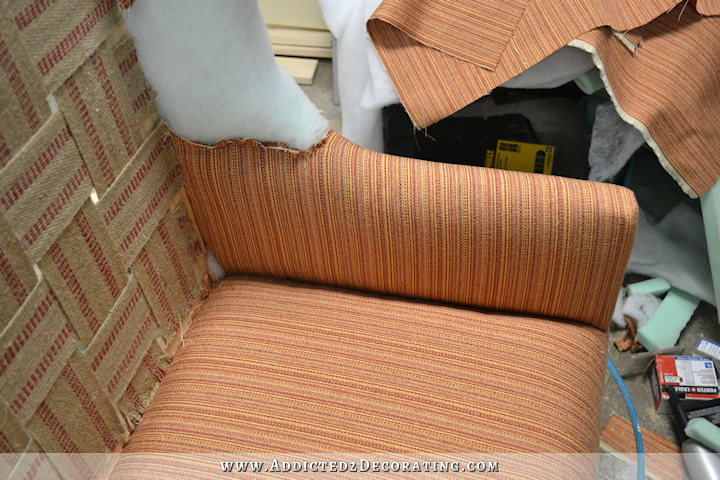
Then I added jute upholstery webbing to the back, stapled to the stretcher posts. I started with the horizontal pieces…
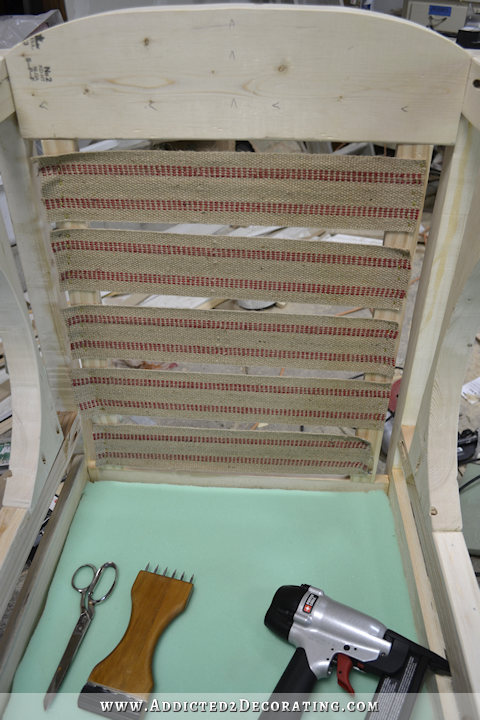
And then wove in the vertical pieces.
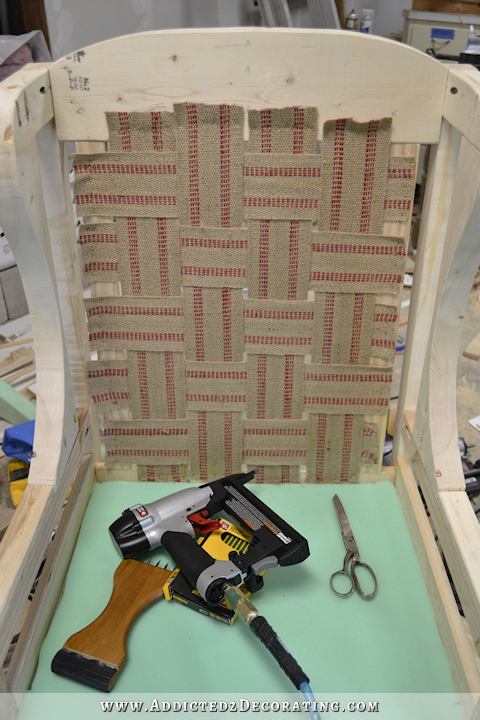
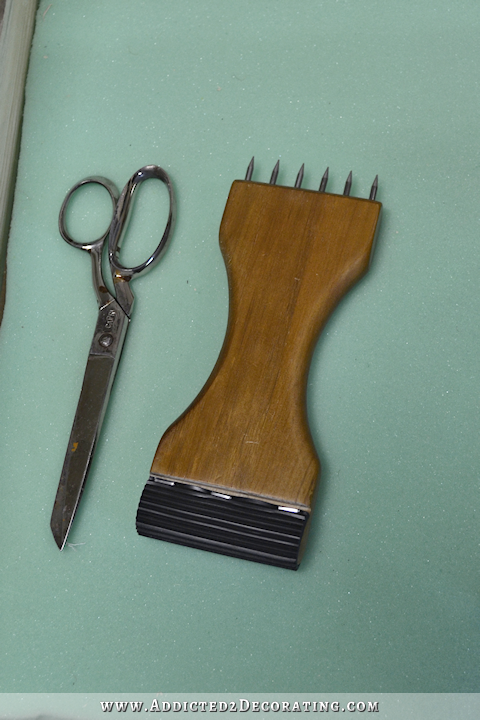
In order to attach jute upholstery webbing, you need a webbing stretcher. The one at Joann Fabrics looks like this, and has instructions on the back of the package. This is a necessary took if you’re going to use jute webbing, because there’s no way to stretch it tight enough by hand.
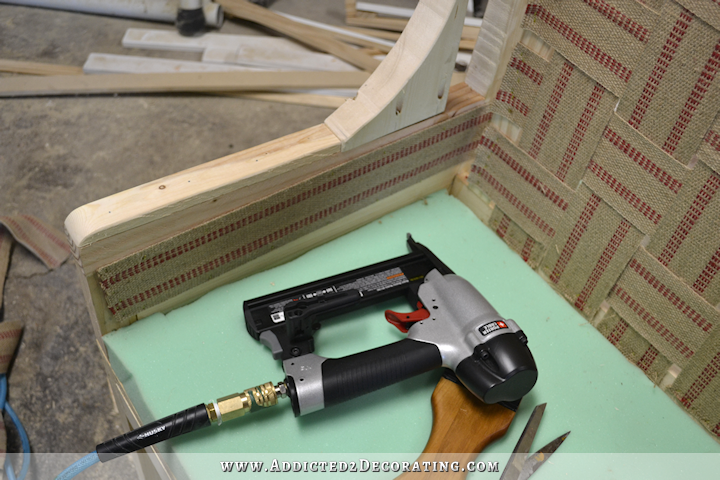
I also added jute webbing to the inside of the arms.
Then back to the seat, I added a piece of 1/2-inch foam over the top, glued into place with spray adhesive. I cut this piece larger, and tucked it under the stretcher rails on the sides and back, and then attached it to the front of the seat so that it would reach the bottom of the seat framing.
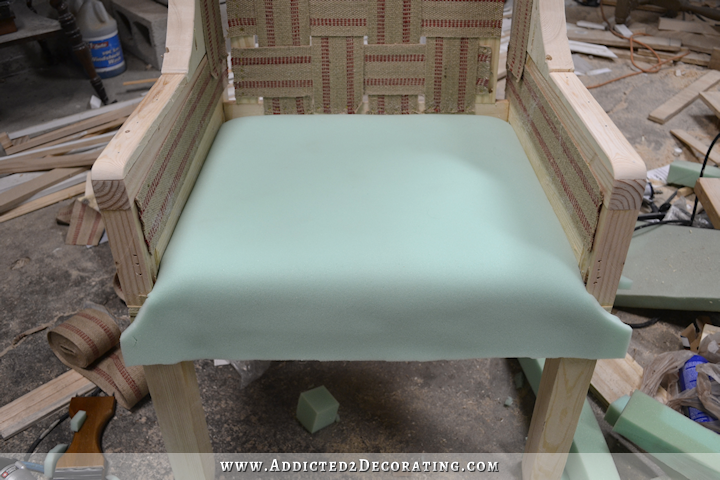
Here’s a look at the side, with the 1/2-inch foam tucked under the stretcher rail.
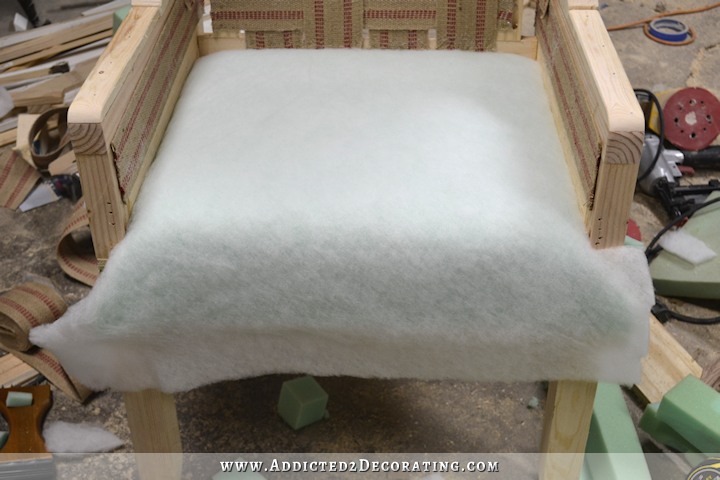
And on top of that, I adhered a piece of high-loft polyester batting. It’s cut, tucked, and wrapped the same way as the 1/2-inch foam, except that it’s longer in the front so that it can actually wrap under the seat framing.
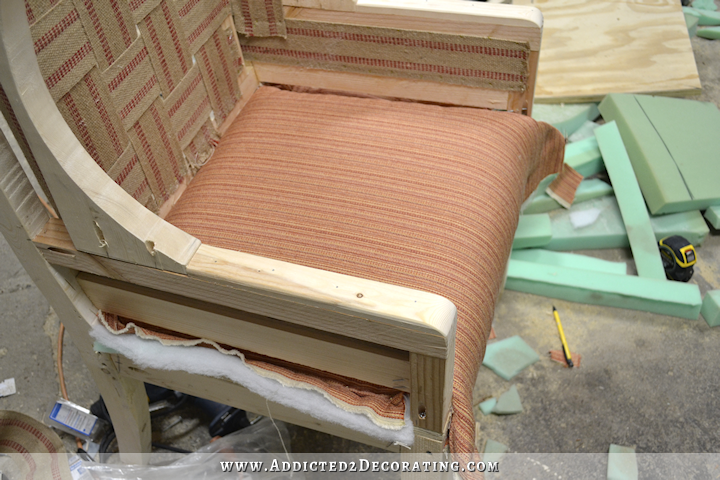
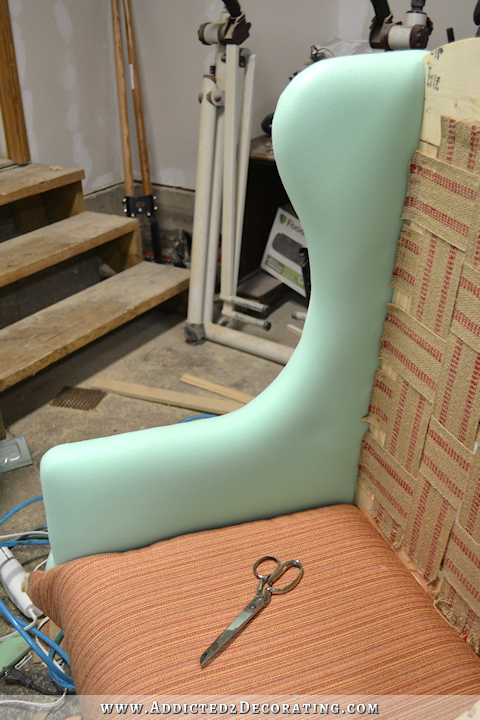
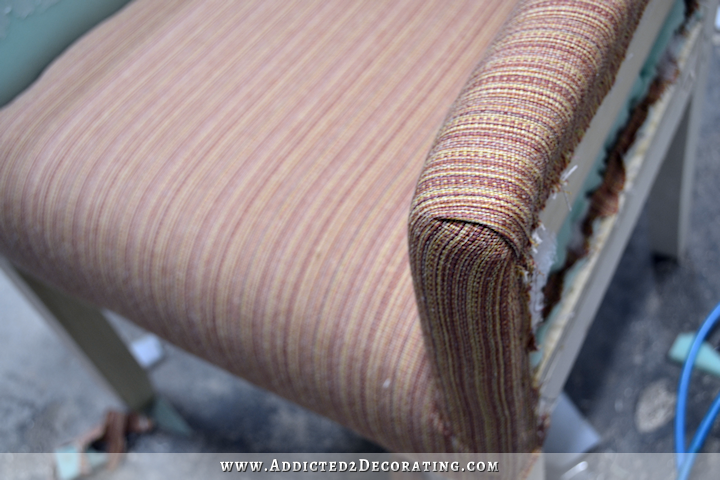
And then finally, the fabric, which was stretched taut and stapled into place on the sides and back with staples going into the top edges of the seat framing.
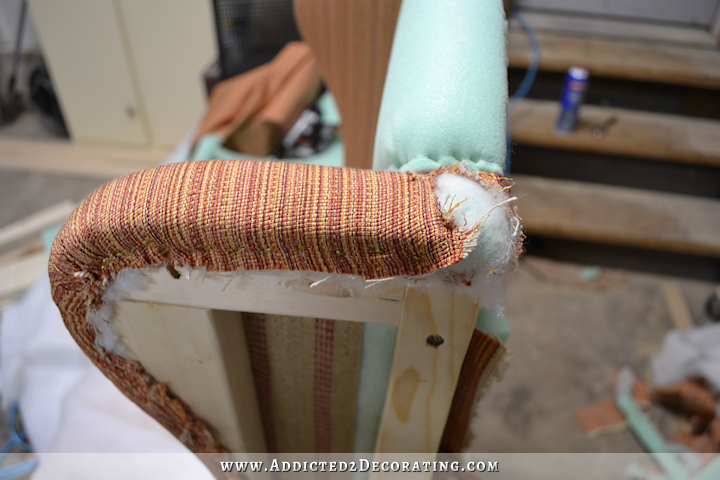
I left the front of the seat unfinished for now, and turned my attention to the arms and wings. Those were covered with 1-inch foam, adhered in place with spray adhesive, and tucked into the stretcher rail on the arm and the stretcher post on the back.
And then on the front edges, I wrapped it around the wood and stapled it right along the edge. Working around the curves was a challenge, and required several relief cuts in the foam to make it around the inside curve.

But once it was all stapled into place and trimmed, it looked like this.

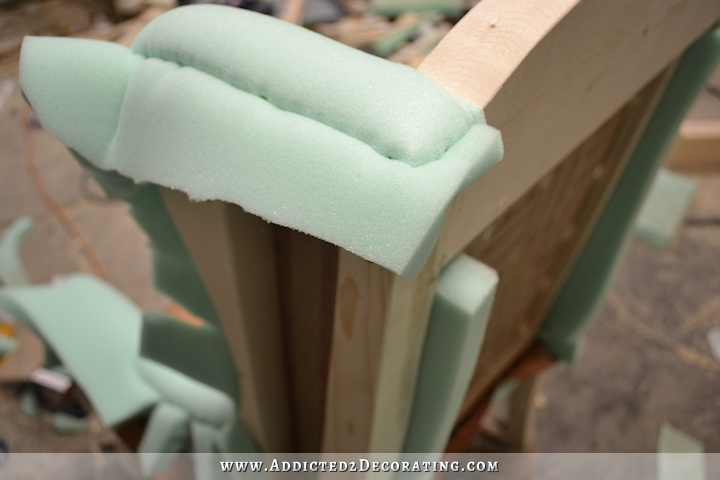
On the top corners where the wings meet the seat back, I brought the foam straight back and stapled around the edges.
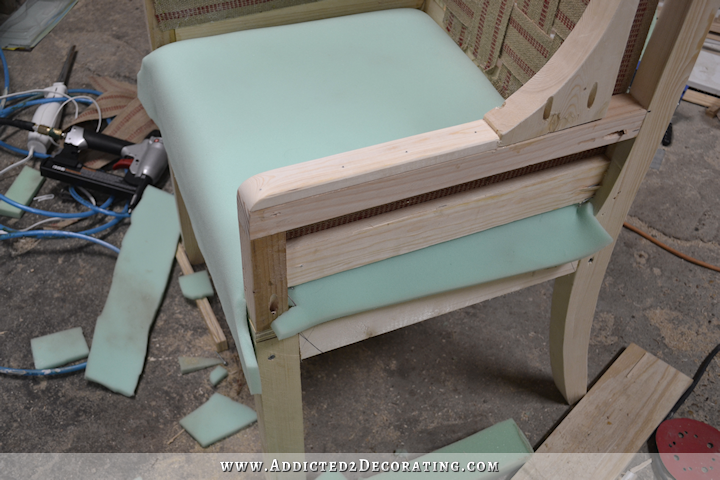
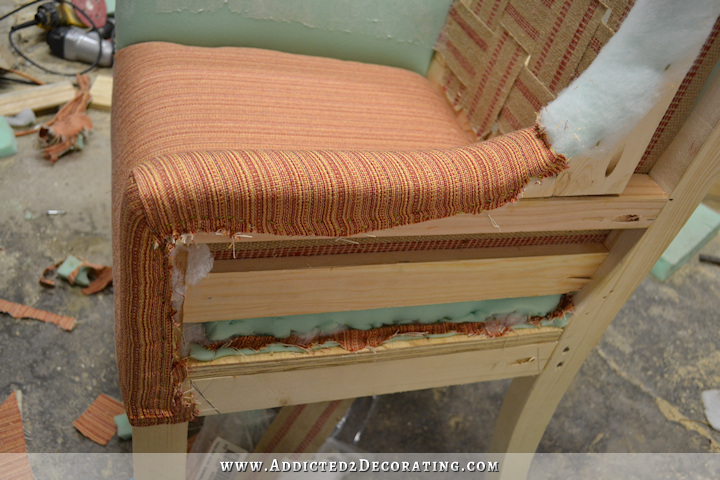
Now on the front of the arm/seat area, I pushed the seat foam/batting/fabric aside and stapled the arm foam around the edge and at the bottom.
I trimmed off the excess, and then wrapped the 1/2-inch seat foam around the edge, right on top of the arm foam.
And then I wrapped the batting and fabric around to the side and stapled in place.
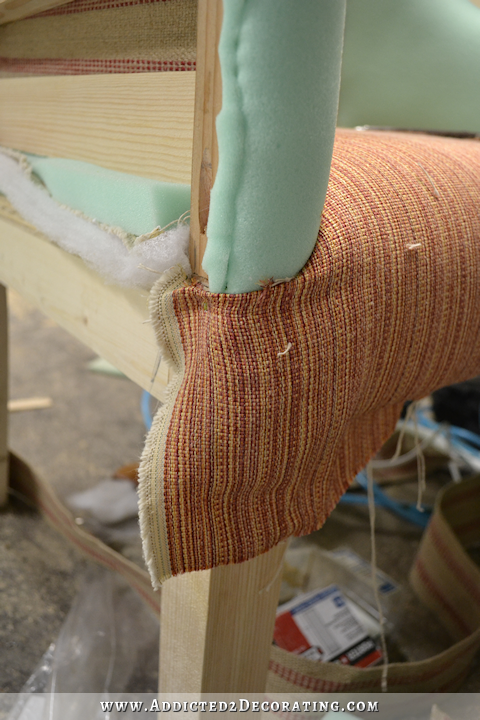
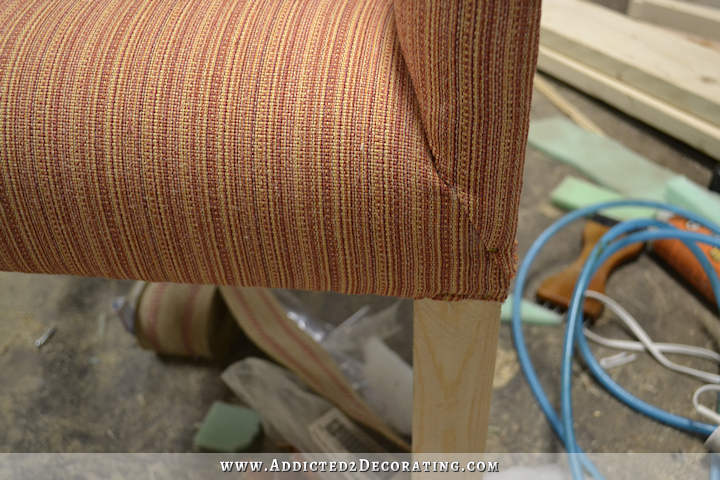
In the front of the seat, I cut a slit in the fabric so that the fabric could wrap underneath the seat frame and be stapled into place.
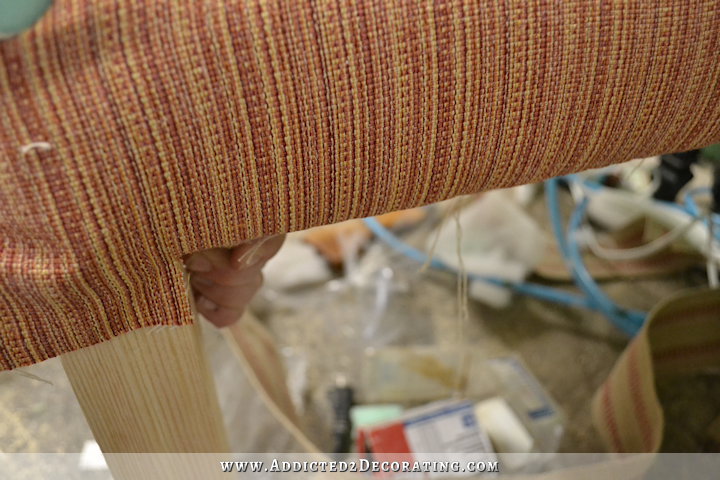
And then the fabric around the leg was just folded under, and stapled right on the very edge.

I’m still uncertain how I’m going to finish the bottom of my chairs. My other six dining chairs will be wrapped and stapled on the bottom, so on these wingbacks I had considered short pleated skirts. I’m still leaning that direction.
BUT…If you don’t want a skirt, then you would finish off the bottom of these chairs with fabric-covered cord that gets stapled around the bottom edge of the chair. Around the legs, you simply trim off the excess fabric, and hot glue the cord around the legs. I’ll be doing that process on my other dining chairs, so if that doesn’t make sense now, it should make sense soon.
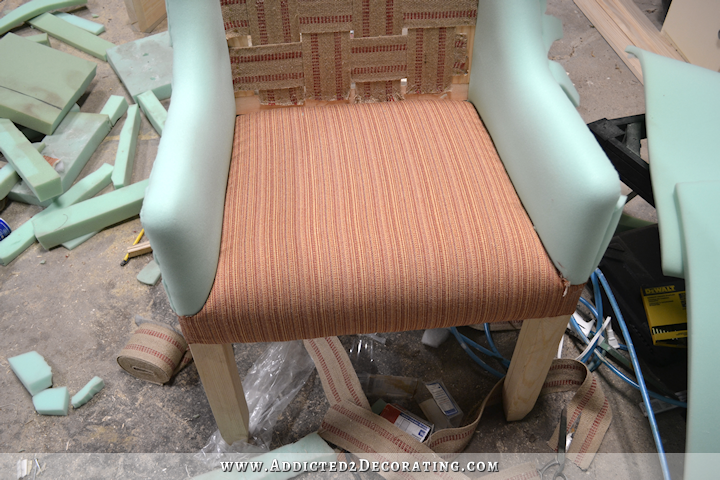
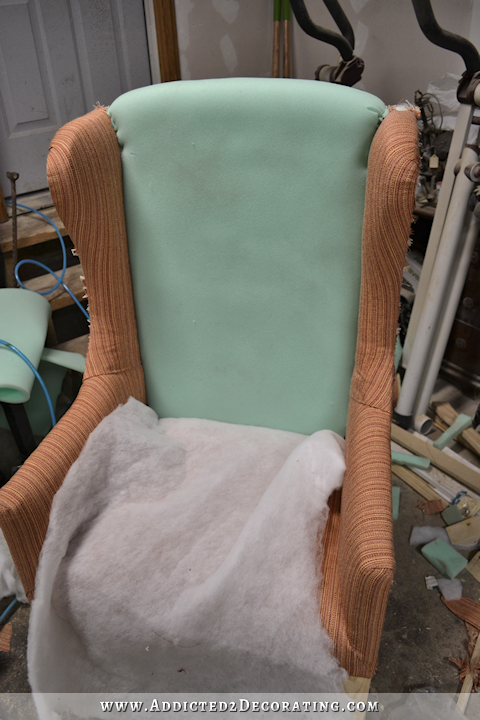
So at this point, the front of the chair seat looks like this…
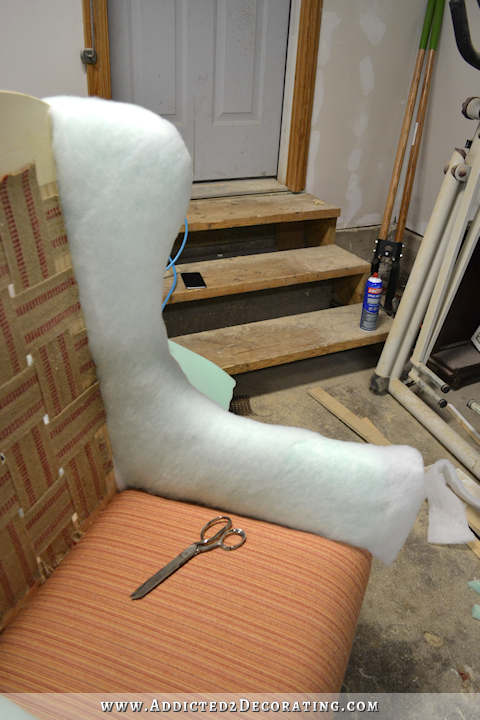
Next I covered the arm and wing with high-loft batting, adhered with spray adhesive and tucked into the stretchers.
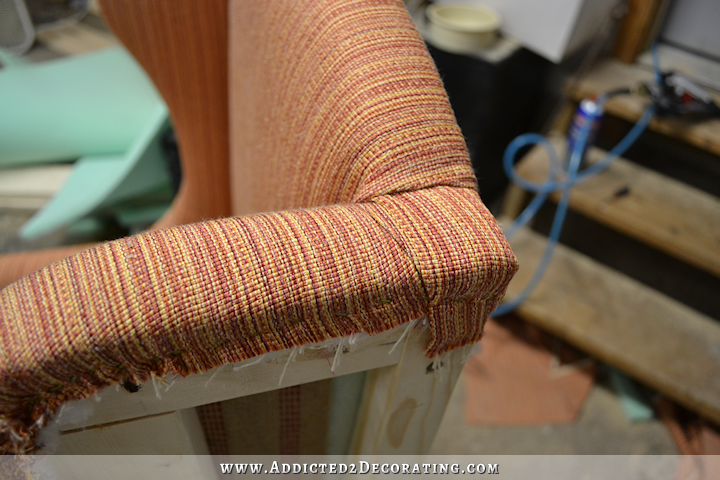
On a wingback chairs with curved wings like mine, the inside of arms and wings require two separate pieces of fabric since there’s no way for one piece of fabric to make the inside curve. So I started with the arm, and wrapped, tucked, and stapled that piece into place.
On the front of the arm, I used one simple, clean fold in the fabric.
And on the front where the arm meets the seat, I folded the fabric at an angle to cover the edge of the seat fabric.
If I were just doing a wrap-and-staple around the bottom edge of the chair, I would have needed more fabric. You’ll notice in the photo above that my arm fabric doesn’t quite reach the bottom edge, so there’s not enough to wrap under and staple in place. So if you just want to wrap and staple, and not add a skirt, then you’ll need to make sure that you’ve allowed enough fabric so that it reaches the bottom of the seat framing and can be turned under just a bit and stapled into place at the bottom.
Here’s a look at the outside of the arm with the fabric stapled into place and trimmed.
And then using a separate piece of fabric, I covered the wing. The bottom where the wing fabric meets the arm fabric is just folded under, and the fabric is shoved into the stretcher post and stapled into place on the back.

I’m not 100% happy with that indentation where the fabrics meet, but that’s the type of thing that gets better with lots and lots of practice. I don’t do nearly enough upholstery to perfect those types of things. But you do want to match your pattern on the two pieces if at all possible.
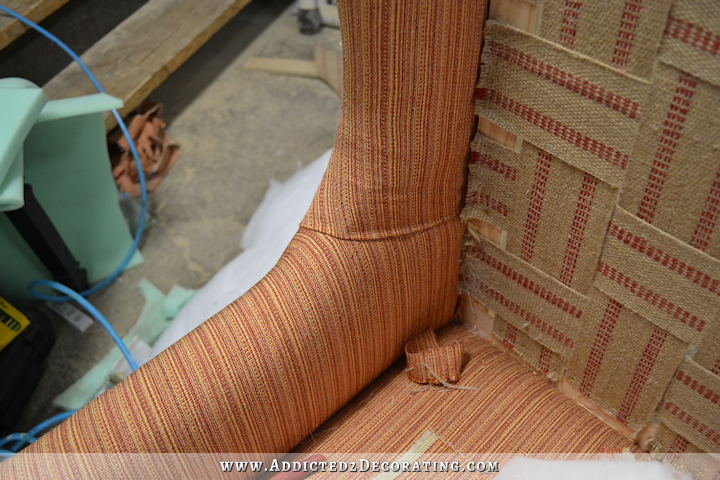
And here’s a look at the outside. I’m not gonna lie. This was the hardest part. Getting that fabric to form to the inside curve on the wing was no easy task. The fabric I’m using has virtually no stretch to it, so it required about 15 relief cuts around the inside corner. I was sure that with that many relief cuts, and that much stretching and pulling, that the fabric was just going to start pulling apart or tearing or unraveling. Thankfully it didn’t!
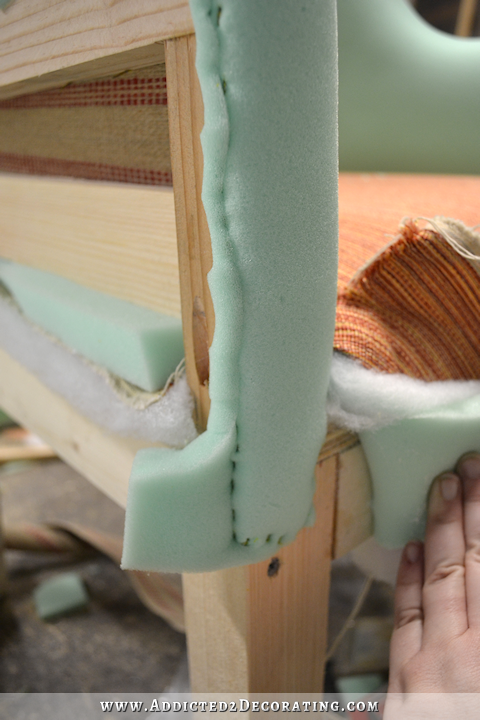
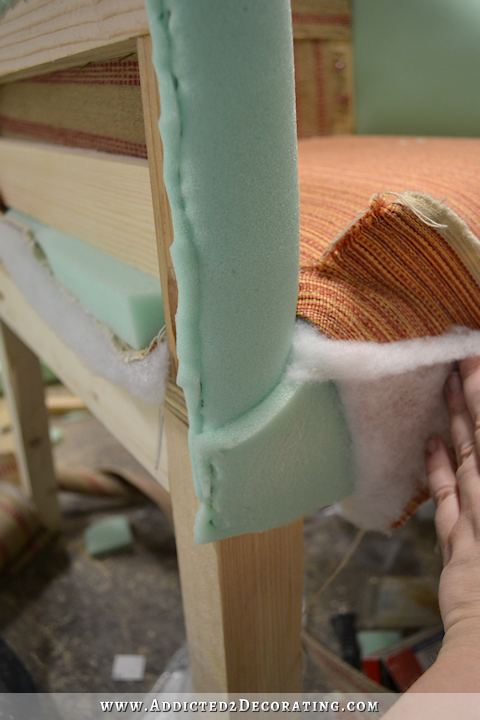
And here’s a view of the back, where you can see the fabric (and underneath that, the foam and the batting) shoved between the stretcher posts and stapled into place on the inside of the framing.
And finally, the back. I used 1-inch foam, attached with spray adhesive and tucked into the stretcher rails/posts.
And on the top, I wrapped and stapled just like I did on the arms/wings.

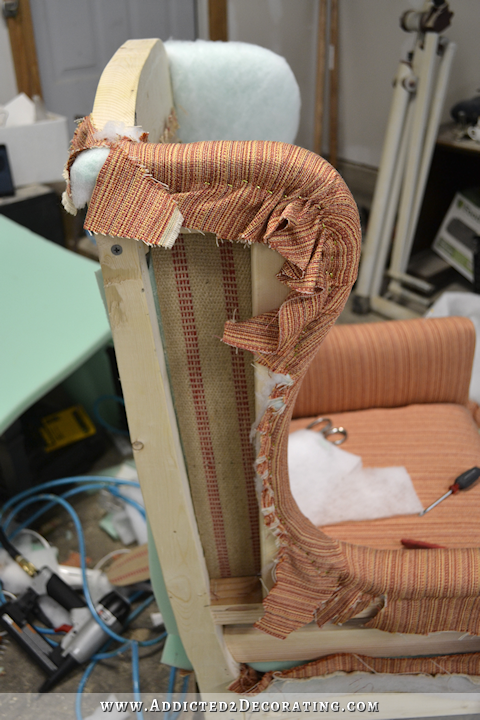
And did I mention that I completely screwed up my fabric at the top of the wings? Well, I did. Twice. Ugh.
So before I finished up the back, I had to take care of those corners by adding just a bit more fabric to cover my error.
Then I added the batting to the back with spray adhesive. It’s tucked into the stretchers, and wrapped on the top.

And finally, the fabric, which is also tucked into the stretchers, and stapled into place. The top is just wrapped to the back and stapled onto the back.
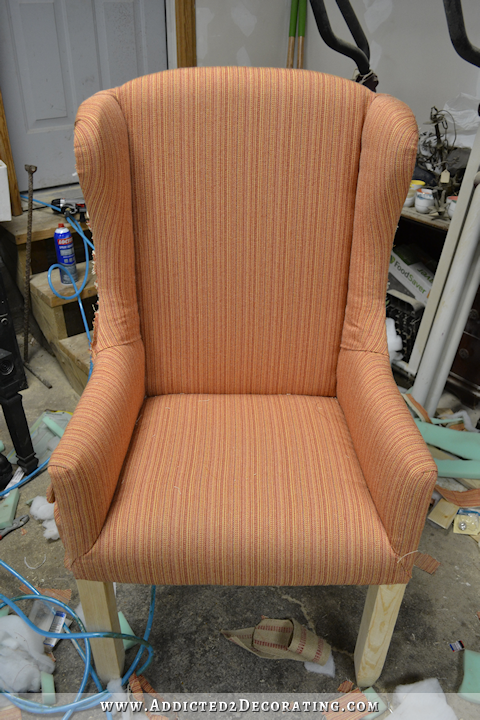
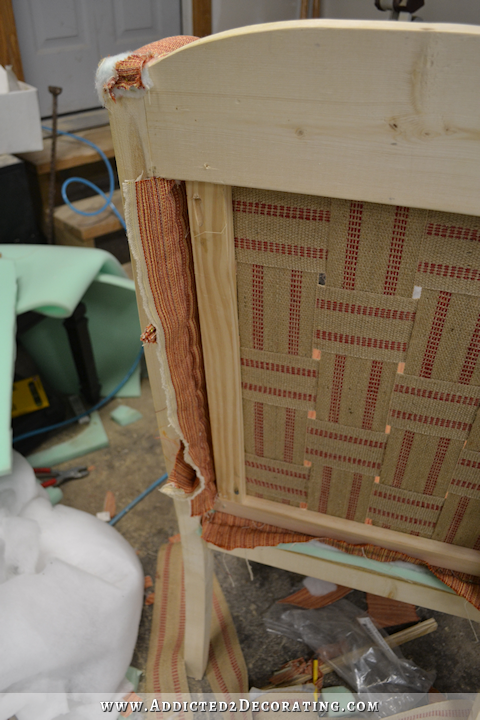
So that’s my progress so far. And before moving on to upholstering the back and sides, I had to clean up the back a bit. I trimmed off all of the excess foam, batting, and fabric, and then stapled everything so that it was all contained within the framing of the chair. In order to upholster the back, nothing could be protruding beyond the framing. I did the same thing on the arms as well.

I’m really hoping can get this finished today, but no promises. Since I’m using spray adhesive, I’ve been working in the garage, and I swear to you it’s about 125-degrees in there. I have a box fan set up, but it’s not doing much good. So I can only be out there about 45 minutes at a time before I have to come in and cool off. Ah, the joys of July in Texas. 🙂
UPDATE:
You can click here to see the second and final part of this project.


Addicted 2 Decorating is where I share my DIY and decorating journey as I remodel and decorate the 1948 fixer upper that my husband, Matt, and I bought in 2013. Matt has M.S. and is unable to do physical work, so I do the majority of the work on the house by myself. You can learn more about me here.


Coming along great! You are tenacious with your tasks, and don’t seem to let goofs get you down. This job definitely requires patience, and with the heat I don’t know how you can “keep your cool”! I would be throwing things and cussing like a sailor! 😉
Don’t overdo in that heat, keep hydrated and take an aspirin! We can wait for the ending of this story. Good luck! 😉
Yeah …. I think I would have been throwing a tantrum too.
I like your fabric Kristi. It looks nice on that chair. Did you learn how to make that chair from a book or website or did you actually reverse engineer this upholstered armchair? It is going to look great.
I didn’t look up any instructions on how to build a chair. I’ve rebuilt and upholstered many chairs, so I pretty much knew the general construction of a chair. So it was a combination of reverse engineering a wingback chair that I already have, and then googling “wingback chair frame,” where I found this one picture that was incredibly helpful for me.
http://www.chiselandbit.com/cgi-script/CSUpload//upload/Wing_Back_Chair%252edb/Prototype.jpg
I have no idea why that picture is sideways. It was right-side-up on my phone. 🙂
So I didn’t follow any instructions or look for “how to build a chair” tutorials. I just looked at the wingback chair I had, the dining room chair I had, and that photo linked above, made a few adjustments, and went from there.
Ok, I’d like to see the list of things you DON’T know how to do. I’d dare bet it’s pretty darn short. This looks amazing as do your other chairs. It’s funny the things a person can learn when reading a blog. For instance, I didn’t know that jute at JoAnn’s was for webbing in a chair. I thought it was ribbon and I used it on my Christmas tree. LOL
I’ve seen photos of that. Also, I’ve seen people weave it together to make an area rug. 😀 There are many creative uses for it, but it’s original purpose is for upholstery. 🙂
The fabric is perfect. I like the pocket holes, they make structures more robust.
The chair is looking great. Well done!
WOW! I’m so impressed! I don’t know that I would ever take on such a huge job. I can’t wait to see all the chairs finished!
Kristi you are in a class of your own, being able to build and upholster a chair. Is there an Olympic gold metal in DIY??? That would be YOU!! I know you must get tired of hearing that! I am sure you will feel a great sense of accomplishment completing this project!!!
Is there anything you can’t do? I think you’re my hero. Girl power!
Great selection of fabric for your wing backs! They will be fabulous when completed. You never disappoint and I can’t wait to see the finished product although I would be tempted to finish up after it cools down.
Patience, thy name is Kristi.
FYI, I’m with you on the Texas heat. Phew, it’s HOT.
Great job. I am impressed, I never would have the patience!!!
Great job, especially the stripes. I’m sure that took more time meaning more time in the heat. You might want to go to Harbor Freight and get one of the large commercial fans on a pedestal for your garage. They run around $100 but you can get coupons for 20-25% off. Might help you to have air moving in the garage. Just wondering – have you finished refinishing the table ? Last you were trying to get the right color.
Amazing! I love watching the work you do.
AMAZING !!! YOU are amazing !! I echo most sentiments already expressed, you NEVER cease to amaze and inspire me , tho My tasks or projects are so simple and elementary by comparison !
Would you please tell again the kind (and brand name ) of your stapler ? I love that you can staple so tightly and close together. Do you need Herculean strength to operate it ? I findthat with advanced age I do not have the strength I once did.
Thanks ,as always, Kristie.
Mary
I think she has the porter-cable stapler – HOWEVER, I am disappointed to find out that the recommended set does NOT have the proper stapler for upholstery after spending $200! I purchased this recommended Porter Cable set:
https://www.amazon.com/gp/product/B009NR3R6A/ref=oh_aui_detailpage_o03_s00?ie=UTF8&psc=1
I have talked with porter cable people via email and they gave me a list of staples to use, NONE of which I can find.
Kristi – I would really be interested in knowing exactly what staples you use, SO, I sit still trying to figure out how I’m going to recover my grandfather’s chair. He died at 92 in 1981 and I so want to fix this chair.
Please help by providing the names/numbers/sizes of staples you are using.
thanks!
Can you tell me what staples you are using???
Linda,
You need to order the Porter Cable staples on-line. The suggested staples are usually listed with the staplers as additions to your order. Just google the staples/nailers that you bought and the staples should also pop up!
I actually have this narrow crown stapler.
http://www.homedepot.com/p/Porter-Cable-18-Gauge-Pneumatic-1-1-2-in-Narrow-Crown-Stapler-Kit-NS150C/203555606
It’s Porter Cable. You certainly don’t need a lot of strength to use it. Its on the smaller side (it’s about the size of my small 18-gauge nail gun) and the air compressor does most of the work. I have a six-gallon pancake Porter Cable air compressor that I use for all of my pneumatic tools. It’s small, but works great.
Interesting article, but I wonder…did a cat walk across your keyboard as you were typing the subject header? This is what popped up as the topic of the email under subject: =?UTF -8?B?RElZIFdpbmdiYWNrIERpbmluZyBDaGFpciDigJMgSG93IFRvIFVwaG9sc3RlciA=?==?UTF-8?B?VGhlIEZyYW1lIA==?=(Part1)
Better watch out! Your cat may be trying to take over your blog! 😉
That’s strange. :-/ I have no idea why it looks like that. I checked mine (yes, I’m subscribed to my own blog so that I can see what the emails look like 😀 ) and mine looks normal. Hmmmm…
it looks amazing, exactly what I have to come to expect from you! Be careful with the heat though. I know we’re under a heat advisory here in Houston. I’m not sure if it goes as far north as Waco but your chairs aren’t worth heat stroke!
Hi again! My step grandfather was a custom upholsterer, and I loved to watch him work. His hands moved so fast, he was difficult to follow. He taught upholstery at Rikers Island (a jail in NYC) because he believed that men who could upholster had a way to make a living and stay out of jail. I am tickled by your use of the word “just.” There’s no “just” in what you do. This is lovely, skilled work. Thanks so much for the detailed descriptions and many pictures. Brava.
Looking really good!! I took off the fabric on four dining chair seats this weekend and replaced it with new fabric. Everyone thinks I’m amazing, and then I say “you should see this blogger who makes her chairs from scratch!” LOL
Again, WOW!!!!! The fabric is simply gorgeous and the wingback chair is looking stunning and truely very professional looking. You are doing an amazing job Kristi and in the Texas heat too!!! Love all the step by step progress photos and your attention to detail is incredible and is a real credit to you. Your dining room reveal is going to be so A-MAZ-ING!!!!!
OMGosh! You just made a chair from scratch 👏🏻👏🏻👏🏻👏🏻👏🏻👏🏻👏🏻👏🏻👏🏻👏🏻👏🏻👏🏻👏🏻
Always wanted to learn how to upholster. Now I think I will just send the pieces out. Way too much work for me to think about tackling. Can’t even imagine when and how you will get all those chairs done, but I am sure you will. Thank God you only have to make one more form scratch. When it is all done, you will have a very custom, one of a kind dining set. Good for you.
[INSERT SPEECHLESS EMOTICON HERE]
Wow. Seriously. Wow!!
Lordy, Lordy! I made an upholstered headboard once out of a striped fabric & swore off stripes after that. How you can use it on a chair is beyond me.
Since I don’t know your email address, I hope you don’t mind me asking you a question here. I bought a Critter paint sprayer off your recommendation. But I was wondering if you use any other type of paint sprayer. Do you use anything bigger?
Yes! For big projects, like spraying walls and such, I use the Wagner Flexio 590. I bought it at Home Depot, and I love it! You could even use it for painting the exterior of your house, and other large projects like that.
This is absolutely fascinating. Thank you so much for taking the extra time to document, and then explain, the step by step. I doubt that I will ever want to do one of these bad boys myself, but I love learning the process!
When I grow up I want to be Kristi….
Totally in love with the fabric you chose and the chair too!
Impressive to the Moon! Very, very nice!
I find this process amazing! Will have to send you a pic of a chair that needs reupholstering to have your suggestions. It totally intimidates me! Following closely, Super Woman!
OMG! I can’t believe the things you do! I once took an upholstery class and we made a footstool from scratch (about 24 years ago) so I have a minimal understanding of what you’re doing. But gosh, I wonder how many 100’s of $s it would cost to have a chair custom built like the one you’re making. . . . .
I hear you about the heat. Although I think it was a tad cooler today 106 maybe?
Wow Kristi! And in this heat, too. Have you considered opening the garage door to your house and blowing cold air into the garage with your fan? A sheet of plywood or something behind you would focus the air closer to you. When we first moved into our house there were not enough vents upstairs to make it cool enough so we put a fan at the bottom of the stairs to blow cold air up and it worked.
Yesterday and today, I actually set up one of our extra window unit air conditioners in there, with the garage door open a bit and the A/C backed up to the door. Then I used plywood to cover the rest of the area where the garage door was open, and stuffed scrap batting and foam into the cracks. It worked! The garage never got cool, but it was definitely tolerable. I would guess it was about 85 degrees in there during the hottest part of the day, which is warm but not miserably hot.
To get rid of the wrinkle you always give a hard pull at the intersection of the wrinkle. Use some fitting pins to keep it pulled down then blind stitch your pieces together.
Kristi, to get rid of the wrinkle where the two pieces of fabric meet you need to do a hard pull down from the middle of the wrinkle on the bottom. Keep in place with fitting pins then blind stitch your two pieces of fabric together to keep the tension from the bottom.
I love your job. Thank you