Finished Front Porch Floor (Wood Front Porch Built Over Existing Concrete Porch)
My front porch floor is finished! And I am absolutely thrilled with how it turned out. My old, ugly, original concrete porch has now been covered over with a gorgeous wood porch that adds so much character to the front of my house. If you missed the previous posts about this project, you can click the links below to read the details.
- Part 1 – Covering an Existing Concrete Porch With Wood
- Part 2 – Wood Front Porch Progress
- Part 3 – More Front Porch Progress
- Part 4 – Critter-proofing and Installing the Porch Boards
Yep, it’s a long, time-consuming project. 🙂 But the the final product is totally worth the effort! Remember what this porch looked like when we bought the house? Here’s a refresher…
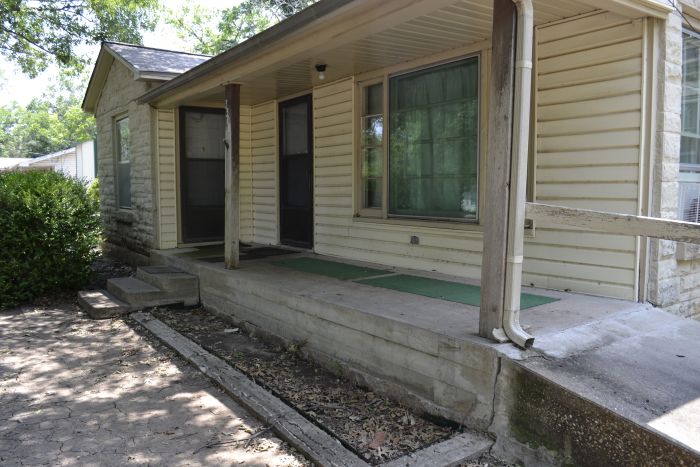
It was concrete that was very unlevel, with a concrete ramp attached to the right side.
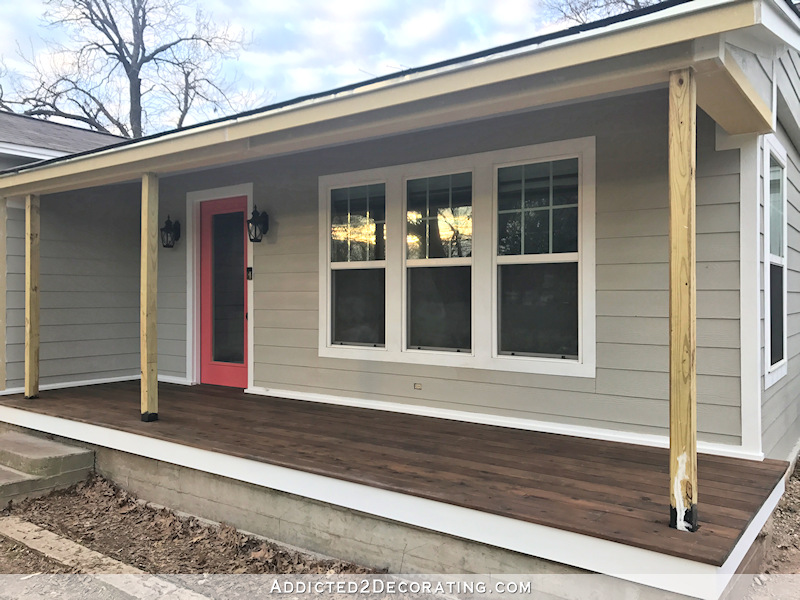
This whole front porch area has had a major facelift (which is still not quite finished), and here’s how it looks with the new porch floor…
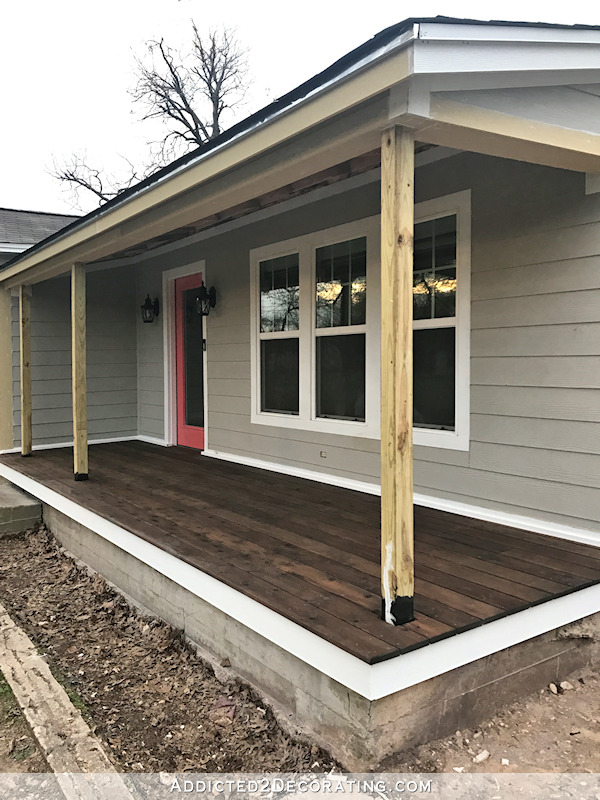
Quite a difference, right? I’m so excited about how this turned out!
I’m still undecided about what I want to do with the concrete below the white fascia board. I’ll make that decision after I build the new steps. So for now, let’s ignore that ugly concrete below the white fascia board. 🙂
So to quickly recap this project, I used 2 x 4 pressure treated lumber rated for ground contact, and I ripped those boards to the heights needed to create “joists” (or risers, or sleepers, as they are also called) spaced 16 inches apart, and I attached those to the concrete porch.
That part of the project was the absolute hardest and most frustrating part, and it’s definitely a two-person job. My brother helped me with that part, and I couldn’t have done it without him.
You can click here and here to read more details about that part of the project.
Then I added spacers to the front of the risers…
![]()
…and attached the fascia board to those spacers and painted the concrete and risers black…
You can click here to read more about that process.
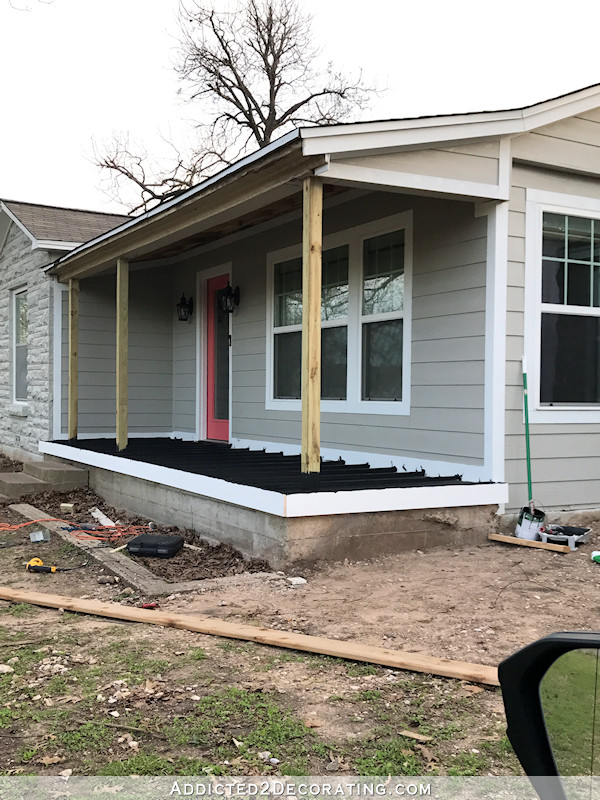
And then I critter-proofed the spaces that would be under the floor boards…
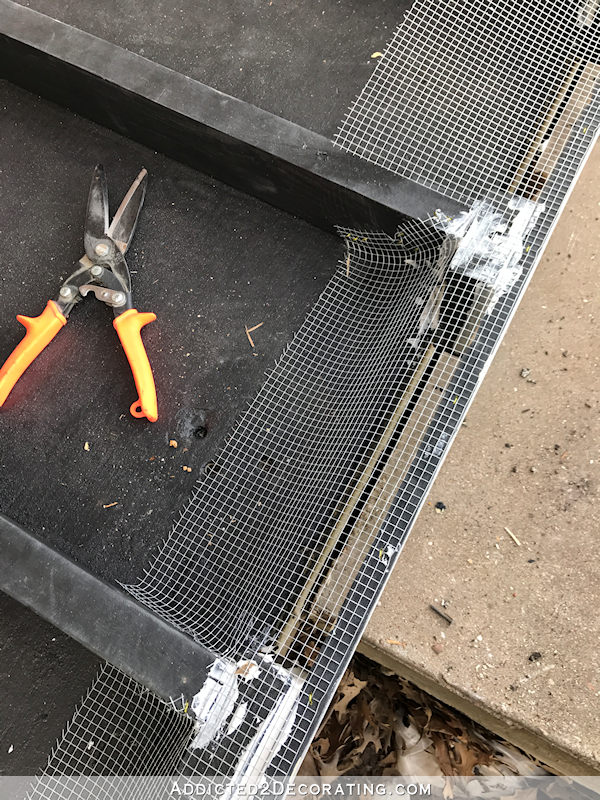
You can click here to read more about that.
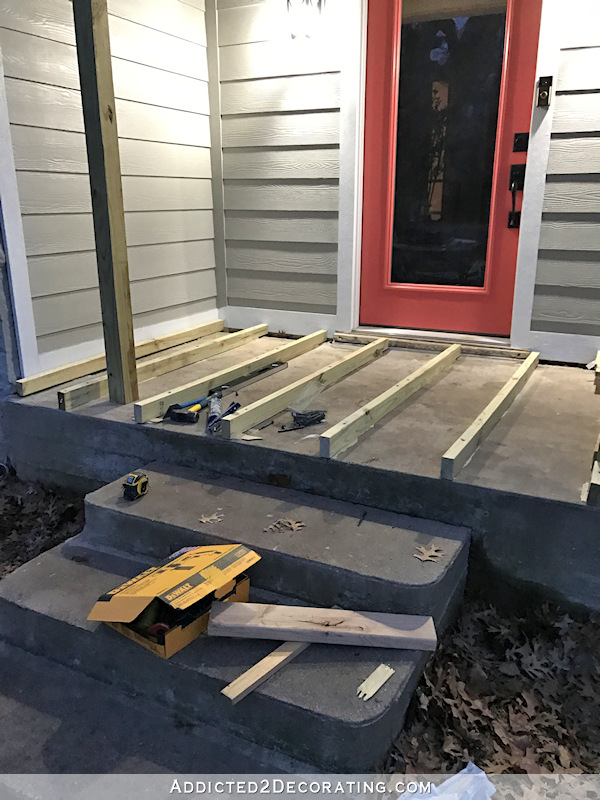
So with all that prep work finished, I was finally able to install the floor boards! That was pretty straightforward. I cut them to fit the joists, screwed them down with DeckMate screws (two screws at every joist), and used two paint sticks (just the small paint sticks you get free from Home Depot) and placed one stick at each end between the boards to determine the spacing between the boards.
The hardest part was cutting the one board that went over the threshold of the door. It wouldn’t sit flat on the threshold because the metal threshold is angled. So placing the board on top created a lip that would have been a tripping hazard. So I had to get creative with my table saw and cut away the bottom of the board at an angle to fit properly over the angled metal threshold. It wasn’t easy, and it took me several tries to get it to fit properly…
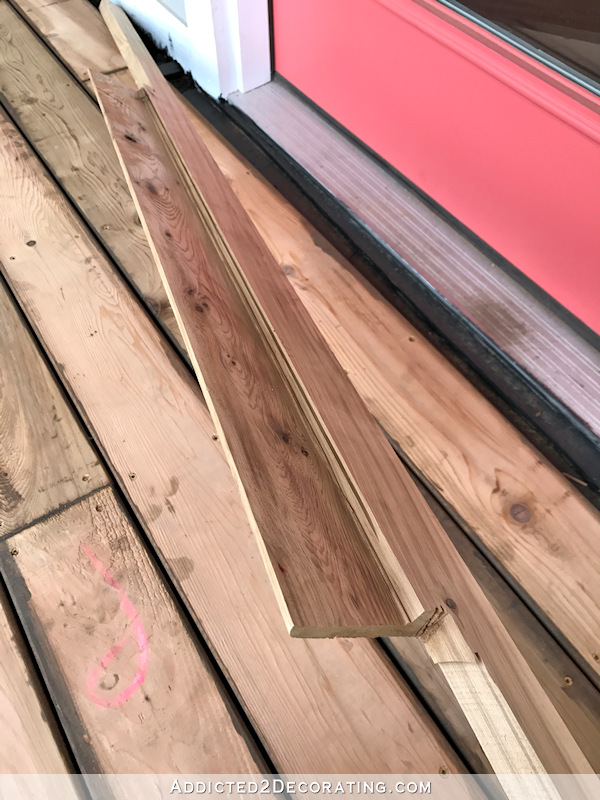
…but I finally got it. I was so proud of how it fit! There’s still about a 1-inch space between the wood and the black rubber weather strip under the door, but it’s not a tripping hazard at all. You’d have to work hard to get the toe of your show between that black rubber strip and the edge of that wood board.
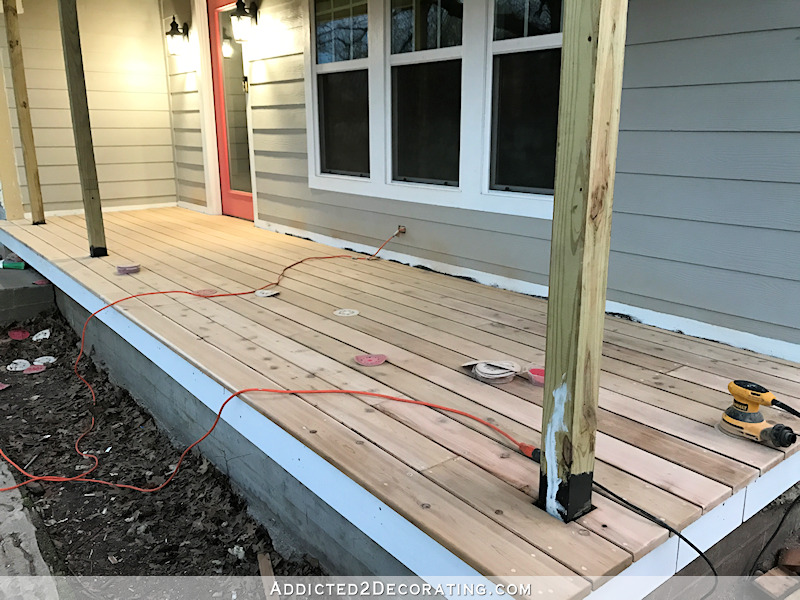
Because I stained/sealed the boards on the bottom, sides, and ends before installing them, I had made a mess of the tops of the boards. So before staining/sealing them, I had to sand them down and get all of that messy stain/sealer off of them. I would have sanded them even if I hadn’t made that mess because I wanted these boards to be really smooth. I also filled the screw holes with wood filler and let that dry before sanding.
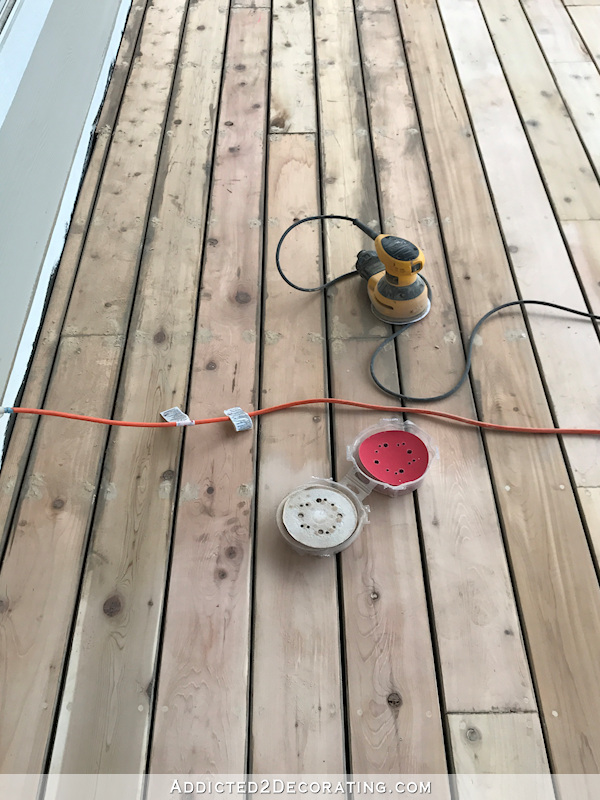
The wood filling and the sanding are two steps I wouldn’t have done on a back yard deck. But this is my front porch. This is the first part of my house that visitors will see close up, and I wanted it to be a step up from a back yard deck, so I did the wood filling and the sanding. I just used my rotary sander and 150-grit sanding discs. Here’s how it looked with the whole thing sanded.
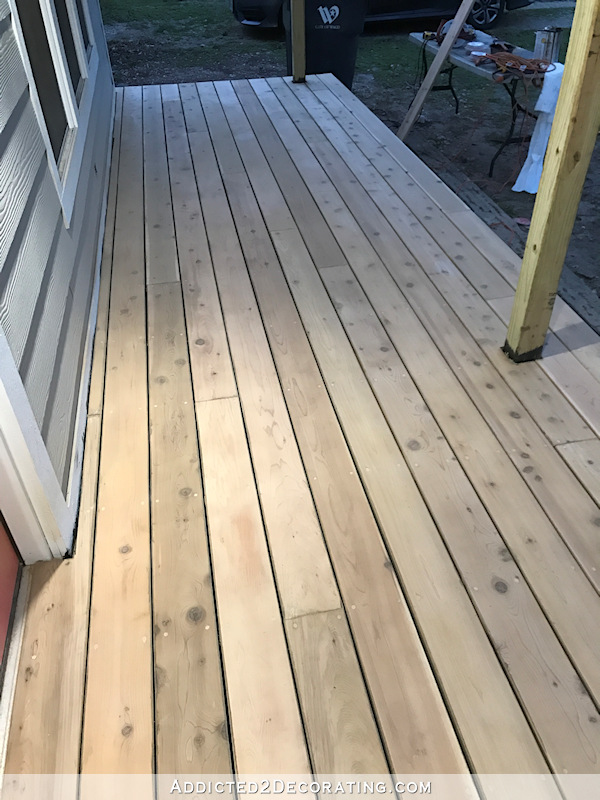
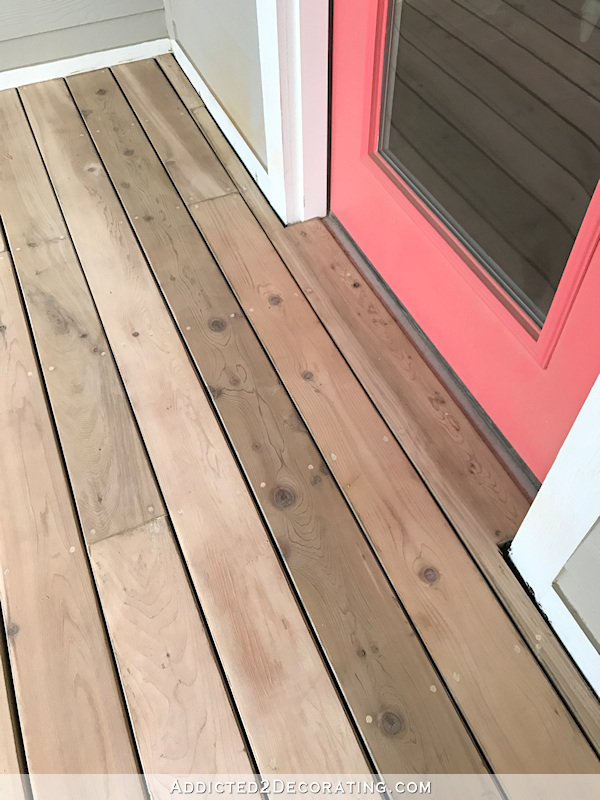
And while I love the natural wood color, it just wasn’t quite my style. I wanted darker and richer, so I sealed it with Thompson’s Penetrating Timber Oil in semi-transparent Mahogany. I brushed on two rows at a time, brushing the entire width of the porch, and then went back and wiped off any excess sealer. Then I moved on to the next two rows. You can see the color difference here…
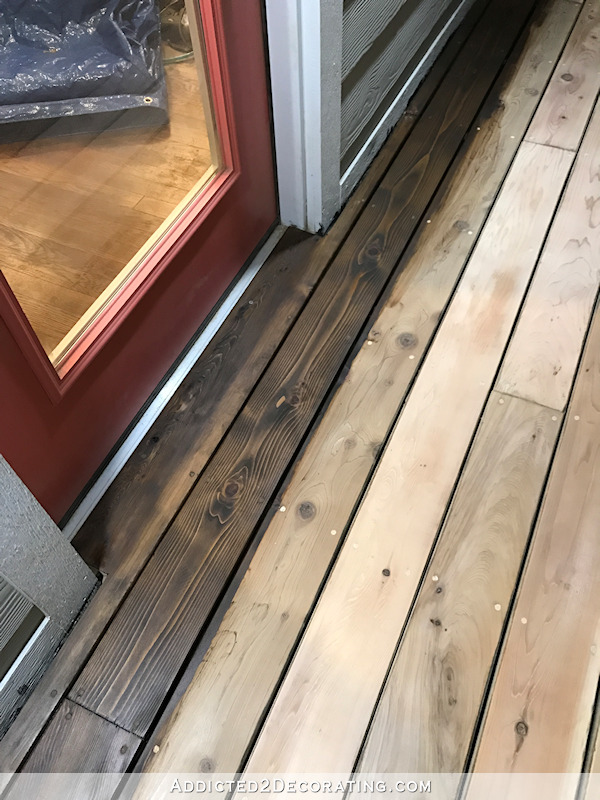
And here’s the whole thing with one coat of sealer…

I’m undecided on whether or not I’ll do another coat. I keep reading different things about that. On the can, it says one coat is recommended. But in the Q & A section on the Home Depot website, more than one person said that they called the company and were told that if you do two coats (about two days apart), it will last about three years. So I might call the company myself and see what they say about that. Since I used cedar, and cedar is soooo dry, I really would like to do a second coat unless they tell me not to.
And finally, I sanded, wood filled, and painted the fascia board, and then I added some trim to cover the cut edges of the floor boards that I had to rip to fit right up against the house (i.e., under the windows, to the right and left of the door, etc.).

One thing I forgot to mention, and didn’t get a picture of, is that when I installed the porch boards, I didn’t cut the boards on this end before installing them. So when I installed them, they were all varying lengths. After they were all installed, and before I did the sanding, I measured and marked a straight line and then cut all of the boards at once with my circular saw. That gave me a perfectly straight edge on this end of the porch.
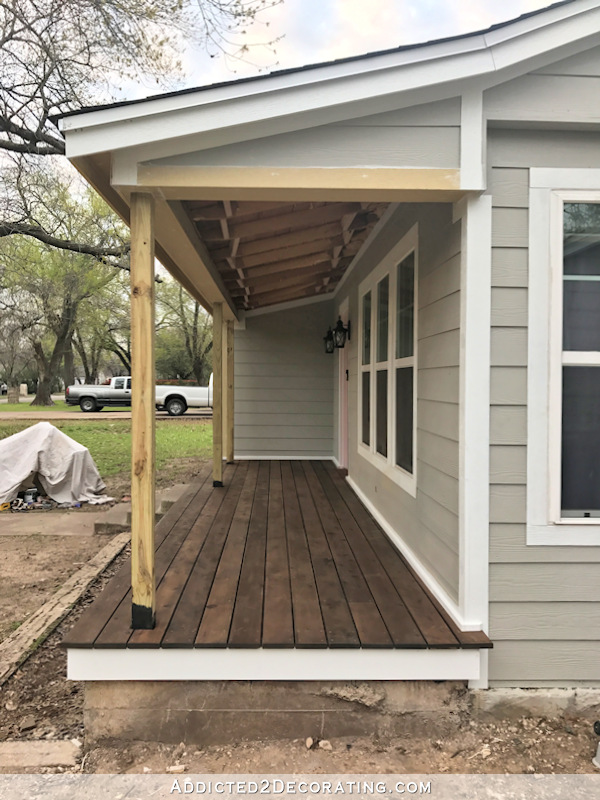
I’m so proud of how this turned out. It adds so much warmth and character to the front of the house.
And I think it’ll look so nice once I get the columns wrapped, trimmed, and painted the white trim color. And of course, I still need to paint that trim that was installed last week as well.
So this porch is coming right along! But there’s still quite a bit left to do before I can call it finished.
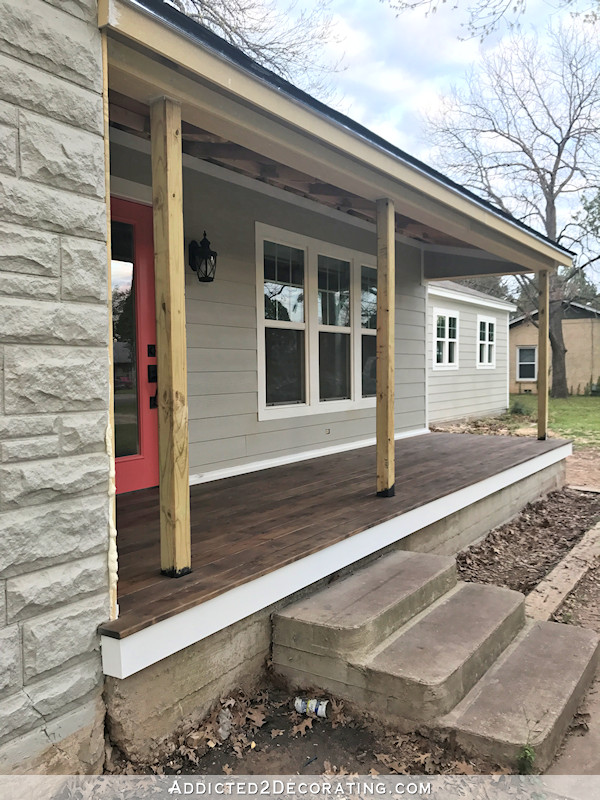
Those concrete steps will soon be replaced with new, wider wood steps to match the porch. As I mentioned, I need to wrap, trim, and paint the columns. And then I still need to install the tongue-and-groove boards on the porch ceiling. But now that the floor is finished, I’m feeling very motivated to continue and get the rest of it done!
UPDATE:
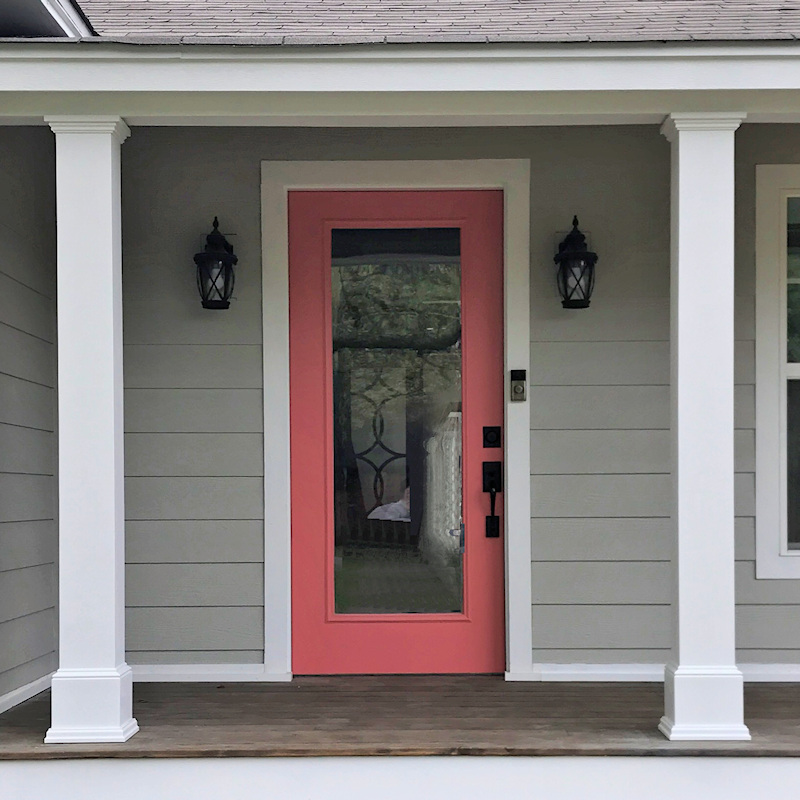
The front porch columns are now finished as well! Click here to see how I wrapped the skinny, bare front porch posts and turned them into beautiful columns.

Addicted 2 Decorating is where I share my DIY and decorating journey as I remodel and decorate the 1948 fixer upper that my husband, Matt, and I bought in 2013. Matt has M.S. and is unable to do physical work, so I do the majority of the work on the house by myself. You can learn more about me here.


Never thought it would make that much difference. But the width it added is a big bonus also. Looks great. Have you thought of putting marine poly over porch boards?
I don’t think you can put a clear coat like that over Thompson’s Timber Oil.
Did you end up doing two coats or just the one?
Two. I waited and did the second coat after I built the steps.
Did you happen to do a blog Like this one on the stair project? We’ve loved the details you provided and want to do the same. Thank you.
I did! It’s in four parts, and you can find Part 1 here: https://www.addicted2decorating.com/building-my-front-porch-steps-the-box-method-part-1-building-the-basic-frame.html
MY GOSH THAT LOOKS AWESOME! Our teacup mansion is looking fantastic. Can you guys tell I’m Krist’s biggest fan?
Matt you must be one amazing guy!! Kristi is so lucky that have your support!
I totally struck gold with Matt. There’s not one in a 10,000 men who would let me do the things I do. I can say, “You know, I think I want to take out this wall,” and without any hesitation, he’ll say, “Okay, if that’s what you want.” 😀 He lets me have complete control over the decision-making when it comes to the house. Except for pink. His one rule is “no pink walls.” I’m okay with that. 🙂
You better be her biggest fan! LOL! You have a Wonder Woman of your very own right there!
Matt, your description is perfect. “Our Teacup Mansion”. I know that you have to be even happier than the rest of us fans! Just to think that one person (short like me) can make the most amazing changes. Thanks to both of you for bringing us so much enjoyment!
Fantastic new porch. I bet it would be hard to find one with as much attention to detail – finished like interior trim work!
I hadn’t noticed until now how your framing beefed up the size of it just a little by going beyond the old porch. That small bit makes it feel like a more generous space.
Looking forward to more of the project!
Mark
Huge, huuuuge improvement to the overall exterior! It seems like a ton of work but wow, it really paid off. The columns, steps, and wall under the fascia board will button it right up!
Love it! It made a huge difference!
Way to go!!!
I love this! What color is your siding? I’m trying to pick siding right now. 😬
My siding is Sherwin Williams Mindful Gray.
I have to commend your work and just look at the over all improvement of the street view of your home, well done! Yes, I bet you are anxious to see the project completed and the end result. You will have your dream home before you know it!
Amazing Kristi. This has got to be one of the best before and afters… You nailed it…(pun intended)
Looks GREAT! Have you ever tried using homemade stain(vinegar & steel wool)?
OMG. It turned out perfect. You are incredibly talented, plus you work real hard!!
I actually used it on a coffee table years ago. It’s fun to play with and use on small projects, but I’d never use it on a big project.
It looks amazing! I love how the wood warms it all up and can’t wait to see what you do with the stairs.
Very pretty!
It sure looks fantastic – and it’s great that Matt thinks so, too! You occasionally tell us that he lets you follow your vision because he is not so fussed about the look of things, but I guess that you are very pleased by his reaction 🙂 I’m very astonished how much of a difference this makes and think going with the dark wood colour has a great and beautiful impact. Well chosen!!
He really does let me do whatever I want to when it comes to the house, but of course, it’s always nice when he’s impressed with my work. 🙂 That makes it even more fun. But he’s not difficult to impress. He’s generally pretty proud of almost every project I do. He’s very encouraging.
Wow, I can’t believe the difference the wooden boards make on your porch floor! It looks fantastic. You’ve done a great job Kristi. The icing on the cake (so to speak) will be trimming out the columns and painting them and the new steps.
Looks fantastic! Can’t wait to see the before and after of the whole thing completed. Hope the momentum keeps going, your on a roll!
Curious as to maybe why you didn’t use concealed fasteners on the deck boards? There is a Kreg jig and others, to help skip that tedious job of filling, waiting and sanding.
I considered it, especially when I was initially planning on using the pressure-treated pine boards. I really like every single Kreg product I’ve bought, but what I don’t like about their concealed fastener jig for decks is that you have to pre-drill every single hole. That’s incredibly time-consuming. Lowe’s actually carries a different brand that doesn’t require any pre-drilling of the holes, and it’s way faster. That’s the one I would have used had I decided to go with the concealed fasteners.
But then I decided to use cedar instead of pressure-treated pine. And then when I realized just how dry the cedar is, and after doing a bit of research, I decided to seal every single side, edge, and end of each board. At that point, it seemed counterintuitive to take all that time to completely seal each board on all sides, edges and ends, only to then turn right around and put holes all down both edges of each board that couldn’t easily be filled and that would allow for water penetration. So I decided to do it so that the holes could be easily filled, sanded and sealed.
At least that made sense in my mind. 🙂 And really, the filled screw holes don’t show. I mean, they do since they’re a slightly different color, but you’d have to be looking for them to notice them.
Did you use 2×6 cedar for your deck boards? It looks fabulous!
No, they’re 1″ x 6″. I got them at Lowe’s, and they’re labeled “cedar deck boards” or something like that.
Your porch looks awesome! Can’t wait until the columns are finished and landscaping. I have a feeling that your neighbors are itching to see the inside also!
Beautiful! I know you haven’t asked for ideas from the peanut gallery, but I keep thinking, would it be possible to use the stone that you removed from the side of the house on the concrete below the porch? I’m not sure if it is thin enough to fit under, but I think it might look good and save money on buying other materials. Just a thought!
That was my thought as well it would tie everything in very well.
Love that idea. If painted, it would have to be maintained which is no easy task with landscaping in place.
Connie, she talked about that in an earlier blog (maybe couple weeks ago)can’t remember for sure. She hadn’t decided yet 😉
The stone that I have is way too thick to go on the bottom of the porch. It’s about 3.5 inches thick, while the space between the porch and the white fascia board is only 1.5 inches. So that stone would either stick out two inches, or it would take a whole lot of cutting to slice it into thin pieces, which I’m sure would cost an arm and a leg since I’d have to hire it out to a pro. I don’t have the tools necessary to do a a job like that.
But I have been looking at faux stone, stone veneer, etc., to see if I can find something that matches reasonably well. I’ve found a few, most of which are extremely expensive, but I just may have found one reasonably priced option that might work. So we’ll see. 🙂
In my neighborhood I’ve noticed that a lot of homes have painted concrete foundations the same color as the house. I’ve been thinking of using concrete stain on mine as well as my block garage. I didn’t want to go to the expense of siding the garage ( built in 1970 by previous owner). It would certainly brighten up the inside if the garage.
As usual, you wow us again! A suggestion for the concrete foundation-you could always stain it a dark brown color, since you are planning to landscape in front of it anyway, it will help to “disappear” into the background.
The porch is looking great, Kristi! I look forward to seeing the final result. What sort of porch furniture are you planning to have?
I’m planning on one swing at the end (i.e., the far right side where the ramp used to be) and two rockers in front of the windows.
That will be very nice and give guests lots of seating options.
Looks very beautiful!
Kristi, I know it is Texas and you do not have that much rain but it might be a good idea before you do a second coat to test scrap pieces of wood – wet them well, dust them slightly to imitate the natural dust residue that would form on you porch, sprinkle some more water on top of it, and see how slippery they are. Here in UK the deckings a notoriously famous to cause slipping accidents. I have personal experience with it too.
If it is the case with your wood, it might help if the second coat has some anti-slippery additives.
Fabulous!
I simply the coral door against the dark wood. Just lovely ! This is going to be a great area to sit and enjoy the spring and fall seasons!
Absolutely one of your best reno’s on this house . So inviting whatever you do to the concrete paint ,tile, stone ‘ brick it will look grand. Did you throw away all the stone? I know you are trying to not have a craftsman look . I feel the stone would bring that back so maybe not an option.
I still have the stone. I don’t think I could bring myself to throw that away. I’ll find a use for it eventually. 🙂
Great transformation!!
Wow! So pretty. I absolutely love your door too!
As always, I’m very impressed with your skills. The house is coming along beautifully and I love how inviting the front porch now looks. Can’t wait to see it completely done. I do have one question though, were you going to make the porch handicap accessible? I know you say Matt is in a wheelchair and I’ve seen you’ve done away with the ramp. Just wondering.
That ramp was way too steep and was very dangerous. He has a ramp out to the back through the sunroom and when we build the carport, there will be another ramp from the studio to the carport. There’s no need for another ramp on the front porch.
Wonderful work. It gets better daily.
Leslie
The floor looks beautiful. I love the mahogany color.Every step is another step towards a couple of rocking chairs to sit and relax and enjoy that new porch.
Looks great! I love the front door and your choice of stain just makes everything look cohesive. Beautiful!
Awesomeness!
Love the dark stain. Great job as always! Would love to show my husband how you did this, but I know, having been married for 43 years, there’s no point. He would say “I’m not doing all that! Are you nuts?” And if I tried, he would have a hissy-fit! Your house is going to be so awesome when all your plans are completed! But THEN what will you do to fill your days? You should seriously get your G.C. license!
Interestingly, there’s no licensing for general contractors in the state of Texas. I could hang my shingle up today and call myself a general contractor. 🙂
Wow, don’t know if that’s a good thing or a bad thing, but I think you h have some serious talent!
Very nice. What will you do about the downspout you removed?
I plan to get all new gutters as soon as I get the front porch done. Hopefully they can find a creative way to attach any needed downspouts in a way that won’t ruin the look of the work I’m doing on the front porch.
Absolutely beautiful!!
I love how your porch has turned out so far, and I’m glad you’re having that warmer weather to enable you to get outside and work. We wound up getting nearly three inches of snow yesterday, and I’m so ready for warmer weather! The porch looks like it was made to be there all the time, not like the cold, dreariness of concrete. You must be a wizard with the table saw. That’s some pretty incredible cutting right there!
This is an amazing transformation! Well done, it looks absolutely beautiful.
I love the front porch makeover ! Wondering why type of sander you used. I am looking for one that does not wear down the drum so fast…..I have gone through two Rockwell sanders on small projects.
I use Dewalt. The one I have is a variable speed 5-inch orbital sander. I got it at Home Depot for about $80, and it’s by far the best sander I’ve ever had. I used (and burned up the motor on) two Ryobi orbital sanders before getting the Dewalt, and there’s no comparison. The Dewalt is far superior, and I love the variable speed control.
Thanks, Kristi, I am going to get this sander for sure. I love following you and seeing all the AMAZING projects you take on. Bonnie
Looks really nice and you have a good brother!
It’s very inviting looking! Beautiful work.
Wooooowwwwww! That’s such an impressive before and after! The new porch looks fantastic, and everyone who looks at it can tell that it had a very detailed, super-professional job done on refinishing it. You should be so proud!
Kristi, this is gorgeous. Love what you did and are doing.
It’s a thing of beauty!
This looks fantastic. I am continually amazed at your transformation of this nondescript Plain Jane into a stunning home. I think, though, I am most amazed at your vision. There is no way i could have looked at that house and envisioned its makeover.
Maybe someone else suggested it, but how about some stone for the cement? The porch looks awesome. I’m printing your procedures because I’m attempting leveling a back porch area and your suggestions are the ones I’m following.
This is sooo good! What a transformation this “teacup mansion” is undergoing! Your vision and lots of hard work are really paying off. I love following your journey.
A note on the concrete block – as long as it is in good condition (not crumbling or such), do you need to do anything? The landscaping will cover it, and painting (and repainting) with plants in plants is such a pain. Up north here, we typically don’t paint such small areas, but will do so if they are large and highly visible such as in an underdeck patio area.
*plants in place
I have both covered and uncovered stain decks; the uncovered is the only one that gets slippery. These are both lakefront (Alabama) and would think they get a lot more moisture and/or rain than under your porch. Your porch looks fabulous btw!!
I think this is my favorite transformation that you have done so far and I was SOOOO impressed with your kitchen!
Great job!!!! The stairs are going to be awesome.
Looking great!!! I saw a sneak peak of the wrapped column – it’s going to be amazing!!!!
We redid a porch on a former home. We painted the concrete flat black and then attached white, vinyl lattice over that. It was gorgeous. Wish I had photos to share
Great job! Looks amazing…
Whoa that is amazing!! Looks great…we too have an ugly old concrete front porch that we are trying to decide how we want to tackle. Your project is inspiring!! Will have to watch and see what you do with your steps, ours are out of code too and it will cost big $ to get the ripped out and repoured…
It’s looking so nice, Great work!
What kind of wood was used for the decking?
5/4 x 6 cedar decking boards
Amazing transformation of your front porch. You did an outstanding job. I’ve been wanting to do a facelift to our front porch and came across yours. Your porch and mine are about the same length and width with same amount of posts (3)… so this encourages me. Thank you for sharing and posting pictures.
Curious as to how you replace the old wood deteriorated column with a newer one?. Or, was it not replaced and you just wrapped around it. From the photos, the original columns looked more wear and then there is a photo before you wrapped it, the column looked more new.
It’s a new post. You can see how I changed it here: https://www.addicted2decorating.com/front-porch-progress-no-more-sagging-roof.html
Stunning! On your porch remodel which wood filler did you use? Any issues with the stain or wood filler since you installed it? Thanks
I used DAP Plastic Wood. Home Depot has two different types. One is water-based and comes in a plastic tub. The other is a solvent-based and comes in an upside down metal can (like a pint-sized paint can). I used the solvent-based one on my porch. It works great and holds up to the weather. The stain has also held up, but I can tell that it’ll have to be redone every two or three years.
What color is the exterior of your house? What a transformation!
It’s Sherwin Williams Mindful Gray.
you are so inspiring Kristi!!! thank you so much for sharing your projects! my porch will be the next project after i finish mortar joints on my brick wall :0)
what material did you use for the facia?
I used pre-primed finger joint board. I made sure it was thoroughly coated with primer (oil-based) and paint on all sides/edges, and then made sure that all holes were filled and primed and painted. So far, it has held up well in the Texas weather. However, if I had to do it again, I would use PVC boards. As the name suggests, they are made of plastic, but you can get them in different sizes (just like lumber). I get them at Lowe’s, and they have one smooth side and one side made to look like wood grain. From now on, my outdoor projects will be built with that. It’s more expensive than wood, but it will last forever. I plan to build window boxes this summer, and I’ll be using the PVC boards for that.
It’s beautiful. For the steps, did you do the same thing?
No, I had the original concrete steps removed completely, and then started from scratch building the steps.