More Front Porch Progress (Building A Wood Porch Over An Existing Concrete Porch)
The weather over the last couple of days has been gorgeous, so I’ve taken advantage of it and made some pretty good headway on my front porch makeover. If you’ve missed the first couple of posts on this project, you can click the links below to catch up on the details.
- Part 1 – Covering an Existing Concrete Porch With Wood
- Part 2 – Wood Front Porch Progress
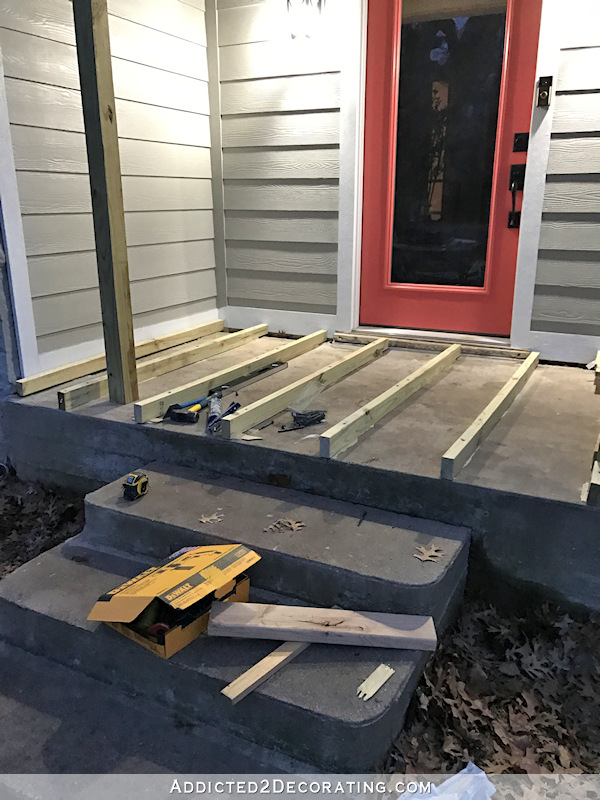
But the nutshell version is that I’m building a wood porch over my existing concrete front porch. So to do that, I had to install wood risers using pressure treated 2 x 4’s rated for ground contact (ripped to the correct height to level the final porch floor), attached to the concrete with exterior construction adhesive and concrete screws. These risers are spaced 16 inches apart to act as joists and give me something to which I can screw the porch boards. Those looked like this…
But again, for more details on that part, you can click here and here.
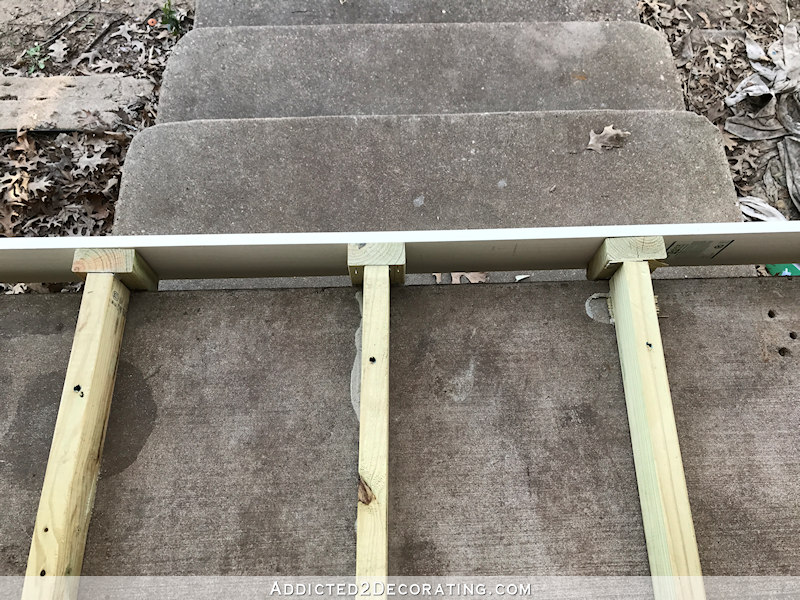
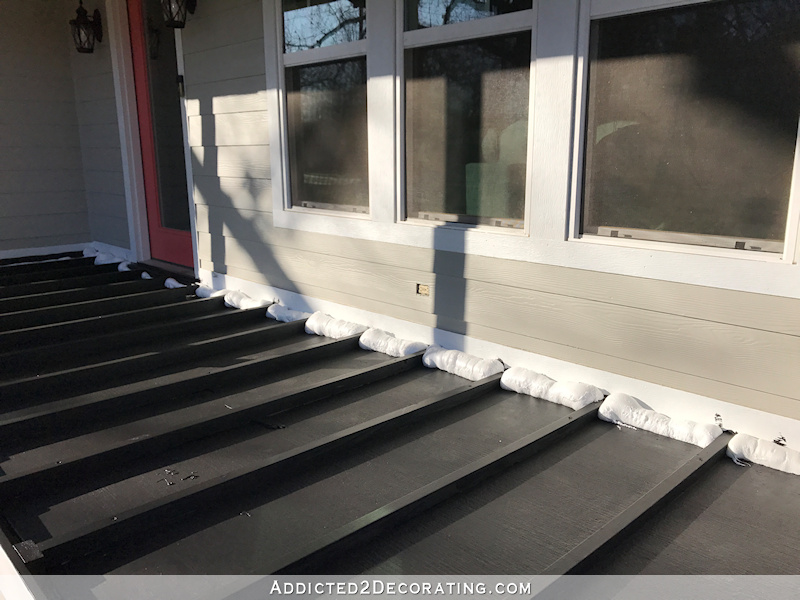
Before adding the skirting board (fascia board?), I still needed to add spacers around the edges of the concrete porch. The purpose for these is to give water a place to drain. If I just attached the skirting board directly to the edge of the concrete porch and high enough to meet the porch boards, I’d basically be creating a dam that would hold in the water every time it rains. So to provide a space behind the skirting boards for water to drain, I cut some pieces of 2 x 4 to five inches long and attached them to the ends of the risers.
![]()
Most of the risers were tall enough so that I could just screw the edge spacers into the ends of the risers. I attached them using exterior construction adhesive and these 6-inch HeadLOK screws that take the place of lag bolts.
![]()
But as I worked towards this end of the porch, where the risers are much shorter and there wasn’t really enough room to screw the spacers into the ends of the risers, I had to use construction adhesive and concrete screws.
![]()
So with that step finished, it looked like this…
![]()
And then I nailed my skirting boards directly to the edge spacers. I placed a porch board on top just to be sure I was lining up the skirting board correctly before nailing it into place.
![]()
Here’s the view from the back side…
You can see that now there’s a space between the skirting board and the concrete porch where water can drain when it rains. And this also provides plenty of air circulation so that there won’t be a built up of moisture under the porch.
With the skirting boards in place, there was one more big project before adding the porch floor boards. I wanted to paint the concrete porch and the risers black. I used Behr porch paint in Tar Black for this…
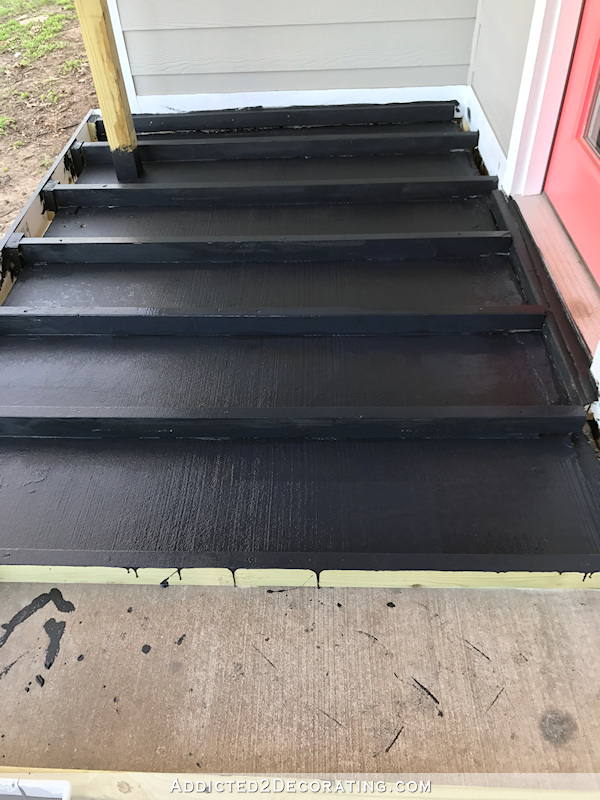
And of course, the whole point of that was to minimize the appearance of the risers and the concrete porch since they’ll be visible in the cracks between the porch floor boards. Hopefully painting them black will make them disappear.
Here’s how that looked with the skirting boards on and the concrete and risers painted black…
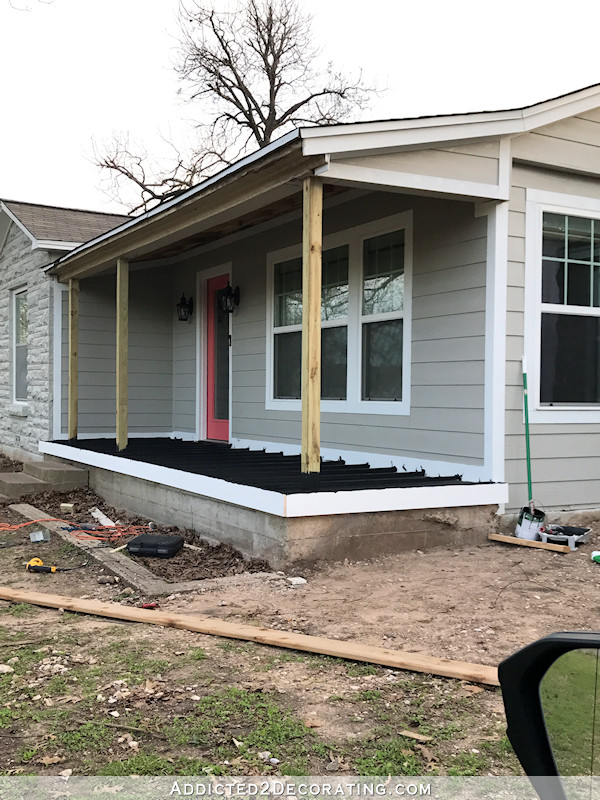
I’m still undecided about what I’ll do with the concrete around the sides below the skirting boards. I’ll leave that decision for another day.
The last bit of prep work that I did last night before calling it quits was filling in the crack between the house and the porch (where the porch has pulled away from the house as it’s settled over the last 70 years) with spray foam insulation. As you can see, I’m not the best at using spray foam insulation. I always overfill the cracks. 😀
But I wanted to get that done last night so that it would have overnight to dry and harden. I can cut away the excess with a serrated knife, and then paint it black as well before installing the floor boards. The whole point of this spray foam is to keep bugs and water out of that gap between the porch and the house. In the four years that we’ve been here, we’ve had some really heavy rain storms, and the water has never gotten that close to the house. (The concrete porch slants down slightly towards the yard.) But since I’ll be covering this up with porch boards and won’t be able to keep an eye on it anymore during heavy rainstorms, I wanted to fill those gaps just as a precaution.
So the progress is slow but steady. I have just a little bit of prep work left to do — cutting away the excess spray foam, painting the spray foam black, adding brackets/braces to the columns, and then doing a bit of caulking — and then I’ll finally be ready to install the floor boards! I’m really hoping I can get all of that done today. I think this porch will totally transform the look of this portion of the house, and I can’t wait to get it done. I’m hoping to have an actual porch to show y’all tomorrow.
Oh, and by the way, I will be building new steps. The current steps will no longer work since the concrete steps are 5.5 inches high, and the last step onto the porch is now over 9 inches high. So the concrete steps will be torn out, and I’ll be replacing them with wood steps to match the porch. So those of you who were concerned about the uneven steps can breathe a sigh of relief. 🙂
UPDATE:
The new wood porch floor is finished! Click the links below to see the rest of the posts in this project.

Addicted 2 Decorating is where I share my DIY and decorating journey as I remodel and decorate the 1948 fixer upper that my husband, Matt, and I bought in 2013. Matt has M.S. and is unable to do physical work, so I do the majority of the work on the house by myself. You can learn more about me here.
Looks great already!
Will you still be able to see the concrete on the bottom half of the porch?
Also, if you’re building new steps, will you make them wider so that they go from the left side of the porch to the second beam? Then you could tie in your new hand rail into that too, to make it look intentional.
I haven’t decided yet what to do with the concrete below the skirting boards. I’ll wait until the new steps are built before making that decision. And yes, the new steps will be much wider.
How about porch skirting?
Looks awesome! Those Lag bolts are the bombdiggity! We used them when the hubby built the covered porch on our back patio. They are the perfect balance of brawn and brains!
How are you going to treat your new wooden stairs from being slippery? We had wood stairs (pressure treated) leading down to our floating dock in NJ, and we had to treat them with an additive that gave the painted surface a bit of a sandpaper feel. But it really helped – we just knew that somebody was going to take a fall one day that wasn’t a ‘giggle worthy’ prat fall of “oops, yeah I meant to do that!”, type fall.
Bu then again as the lady builder extraordinaire, you probably already have this part all worked out!
Can’t wait to see the finished product!
I actually hadn’t given that any thought. I didn’t know I had to be concerned about wood getting slippery (except the obvious times when it’s cold enough for ice to accumulate, which isn’t often here in central Texas).
Unfortunately for us (and it may have been more humid because we lived on the bay), but the morning dew and moisture would leave enough of a layer of water to indeed make them dangerous, especially in the early mornings – and they were east facing stairs – yet they wouldn’t dry out fully until mid day. There are treads that you can add later on as well. I guess the best way to figure out if you’ll have any moisture/dew issues is to leave a board of the same type of wood that you will be using as close to the spot that the stairs will be built. Lift it off the ground to the elevated height of the new stair tread, and just see how it reacts over the day during normal weather. Then see how it reacts to rain as well. If anything at least you can keep a cautious eye out in the back of your mind. However if you are planning on painting the stairs anyway, I myself would TOTALLY add the non slip additive.
and the older the wood gets the more slippery it gets. We are ripping out the old deck and stairs on our house this spring. Its been a serious slipping hazard every time it rained. It just happens over time.
One really good option is to get the thin sandpaper like non slip tread covers that are easily replaced when they w ear out. You can get them in 3 different materials I think.
The fine sand paint additive works very well. It also works to sprinkle it on the wet coat of paint, let it dry, and then paint a top coat or two. I haven’t tried it with a clear coat or stain, if that is what you are using. In that case, I might put down the strips of sand paper-lie decals meant for this purpose.
Wood steps do get slippery, even when it is not icy.
We’ve used that additive too. We also used it on concrete steps at one of our rentals. We’re in California where we rarely get ice, but yes, those steps can be slippery when they get wet.
Kristi, something I just thought of, will the paint sprayed on the foam melt the foam? if you have a squirt of dried foam you might do a test on it to see if the paint chemical melts that stuff. I’m not sure that it would, but it would be terrible for you to have gone to all the work of getting that foam trimmed and one squirt of paint and poof…gone. It all looks so good. Can’t wait to see it finished.
It should be fine. The specifications on the spray foam can say that it’s paintable.
That’s great. I think painting the black is a great idea.
But paint-able with spray paint or with brush on paint? You might want to check. Spray paints will eat some foams.
As for the rest, the neighbors can really start admiring the changes, without having to sneak a peak of the interior!
I’ll be using the same porch paint. It’s latex paint.
What a transformation!!!! Very inspiring!
Question: do you really need to remove the current steps? Can’t they just be enclosed by the new wooden ones? Seems like a lot of extra work, but maybe worth the effort, if it affects the final design.
I was actually discussing this with my sister and mom earlier. I think I’ll add one more step, which will make each step just over 5 inches high, and then I won’t need to remove the existing steps.
That was so smart to paint it black!!! I think you’re going to be so much happier with it like that. Great post as always.
I’m grateful there are people like you and others on the Internet who share skills, instructions and advice. It’s so hard to find people to do smaller jobs anymore. Boys often pick up building skills from their fathers. Girls need to learn this stuff, too, and not depend on the whims of people who going to flake out when a better job comes along.
I completely agree. It’s very difficult to find people to do the small jobs and when I do they want some ridiculous price. As women, we need to know at least some basic stuff. Kristi has really inspired me to learn more.
I’m grateful there are people like you and others on the Internet who share skills, instructions and advice. It’s so hard to find people to do smaller jobs anymore. Boys often pick up building skills from their fathers. Girls need to learn this stuff, too, and not depend on people who often turn out to be undependable.
If you also paint the exposed concrete black, when you come to landscape in front of the porch, the concrete will ‘disappear’
Making progress! I wouldn’t worry too much about the concrete face. If you plant a flower bed or small shrubs along the front of the porch, you’ll never notice it.
That’s what I was thinking, a few shrubs or plants will cover the concrete in front. I don’t think most people will notice it anyway. Seems like if you paint it, you’ll have to maintain that year after year.
Kristi ~
How about using salvaged/reclaimed Texas stone, or maybe brick, to build the steps and be a facade to cover the cement base? Just a thought.
I’ve considered using the Austin stone that came off of the side of the living room. That might look really nice.
That’s exactly what I thought as soon as I read that portion of the post. Then paint it the color of your house. It would look as if it was completely finished.
Do you still have the rock that was removed from the house siding? If so maybe consider using those as a skirting of the porch.
I was thinking the same thing! Put the Austin stone on to cover the skirting.
I do still have it. That would look really nice. I’ll have to see if I have enough.
You are so smart to create a gap for the water to drain. Hate to mention one thought I had though – would it be inviting to mice (or worse, a snake) to burrow under there?! Hope not!!
There has got to be a technique so that you could get the just the right amount of foam🙄. I spent a day trimming foam off the perimeter of our newly installed windows. Husband bought a tool that made it super fast and easy!
Rockwell 20V MaxLithium Sonicrafter Oscillating Multi-Tool with Variable Speed, Hyperlock Clamping, and Universal Fit System, 27-Piece Kit – RK2863K
It’s a great little tool that performs many tasks. Kristi you need one of these to add to your arsenal of tools! Can’t wait to see the porch all done
I have one of those! But mine is the Dremel brand — Dremel Multi-Max. That’s one of those tools that I lived for a long time without, and then once I finally got it, I used it so often and on so many different things that I wondered how the heck I DIYed without it so long.
I hope not, too! But if I notice any getting under there, I can put some mouse/rat poison in there. Not so sure what to do about snakes, though. Is there such a thing as snake poison? 😀
You could also nail hardware cloth around the perimeter to close the gaps. Time-honored solution to critter control.
There is sulfur type powder that deters snakes from coming around.
I think I’d just paint the concrete that shows under the skirting. Even if it needs it every few years 😉
Repainting, that is. We do that, because not all the bushes and flowers completely cover everything.
Yes, this. My personal preference would be the same color as the house. It will recede and just be a backdrop for the landscaping.
Your porch transformation is already looking great Kristi, can wait to see what you manage to get done today and see the reveal tomorrow. You’re doing an awesome job!!!!
It might actually be Friday before I can show the finished porch. I totally forgot that I had some people coming today to install new Hardi trim and drip edge flashing on the porch roof. I’d be all in their way out there, so I’ll have to find something else to do today.
You’ve made great progress as this is NOT easy working with wood on concrete. I think the black on the porch and underboards will work out nicely.
I am also wondering about mice getting into the gaps behind the skirt board.
You might want to call a pest control guy to find out what kind of screening you could put in there to block rodent entry and still allow the water to flow out.
Great – something else to do before putting on the decking!
A dead rat under the floorboards isn’t a very pleasant welcome. Screening would be so much easier to put down BEFORE the floorboards go on…
Someone may have already said this, but I would paint the concrete the color if the house. Around here a lot if people paint a foundation black, but you dont have a foundation all the way around, so I day the color of the house. 🙂 I am loving what you have done so far and so jealous you have a porch in yhe forst place.
I am so enjoying your posts on the porch renovation because I have the exact same old concrete porch with a crack through the middle. I live in an area where there is a lot of sand in the dirt (east coastal region) so there is always settling. I have been trying to figure out how to fix the porch and always wondered if you could get a decking type of porch over concrete. Obviously you have given me the answer! Can’t wait to see the finalized porch!
I can’t wait to see the finished result! You might want to consider putting some kind of screen or mesh type material along that space between the skirting boards and the concrete at the front of your porch. That is the perfect size for small critters to get in and make their home and then it would be difficult to get them out if need be. You would think it wouldn’t be comfortable, but it’s a protected spot and they will find it!
How would it look to use the same stone on the side of the house to cover the leftover cement bottom? Just a thought…
You are definitely my role model.
I for sure would attach some screening to keep out critters. Don’t think there is snake poison (wish there was!) but if you used some heavy weight screening, it would suffice.
I wonder if you painted the concrete skirt the same black? It would make plantings stand out more. I also like the stone idea, but that may be a bit more difficult to do if you have to cut the stones.
I also like the wide step idea, and some kind of non-slip addition.
Are you going to pull the baseboard piece up so that the porch won’t cover up any of it? Or lay the porch and let it cover some of it?
The second option. 🙂
If you’re thinking paint for the concrete skirting, I wouldn’t suggest a concrete stain instead. You should be able to get a dark color close to the color of
Your deck boards. With an acid stain there would be no paint maintenance.
That new porch and eventually new steps are going to make a world of difference. Nice!
If you don’t have enough Austin stone to do the porch foundation, are they the correct height that they could they be used to face the risers on the steps? Maybe enclose the sides of the steps?
I would either paint the foundation the same color as the house or I would put Hardie Board siding there and paint it the house color. Either would be fine, especially if you will have shrubbery that will hide the foundation during the winter months. If you plan on having plants that will be gone or die back during winter, you may want to dress the foundation up a little more.