Wood Front Porch Progress – Part 2
This front porch project is moving along slowly, but we’ve made a little more progress and learned some important lessons along the way. If you missed the first post in this project, you can click the link below to get caught up.
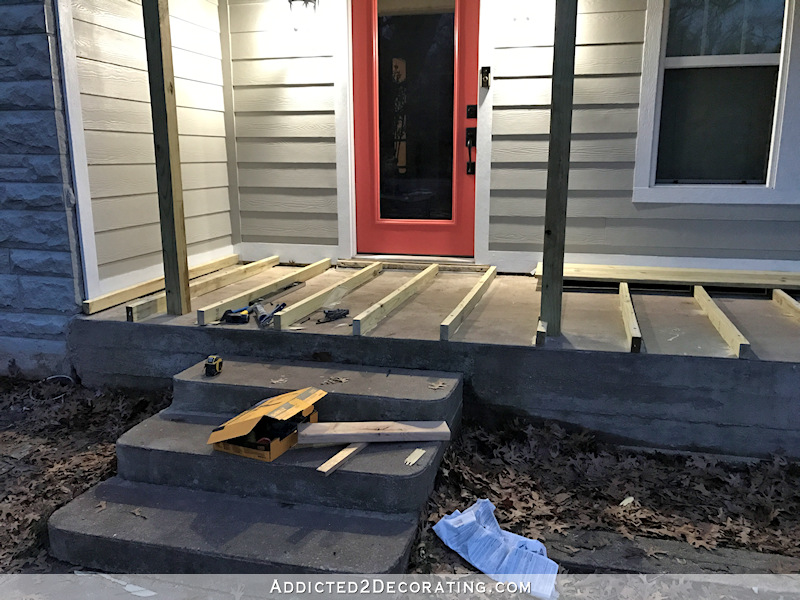
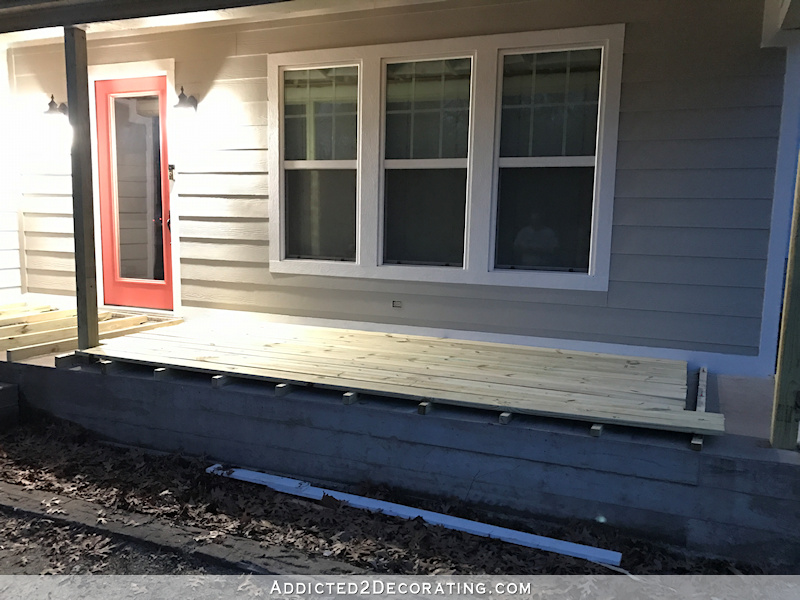
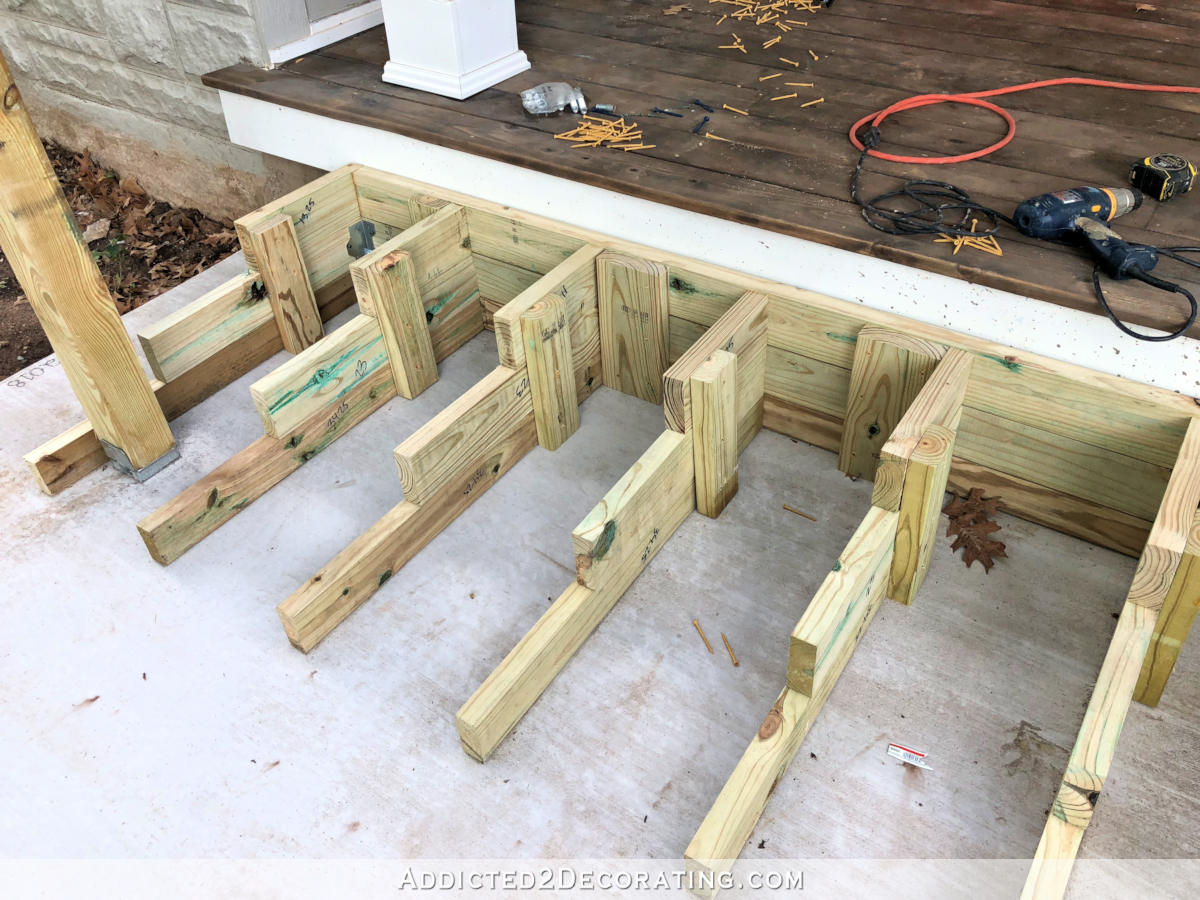
My brother returned yesterday afternoon so that we could finish installing the risers. We got kind of a late start, but we were able to get all of the risers (at least the ones attached to the concrete porch) in place just before the sun went down.
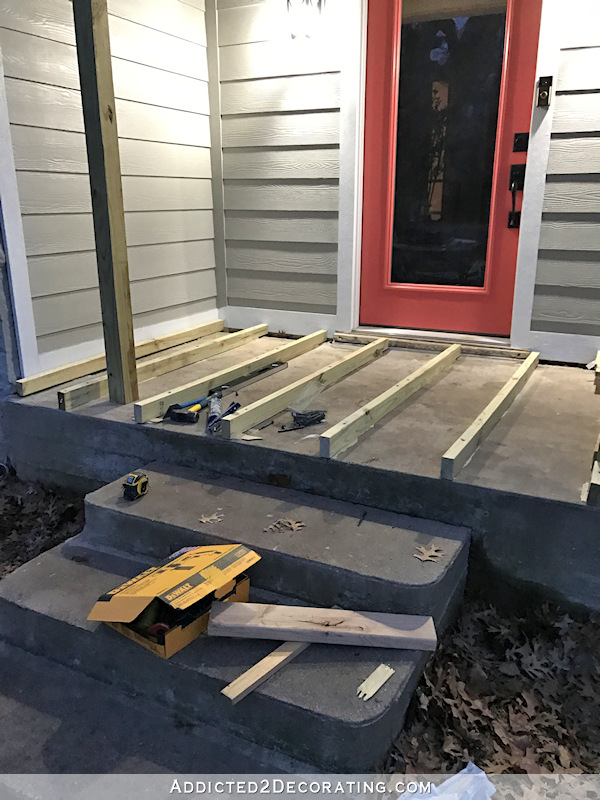
That very last riser against the side wall isn’t attached yet. The concrete underneath it is super rough and uneven, so we cut it so that it would have concrete supporting it in the front and back, but it’s actually going to have to be screwed or nailed to the side wall. I didn’t feel like dragging out extra tools after dark, so I’ll get it done this weekend.
I learned a few things along the way that I want to pass along to those of you who might try this or a similar project.
First, when using Tapcon concrete screws, purchase a separate Tapcon drill bit. In fact, just purchase two or three at the beginning of your project so that you don’t have to make an extra trip to the store when the first one starts going dull (and it will).
When we first started the project, I just used the drill bit provided in the package of Tapcon screws. It worked, but after getting two risers down yesterday, that one broke, so we had to go to Home Depot for another one. The Tapcon drill bits that are sold separately are far superior to the ones that come in the box of Tapcon screws. So if starting a project like this, just grab two or three separately-sold drill bits right from the beginning. They work so much better, and make drilling into concrete a bit easier.
And second, be sure you’re using the right size screwdriver bit!! 😀 Remember how I said we had so much trouble getting the screws to go in even after pre-drilling the holes on that first work day? Well, that’s because I was using the wrong size screwdriver bit!! I was trying to drive those screws in with a #2 Phillips bit, but if you actually read the directions on the Tapcon screws (and I’m really not good with reading directions 😀 ), it clearly says to use a #3 bit. It makes all the difference in the world! After getting some #3 bits, I had no problem driving those screws into the concrete.
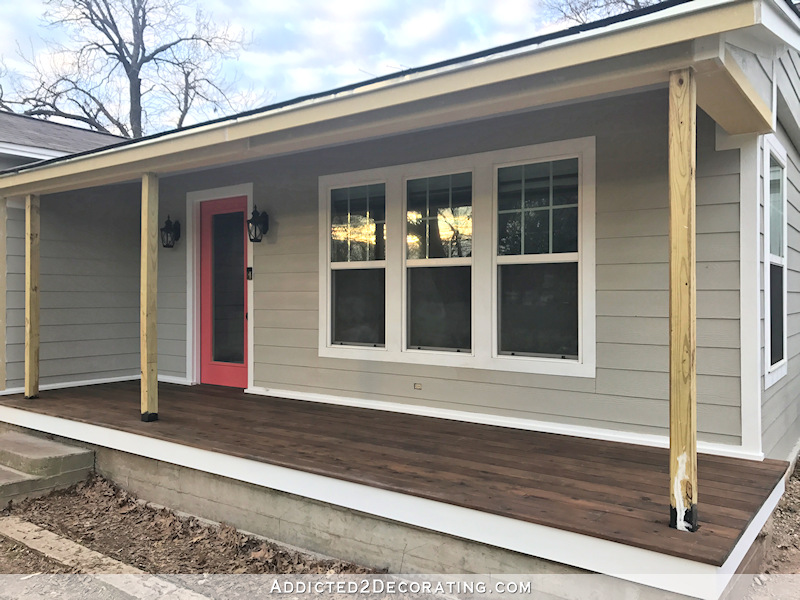
After we had installed all of the risers, it was too dark to continue working, but I was anxious to see what the porch boards would look like. So we placed a few on the risers. These aren’t screwed down, and when I actually install them, I’ll stagger them. But here’s a preview…
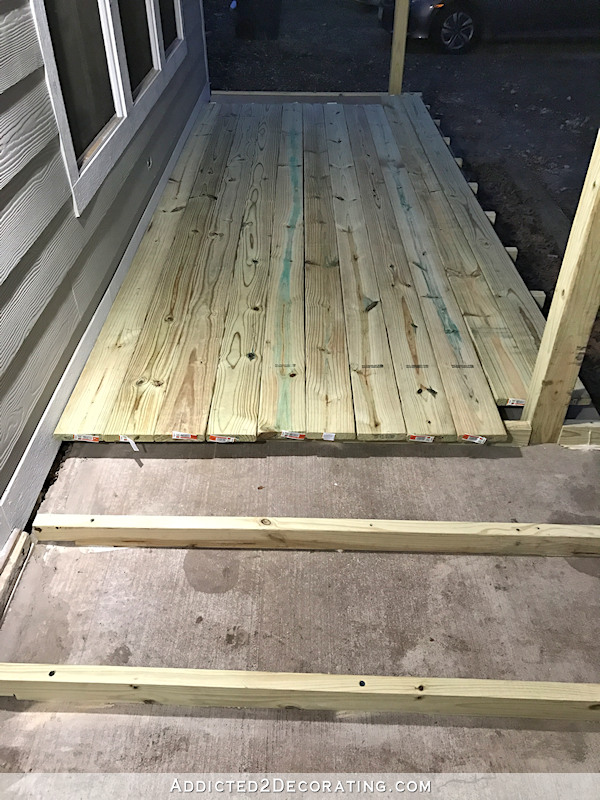
I’m so excited! It think it’s going to look great!
Of course, I still have to install the spacers on the front and side of the porch so that I have something to attach the front fascia board (skirt board?) to so that it will hide the risers.
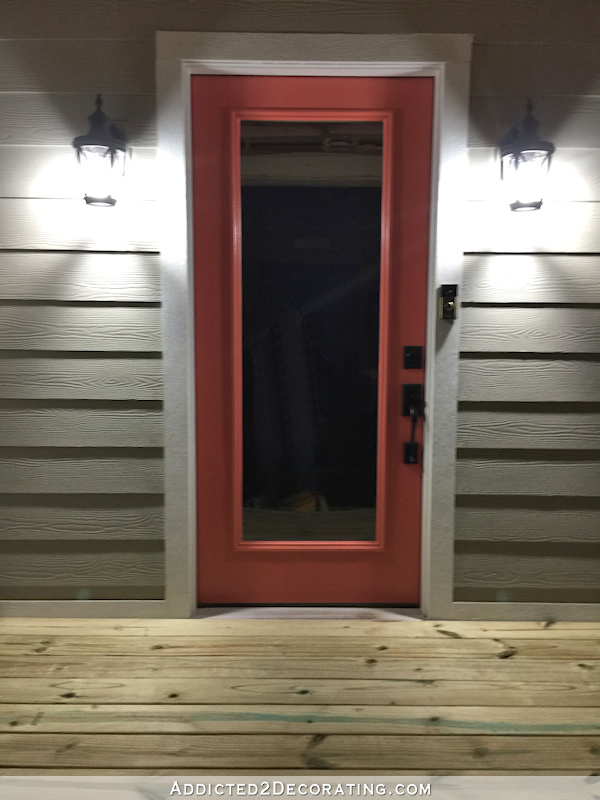
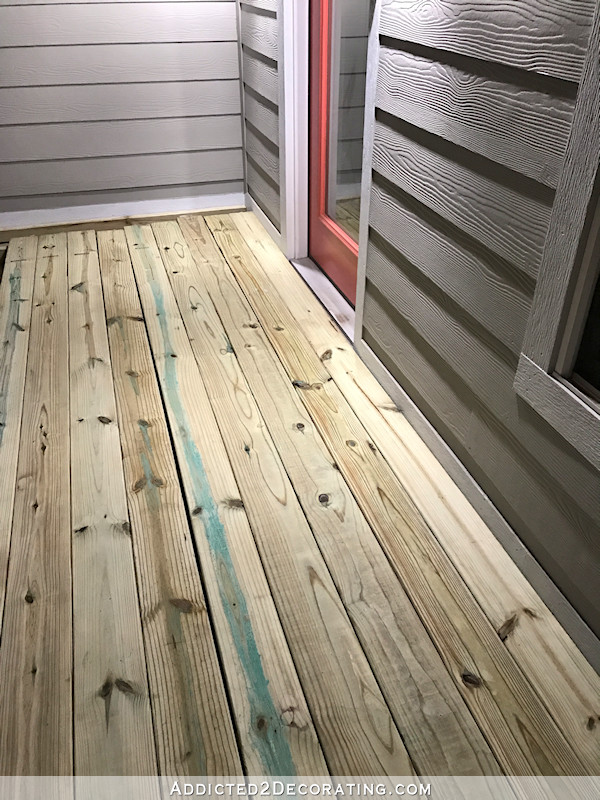
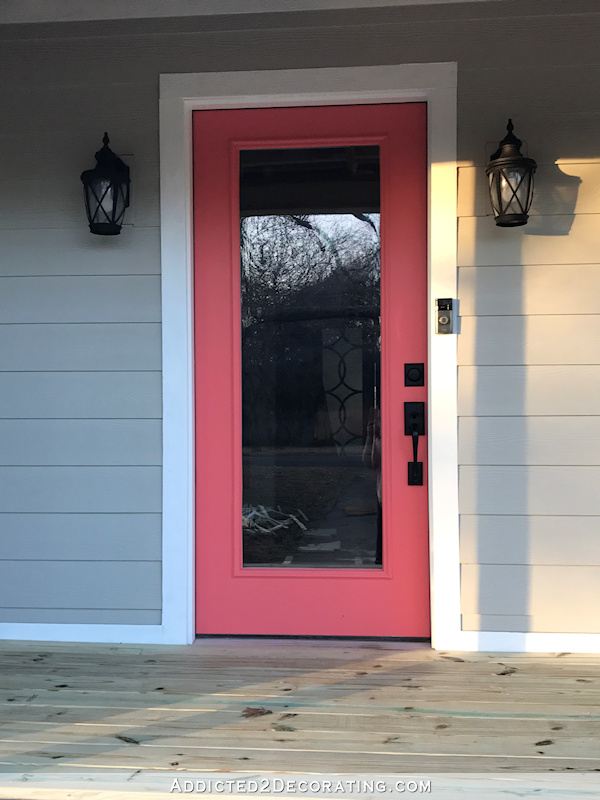
I got up early this morning and headed right out because I was anxious to see it in the daytime. I think this wood porch is going to add so much charm to the front of the house!
Unfortunately, you can’t just install pressure treated porch boards and then stain them right away, unless they’ve been kiln dried after the treating process. But if you’ve ever purchased the in-stock pressure treated boards from Home Depot, you know how wet (and heavy!) they are in the store. Depending on the climate where you live, you might have to wait up to two months or so to let them dry out before staining. But I’m hoping here in Texas, the wait will be much shorter than that.
UPDATE:
The new wood porch floor is finished! Click the links below to see the rest of the posts in this project.
- Part 3 – More Front Porch Progress
![]()

Addicted 2 Decorating is where I share my DIY and decorating journey as I remodel and decorate the 1948 fixer upper that my husband, Matt, and I bought in 2013. Matt has M.S. and is unable to do physical work, so I do the majority of the work on the house by myself. You can learn more about me here.
Wow! What a difference that will be! You have such a great vision!
I do have a question: do you have to worry at all–or prep for–the wood on the house where the risers and porch boards butt up against (rot, trapped debris, etc.)? I think you said you were going to paint the porch and risers, will this provide some weather/rot protection? I need to replace a rotting wood porch and I’m wondering if there are any preventative measures I can take to increase the life of this next porch. Thank you!!!
In my case, the paint is less about protection and more about hiding the concrete and risers so that they’re not visible through the tiny spaces between the porch boards. The boards are all pressure treated, and the ones I used for risers are rated for ground contact, so that in itself should provide quite a bit of protection from rotting. I didn’t do anything extra to them to protect them. But wood stain also protects wood, and there are products like Thompson’s sealer for decks and outdoor wood that can be used to further seal and protect exterior wood. You might look into those things as well.
Thank you, Kristi!!!
Looking good! How level is your front threshold with the deck boards? Will you need to figure out how to raise it?
I think it’s going to work out perfectly. One board will have to be cut so that it fits into the doorway a little bit. It’ll basically cover the metal threshold completely and be perfectly level with the black strip that the door is against. So it’l be a zero threshold door on the porch side. But I won’t be raising the threshold.
This was my question too. I though maybe you would have to step down to get to the door but from the pictures, the door looks exactly level with the top of the deck.
What kind of screwdriver did you use? Is that the box for it in picture no. 1?
The Tapcon screws and drill bit require a hammerdrill. I didn’t have one, so I had to purchase one for this project (although I’ve wished I had one in the past, but made do with my regular drill). I bought a Dewalt hammerdrill that was around $99 at Home Depot, and it worked perfectly.
I’m jealous. I wanted a zero threshold door but our building permit guy said it was against code 🙁
This will be stunning!
Wow, what progress. It’s going to look so good. I’m wondering about the height of that last step though? Do you need to do something about the rise of the stairs?
I continue to be so inspired by your craftsmanship!
I’ll be removing the concrete steps and completely rebuilding the steps. The new steps will be stained wood treads to match the porch, with painted white risers to match that fascia board that will go around the porch just under the porch boards. The new steps will also be much wider (the width between the columns) and will have painted white handrails on each side.
Kristi, your new entry to the house is going to be so gorgeous when it’s finished! It already looks so good just in the bare wood state. So excited to hear you are building new steps/handrails, it’s is going to be a stunning addition to the front of the house!
Good work! I think the wood floor will look very nice. I can almost see you in your porch swing enjoying a glass of tea on a warm afternoon. : )
It’s going to look awesome!! When I replaced the decking on my back porch a contractor friend warned me to go ahead and butt them up to each other tight because the wet pressure treated boards would shrink and leave gaps. Boy was he right. After about 3 months there were 3/4″-1″ gaps between them. It was okay since it wasn’t covered and needed the drainage space. If you don’t want gaps, you may want to let them dry for a couple months before screwing them down. Can’t wait to see it all finished!!
Yep, you need to let the boards dry out. Your back porch room would be a good place to do it. It is best to stack them in a grid (layers perpendicular to each other) rather than stacked or in a pile–they need air circulation. Then stain and seal both sides and all edges to help prevent warping and rotting. You don’t actually need to stain the underside but staining both sides gives you some flexibility as you discover flaws as you work–turn the board to the better side. Stack them now, opening the windows when you have weather to aid air flow, and you should be ready to stain, seal, and install before the weather gets unpleasantly hot.
As for the white vertical board on porch, consider painting it the siding color so it blends in visually. I could also see a large vertical planter of succulents on that wall–the kind that hang like a picture.
That is really good advice Adele. I am so excited for you Kristi…it is amazing how it is starting t look. You are going to really enjoy that porch once the warm weather arrives.
I love that you are taking out the concrete steps and putting in wider wooden ones. That will look so inviting! Everything looks great. I can’t wait to see how it all turns out.
I know you’re glad to have the outside reflect some of the progress you’ve made inside. Earlier you mentioned putting stone on the wall to the left of the front door. Are you still doing that?
I think I’m actually going to skip that. After my mom came over the other day and we talked through all of the plans (and decided that the porch shouldn’t have a balustrade), we also determined that that $950 would be better spent in other ways. I do want to do something about that one vertical white trim board, though. It sticks out like a sore thumb, and it really bothers me.
Perhaps painting that one piece of trim the same color as the house body might help it blend better?
Fabulous!
I’m still worried about trapped water in that back corner, once rain seeps through the wood flooroards. You said the concrete sloped down in that back corner. Once it gets there, it will have to stand there until it rots something out, won’t it?
Even in the hardest and longest downpours we’ve had, water has never reached the back corner of that front porch. As for water in general, the porch boards will have spaces between them, and the front skirt board will have space behind it. There will be plenty of room for drainage and air circulation.
Nice work! I know you are anxious to get the boards down, but I would suggest letting the pressure treated wood dry out completely before you do. There is bound to be a lot of shrinkage and that will increase the gaps between your boards allowing you to see the old concrete under them.
I really admire all that you do. The level entry to the door looks great, very custom. Having lost my mother a couple of years ago, I think it’s wonderful how you and your mom collaborate.
An FYI from southern Texas. We were advised to wait at least a year… and to make sure that water no longer beads up anywhere on the treated wood surface, but sinks into the wood surface making it look like wet wood. Only after this water penetration occurs and is allowed to dry again is the new stain or coating able to stick to the now dried out treated wood evenly and without peeling or gumming up because of wood treatment still being wet within the wood.
At about the 10 month mark we noticed rainwater beginning to saturate the wood instead of bead up in some places. A bit after the one year time the beading was only at the edge against the house. Guess it did not have as much air circulation there to dry out?
I would love to hear the experience of others in regard to waiting to stain or paint treated decking.
That is interesting and also makes sense! We weren’t told such a long time-line but perhaps our wood was kiln-dried. It has been so long ago I don’t remember. But, without a garage, it was also drying in the living room–and our house is small and doesn’t have a family room so I was desperate to get it out of there.
Lots of good info here re: wood decking! What a great resource! You’ll have to do some posts incorporating everything you’re learning. 🙂
I bet your excited to be able to drive up to your pretty house! You could paint that transition board that bothers you the house color, like the one in the corner. Notice I said transition not trim. I believe all corner boards should be painted the house color. Their purpose is a time/money matter so they don’t have to miter corners of the siding. It would put more focus on the windows and front door, instead of bringing your eye to the edges of the house. Can’t wait for landscaping!
I always felt the same way, that your eye should be drawn to the doors, windows and shutters and not the structural elements. (like making your gutters and downspouts into decorative elements)
I agree. Painting corner vertical trim the same color as the house body is sort of the same concept as installing matching floors in every room (when possible) inside. Makes eveything “flow” better to the eye and even makes the house look a little larger.
This may be addressed in this thread already…but how did you add that much height to your porch & not have to adjust the threshold? Or did you just luck out ? 😁 I cant see adding the risers & wood planks *Which. I. Love.* to my porches w/o needing to raise my door threshold as well 😬. And is that even possible? 🤷♂️ Or is there more room on a standard porch/door transition than I realize? Thanks for the info 😉
Well, keep in mind that the reason I’m even adding the risers that are more than 3/4″ thick or so is because over the last 70 years, my front porch has moved, shifted, and sunk a bit on the left end (i.e., the door end) of the porch. So really I’m just building it back up to its original height, and then adding 3/4″ for the risers plus 1″ for the porch boards. Most exterior thresholds have about 1-2 inches to spare. If my front porch had been level, I would have just added 3/4″ risers across the whole thing, and then put the 1-inch-thick porch boards on top of that.
Wow, that is going to look so good! I wish I could convince the man to cover our concrete porch with wood. I even asked if we could do without the concrete when the house was built, but he said he didn’t want to have to maintain it through the years. BOO! Then I asked the builder to NOT do a smooth finish on the concrete, because when it’s wet/icy, it can be slippery. But he forgot, and by the time we stopped by to see the progress, it was too late to change it. Just last week we had icy/sleet conditions, and I was terrified someone would try to come to the door, and fall. It was almost a week before it melted. ( We can’t use de-icer yet, because the concrete is still not totally cured.) A wood deck would still ice, but I feel it would be easier to deal with. But, my man is a “what do women know?” kind of guy, until I can prove him wrong! (And I do, quite often! LOL!)
DO make sure that wood is REALLY dry before finishing with paint/stain, or you will be redoing it next year!
My parent’s house was that way and more than one person nearly fell on it, but it would be me that nearly took a header on the blasted thing! My husband and I were packing the car after a visit, and I was in a hurry during a downpour and not thinking about the slippery porch. My feet shot out from under me, and I nearly hit the brick window sill with my head. It was so close that I had a long scrape on my scalp from the brick. It would have definitely given me a nasty head injury.
Your front porch is already looking great. So nice that your brother came to help you. The curb appeal is going to look awesome with all this done and with the new wider steps. I can just picture your porch swing hanging there.
So excited for you and the progress you’re making! A lot of fabulous advice has been offered, particularly with regard to letting your treated lumber dry out fully before painting or staining it. With regard to laying out your floor, have you considered laying the planks perpendicular to the back wall? I’m asking because, to my eye, it seemed as though the horizontal lines of the siding, coupled with the horizontal lines of the floor blurred the delineation between the two planes.
If my meaning isn’t clear, perhaps the pic in this link will help://yodersmart.com/simple-front-porch-decorating-ideas/front-porch-christmas-decorating-ideas-photos/
I did consider it, but in order to lay the floor boards that way, the risers would have had to go the width of the porch. And if I put the risers the width of the porch, rain water would get trapped each time it rains. With the risers perpendicular to the back wall, that allows rain water to run off the front edge of the porch and not get trapped. So that necessitated the floor boards going the width of the porch.
I am wondering about your choice of pressure treated wood for the deck boards. Had you considered cedar or redwood? They are able to be stained right away, and don’t have the arsenic that the pressure treated boards do.
Pressure treated boards are no longer treated with chemicals containing arsenic. But I did actually return them this afternoon and get western red cedar…at three times the cost.
Your porch will be awesome and easy for Matt to enjoy, too! I can see you DIYing some neat address numbers to mount on the column above your handrail. Have you been looking in nursery catalogs for plantings you want to use? You are well on the way to having the exterior you’ve been dreaming of!
I haven’t really looked at plantings because I know so little about plants that I have no idea what can live where. I think I’ll need to call in a pro to come up with a plan for me. I have a general idea of how I want it to look, but the specifics overwhelm me.
Please check the Arbor Day Foundation site for plantings. If you become a member ($10 fee) they will send you free trees (they are infants, but grow fast) and you can get bushes and other trees for very cheap. they sell flowering trees and bushes, but do not have flowers…
Excellent idea! We’ve done that before, too.
If you go to one of your local nurseries, they should be able to draw up a plan showing which plants will give you the look your going for.
I bought a product a while ago (unfortunately I haven’t tested it out yet to see how it works). It is called Wood RX and they sell it at Home Depot. It says you can use it on pressure treated lumber without waiting for it to dry out. I’m in Florida and with the humidity, I didn’t want to wait forever to treat my project. It is also a thin consistency for spraying.