January Progress Report & February Goals
Y’all, I’m very serious about sticking with my “to do” list for this year and not getting sidetracked. VERY serious. So serious that I’m going to be keeping myself accountable by reviewing that list at the end of each month and making sure I kept busy and made good progress, and mapping out a plan for the new month.
Here’s the very simplistic progress report: My list started out with 49 items (actually fewer, but I’ve added a few things as I think of them), and in January I got eight of those items checked off the list. That’s awesome! If I can keep up that pace, I’ll finish my list this year for sure. Of course, that’s the very simplistic view, and some of the projects on the list are one-day projects, where others are week-long projects, but I still started off the year strong.
So here’s the detailed progress report:
Most of the things I checked off of my list were items that still needed to be done in my niece’s bedroom. Life events got in the way, and that sweet girl waited a year-and-a-half for her room to be finished, so my mom and I really buckled down and determined to get it finished first thing this year. On my list of things to do for her room were:
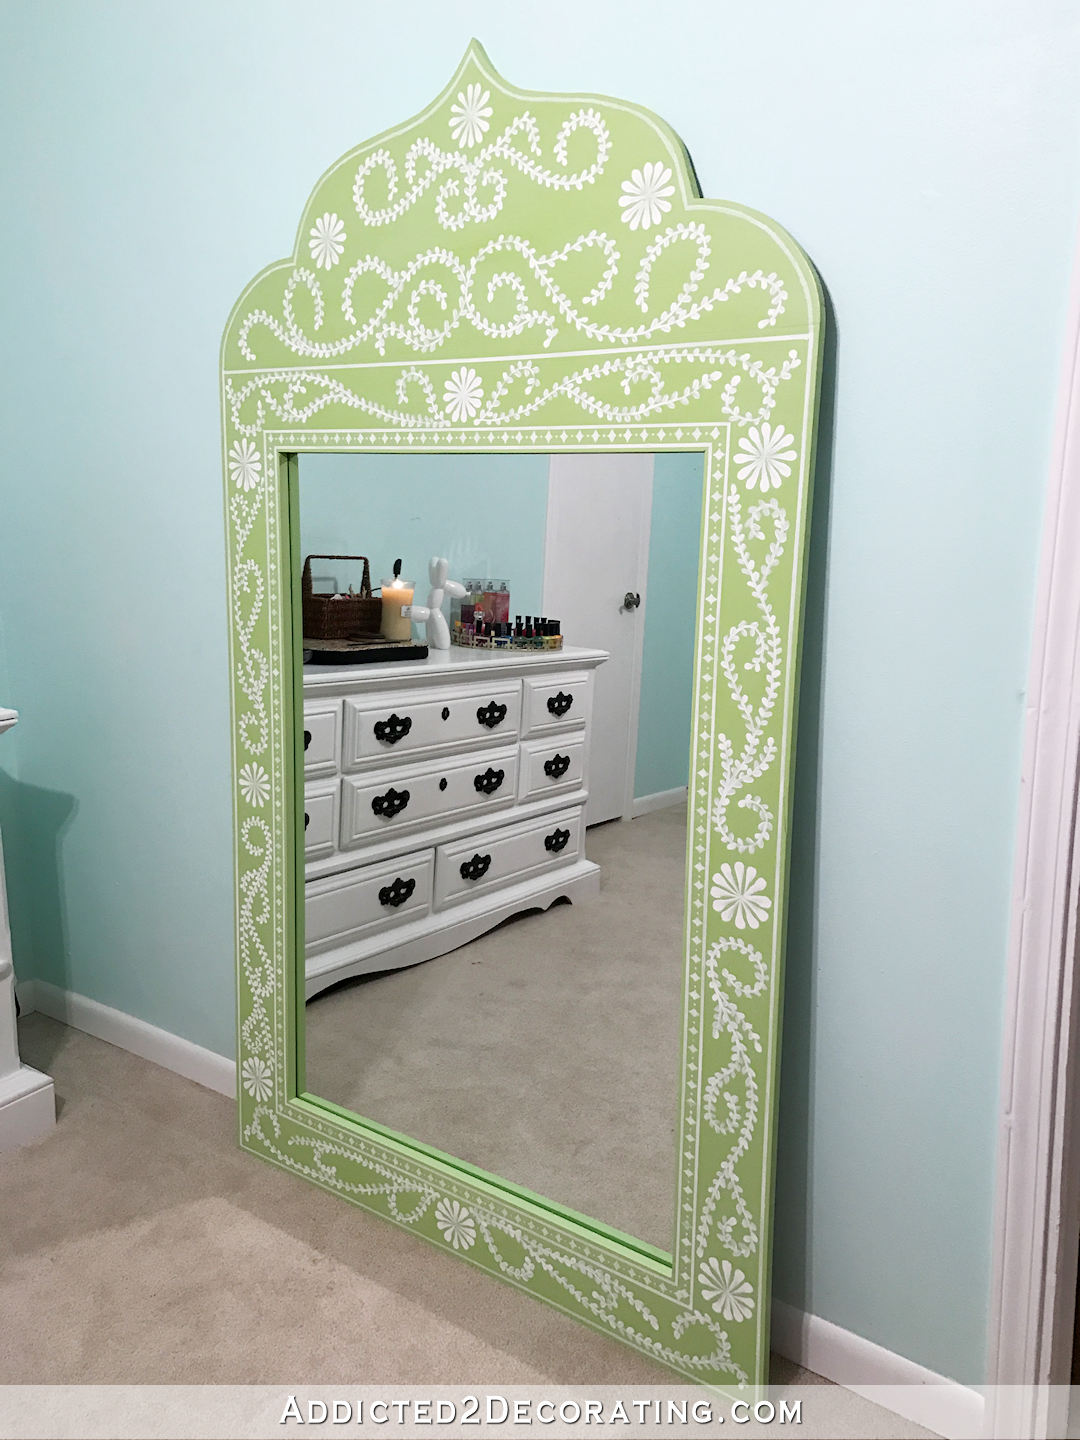
- Make a decorative full-length mirror. Done!
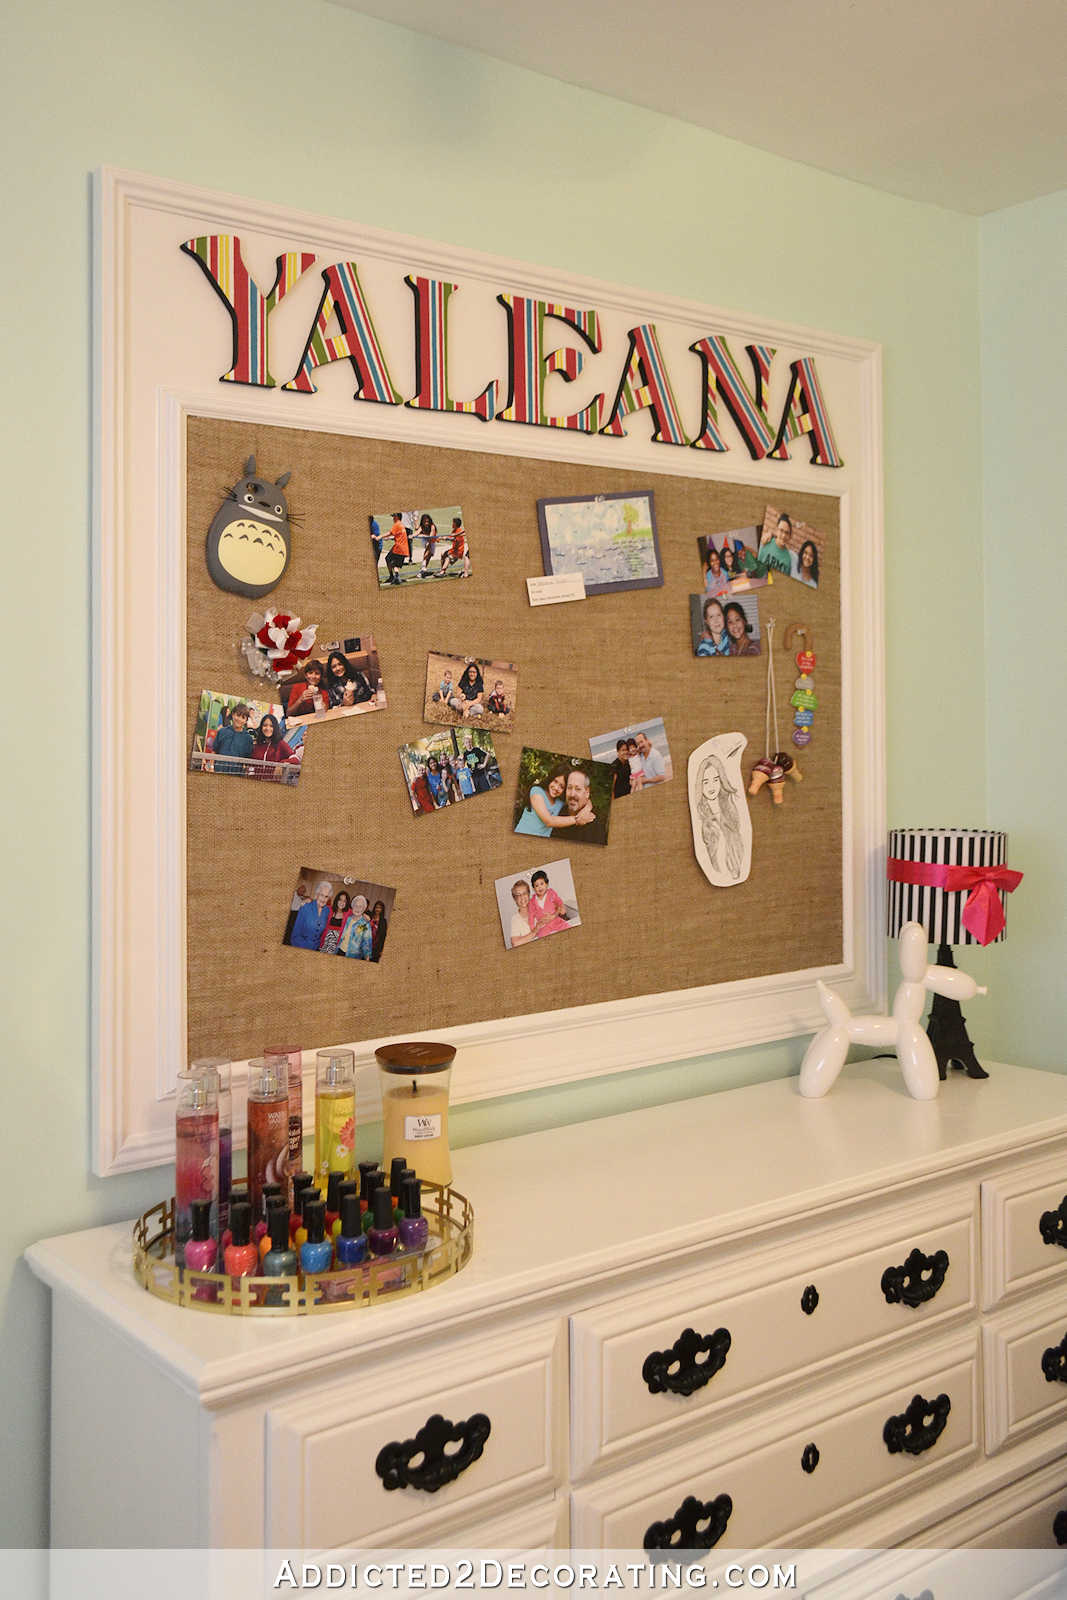
- Make a bulletin big bulletin board. Done!
- Finish installing baseboards. Done!
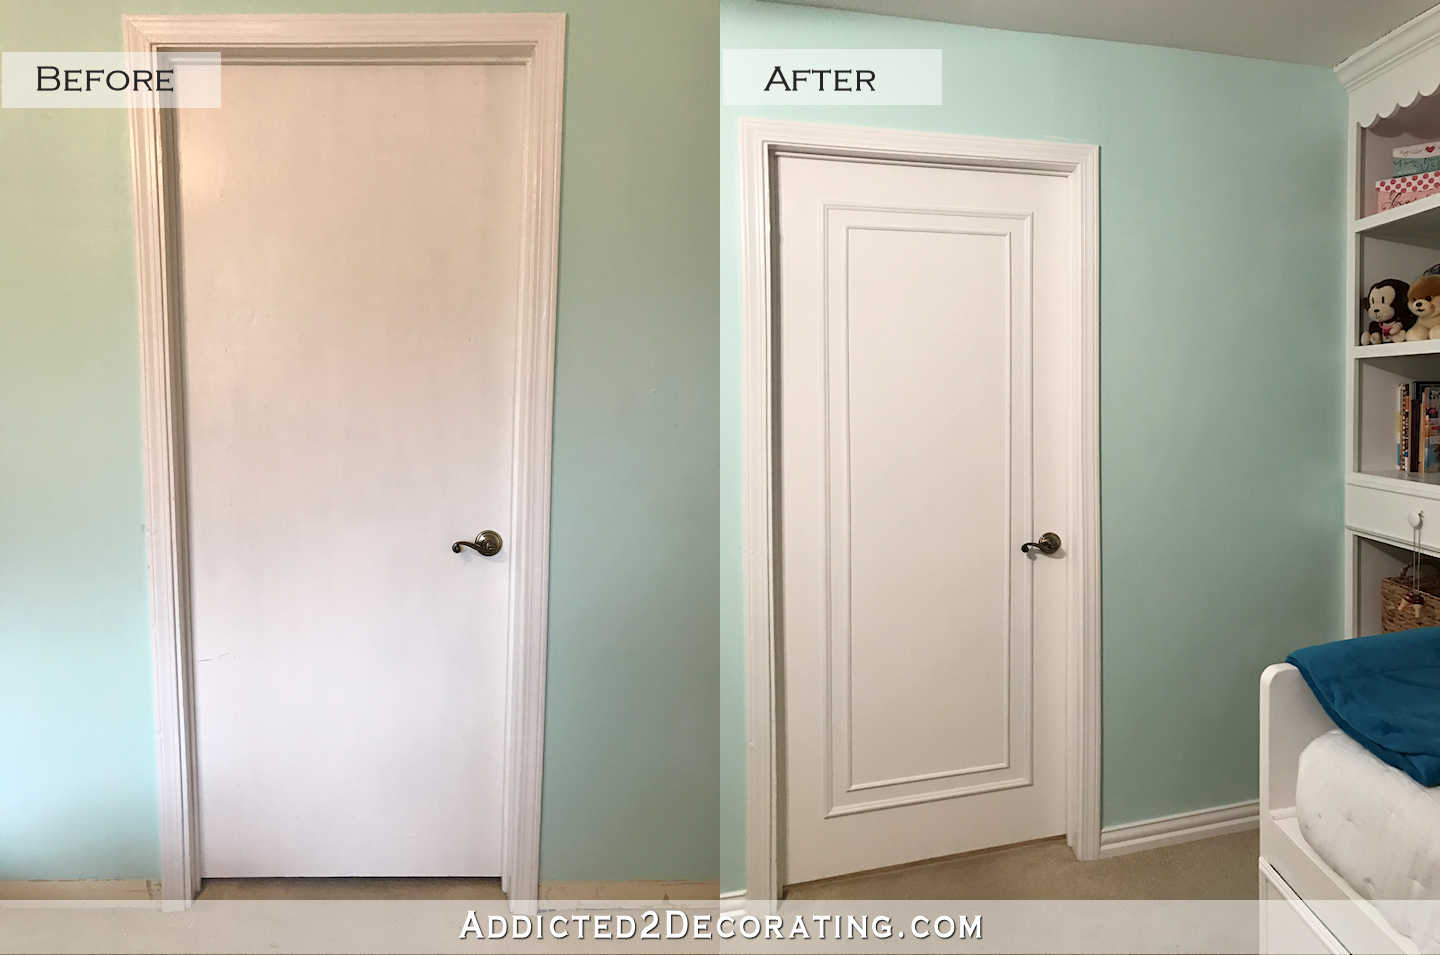
- Pretty up the plain, flat hollow core doors. Done!
- Purchase and install sconces by the bed. Done!
- Decorate and accessorize to finish. Done!
I made this pretty little (or rather, very large) mirror…
And I made this big personalized bulletin board (with the fun striped letters that my mom painted) where she can display her artwork and other fun stuff…
And I prettied up her plain hollow core doors with some simple trim…
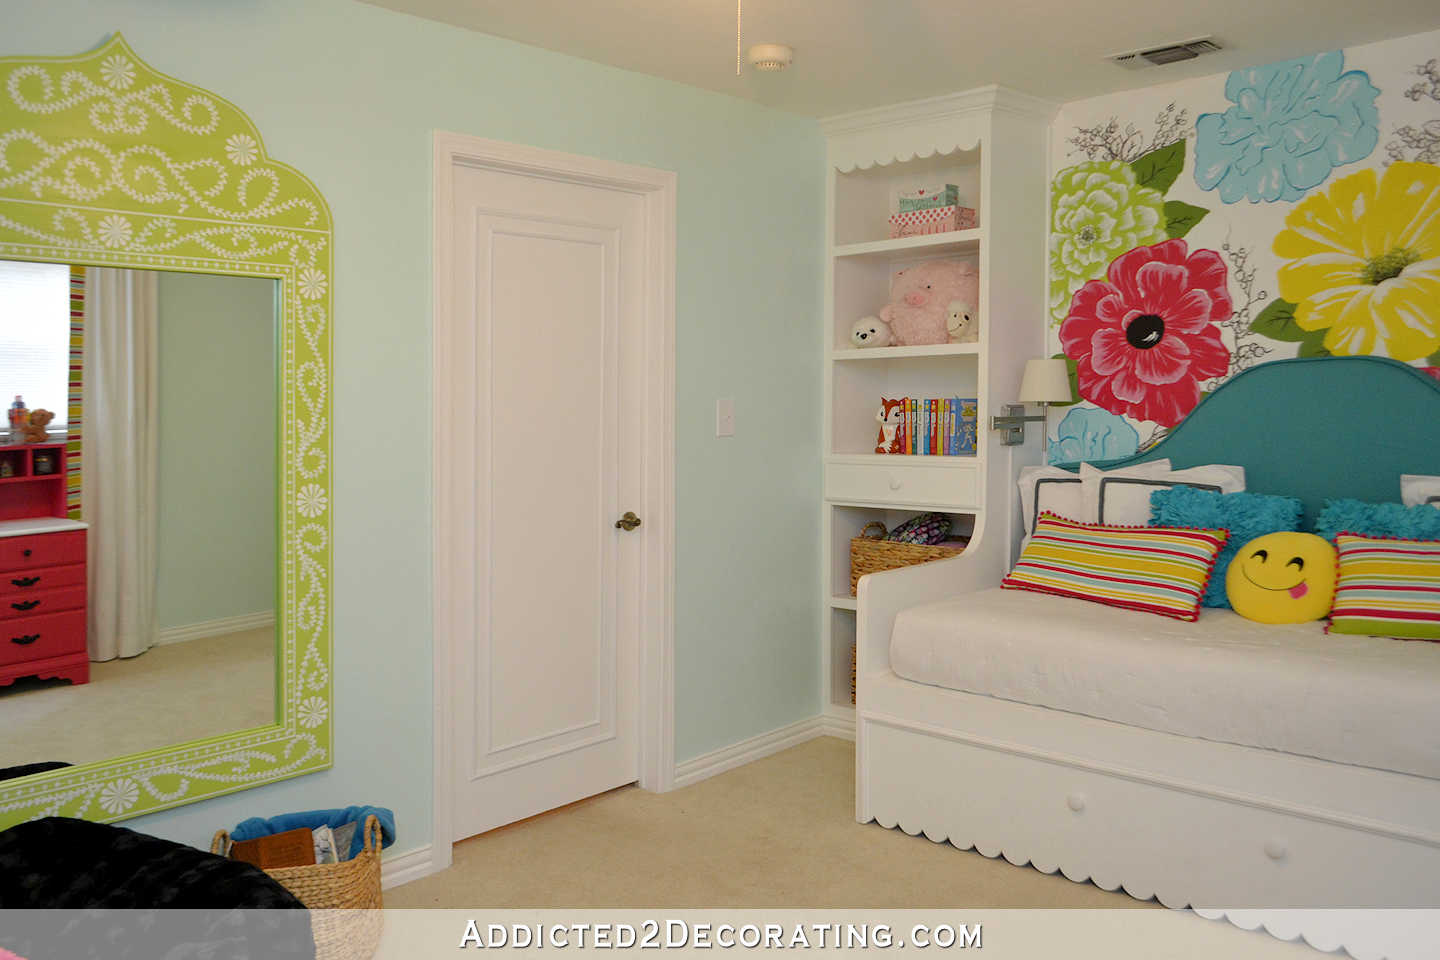
It took us a week-and-a-half or so, but we finally finished my niece’s room, and I love how it turned out! But more importantly, she loves how it turned out.
I’m so glad that room is finally finished! I can now spend the rest of the year focused exclusively on my own house, and so far, I’ve gotten two things checked off the list that pertain to my house.
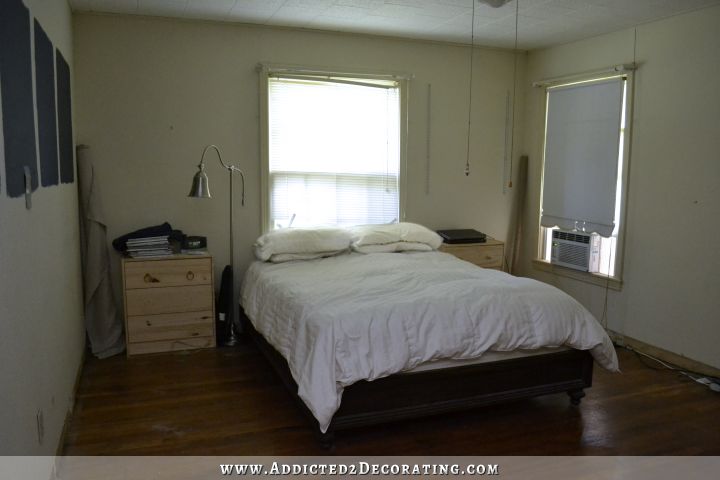
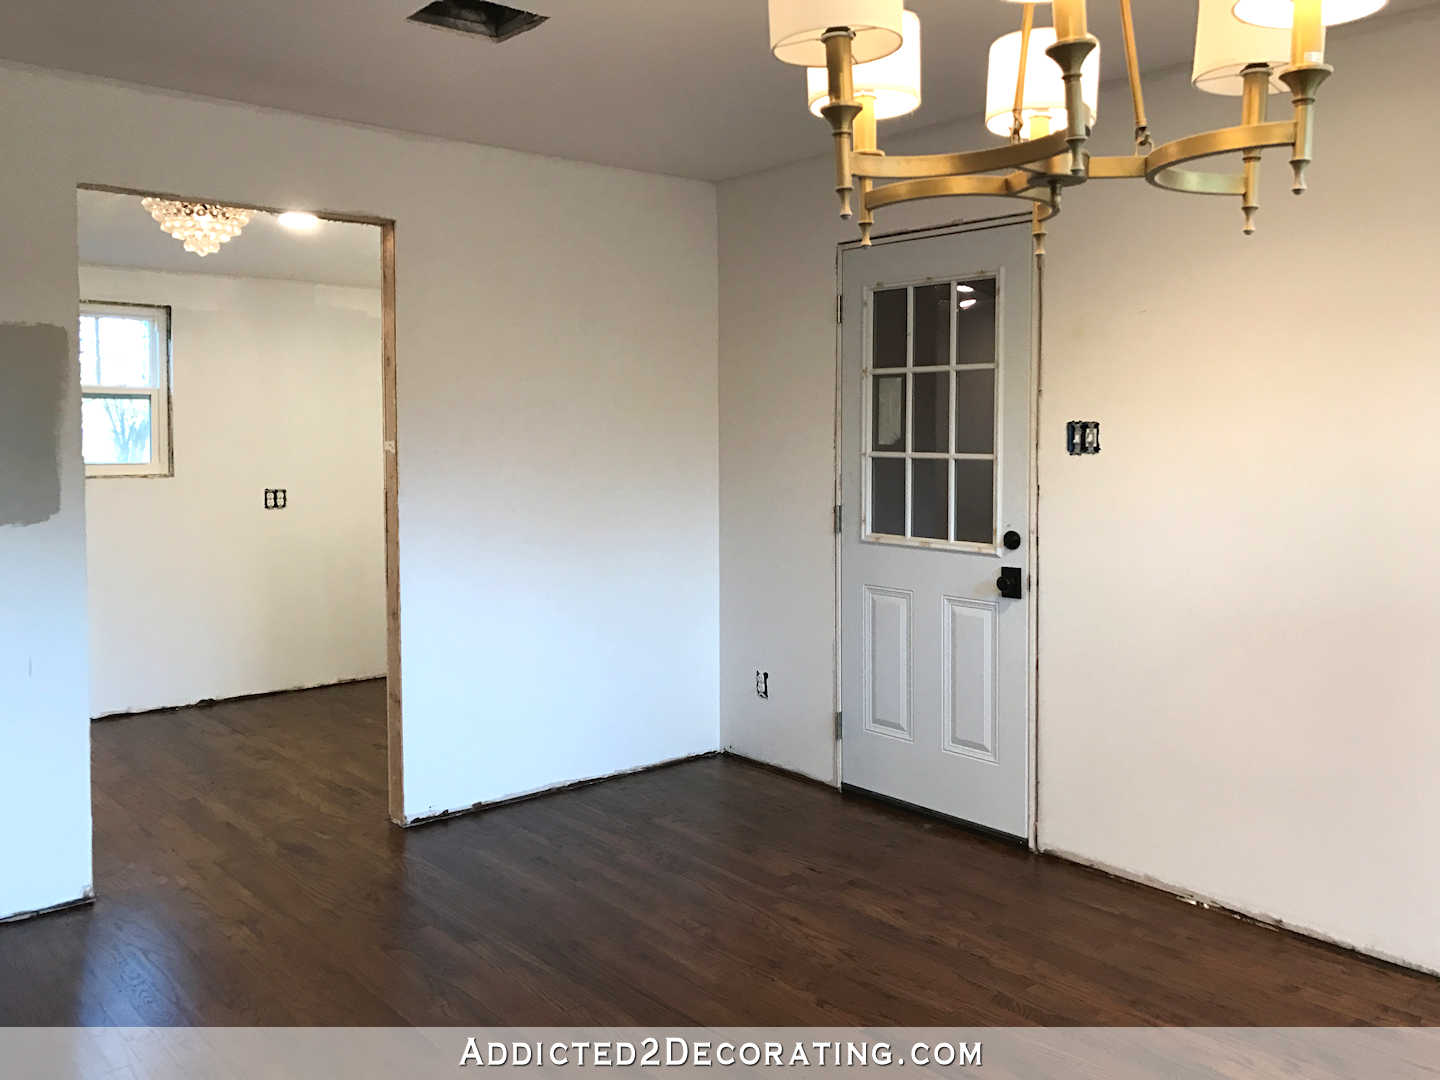
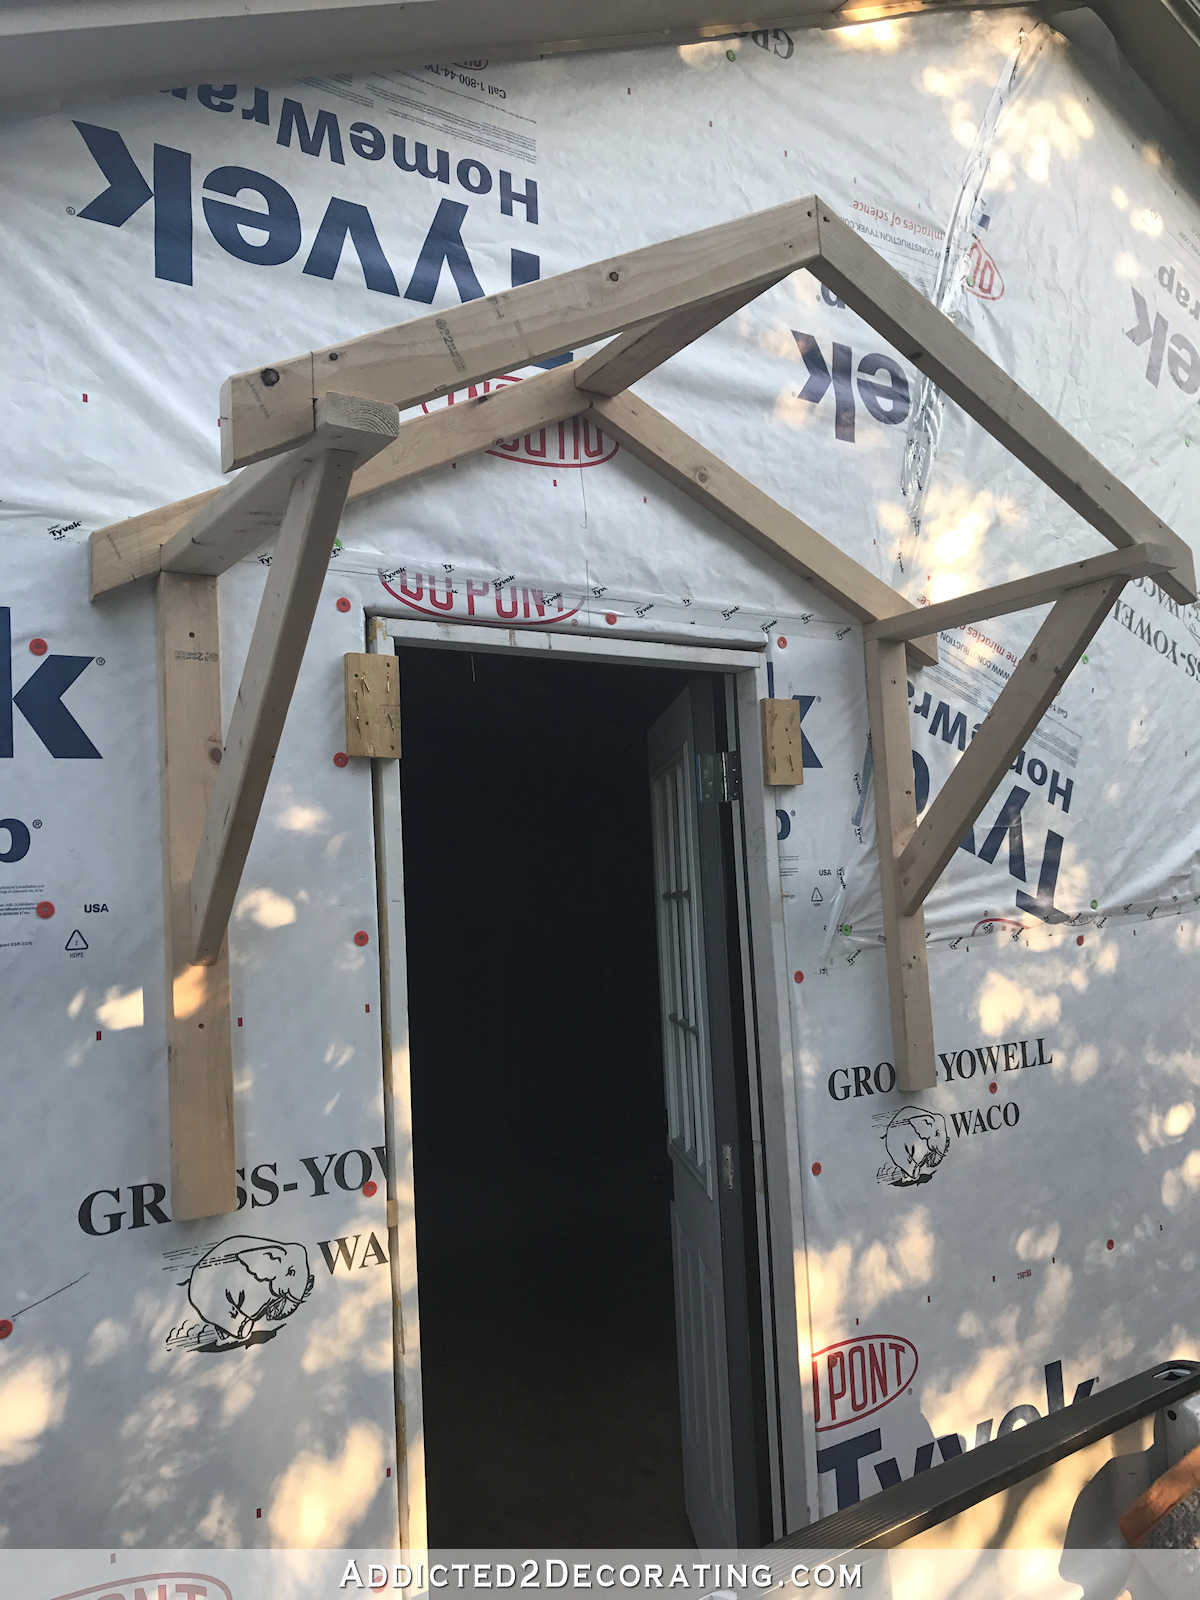
The first thing was removing the side window in our bedroom (this is a very old picture, but the room hasn’t changed much other than adding a headboard, getting rid of the old window coverings, and getting rid of the window air conditioner)…
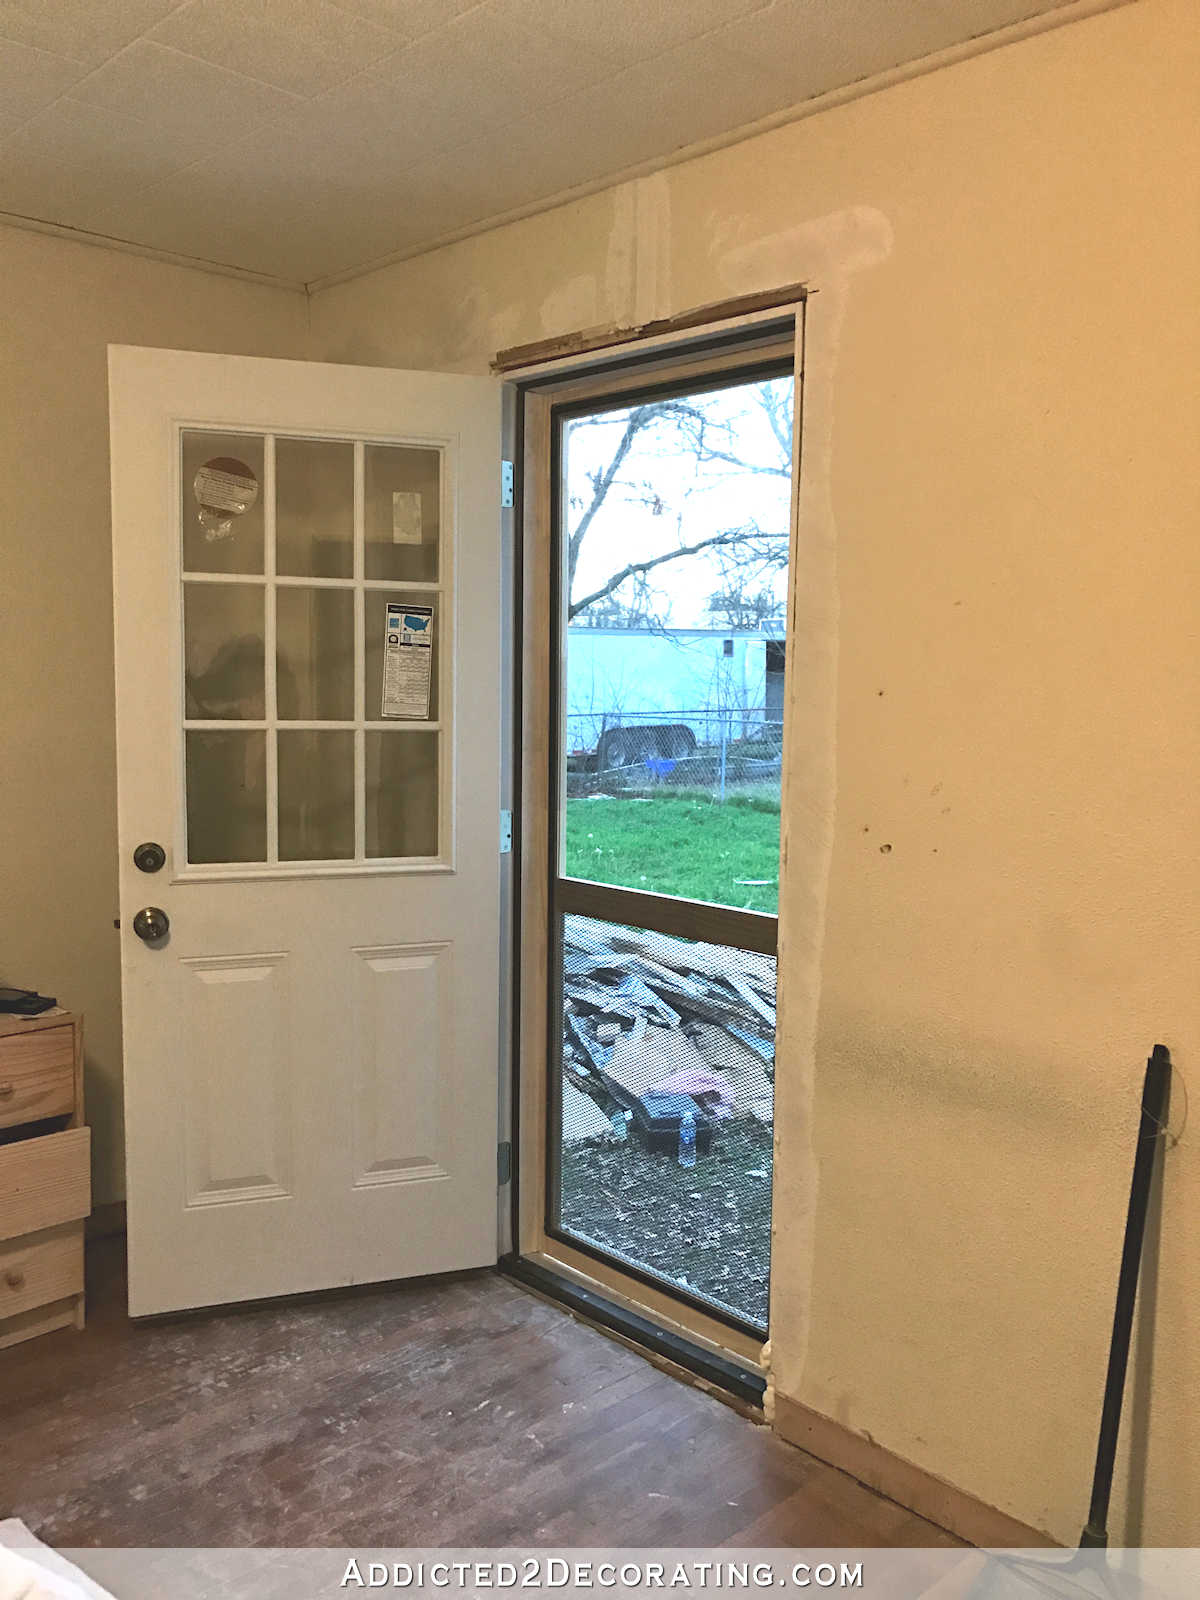
…and installing a door…
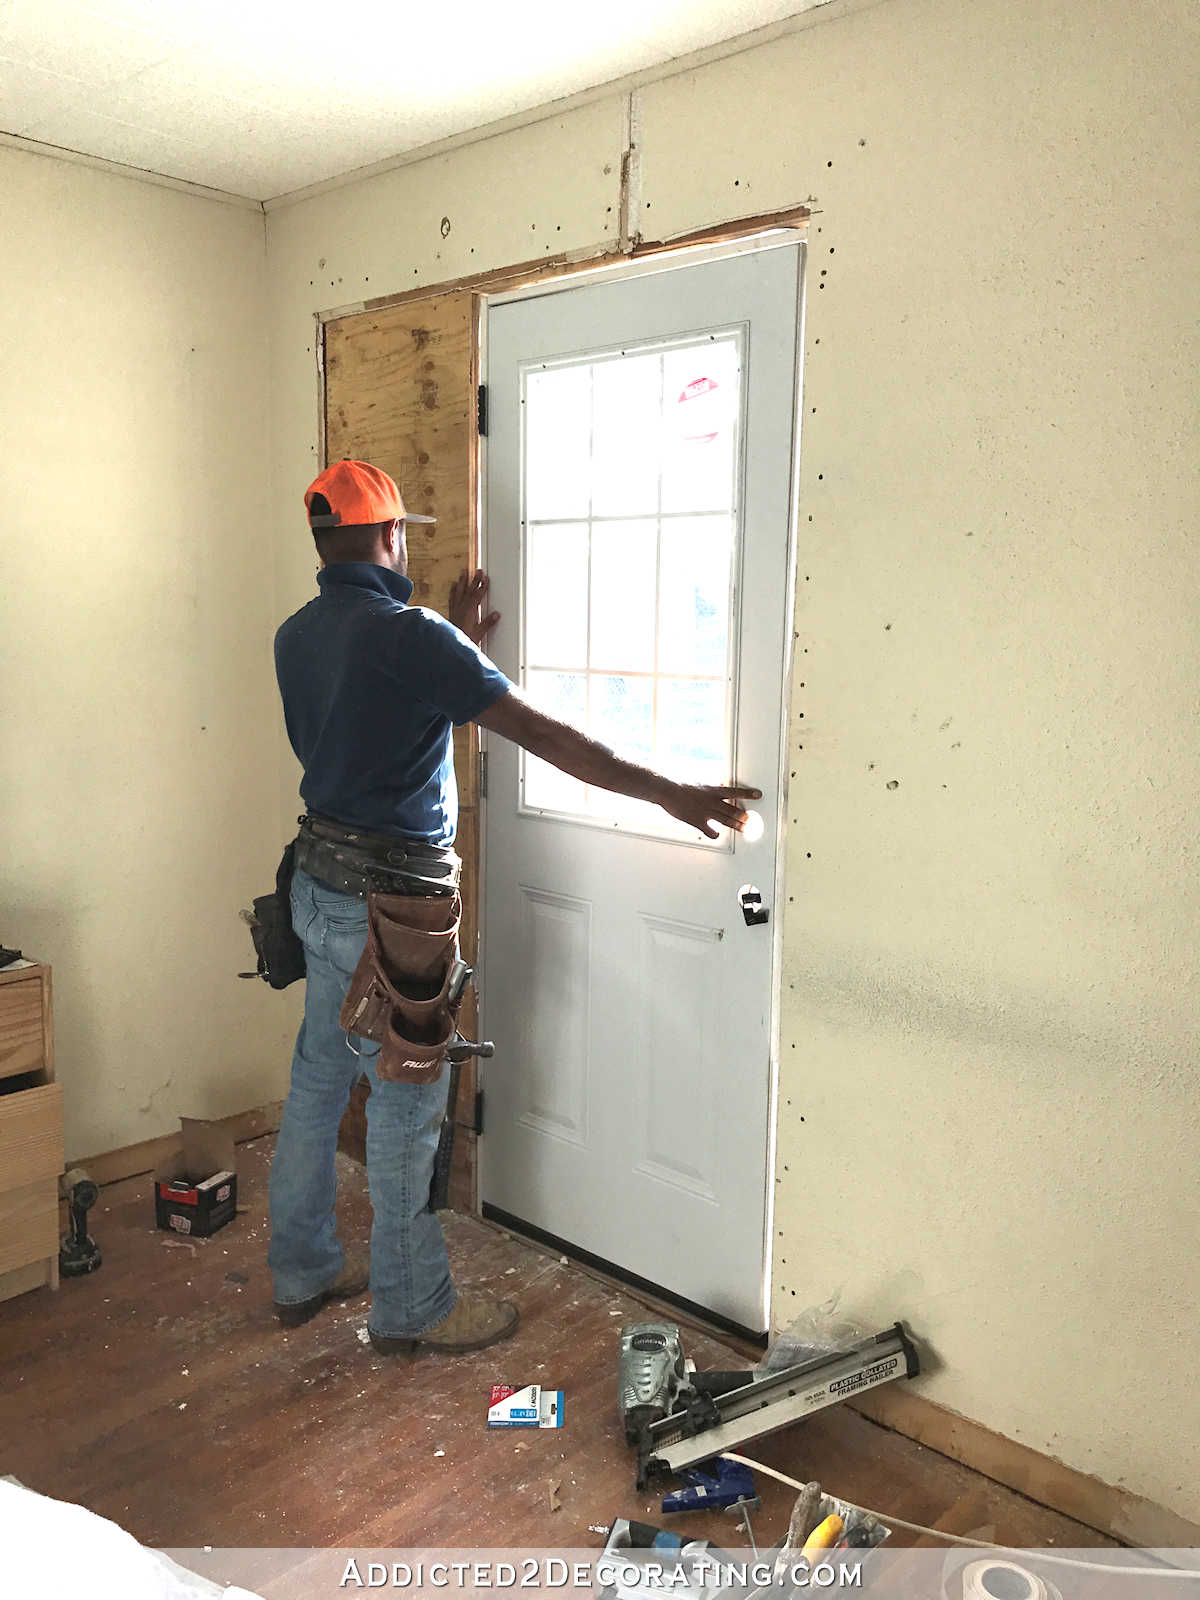
The guys got about halfway done with installing the door when Matt said, “How about adding a screen door?” So I quickly headed to Home Depot, and they took an extra 30 minutes or so to add the screen door. BEST.DECISION.EVER!!! Our weather lately has been absolutely gorgeous (mostly high 50s, 60s, and 70s), and that door stays open just about all day every day with few exceptions.
I’m glad I didn’t try to tackle this myself. I certainly could have gotten it done with my brother’s help (it’s essentially the same process that we did on the front and back exterior walls in the breakfast room, but instead of installing windows, they installed a door), but it was just nice to hire this one out. And you can see the big pile of wood, siding, etc. that they removed just from that one section (which has now been hauled away). It was a pretty big project.
Just a side note, I probably won’t even bother finishing out that door with trim, or even painting it. In fact, this room probably won’t be touched any more this year…or ever as a bedroom. I don’t want to waste any money at all in that bedroom until we’re ready to turn it into our master bathroom when we add on to the back of the house. And we’re hoping to start that big remodeling project either at the end of this year, or first thing next year.
Anyway…
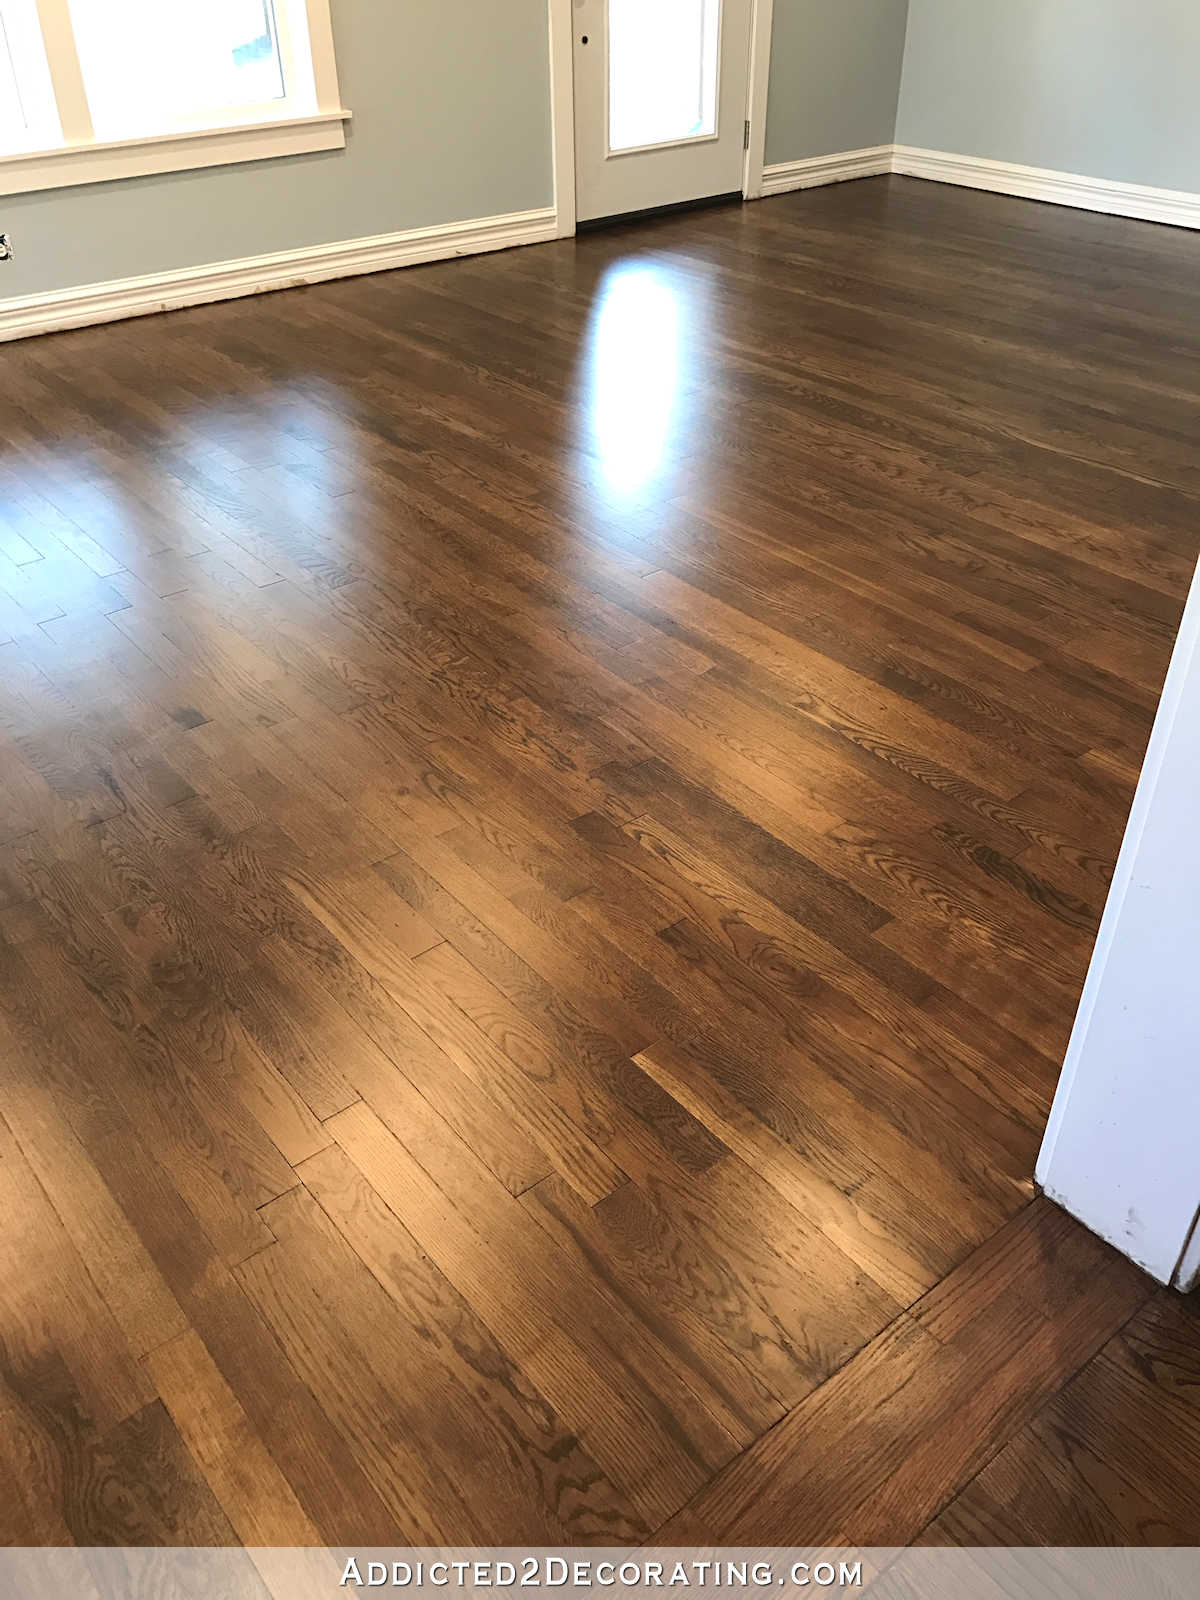
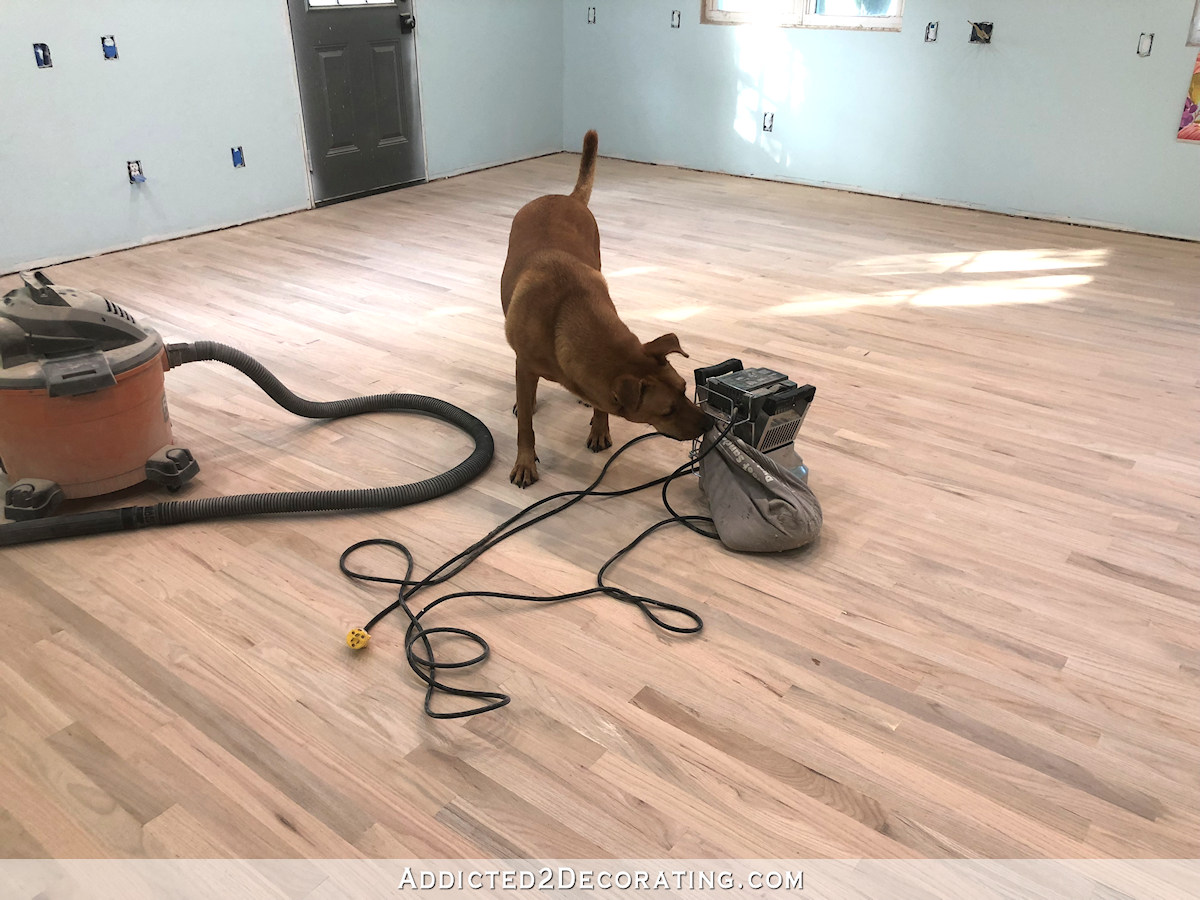
The last project that got done in January was, of course, my floors (which, by the way, would not have been possible without the door in our bedroom). I’m so glad this project is finished! And I’m so glad I took the time to refinish the floors to get rid of the old orange color and stain them a more neutral brown.
That’s a pretty good start to the year, right? 🙂
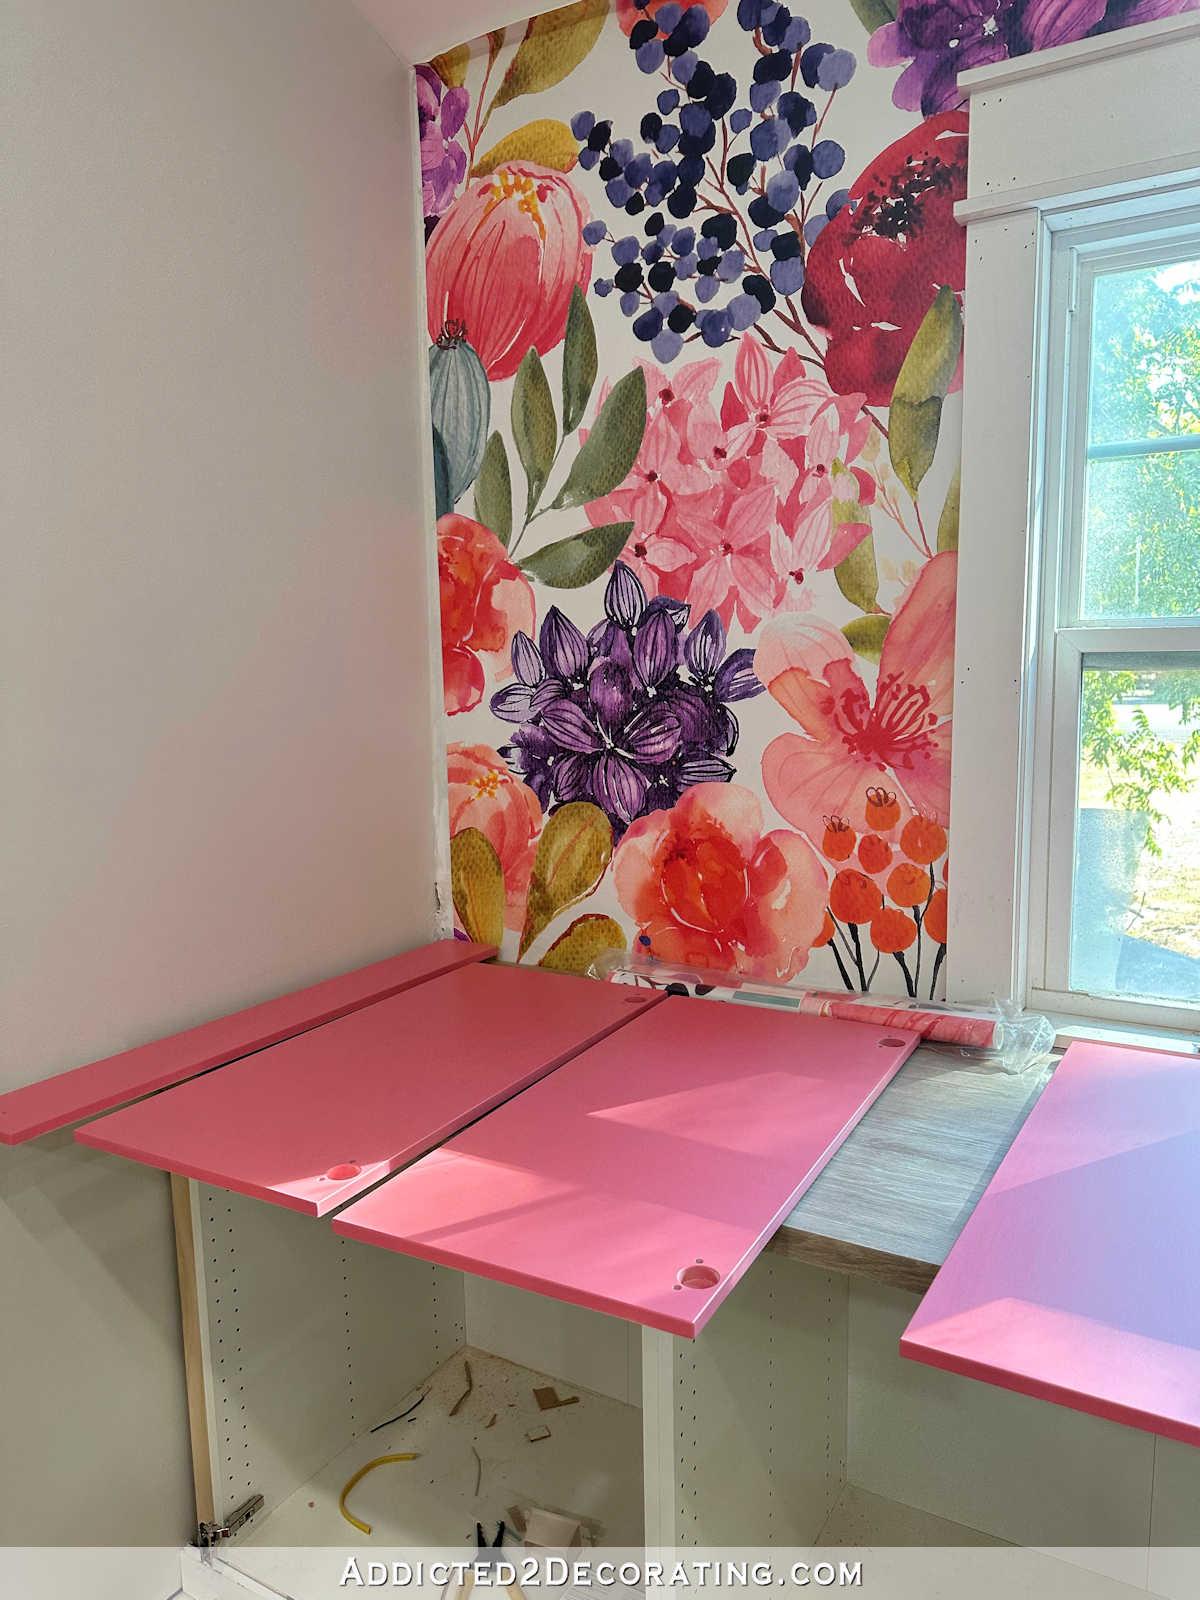
So for this month, at Matt’s request, I want to focus on the breakfast room. He’s very anxious for me to finish that room so that we can start eating our meals in there, and so he can have a comfy place to hang out with me while I’m cooking meals.
Right now, it looks like this…
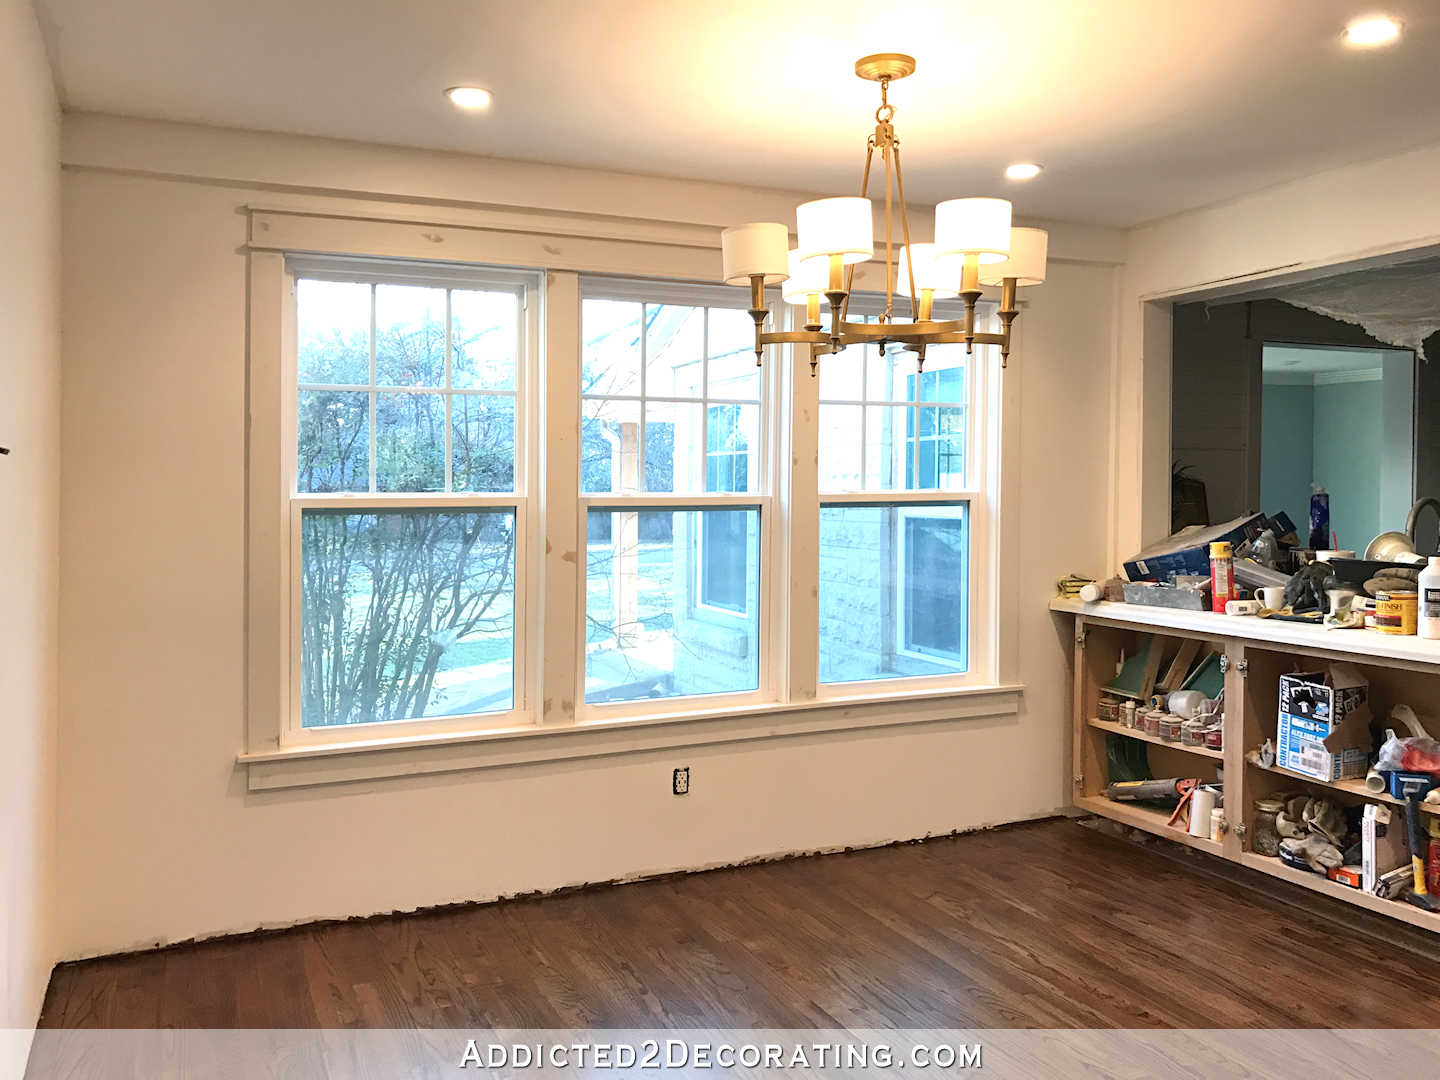
The back side of that peninsula has been used as a catch all for all of my small tools, caulk, paint stuff, etc. for far too long now. I didn’t specifically put it on my list of things to do, but it’s definitely time to get that mess straightened out, and find a better home for all of those items.

My complete “to do” list for this room includes:
- Finish installing trim (door casings, baseboards, crown moulding)
- Finish the back of the peninsula (install trim, prime, and paint)
- Make draperies
- Choose new woven shades and get them ordered and installed
- Paint and upholster dining chairs
- Refinish dining table
- Paint the buffet
- Make a t.v. cover for the wall mounted t.v.
- Paint the new door
- Decorate and accessorize to finish
No, I don’t think I can get all of those things done in the shortest month of the year. 🙂 So I need to focus on the important things. I’ll start with finishing up all of the trim in the room, and also finishing up the back of the peninsula. Those projects will finish out the rest of the “building/remodeling” projects left in there.
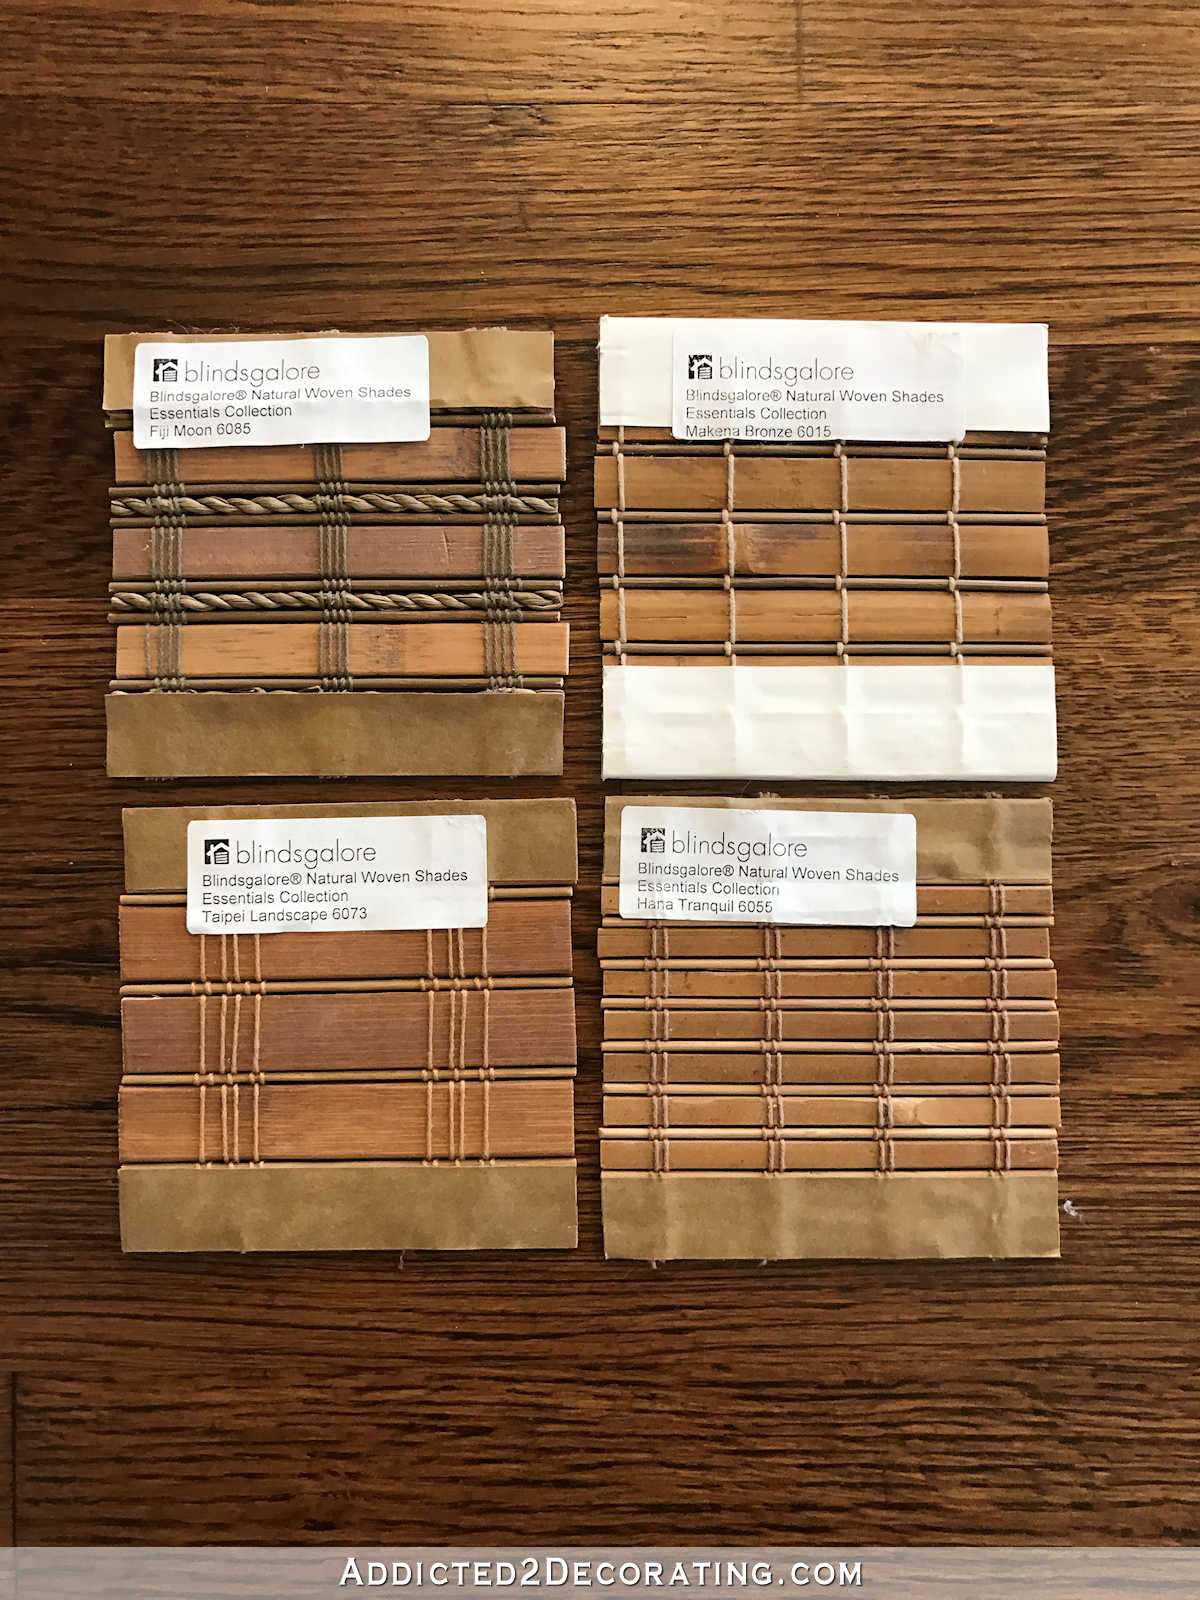
I’ll also finally get my woven shades ordered. I was planning on doing that a few weeks ago, but decided to wait until I got the stain on my floors before making the final decision. I started with about 20 options and narrowed it down to these four.
And since Matt’s priority is having a place to eat, I’m going to refinish the dining table that will go in there. I’ll be using this one that I found on Craigslist two (yes, two) years ago.
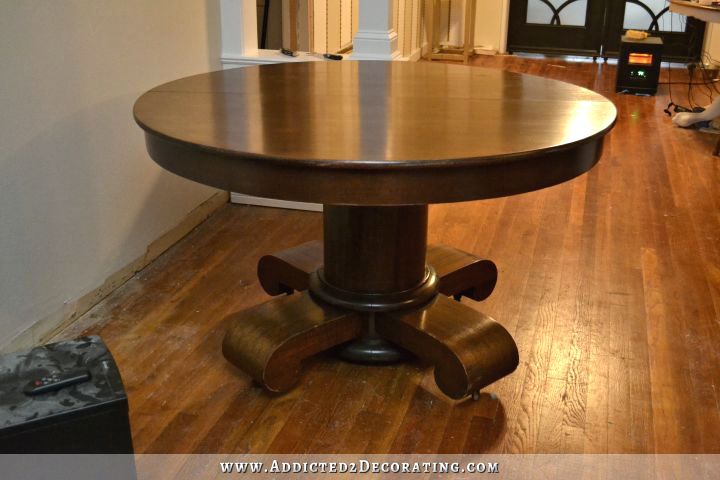
I know the finish looks fine in the picture, but it doesn’t in person. It definitely needs to be refinished.
And a table does me no good without chairs, so I’ll also try to paint and reupholster the chairs that I found at World Market for 50% off.
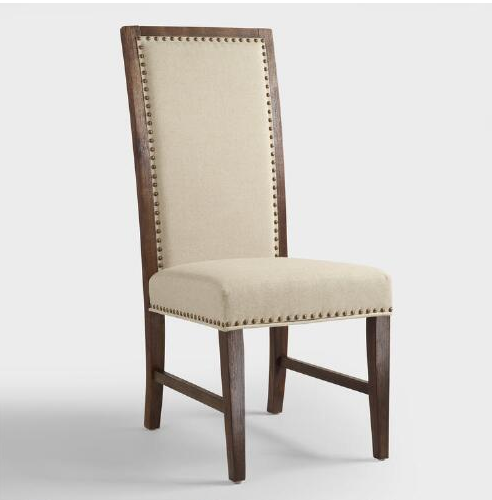
I liked the shape and the wood frame around the upholstered back, but the current finish and look is way too old world/rustic for me. Needless to say, they’ll look completely different when I get finished with them. 🙂
And finally, I hope to get the new door painted. I haven’t quite decided what color I want my interior doors. Last year, when I took my “bold, bright colors” detour, I was going with all black interior doors. It’s quite possible that I might stay with black, but I’m also tossing around the idea of a slightly lighter gray, similar to the gray I used on my fireplace in the living room.
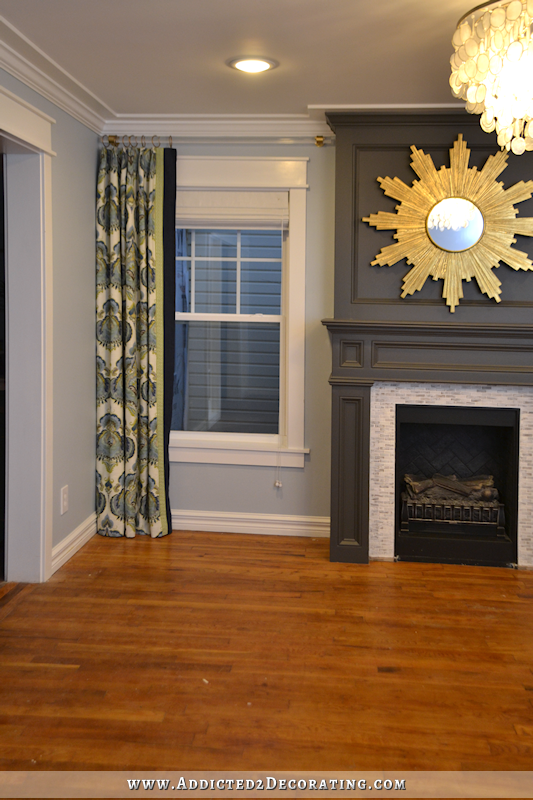
It’s still dark and beautiful, but not quite so stark as a deep pure black.
So those are my goals this month. But first, I need to head to Home Depot and get a roll of that thick paper (or the cardboard that several of you have told me about) and get my floors covered! I’m not taking chances this time.

Addicted 2 Decorating is where I share my DIY and decorating journey as I remodel and decorate the 1948 fixer upper that my husband, Matt, and I bought in 2013. Matt has M.S. and is unable to do physical work, so I do the majority of the work on the house by myself. You can learn more about me here.


Yowza! You got a lot done in January (I love your niece’s bedroom. You and your Mom did a wonderful job and she will enjoy that for years to come). What an ambitious list for February but I’m betting you will get quite a few things done. I love the shade with the rope trim and am wondering if you could use some kind of rope trim on the remodel of your chairs? Also like the fact that you are going to use the round table in the breakfast room. Everything else is linear/rectangles so the round will break that up a bit and be easy for Matt to get to for meals and to keep you company. Good luck!
Its looking great! Did I miss it? Which blind did you pick?
I haven’t yet. Narrowed it down to those four, but I’m having a hard time making my final decision. I’m leaning towards the bottom right, but not quite sure yet.
The one on the bottom right is the one I picked out!
I vote bottom left, because it’s the simplest, and the wider slats counteract the tendency those blinds have to cross the line from “natural and organic” to “snaggled-toothed and higgledy-piggly”!
Hmmm, those wood blind choices are lovely, and I can see how choosing one would be difficult. I think the upper right sample is my favorite. It’s such a beautiful match for your floors, and they have the cleanest lines out of all the choices as far as detail.
I’ve got some issues with sensory processing, and certain decor elements that have lots of details/lines/movement read to me as incredibly “noisy” and distracting to my eyes. All of the blinds samples are beautiful and I do like them all, but that’s because they’re presented in such a small format! The “busier” patterns would be so distracting to me that I’d be uncomfortable in the same room with them. I do in theory love painted shiplap a la Joanna Gaines, but in reality in my life those boards would have to be quite wide in order to reduce the visual distraction and noise for me. I see where she’s now doing skinnylap, and it is so bothersome and busy to my eyes that I’d not be able to have it in my house.
Excited to see which blinds you choose! I’m sure whichever pattern you select, it will be stunning in the room!
Just awesome! i tire just reading what you do 😃 One day at a time, yes?
Great goal list! I like the top right shade, I think it picks up the color variations in your floor stain without being matchy matchy. So excited to see more progress!!
I like the same one Paige likes. It immediately hit my eye as “that one would look pretty!”. I know the answer but have to ask anyway…that white row on top and bottom won’t be there correct? The one below it is very nice, neat and simple. But…it reminds me too much of the cheapy plastic blinds I have on my screened in porch. But I can see how you would like it Kristi…it won’t overtake a room.
No, the white bands are just tape holding the samples together. Without that, the strings holding the bamboo pieces together would come off.
Thank you. I knew that but for some reason I just had to ask. BEAUTIFUL job on the floor btw.
I also prefer the top right shade. Somehow it seems less fussy and easier to dust, but simple elegance and well made.
I love the top left. The braid I will such a unique detail. All the others are just variations on the same blind you can get anywhere. The braid adds class.
Same here! Love the upper left!
I like that one the best, also!
Same here!
Same here! Upper left.
You are off to a great start!! I love the top two shades. The color looks so pretty with your floor. Although, when they aren’t right next to each other (and they won’t be!) I might choose a different one.
Great work as always, Kristi. Your niece’s room is fabulous, your floors are gorgeous and you have worked so hard and accomplished so much in January. I also like the lower right blind, mostly because it is narrower than the others. Looking forward to seeing what you accomplish this month.
My vote for the blinds is for the top right or bottom right. Good luck choosing. Can’t wait to see some more of your progress,
I’m still in awe of your floors, they look so beautiful – and it’s a great canvas for everything you ant to get done now! Re the blinds I like the bottom left one the most, so you see: 4 people, 4 opinions 🙂 it’s good there are so many styles to chose from, even if the differences seem to me small…
Glad you included the “old” photo of your fireplace, it really points up the difference in your floors. I’m STILL astonished at the transformation.
Everything is gorgeous as usual! I love your style. We just got our blinds! Looks like they are one of your choices. I love them.
I tried to attach a photo but can’t. We picked your top left choice from Select blinds and added a privacy liner. They are beautiful.
The floors look beautiful! Very impressed. If I could leave a suggestion, be careful with putting down the paper/cardboard on the floors. Speaking from experience, I did the same on my newly stained/polyed floors and used blue painters tape to hold the cardboard in place. When I removed the tape it pulled up the stain. I had small areas of strips of light colored wood. I put the cardboard/tape down after about a week of curing on oil based poly, which I thought was long enough. My suggestion, tape to baseboards or floor that will be under baseboards but not the actual floor itself.
Yes, I was going to say the same thing! I didn’t actually have the issue myself, but saw warnings about it right after taping some paper down on my floors so I immediately (carefully) removed it, luckily without damage. I’d hate to see those beautiful floors damaged.
Everything you’ve done looks fabulous! Kudos to you!
With curtains, plus with everything else that that will be in the dining area space, I think the ‘simplest’ blinds…i.e. the top right…would be a good choice. That said, any of them would work well.
(Wish I had your energy!)
Hi Kristi, Love the progress you are making and the floors look absolutely awesome. I’m a designer in NJ and have specified the chandelier which you have installed in the breakfast room for her updated dining room. Are you happy with this light fixture? Anything you would change?
I do like the light fixture, but it’s definitely not made for 8-foot ceilings, so just be aware of that. If your client has higher ceilings, it should be fine. I literally had to take mine apart, shorten the rods, and then basically rewire part of the light to make it short enough for my ceiling height. Also, I had mine for over a year before I ever took it out of the box and installed it. When I finally did open it, I found that mine included three of one type of shade, and two of another kind. They’re all the same color, but slightly different fabric and different trim used on them. That was frustrating considering it wasn’t some cheap chandelier. But overall, I do like it.
Wow! You have been busy. My last 3 years have been like that, but taking a break (sort of) this year. My first pick when I saw the blinds was top right. I think I’d have to see it in the room before I’d finalize that decision. I’ve save your directions on painting furniture because I have a great old armoire that needs a face lift. Thanks for sharing all your wonderful ideas.
You have worked very hard on your stunning hardwood floors. Keep in mind all hardwood floors fade from the sun, moisture and heat. In two of our previous houses, we picked up an area rug and noticed hardwood fading in the area of the rug. I bet this would even out over time (we sold those houses so I don’t know what happened with the floor), but thought I would mention it. Not sure if you plan on keeping #2 natural woven shade closed or not on a daily basis. Enjoy reading your blog!
blinds – the upper left just strikes me – different – like that one
Looks really pretty! Love a big round table with parsons chairs, so simple but elegant at the same time and they can be changed just by adding a slip cover. If I were picking the blinds I would chose the top left, it looks nice with the floors and has all the tones of the wood in them. I also like that natural twist that is in there. Are you putting doors on the peninsula (breakfast room side) or leaving the shelves open? Also… What color did you use on the walls in the living room? I love the color.
I’ll be putting doors on the peninsula. The living room wall color is Benjamin Moore Silver Gray.
I love #1, in your blinds. Fiji Moon if I read it correctly? Can’t wait to see it finished.
The floor is beautiful!! I like the two top blinds because of the darker color that is integrated into the slats. My 1st choice is the top left. Love the rope detail. We are building a new house and I googled “Blinds Galore.” Thank you–I will be pouring over their pictures and probably placing an order in the next few months. 🙂 Can’t wait to see your living room come all together.
So much progress – beautiful floors and the new door is great. What about getting one of those tall wire shelving things and adding wheels, with two of them locking, to store all your tools and materials? You can then move it where every you need it, you can use bins for the small stuff, and when you don’t need it inside you can use it in the garage or storage room. If needed, you could even put some scrap wood on the shelves to keep things from falling through. Or, make your own portable shelving unit.
Kristi, I had the same idea as Barbara H., but forgot to add it to my previous reply!
You could easily make yourself a nice wooden, multi-level cart with shelves, cubbies (both open variety, and one or two secured by cabinet doors) with vertical slots to hold wood scrap. It could hold all of your tools, extension cords, and other supplies that you find you use often like tape, tape measures, paint brushes, sandpaper, nails, etc., and put the whole unit on some nice rubber casters that won’t damage your floors. Keep it inside while you’re refurbing the house, and roll it out to the garage or backyard or wherever when the time comes to complete work not in the house proper. It would make cleaning up between projects that much easier, be portable to the room/location where you need to use it, and keep all your stuff contained and organized.
Was it Sawdust Girl who made herself one? Perhaps Ana White has some plans for a tool totin’ cart? Of course, you are virtually a master carpenter yourself and could draft your own plans for the cart, and maybe even open a store on your website and sell plans there for the cart and also some of the things like those side tables that you created from scratch!
Kristi,
What a go-getter. I can’t wait to read your blog when your emails arrive to see what you have been doing.
You are an inspiration. I have a long list of decorating jobs to do as well, you have inspired me to make a list with the most important on top and JUST DO IT.
Sending love to you and Matt from Melbourne Australia.
What are you doing on the walls in your breakfast room?
I still haven’t decided. 🙁
So many projects to look forward to reading about. Hard pick on the blinds, though the first one with the braided trim looks a bit different and unique. I would lean towards that one myself, though I wonder if the braid will be a dust magnet.
I can’t wait to see how the breakfast room comes out.
Floors look great, as does Yaleana’s room.I still can’t believe that fabulous bed you built for her! One question: why do you want to cover the wall-mounted tv?
Since this has basically become our only dining room, I’d just like something nice to look at covering the tv when people come over for dinner.
Ah, I cannot wait until you redo the table! I have a Craigslist table and chairs that desperately need redone (orangey pine) but I am such an amateur that I’m scared to start. I know it’s way above you, but would you mind including a quick tutorial on sanding, how to apply stain & varnish. Those videos you talked about a long time ago come to mind. 🙂 I know there’s probably some on YouTube, but I like the way you explain things and I’ve followed you long enough to trust your knowledge. You’re not just a wanna be DIYer. 😉
Will Matt’s wheelchair fit under that table? It looks like the base could be in the way.
The cardboard to cover your floors is called Ram Board and I highly recommend it over the paper, especially if your project is going to take more than a few days. You can tape it down with 2 inch painters tape and Matt can roll over it without worrying about it ripping. I work as a carpenter and our worksite has had ram board down in some places for 18 months and it’s still holding strong. Much sturdier than paper!
Hi Kristi, I was reading the comments and wanted to say I agree with the woman who suggested painting the doors Navy. Everything is coming together and I’m happy for you and Matt.
I love that your next project is based on your husband’s desire to be closer to you, thus the breakfast room. Speaks volumes of your marriage and that is as wonderful as seeing the progress you are making. 🙂