My New DIY Farmhouse Dining Table – Part 1
I’m not quite sure how to categorize this project. It’s not really a dining table makeover, because I built a new table base from scratch. But I didn’t exactly build a whole table since I reused the top from the dining table that came with my eight Ebay dining chairs (that only cost me $51). I’ll call it a DIY farmhouse dining table, but if you need instructions for building a table top, you’ll have to find those elsewhere, because I kind of lucked out with this one.
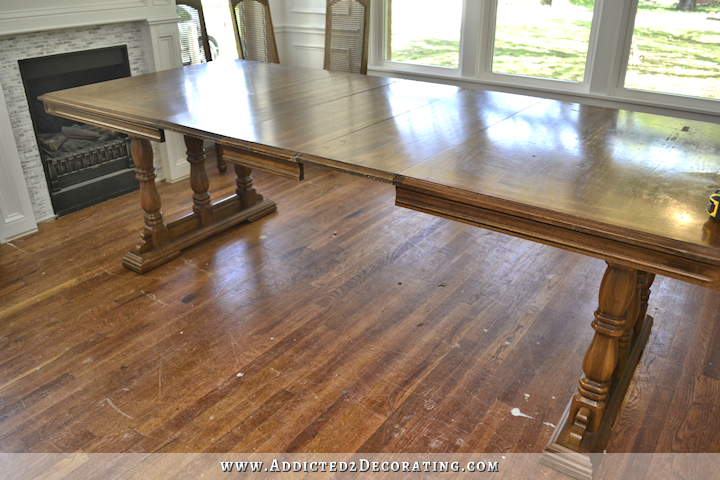
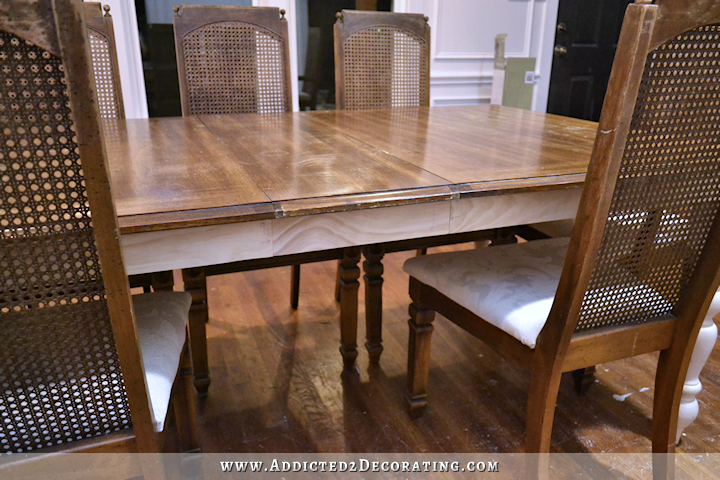
So anyway, yesterday morning, I had a dining table that looked like this…
And by the end of the day, I had a dining table that looks like this…
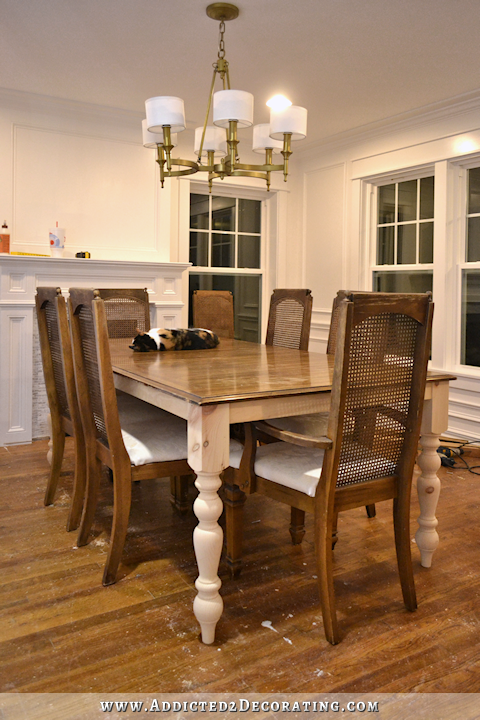
Cat included. 🙂 She has been rubbing herself over every square inch of this furniture since I brought it in the door Sunday night. I don’t know if the previous owners had a cat, but she’s made it her mission to mark every piece of this set as her own. 😀
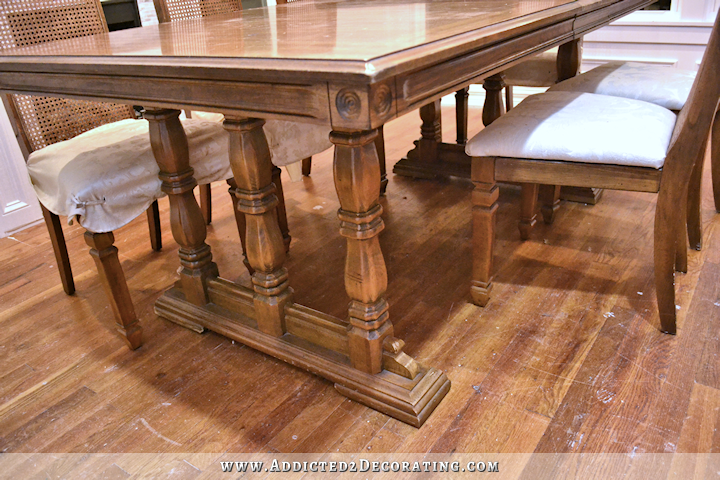
One strange thing about this table is that two of the leaves are apronless. Doesn’t that look strange?
I haven’t fixed that yet, but I plan on it. But yesterday, my main goal was to get the table and one leaf finished, since those are what will be in my dining room on a permanent basis.
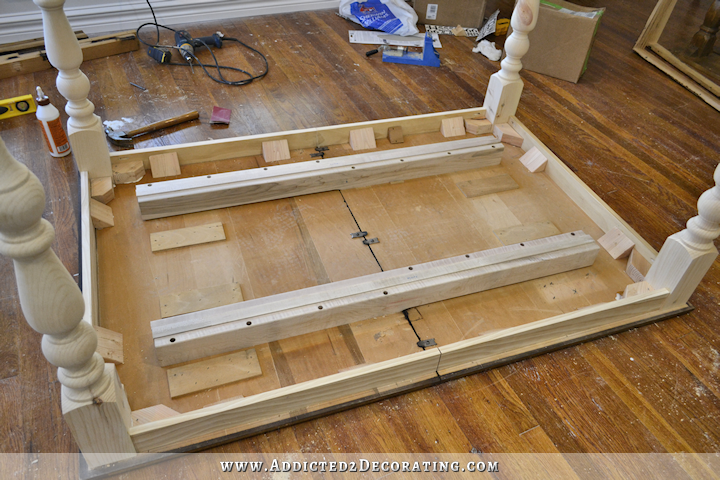
So start, I flipped the table over on its top.
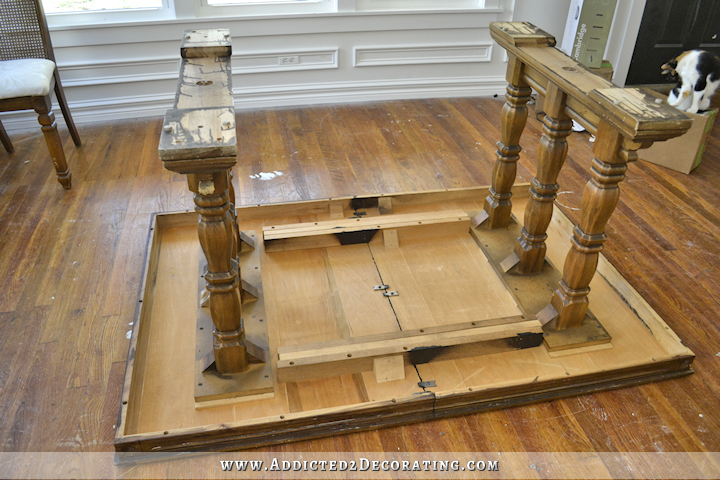
And then I removed the legs. They were just screwed to the table top, so removing them was very quick and easy.
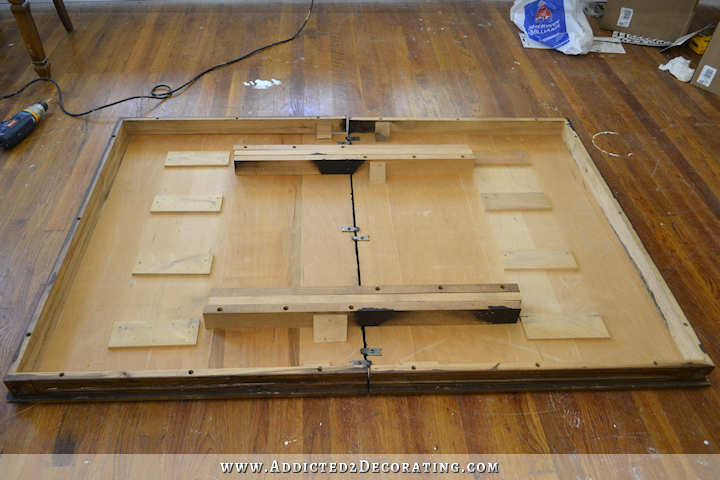
And then I removed the apron. That was mostly just a matter of removing some screws, but there were a few wood pieces that were glued that I had to remove with a hammer.
Next, I marked some guide lines on the table top so that I would know exactly where the legs and the new apron needed to be placed. Then I used wood glue to glue the new legs into place along the guide lines that I had drawn. I let those sit and dry for about 30 or 45 minutes while I prepared the pieces for the new apron.

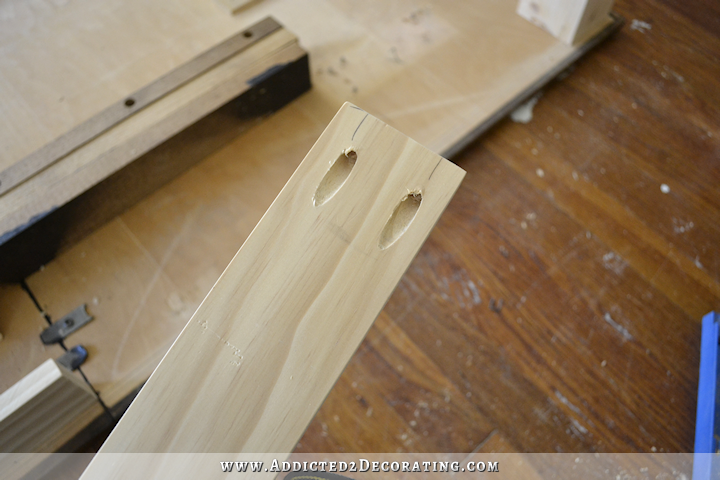
For the new apron, I just used plain lumber (as opposed to anything fancy with a routed design in it, like the apron I took off of the table). The long side pieces had to be cut in half since the table expands so that leaves can be added. But the end pieces were just whole pieces. I then used my Kreg Jig to drill pocket holes on the apron ends that met the table legs.
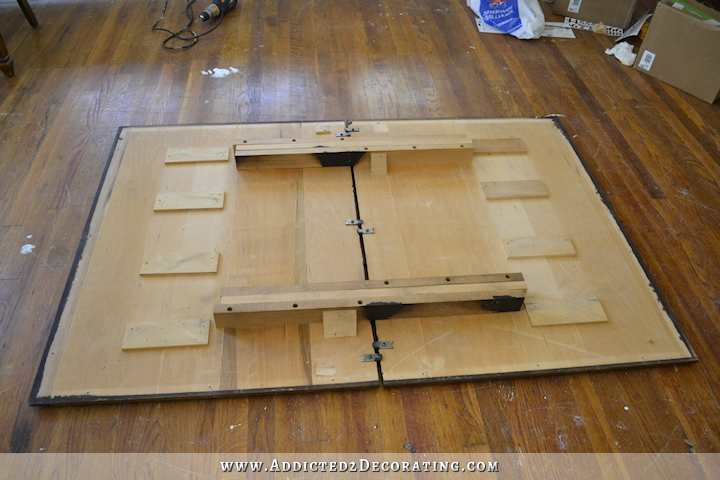
I used wood glue to attach the new apron along the guide lines that I drew. I personally don’t like an apron lined up exactly flush the table legs, so I set the apron pieces back about 1/4-inch from the front of the blocks on the table legs.
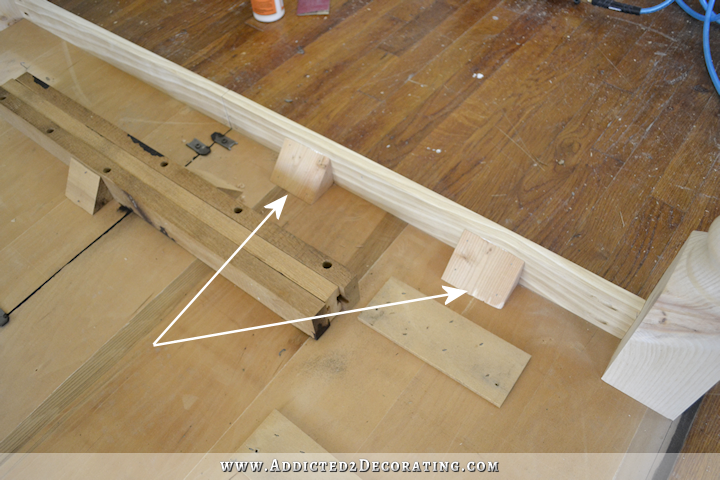
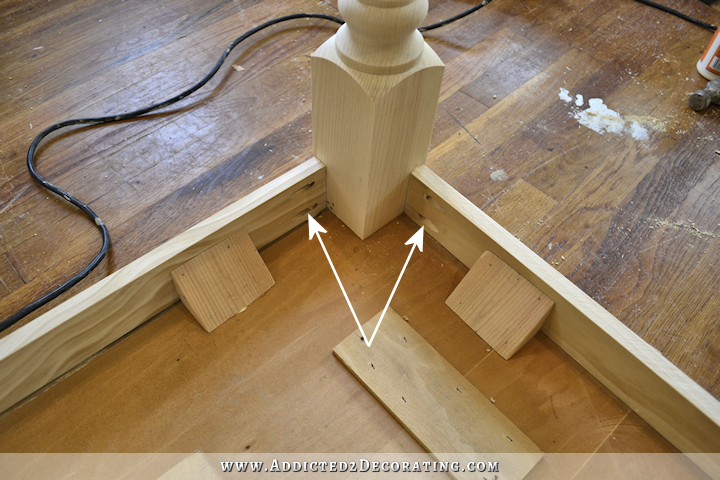
I also added some wood wedges, cut from 2 x 4’s, to the back of the apron pieces to hold them securely. I attached these with wood glue and 1-inch finishing nails nailed into the table top and the apron.
After I got all of the apron pieces and support wedges in place, I went back and screwed the apron pieces to the table legs using the pocket holes that I pre-drilled.
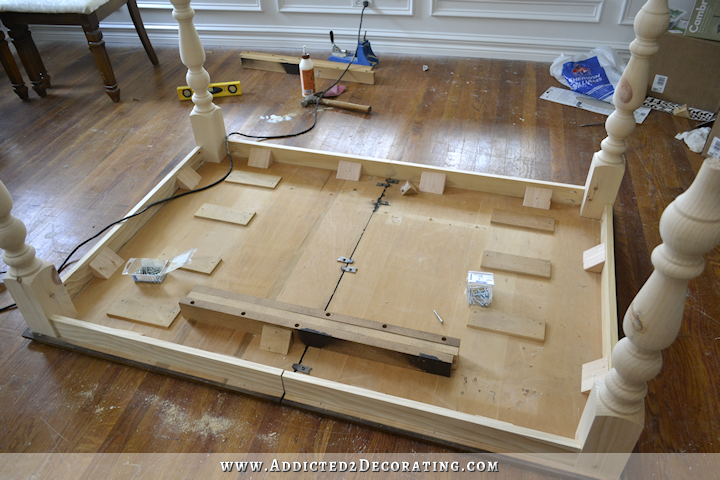
Here’s how it looked at this point (with one table slide removed).
To add just a bit more leg support, I added some pieces cut from 2 x 4’s to the inside of the blocks on the table legs. I glued these to the table top, the legs, and the apron, and also nailed them into place.

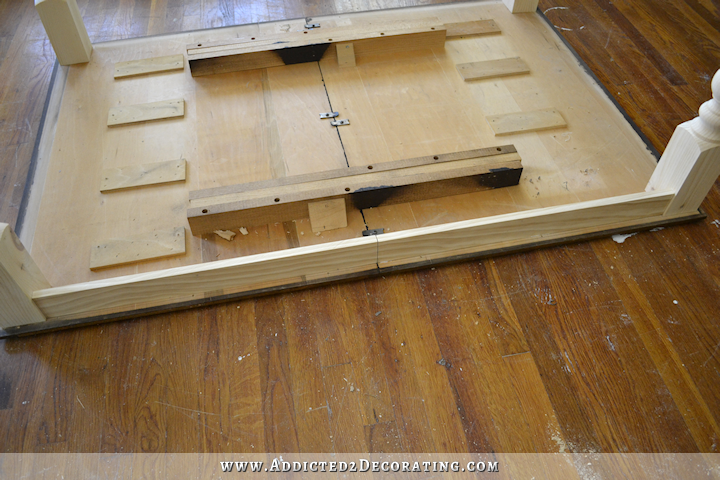
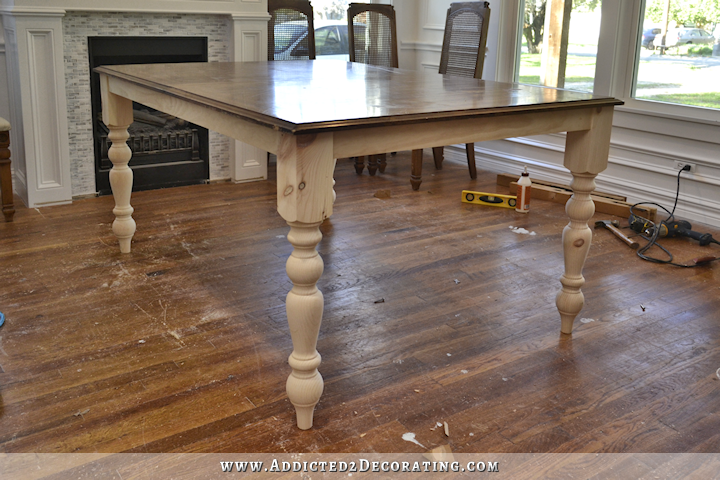
I debated whether or not to switch out the table slides. I thought perhaps I might just keep the original slides, and return the new ones I purchased for a refund. But in the end, I decided to upgrade to the new ones. You can see here how much longer and more substantial the new ones are…
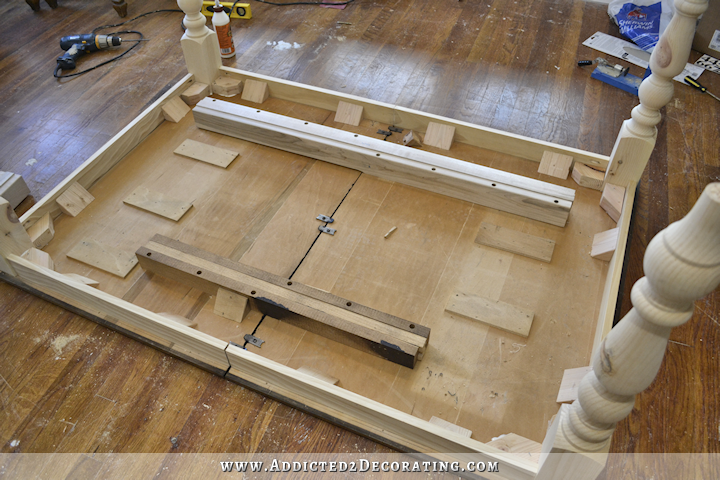
And since they’re new, they slide much easier, they open wider, and they’re much stronger. The old ones just weren’t as strong as I’m sure they once were. So I switched them both out, which is simply a matter of lining them up straight and centered lengthwise, and screwing them to the bottom of the table top. You do have to make sure that the glides are turned the same way so that they open the same way. If you attach one the wrong direction, then obviously the table won’t open.
And with that finished, I was ready to set the table upright. This table is incredibly heavy and sturdy. It took me about four tries to get it lifted and turned over. That table top appears to be solid wood.
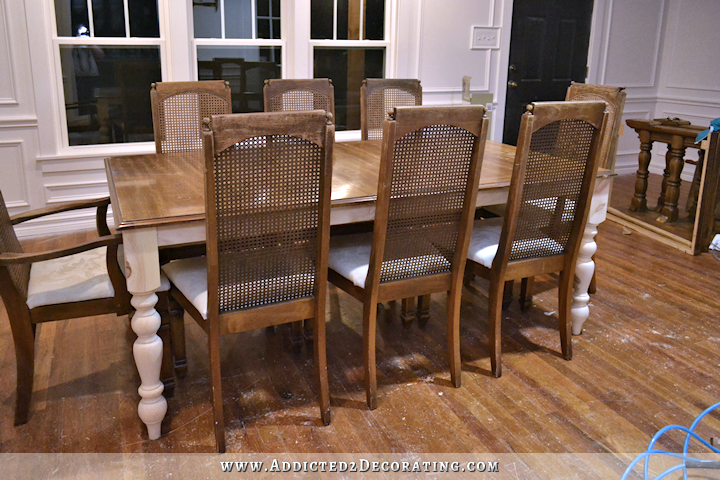
And here it is with six of the chairs around it.
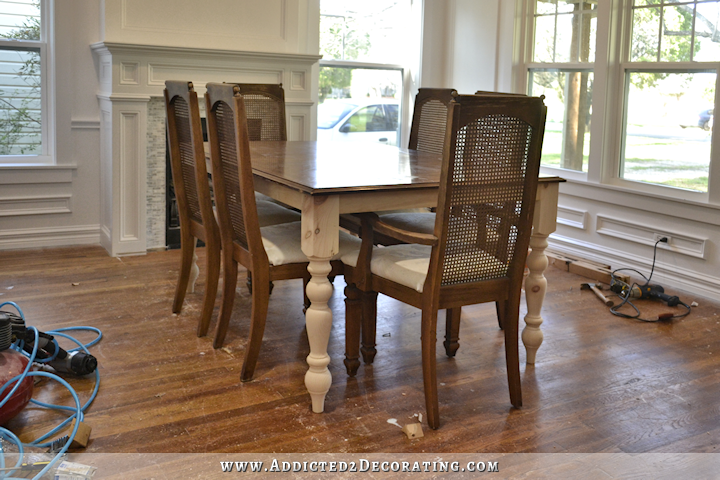
I decided that I prefer it with one leaf in it, so I did go ahead and switch out the apron on one leaf.
Here’s how that turned out. It was just a matter of cutting an apron piece, gluing it to the leaf, and then adding a wood wedge, glued to the leaf and the apron and nailed into place.
The frustrating thing is that I really tried to pay attention to detail on that apron, and be sure that I cut each of the long sides from one continuous piece of lumber with a cut in the middle so that the table would open. That way, when the leaves are all out, the apron has continuous wood grain from one end to the other. And then I decided to keep one leaf in, which breaks that continuous wood grain that I worked so hard to make sure I had. 😀 Oh well.
Now I just have to strip the table top, and stain and polyurethane the whole thing. I want a light to medium wood tone on the whole table, and I’m really hoping I can achieve the look I envision in my head (and that I practiced here).
So here’s one more quick look at the old table (and yes, I saved those legs, and I’m sure I can find a use for them)…
And my new table using the table top from the old table…
Reusing that old table top saved me hundreds of dollars on tools and lumber that I would have needed in order to make my own table top, and it saved me many hours of learning how to use new tools and making my own table top. It worked out perfectly! I did still have to buy new table legs, but I bought the cheapest knotty pine legs here, and I used the new table glides that I had purchased, which I think was a good decision in the end.

Addicted 2 Decorating is where I share my DIY and decorating journey as I remodel and decorate the 1948 fixer upper that my husband, Matt, and I bought in 2013. Matt has M.S. and is unable to do physical work, so I do the majority of the work on the house by myself. You can learn more about me here.

Everything you do amazes me. I was reading the post yesterday and for the life of me couldn’t figure out how you were going to make it work. It seemed much more cumbersome than what you just showed. Now you have me on the hunt for a table to re-do, with 3 kids and me wanting another we could use a table like this!
That is a farmhouse table! It looks great and I’m so happy you could save some $$$ and still look great!
Love love love the new table legs! You make it seem so easy. It looks amazing in your new dining room.
OMG, what an improvement. Great vision! I LOVE it.
I love it too! You’re awesome’
Maybeee those legs could be useful for that built in kind of area you wanted for you hallway? On some sort of bench?
Love the table! 😀
I am glad to see that you turned the table lengthwise. I think it looks much better like that, and it makes the room look more open. I hope the table top is solid wood and not veneer. Mass market furniture like that usually is not solid wood. Can you tell anything from the underside. If it isn’t solid, would you consider flipping your options and painting the top and staining the base? Also, what color were you planning to paint the base? Regarding the aprons, our table was made by an Amish Man. It is a drop leaf solid cherry table with twelve boards. None of the boards have aprons. I find it very convenient if I have to use arm chairs on the sides of the table. They fit under the boards, but will not fit under the part of the table that has the apron. You are making big progress on the dining room. Hope to see it all finished soon.Blessings
What a difference! And here I posted a comment yesterday that we’d have to wait for the exterior house painting to see this transformation begin! LOL Glad to be wrong. 🙂
The table looks great! I misunderstood how you were using the table top. But, seeing it with a new apron makes so much sense! Great deal!
Those old table legs would look fantastic painted in a fun color and used under your future office table.
That is a great idea Lysa!
Awesome way to use what you had and make it what you wanted!
Ok, so I’m going to state the obvious. The cat totally makes the photo. I’m officially lobbying for her to be featured in all reveal photos. I’m not even a cat person, but they crack me up. Oh…the table is awesome! I could not conceive how to do what you’ve done. I am, as always, impressed.
Beautiful job Kristi, as always. Looking forward to seeing the finished look!
I love how blessed you are with ingenuity. Seriously. lol
I love it! (and I agree that the cat should be a featured celebrity in your photos.) Re aprons on expansion leaves: we have two tables that I would consider high-end (although I bought them secondhand). One is a round French Provincial table with leather top that makes an oval with the leaves in. The other is a solid cherry Prairie/Mission style with many leaves. Both of them have some leaves that include aprons and two that do not. I’ve always thought that odd, too. Surely it’s not about saving a few pennies on the wood and construction!
The leaves with/without aprons has to do with storage and tablecloths. Most people only put in ALL of the leaves for big, family dinners – so they would be in storage most of the time AND there would probably be a tablecloth used when they are part of the table. The skirted leaves take up about 3 times the space when stored. 🙂
Awesome job Kristi…but how in the world did you turn that table by yourself? Or did I miss that you had some extra hands around to assist? Love the cat…she makes the picture…she needs to be your star in future posts….she is obviously in love with your new purchase….Kristi…you amaze all of us…you certainly do not let any grass grow under your feet….
I actually did it by myself, but it took a few tries to turn it right side up. 🙂
Wow. From dowdy and dated to chic and timeless. Good riddance to the original legs. They would have been a knee-banging nuisance for anyone sitting at the head or foot of the table. I’m totally impressed.
The table looks so awesome. What a transformation. You certainly have incredible vision and work so fast to achieve all that in a day. Also loving the table/chairs lengthways in your dining room. Well done Kristi, you always continue to inspire us all.
Kristi, love the table!You are an inspiration to me!
I am blown away by you! When i first saw the picture of your farmhouse table i figured it was a picture of what you “wanted” to do, not what you already “did!!” When you put your mind to something you sure do get results! 💚
Great transformation! We have a huge Amish made oak dining table with four boards. I think only two of them have aprons. This is because they store inside the table and because of the way they stack, it would not work for them all to be aproned. Also, leaves without aprons are much easier to store in a closet, stacked up along the wall without taking up much space. Keep up the good work!
This is true about the amount of storag space required for leaves with aprons. But our table’s leaves have hinged aprons that fold under for storage. Isn’t that a clever idea?! Maybe you could do something like that, Kristi, with yours since you’ll be storing the other leaves most of the time?
Love the farmhouse style for your dining room. You did an amazing conversion! Was thinking how the old legs would make for a unique vanity in a bathroom (yes, I admit to being weird lol). The room is coming together fantastically! 😃
OK, now I’m dying to know the color choices? Green, black or white chairs????? Table top color? I would leave the legs and apron stained wood to warm up the space. I think I white or green top and black or green chairs would be STUNNING. But that’s just me. PHULEEZE share colors!!!
I stained the table top a medium brown, and ended up painting the base. Just finished up tonight, so you’ll have to wait and see my color choice. 😉 And I’m still working out the details in my mind about the chairs.
Brilliant as usual!! Those legs would make a great console table…
Kristi the table looks much better and you answered my question, did you keep the old legs. I’m sure you will find a spot for them. Your cat looks like our Lucy (Lucifer). We love her but she is a devil!!!!!
Last year I made a new table top for my beat to crap old dining table out of some beautiful lumber I was gifted. I thought making the base would be too difficult and I was just going to paint it anyway, so I just did the top. But I never finished (painted the base) because that old base just didn’t look right with the gorgeous new top. Now that you showed me how easy it is, I’m going to build a base and finally finish this project! Thank you for the inspiration!!
I have to admit that I was a little skeptical when you said you were going to re-use the top, but it turned out awesome!
Now, I just hope you can make all the different woods look similar enough with stain to make it look uniform. I personally would have probably painted the apron and legs, but I like that two-toned look and that’s not what you’re going for.
So awesome! That table is rejuvenated, yay!
You are on fire!
I’ve noticed that lots of old tables don’t have aprons on the leaves. Maybe that was typical back in the day?
Beautiful work (again)!
I was a little confused when you said “You do have to make sure that the glides are turned the same way so that they open the same way. If you attach one the wrong direction, then obviously the table won’t open.”
Do you mean to be careful to have them parallel to each other? Or is it important that they were turned to be mirror images (left half of table attached to the outsides & right half to the insides of the slide)? Actually, I can’t picture how rotating one the other way would change anything…
I definitely wasn’t clear on that. The slides need to mirror each other. They only open one direction, so if you get one turned the wrong direction, the table won’t open.
I, too, like the two-toned look of this table! Restain the top and paint the apron and legs??? So many possibilities! So excited you have fun indoor projects while waiting for the weather to brighten up!
Perhaps the original leaves had no apron on two of them because the assumption is that if you’re putting all the leaves in it is undoubtedly for some form of feasting and the whole lot will be covered with a table cloth and hidden anyway. It probably also makes the extra leaves easier to store…
But I have to agree that it did look very odd!
Cat celebrity status!! Makes me so happy. You did a wonderful job. I had such a hard time envisioning a farm table in the style of home you’ve been creating.
Craving some color and looking forward to this room being pieced together now that the central stage has been set!
Knowing how handy you are, I imagine you could easily build a ‘shelf’ on the underside of the table to store those two leaves without aprons. It’s a very common design feature on tables we sell at our store.
Hi Kristi,
Your table looks great! It’ll be lovely for you and Matt to have a proper dining space to share meals.
I was wondering why you only glued your legs on, when they’re going to be subject to movement to open and close the extension? I can see they’ll be stabilised by the apron pocket holes, but am curious whether that’s enough? I’m not being critical, just curious as I would’ve thought they’d require their own pocket holes at least to give them their own stability. I’d be very grateful if you could let me know. (I understand you’re busy, but a girl can hope! 🙂 ).
Thanks Kristi. As always, it’s a joy to follow your adventure.
Cheers, Liz (Australia).
The legs are actually incredibly stable. Wood glue alone is very strong. In fact, table tops that are made of separate pieces of wood are generally only put together with wood glue. But I just started out by gluing the legs to the table top. That, along with the aprons glued to the leg blocks, and the four long screws through the aprons and into each leg, makes the legs very strong. But I also added extra blocks on the inside of the leg blocks, glued to the table top, leg blocks, and aprons, and then nailed into place. With all of that support, those legs don’t move.
Thank you Kristi, I really appreciate the explanation. Happy dining!
Lookin good! I like the legs you got. Hopefully the stain will match on the top and apron. You are a speed demon when you get ideas! I figured you might take a day or two before tackling this. Not you! 😉
Our table has a gear mechanism to open it, and the leaf folds up in half on hinges (aprons have hinges too) and stores under the table on brackets. I love it, because I don’t have to store the leaf in a closet or under a bed. When the leaf is in place, there are locks that lock the leaf to the table top. The only problem we sometimes have is if the aprons don’t get opened up when you push the table together. But after owning the table for 9 years now, we have learned to check the aprons before pushing it together. We bought the set from an unfinished furniture store and had them finish it. The top is stained and the apron and legs are painted black.
Wow! You really can do anything!
You are just amazing! Love that table it’s beautiful already. I also love your kitty.
It’s nice to see the rosettes and deep grooves that were part of the old apron gone, replaced by your much simpler looking apron. And I like that you set the apron back that 1/4″ from the legs. Those kinds of details really make a difference.
I just love what you did with the old table! I keep on mumbling to myself Brava, Kristi!
Great Job!! Everything you do comes out great!!! Your cat is cute on the table. My cat lays on are kitchen table.
Your table looks amazing. I am n the hunt fir a new/ old table. We had one with apron-less leaves- I think it has to do with storage, have wondered why they can’t add hinges to the aprons on the leaves so they can be stored flat.
ugh, typing at 5 a.m…. *on the hunt for
The table looks great, Kristi, and I too am absolutely amazed at how fast you got it remodeled. It turned out just right. Good job!
I like the idea of upholstering the arm chairs in green, skirting them all the way to the floor, then painting the side chairs black and leaving the caning stained the same as the table.
Peeve is the purrrfect model for your photos, don’t you think? She adds a personality all her own, lol.
Fabulous. Really amazing. Now get rid of the cane on those chairs and you’d be laughing. (Just kidding – cane is not my taste, but to each her own!)
I really like the chairs can’t wait to see what you do with them! And you are amazing!!!
Kristi, I love your creative mind and you are not afraid to try anything! From your emails I have learned so much and you give me inspiration! I live in a condo now and my tools are packed in a closet so I am very limited as what I am able to do but you keep me going because someday I will have a little house again with a shop and a CAT! 🙂
Nancy
This is what I’ve been thinking of doing to my dining room table! Darker table top. Have even been thinking of doing the chairs a color, or different colors. Someone said, about the chairs, that it would be “cute.” Not sure that’s what I’m going for.
But thanks, once again, for the inspiration!
Sometimes I just want to reach through this computer and give you a hug – but not in a creepy way or anything. You a women who has great ideas and can figure out how to get things done! If Nike had a ‘just do it’ contest, you would be my first entry. Thanks for sharing your thoughts along the way. You’re terrific – keep it up.
So was this the table that you were doing all that stain testing for? I liked the stain technique you settled on and I looked around on your blog hoping to see the end result on actual furniture… guessing you went in a different direction, but I’m sure that stain will show up another project. Maybe even my own!
Yes. It didn’t work out because the top is not pine. I’m not sure what it is, but the two different woods didn’t look the same.