Subway Tile Bathtub Surround
Well, my work pace has slowed considerably over the last two days. The phrase “as slow as molasses in winter” seems to be appropriate. Our beautiful 60-degree weather has left us, as has been replaced with temps in the teens, 20’s and 30’s, accompanied by freezing rain and just all around dreariness. (Temps in the teens, 20’s and 30’s accompanied by the gorgeous Texas sunshine feel MUCH different to me than those same temps accompanied by rain, sleet, and lack of sunshine.) And of course, we still have no HVAC system. That’s #1 on our list of priorities as soon as we sell the condo.
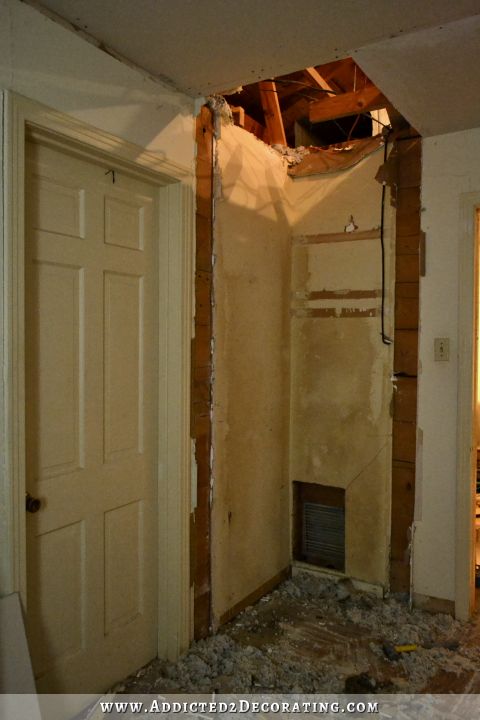
Fortunately, we’re in Texas, which means that our winters are pretty mild overall, and when we do have cold spells like this, they generally only stick around for a couple of days…a few at the most. I did try to prepare a bit for this cold spell by putting heavy plastic up between the kitchen and dining room. That dining room is one of the draftiest rooms in the house, and just sucks out any warm air that the infrared heater puts out into the kitchen. I also used thick plastic to seal off the gaping hole in the hallway ceiling left from when I removed the closet and the old furnace intake duct a couple of weeks back.
But even with my efforts, our house was so cold on Monday (the coldest it’s been all winter, by far, because of all of the moisture in the air) that all four of us — Matt, me, our dog Boo, and our cat Peeve — stayed hunkered down in Matt’s game room all day, with the door closed and the infrared heater pumping out as much heat as possible. It was so nice and toasty in there that I didn’t dare venture out into the hallway (or any other part of the house) to do any kind of work in the cold. It was actually kind of nice to have a valid excuse for taking another day of rest — the second in four days, which is very unusual for me! 🙂 It was actually kind of fun, playing hooky on a work day, watching shows, hanging out. We even ordered pizza and had it delivered so that I would only have to leave the warmth of Matt’s game room to go to the front door when it was delivered.
Ahhh…the joys of buying and remodeling an old house. 😀 It’ll all get sealed up, insulated, and heated/cooled eventually, and in the interim, we’ll make do any way we need to. Thank goodness we live in Texas, though! The weather is already warming up a bit (although as I write this, it’s actually snowing outside), and by this weekend, it’s supposed to get back into the 60s, and will even hit 70 by next Monday. And at some point in the future, we’ll look back on these days and say, “Do you remember that winter that we didn’t have an HVAC system?” We’re making memories, for sure! 🙂
There have been a couple of times over the last few days that I’ve kind of regretted removing the ductwork for the old furnace, which still works, and still sits in the back storage room of the garage. But when I remember the loud, rumbling, exploding sounds it would make at least once a day as the furnace would kick on, which would literally shake the entire house and rattle the windows, I’m actually very glad that the ductwork is gone so that I’m not tempted to turn it on. That thing did keep us nice and toasty warm last winter, but it also scared the crap out of me. I’d rather be cold than be scared for our safety in our own home.
Anyway, enough about that! This is supposed to be a post about my new bathtub surround! The last time I showed you my progress, it looked like this…
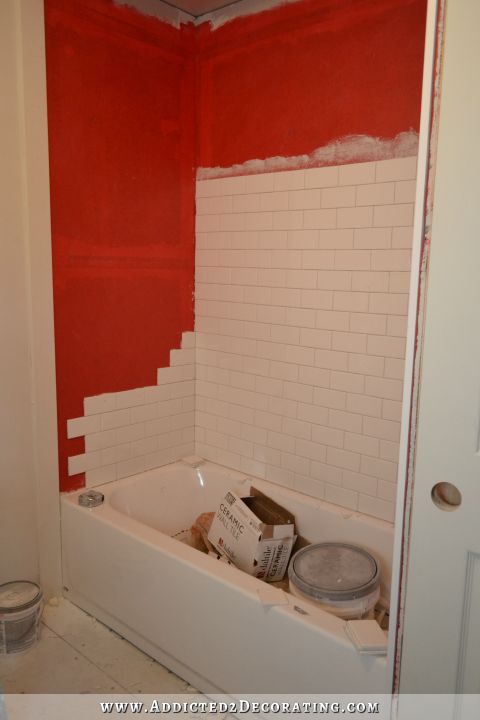
And now, it looks like this…
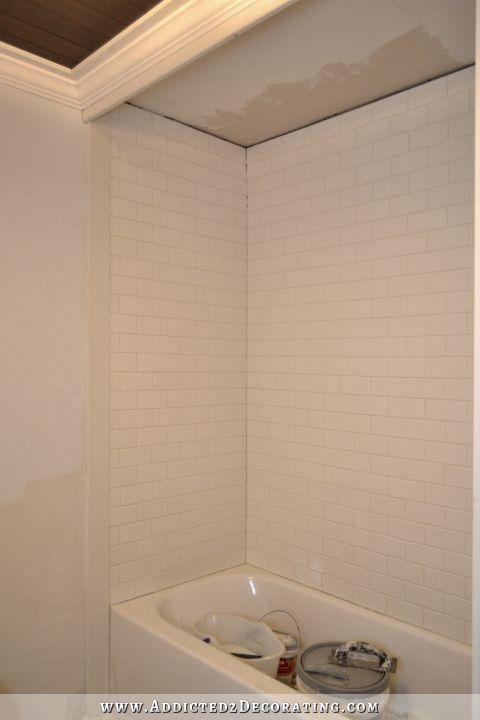
I seriously love white subway tile! It’s so inexpensive that you can tile huge areas at a very low cost. But I also love how light, bright, and clean it is. This room started out so dark and dingy-looking that this light, bright expanse of clean, white tile is such a welcome sight.
The tile would be completely finished now except that I happened to choose the one grout color for which Home Depot does not carry a matching caulk in stock at the store. For some reason, they have a matching caulk for all of the pre-mixed grout colors except for the one that I chose, which is Alabaster. So I had to order it online, and it won’t be here until next week. I sure wish I would have checked that before I chose that grout color! Had I known that, I would have chosen another color, and it would have been done by now.
Another mistake I made was purchasing this sponge with the blue side.
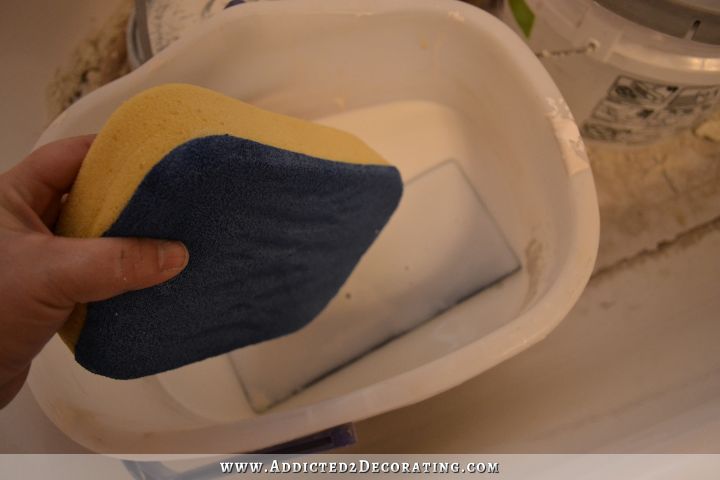
I didn’t do it intentionally. I thought I was purchasing the solid yellow sponge that is about four dollars cheaper. I didn’t realize I had picked up this one until I was home and unwrapping it. When I realized what I had done, and that it was so much more expensive, I thought it would be better than the one I generally use.
Not true at all. In fact, it was a real pain to use. That blue cloth-covered side is much thicker and denser than the yellow sponge, so it was impossible to wring out as much water as I’m generally able to wring out of the solid yellow sponges. This was a problem because I’d swipe the sponge over the tile, and about 20 seconds later, I’d look back at the areas where I had removed the grout, and there was water dripping down from the grout lines, bringing the grout with it. No matter how much I tried to wring out every bit of excess water, it would still do the same thing just because that blue side makes it so much harder to wring out.
Because of all of the water running down, and the grout following the water, this was absolutely the messiest tile job I’ve ever done. I finally gave up trying to get it all clean during the process, and just let it dry like that. I went back yesterday and had to clean up some grout lines with a razor blade, and now I’ve got an unbelievable amount of grout haze to clean up. And all because I wasn’t paying attention and picked up the wrong (more expensive) sponge.
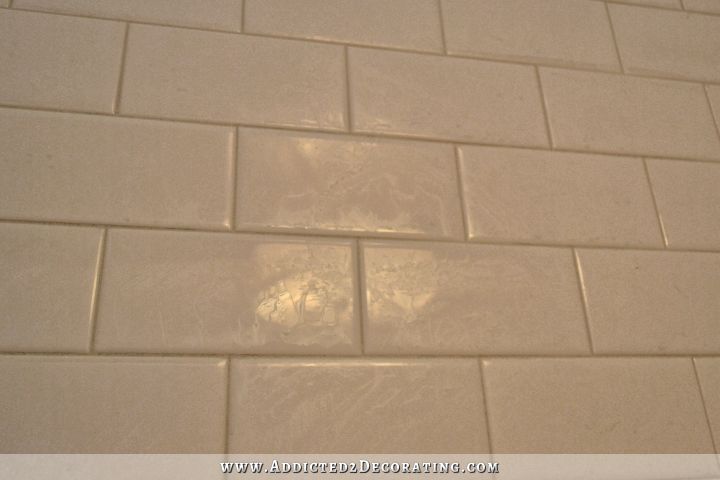
Oh well. It was definitely a learning experience. I can guarantee you I’ll pay much more attention from now on when I’m buying sponges for tiling projects!
I also need to decide what I want to do about the gap at the top. I think it’s too big to caulk, but too small to tile. So I’ll probably end up just attaching some sort of small trim and calling it good. I also need to finish up the ceiling, which will just be sanded, primed, and painted.

And thanks to some of you brilliant people, I’ve decided that I’ll put the exhaust fan above the tub! For some reason, I had gotten it in my mind that it was against code to put it directly above a tub or shower. But after a few of you mentioned it, I decided to research it to verify that it can be done that way, and sure enough! If you purchase an exhaust fan that’s rated for use above a tub (not all of them are, so you have to verify by looking at the specifications for each fan), and as long as it’s wired to a GFCI circuit, it’s fine! So that’s the plan. That way, I won’t have to have an unsightly vent on my pretty new stained wood ceiling.
So here’s a glimpse at the way the tub looked before, and the progress I’ve made.
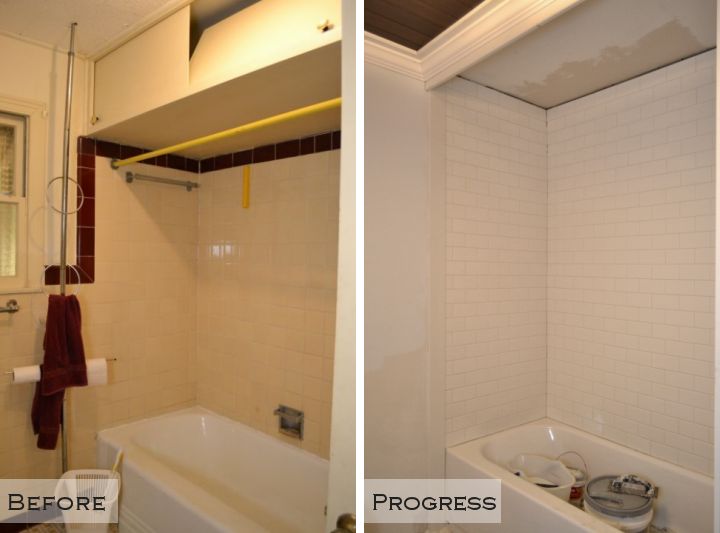
Every time I go in there, I’m amazed at how tall the ceiling looks in there now that I’ve removed that strange storage cabinet above the tub, and now that the tile goes all the way to the ceiling. And you may have noticed that I created a kind of “valance” using a 1 x 6 board across the top of the tub (that the crown moulding is attached to). The shower curtain rod will go behind that, so I’ll be hanging a full-length shower curtain as well. That will also give the illusion of a higher ceiling. Short, squatty shower curtains are one of my least favorite things ever. I like my shower curtains to look more like a custom drapery panel than a store-bought shower curtain.
So while progress has been slow these last couple of days, I’m at least making some progress! Hopefully I can get the floor tiled today, and then I’ll be ready to start on the vanity!

Addicted 2 Decorating is where I share my DIY and decorating journey as I remodel and decorate the 1948 fixer upper that my husband, Matt, and I bought in 2013. Matt has M.S. and is unable to do physical work, so I do the majority of the work on the house by myself. You can learn more about me here.


It looks so good! Aren’t there curved tiles you can use on the ceiling gap?
Also, snow! I can’t believe it really is snowing here! It always makes me laugh. I am a bit more north than you, I believe. DFW area. But it was pouring rain when I woke up!
The do have “quarter round” tiles that match the white subway tiles. That might be an option.
You’re about 90 miles north of me. I’m in Waco. 🙂
Glad you took a break and stayed warm yesterday. Gotta love this Texas weather! We are now getting snow in Dallas, but the schools opened anyway. Tub surround looks great. I personally am not a fan of subway tile (my kitchen has ruined it for me), but it does look clean and bright. Good luck on floor.
Love the idea of the crown to cover up the shower curtain rod…I am with you on the look of shower curtains…I typically make mine out of sheets to match the nearest bedroom…
Question:…We are in the process of picking a builder for our “downsizing” one story house and the idea of your 1×4 framing your room and crown I really liked…My ceilings are going to be 9 feet as we are seniors and don’t want to get on to high a ladder to change light bulbs and I love 5″ crown…Found one yesterday at Lowes that is awesome in 7″…hoping to find the same look in a smaller one…so my question is…For 9 ft ceilings can I add a 1×6 to frame and the 5″ crown? or should I stick with 1×4 and 4″ crown?
In a larger room with higher ceilings, I think you should definitely go with the 1 x 6. Or maybe even a 1 x 8! You might try both and see which one you like best. But the 1 x 4 would be too small.
Kristi ~ Have you considered finishing the ceiling with the subway tile?
I was going to say the same thing! And many of the fans have lights in them! A light in the shower is a great thing! 🙂 and the ceiling being protected from water is a major great thing! 🙂
Several people have mentioned that, but I just can’t envision it. I meant to look up some pictures online to see what that would look like, and I completely forgot. I’ll do that today! Of course, I’ve seen it done over a shower many times. That seems pretty standard. But I can’t ever remember seeing it over a tub. I do like the idea, though!
It’s looking great, Kristi, and I’m so glad to hear you took a day off. Yes, you and Matt are definitely making memories for future reflection. I love the tiles going all the way to the ceiling and the valance that will cover the shower curtain hardware. I learned the trick of hanging drapery close to the ceiling years ago, and isn’t it surprising how effective it is in making a room seem taller. Adding crown molding has a similar effect.
If you paint your vanity teal and have a wood countertop, will it resemble the kitchen in the condo?
I didn’t even realize that…but yes! It’s so funny, because for the last year, I’ve really gone out of my way to NOT recycle any design ideas that I used in the condo, and yet I’m doing it without even realizing it! I just seem to gravitate towards the same colors, over and over, and I’ll always love the warmth of wood. It’s interesting that you bright that up, though, because the color I used at the condo was MUCH lighter than the color I used on the living room walls here at the house. In fact, I did try it out in the living room, and it looked way too light, bright, and washed out. And yet in the condo, it looks much darker and richer. So since I’ll be using it in a small room with no natural light, I guess I shouldn’t just assume that the dark teal on the living room walls will work. I’ll definitely need to try out a few colors and see which one works best!
Hi Kristi, as far as using the same colors and or applications you used in the condo….so what. If that is what you like, and you gravitate toward those colors and warm woods, keep on keep on. It is your style. Why change it? I have two color schemes that I absolutely love. Navy or dark blue with red and white. The other one is soft shades of teal, grey, pinks and eggplant. I plan to use them in my next home, which will be retirement. However I am going to change it up a bit. I will make my master bedroom formal by using things from the living room, and I will go red white and blue in my living room. I will use the same drapes, swap out some chairs, and paint some of the darker wood pieces with soft shades of teal. I already have the bedding set, the drapes are not being used in this house, but I bought them for the condo in Cincinnati and they are silk and well packaged for the next use. My red toile drapes will do well on sliders out to the pool. If perchance we purchase a home with plantation shutter, I wont have to worry about most window treatments. So anyway….go with what you love. Blessings
I am curious if the wood that is on the ceiling (which looks awesome, btw), will warp or get damaged with the moisture in the bathroom?
Actually, I know it probably won’t since you chose to install it, but I’m curious as to what measures you’ve taken and how you can prevent that.
I polyurethaned both sides, and both long edges, of every single piece before installing it. I also took into consideration that this bathroom gets very little use overall. It’s never had an exhaust fan, and yet has never had a mold or mildew problem. If we had a very large family and/or were constantly hosting overnight guests, and this bathroom was going to be in constant use with lots of people taking hot, steamy showers, I probably wouldn’t have chose this particular ceiling treatment. But I’m pretty much the only person who ever uses it regularly, and I just don’t create enough steam to cause a problem. Everyone else who uses this bathroom, with the exception of Matt’s dad who comes to visit once a year, will be in here just using the toilet and the sink.
Once you get the vent in over the tub/shower, there will not be a danger of moisture behind the wood, which would be the cause of warping. And they do make the shower vents with a light, so you might want to look at those. With most of them, the light only comes on when you turn the vent on (so you would only need wiring for one and once switch. You should think of the wiring and where a switch will go before you put any tile on the walls. You are doing such a great job.
using a small piece of trim to cover the cat sounds like a great idea. Since its in a shower and there is always the concern of moisture, have you thought about using polystyrene trim? I know its available at The Home Depot in my area. Once it’s painted it looks exactly like wood or composite molding.
“…to cover the cat…” 😀 I get such a kick out of autocorrect, but this might be one of my favorites. 😀
I’ll have to check on that polystyrene trim. I’ve seen it online, but never at the local store.
Ha ha! Yeah, Peeve would definitely be rather … peeved … if you used trim to “cover the cat”! 🙂
I don’t remember seeing what year your house was built in, but mine was built in 1950 and it, too, has the weird above-tub storage cabinet! It is literally 7 feet off the ground and yet makes the tub shower feel SOOOOO small. My 6’1″ husband can barely reach the knob to open the cabinet door, let alone see inside it. Who thought that was a realistic space to store things?! We are planning our bathroom renovation too. Excited to follow along with yours! Good luck!
It really makes the tub feel like a cave, doesn’t it? I removed that storage cabinet long ago, probably at least ten months ago, just because I couldn’t stand how cave-like the shower felt. And I’m only five feet tall! 😀 It was definitely way too high and too deep to be an actual usable storage space.
Hi Kristi, I wondered what was going on in Texas when we didn’t hear from you. I was worried that you or Matt had gotten sick. Glad to hear that is not the case. Well you are experiencing our kind of winter! Yesterday we broke a record set in 1940’s of 3 degrees above zero. Our new record as of yesterday is 4 below zero. I have not left the house in three days. Not even to get the mail. I have plenty to do inside, so I am not venturing out until I absolutely have to and the temp is at least in the high 30’s. So the tub surround looks great. I did not realize you didn’t have the wood over the tub. Smart girl. Love how the molding creates a break between the tub and room. You can hide the rod behind that. You said you are going to paint and use wood trim to fill in the gap. Would you consider using tile on the ceiling? Our Masterbath shower is like that and is so great. We do have a light/fan in it so it stays pretty dry. Plus the glass door does not go all the way to the top, which gives the moisture room to escape. If you tiled it you could fill it the gap with some sort of trim tile. Just a thought…..and more work.
Glad to see you are moving along and taking it easy too. Rome was not built in a day! Blessings
I went and bought more tile today to put on the ceiling. I think that’ll look great!
You are going to love how easy it is to take care of! We are in our house for almost 25 years and that shower got used at least 20 of those years and it still looks great. No grout problems nothing. I think you will really like it, once and done! Blessings
How will you be removing the grout haze? We have this on our glass tile backsplash, I’ve tried glass cleaner but it’s still there.
I’m probably the only one who even sees it but would love for it to be gone!
I’ll try a vinegar, baking soda, water solution first. If that doesn’t work, I might have to purchase a grout haze remover from Home Depot. Those are pretty acidic and can damage metal fixtures, though, so I don’t want to use that unless it’s absolutely necessary.
As usual…beautiful. I was wondering how the dark ceiling would look, but can see…awesome. Just one tip…next time cut that hard green stuff off the sponge. Seems would be better than struggling with it. Can’t wait to see the finish of this project.
Hi Kristi, I’m in the process of updating my hall bath and have been trying to figure out how to make a “valance” above my tub and love your idea. How did you do it? I have 9 ft ceilings so how deep or long should I make it and how do you go about attaching it to the walls? Thanks for all of your ideas and know how, Love your ceiling…
You just have to create something to attach it to. My mom has one in her guest bathroom, and the people who built it first attached 1 x 2 lumber to the ceiling with screws, and then attached the “valance” to that. It just needs to span the bathtub area. I used a 1 x 6, but for 9-foot ceilings, you might consider using a 1 x 8 piece of lumber.
Thanks so much… I couldn’t quite figure that out! That makes a lot of sense… 🙂
It looks fabulous!!! I sooooo wish I had put subway tile in my master bathroom. I do have it in my kitchen, but I just love it and it looks so fresh and timeless. I hear ya on the weird weather. I live in Washington and am so glad our weather doesn’t get extreme cold for long periods of time like the midwest where I grew up. One of the main reasons I moved here. lol I do have a love/hate relationship with the gray and dreary winters. This year hasn’t been too bad. But having 60° weather in Jan/Feb is freakin’ awesome.
I had a big gap (about half an inch) under the tile in my kitchen, right over the worktop benches. I ended up using the paste we use to close holes in walls (I’m not going to try and give the proper names, ’cause I’d probably get them wrong right now) – and used my finger to get it straight since there wasn’t a proper tool. It ended up looking perfect, and while I thought I’d have to put the silicon paste over it to waterproof it hasn’t given me any sign of trouble so far (granted, it’s on the bench I don’t use much, but still).
You are STILL doing fabulously!!!!!!!!
I am so looking forward to the floor…..will be great I am sure!
Hang in there doll….sending you warmth and strength!
A few years ago, we installed a fan/light combo over the tub in the bathroom my husband uses – he loves the light and hates the fan. He says that it pulls the cooler air in over the tub and it can feel chilly while showering or bathing. Ours is on one switch, so maybe a unit that can be controlled by separate switches? If you did that, at least you wouldn’t have the cold air coming over during a bath!
This is a good point. With the curtain going all the way to the cieling you might not get the cold air coming in, but the suction of the fan could pull in the shower curtain. I’ve been in showers where I’ve been almost smashed up against the wall trying to get away from the cold, wet shower curtain liner as it billows in, haha.
I can completely relate on the weather issues. We’re modifying the ceiling line in our kitchen, so currently have no ceiling in there as we work every night after work on the truss modifications. We joke about the different climate zones in the house. And of course last week the temp dropped down to 36 overnight. 36!!! That’s a rarity this far south in FL. I measured the temp in the kitchen that morning… mid 40’s inside. Brrr!!! Definitely making memories. =)
Why are you not tiling the shower ceiling too? I always see steam on the drywall in the shower area and am waiting to see some mildew starting to grow up there one day. Just a thought. ( I didn’t read the other comments to see if someone already brought this up.)
I went and bought more tile today so that I can tile the ceiling over the tub. 🙂
Yay! Can’t wait to see it!
I love white subway tile! Definitely a tremendous difference from the initial room. I think the tile on the ceiling would look wonderful. So here in southeastern CT we’re having a “heat wave”…was about 24 degrees when I walked out the door for work. Lol…sweatshirt weather since there was no wind! Being without heat/cooling would probably put me over the edge. Kudos to you and Matt!
Love this! I ditto the fan/light combo idea. That way you can take your shower curtain high like you would a window treatment.
What was your original plan for a light in the shower space before deciding on the vent fan/light going there? Hopefully the vent light will be bright so it is not too dark in the shower with the curtain going all the way to the ceiling! I love the idea of hiding the rod and treating the curtain like draperies, especially since you are using such beautiful fabric. I also think that having tile on the ceiling will look less classy than paint and trim, but you can make anything look fabulous! Good luck and I am so excited to see more of the “pretty stuff”.
I didn’t have a plan. I just make it up as I go along. 😀
Kristi, it looks great! As for cleaning the grout haze, when we tiled our bathroom last year, somebody on a DIY forum recommended this tool
http://www.screwfix.com/p/vitrex-grout-clean-up-polishing-kit/69180
Vitrex is a British company but maybe you can find something similar in USA. It makes cleaning even the messiest job easy and I would say – enjoyable. If they don’t sell them there, and if you don’t mind waiting, I would be happy to buy you a present and send this marvelous tool to Texas 🙂
That’s just what I need! I watched a few videos about cleaning grout haze, and they used a tool that used just like that, so surely I can find one locally. If not, I just might be calling on you to send me one of those, though! Thank you so much for offering to do that!! 🙂
You can buy that same item on Amazon, here’s the link: http://www.amazon.com/Vitrex-2912-Grout-Clean-Polishing/dp/B000C74Y9Y
Hi Kristi
Great job! I have had issues with those sponges and I have used a craft knife to slice behind the blue layer to remove it. Hope this helps if it ever happens in the future.
Your subway tile looks awesome! What a cool idea to have that ‘valance’ trim to cover the shower curtain rod. I think teal would be a beautiful color for your vanity. I absolutely loved the teal with the wood counters in your condo kitchen, and I think it will be awesome in the house too! I’m sure that’s going to look super with the fabric and tiles.
The tiles look so clean and fresh. Love it! Also, I think I’ve seen at Lowe’s the quarter round tiles for trim. They might be big enough to fill that gap and complete your tub area. When you’re looking at exhaust fans you might also look for one with a built in light so you could have a bit more light over your tub/shower area. Just a thought.
Sorry you’ve been so cold this week. We live in northern Illinois and the temps have been ridiculous for February. We should have an average high in the high 30’s by now. We haven’t see 30+ but 2 days in the last 2 weeks and with wind chills the last few nights have been -10 to -20 degrees each night. Argh!
I didn’t have time to read all of the comments, but I’m betting I’m not the first to say that we would be SOOOO happy to have temps like you’re having! Our temp was -32.8°F yesterday.
More importantly, your bathroom is looking amazing! I wish I’d known you could put a vent over the tub ~ such a good idea!
Kristi, your bathroom is stunning! I love the dark wood planked ceiling, the beautiful drum light (so unusual for a bathroom!) and the subway tile. I had my master bath remodeled last year. I installed an exhaust fan where the motor is mounted in the attic, a distance from the ceiling vent. It’s so much quieter. And, instead of a switch, I put it on a timer. I hate going back to the bathroom an hour later to find I left the exhaust fan running. I also installed heating under the tile floor, it’s wonderful in these brutality cold Connecticut winters. Keep on with your fantastic remodeling… I love seeing your progress.
I’m loving how your bathroom is turning out! It’s gorgeous and so bright and clean looking! My shower has the tile on the ceiling. It also has a ceiling vent with a light included. Certainly helps especially when you’re shaving your legs to have the extra light. I like the idea of the tiled ceiling too so we don’t worry about moisture on the ceiling from long, hot showers. I absolutely LOVE the wood ceiling in the rest of the bathroom!!! Looking forward to seeing your finished project!
Love the subway tiles up-to the ceiling. Like the way of hiding the shower curtain, the bathroom is coming together beautifully. You probably needed to have another restful day. Lovely to have time out with Matt and the you furry friends. Hope you weather is better and you are not so darn cold. Thanks for your daily posting.
Kristi…since you’ve decided to tile your ceiling, will it need to have a coating of the red sealant like you used on the walls?
I was actually just researching that! 🙂 It looks like any surface above the shower head doesn’t need to be waterproofed. I guess that makes sense since lots of showers have just painted drywall on the top 12 inches of the wall and then on the ceiling above. I will need to prime it, though, since tiling directly onto unprimed drywall is never recommended. So it looks like just a coat of primer, and I’ll be ready to go!
Looks amazing! Did you use a bullnose tile around the edges of the tub surround or is that some type of trim?
I actually just used wood trim since it’s outside the “splash zone”. I hope it’ll all make more sense once I add the wood skirt to the tub, and the wainscoting to the walls.
It looks lovely! I can’t believe that the place was in such a bad condition! Great job! Thanks for sharing! Regards, Storage Maze Hill Ltd.
Hi Kristi!
Your renovation is beautiful! I am going to be using subway tile, but am finding the cost of the tile to be expensive. You mentioned that subway tile is inexpensive. I would like to know where you found the subway tile that you purchased and used for your project.
I buy mine at Home Depot, and they carry it in stock.