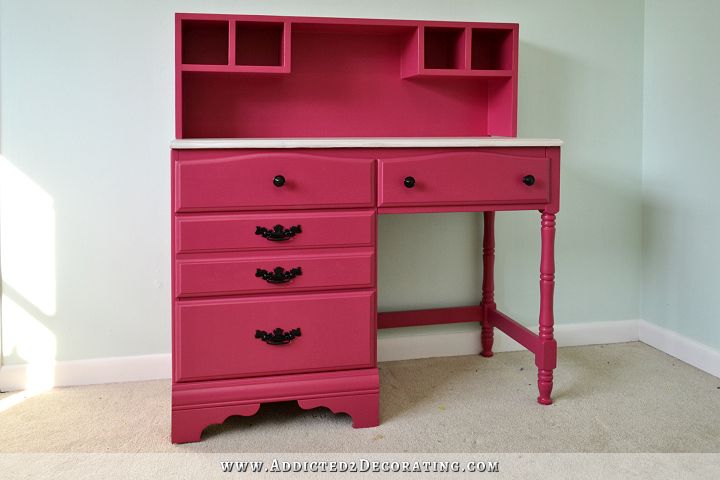
Vintage Desk Makeover With An Added Hutch
My mom and I have finished another project for my niece’s bedroom — a vintage desk makeover with an added hutch made from 1″ x 8″ lumber and 1/4-inch plywood.
We found this desk at a local consignment store for $40, and it’s made of solid wood.

It was actually in great shape when we bought it, other than a few stickers that were on the side.

We thought it would be safe outside until we were ready to work on it since no rain was expected. But unfortunately, what we didn’t realize was that we put it directly in the path of the lawn sprinklers that come on automatically. So by the time we were ready to work on it, we had to deal with some damage. The bottom drawer had begun to split, and both of the feet had also split.

There was also a large split on the side, and another one on the desktop.

Lesson learned. Don’t leave your wood furniture in the path of sprinklers. 😀 All of those splits were easily taken care of with lots of wood glue and clamps, and then some wood filling and sanding.
Once everything was put back together, I set about building a hutch with some cubbies, at my niece’s request. This construction was very simple. I cut the top and sides out of a 1″ x 8″ piece of lumber, and attached them to each other using wood glue and 16-gauge nails. I also used a framing square to be sure everything was square.
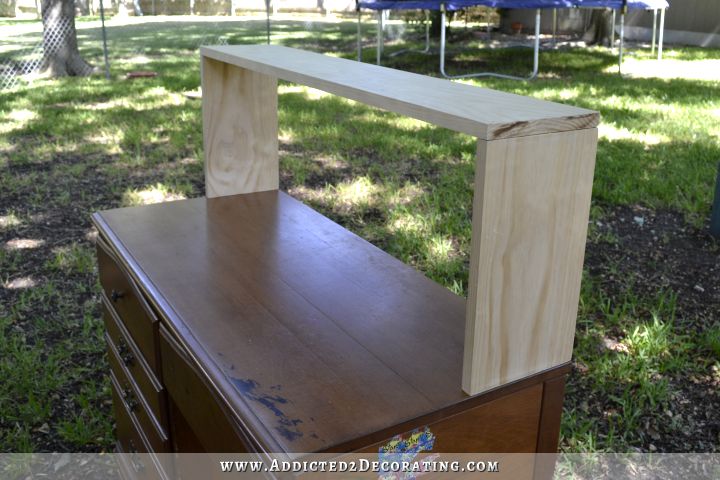
Next, I made two L-shaped pieces and attached those, also with wood glue and 16-gauge nails, to form the cubbies.
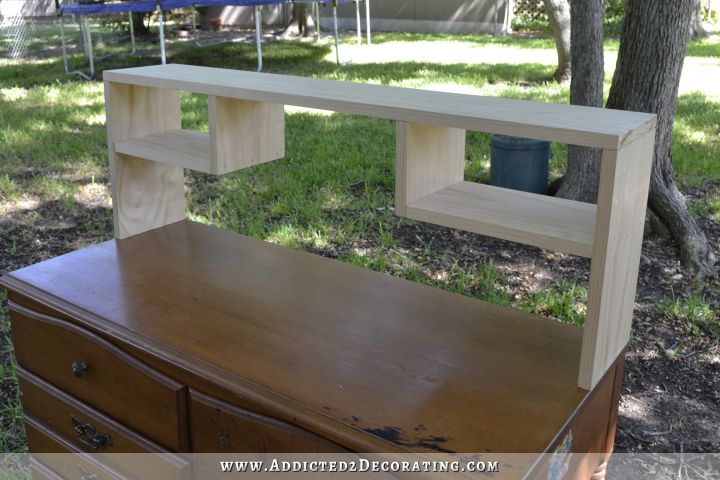
And finally, I added a divider in each section to create the smaller cubbies, and then added 1/4-inch plywood to the back. I cut the plywood so that it would go down an extra 3/4-inch behind the desktop so that I could later secure the hutch to the desk by gluing and nailing the plywood into the back edge of the desktop.
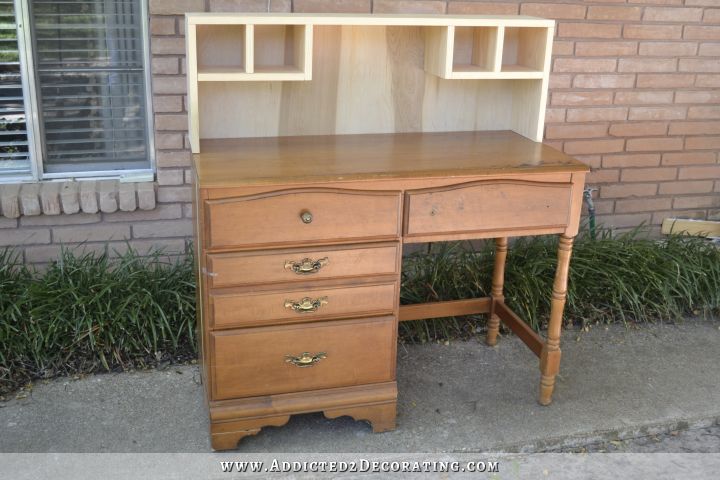
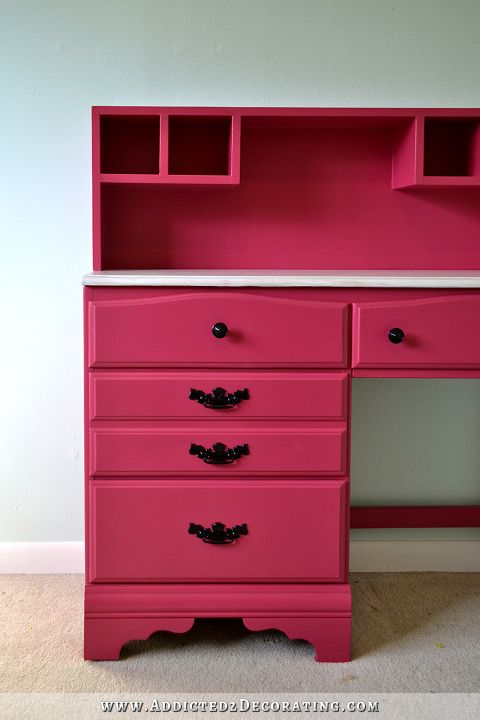
And then after the hutch was wood filled, sanded, and caulked, my mom gave everything a coat of primer and two coats of paint. The paint color we used is Behr Glamorous.
We re-used the original drawer pulls, and used black spray paint in a satin finish to give them a new look. Then we bought some knobs at Home Depot to match.
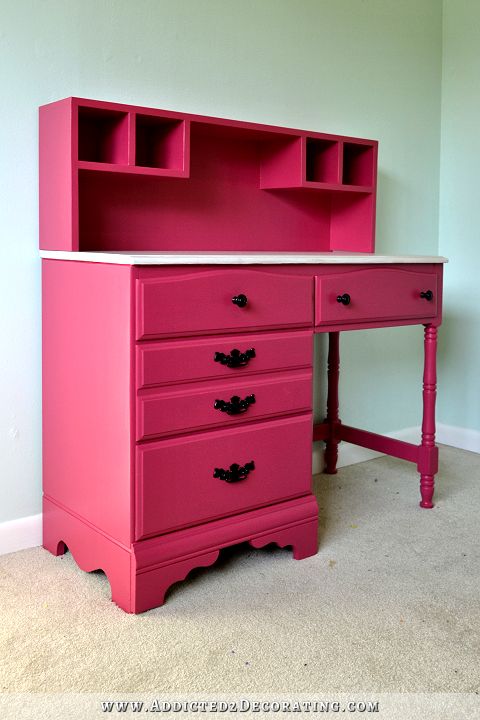
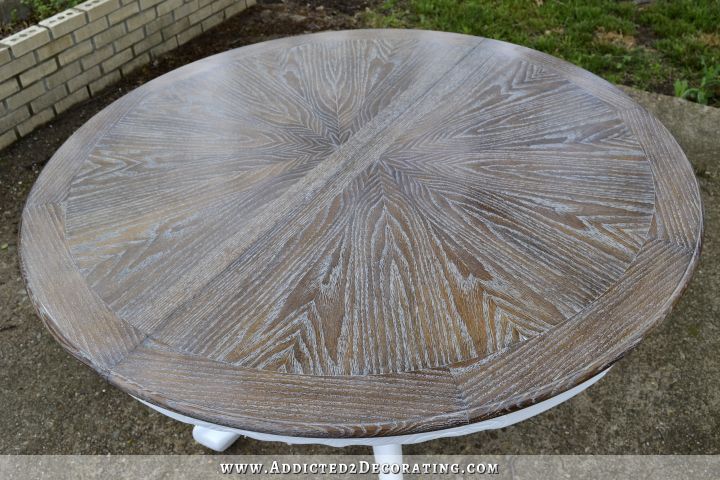
I sanded the original finish off of the desktop completely since the wood was so pretty, and rather than stain it, I whitewashed it with watered down white paint (Behr Polar Bear). That way the desktop stays light and bright, but you can still see the wood grain through the paint. (Or at least you can in person. It doesn’t really show up very well in my pictures.)

I gave the desktop a couple of coats of Minwax Polycrylic (water-based polyurethane) for added protection.
The desk is perfect for her room. She had originally requested a desk with shelves above it, but since the desk needs to go under the window where there’s no room for wall shelves above the desk, and since she now has loads of shelf storage in the bookcases I built for her, the hutch was the perfect compromise. And it was my niece’s brilliant idea. 🙂

The desk looks so cute in her room, and brings out the reddish pink color in her wall mural. It’s actually the same paint color, but for some reason, the desk looks pinker, and the flowers in the wall mural look redder. But they complement each other, and will look fantastic together in the finished room.

We still have a dresser to paint, curtains to make, and a full-length mirror to build. If I remember correctly, I think those will wrap up the big projects for her room, and then we’ll just need to add the decorative touches to finish up.

Addicted 2 Decorating is where I share my DIY and decorating journey as I remodel and decorate the 1948 fixer upper that my husband, Matt, and I bought in 2013. Matt has M.S. and is unable to do physical work, so I do the majority of the work on the house by myself. You can learn more about me here.

Love, Love, Love This Piece! What a lucky niece you have!!! I can’t wait to see the whole room in all of its glory. So many fun projects on your blog lately. I so look forward to reading it every day!
This is not only cute but a great way to re-use a solid piece of furniture! I LOVEEEEEE the color and how sweet this all came from your niece, I can not wait to see what her room will look like when its all done!!!!
This is adorable. Will she have some print on the chair that she uses with it?
Your blog is a goldmine of examples and information! I appreciate it and am stashing away your wealth of information and inventive ideas. And your niece is fortunate to have you and your Mom. Sweetness, love it!
Beautiful & love the color for this room! Great idea from your niece!
LOVE THIS COLOR!!!!!!!!!
So cute! The only thing I would have changed is the plywood “face”. It is a great place for a cork board. Since you have already painted it, how about applying various sizes of round self stick cork. You would be able to see the pink background and the rounds would follow the pattern of the flowers on the wall. Girls love to pin things up we all know. Great job ladies!
We have other plans for something like that. 😉 And with the amount of artwork she does, the back of this hutch wouldn’t allow nearly enough space for a cork board for her. She needs something with lots of space for her to display her creations.
Awesome Kristi…!!
It’s beautiful! Love the bright color and the whitewashed top.
Great job. I love it!!!!
What a lucky little girl you niece is.
U are amazing! I love your ideas & performance. Masterpiece!
anorger great project. Love the colour.
Wow, you hit it out of the ballpark again! What a lucky niece you have to have an aunt and grandma who is so creative. I just love seeing all your work and wish I had an ounce of your know-how!
Adorable!
Fantastic! This room is really going to be spectacular.
I learn something from you every day. Love everything about the room and can’t wait to see the finished product.
Wowie! That is so bright and inviting. Your niece is one lucky young lady. Will there be a built in light in it? Love it!
Wow! That is gorgeous and I LOVE LOVE the top whitewashed! Can’t wait to see finished room! I am so jealous, would love a room like that! Lol
Kristi, you are just a marvel in all you do. I love that color. In fact, I am going to use it to paint the insides of a boring bookcase that I keep staring at. I have lots of bright ideas but lack the gumption to pull them off and you do give me some gumption. For this I thank you. Will you share what kind of wood glue you use and how do you know what guage screws or nails to use? Thanks
I love it! A small detail on the top of the hutch to match the scallops on the bottom of the original desk would be cute.
Beautiful job on the desk. You’ve helped me with the decision of whether to use chalk or regular latex paint on my desk painting project. Thanks for so much information and motivation. Can’t wait to see the whole room completed in all its glory!
Great project. I have a couple of desks that may get the same treatment. I just wanted to know why you didn’t use pocket screws for any of the joints.
I love it and I enjoyed your tutorial. The hutch top looks terrific and it looks like it was pretty simple to make. What do the insides of the drawers look like? Are they painted too?
Cant wait to see pictures of the room when its done.
Adorable!!!!! I hope it is deep enough for a laptop or computer screen and keyboard. Kristy, you do such amazing work!!! I LOVE this room you are doing for your niece. Do you still do work for the public? I have rooms I need guidance. I live to far from you for you to *do* any of the work, but I need eventually hire you for direction.
Adorable. The bedroom setting is wonderful with the flowers.
Excellent idea! I love the color combination ! This is awesome! Great job!
This desk is absolutely darling! Love it! 🙂
It looks really cute. I know she will get lots of use out of it. It goes great with the bedwall. What more do you have to do in the room to complete it?
Great job. Can’t wait to see the whole finished room. It’s perfect for a teenaged girl.
I don’t know which is more fun – watching you create something completely from scratch, or seeing you transform something homely into something beautiful. I haven’t been able to keep up, so this is a congratulations on the offer for the condo; your piano is gorgeous! (I’m so glad we can see the exquisite walnut); and I think this room is going to look amazing!
The desk is so cute and perfect for your niece! Did you use a flat or satin for the desk? Thank you for sharing all the how-tos with all of us, it makes it so much less intimidating to tackle something new.
I love the desk and what you did with it and especially the desktop! I’m not so sure about the cubbies though – the space she has to sit is to the right, therefore all her books and stuff will get there and those cubbies may be in the way. Maybe if you had all of them to the left? Then again, i spend all my day on a desk and still haven’t found the perfect arrangement…
Absolutely love everything about it.
I love it!!!
You always have the coolest projects to look at each morning! I love all of your projects!
I love your project. You breath a new life into your desk. You inspired me to repaint my old desk. I am going to use the same color. Thank you for sharing these photos. Greetings!
Kristi, another wonderful project completed! I love painted furniture! What a lucky little girl to have you all for relatives!
Looks gorgeous! My daughter would have loved a room like this growing up.
The Desk is wonderful!!!
You have chosen the beautiful color. I really like your creativity. This is the best gift for your niece. Thank you for this amazing post. Keep sharing this type of posts.
‘this piece turned out gorgeous!!!! I m just now catching up on some older emailed posts… the room is looking SPECTACULAR!!! Love the mural also!!!! have you already discussed the pale blue wall color somewhere else? I love the clean crisp look of it, with all of the wihite casework, and the bright florals!!! can you share the blue color here?
I think I forgot to share the paint color name. It’s from Behr, and is called Jade Pastel.
this is so cute…what a wonderful room for a little girl to retreat to…rooms are so important for children..for all of us..a place of privacy to call your own…wonderful…
Have you finished your niece’s room yet? Haven’t seen any posts in a while.
No, I haven’t finished it. I’ve been focusing on my house, but I hope to get back to her room very soon.