Walk-In Pantry Progress – New Back Wall + New Window
Y’all, I feel such a sense of accomplishment this morning! One of the monumental tasks involving the breakfast room and walk-in pantry is (almost but not quite) finished! My brother came over yesterday morning, and we got started working at 9:00am. We finished working last night at around 8:30pm, literally working outside, in the dark, by the light of two iPhones. 😀
But it’s done! (Well, again, for the most part.)
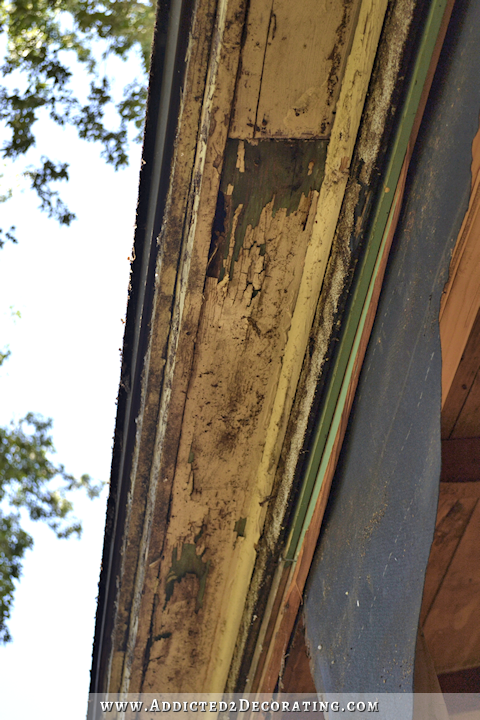
The demolition part of this project was by far the hardest part. There were layers of various materials covering the exterior wall, and it seemed like we’d never get down to studs! After removing the vinyl siding, there was a layer of aluminum-covered styrofoam-type insulation sheets (the ones that come in 4′ x 8′ sheets). Then underneath that was a thick asphalt layer (like asphalt shingles) that had a faux stone design on it.
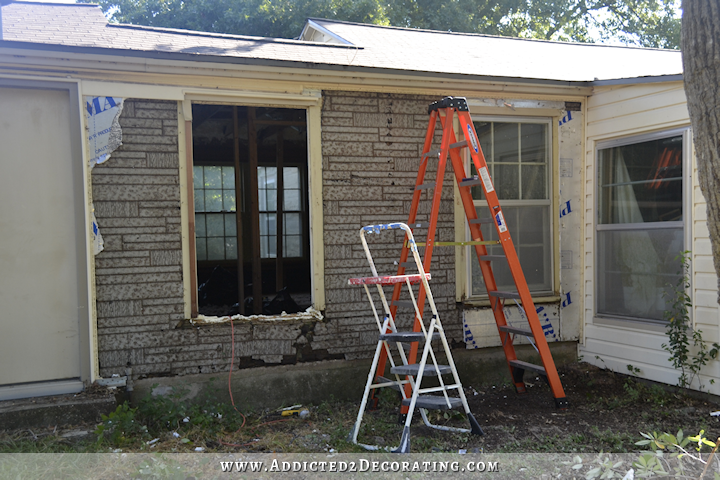
And then underneath that was the original wood siding.
And as I’ve already mentioned, that was applied over a layer of tar paper.

So getting all five layers of those various materials off of the exterior took much more time and effort than I had anticipated. I mean, when we were done, I felt like we had put in a full day’s work, and I was ready to pack it up for the day. Of course, that wasn’t an option.

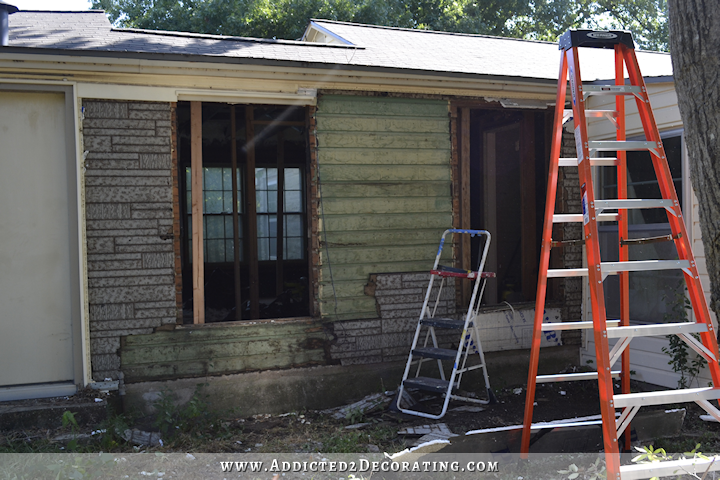
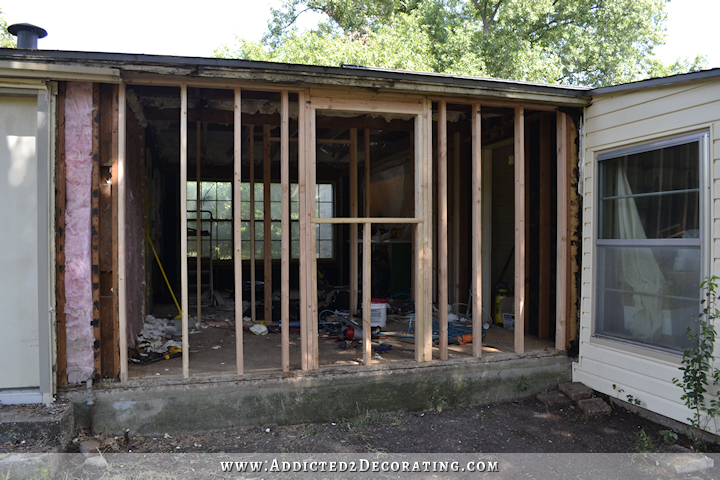
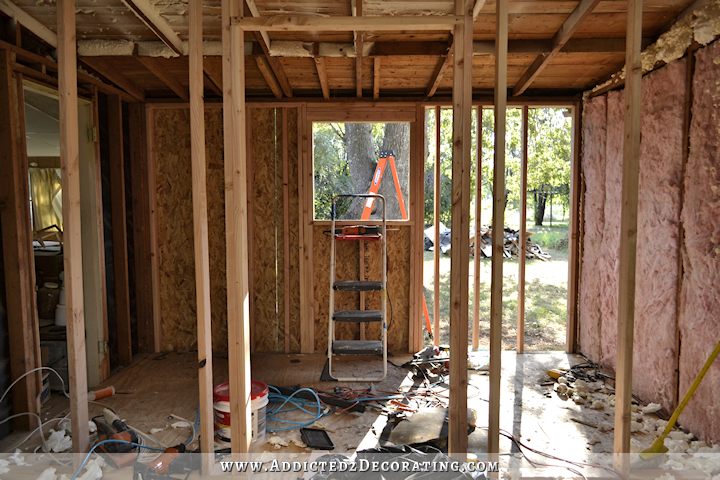
While my brother finished up getting the last of the siding off of the exterior, I started reframing the wall with new studs. Since that wall had two very large windows, it required all new framing. Before we tore out the old framing, I placed a temporary 2 x 4 “jack” underneath each of the rafters to transfer the weight from the back wall to the temporary “jacks.” I know it’s hard to tell in photos what 2 x 4’s go where, but you can see one of the “jacks” here. If you look towards the top, you’ll see that it’s directly under that rafter, and I hammered it in there very tightly.

Once the new studs were in, I removed those temporary boards to transfer the weight back to the back wall. Here’s how it looked on the inside once I got all of the new studs in place, set 16 inches apart on center.
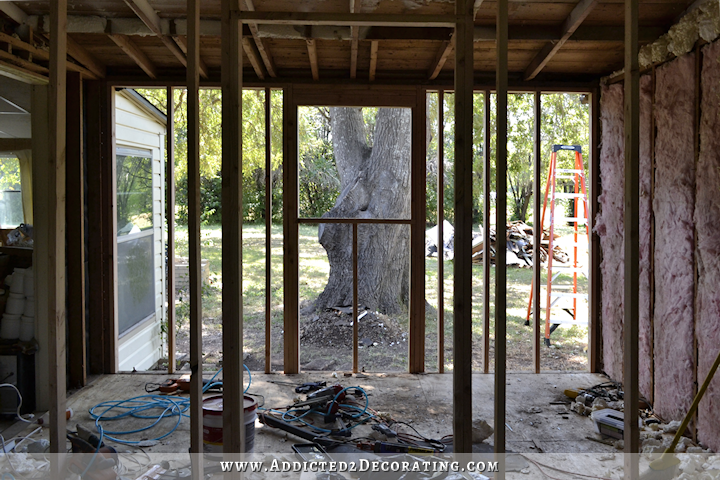
And here’s the view from the outside.
Now just as an aside, let me mention how much I detest vinyl siding. I don’t like the way it looks, but for me, that’s only part of my issue with it. The main issue I have with it is that you never know what’s going on underneath it. Your house could literally be disintegrating underneath that facade of vinyl siding, and you’d never know it.
And that was exactly the case with the fascia boards and soffits that we uncovered. A lot of this is literally crumbling, and will need to be replaced ASAP. And had we not removed the vinyl siding, I never would have known that.
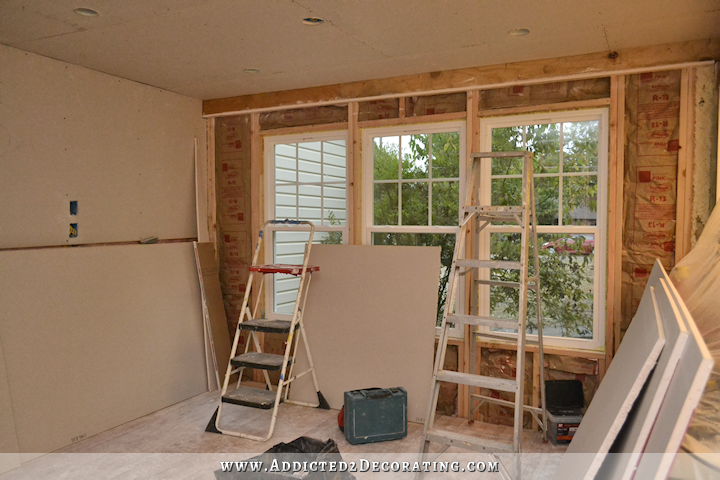
Once the framing was up, we could install the new sheathing. We used OSB from Home Depot, which costs about $10 per 4′ x 8′ sheet. We installed the OSB first, and then I went back with my reciprocating saw and cut the opening for the window after it was installed.
And if you look at the picture above, you can see a strip of light coming through where the two boards meet. You’re supposed to leave a slight gap between the boards (about the width of a quarter) to allow for expansion. But also, those seams have to be on a stud so that the edges can be nailed down. I had spaced the studs at 16 inches on center inside (perfect for drywall), but because we had extra spaces and gaps that needed covering on the outside, those seams didn’t line up with the studs. So I had to go back and add two more studs.

Let’s just say that this 12-foot wall is probably the most secure and structurally sound wall in my entire house now with all of those studs. 😀
It was about this point that we started losing daylight. So while my brother finished up nailing the OSB to the studs, I caulked the joints.

And then we added a layer of house wrap, and installed the window. By the time we were ready to install the window, it was completely dark outside and we were working by the light of our iPhones. 😀 I didn’t get a picture last night, but I snapped this picture outside this morning.

You can tell I have quite a bit of work left to do in order to tuck and secure all of the edges of the house wrap, and I also still have to add the side and top flashing around the window. But since there was no rain in the forecast, we decided to call it quits as soon as the window was installed with a few nails.
The windows I bought have a nailing fin, and you just slide the window into the roughed-in opening so that the nailing fin is right up against the OSB, and nail it into place.

And here’s the new view from the inside.
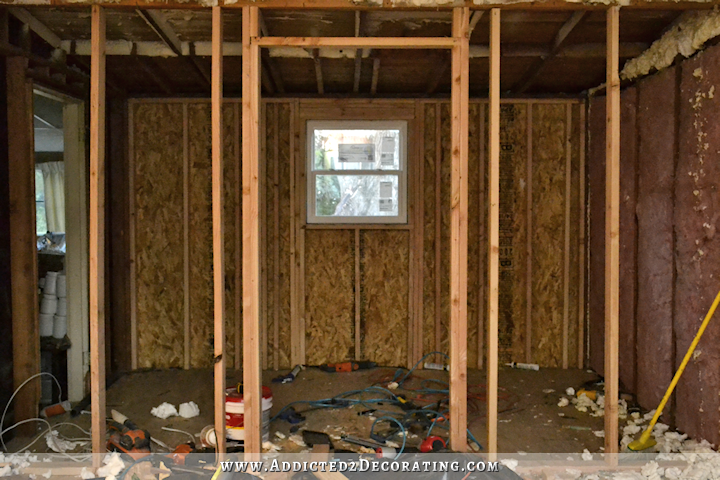
This small window obviously lets in considerably less light than the two large windows, but since it’s a pantry, I think that’s preferable. But I’m very glad that I decided to go with a window. I think it would have been a mistake (for me) to completely lose the view and the sunlight from that side of the room.
So we made a huge amount of progress yesterday!! I’m so excited about what we accomplished.
Now just a word about house wrap…
When I was at Home Depot the other day to purchase the house wrap, I noticed they had two brands — Tyvek and Everbilt. I asked the guy working in that department if there was a big difference (since the Tyvek was about double the price), and he said no. He said that with Tyvek, you’re basically paying for the name brand. (It’s made by Dupont.)
So I bought the cheaper stuff. It didn’t even dawn on me to actually research it on my own, or look up customer reviews, or anything like that. I just took his word for it, and assumed that house wrap is house wrap, right?
Wrong.
Don’t buy the cheap stuff. Don’t EVER buy the cheap stuff, especially if you’re planning on leaving your house (or part of your house) unsided for any amount of time. First of all, Tyvek is a solid sheet of product. This other stuff is perforated all over. Why in the world would something that’s supposed to keep out wind and rain be perforated?! I actually didn’t realize it was perforated until late last night when I decided to research that specific brand and see how long it can remain unsided. That’s when I learned that what I had thought was just a texture was actually perforations, and there are lots of customer complaints about water coming right through the Everbilt stuff.
So today I’m going to head back to the store and buy the Dupont Tyvek, and re-wrap the exterior with the good stuff. We have thunderstorms coming this weekend, so I have to get it done ASAP so that all of our hard work won’t be ruined. And the good thing is that Tyvek actually works. It’s actually a wind and rain barrier, and it can be left unsided for up to four months before it has to be replaced. That’ll give me plenty of time to get something done about the siding.
But even though I have to go back and redo something, and I wasted money on poor quality house wrap that doesn’t do what it’s supposed to, I’m still very happy with the progress. And I’ll just chalk this up to a learning experience. 🙂 I should always do my own research!!
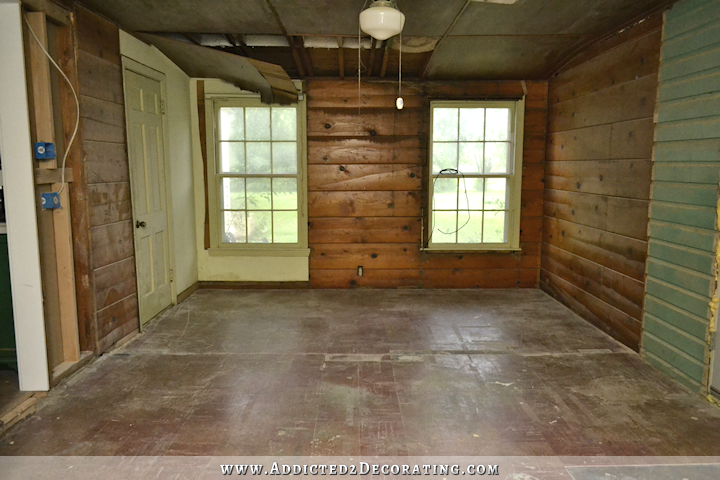
So let’s review, shall we? I started with this…
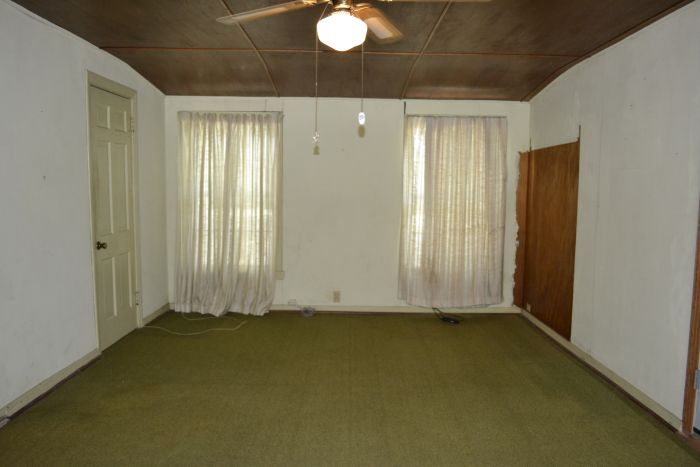
And then it looked like this…
And then like this…
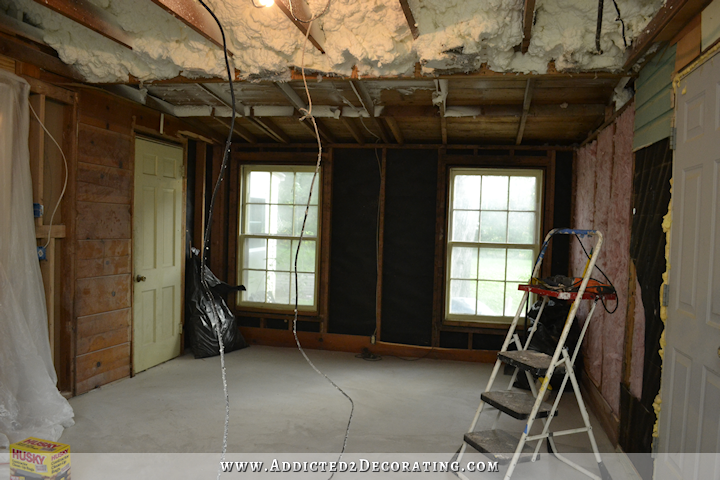
And today it looks like this…
It’s getting there!

Addicted 2 Decorating is where I share my DIY and decorating journey as I remodel and decorate the 1948 fixer upper that my husband, Matt, and I bought in 2013. Matt has M.S. and is unable to do physical work, so I do the majority of the work on the house by myself. You can learn more about me here.


You constantly amaze me!! Looks good AND you know it’s done very structurally sound! I’m glad you kept the window also – natural light is always a good thing. Now that you know you have so many layers on the outside of the house under your siding, does that change your vision for the outside of the house? Will you try to use any of the layers underneath? Keep up the great work!! I love watching this house transform!
No, it all needs to come off. The original siding in is poor shape, and the asphalt layer is old and crumbly. I’d like to get down to studs on the entire exterior, and have new OSB and siding (Hardiplank this time) installed.
One tip about the Hardie board. They require a different blade to cut (cement) and a hand held cutter (air or corded) works fantastic. i have seen it used where I live and am amazed at how well that small cut off tool works. Links http://www.homedepot.com/p/Husky-3-in-Cut-Off-Tool-H4210/203462127?keyword=electric+cut+off+tool for air http://www.harborfreight.com/3-in-heavy-duty-electric-cut-off-tool-68523.html for electric of course if you are putting up the 4X8 sheets then your skill saw will work also. Good luck and great job
Gosh, Kristi, you’ll be rebuilding the entire house 🙂
Shame on Home Depot for giving you bum advice. I’d ask for my money back if I were you.
I have taken their word at both of these big box stores on things that I have purchased and I have come to learn that I have to do my research on things. A lot of the folks that work there do not have the knowledge to give out, the ones that do are few. So yes, good idea to research before you head into these stores. Thanks
Yes, return the unused product for a refund. All they can do is say no… it never hurts to ask.
Looks amazing Kristi!!! Well done!
If the front wall is the same as the back, I think we know why that wall is still standing…ALL THOSE LAYERS! Oh, my gracious!!! LOL
Looking good, Kristi 🙂
Wow and Wow. As far as light in the pantry, we are putting in a few sola-tubes in the darker areas of our house (even where there are windows). That might be great for the pantry and they come with LED lights as an option for night-time use. Just a thought.
Unfortunately I don’t have an attic in my pantry, so there’s no space for a solar tube. My drywall will be installed directly on the rafters in the pantry.
What a great brother!! Great job that both of you did. I’m impressed. Again.
Today, you need to remind Matt what a lucky boy he is! LOL! Great work, Kristi! Is there something in the water in Waco? Send a bottle along!
Got to love brothers! You guys made massive progress. Love the window. Always be able to find things in the pantry even if power is out! Enjoy a brief rest as you drive to Home Depot.
Cant wait to learn from your Hardiplank experience. Our home has stained Hardiplank siding. The stain has faded in many places. It also has broken and crumbled in places and needs replacements. Though I love the look of the stain, I cannot seem to find how to re-stain it. Or how I would match up the replacements boards. So my husband is gearing up to paint it. I’m so concerned about the paint adhering to the rough hardiplank texture with smooth stain on top!
I would call the company, James Hardie.com, maybe they can address your problem. Thanks.
How wonderful to have this project done (or at least on the road to done)! Something I’ve learned, is to NEVER follow opinions of home improvements store employees. I’m fairly new to DIY, but I’ve heard some interesting tips and info from those guys that I knew right away was crazy talk. They often don’t know what they think they know. lol. Good luck re-wrapping, sorry you have to do that.
“Let’s just say that this 12-foot wall is probably the most secure and structurally sound wall in my entire house now with all of those studs.”
Hmmm, does this mean you might be re-building very wall of your house in the future? In your abundant spare time? Wouldn’t surprise me in the least!!
Making great progress. Thanks for the tip on the Tyvek; I too would have thought the price was largely the name recognition due to marketing costs. Just wondering but why didn’t you put either Protecto Wrap or Dupont flashing tape around the flanges before putting on the house wrap? I thought the layers were supposed to be OSB, Tyvek skirt below the window, sill pan tape, sealant caulk around the opening, window put in, sealant tape over the flanges, Tyvek, Tyvek tape over the sealant tape.
I really don’t know. I’m such a visual person that I’m having a hard time following and understanding your comment.
All I know is that I watched this guy’s videos (which are some of the best that I’ve found) and tried to follow what he did. I did cut my house wrap too wide around the window, though, so I guess it’s good that I’ll be redoing it.
Thanks for video link, Kristi! I’ll definitely check out his other videos as well. His is pretty much the way I thought based on windows I’ve seen go in though he doesn’t get as far as the Tyvek. I looked to see what Dupont said and if you’re interested, they have a pdf on installing flanged windows using their products.
http://www.dupont.com/content/dam/assets/products-and-services/construction-materials/assets/K16791-Integral%20Flanged%20window%20BEFORE.pdf
He’s got some great videos! Great links! Thanks
You and your brother did an amazing amount of work yesterday. It’s taking shape and I think you will be happy with the smaller window in your pantry. It lets in some light but not too much to affect your food stuffs.
Exactly my thought. I liked the light from the 2 big windows, and I am glad that you kept a small window. But, I have never seen a pantry with a window because you would probably want your food kept in a dark and cool place. Personally though I like the small window.
I’m so glad you get more help now, and how about that handy truck for hauling? 😎😎😎then during/after all that hard work you snap photos and blog to show us your progress!! Whew, I’m impressed. Strong work, Kristi, strong work.
I am just speechless and in awe of your accomplishment. Thank you so much for sharing!!
Amazing progress! Since you now have a smaller window and were planning on the double doors having glass to let the light in, have you considered installing a skylight or Solartube in the pantry? It would really light up the pantry!
A solar tube isn’t possible in the pantry since there’s no attic above. I’ll be applying the drywall directly to the rafters in the pantry, which means there’s only about four inches between the ceiling and the roof.
Wow. You are just amazing!
Love watching your progress on the website. It’s the first thing I look for every day when opening my email. Also appreciate the research you put into each product you are buying. I have had a pantry at each of our last two homes and wouldn’t be without one
that may explain why I only ever see the Tyvek brand in new home construction! Definitely good to know. 🙂
I can’t wait to see your final plan for the pantry!
You are so blessed to have family members who are willing to assist when you really need help. “Many hands make light the work”.
I remember when Tyvek first arrived at the lumber yards in the Midwest. DuPont had jackets made of the material for give-aways. Everyone was amazed; lightweight, waterproof and windproof, and pretty darn tough to rip. It was a stroke of marketing genius.
Can you show some details (when you get to that point) of how you’re tying the house wrap and siding into the existing siding considering that you’re not doing all the siding on the house all in one go?
I’ve got a similar situation as you on a kitchen window that needs to be replaced with a smaller one, and the accompanying mess with house wrap/siding/etc. And like you, I’m also not planning on redoing all the siding on the entire house when that window gets done, but I’ve been stumped on how to make the house water tight where the old meets the new until I can get around to doing all of it.
Kristi, it looks like you and your brother really got alot done. This was a fun post to read! The breezeway has kind of a funny roofline, doesn’t it? I never noticed it from the pictures of the front of your house. But the pictures from the back, it looks like the roof is flat over the add-on between the house and garage. If the roof on the house and garage are the same height, have you ever considered (eventually), not right now) actually extending the roof so it is the same height? then you would have an attic over the pantry.
Thanks for the information on housewrap. That’s the nice thing about locally owned hardware/ building supply/ lumberyards. Usually the employees there are much more knowledgeable than the employees at the “big box” stores. I have noticed that myself. If I need to talk to someone who is knowledgeable, I buy local. The large “chain stores” have better hours and more variety but they are putting the locals out of business.
Major amount of work for one day! Bet you slept like a baby last night! Looks to me as though you are doing it right. ( But I’m no expert, just been through three house builds and some DIY with hubby.) This house is breathing a sigh, and thanking you for healing it!
Now for my soapbox moment…feel free to skip past! 😉
As for the “experts” at HD, ( and LOWES TOO ) in my opinion, when they first were opening stores here in our area, I applied for a job there. They were all about wanting to hire people with knowledge and experience, especially in major departments. I was offered to manage the nursery, since that was where my expertise was, but declined the offer. However, many of my co-workers ( our company was folding) were hired, and most still work for them. They tell me that now, it’s just about “warm bodies”, because of pay and schedules not being attractive to the skilled people. I have “tested” employees on occasion with questions that I already knew the answers to, and they were most often wrong. I could tell they were just giving me the answer that they thought I wanted to hear. Do they think I want a low price? Tell them to get the cheaper item. Do they want to make the store more money? Sell the high price stuff. I have had some who were truly helpful and knowledgable, but overall, not so much.
Do research. Unfortunately these days, the paid help are minimum wage, untrained, and unskilled. If you find one who is good, sing their praises to the manager, and corporate. It does not go unnoticed! And let the person know how much you appreciate their help too, it makes them perform better!
Okay, off my soapbox now! 😉
Kristi, I would agree with several others about taking the cheaper product back for a refund. I would also ask to speak with the manager/supervisor of that department and advise her/him why you are returning the item. If we do not return items and speak up “they” will never know how poorly their employees are really doing. Some employees are just there for a paycheck but others just need to be trained on-the-job! If their employees can learn and gleam some of your DIY knowledge, they will be better for it!
As always……GREAT JOB!!!!!! : )
Love your blog! Thanks for sharing your adventures with us 🙂
I get so much inspiration from you. When you mentioned
working by the light of your iphones it made me think of a great tip.
I don’t know if you have one but a headlamp is so great for working on
projects in lowlight, when the power is cut, or just where you need to focus more and they are hands free. We use ours all the time around here on house remodeling projects.
Best of luck to you 😀
What a great family you have Kristi, you and your brother achieved a lot yesterday. The pantry will look amazing. Thanks for sharing your transformation.
I’m a big fan of your vision, talent, and artistic eye! Just curious if you have ever considered one of those sun-tubes ( http://www.veluxusa.com/products/sun-tunnels ) to make up for some of that lost natural light in the pantry room? Keep it up!
Nice job! I’m just leaving a comment to say that a year ago we blocked in an outside door and moved a window. Both of those necessitated putting house wrap on a couple of small sections of our house. We don’t have the budget right now to re-side the house, so that house wrap has been exposed to all kinds of weather for months (I live in the north, so that includes months and months of snow and cold every year), and it is holding up just fine. We also lived even further up north for five years, and our neighbours had a garage that was house wrapped and not finished for almost the entire time we lived there and it held up well. So I think your house wrap will be just fine until you can refinish the outside of the house. We do have a layer of styrofoam insulation between the house wrap and the outside of the house, because that’s how you need to do it in our colder climate, but I don’t think that would affect the durability of the house wrap itself.
What you’ve done is great! You are literally going to rebuild that house by the time it’s all said and done! Amazing!
Questions: did you have to get permits for the new window and for the electrical changes that you’re making? In Florida, any time you touch the exterior “openings” (windows/doors) of your house, you have to get a permit. And, changing out electrical would require a permit, too.