DIY Ottoman Coffee Table Part 1 – How To Do Diamond Tufting
I think y’all are going to love today’s project! I’m going to show you how to make a diamond tufted coffee table ottoman!
I’ve actually had a diamond tufting tutorial on my blog for over three years now. That tutorial is what I would call “the correct way” to do tufting, where you attach the buttons using cord through a hole and stapled onto the backside of whatever you’re making. (In that case, it was a king size headboard for Gwen’s bedroom.) (And FYI, my tufting has improved since then, using some tips that I’ll share below.)
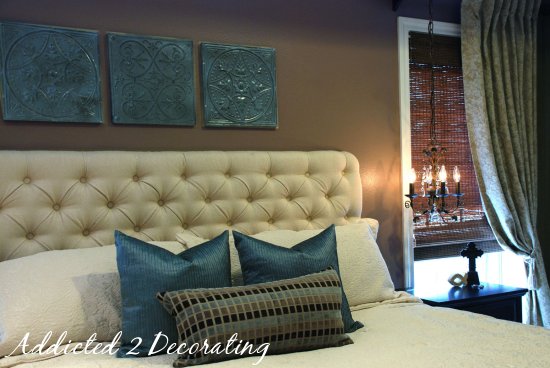
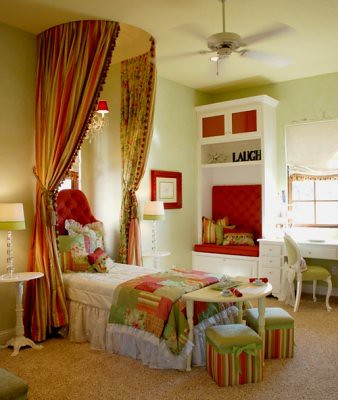
But the very first time I ever did tufting was for the bedroom I designed for a six-year-old girl — part of the Waco Symphony Designer Showhouse — and I decided to tackle not only a headboard but also the tufted upholstered backs for the two built-in seats.
That first time, I used a completely different modified method for tufting than the one I shared on my original tutorial, and this modified method is what I want to show you today.
This method is easier if you’re working alone to make a headboard or tufted coffee table ottoman. With the “correct” method, you have to continually switch from working on the front of the piece to working on the back of the piece, all while keeping perfect tension on the cord holding the button. It can be quite a challenge if you’re working alone, especially if you’re making something large like a headboard.
With the modified method I’ll show you today, you do all of the work from the front of the piece, and there’s no pulling cord to the back and stapling it. Everything will be done from the front.
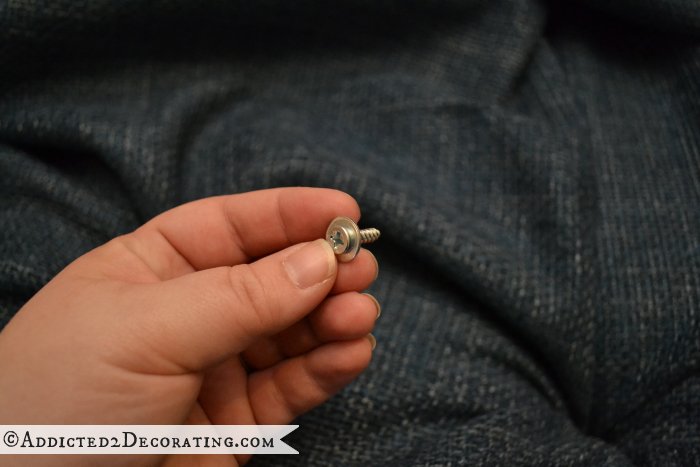
The bottom line is that with this modified (non-professional-upholsterer-approved) method, you use screws and washers to hold the tufts in place, screwed into the plywood from the front. Then when the tufting is all finished, you glue the decorative buttons onto the screws using hot glue or any other strong adhesive like E6000.
The one thing to keep in mind with this method is that you do not ever want to use this with thin materials, like silks, silky polyesters, etc. I recommend only using it with upholstery weight fabrics, and while heavy decorator cotton fabrics will work, woven upholstery fabrics are ideal.
So let’s get started, shall we? 🙂
How To Make A Tufted Coffee Table Ottoman
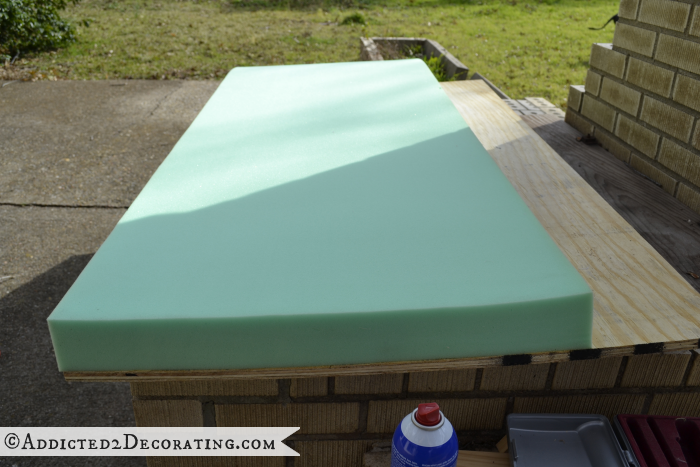
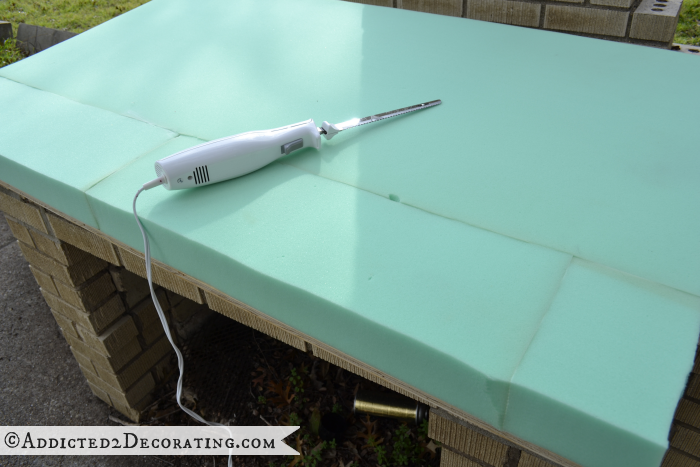
First, cut your plywood to the size you want (or have Home Depot or Lowe’s do this for you). I used 3/4-inch plywood for my ottoman top. Then use spray adhesive to adhere the foam to the top of the plywood. I used 3-inch high-density foam for mine, purchased at JoAnn Fabrics during a 50% off sale. That’s the only time I’d ever buy foam unless I have a coupon. That stuff is expensive!!
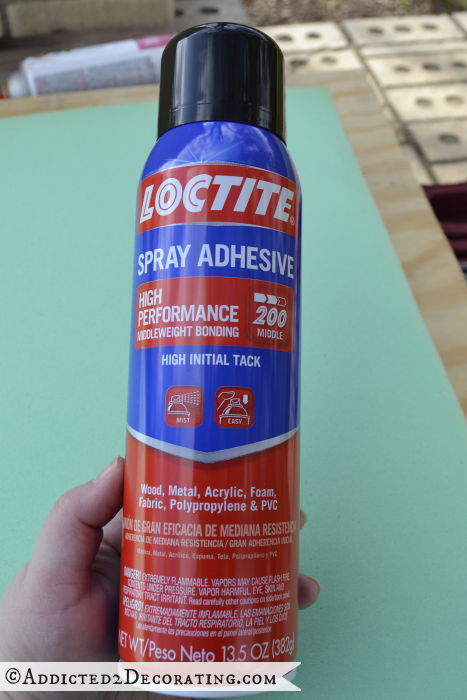
And just in case you’re wondering, I use Loctite spray adhesive. I could only find the middle-performance 200 strength. I hate this stuff with a passion because it sprays as a mist, and it gets everywhere! I can feel it on my arms, in my hair, etc. My favorite is the Loctite 300, which sprays as a web. Always use spray adhesives that spray as a web because they’re easier to control and have way less overspray.
It’s perfectly fine to piece the foam together if you need to. Just be sure that you glue the foam not only to the plywood but also glue the edges of the foam to the edges of the pieces next to it. And the absolute easiest way to cut foam is with an electric knife. I have two — one for my kitchen, and another for my toolbox.
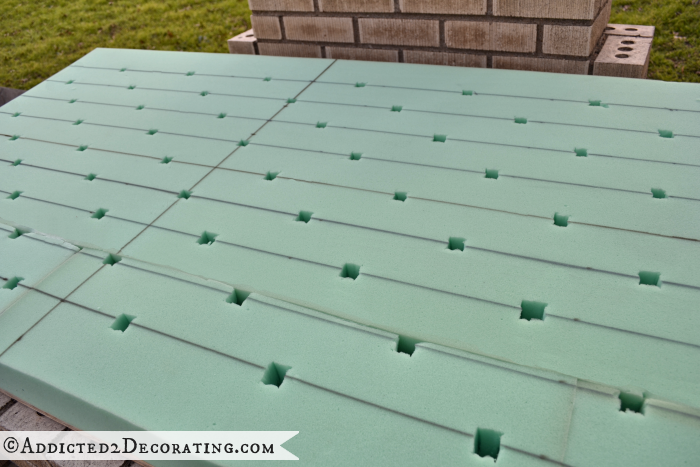
Once the foam is attached, use a tape measure to mark where your buttons need to go. Here’s how I did mine.
I wanted my tufted coffee table diamonds to be eight inches wide and six inches high. First, I measured and marked the center lines on my ottoman going the length and the width (shown in red). Then from that line, I measured and marked every three inches and drew a line the length of the ottoman (shown in gray).
Then starting on the middle long red line, I measured four inches from the center and then marked every eight inches from there. I repeated this on every other line.
Then on the remaining rows, I placed a mark for a button along the center line and measured and marked every eight inches from there. That 4-inch offset between rows is what will form the diamonds.
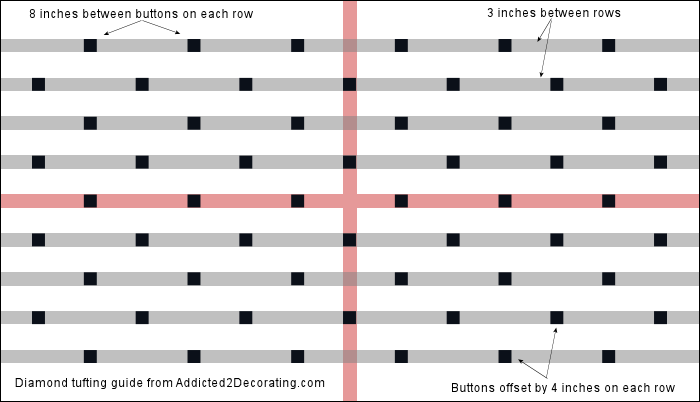
Of course, if you want your diamonds a different size, you can adjust the measurements.
Next, you’ll cut out the foam where each button will go. I’ve used many methods for this, and the absolute easiest method (that requires no special tools!!) is a pair of sharp scissors. Just open the scissors at least an inch, shove the points down into the foam, and cut.
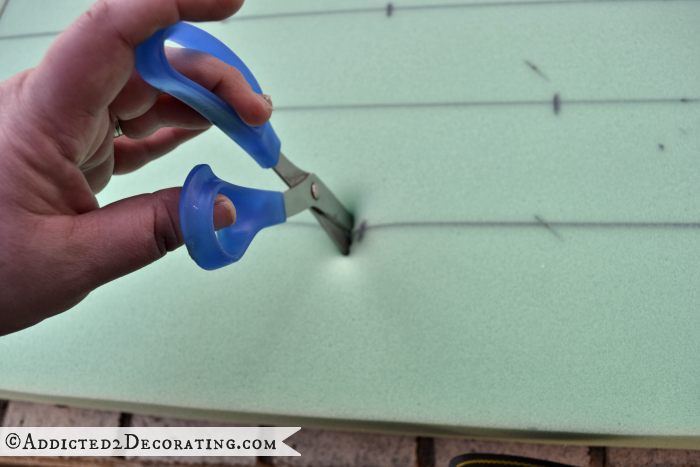
Do this three more times to cut out a square plug of foam for each button. You’ll want each one to be no smaller than 1-inch square. If you’re using buttons larger 3/4-inch, you’ll want to increase the size of the hole.
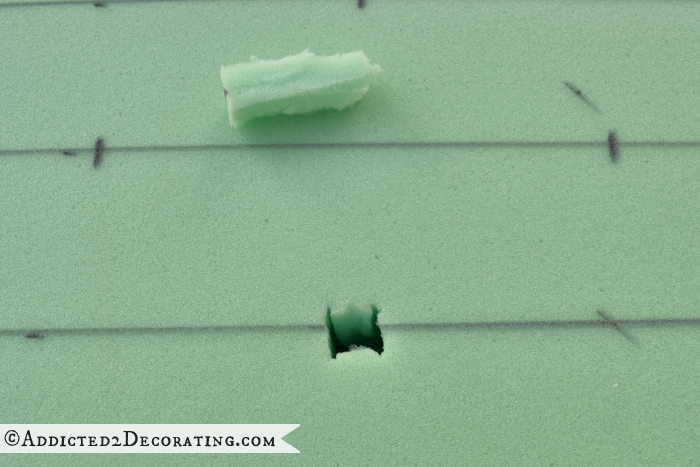
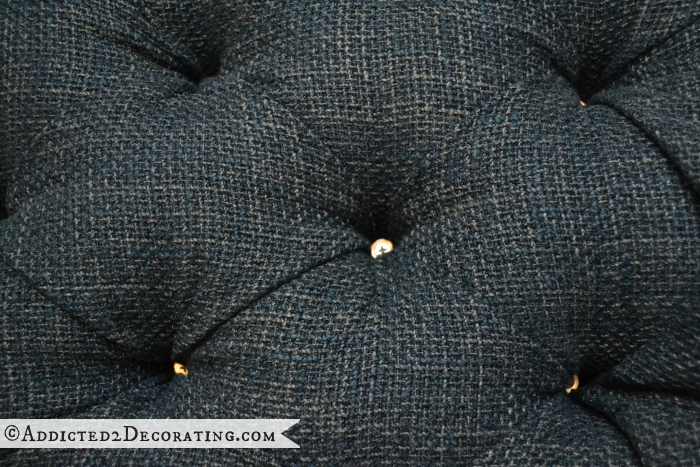
And with all of the button holes cut, it should look like this…
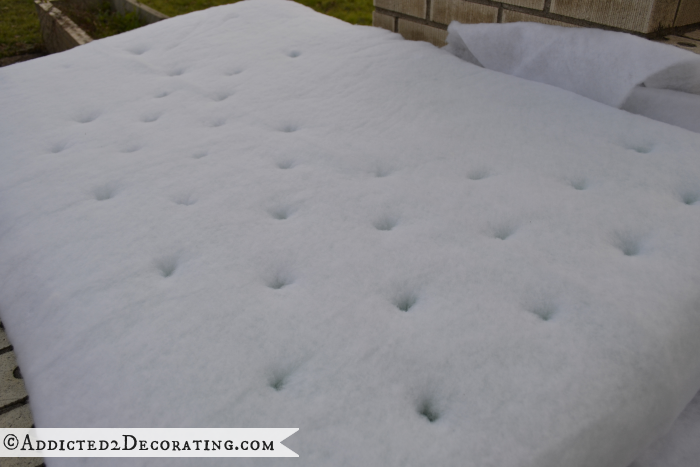
Next, cover the entire thing with batting. I prefer to use two layers of high-loft batting. For my ottoman, a twin size piece of batting worked just fine. Use your fingers to poke holes in the batting for each buttonhole. (Basically, you don’t want anything — foam or batting — giving resistance to your buttons, or in this case, screws and washers. You want them to be able to sink down into the hole with little or no resistance at all.)
Now it’s time to start tufting!
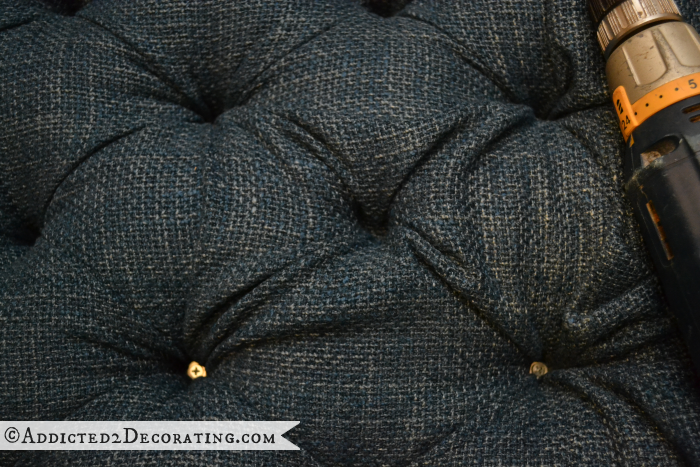
Starting in one corner of the ottoman, poke the fabric down into the buttonhole. Be very sure that you still have enough fabric to wrap around the edges and to the back!! Once it’s placed just right, screw that tuft into place. (More details on this in a second.)
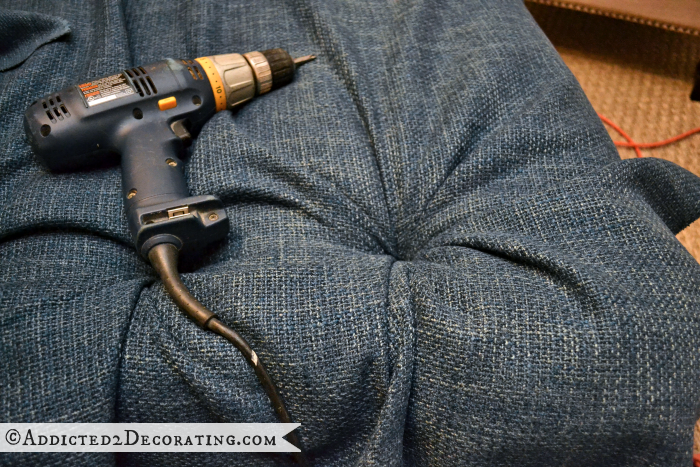
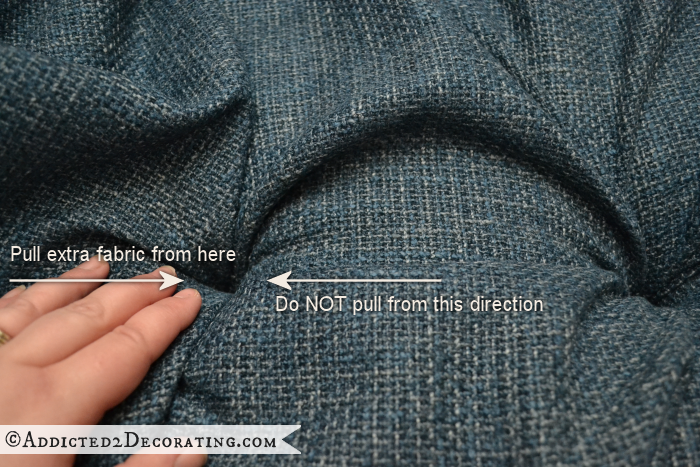
Now working down that row, move on to the second buttonhole. Work the fabric down into the buttonhole until you can feel the plywood. You don’t want a lot of pressure and pulling on the fabric. You want to work enough fabric into the hole so that it pretty much stays there on its own.
This is very important: When needing extra fabric in the hole to reach the plywood, do not pull and tug from the side where you’ve already attached a button!!! Instead, pull any extra fabric you need from the end with the loose fabric. If you pull from the side with the button, you’ll pull the fabric too tight and end up with permanent creases in the foam around each button in your finished tufting. (If you look at the first picture of the headboard in this post, you’ll see that I made this mistake.) You want the fabric between buttons to be smooth, but you do NOT want to pull it so tight that you get indentations in the foam.
Now use a #8 x 3/4-inch wood screw and a #10 flat washer to secure the fabric in the buttonhole. Screw right into the plywood.
Continue working down that row until the row is complete.

Next, you’ll work on the buttons that are straight across from the first row.
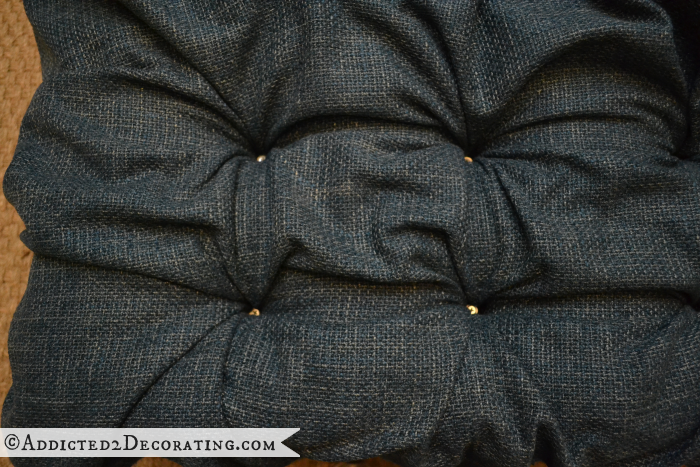
In other words, you’ll skip the second row (the row with the offset buttons) and move to the third row. Use the same methods as above — don’t pull and tug from the button side of the fabric, but instead, if you need extra slack, pull the fabric from the side with the loose fabric. Also, if you’re working with a fabric that has a very visible weave, you can use that weave to be sure that you’re pulling the fabric straight from button to button.
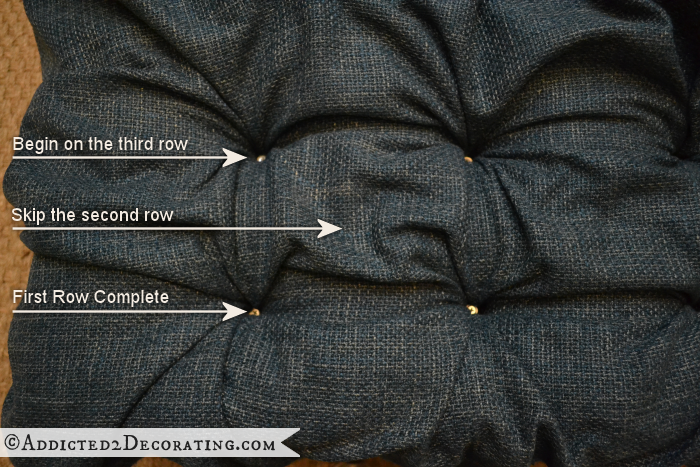
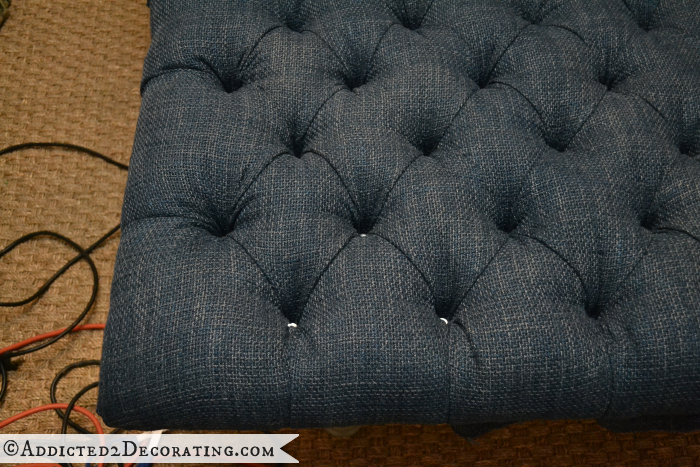
Continue working on every other row until it looks like this…
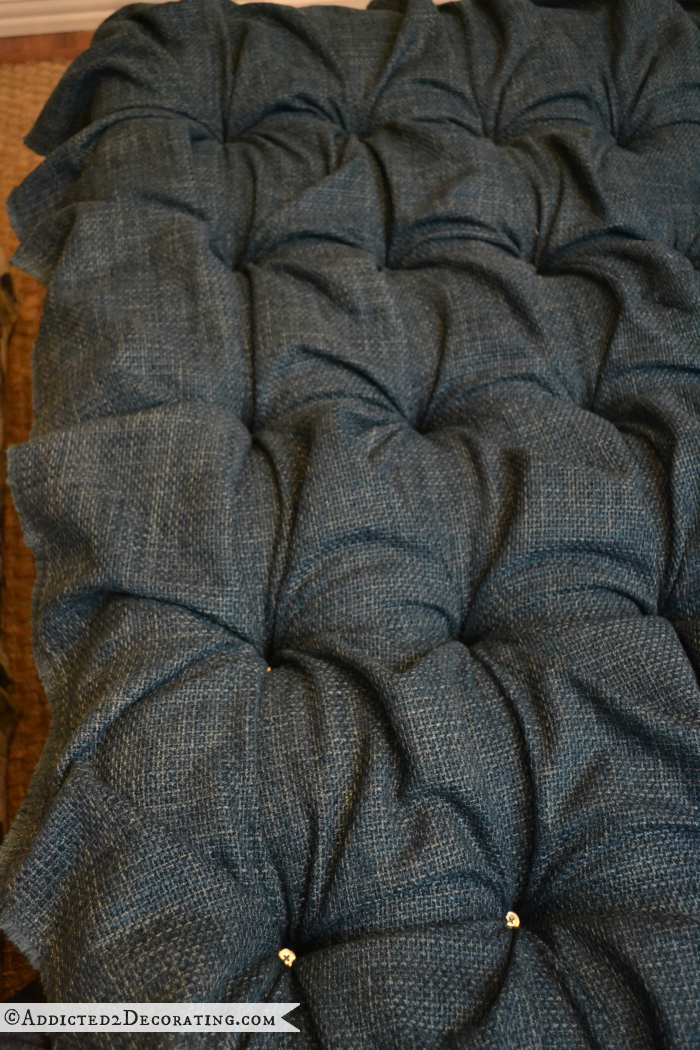
Now you’ll go back and work on the rows you skipped. This is where the beautiful diamonds are formed.
First, just shove the extra fabric into the buttonhole to see what you’re working with. You’ll probably have some not-so-pretty wrinkles, pulls, and puckers in the fabric. Don’t worry about it!
Now with one hand holding the fabric inside the buttonhole, use your other hand to work with the extra fabric until you’ve formed folds that take up the extra slack and remove the wrinkles and puckers. This may take some work. Just be patient with each one.
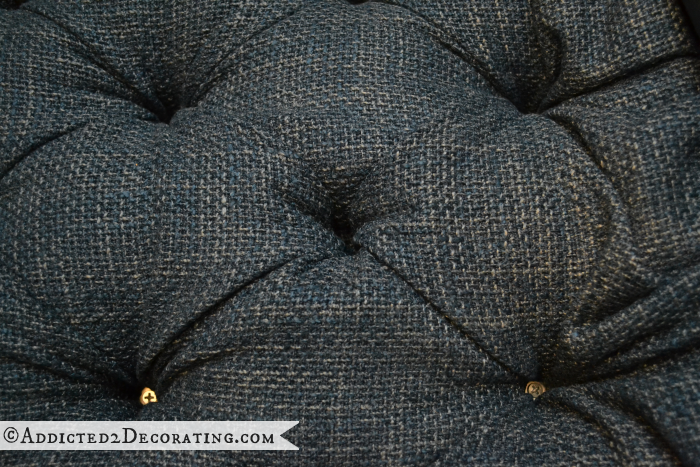
Once you’ve got it looking reasonably under control, add the screw and washer. You might still notice some wrinkles and puckers, but those can be worked out after the screw and washer are in.
With the screw and washer in, take a second to get rid of any wrinkles that remain by working with the folds until they disappear.
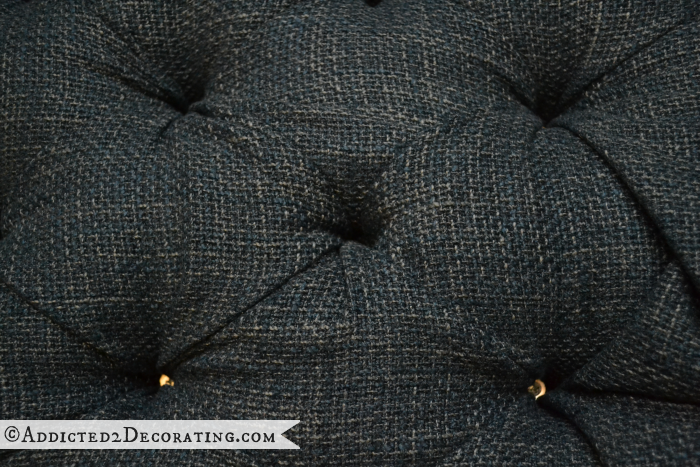
And as you move from button hole to button hole, you’ll see your beautiful diamond tufting taking shape.
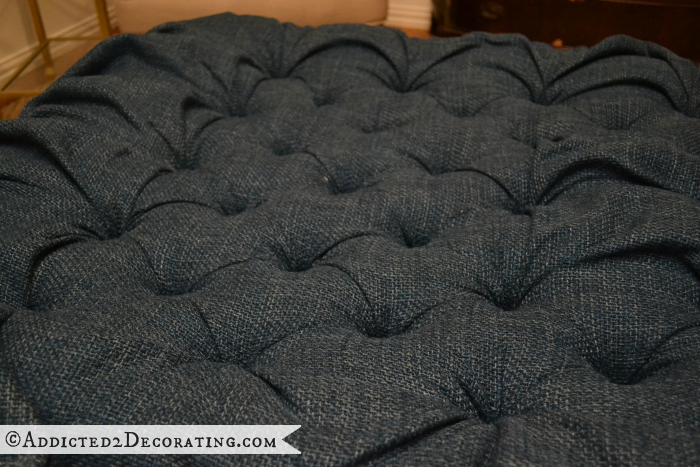
The main key is just to be patient. Each buttonhole might take a few minutes, but with enough working and folding, it should look just fine when it’s finished.
Also, don’t stress about each individual tuft looking absolutely perfect. It’s the overall effect that’s important. I guarantee you that if you took the time to look at professionally tufted furniture, you’d start to see some flaws in the individual tufts. But the overall effect is still beautiful. So if the pros aren’t perfect, we can’t expect that ours will be perfect. 🙂
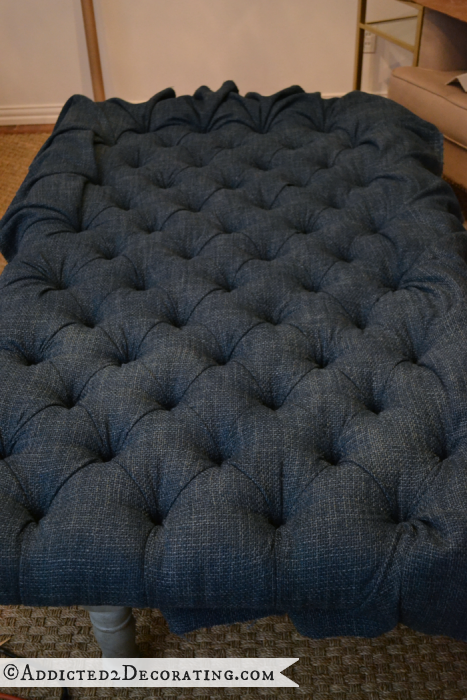
Once all of the tufting is done, it’s time to finish off the sides.
I cannot stress this enough. How you finish the sides will make or break your tufted coffee table results. Seriously. If you just start pulling and stapling the fabric at random, the piece will absolutely, without a doubt, look homemade (and not in a good way). Please don’t go to the trouble of diamond tufting, only to ruin it with a sloppy job around the edges!!!
The main key with the edges is that you want to create folds directly from each button to take up any extra fabric.
You can do this however you find to be the easier way, but I personally like to start by pulling the fabric between the buttons smooth and securing those areas with a staple on the back.

Then I take the extra fabric and work with it until I’ve created a fold that takes up all of the additional fabric and removes the wrinkles. Wrap around to the back and staple. Once those areas are done, you can go back and add as many staples as needed to make the fabric on the edge perfectly smooth.
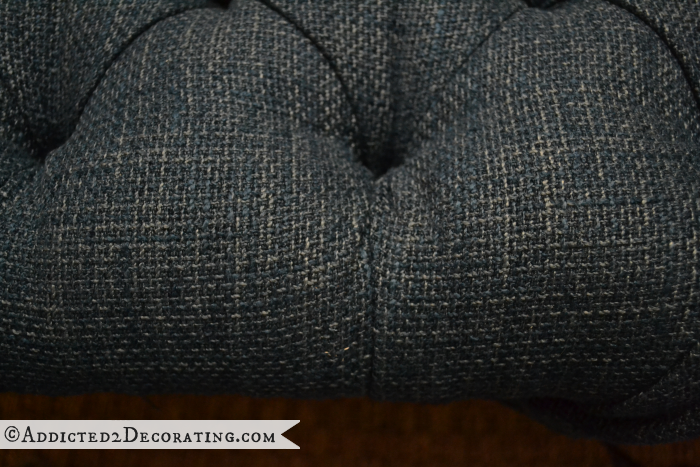
On the finished piece, you should have a fold going from each button around the edge, and the fabric between the buttons should be smooth.
And unfortunately, this is as far as I got with my tufted coffee table ottoman because my staple gun wouldn’t shoot staples through the plywood.
I was using the appropriate staple length, and I was applying as much pressure as my (very tired) hands could apply, but those staples just curled up like a ribbon. I’ll be going today to see if I can find staples to fit my nail gun. That should do the trick.
And of course, the finishing touch with this method of tufting is to cover your buttons with fabric (be sure to remove any metal loop from the backs so that they’re flat on back), and use an adhesive to glue the buttons to the screws. As long as you use an appropriate adhesive, they should be there permanently.

I hope to finish this tufted coffee table top up today, and then this weekend I’ll get started on the coffee table base.
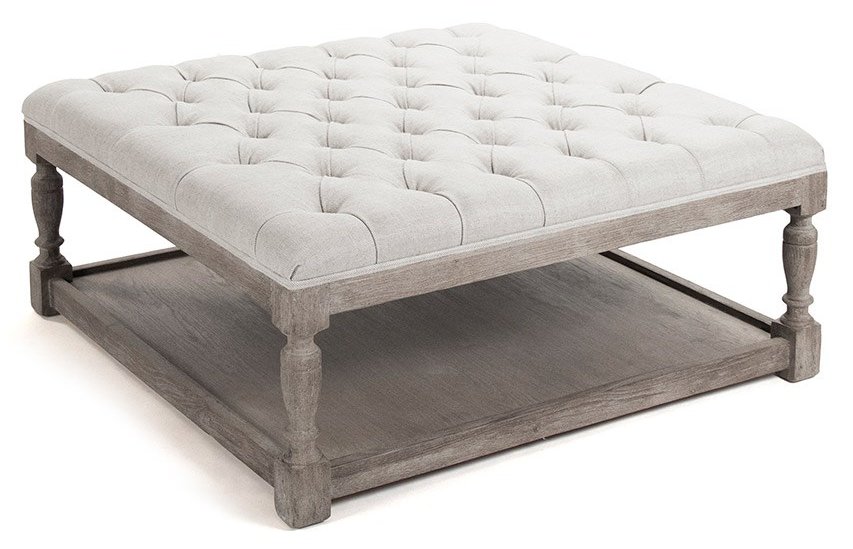
Just in case you missed it, this $1200 coffee table ottoman from Layla Grayce is the look I’m going for…
So check back on Monday and see if I was able to pull it off! 🙂

Addicted 2 Decorating is where I share my DIY and decorating journey as I remodel and decorate the 1948 fixer upper that my husband, Matt, and I bought in 2013. Matt has M.S. and is unable to do physical work, so I do the majority of the work on the house by myself. You can learn more about me here.

Great tutorial! Thanks so much!
Thanks so much for this tut! It takes a lot of the ‘mystery’ out of diamond tufting, bringing it into the realm of what’s actually now possible. ~:)
Beautiful just beautiful. Your tutorial is excellent and gives me inspiration …
You make it look so easy, I almost want to try it. I think in a previous post you mentioned re-upholstering your couch. What material are you using on that?
Oh yes…that white and navy blue floral fabric has got to go! 🙂 I’m still undecided on the fabric. Since the ottoman is such a deep color, I’ll probably go with a light to medium neutral color on the sofa, but I wouldn’t mind something with a noticeable texture or slight color variations in the weave of the fabric. But definitely not a print. I’ve been on the lookout for the perfect fabric, but haven’t found anything yet.
Beautiful project. Your tutorial gives me inspiration …
I like this method so much better than the other! Wish I’d thought of it when my daughter and I did hers last summer. We used the needle and cord method and it made for a long tedious job. We had staple gun issues too, BTW. No fun!
Your ottoman is going to be gorgeous!
LOVE your ottoman. The fabric and color are awesome. What are the dimensions?
My ottoman is 32″ x 55″.
Will you post pictures of the back in progress also, please? I am a visual learner and like to know it is looking as it should. Also, button type?
Thanks. It is looking great!
Yep, I’ll update with those things when I finish the top. 🙂
Kristi you are an amazing woman! You tackle projects I would be too intimidated to even try and do very professional, quality work. You’re an inspiration!
If you mark the same pattern on your plywood , pre drill 1/4″ holes for each button. Cover your buttons. (Local upholstery shops can do this for you or you can buy kits at your local fabric store to cover buttons yourself.) cut a length of button twine or a strong string for each button. Using a long (mine is 10″) upholstery needle, first thread a button onto the string then thread both ends of the twine through the eye of the needle. Go through the fabric, the hole you cut in the foam. Then through the hole in the plywood pulling the tight and staple the ends of the string on the back of the plywood. This is the way upholsterers like me, do it.
Yes, I know. 🙂 That’s the “correct” method that I referred to, and that I used in my first tutorial that I did three years ago. (The link is in the first paragraph.) As I stated, this is a modified version of button tufting that can only be done with certain fabrics and might be easier for non-professional, DIY types who are working alone.
I love your tutorial. My only tip is get a small air compressor and staple gun. My husband bought me one a few years ago as a Christmas gift. Best. Present. Ever! Makes upholstery so much easier!
I agree. I have a air compressor and staple gun, too. I made a headboard to my daughter as a Christmas gift – it only took me a few hours – thanks to my air compressor. http://pimpinellate.com/2013/12/25/making-a-headboard-all-by-myself/ I didn’t do a diamond pattern, but I have done that on an armchair http://pimpinellate.com/2012/06/29/mobelrenoveringskurs-fristads-fhs-fredag/img_2273/
Great tutorial! Well done. Can’t wait for part two.
WOW! It’s looking gorgeous!
that is looking stunning thanks for sharing this cheating way as now i might actually try this myself one day hee hee
Love this! I have done the button tufted headboard the “correct” (hard) way, but can’t wait to try this out on an ottoman like this one. One question – do you find that the fabric twists with the screw when you try to put it in? Any tips for that? Thanks! Love reading your blog.
The only time I’ve had trouble with the fabric twisting is when I tried to use thinner fabric. I used this method with a silky polyester fabric. Definitely a mistake. But I don’t have problems with the fabric twisting when I’m using heavier upholstery fabric.
One way to avoid having the fabric catch up in the screw and twisting would be to punch a hole through it (hammer a nail, just barely into the surface, and then pull it back out).
Also, for putting the holes in the foam, an apple corer works wonders!
Kristi wow its pretty. I did go back and look at that 6 year olds room wow that’s fantastic. I didn’t know their is a difference between interior design and decorator. Are you license now? or is that going back to college? You are really talented. Have a great weekend, cant wait to see your coffee table when its done.
I’m not licensed. In order to be so, I’d have to get another 4-year degree, then spend about two years of my life interning with a licensed interior designer, and then take a licensing exam. Not at all worth the effort for what I’m doing now.
Thanks for responding. I did think it was 2 year. oops. 🙂
The ottoman is looking great, Kristi, can’t wait to see it finished! btw, I’ve had problems stapling into plywood too. It is something to do with the cross plys in the plywood, I think.
You con’t to amaze! I wish I had a bed set that didn’t already have a headboard attached, this is gorgeous. I will definently try this out on a stool some day….I LOVED the lotus mirror the other day. I hope you and Matt have a wonderful, warm Christmas in your new place 🙂
Thanks for the step-by-step that even I can follow (that’s quite an accomplishment on your part, I must say). Looks great and I think I’ll start out with something a bit smaller and see if I can learn to diamond tuft. Sometimes the projects I do tuft, but they’re not supposed to. Maybe I’m a natural? Anyway, have a wonderful Christmas.
Wow! That is beautiful and with a base like the one in the photo, it will be the ‘icing on the cake’ for your living room.
You are awesome. I love this tutorial and the color fabric is great. Your house will be wonderful for you and Matt. I do have to say, I am loving the direction you are going with this house versus the condo. I would love to read a blog post about your personal style and how it has evolved over the years.
Oh, now that would be an interesting post even for me to read (and write)! Would you believe my taste used to be ultra contemporary? 😀 I’ve definitely done a complete 180-degree turn when it comes to my taste.
The condo was definitely fun, and for some reason, the small size of it gave me the confidence to do some things that I’d probably never do in a house. But this house is definitely going to be “me”. 100% me. (And Matt’s totally okay with that. 🙂 ) It already feels more like home to me than the condo ever did. 🙂
I would have never guessed ultra contemporary for you. Thank you for considering the topic. The new house seems very “you” even though I don’t know you in real life.
I really LOVE the original ottoman that you showed. Do you think it’s all cushion (i.e., foam) on the top or do you think that maybe that’s an illusion? I’m not sure they make foam (available to the general public, anyway) that thick. I’ve looked at it at Joanns before, and I’m guessing the thickest I saw was maybe 5″, so that’s why I’m wondering if part of the thickness is just covering board attached to the bottom of the plywood. Hopefully that question makes sense.
I think it’s just the picture. In other pictures, the foam looks like it’s about 3 inches thick, which is what I’m using.
Love this step by step for diyer’s like me, looks professional, and beautiful. You are an inspiration, can’t wait to try this on something smaller. Great job Kristi!
What a wonderful way to do this ! I am always doing my projects alone and this would be such a help not to mention that the quality of your tufting is beautiful ! Thanks so much.
Hmm, this is the second time you’ve used a piece from Layla Grayce for inspiration. They’re going to hate you! I’m anxious to see how your version of their ottoman turns out, since your mirror was so much nicer than theirs.
And I’m going to use another piece I found there as inspiration for my IKEA Rast 3-drawer chests that I’m using as bedside tables in the bedroom. 🙂 Hope they don’t sue me! 😀
I think you’ll be safe as long as you don’t start selling “Layla Grayce Knockoffs by Kristi!”
I can’t wait to see the finished product! I love how easy it is to follow your tutorial! I plan to tackle my own ottoman project and will definitely use your site as a resource. Thanks!
Wow. This is the best tutorial I have seen on tufting! Thanks for sharing….I would like to try this some day soon so I am pinning to my DIY board! 🙂
what a great way to handle tufting…thanks for the step-by-step tutorial.
That is absolutely gorgeous Kristi! Do you have any advice for how to mount an over 100 lb. reclaimed barn beam mantle to the wall? this is my Christmas present and it arrived yesterday! It is currently untouched by stain or any finish , so I need to decide how to finish it and then how to mount it. It is extremely heavy, but I am so in love with it!
Oh wow, I really don’t know. Is there any way that an Ook Hangman French cleat would work? Those hold up to 200 pounds. You could even use one at each end and be really confident that it will hold.
The only thing is that those French cleats stick out about 1/4-inch. Not sure if you could hide the gap with some tiny trim or something.
Patience is NOT my virtue. Even reading your tutorial made my eyeballs itch with anxiety! Your instructions are perfect though. Wish i had a friend like you–I’d trade her upholstery skills for my cooking . A warm and loving Christmas to you and Matt. You deserve an extra special visit from Santa!
This came out great! Can’t wait to see it finished.
Great tutorial! I have struggled with tufting before and this would make things so much easier next time. Thanks
Wonderful tutorial! It appears that a lot of fabric is needed. You mentioned the size of the ottoman is 32″ x 55″. How many yards of fabric does it take to make this wonderful diamond tuft? I sure would hate to not have enough 3/4s the way through!
I purchased three yards of 54-inch-wide fabric for this ottoman, and that gave me just enough for upholstering the top, as well as for covering the 58 buttons and also covering the welt cord that goes around the edges between the upholstered top and the wood base.
Thanks so much for taking all the guess work out! It is simply beautiful!
I love the tutorial. Thank you! I wanted to make a round skirted ottoman. The upholster quoted me 360 without fabric. I think I will try my hand at it instead. Would I use the same method for counting the diamond as you did?
It’s the method I would use — find the center point and work from there.
Great, great tutorial. You have the heart of a teacher: you are aware of the common mistake spots and explain well how to get around them. Tufting has been everywhere on the home decor blogs in 2013, and for the first time, I actually want to try doing something!
Once it’s placed just right, screw that tuft into place. (More details on this in a second.)
Hello, just read through the whole blog and not sure what to do with the drill after sticking fabric through the hole. I didn’t see the details……
Also, when i did my ottoman, because it was wider than 54′, I ended up buying a table cloth. Any other suggestions where I could find wider than 54′ material because I am so redoing my ottoman!
Hi Debbie~
You just use the drill with a screwdriver bit on it to screw the screw with the washer through the fabric and into the plywood.
As far as wider fabric, I really don’t know. I haven’t had any success at finding wider fabric either.
I’ve used a King duvet
Cover before that was super thick. It wasn’t for upholstry, but would have been suitable
This tutorial just changed my life–seriously. The screw and washer idea is brilliant and produces such a great result. And the every other row thing–haven’t seen that in other tutorials. Thank you!
Hallo, this ottoman is beautifully, I’m going to leave the work to me. I like this tufting. I ordered by heritageupholstery the wooden furniture legs with brass castors.
So and I think i will have in autuum my new ottoman-coffeetable
thank of your inspiration
edith
thank you so much! I used to tutorial and new method of tufting (with the screws/washers) to make an amazing headboard! I cant be happier with it! next…Im inspired by your coffee table!
Kristi –
You mentioned the size of the ottoman is 32″ x 55″. I am currently in the process of acquiring fabric for the project my husband and I have started. However the ottoman we are working on is 40″ x 40″. Any chance you remember how much fabric was left on the edges post tufting – in your opinion do you think we can make it to the edge with the standard 54″ width?
Thanks so much – this is incredibly helpful – I love this “cheat method”, so much quicker and I can work on it without my husband alot easier.
I do think that it can be done (only because I’ve done it before), but it’s going to be a bit of a challenge. Just be sure that you don’t waste ANY fabric at all on the side you start on (only leave just enough to wrap around and staple, but no extra), and then be sure that you plan your tufts just right so that you’ll end up with enough fabric on the other side. What you can also do is a practice run — just lay out the fabric and push the fabric down into the button holes, starting on one edge and working towards the other edge, to get an idea of how tightly you’ll have to pull the fabric in order for it to reach all the way. That way you’ll know exactly what to expect as you’re actually doing the buttons.
I love your ottoman. I read that you used wood screw instead of buttons. Wouldn’t the screws rip the fabric while drilling them in?
Not if you use thick upholstery fabric. If you use thin fabric, then you would run the risk of it tearing, although I have done it successfully in the past with thin silk-like polyester fabric.
Would upholstery faux leather hold up with the screws? Also, how did you cover the top screws so the metal tops don’t show?
I’m wondering if you are going to keep doing tufting, if it would be a benefit to use the snap on buttons (like in boats) I know you can buy a tool to cover the snap heads. that way you wouldn’t have to use the glue that may come undone. Any was just thinking out load.
Your tufting looks great!
Matgaret
Very impressive! I have been looking for a method which gives nice deep tufting and well-rounded edges. Thanks for filling in all the important detail, such as the grade of foam, and the bit about the web Loctite. That’s what we need to know! Also the way you do all the square rows first and then the diamond rows to get the tension just right: I haven’t seen that anywhere else. And your finished work looks so professional! Thanks for sharing this.
This is a great tutorial! I am going to be re-purposing an old round coffee table into an ottoman and using the foam from my kids’ round crib mattress. The foam is pretty thick, so I may have to cut it down a bit. I hope it turns out as beautiful as yours did! 🙂
hi! I can’t wait to get started on this tutorial!!! Thanks so much for sharing it. I had a question – how did you attach the welt? and how did you attach the top the the base?
thanks! and I apologize if you already answered it and i overlooked it. I was so excited to see the pics that i may have missed it. 🙂
I used hot glue for both. Not the small little things you get from the craft store, but the big, professional sized things you get from Home Depot. I had planned on using my Kreg Jig to secure the top the base, and even had the pocket holes drilled for it. But once the top was sitting on the base, I realized that there wasn’t enough room underneath for my drill to fit in there so that I could screw the two pieces together. *Sigh* So hot glue to the rescue. It has held securely ever since, though.
Thanks so much for replying!! I’ve want to get an industrial glue gun for some time and this is the perfect excuse to! 🙂
Great job! this looks awesome! Can’t wait to see the finished product!
I love this ottoman. Thank you so much for sharing this. I have been thinking about doing this project using vinyl. I know you suggest fabric but I have my heart set on faux ostrich. Do you think this is possible or should I go back to looking for fabrics? I really appreciate your advice and your blogs. Thank you
With lots of patience and very sore fingers, it’ll be possible. 🙂
Would you recommend this method using a “55% LINEN, 45% RAYON” fabric (https://www.decoratorsbest.com/p-robert-allen-interim-ruby-fabric-42687.aspx)?
Thanks!
Denise
That fabric will work for an ottoman, but I would probably do a standard tufting with it, where you drill holes, and thread the buttons with upholstery twine. I wouldn’t use the screw and washer method with that type of fabric.
Thanks for the quick reply! I really love the fabric that you chose (thickness/weave), but I’ll need a dark red if it’s to work for my living room. Do you have any recommendations?
Thanks again,
Denise 🙂
Omg that is amazing I LOVE IT!!! I have a question for you, I want to buy a new living room set and the set has buttons but i want to add more how would i go about doing that thanks in advance hope to hear from you soon.
There’s really no way I could answer that without seeing it, and more than likely, it’ll be much more complicated than its sounds.
Thank you again for taking the time to reply to my question. This is almost identical to the one i want.
http://www.ebay.com/itm/Modern-3PC-Brick-Orange-Right-Left-2-Position-Contemporary-Sectional-Sofa-Bed-/291406337126?pt=LH_DefaultDomain_0&hash=item43d92bd466
I would suggest leaving it alone. You’d have to remove all of the fabric from the backs to add new tufting, and the reupholster the backs.
ok thanks again love your blog btw.
Wow, a lot of work but it definitely looks great already. Awesome work!
I shared this article on my site.
Thanks a lot for inspiration. Great tutorial.
Great tutorial! When did you attach the top to the base?
I was wondering the same thing. Once the tufting is finished, how does the plywood get attached to the actual table??
I attached it with hot glue — not one of those little things, but the big kind make for woodworking and upholstering.
Your tutorial was so easy to follow – what a great way to do tufting. Thank-you!!!
Kyles
I realize this is an older post, but i’m finally getting ready to tackle this project myself. I had a question about how you selected the distance of your tufts being 3 inches and 8 inches apart. Is that standard? Mine will be round, but the width I have is 41 inches at it’s widest point. (I’m converting an old table). I love the look of yours, but I’m afraid that with my fabric only be 54 inches wide, I won’t be able to do as much tufting. So I was st curious if there is a of standard on this how to determine how close you should have them. Thanks so much!
Thanks for the tutorial this is very helpful. I was curious if you could tell me where you bought your buttons. I’m looking to do this but can’t find the right type of buttons
Hi Kristi, Beautiful job!! This tutorial is definitely the most thorough I’ve read. One question. I’m getting ready to tuft a bench back in our kitchen. I’m using 2″ foam on plywood. One person told me to cut the foam 1″ wider than the width & length of the board. Was your foam the exact size of your lid?
thanks!!
I cut my foam the exact size of my plywood, and then wrap batting around the top and the edges to soften the edge of the plywood.
Love it! Wondering how much fabric you used and the dimensions of the ottoman? I need a big rectangular one, so i dont want to mess up buying the fabric.. Thank you!!
I don’t have that information anymore, but I do remember answering those questions before, so I’m pretty sure the answers are buried somewhere in this comment section.
Thanks so much for this awesome tutorial. Love the fabric you chose.
Thank you for your great tips and tricks. I appreciate your tutorials for all your projects! When using the screw method to tuft, there is no need to pre-drill holes in the wood top for the ottoman, correct? Thanks for your help! I am excited and a little nervous to take this on, but I think I can do it.
You are correct. No pre-drilling necessary. Just keep in mind that that method is only appropriate for very substantial upholstery fabric. If you try it with thinner fabric, you take a risk on snagging the fabric.