Bathroom Remodel Progress – Tiled Tub/Shower Ceiling & More
It’s been twelve days since I posted my final “to do” list for the bathroom remodel, and boldly proclaimed that it should take me about a week to finish up. And I’m still not finished. Yep, that’s about right. 🙂
I could have easily finished by now had I stayed focused last week and actually worked on the bathroom, but I was way too sidetracked with, and excited about, my plans for my entryway and dining room. But this weekend, I finally felt motivated to get in there and work. And I got so much accomplished, including two projects that I’ve really been dragging my feet on!
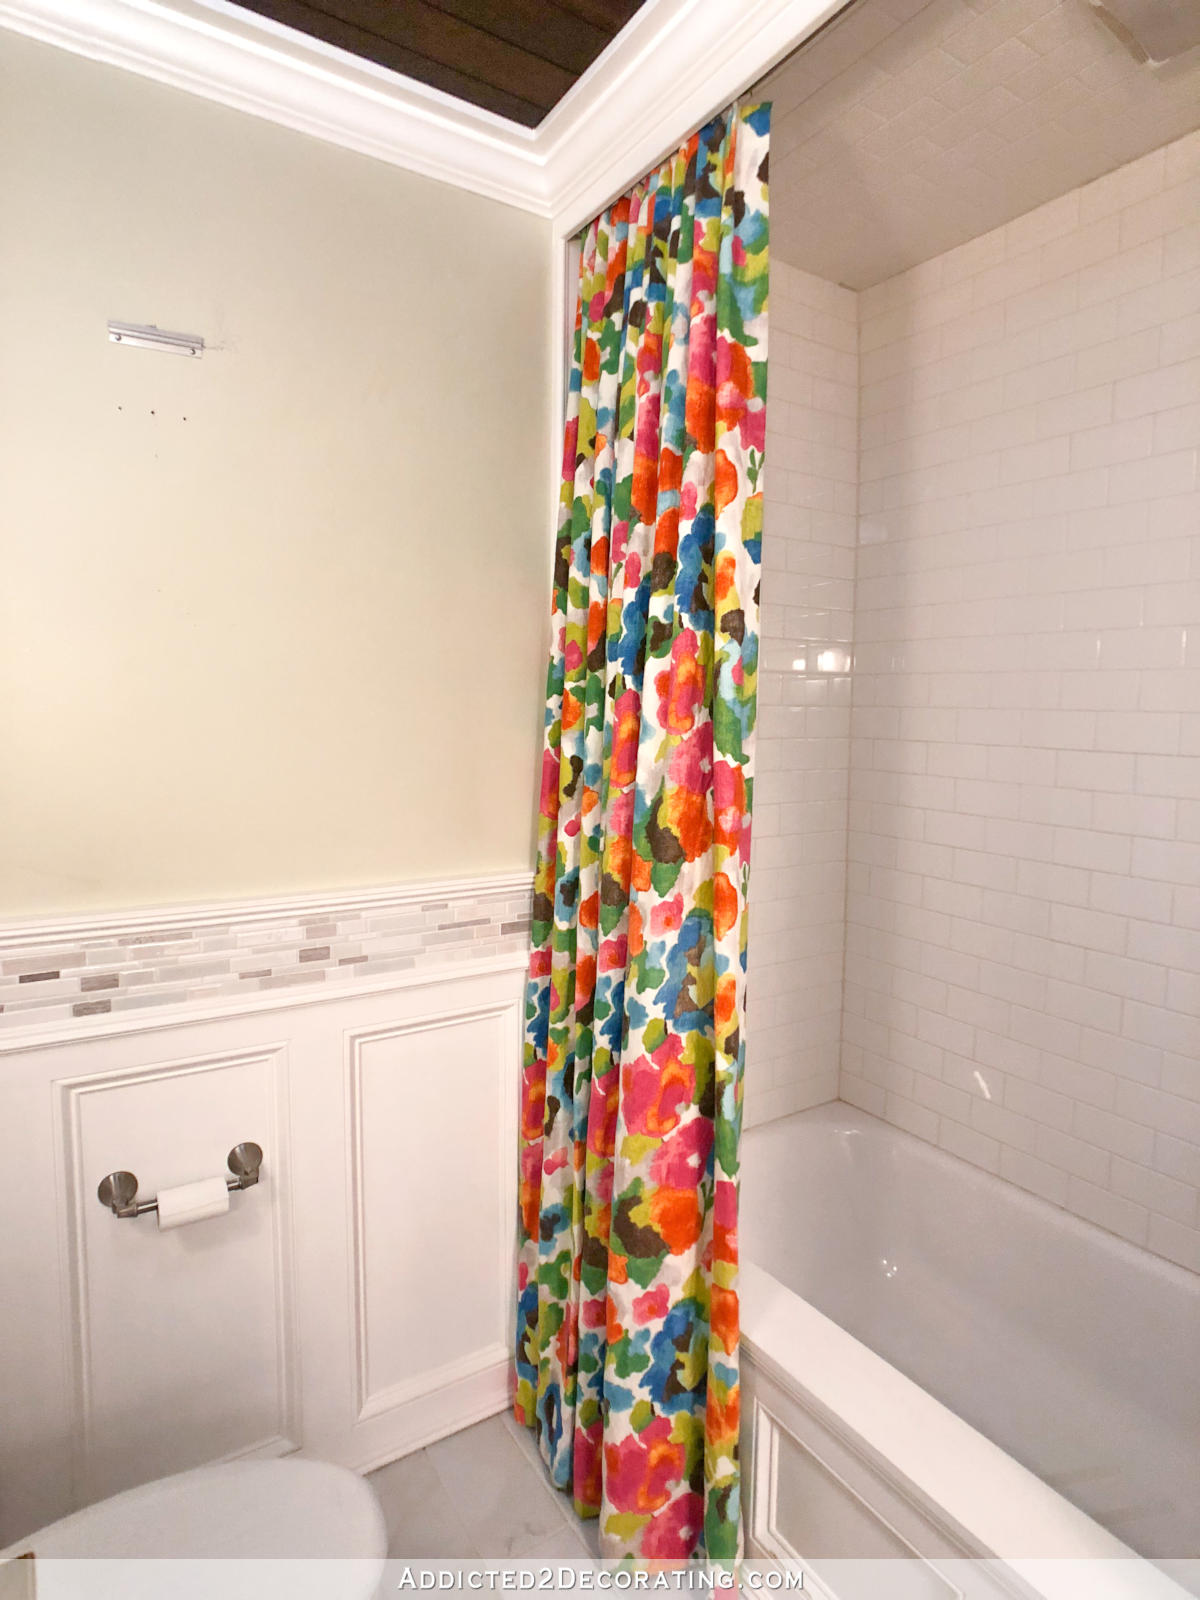
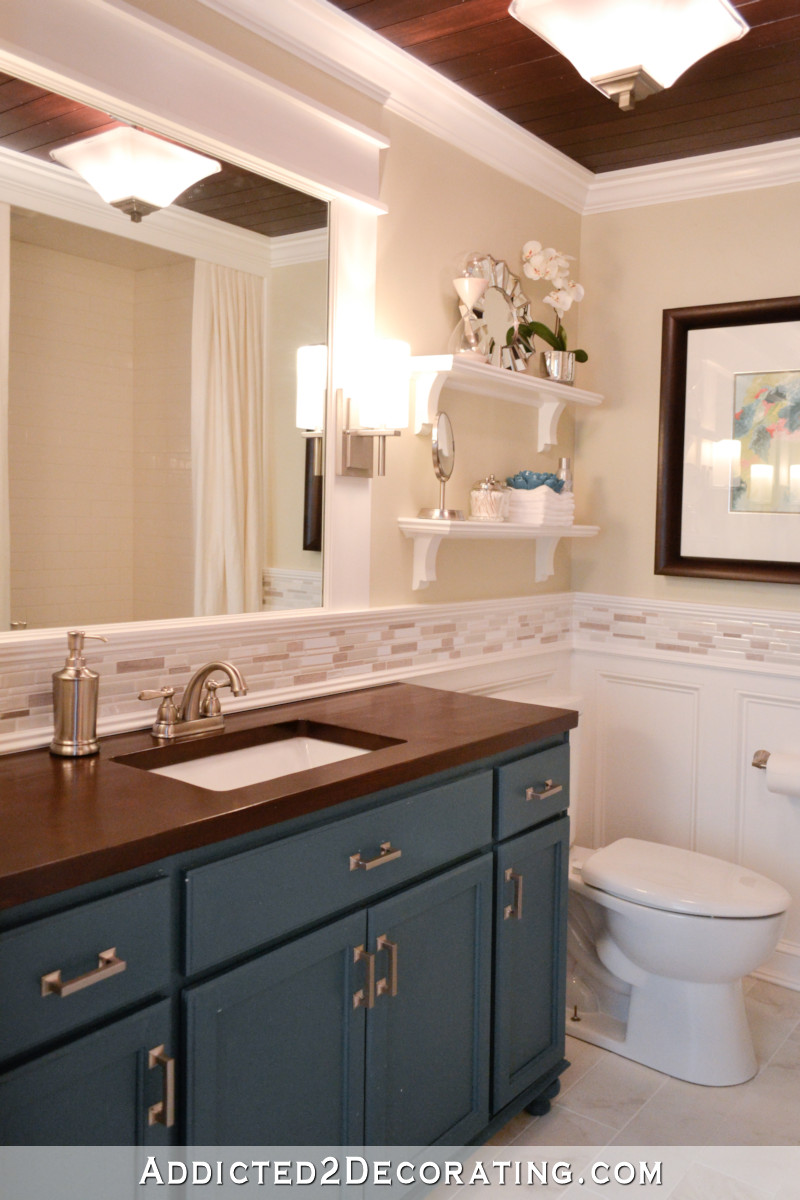
First, I finally cut the hole for the exhaust fan and light above the bathtub, and then tiled the ceiling.
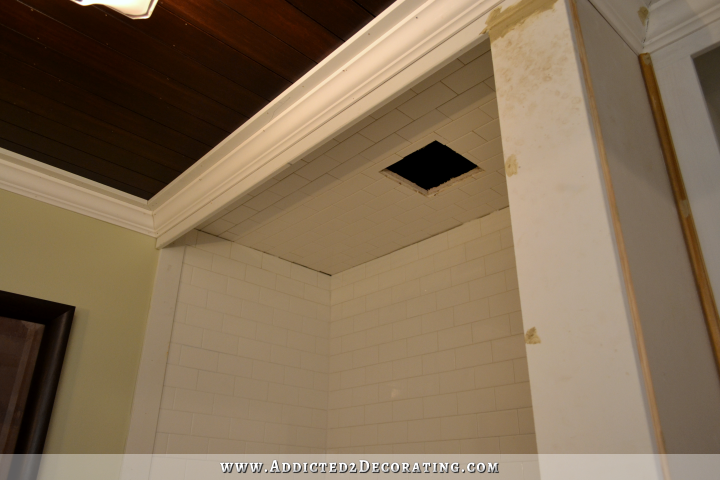
I really love how this looks. Obviously I still have caulking and grouting to do, so it’s not quite finished. I don’t think I’ve ever personally seen a tiled ceiling above a bathtub before. Above a shower, yes, of course, but not above a bathtub.
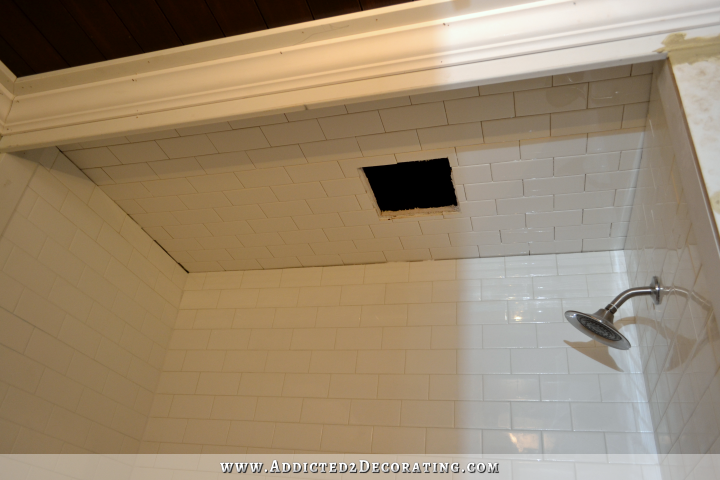
In fact, when several of you suggested that I finish my ceiling with tile (something I never would have thought of doing), I went in search of pictures to get an idea of what it would look like, and I could only find about two other examples on Houzz. It’s definitely not very common, but I think it should be! 🙂
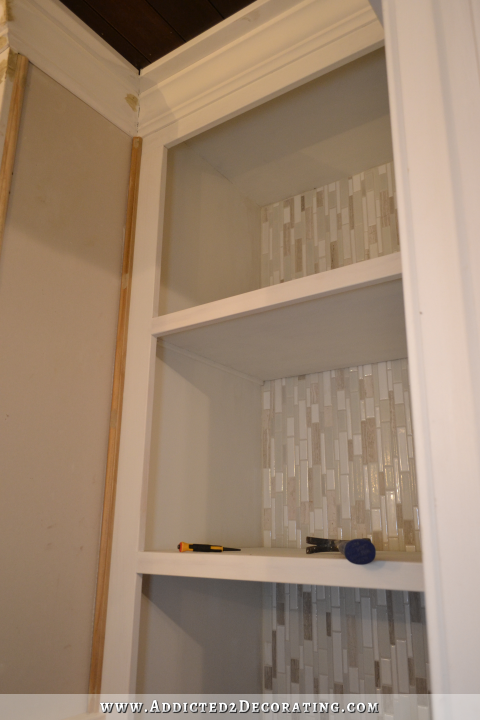
I finally got the built-in shelves primed, so now I can actually get an idea of what they’ll look like when they’re painted. It really brightened up that corner, and it’ll brighten up even more once they’re actually painted.
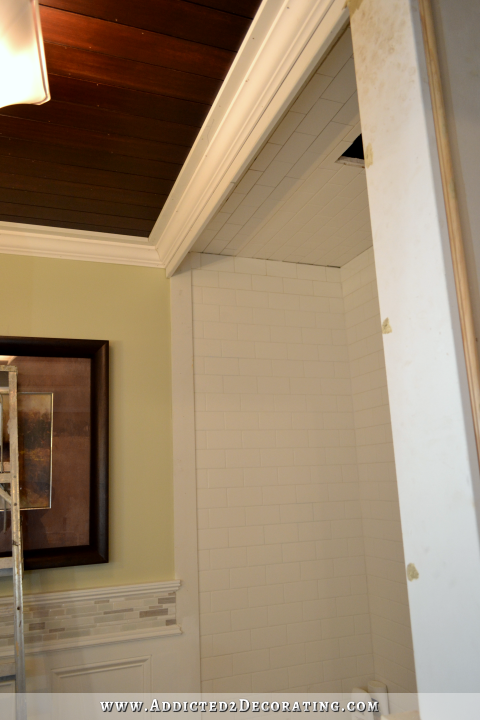
And then the second project that I’ve been dragging my feet on, and finally tackled this weekend, is trimming out this wall beside the built-ins that wraps around to the bathtub. I’ve been procrastinating on this because, quite honestly, I had no idea how to finish out this wall. I didn’t know where to stop the wainscoting, how to wrap the tile accent, where to stop the tile accent, how to finish out the top of the wall where the “cornice” above the bathtub meets the wall. It was just all very confusing and frustrating for me.
But I finally made myself just get in there and do it. I made it up as I went along, and just kept telling myself that it doesn’t need to be perfect. It just needs to be done.

And hopefully I can get it done today. As you can see, I have quite a bit of sanding to do. And then I still have to add the trim to the inside of the panels, caulk, prime, and paint.
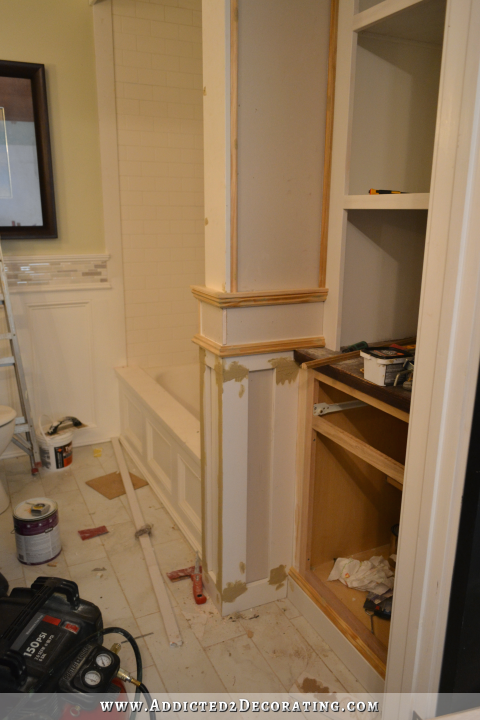
It definitely won’t be perfect, and I’m sure there was a much better way to finish out this small area of wall, but that’s okay. At least it’ll be finished. 🙂

I’m ready to get this wrapped up and get started on my entryway and dining room! If I can stay focused (and that’s a big IF 🙂 ), I really should be finished in here this week.

Addicted 2 Decorating is where I share my DIY and decorating journey as I remodel and decorate the 1948 fixer upper that my husband, Matt, and I bought in 2013. Matt has M.S. and is unable to do physical work, so I do the majority of the work on the house by myself. You can learn more about me here.
I have two tubs with tiled ceilings and I love it!
I have tile above my tub/shower. Anyway, well done and keep it going. Just wait til you get to fill those shelves!!!!! Decorate.
OK Kristi, you need to stay focused because the bathroom is going to be fantastic!!! I cannot think of a better way to fit out that tiny corner, actualy I think you found a method to give it the most distinction it could get – and I think, as you look at it all the time when entering the room, it deserves that 🙂 I like the look of the tiled ceiling and I too would never have thought of it. I could imagine that tile (and the tiling process hired out to somebody normally 🙂 ) is much dearer than paint or wallpaper, a lot of people just save on that part as it’s definitely not necessary to protect the ceiling from much splashes… But it looks good and custom-made, so a very true Kristi solution!
I can’t imagine how difficult it must have been to tile that ceiling by yourself, holding each tile until it set just enough to stay up against gravity! That would have been the project I would have procrastinated on or hired out instead. Great job, Kristi.
I was prepared to have to hold the tiles on, but as it turns out, they stayed up by themselves. I put the mortar on the ceiling using my V-notch trowel AND “buttered” the back of each tile before sticking it to the ceiling. And once I pressed each one on the ceiling, it really stuck on there. No holding required. It was so much easier and fast than I had expected!
Interesting that you put the tiles vertically in the shelving area instead of horizontally.
Now, why did you do that? I am just curious because the border is horizontal.
https://www.addicted2decorating.com/bathroom-built-in-storage-tiled-trimmed.html
This previous post explains the answer to your question.
thank you Deborah I wonder how come I didn’t get that in my email? Maybe only certain ones make it through? Maybe I will have to check the blog every day instead of relying on my email?
Eventually I will figure it out! LOL
That troubles me, too. I remember her saying ease of installation. Might have been easier to tile a board and then install it and then the shelves. She’s tired and rightly so. Job well done.
Hi. Just wondering what you used to stand on when you tilled the ceiling?. Did you have to hold each piece until the adhesive took hold? Great job.
i used a tall ladder, and had the ladder straddle the side of the tub, with the steps of the ladder inside the tub. I actually didn’t have to hold the tiles up. I put the mortar on the ceiling using my V-notch trowel AND “buttered” the back of each tile before sticking it to the ceiling. And once I pressed each one on the ceiling, it really stuck on there. No holding required. It was much easier, and went much faster, than I had anticipated.
Love the tiled ceiling and I think the corner finishing is beautiful! Great job!
One word of advice on the tiled ceiling… Make sure you seal the grout well and then keep on top of cleaning it with a light spray cleaner frequently. If you let it get dirty enough with soapscum or mildew to require actual scrubbing with soapy water, it’s a pain in the butt to clean because….gravity. You’re working over your head. With a sponge full of water. This is not a fun job.
Ask me how I know this… 🙂
I clean mine with spray clorox. Let it drip off. Squeezie. Not to bad.
Your trim work is always amazing! That is the icing on the cake….and takes it from good — to WOW!!!!
Looks great to me!!!
But then, I’m not sure what the dilemma was. Two thumbs up.
I love everything about this bathroom. The trim on that wall between the shower and cabinet, makes a beautiful statement! I see the trim on the top outside edge and I don’t understand that piece.
Glad to see the bathroom finally getting finished. I think it gives such satisfaction to see a plan to completion. I am like you in that respect, I have two rooms, guest suite, and the sitting room in the master suite. It is just a matter of decorative things, and I have all the tools in each room, but I cannot get my self motivated to hang shelves and pictures and drapes. It’s silly I know, but sometimes a project means so much to you, that you don’t want to let it go, so you drag your heels to finish it. We are funny creatures, we female decorators. Blessings
Hi there,
Absolutely love everything you do…so impressive. My husband and are slowly but surely doing some upgrades to our home. We are currently working on installing the baseboards and door casings after laying hardwood throughout our home. I would like to do the same door treatment that you are showing on the inside of your bathroom door to all of our windows and doors. Would you be able to tell me the name of the pieces you use to make the entire casing? Hope this isn’t a ridiculous question 🙂
Definitely not a ridiculous question! 🙂 This casing looks kind of fancy, but it couldn’t get any easier. I’d rather install this any day over the type with mitered corners, because this is so much easier!
Anyway, I shared the details here:
https://www.addicted2decorating.com/fancy-but-easy-diy-door-trim-design-plus-seven-design-variations-and-how-to-create-them.html
You are so good at trim moulding. Could you ever throw on a quick tutorial on how to do crown molding? So many people out there do it soany ways . Yet whatvyouvdo is effective and to the point. Lovevthevtikebon the ceiling. It will protect it it years to come from the shower great idea. Trust your gut because what you finis incredible.
Ha! Well, I’m sure there are many helpful videos I could make, but installing crown moulding is not one of them. 😉 I’m not so good at crown moulding, and I find it very frustrating. For this room, I did get a Kreg Crown Pro, and it made it so much easier. I watched this video to learn how to use it:
I do like the tile on the ceiling of the tub. Very easy to keep the whole bath area clean. Also love how you are finishing the wall next to your built-ins. Very nice.
Kristi, as always, you absolutely astound me. And I love every teeny, tiny, minute thing you’ve done to this bathroom…it is genius! Especially the ceiling. But in the interest of full disclosure, I have to tell you that your selection of art for this room is “off” to me. To my eye, it’s dated and just screams “Tuscan.” But you are a much better decorator than I could ever dream of being, so I will defer to your obviously superior aesthetic judgment.
I love that little wall! You’ve got the gift of making the most of the details, and giving it the wow factor! I love this bathroom!!! I keep looking at all the photos. Yep, I’m wowed!
Beautiful…so unique!!!
Wow! I am so tiling the ceiling of my next bathroom. It gives the bathroom a polished feel.
The trim looks great! What’s not to like? 😉
I’ve been impressed with what you do since the barn door feature. I’ve followed since. Now, we have a bathroom to undertake, so I’m reading very carefully what you are doing. BTW…have to include a barn door for this bathroom since the present door BLOCKS the heating/cooling vent IN the bathroom. I know…which architect designed this flaw? This is why we seek to find ways to improve our homes. Thank you for sharing the process.
I have the same exact layout in my house for my hall bathroom and you have given me so many great ideas! I live in CA and I had a contractor come out and give me an estimate for a complete remodel. All of the fixtures/parts were $5K and he wanted an additional $15K for labor, permits, etc. you name it. I would be interested to know how much you have spent to date. Best.
I’ll be interested to know that, too. 🙂 I’ll be finishing up the remodel this week, and then I’ll post a final before and after, with all of the sources and the cost of the remodel. I really don’t even have a guess at this point since I don’t budget for projects, but rather, I have a certain amount of money budgeted each month that I can spend on decorating and house projects, and I just tackle my projects as they come and try to do them as budget-friendly as possible. This project has been going on for six months, so even if I spent every last penny of my decorating money on this bathroom (which I haven’t at all), that would be $7200. So I know it’s at least less than that! 🙂
When you finish all this your bathroom is going to look fantastic.I am going to adopt some of these ideas like to tile my ceiling and replace all shampoo bottles with shampoo dispensers. I really liked the new shampoo dispensers of Better Living . I think when the shabby old bottles gets replaced with trendy new dispensers that will really class up my bathroom.