DIY Fireplace Part 5 – Trim, Grout, and Mantel
Well, y’all, I’ve let you down. And I’ve let myself down. I was sure that I’d be able to finish my fireplace this weekend, but try as I might (and believe me…I tried), I just wasn’t able to get it done.
Sometimes I forget what a tedious and time-consuming task it is to do all that wood-filling, sanding, and caulking. And because I hate it so much, the caulking seems to last the longest. Ugh. I seriously hate caulking.
But anyway, here’s what my fireplace looked like last night when I finished working around 9:00pm.
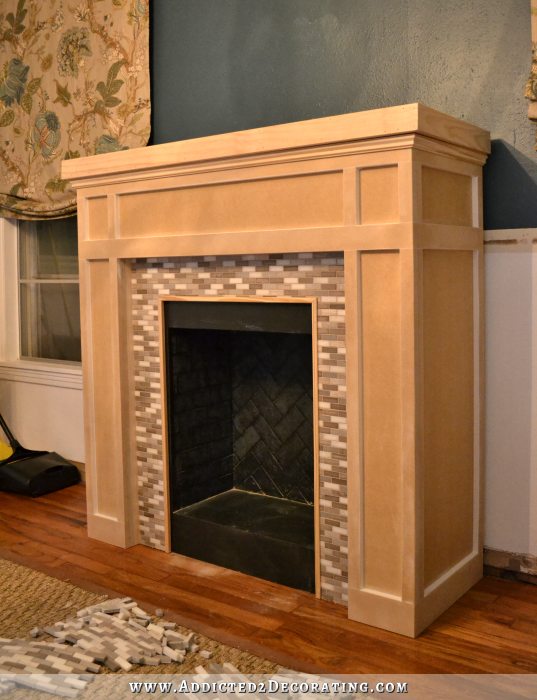
It’s getting there, right!? I got all of the trim added, and wood-fillered (what, exactly, is the correct way to say that?), sanded, caulked. I got the top trim added, and mantel built, the tile grouted, and the trim added to the inside cut edges of the tile.
Okay, so I guess I did get quite a bit done. 🙂 But I’m still just a tad bit disappointed that it’s not finished. 😉
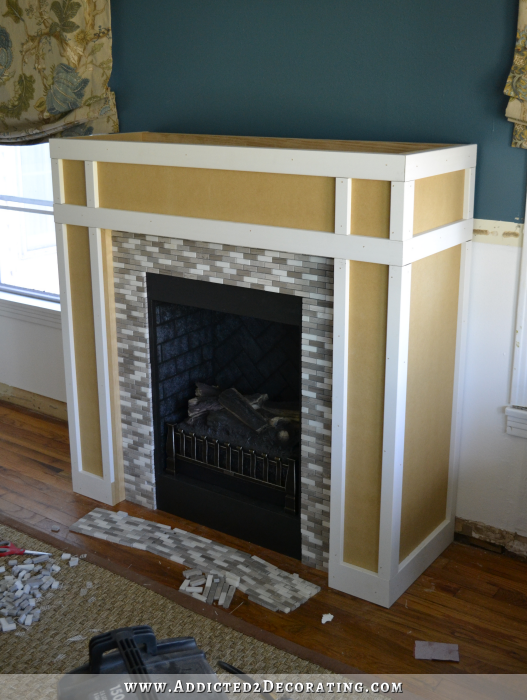
So let me back up again and show you how I got from this point that I showed you on Friday…
…to where it is now.
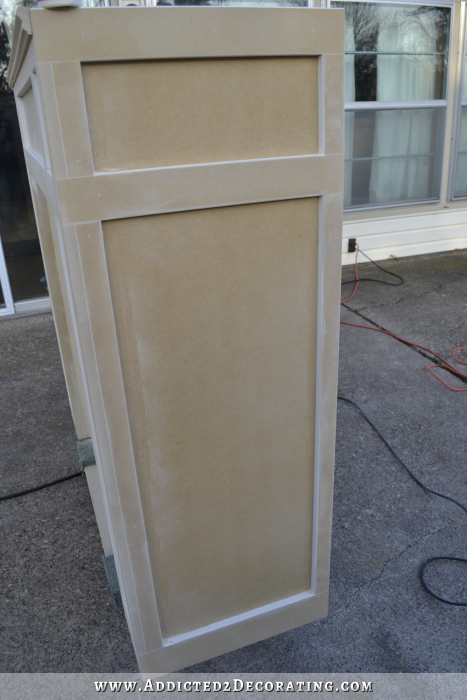
I started by adding all of the horizontal trim to the main part of the fireplace. I used 1 x 4’s along the very bottom of the fireplace, and 1 x 3’s on the other two areas, and I mitered them on the corners.

And I used MDF boards instead of solid wood lumber. This was an intentional decision (not based solely on cost), and I’ll show you why in just a bit.
Then I went back and added all of the vertical trim. I used 1 x 2’s for this part.
Next I loaded up my fireplace on a furniture dolly, wheeled it outside, and wood filled the heck out of it, being sure to get lots of wood filler in each crack and nail hole. I’m a very liberal user of wood filler. 🙂

While that was drying, I worked on my mantel. I had Home Depot cut two pieces of plywood for me. They were 50.5″ x 18.25″.
Using 1″ x 3″ lumber, I trimmed out the edge of one of the plywood pieces, mitering the lumber on the corners. I attached the lumber with wood glue and 18-gauge 1.5-inch nails in my nail gun.

Then I cut and added several support pieces. I cut these from scrap 2 x 4 lumber, and cut each one to 1.5 inches long.
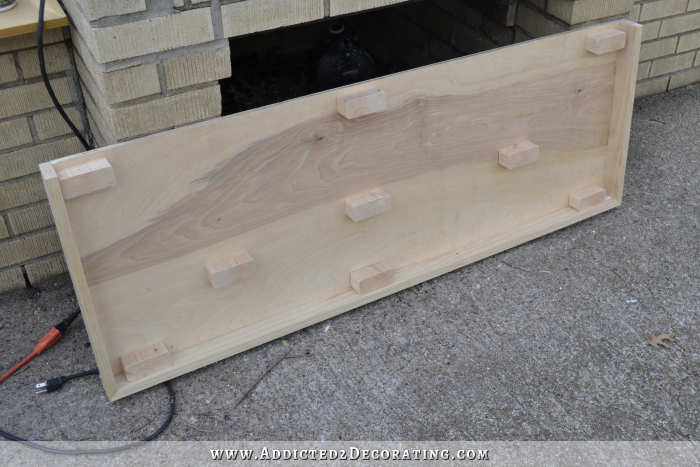
And then I added the other piece of plywood on top of that (set inside the 1 x 3 lumber around the edges) and nailed it into place.
I forgot to get a picture of the finished mantel, so I’ll try to remember to get that and add it before it gets attached permanently.
By the time I finished the mantel, the wood filler was dry, so I sanded everything down perfectly smoothly using my orbital sander and 100-grit sanding discs.
And this is why I love MDF boards. On projects like this, where you want the finished product to be sanded perfectly smoothly, and you don’t want any joints between boards showing, MDF is a dream to work with. It sands so easily, and so smoothly. It’s always my first choice when I do projects like this where I’m creating a design using the boards, and I don’t want any joints showing on the finished product. Board and batten wainscoting is another example of where I always use MDF boards. I just absolutely hate for joints to show between boards on board and batten wainscoting, so with MDF boards, plenty of wood filler, and a little bit of effort with a sander, I end up with perfectly smooth joints between boards.
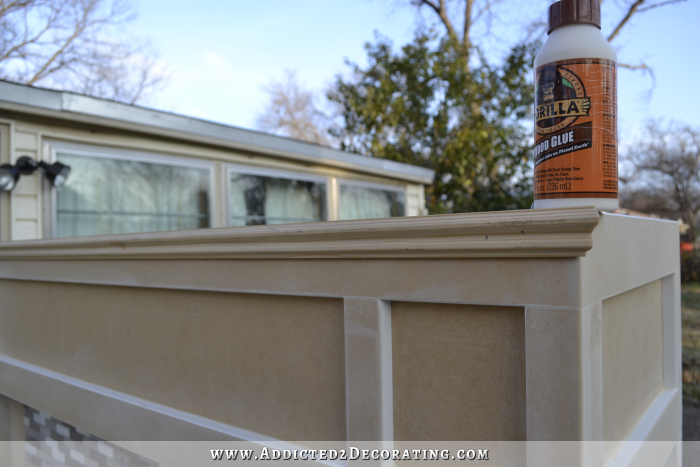
With everything sanded, I added a final bit of decorative trim at the top, attaching it with wood glue and 18-gauge finishing nails.
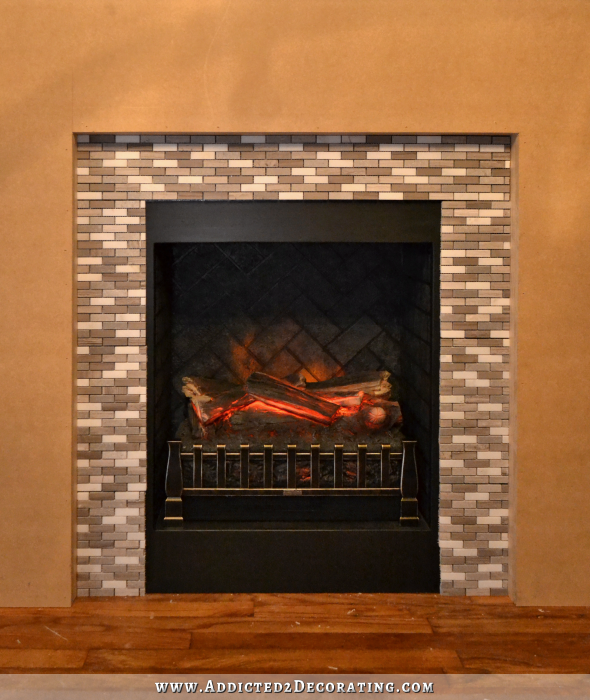
The final messy step I needed to accomplish while the fireplace was still outside was grouting the tiles. I taped off the areas around the tiles with thick painters tape.

And then got busy grouting the tile. I used a pre-mixed grout color called Haystack.
Now when I bought these tiles at Home Depot, I had picked out one of their samples that I absolutely loved — mosaic tiles with various shades of browns and white. I searched and searched for that particular tile and couldn’t find it, so I asked one of the employees and he pointed me to this tile that I used. My mom and I both looked at each other with that look that said, “That is absolutely not the same tile.” But he assured me that the grout would make all the difference, so I decided to trust him.
And he was absolutely right! See how the ungrouted tile on the left side and top still look gray, but the grouted tile on the right side looks brown? I was so relieved to see that!!! I did not want gray tiles on my fireplace, and I’ve been sweating it for a few days now. (I know gray is all the rage right now, but I don’t like it, and it just does not go in my house at all.)
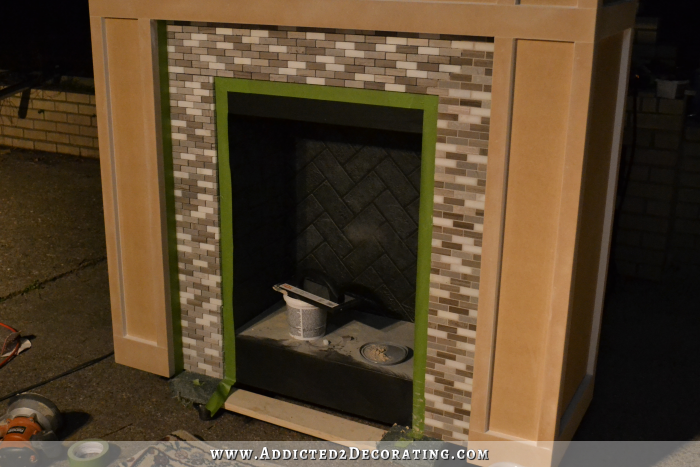
After I got all of the tile grouted and gave it a while to dry, I removed the tape and then I cut some of this corner trim…
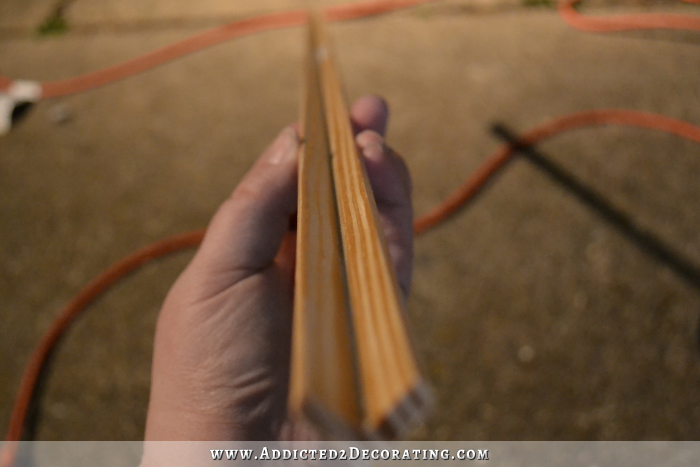
…and I added it to the inside cut edges of the tile to give it a finished look. It’ll be painted out black to match the fire box.

So that’s where I left this project last night.
Still on the “to do” list before I can call this project complete:
- prime all of the MDF and trim,
- sand all of the primed MDF and trim,
- paint all of the primed MDF and trim,
- wood fill all of the holes and cracks in the mantel,
- sand the mantel,
- stain the mantel,
- polyurethane the mantel,
- build the hearth.
Yep, I’ve decided that I definitely want a hearth (even though my inspiration fireplace doesn’t have one), and I’ll explain my reasoning for that tomorrow. 🙂 But for now, I better get busy! I’m so ready to get this thing finished!!!

Addicted 2 Decorating is where I share my DIY and decorating journey as I remodel and decorate the 1948 fixer upper that my husband, Matt, and I bought in 2013. Matt has M.S. and is unable to do physical work, so I do the majority of the work on the house by myself. You can learn more about me here.

Please don’t feel disappointed, Kristi, I think you made wonderful progress! I’ve been eagerly anticipating all weekend to see the finished project too, but I can imagine how it’s going to look and it is absolutely GORGEOUS!
Again, you get more done in one day than I could in a week!
Another absolutely beautiful project. Your patience inspires me and I can’t wait until my new house is built and I can get to some of these projects. In my current house I did the built-ins in my entrance. I plan to do the same in the mudroom, make the ottoman and make some of those gorgeous roman shades. What would I do without you? You are fabulous!
Wow, it’s beautiful!
Agreed – Don’t apologize! You got an amazing amount of work done and it looks wonderful! Can’t wait to see all the finishing touches.
YOU are Wonder Woman. No really…it’s true!
Love the look of it. Can’t wait to see the finished one.
My first comment, but I am an avid fan and enjoy every post. The fireplace is on its way to be the centerpiece of your room. It is wonderful!
You got a lot done, so quit beating yourself up. It is looking beautiful.
And here I was just happy that I got off the couch this weekend. You did an amazing amount of work and can’t wait to see it finished.
I just have to tell you that this looks amazing. I was not able to visualize your finished design from your first sketches but I have so enjoyed watching this project come together and I know it is going to be beautiful when you do finish it. I can hardly wait for your next post on this project!
No ‘fail’ in *my* book! Every single day I show my husband what you do with the talents you were born with and the skills you’ve learned. Couple those with the experience you’ve gained, and you’re the AmazeMeister! ~;0)
How Beautiful! Your careful craftsmanship is paying off! I love all the detail! You should be so proud of yourself! I think you work really fast:-).
Looks SO awesome! You’ve inspired me to try to do one. 🙂
Can’t get over how the grout totally changed the look of the tile…wish I understood why as it sure makes choosing grout a very important decision!! Looks great girl!!
Recently purchased more sewing tools in preparation for making drapes!! Will be working right along with you on that step 😉
It’s President’s Day! 3 day weekend – you still have time!! LOL. Looks beautiful – can’t wait to see the final result.
I agree with you that caulking and filling in nail holes is the worst part. It’s so tedious but worth it in the final outcome. It’s coming along beautifully.
Wow! You got so much done this weekend and it looks absolutely beautiful! I think I’m as anxious as you are to see the final project! I know you will get it finished this week – even the hearth! Thanks for the inspiration Kristi!
Hugs!!!
Do not be disappointed!. It looks great! Whenever I estimate how long a project takes me it takes twice as long. You are doing a great job ! I have yet to see a project of yours I haven’t loved. I’m renovating my home at the moment and I’ll be nice and say its a fixer upper 🙂 your blog gives me so much envy lol and In answer to your question it’s ” wood filled ” 😉 keep it up you really are wonderful
Simply amazing. You’re a freaking genius.
Christine
I think its absolutely gorgeous. I think you spend a lot of time on details but that makes it so beautiful in tbe end. Me I just skim right over the top on my projects.
It looks great, will be stunning and absolutely worth the wait!
Your fireplace has absolutely changed my mind about fake fireplaces. I’ve never seen them done so good, Kristi. I always had wood burning fireplaces until I moved into this house. Now I flip a switch and the gas comes on. Dearly miss my old fireplace, but the way you are working yours is so, so nice. I know the rest of it will be great and can’t wait for a reveal of the whole room together.
It looks beautiful!
I am so impressed!!
I’m in agreement with everyone else, it looks AMAZING!!! Great job.
Good job—I like your attention to detail. One question: Why don’t you use spackle instead of wood filler to fill in the nail holes and cracks if you’re going to paint? Spackle dries a lot faster and is much easier to use, IMHO. But only if you’re painting!
Super great. Now that I’ve read this post, I do vaguely remember that you said you might use a stained mantel on the painted fireplace. Don’t stress yourself on a finish date for this fireplace. Use the time that your father-in-law is here and get that dog run built. I’m sure you have amazed him as much as you have us.
Your fireplace project is coming along nicely. You should feel very proud of yourself. I admire you. You are inspiring me to try building something myself. I usually come up with the ideas, buy the makings and my Husband and I complete the job together. I’ve gotten down and dirty with lots of things, but have been reluctant to use a circular or drop saw by myself. Now…what do I want to make?
Please don’t apologize for not completing this project. You do every step with detail and finesse and that takes time. It looks absolutely beautiful without paint – can’t imagine how gorgeous it will be when complete. Wow!
Kristi you are too hard on yourself. You are working very hard and you will finish everything you want – it might not be today or tomorrow but it will get finished. I hate when my house is in an uproar (like it was today) but I do things at my speed. Take a deep breath and enjoy what you have already done.
Thank you for the wonderful tutorial! I would like some clarification please. Did you use MDF 1 x 4’s, 1 x 3’s and 1 x 2’s? I don’t believe I’ve ever seen those dimensions in anything but wood in the stores around my home. Where did you purchase them? or do you cut down a sheet of MDF to get those measurements? Thank you
you have to cut down a sheet of mdf
Looking great. Anxious to see finished fireplace. As fast as you are going it will be done real soon.
I have a question unrelated to fireplace. I wanted to know where you purchased your rug and what type of grass is it?
Thanks
Lois
It looks amazing! I learned about the importance of finishing with filler from you. I am not a perfectionist, and didn’t realize the HUGE difference it makes to do those boring parts that make all the difference.
I also can’t believe how very different the grout makes the tile color look, it’s almost freaky:)
So the hearth I see in picture #3 is just fake for now? Looking really good Kristi.
OMG! It is absolutely gorgeous!
This looks great. I have been searching for an electric fireplace that I like for so long. This is absolutely beautiful and gives me the motivation to tackle my own. You are amazing!
Awesome! Love it! I’m bookmarking every post so I can get to them fast. I love your work and the passion you have in very step you take. Sometimes to get the best you have to do it yourself. We all know you deserve the best as you are so good at doing these things. Wish you where here in Tennessee to do my home.
Let us down? Are you kidding me?! So not true. Kristi your pace is amazing, so please do not apologize. This is looking fabulous!
Unbelievable, I’m so impressed. You did an amazing job.
I am so impressed with how the fireplace turned out. I was skeptical as I watched it unfold but it is great! I need to follow my own advise. I always tell my husband not to judge my projects before I am finished. I need to do the s a me
You’re so courageous to tackle a project such as this! Can’t wait to see your finished masterpiece…. so awesome!
This project is beautiful! It blows my mind that you even knew how to begin. So impressive. I would never have attempted something like this.
Wow Kristi, that is freaking awesome..!!! You do such a great job and you have not let any of us down.Your putting alot of guilt on yourself because you think we want it done quickly. That is alot of work and is very time consuming.. which most of us woulnd’t have the knowledge or patients to tackle a project like that..!! Just think, everytime you walk into that room how proud you can be of yourself knowing YOU did that…!!!! Again….A~M~A~Z~I~N~G…!!!!!
Wowww! love it!!!
Overwhelming, what an innovative idea, your patience really inspires me. You got an amazing amount of work done and it looks wonderful! Obvious, Fireplace is the heart of the home, which enhance the market value.
I would have given that look to my mother too! It’s amazing how the grout changed the color.
I WOULDN’T use JUST grey on my walls, but I’ve been thinking that I should have used a “greyed” version of the color I used (turquoise) on my family room and kitchen walls – just can’t decide, and hubby went along with me on the color, eve though he had doubts.
I’m wondering why you used the extra piece of plywood for the top of the mantel. Couldn’t you have just used the support pieces and saved yourself the cost of the plywood?
This looks great! How did you attach the corner trim to the inside corners of the tile?